

Power Your Software Testing with AI Agents and Cloud
The Native AI-Agentic Cloud Platform to Supercharge Quality Engineering. Test Intelligently and Ship Faster.


- TestMu AI (Formerly LambdaTest)
- /
- Blog
- /
- E2E Headless Browser Testing Using Nightwatch JS
E2E Headless Browser Testing Using Nightwatch JS
In this blog, you’ll learn to perform headless browser testing on Chrome and Firefox using Nightwatch.js and execute the same on remote Selenium Grid.
Last Updated on:
Headless browsers are gaining popularity as a viable option for testing web applications. As we all know, web browsers are an integral part of automation testing using Selenium Webdriver. While performing Selenium automation testing, Selenium launches the corresponding browser defined in the script during the test run and then executes test steps. However, issues like the slow rendering of web pages can be a potential issue that can delay the test execution speed. As a solution, headless browser testing was introduced to speed up test execution time
Overview
To perform headless browser testing, use Nightwatch.js to execute fast, lightweight automation scripts without a graphical user interface. For scalable cross-browser execution across multiple operating systems, integrate Nightwatch.js with TestMu AI to run your headless tests on a cloud-based remote Selenium Grid.
What Is Headless Browser Testing?
Headless browser testing runs standard browser operations in the backend without displaying a user interface, which improves execution speed and efficiency.
Key Benefits and Tools
- Nightwatch.js framework: The open-source Node.js framework interacts with browsers via the W3C WebDriver API to run fast, resource-efficient headless test scripts.
- Headless Chrome configuration: Nightwatch.js configures Chrome with chromeOptions to execute tests in the background without launching a graphical user interface.
- Headless Firefox configuration: Testers can run headless Firefox tests by adding moz:firefoxOptions to the Nightwatch.js configuration file and setting the geckodriver path.
- TestMu AI integration: TestMu AI integrates with Nightwatch.js to run headless tests across multiple browsers and operating systems on a remote Selenium Grid.
- CI/CD pipeline execution: Headless testing minimizes CPU and memory usage on remote servers, providing rapid feedback during automated deployment cycles.
Limitations of Headless Testing
- Headless browser testing should be avoided for visual layout verification, cosmetic bug detection, or debugging complex user interactions, as it does not render a graphical user interface.
What is Headless Browser Testing?

A headless browser is a web browser without a graphical user interface (GUI) in layman’s terms. This program will behave like any other browser, but the only difference is that the GUI will be hidden from the user. The program runs in the backend, and nothing will be presented on the screen. Hence it is called headless – one without head/GUI.
Headless browsers are favored in scenarios where there is no need to render the visuals. For example – they may not be a good choice for surfing but can be a great tool in testing.
Headless Testing, as it implies, means running your browser UI tests against a headless browser. But why would you want to use headless browsers? In the upcoming section, let’s explore the advantages and disadvantages of using headless browser testing.
Advantages and Limitations of Headless Browser Testing
Let us take a detailed look at the major advantages and disadvantages of leveraging headless browsers for your testing needs.
Advantages:
- Faster automation test execution
Headless browsers are faster than real browsers. They do not come with the overhead of starting up a browser GUI. all the time taken to load and render HTML, CSS, and JavaScript can be bypassed. This equates to quicker test execution results and up to 15x enhanced performance.
- Useful in CI pipeline
This testing methodology is beneficial to run tests on a remote server or CI environment like Jenkins, as there is no one to view the visuals. Also, scaling can be achieved efficiently.
- Support for multiple browser versions
The testers would like to test the applications on different browser versions on the same machine. In this case, a headless browser comes handy as most of them support the simulation of different versions of browsers.
- Useful in Multi-tasking and Parallel testing
While executing tests in parallel, UI-based browsers consume a lot of memory and resources, which can be drastically reduced using headless browsers. Similarly, they help you to multitask. While the test runs in the background, you can use your machine to do anything else.
- Beneficial in Data extraction
If your requirement is just to perform website scraping and data extraction, loading an entire browser instance would be overkill. For such cases, Headless browsers are a perfect choice.
In short, headless testing offers you a more lightweight, less resource-intensive way of automation testing with enhanced performance and quicker execution.
Limitations:
- Debugging can be a challenge at times
Due to the faster page loading ability of headless browsers, sometimes it is difficult to debug an issue. Also, it can be challenging in cases where a lot of browser debugging is required.
- Unable to detect cosmetic bugs
Cosmetic bugs like the location of web elements, broken images, the color of an element, etc., get missed using headless browser testing.
- It doesn’t mimic exact real-time user behavior
Real users don’t use headless browsers. A headless browser is a different browser, and the bugs and errors thrown in them may not always occur in a real browser. For user experience testing on a website with precise feedback, a headless browser is not recommended.
Headless Browser Testing – When to Use and When Not to Use?
Before proceeding further, it is critical to ensure that the test strategy you are adopting is the most suitable solution for your requirement. Let us examine some cases where the headless browser can be adopted and where it should be avoided.
- When to adopt headless browser testing?
- Running tests on machines without a display (GUI).
- Running tests on a headless system (without GUI) like Linux OS.
- Simulating multiple browsers on a single machine without resource and memory overhead.
- Performance-oriented test execution.
- For web scraping and data extraction from websites.
- Generating PDFs and screenshots of web pages.
- Layout testing.
- Monitoring network application performance etc.
- When to avoid headless browser testing?
- If there is a need to observe the test execution visually.
- If you want to perform the test from the end-user experience perspective.
- If lots of debugging needs to be done.
- Running tests on machines without a display (GUI).
- Running tests on a headless system (without GUI) like Linux OS.
- Simulating multiple browsers on a single machine without resource and memory overhead.
- Performance-oriented test execution.
- For web scraping and data extraction from websites.
- Generating PDFs and screenshots of web pages.
- Layout testing.
- Monitoring network application performance etc.
- If there is a need to observe the test execution visually.
- If you want to perform the test from the end-user experience perspective.
- If lots of debugging needs to be done.
Read – Top Automation Testing Trends To Look Out In 2021
With this much said, now let’s get into some coding! In the upcoming sections, we will see how to achieve headless testing using the Nightwatch.js framework.

Headless Testing using Nightwatch.js
Nightwatch.js is an open-source automated testing framework that supports end-to-end browser testing for web applications and websites. It is powered by Node.js runtime and uses the W3C WebDriver API (formerly Selenium WebDriver) for interacting with various browsers to perform commands and assertions on DOM elements.
In this Nightwatch.js tutorial, we will be creating a test script and making it run in a normal browser.
Step 1: Create a project.
- Create a project folder in your machine.
- Go to the terminal in your IDE, navigate to the project root folder, and initialize the project by giving the command
npm init --y - We have successfully generated the package.json file.
Step 2: Install required dependencies.
npm install --save-dev nightwatch geckodriver chromedriver
Step 3: Project setup is done. Now create the folder structure.
- Let us create two folders in our root directory – “tests” for keeping test files and “reports” where reports will get stored after each test run.
Step 4: Time for configurations.
- In the package.json file, replace “scripts – test” with “nightwatch.” This will enable us to run the tests from the project base directory using the command “npm test”.
"scripts": {
	"test": "nightwatch"
  },
{
    "src_folders" : "tests",
    "output_folder" : "reports",

    "webdriver" : {
        "start_process": true,
        "server_path": "node_modules/chromedriver/lib/chromedriver/chromedriver.exe",
        "host": "localhost",
        "port": 4444
      },
      "test_settings" : {
        "default" : {
            "desiredCapabilities" : {
                "browserName" : "chrome"
              }
          }
      },

      "firefox": {
      "desiredCapabilities": {
        "browserName": "firefox",
        "marionette": true,
        "javascriptEnabled": true,
        "acceptSslCerts": true
      }
    },

    "chrome" : {
      "desiredCapabilities": {
        "browserName": "chrome",
        "javascriptEnabled": true,
        "acceptSslCerts": true
      }
    }

}
Step 5: Let us write one quick test script.
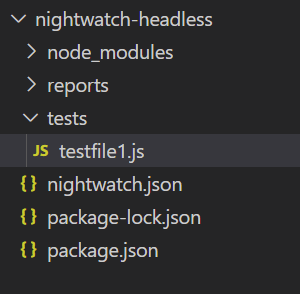
- Inside the “tests” folder, which we created previously, create a test script – testfile1.js (any name of choice).
- The final folder structure will look like this.
- Paste the following code for a simple test scenario.
module.exports = {
    "Step one: Navigate to google.com and verify URL and title" : function(browser) {
     browser
     .url("http://www.google.com")
     .waitForElementPresent('body', 1000)
     .assert.urlContains("google")
     .assert.title("Google")
    },

    "Step two: Search 'Nightwatch' and verify result" : function(browser) {
      browser
     .setValue('input[type=text]', ['nightwatch', browser.Keys.ENTER])
     .pause(1000)
     .assert.containsText('#main', 'nightwatch')
     .end();
    }
}
- Launches Google.
- Verifies URL and title.
- Searches for “nightwatch” and finally.
- Verifies search result contains “nightwatch.”
- Launches Google.
- Verifies URL and title.
- Searches for “nightwatch” and finally.
- Verifies search result contains “nightwatch.”
Step 6: Execute the code.
npm test
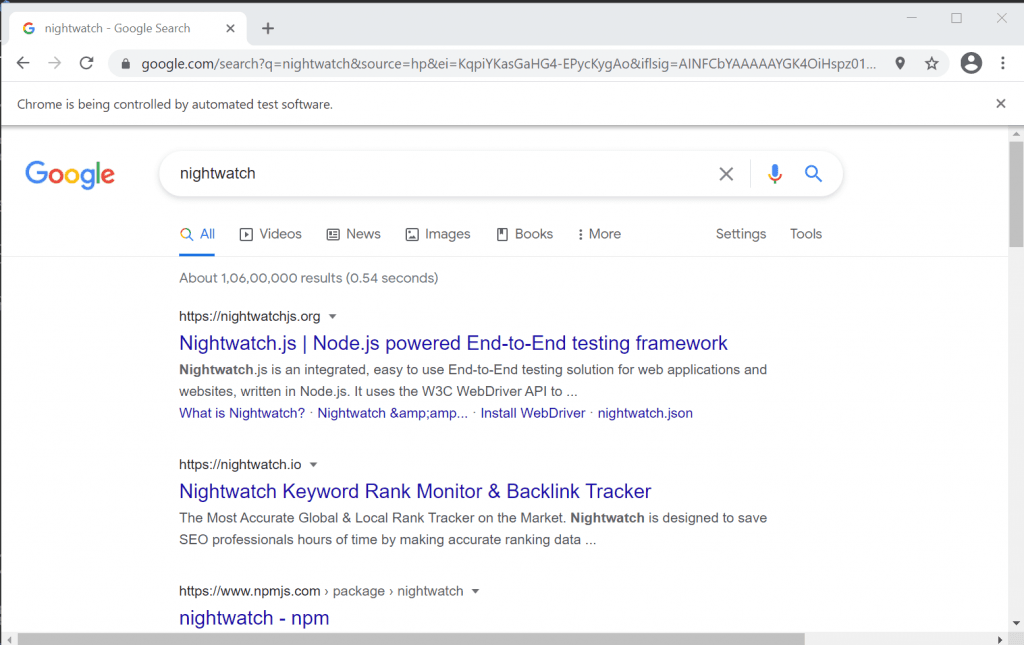
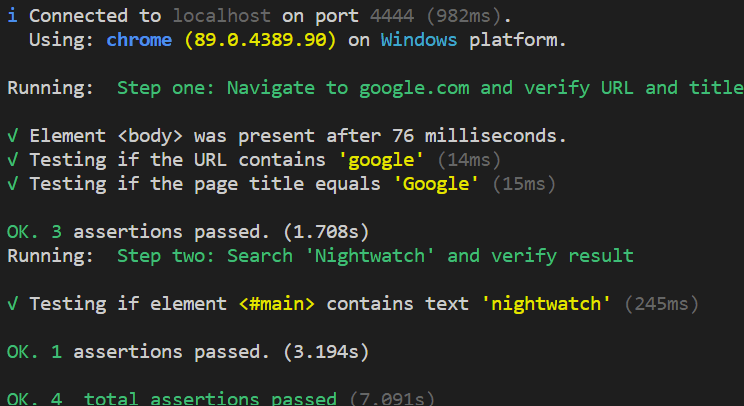
- The test starts running. The chrome browser will be launched, and the script gets executed successfully.
- In the terminal, we can verify that all the assertions are passed.
Our project setup is completed, and we have verified that our test script is running successfully in the normal browser. Now it’s time to go Headless!
Almost all modern browsers provide the capability to run them in headless mode. We’ll see the configurations required to trigger Chrome and Firefox in headless mode in the upcoming sections.
Running Nightwatch E2E Tests with Headless Chrome
Nightwatch.js framework allows you to run your tests in headless Chrome mode using a few quick configuration changes. In this Nightwatch.js tutorial, we will look into running Nightwatch.js tests with headless Chrome.
Step 1: In your nightwatch.json configuration file, add the chromeOptions settings in chrome.
"desiredCapabilities" : {
                "browserName" : "chrome",
                "chromeOptions" : {
                    "args" : ["headless", "no-sandbox", "disable-gpu"]
              }
            }
Step 2: Now, it is time to run the test and verify the result.
npm test
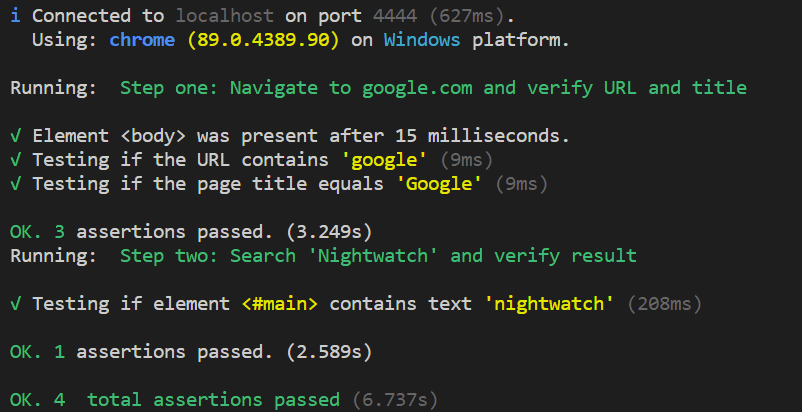
- Observe that the browser is not getting launched!! The test run status can be verified in the terminal.
- We have successfully run our test cases in Headless Chrome!!
Running Nightwatch E2E Tests with Headless Firefox
In this Nightwatch.js tutorial, we will now look into running Nightwatch.js test scripts with headless Firefox. Let’s examine the configuration changes.
Step 1: In your nightwatch.json configuration file, add the moz:firefoxOptions settings in firefox.
"desiredCapabilities" : {
                "browserName" : "firefox",
                "alwaysMatch": {
                  "moz:firefoxOptions": {
                      "args": [ "-headless" ]
                  }
              }
           }
- Also, change the server_path to geckodriver executable path.
"webdriver" : {
        "start_process": true,
        "server_path": "node_modules/geckodriver/geckodriver.exe",
        "host": "localhost",
        "port": 4444
      }
Step 2: Now, it is time to run the test and verify the result.
npm test
- The script gets executed in headless Firefox mode, and we can verify the run status in the terminal.
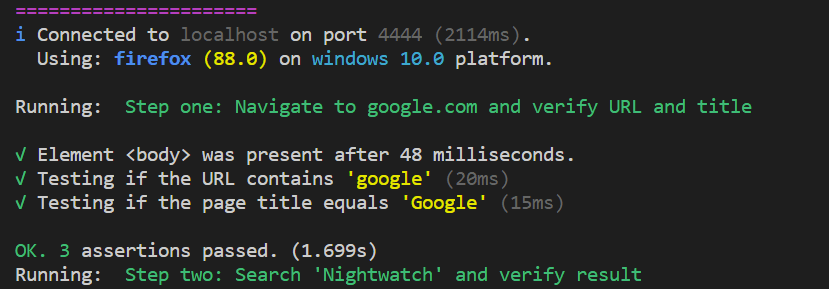
Test Execution With Remote Selenium Grid
To stay ahead in a highly competitive market, it is our duty as testers to ensure that our app behaves as expected across all platforms, browsers, and device combinations without crashing. Hence derive the importance of considering test coverage and cross browser testing into our testing approach.
Selenium Grid is always a good call when it comes to distributed test execution. It can run test cases on different versions of browsers and different operating systems simultaneously.
To leverage the test coverage, cloud-based solutions are widely adopted by companies due to various merits like:
- Low investment cost compared to buying the infrastructure.
- Access to hundreds of device and platform combinations.
- Extends supports to old and outdated browser versions and OS devices
- No set-up or installation, or maintenance needs to be done locally.
- Scalability.
Hence, using a combination of Selenium Grid with the right cloud-based solution provider for cross browser compatibility testing is the optimum strategy that you can deploy to assure quality. Let us see how we can perform automated browser testing with headless browsers using a remote Selenium Grid provided by TestMu AI.
TestMu AI is a popular cloud-based platform that provides you access to 2000+ browsers for mobile and desktop to help you gain the maximum test coverage during automated browser testing. Moreover, you can choose from a wide range of Windows and Mac operating systems, along with all legacy and latest browsers.
The good news is that we can seamlessly integrate TestMu AI into our Nightwatch.js framework through a few quick and easy steps. Let’s look into it step by step!
Step 1: Create a free account or log in to your TestMu AI account and fetch your unique username and access key. You can fetch the details from the TestMu AI Profile section.
Step 2: We need to pass browser and environment details to the TestMu AI Selenium Grid via the desired capabilities class. Unlike the local setup, now we have the flexibility to choose the precise settings we want.
TestMu AI provides a helpful tool to generate desired capabilities based on the combination we want. Visit the TestMu AI Desired Capabilities page to generate them.
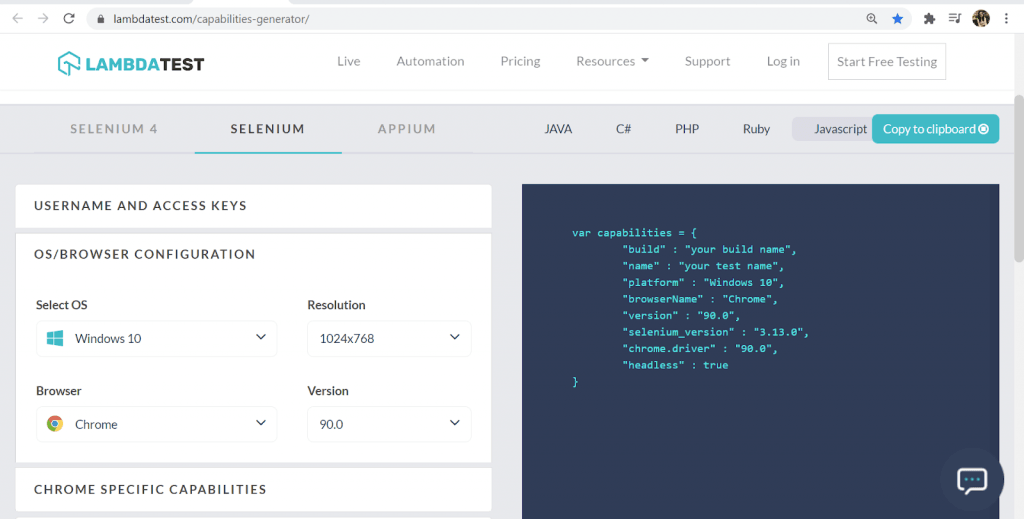
From the browser-specific capabilities, you can opt for the “Headless” mode.
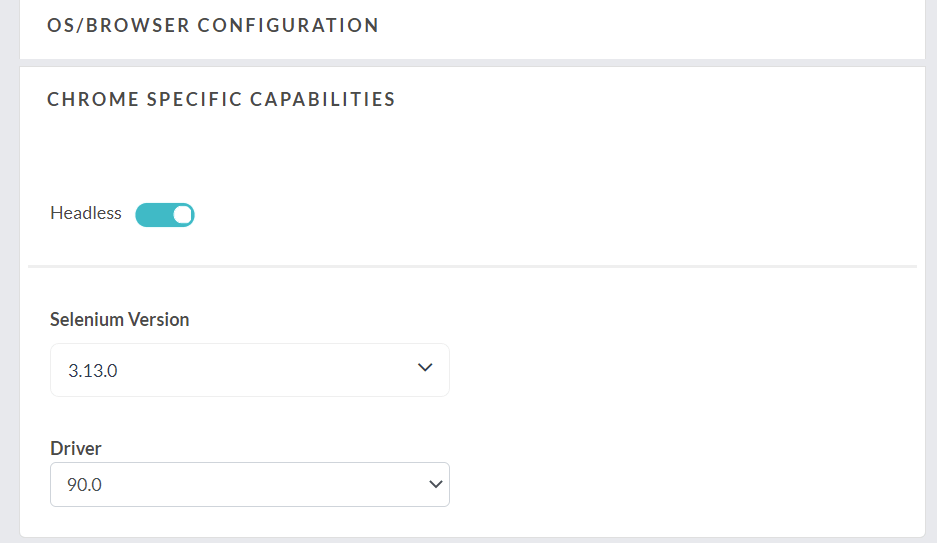
In this case, the desired capabilities class in nightwatch.json will look like this:
"desiredCapabilities": {
       "build":"Nightwatch-Headless-Browser-Test",
       "platform" : "Windows 10",
       "browserName" : "Chrome",
       "version" : "90.0",
       "selenium_version" : "3.13.0",
        "geoLocation" : "IN",
        "chrome.driver" : "90.0",
        "headless" : true
    }
Step 4: Paste the following snippet in your nightwatch.conf.js file. (If not created already, you can create this file in your root).
Here we are declaring the user configuration for an access key, username, host, and port for the test.
module.exports = (function(settings) {
    console.log(settings["test_settings"]["default"]["username"])
    if (process.env.LT_USERNAME) {
      settings["test_settings"]["default"]["username"] = process.env.LT_USERNAME;
    }
    if (process.env.LT_ACCESS_KEY) {
      settings["test_settings"]["default"]["access_key"] = process.env.LT_ACCESS_KEY;
    }
    if (process.env.SELENIUM_HOST) {
      settings.selenium.host = process.env.SELENIUM_HOST;
    }
    if (process.env.SELENIUM_PORT) {
      settings.selenium.host = process.env.SELENIUM_PORT;
    }
    return settings;
  })(require('./nightwatch.json'));
Step 5: Configure your nightwatch.json file. Since we are using TestMu AI, why don’t we go for cross-browser testing across multiple platforms?
In this code, we are configuring for the script to run across two browsers – Chrome and firefox across two different platforms – Windows and macOS, respectively.
Check out the code below, and let’s look into the required changes and additions to be made on your existing file:
{
  "src_folders" : "tests",
  "output_folder" : "reports",

  "test_workers": {
    "enabled": true,
    "workers": "auto"
  },
  "selenium" : {
    "start_process" : false,
    "server_path" : "",
    "log_path" : "",
    "host" : "hub.lambdatest.com",
    "port" : 80,
    "cli_args" : {
    "webdriver.chrome.driver" : "",
    "webdriver.ie.driver" : "",
    "webdriver.firefox.profile" : ""
    }
  },
  "test_settings" : {
    "default" : {
    "launch_url" : "http://google.com",
    "selenium_port"  : 80,
    "selenium_host"  : "https://lambdatest.com/",
    "silent": false,
    "screenshots" : {
        "enabled" : true,
        "path" : ""
    },
    "username" : "YOUR_USERNAME",
    "access_key" : "YOUR_ACCESSKEY",

    "skip_testcases_on_fail": false,

    "desiredCapabilities": {
       "build":"Nightwatch-Headless-Browser-Test",
       "selenium_version" : "3.13.0",
       "visual":true,
        "video":true,
        "console":true,
        "geoLocation" : "IN",
        "network":true
    }
    },
    "chrome": {
    "desiredCapabilities": {
        "platform": "Windows 10",
        "browserName": "chrome",
        "chrome.driver" : "90.0",
        "version": "90.0",

    }
    },
    "firefox" : {
    "desiredCapabilities": {
        "platform": "macos 10.13",
        "browserName": "firefox",
        "version": "87",
        "headless" : true
    }

    }
  }
}
- Pass your Access Token and User details.
- Provide Desired Capabilities for all the browsers.
- Set the Hostname corresponding to TestMu AI.
- Optionally we have also enabled report formats like video recording, console, network logs, etc., to be true.
Do check out the Nightwatch.js official documentation to know more about configuration settings.
Step 6: In package.json, change the “ scripts – test” argument value.
This is important as it is here to specify the browsers where we need to run our test.
"scripts": {
    "test": "./node_modules/.bin/nightwatch -e firefox,chrome tests"
  },
Step 7: Execute the test.
npm test
The code starts running, and logs can be observed in the terminal.
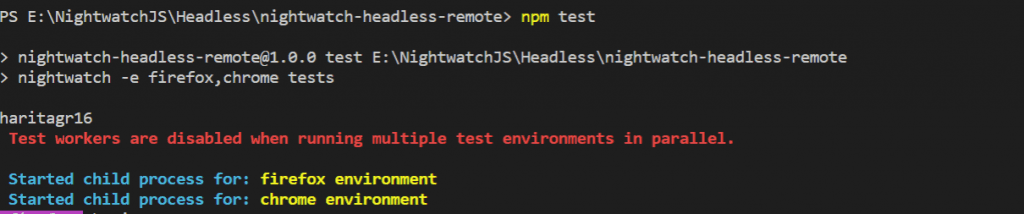
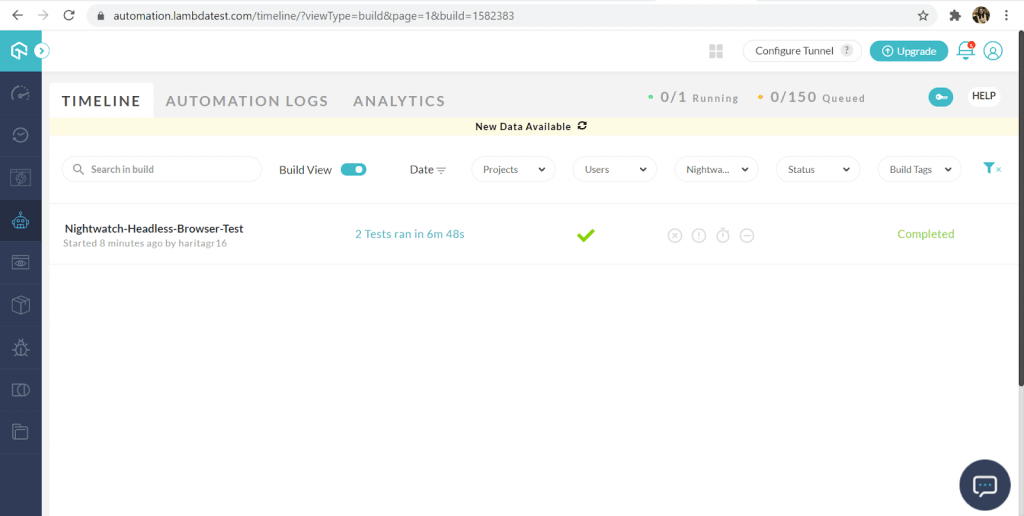
To observe the live running status, go to your Automation dashboard in TestMu AI.
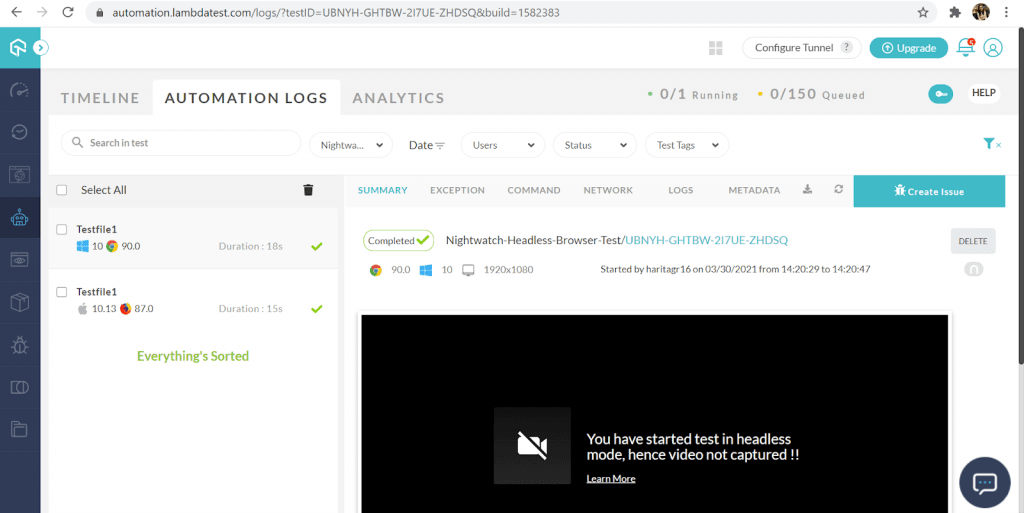
We can also analyze individual test run reports from Automation Logs.
We have successfully automated and run our test cases using a cross browser testing solution provided by TestMu AI through a hassle-free experience!
Read – Nightwatch.js Tutorial For Test Automation Beginners – With Examples
Conclusion

Headless browsers are gaining popularity as a performance-boosting strategy in Selenium automation testing. Headless browser testing offers you a more lightweight, less resource-intensive automation testing method with enhanced performance and quicker execution. Almost all modern browsers provide the capability to run them in headless mode.
In this article, we did an in-depth exploration of headless browser testing along with its pros and cons. Further, we also checked out how to achieve headless testing in popular browsers like chrome and firefox for Selenium test automation using Nightwatch.js. Additionally, we have leveraged our automation testing quality by adopting test coverage concepts and cross browser testing using a cloud-based remote grid solution provided by TestMu AI.
Hopefully, this Nightwatch.js tutorial will enable you to kickstart your journey in headless browser testing. If you wish to optimize your web application quality by unlocking coverage in a wider variety of platforms or browsers, or versions, feel free to explore the TestMu AI platform.
To run Nightwatch.js tests at scale on the TestMu AI cloud, refer to the Nightwatch on HyperExecute grid documentation.
Happy Testing!

Author

Harita Ravindranath
Blogs: 18


Harita Ravindranath is a Full Stack Developer and Project Manager at Tokhimo Inc., with 7 years of experience in the tech industry. She has completed her graduation in B-tech in Electronics and Communication Engineering. She has 5+ years of hands on expertise in JavaScript based technologies like React.js, Next.js, TypeScript, Node.js, and Express.js, and has led 4 full stack projects from scratch. Harita also brings over 2 years of experience in Quality Engineering, including manual and automation testing using Selenium and Cypress, test strategy creation, and Agile/Scrum based development. With 4+ years in project leadership, she is skilled in managing CI/CD pipelines, cloud platforms, and ensuring high quality releases. Harita has authored 30+ technical blogs on web development and automation testing, and has worked on end to end testing for a major banking application covering UI, API, mobile, visual, and cross browser testing. She believes in building clean, efficient, and maintainable solutions by avoiding over engineering.


Did you find this page helpful?
More Related Blogs
TestMu AI forEnterprise
Get access to solutions built on Enterprise
grade security, privacy, & compliance
- Advanced access controls
- Advanced data retention rules
- Advanced Local Testing
- Premium Support options
- Early access to beta features
- Private Slack Channel
- Unlimited Manual Accessibility DevTools Tests