

Power Your Software Testing with AI Agents and Cloud
The Native AI-Agentic Cloud Platform to Supercharge Quality Engineering. Test Intelligently and Ship Faster.


- TestMu AI (Formerly LambdaTest)
- /
- Blog
- /
- XUnit Testing Tutorial: Environment Setup For Selenium Testing
xUnit Testing Tutorial: Environment Setup For Selenium Testing
xUnit is a popular open-source testing framework created by the developers of NUnit. Learn how to set up xUnit via Visual Studio or package manager commands.
Last Updated on:
Setting up an xUnit testing environment means installing Visual Studio, the xUnit NuGet packages, and the xunit.runner.visualstudio test runner before writing Selenium C# tests.
xUnit creates a fresh instance of the test class for every test method, which isolates state between Selenium test runs without any extra setup code.
This guide covers configuring Visual Studio, installing the xUnit framework and its test runner, and running xUnit tests through the IDE or Package Manager commands.
Overview
To set up xUnit for Selenium testing in C#, configure Visual Studio 2019 to run automated web tests across browsers. This setup uses the xUnit framework to isolate tests by creating a new instance of the test class for every test, ensuring clean execution and seamless integration with Visual Studio Test Explorer.
Why It Matters
- Best framework for community-focused testing: xunit - An open-source testing framework for the .NET platform that uses fewer attributes than NUnit or MSTest and instantiates a new test class for every test.
- Best attribute for isolated execution: [Fact] - A default attribute used in xUnit testing to ensure that individual Selenium tests run in isolation for cleaner code and better debugging.
How to Set Up xUnit and Selenium in Visual Studio
- Best IDE for C# development: Visual Studio 2019 - Provides the development environment for C# automation testing, requiring a user sign-in for the Community Edition to continue usage after the 30-day trial.
- Best project template for test isolation: xUnit Test Project (.NET Core) - A Visual Studio project template that automatically includes the default xUnit package and a template file containing the [Fact] attribute.
- Best runner for Visual Studio integration: xunit.runner.visualstudio - The mandatory test runner required to ensure proper test discovery and full compatibility with the Visual Studio Test Explorer.
- Best package for test SDK integration: Microsoft.NET.Test.Sdk - One of the mandatory NuGet packages required alongside xunit and its runner to enable Selenium automation testing in Visual Studio.
Setting Up Visual Studio For Development And Testing
For development, I’ll use the Visual Studio 2019 (VS 2019) IDE. Before looking into the xUnit setup example, I’ll take a brief look at setting up Visual Studio for automation testing with Selenium C#.
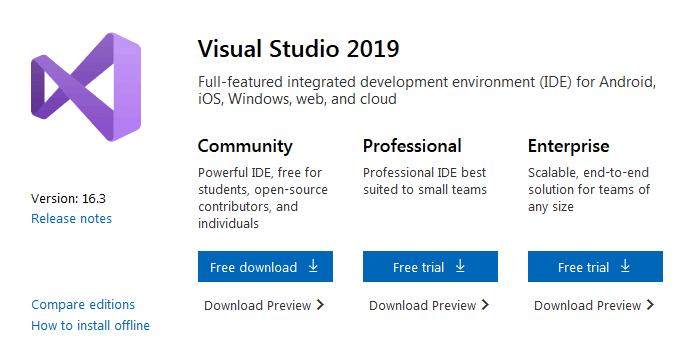
Step 1: Visual Studio can be downloaded from here. You can choose from the Community/Professional/Enterprise versions. In this xUnit testing tutorial, I have used the Community Edition of Visual Studio 2019.
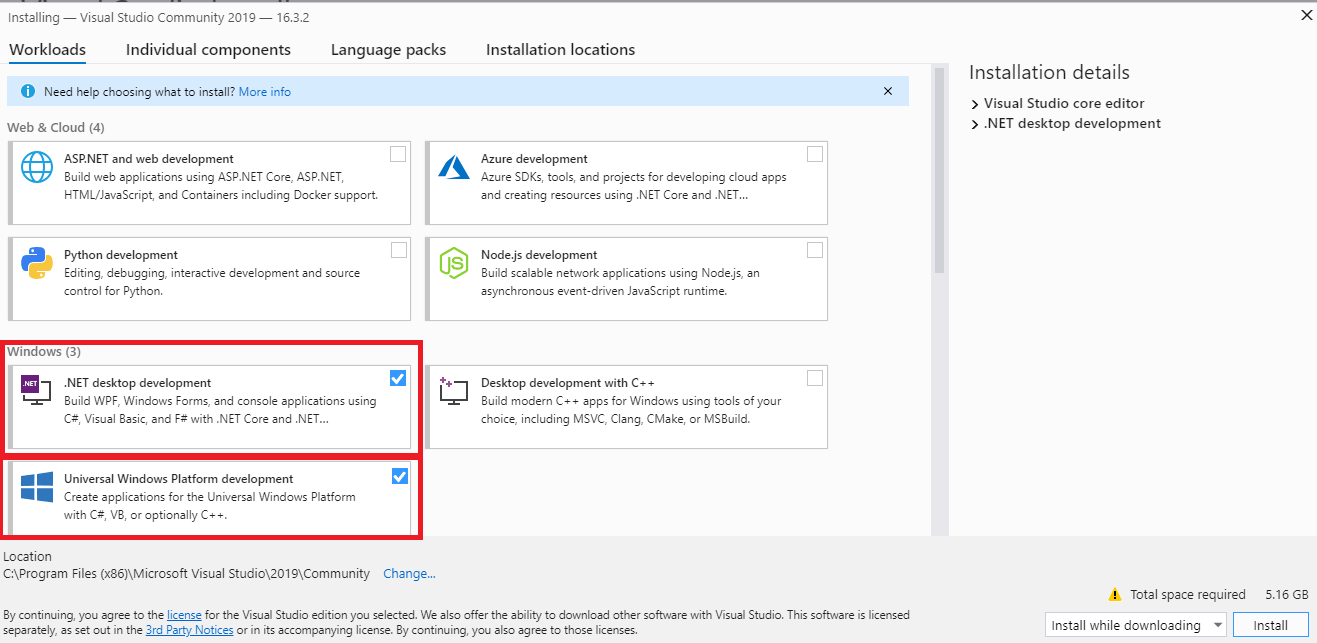
Step 2:In this xUnit testing tutorial, the xUnit test framework will be used along with Selenium for test automation. Hence, I’ll install the necessary packages that aid in automation testing with Selenium C# on the Windows platform.
Launch the Visual Studio: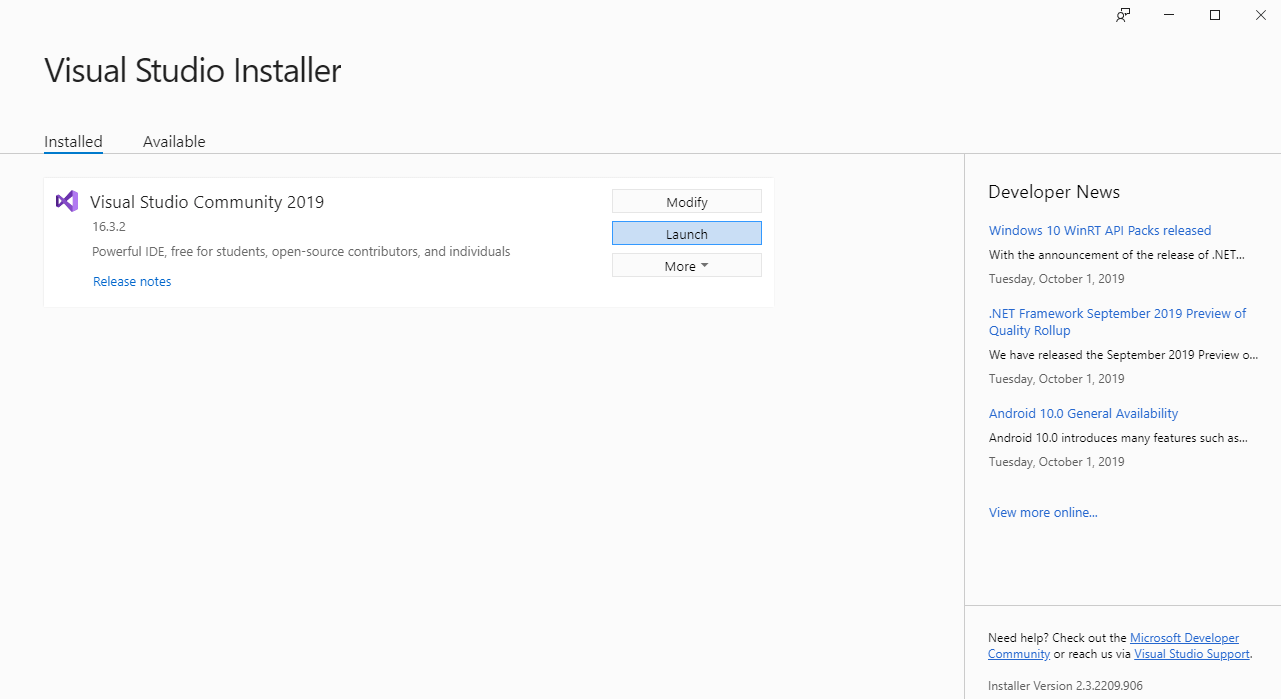
Install the necessary packages:
 Step 3: In case you are also installing the Community Edition of Visual Studio, it is important that you sign-in to the IDE else you would not be able to use the IDE after the trial period (approximately 30 days). Once you sign-in, you can also utilize other powerful features such as pushing source code to private Git, syncing Visual Studio settings, and more.
In the next section of the xUnit testing tutorial, I’ll take a look at the steps to install the mandatory packages for performing automation testing with Selenium C# using xUnit framework.
Selenium C# Tutorial: Setting Up Selenium In Visual Studio
This xUnit Tutorial for beginners and professionals will help you learn how to use xUnit framework with Selenium C# for performing Selenium automation testing.

Installing The xUnit Framework & xUnit.net Runner
For executing tests that make use of the xUnit framework, you’ll have to install the corresponding test runner i.e. xUnit.net runner. Installation of the xUnit framework and its runner can be done by installing the packages using the package manager from GUI or executing the equivalent package manager (PM) commands on the terminal.
For this xUnit testing tutorial, I’ll explore both these options for installing the xUnit framework. Before the installation of the required packages, you’ll have to perform the following steps:
Step 1: Create a new project of the type ‘xUnit Test Project (.Net Core)’ in Visual Studio.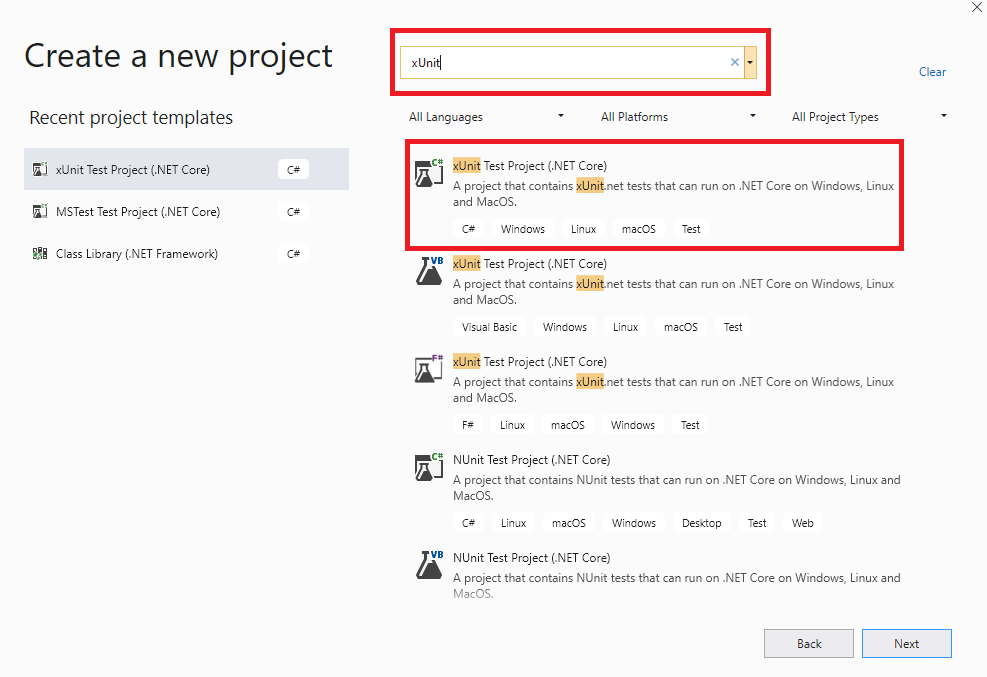
Step 2: Since I have created the project based on the xUnit.net framework, the default .cs file contains the [Fact] attribute in it. Also, the xUnit package is also included by default in the source code.
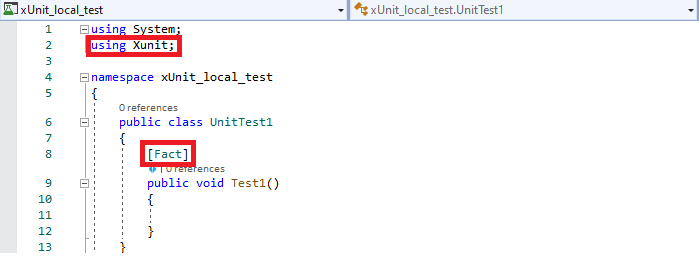
In case you have not created a project of the type mentioned above, you can still use the xUnit framework for performing automation testing with Selenium C#. The xUnit framework and the runner can be installed using the package manager from GUI or the terminal.

Austin Siewert
Co-Founder, Steadfast Systems
Discovered @TestMu AI yesterday. Best browser testing tool I've found for my use case. Great pricing model for the limited testing I do 👏
2M+ Devs and QAs rely on TestMu AI
Deliver immersive digital experiences with Next-Generation Mobile Apps and Cross Browser Testing Cloud

Take this certification to master the fundamentals of Selenium automation testing with C# and prove your credibility as a tester.
Here’s a short glimpse of the Selenium C# 101 certification from TestMu AI:
Using Visual Studio IDE
For installing the xUnit test framework and other required packages for performing Selenium test automation with xUnit, perform the following steps:
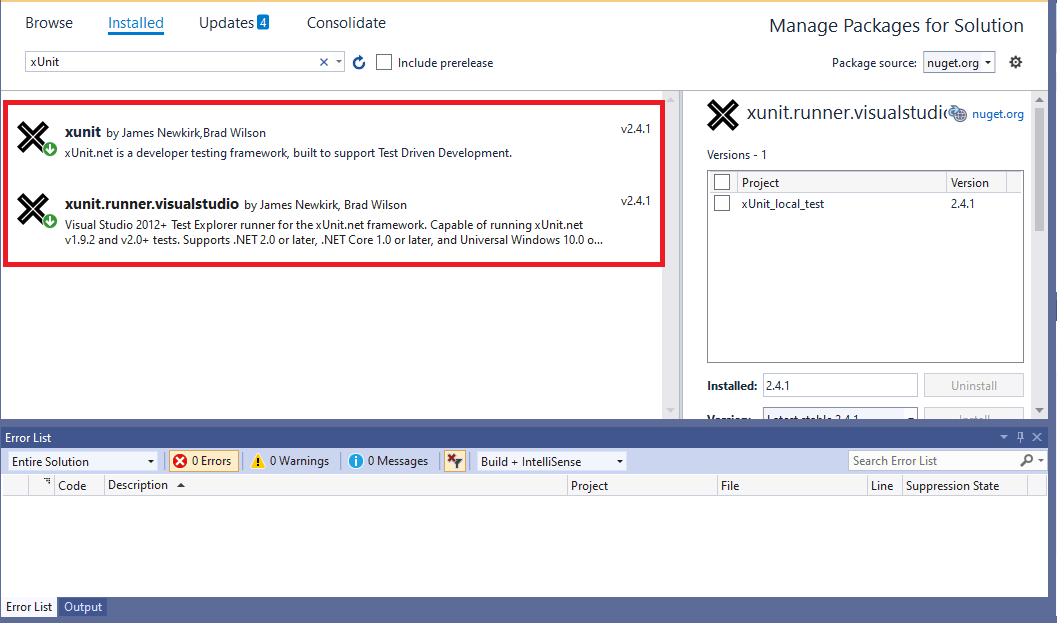
Step 1: Go to Tools -> NuGet Package Manager -> Manager NuGet Packages for Solution for opening NuGet Package Manager in Visual Studio.
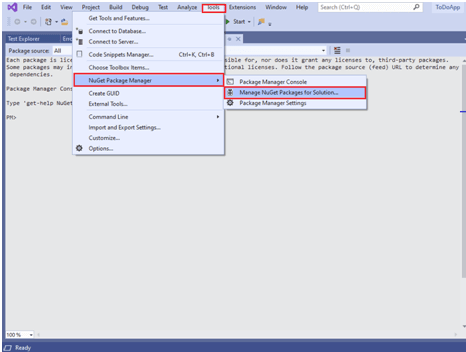
Step 2: Search for the following packages in the Browse tab and click Install
- xunit
- xunit.runner.visualstudio
- Microsoft.NET.Test.Sdk
Note: Experience reliable automated testing with Selenium Testing Tool on a cloud grid of 3000+ browsers and operating systems.
Using Package Manager (PM) Commands
If you are comfortable using the terminal, then you should look at the option of installing the xUnit framework using the Package Manager (PM) commands.
Step 1: For executing commands from the PM console, navigate to Tools -> NuGet Package Manager -> Package Manager Console.
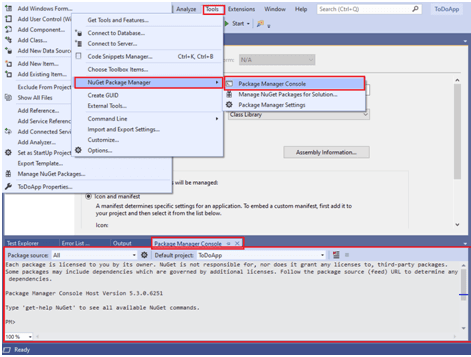
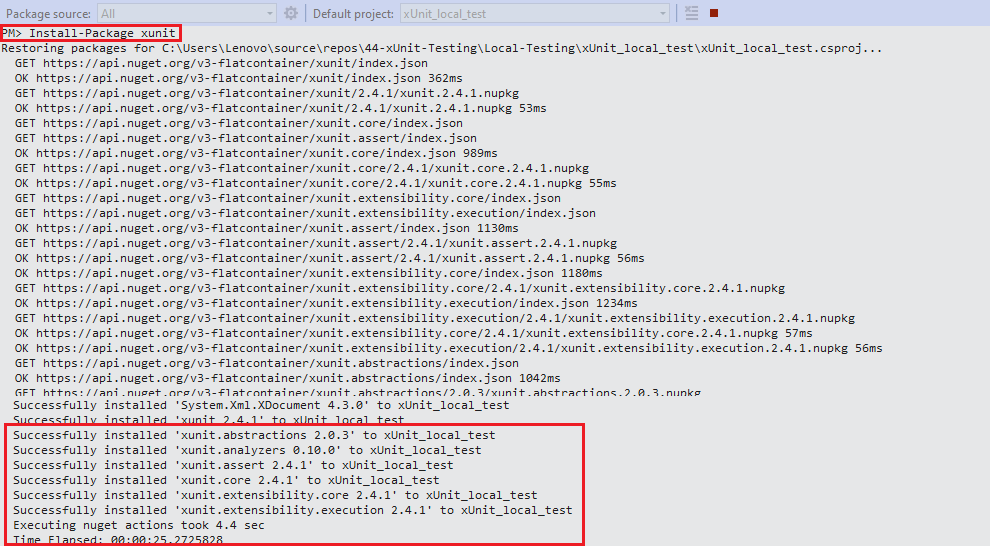
Step 2: For installation of the xUnit packages, we use Install-Package command with the required
Install-Package xunit
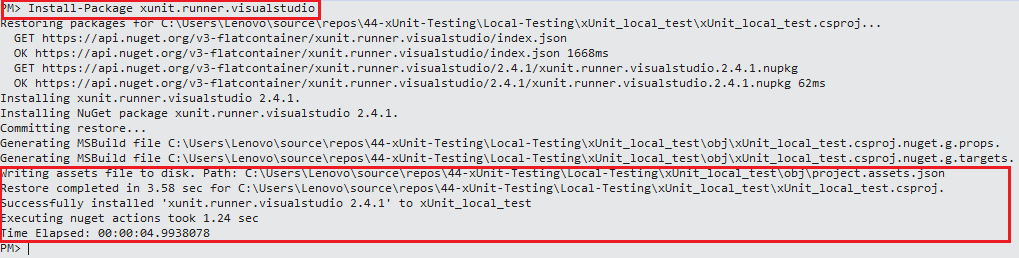
Install-Package xunit.runner.visualstudio
Install-Package Microsoft.NET.Test.Sdk
Shown below are the package installation snapshots:
Step 3: To check whether the packages have been installed successfully, execute the Get-Package command on the PM console. Shown below is the execution output:
PM> Get-Package

Id                                  Versions
--                                  --------
xunit                               {2.4.1}
xunit.runner.visualstudio           {2.4.1}
Microsoft.NET.Test.Sdk              {16.2.0}
Also Read: NUnit Test Automation Using Selenium C#

How Do AI Coding Assistants Help Set Up xUnit Tests?
GitHub Copilot Chat inside Visual Studio can scaffold a new xUnit test method directly from a selected method, which shortens the manual setup this tutorial walks through. xUnit remains one of the most common .NET unit testing frameworks, alongside NUnit and MSTest, and Visual Studio's AI tooling now targets it directly.
- Copilot Chat /tests command: Highlight a method in Visual Studio and run /tests in Copilot Chat to generate a matching xUnit [Fact] or [Theory] test method with its assertions already written.
- IntelliTest is deprecated: Visual Studio's older automatic test generator, IntelliTest, is deprecated in Visual Studio 2026, which makes Copilot Chat the practical way to scaffold xUnit test methods now.
- Packages still come first: a Copilot-generated test method only compiles once xunit, xunit.runner.visualstudio, and Microsoft.NET.Test.Sdk are installed, so the setup steps above stay necessary.
- Selenium step generation: Copilot Chat can also draft the Selenium WebDriver calls inside a generated xUnit test method, which speeds up Selenium testing scripts built on this environment.
None of this replaces installing Visual Studio, xUnit, and its test runner first. Copilot only speeds up the test code that runs inside the environment this tutorial sets up.
Wrapping It Up!
With this crisp xUnit setup example for Selenium test automation, I demonstrated how to get started with the xUnit (or xUnit.net) framework for Visual Studio. Steps shown in the xUnit testing tutorial will be instrumental in performing automation testing with Selenium C# frameworks.
This brings us to the conclusion of this article. You can go ahead and set up the xUnit environment for yourself. We’d have covered a lot of articles before on automation testing with Selenium C#. Feel free to check them out, and do help us to reach out to more people by sharing and retweeting our article. That’s all folks. Happy Testing!!!?
Author

Himanshu Sheth
Blogs: 141


Himanshu Sheth is the Director of Marketing (Technical Content) at TestMu AI, with over 8 years of hands-on experience in Selenium, Cypress, and other test automation frameworks. He has authored more than 130 technical blogs for TestMu AI, covering software testing, automation strategy, and CI/CD. At TestMu AI, he leads the technical content efforts across blogs, YouTube, and social media, while closely collaborating with contributors to enhance content quality and product feedback loops. He has done his graduation with a B.E. in Computer Engineering from Mumbai University. Before TestMu AI, Himanshu led engineering teams in embedded software domains at companies like Samsung Research, Motorola, and NXP Semiconductors. He is a core member of DZone and has been a speaker at several unconferences focused on technical writing and software quality.


xUnit Environment Setup FAQs
Did you find this page helpful?
More Related Blogs
TestMu AI forEnterprise
Get access to solutions built on Enterprise
grade security, privacy, & compliance
- Advanced access controls
- Advanced data retention rules
- Advanced Local Testing
- Premium Support options
- Early access to beta features
- Private Slack Channel
- Unlimited Manual Accessibility DevTools Tests