

Power Your Software Testing with AI Agents and Cloud
The Native AI-Agentic Cloud Platform to Supercharge Quality Engineering. Test Intelligently and Ship Faster.


- TestMu AI (Formerly LambdaTest)
- /
- Blog
- /
- Selenium C# Tutorial: Setting Up Selenium In Visual Studio
Selenium C# Tutorial: Setting Up Selenium In Visual Studio
In this Selenium C# tutorial, we are going to help you set up Selenium in Visual Studio and run your first Selenium C# example script for automated browser testing of your web-application.
Last Updated on:
On This Page
- Getting Started with Visual Studio 2019
- Downloading & Installing Selenium WebDriver
- Creating our first NUnit Project
- Writing Your First Selenium C# Test Automation
- GitHub Copilot for Selenium C#
- Selenium C# Tutorial: Setting Up Selenium In Visual Studio
- Running First Selenium C# Script With NUnit
- Selenium C# Tutorial: Using Implicit Wait in Selenium
- Selenium C# Tutorial: Using Explicit and Fluent Wait in Selenium
- Selenium C# Tutorial: Handling Alert Windows
- Selenium C# Tutorial: Handling Multiple Browser Windows
- Selenium C# Tutorial: Handling Frames & iFrames With Examples
- Selenium C#: Page Object Model Tutorial With Examples
Setting up Selenium in Visual Studio starts with choosing an edition: the free Community Edition, whose 30-day trial license extends only if you sign in, or the paid Professional and Enterprise tiers. After installing Visual Studio 2019, the next step downloads Selenium WebDriver for Chrome and creates an NUnit test project to run C# automation scripts.
In this Selenium C# tutorial, we are going to:
Step 1: Getting Started with Visual Studio 2019
Visual Studio is the best IDE (Integrated Development Environment) to use for Selenium C# test automation. In this Selenium C# tutorial, we will use Visual Studio 2019 for the walkthrough below.
There are a number of download options available with VS 2019. The non-commercial version is Visual Studio Community, whereas the commercial versions are Visual Studio Professional & Visual Studio Enterprise. For the demonstration in this Selenium C# tutorial series, we would make use of the Community Edition of Visual Studio 2019 for Selenium test automation.
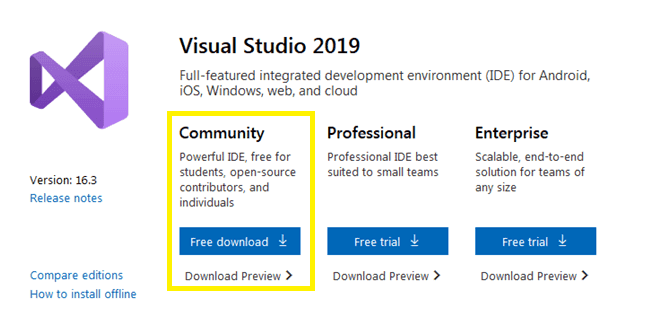
Install the necessary packages for Selenium C# test automation in your operating system.
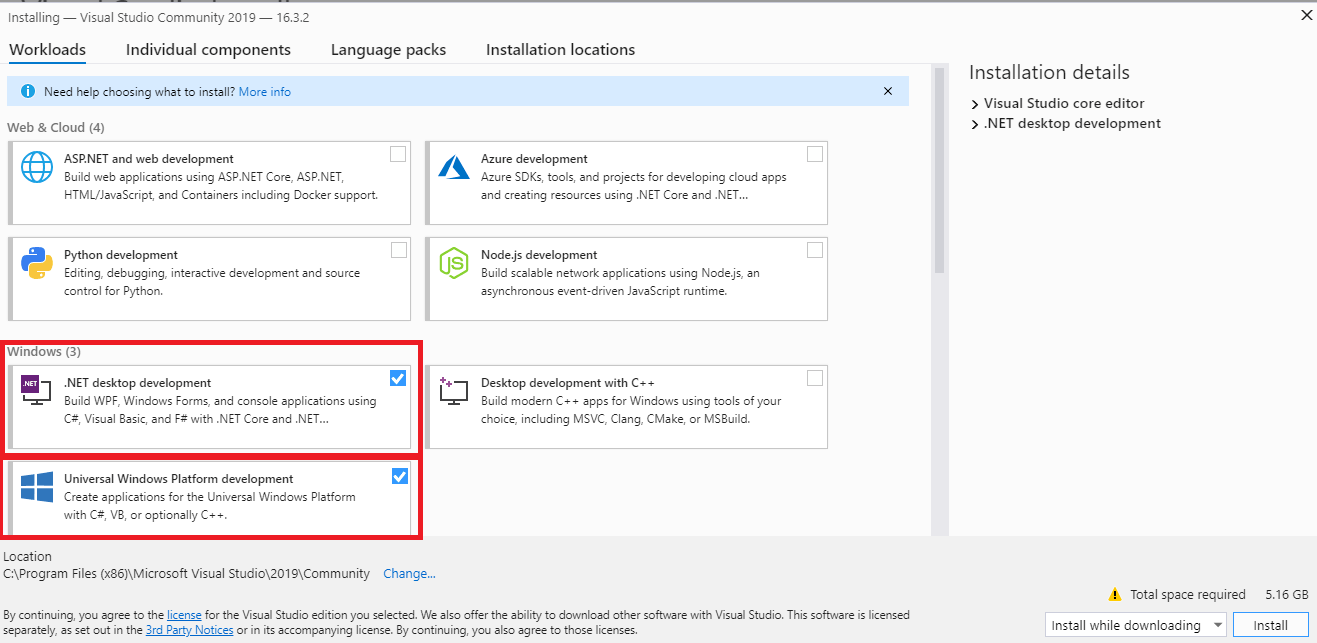
Note: The license of the Community Edition expires after 30 days of usage. To extend the license, you should sign-in to the IDE. Signing-in also lets you use the other powerful features of Visual Studio such as pushing source code to private Git, syncing Visual Studio settings, and more.

Austin Siewert
Co-Founder, Steadfast Systems
Discovered @TestMu AI yesterday. Best browser testing tool I've found for my use case. Great pricing model for the limited testing I do 👏
2M+ Devs and QAs rely on TestMu AI
Deliver immersive digital experiences with Next-Generation Mobile Apps and Cross Browser Testing Cloud

Take this certification to master the fundamentals of Selenium automation testing with C# and prove your credibility as a tester.
Here’s a short glimpse of the Selenium C# 101 certification from TestMu AI:
Downloading & Installing Selenium WebDriver
Selenium WebDriver is one of the most popular open-source test automation framework used for automating web application testing. Selenium WebDriver helps to greatly reduce the efforts involved in cross browser testing by automating the test scripts.
Selenium WebDriver Tutorial for Cross Browser Testing
Now, let’s install the Selenium WebDriver for the browser under test on your operating system. Shown below are the locations from where you can download the Selenium WebDriver for popular browsers.
| Opera | https://github.com/operasoftware/operachromiumdriver/releases |
| Firefox | https://github.com/mozilla/geckodriver/releases |
| Chrome | http://chromedriver.chromium.org/downloads |
| Microsoft Edge | https://developer.microsoft.com/en-us/microsoft-edge/tools/webdriver/ |
In this Selenium C# tutorial, we will make use of the Google Chrome for automation testing with Selenium in Visual Studio.
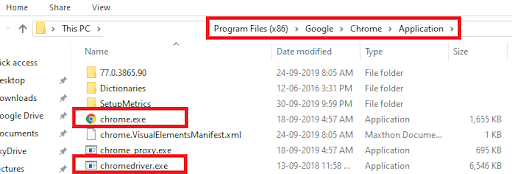
Note: It is recommended to install the Selenium WebDriver executable in the location where the Google Chrome browser is present. That way, you need not mention the location of the Selenium WebDriver when invoking the same in your test implementation.
Creating our first NUnit Project for Selenium C# in Visual Studio
Now, you have installed Visual Studio 2019 along with the Selenium WebDriver for Google Chrome. You are all set to execute your first Selenium C# testing script through the NUnit framework.
NUnit is a test automation framework that helps to perform Selenium C# testing with much ease. In this chapter of the Selenium C# tutorial series, we will touch upon basic aspects of NUnit such as the installation of the framework along with installing the Selenium WebDriver for the test project. We will talk more about NUnit as we go forward. For now, let get your first Selenium C# example script running through NUnit.
You will need to create an NUnit project for running an automation script using Selenium in Visual Studio. Here are the steps to create an NUnit project for Selenium C# development:
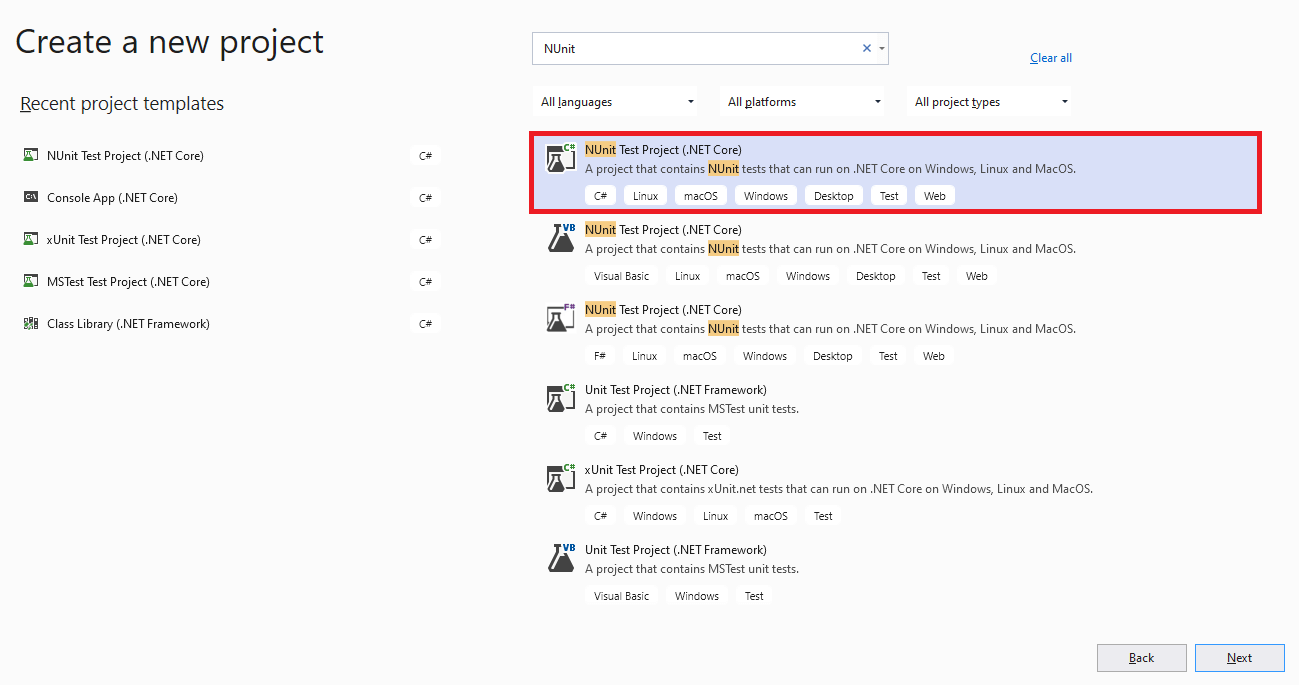
Step 1: Create a new project of the type ‘NUnit Test Project (.Net Core)’ in Visual Studio.
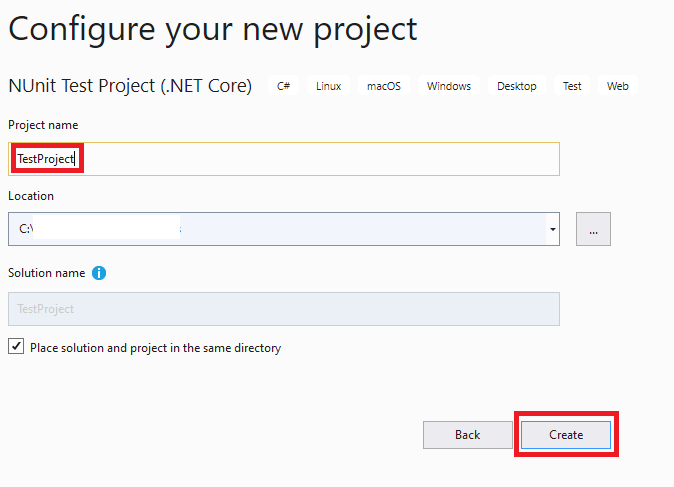
Step 2: Give an appropriate name to the project and click Create.
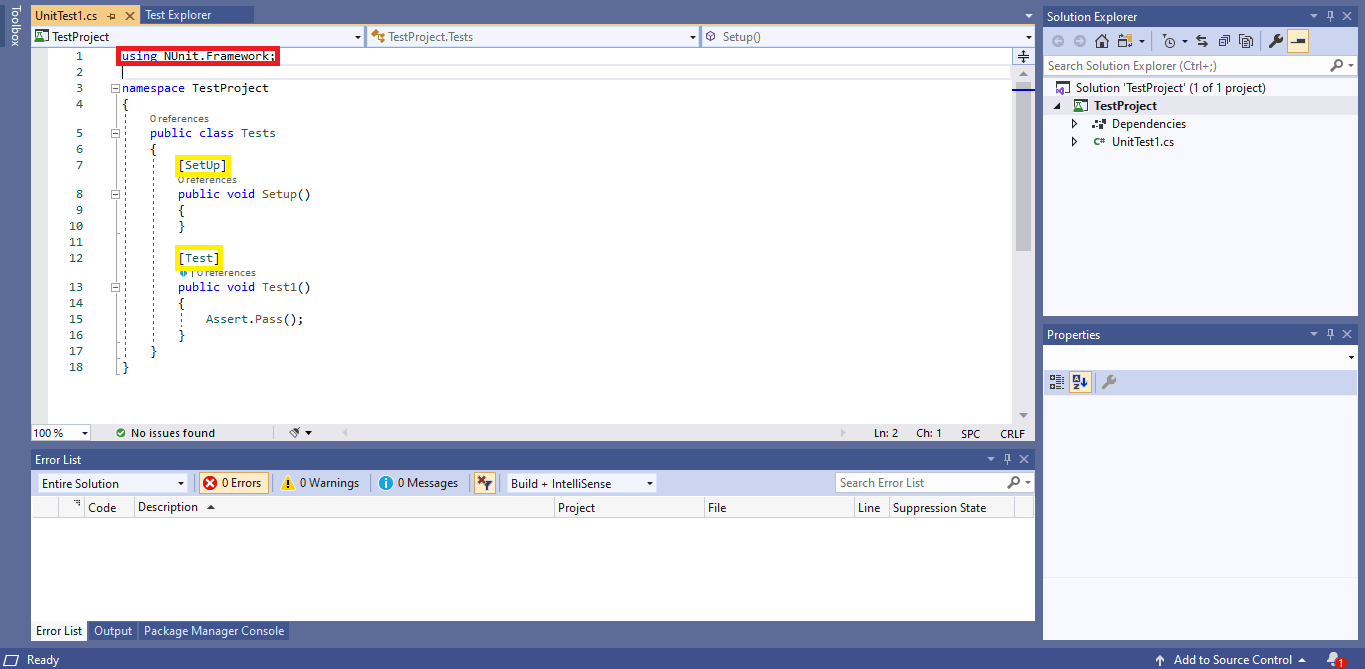
Step 3: Since the project is of the type NUnit (.Net Core), the newly created .cs file will contain the basic functionalities of the NUnit framework.
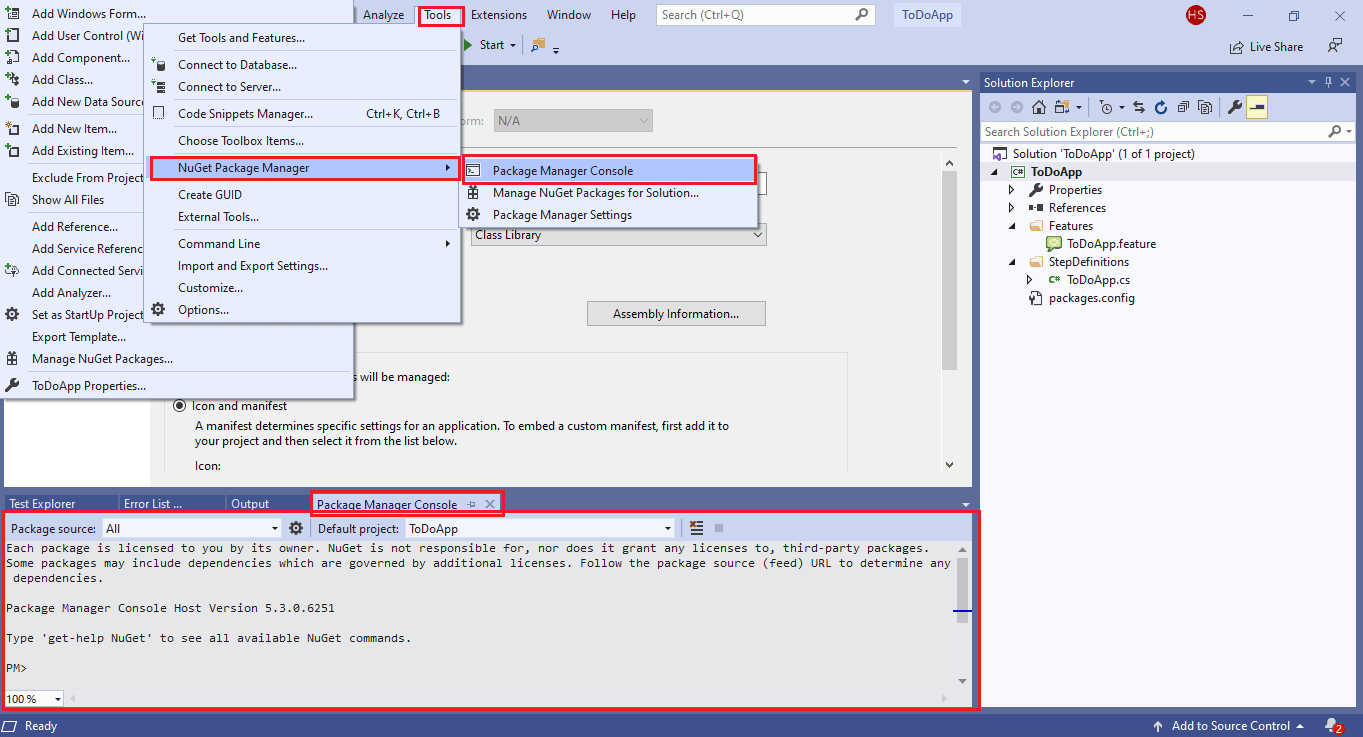
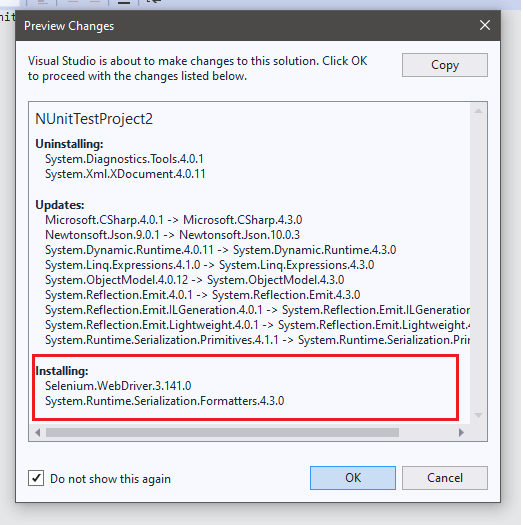
Step 4: Install the Selenium WebDriver (for Google Chrome) and NUnit framework. Execute the appropriate Package Manager(PM) commands to install the necessary packages.
To execute PM commands from the PM console, navigate to Tools -> NuGet Package Manager -> Package Manager Console.
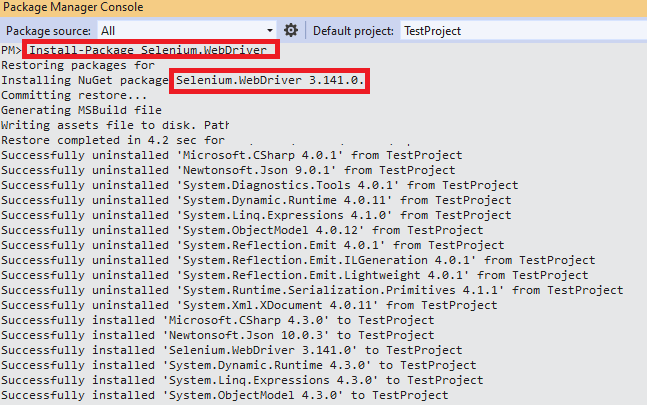
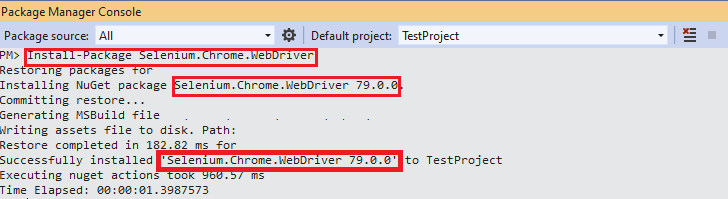
Execute these commands on the PM console to install Selenium in Visual Studio:
Install-Package Selenium.WebDriver
Install-Package Selenium.Chrome.WebDriver
Similarly, execute the following commands on the PM console to install NUnit:
Install-Package NUnit
Install-Package NUnit3TestAdapter
Below are some of the screenshots of the execution:
Step 5: To verify the status of the package installation, execute the Get-Package command on the PM console.
PM> Get-Package

Id                                  Versions
--                                  --------
Selenium.WebDriver                  {3.141.0}
Selenium.Chrome.WebDriver           {79.0.0}
...... ......
...... ......
Writing Your First Selenium C# Test Automation
In this section of Selenium C# tutorial, we look at the following test scenario:
- Navigate to the URL https://www.google.com.
- Locate the search-box on the page.
- Enter the search item as TestMu AI and click Google Search.
We are using a basic test scenario that uses the bare minimum annotations of the NUnit framework. It is just to get you started with Selenium test automation using a test framework like NUnit.
using NUnit.Framework;
using OpenQA.Selenium;
using OpenQA.Selenium.Chrome;
using System;

namespace Selenium_Demo
{
    class Selenium_Demo
    {
        String test_url = "https://www.google.com";

        IWebDriver driver;

        [SetUp]
        public void start_Browser()
        {
            // Local Selenium WebDriver
            driver = new ChromeDriver();
            driver.Manage().Window.Maximize();
        }

        [Test]
        public void test_search()
        {
            driver.Url = test_url;

            System.Threading.Thread.Sleep(2000);

            IWebElement searchText = driver.FindElement(By.CssSelector("[name = 'q']"));

            searchText.SendKeys("LambdaTest");

            IWebElement searchButton = driver.FindElement(By.XPath("//div[@class='FPdoLc tfB0Bf']//input[@name='btnK']"));

            searchButton.Click();

            System.Threading.Thread.Sleep(6000);

            Console.WriteLine("Test Passed");
        }

        [TearDown]
        public void close_Browser()
        {
            driver.Quit();
        }
    }
}
As seen in the above implementation, the Chrome WebDriver is initiated in the code implemented under the [SetUp] attribute.
[SetUp]
public void start_Browser()
{
	// Local Selenium WebDriver
	driver = new ChromeDriver();
	driver.Manage().Window.Maximize();
}
The test implementation is under the [Test] attribute. The necessary web elements are located using the Inspect Tool in Google Chrome.
[Test]
public void test_search()
{
    driver.Url = test_url;
    System.Threading.Thread.Sleep(2000);
    IWebElement searchText = driver.FindElement(By.CssSelector("[name = 'q']"));

    searchText.SendKeys("LambdaTest");

    ......................................
    ......................................
}
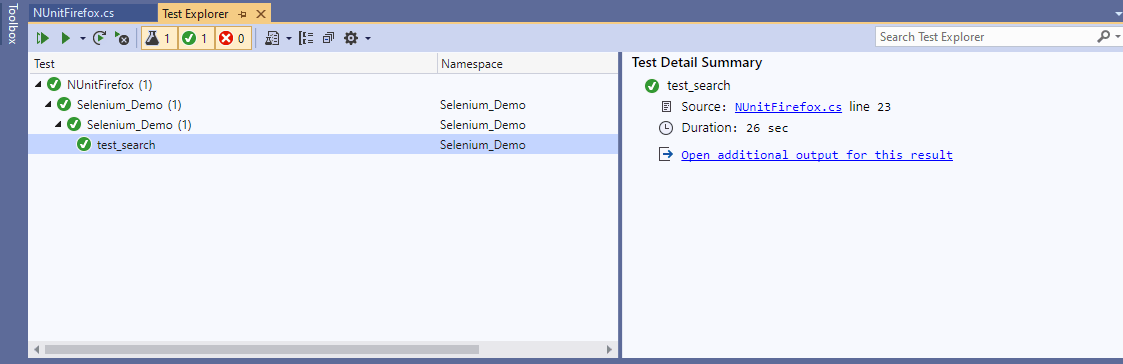
Now, you can execute the test using the IDE. The status of the tests can be seen using the Test Explorer in Visual Studio. For accessing Test Explorer, go to View ? Test Explorer.
To build the project and execute all the tests, go to Test ? Run All Tests. On successful execution, you would see a Green test in the Test Explorer window.

How Does GitHub Copilot Help Write Selenium C# Tests in Visual Studio?
GitHub Copilot, built into Visual Studio, autocompletes NUnit test methods, WebDriver calls, and CSS or XPath locators from a plain comment, cutting manual boilerplate. It reads the existing project context, including the ChromeDriver setup already used in this tutorial, to shape its suggestions.
- Locator suggestions: typing a comment like 'find the search box' prompts Copilot to draft a By.CssSelector or By.XPath call, replacing part of the manual DevTools lookup used earlier in this tutorial.
- Test method scaffolding: adding a [Test] attribute and a descriptive method name prompts Copilot to draft the Arrange-Act-Assert body, including the ChromeDriver calls this tutorial's SetUp method already uses.
- Failure explanation: pasting a failed assertion into Copilot Chat inside Visual Studio returns a plain-language guess at the cause, though it reasons only over the error text, not the live page state.
The real limitation: Copilot has no access to the live DOM, so a suggested selector can target the wrong element or one the page no longer has. Every AI-suggested locator still needs a real run against ChromeDriver in Test Explorer before it ships, the same manual verification this tutorial's NUnit project already relies on.
Stay Tuned For Upcoming Chapters
In this article of the continuing Selenium C# tutorial series, we looked at the basic aspects like installing Selenium in Visual Studio along with running the first Selenium C# testing script. The test case using the NUnit framework gave a complete end-to-end demonstration. I will see you in the next tutorial of this Selenium C# tutorial series where we’ll run our first Selenium C# script with NUnit. Let’s Automate!!!
Update: We’ve now completed the Selenium C# tutorial series, so in order to help you easily navigate through the tutorials, we’ve compiled the complete list of tutorials, which you can find in the section below.
Selenium C# Tutorials With Examples
Stay tuned with the TestMu AI blog by hitting the bell icon. We look forward to having you back in the next chapter of this Selenium C# tutorial series where we will talk about Web Browser commands in Selenium C#. See you then & Happy Testing.!! 🙂
Austin Siewert
Co-Founder, Steadfast Systems
Discovered @TestMu AI yesterday. Best browser testing tool I've found for my use case. Great pricing model for the limited testing I do 👏
2M+ Devs and QAs rely on TestMu AI
Deliver immersive digital experiences with Next-Generation Mobile Apps and Cross Browser Testing Cloud
Author

Himanshu Sheth
Blogs: 141


Himanshu Sheth is the Director of Marketing (Technical Content) at TestMu AI, with over 8 years of hands-on experience in Selenium, Cypress, and other test automation frameworks. He has authored more than 130 technical blogs for TestMu AI, covering software testing, automation strategy, and CI/CD. At TestMu AI, he leads the technical content efforts across blogs, YouTube, and social media, while closely collaborating with contributors to enhance content quality and product feedback loops. He has done his graduation with a B.E. in Computer Engineering from Mumbai University. Before TestMu AI, Himanshu led engineering teams in embedded software domains at companies like Samsung Research, Motorola, and NXP Semiconductors. He is a core member of DZone and has been a speaker at several unconferences focused on technical writing and software quality.


Did you find this page helpful?
More Related Blogs
TestMu AI forEnterprise
Get access to solutions built on Enterprise
grade security, privacy, & compliance
- Advanced access controls
- Advanced data retention rules
- Advanced Local Testing
- Premium Support options
- Early access to beta features
- Private Slack Channel
- Unlimited Manual Accessibility DevTools Tests