

Power Your Software Testing with AI Agents and Cloud
The Native AI-Agentic Cloud Platform to Supercharge Quality Engineering. Test Intelligently and Ship Faster.


- TestMu AI (Formerly LambdaTest)
- /
- Blog
- /
- Python tox: A Complete Tutorial
Python tox: A Complete Tutorial
Learn how to use Python tox for automated testing across multiple environments. This complete tutorial covers setup, configuration, and best practices.
Last Updated on:
Python's tox tool solves the dependency conflicts and version mismatches that crop up when testing manually across multiple Python versions, automating environment setup instead. Maintained as an open source project on GitHub, tox isolates each environment so tests run independently, stores every operation in a local .tox directory, and integrates directly into CI/CD pipelines.
What Is tox in Python?
Python tox is a command-line tool for managing virtual environments and automating testing in Python.
It lets you test code across multiple environments, ensuring that it remains functional and reliable regardless of the Python versions or configurations involved.
tox is an open-source tool actively maintained on GitHub. It offers features like environment isolation, which enables tests to run independently without interference.
Python tox comes with numerous benefits that highlight its importance:
- Ensures consistent testing in open-source projects, preventing issues from new contributions.
- Creates isolated environments, eliminating inconsistencies between different systems.
- Automates testing across multiple Python versions, OS, and dependencies.
- Integrates with CI tools like Jenkins and GitHub Actions for automation testing.
- Allows customization with a plugin system to fit any project’s specific needs.
How Does Python tox Work?
tox can help you automate and standardize testing workflows by managing virtual environments, dependencies, and commands.
Here is how tox works in Python:
- Configuration: tox reads the tox.ini file, which specifies the environments, dependencies, and commands required for testing. This configuration acts as the blueprint for the entire process.
- Environment Creation: For each environment listed in the configuration, tox creates isolated virtual environments. This ensures that dependencies and tools for one environment do not interfere with others, maintaining consistency and reproducibility.
- Dependency Installation: Once the virtual environments are created, tox installs the specified dependencies (like pytest, Selenium, or any other required libraries) for each environment.
- Command Execution: After setting up the environment and dependencies, tox runs the specified commands, such as test scripts, linters, or build processes, in each environment.
- Result Reporting: tox consolidates the results from all environments and provides a summary to the user, allowing them to identify any issues or inconsistencies.
All of the operations in tox are stored in the .tox directory, making it easy to manage and debug the process.
Setting Up Python Environment
Before using tox, it’s crucial to set up the necessary environment for our examples. For this blog, we will be working with Python, a widely-used programming language, together with Selenium, a tool for automating web browsers.
We will also use the pytest plugin, a flexible framework for writing and organizing tests in Python. Our tests will be executed on the TestMu AI platform for seamless cross browser testing.
TestMu AI is an AI-native test execution platform that allows you to perform Selenium Python testing on different real browsers and operating system combinations.

Note: Run Python tests with tox across 5000+ real desktop browsers. Try TestMu AI Today!
- Download and install Python. Make sure to select the option to “Add Python to PATH” so you can easily access it from your command line or terminal.
- Run the following command to install Selenium, pytest, and tox libraries:
pip install -r requirements.txt
The requirements.txt file contains the necessary dependencies.
After that, set your credentials as environment variables:
export LT_USERNAME=your-lambdatest-username
export LT_ACCESS_KEY=your-lambdatest-access-key
With these prerequisites, you’re ready to use Python tox with pytest, Selenium, and TestMu AI.
How to Use Python tox With Selenium?
Testing websites often involves verifying functionality across various conditions and environments. Selenium, when used with Python, provides a robust toolkit for navigating and interacting with web pages.
In this section, we will use Selenium with Python tox and showcase a practical test scenario implemented with the pytest framework.
Test Scenario:
- Open the register account form in the TestMu AI eCommerce Playground.
- Fill in the details.
- Subscribe to the Newsletter.
- Accept the terms and conditions.
- Click the Continue button.
- Check that a success message is shown to the user.
Implementation (tox.ini):
[tox]
envlist = py{39,311}-chrome, py{39,311}-firefox


[testenv]
deps =
   pytest
   selenium
passenv =
   LT_USERNAME
   LT_ACCESS_KEY
setenv =
   PLATFORM_NAME = Windows 11
   SELENIUM_VERSION = 4.0
commands = pytest -s


[testenv:py39-chrome]
setenv =
   BROWSER_NAME = Chrome
   BROWSER_VERSION = latest
   BUILD_NAME = Tox Chrome Python 3.9 Tests
   TEST_NAME = Chrome Test Python 3.9


[testenv:py39-firefox]
setenv =
   BROWSER_NAME = Firefox
   BROWSER_VERSION = latest
   BUILD_NAME = Tox Firefox Python 3.9 Tests
   TEST_NAME = Firefox Test Python 3.9


[testenv:py311-chrome]
setenv =
   BROWSER_NAME = Chrome
   BROWSER_VERSION = latest
   BUILD_NAME = Tox Chrome Python 3.11 Tests
   TEST_NAME = Chrome Test Python 3.11


[testenv:py311-firefox]
setenv =
   BROWSER_NAME = Firefox
   BROWSER_VERSION = latest
   BUILD_NAME = Tox Firefox Python 3.11 Tests
   TEST_NAME = Firefox Test Python 3.11

Code Walkthrough:
The envlist specifies a matrix of environments for tox to run tests. It ensures that tests are executed across multiple Python versions and browser combinations, improving test coverage.
In the [testenv] section, we have the deps section, pytest and selenium are installed, enabling test execution with pytest and browser automation with Selenium.
The passenv allows specific environment variables (LT_USERNAME and LT_ACCESS_KEY) to be accessed by tox. These variables are required for TestMu AI authentication.
The setenv defines default values for PLATFORM_NAME (operating system) and SELENIUM_VERSION, which are required for TestMu AI configuration.
The pytest -s runs the tests, with the -s flag used to disable output capture for better logging visibility. In the py39-chrome environment, BROWSER_NAME and BROWSER_VERSION are set to Chrome and the latest version, respectively.
The BUILD_NAME and TEST_NAME are custom names for the build and test on TestMu AI. These identifiers make it easier to locate and track tests on the TestMu AI dashboard, especially when running multiple tests. This environment configures Python 3.9 with Chrome, using the latest browser version.
For py39-firefox, BROWSER_NAME is set to Firefox, and BROWSER_VERSION is configured to use the latest version. The BUILD_NAME and TEST_NAME are custom identifiers for easier tracking on TestMu AI. This environment uses Python 3.9 with Firefox, ensuring tests are also verified on this browser configuration.
In py311-chrome, the BROWSER_NAME and BROWSER_VERSION are configured to Chrome with the latest version. The BUILD_NAME and TEST_NAME are unique identifiers for the build and test on TestMu AI.
This environment specifies Python 3.11 with Chrome, covering an additional Python version.
For py311-firefox, the BROWSER_NAME and BROWSER_VERSION are set to Firefox with the latest version. The BUILD_NAME and TEST_NAME are custom names for this specific test environment.
Implementation (test_tox_sample.py):
lt_options = {
   "user": os.getenv("LT_USERNAME"),
   "accessKey": os.getenv("LT_ACCESS_KEY"),
   "build": os.getenv("BUILD_NAME", "Default Build"),
   "name": os.getenv("TEST_NAME", "Default Test"),
   "platformName": os.getenv("PLATFORM_NAME", "Windows 11"),
   "browserName": os.getenv("BROWSER_NAME", "Chrome"),
   "browserVersion": os.getenv("BROWSER_VERSION", "latest"),
   "selenium_version": os.getenv("SELENIUM_VERSION", "latest")
}


def generate_email():
   numbers = ''.join([str(random.randint(0, 9)) for _ in range(8)])
   email = f"maria-costa-{numbers}@example.com"
   return email


@pytest.fixture
def browser():
   web_driver = webdriver.ChromeOptions() if lt_options["browserName"].lower() == "chrome" else webdriver.FirefoxOptions()
   web_driver.set_capability('LT:Options', lt_options)


   driver = webdriver.Remote(
       command_executor="https://hub.lambdatest.com/wd/hub",
       options=web_driver
   )

   driver.maximize_window()
   yield driver
   driver.quit()


def test_create_account(browser):
  browser.get("https://ecommerce-playground.lambdatest.io/index.php?route=account/register")


   browser.find_element(By.ID, "input-firstname").send_keys("Maria")
   time.sleep(1)


   browser.find_element(By.ID, "input-lastname").send_keys("Costa")
   time.sleep(1)


   browser.find_element(By.ID, "input-email").send_keys(generate_email())
   time.sleep(1)


   browser.find_element(By.ID, "input-telephone").send_keys("+351123456789")
   time.sleep(1)


   browser.find_element(By.ID, "input-password").send_keys("987654321")
   time.sleep(1)


   browser.find_element(By.ID, "input-confirm").send_keys("987654321")
   time.sleep(1)


   browser.find_element(By.XPATH, "//label[@for='input-newsletter-yes']").click()
   time.sleep(1)


   browser.find_element(By.XPATH, "//label[@for='input-agree']").click()
   time.sleep(1)


   browser.find_element(By.XPATH, "//input[@value='Continue']").click()
   time.sleep(3)


   assert browser.title == "Your Account Has Been Created!"
   time.sleep(1)
Code Walkthrough:
The script begins by importing the necessary modules, including pytest for testing, selenium for browser automation, and os to access environment variables.
The random library is also imported here to generate unique email addresses for each test run, ensuring no conflicts in account creation. This is needed because the website that is being automated forbids creating new accounts with emails already used.
The lt_options dictionary is defined to configure various parameters required for TestMu AI. This dictionary pulls TestMu AI credentials and test-specific options from environment variables set in tox.ini. The fields like build, name, and platformName will help organize and identify test runs on the TestMu AI dashboard.
The generate_email() function generates a random email address for each test, ensuring that there are no duplicate emails when the tests are executed multiple times.
By appending random numbers to the email prefix, we create unique emails with each test run.
The browser fixture is defined using the pytest.fixture decorator to initialize and configure the Selenium WebDriver for each test. The browser fixture pulls TestMu AI configuration settings from lt_options and sets capabilities based on the chosen browser.
The WebDriver connects to the cloud grid using the specified credentials and options. After setting up the session, the WebDriver is maximized for better visibility, and it quits after the test execution completes.
The test_create_account() function automates the account creation process on TestMu AI eCommerce Playground. The WebDriver navigates to the registration page URL, where the account creation will be done.
The test script fills in various fields in the registration form, using send_keys to input the necessary data. It interacts with checkboxes for accepting newsletters and terms and conditions. The click() method simulates user actions on the checkboxes for subscribing to the newsletter and agreeing to terms.
Finally, the test script submits the registration form by locating and clicking the “Continue” button. This action triggers the form submission.
To verify that the account has been created successfully, the test script checks if the page title matches the expected result. The assertion checks the title of the resulting page.
If it matches “Your Account Has Been Created!”, the test passes. Otherwise, the test fails, indicating that the account creation was unsuccessful.
To run this test, just execute the below command:
tox
This test suite is set up to run in multiple environments as configured in the tox.ini file covering Python 3.9 and 3.11 with Chrome and Firefox browsers on TestMu AI.
To see the test results, you can navigate to the TestMu AI Web Automation dashboard:
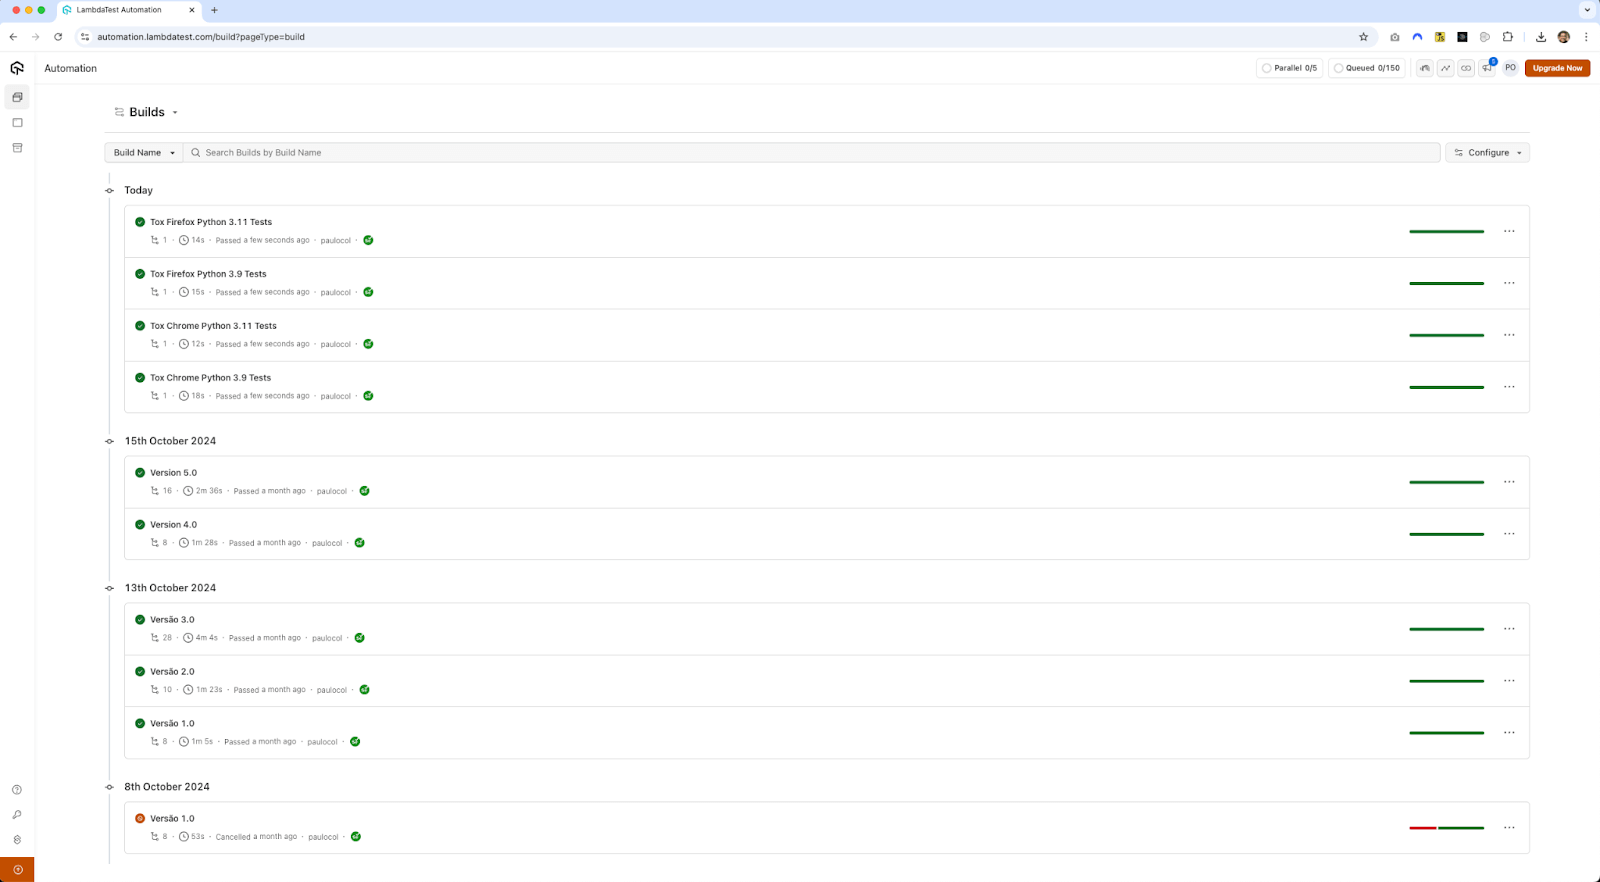
Here you can notice the Python tests with tox are executed on the TestMu AI platform.

Austin Siewert
Co-Founder, Steadfast Systems
Discovered @TestMu AI yesterday. Best browser testing tool I've found for my use case. Great pricing model for the limited testing I do 👏
2M+ Devs and QAs rely on TestMu AI
Deliver immersive digital experiences with Next-Generation Mobile Apps and Cross Browser Testing Cloud

Advanced Uses Cases of Python tox
This section will explore advanced use cases of Python tox in the context of Selenium and Python testing, focusing on parallel execution, environment customization, and tool integration.
Parallel Testing With tox
Running tests across multiple environments sequentially can be time-consuming, particularly in large Selenium test suites where browser-based testing can add to the overhead. tox can help reduce test execution time by allowing tests to run in parallel across environments.
Running Tests in Parallel Across Environments
By default, tox runs each environment one after the other. For large test suites, running environments sequentially may significantly slow down the development cycle. tox, however, supports parallel execution of environments, allowing tests to run concurrently.
You can enable parallel execution with the -p or –parallel flag:
tox -p 4
This command will run tests in four environments simultaneously, which can significantly reduce the overall runtime, especially for tests involving Selenium and multiple browsers.
For environments with numerous configurations or test cases, you can let tox automatically detect the number of processors available by running the below command:
tox -p auto
This will instruct tox to utilize all available CPU cores, optimizing performance and test execution time, particularly in CI pipelines or large-scale projects.
Optimizing Test Execution Time
There are a few other ways to optimize test execution time when working with tox and Selenium:
- Parallel Browsers With Selenium Grid: When running Selenium tests, you can use Selenium Grid to parallelize tests across multiple browser instances or even remote machines. This can be done in conjunction with parallel environment support offered by tox for additional speed-up.
- Reusing Environments: tox recreates environments by default, but if your dependencies don’t change often, you can instruct tox to skip environment creation and installation using the –skip-missing-interpreters or skip_install option. This can significantly reduce the overhead of re-installing dependencies, particularly in CI systems.
Customizing Environments
When using Selenium and Python test automation, you may need to create custom environments that accommodate different browsers, setups, or even stages in your development workflow (e.g., regression and smoke tests).
tox provides flexibility in defining custom environments that allow you to organize your tests more effectively.
Creating Custom Test Environments
A typical Selenium project may involve running tests on different browsers or different versions of those browsers. tox allows you to create custom environments for each scenario by defining them in the tox.ini file:
[tox]
envlist = py39-chrome, py39-firefox, py39-headless
[testenv]
deps =
   pytest
   selenium
commands = pytest --driver={env:SELENIUM_DRIVER:chrome} --headless={env:SELENIUM_HEADLESS:false}
[testenv:py39-chrome]
setenv =
   SELENIUM_DRIVER=chrome
commands = pytest --driver chrome
[testenv:py39-firefox]
setenv =
   SELENIUM_DRIVER=firefox
commands = pytest --driver firefox
[testenv:py39-headless]
setenv =
   SELENIUM_DRIVER=chrome
   SELENIUM_HEADLESS=true
commands = pytest --driver chrome --headless
In this configuration:
- The py39-chrome environment runs tests in Chrome.
- The py39-firefox environment runs tests in Firefox.
- The py39-headless environment runs tests in headless Chrome mode, which is useful for CI environments where you don’t need a browser UI.
These environments can be run individually, allowing you to easily execute tests in specific setups without repeatedly modifying the command line.
Using Environment Markers and Factors
The factor system of tox allows you to refine environments further based on specific parameters. This is particularly useful when working with multiple Selenium configurations, browser versions, or operating systems.
Here’s an example that uses factors to test different versions of the Chrome and Firefox drivers:
[tox]
envlist = py39-{chrome80,chrome90,firefox75,firefox85}
[testenv]
deps =
   chrome80: selenium==4.0.0
   chrome90: selenium==4.0.0
   firefox75: selenium==4.0.0
   firefox85: selenium==4.0.0
commands = pytest --driver={env:SELENIUM_DRIVER} --driver-version={env:DRIVER_VERSION}
[testenv:py39-chrome80]
setenv =
   SELENIUM_DRIVER=chrome
   DRIVER_VERSION=80
[testenv:py39-chrome90]
setenv =
   SELENIUM_DRIVER=chrome
   DRIVER_VERSION=90
[testenv:py39-firefox75]
setenv =
   SELENIUM_DRIVER=firefox
   DRIVER_VERSION=75
[testenv:py39-firefox85]
setenv =
   SELENIUM_DRIVER=firefox
   DRIVER_VERSION=85
This configuration uses environment markers to test different versions of Chrome and Firefox drivers. Depending on your testing needs, you can easily expand this approach to include more browsers or versions.
Integrating With Other Tools and Frameworks
Integrating tox into your broader testing and development workflow can significantly improve efficiency, particularly when it comes to continuous integration and testing frameworks like pytest and unittest.
Integrating tox With Continuous Integration (CI) Tools
tox integrates smoothly with most CI tools, enabling automated testing across different environments with minimal setup.
It also simplifies the process of running tests in parallel across multiple configurations, making it easy to create robust test matrices that can be automated in CI tools.
Using tox With Python Testing Frameworks
tox is often used with pytest, but it’s also compatible with other Python testing frameworks, such as unittest.
Here’s an example of integrating unittest framework into a Selenium project:
[testenv]
deps =
   selenium
   unittest2
commands = python -m unittest discover -s tests
In this setup, tox will run unittest to discover and execute tests from the tests directory. tox can be adapted to suit your preferred testing framework.
Best Practices for Configuring Python tox
Following best practices for structuring and optimizing your tox configuration can help your project scale smoothly as it grows.
- As your tox.ini file grows, it’s essential to organize it for readability and maintainability. Use comments to explain non-obvious configurations and logically separate sections.
For example, in the code snippet below, using comments and grouping related sections can help understand the purpose of each configuration.
[tox]
# List of all environments to test across different versions and configurations
envlist = py37, py38, py39, lint, docs


[testenv]
# Base dependencies for all test environments
deps = pytest
commands = pytest


[testenv:lint]
# Linting environment to check code quality
deps = flake8
commands = flake8 myproject


[testenv:docs]
# Environment for building documentation
deps = sphinx
commands = sphinx-build -b html docs/ docs/_build/
[testenv]
deps =
   pytest>=6.0
   selenium>=3.0,<4.0
Then, each specific environment can override only what is necessary. This makes the configuration easier to maintain and reduces errors when updates are needed.
[tox]
envlist = py38, py39, lint
[testenv]
deps = pytest
commands = pytest
[testenv:py38]
basepython = python3.8
[testenv:py39]
basepython = python3.9
[testenv:lint]
deps = flake8
commands = flake8 myproject
For example, you might want to enable additional test reporting in CI environments:
[testenv]
setenv =
   CI_ENVIRONMENT = {env:CI_ENVIRONMENT:false}
deps = pytest
commands = pytest --junitxml=reports/junit.xml
Here, CI_ENVIRONMENT can be set based on whether the tox is run in a CI pipeline, and you can adjust commands based on this variable as needed.
You can use the skip_install option in environments where installing packages is not required or use –notest to skip test execution if you’re just checking environment setup.
Troubleshooting Python tox Issues
Even with careful configuration, it’s easy to run into issues with tox. Understanding common pitfalls and how to troubleshoot them can help save time and prevent frustration.
- Environment Not Found Errors: This error usually occurs when the specified Python interpreter is missing. For example, if you have envlist = py37 but Python 3.7 isn’t installed, tox won’t be able to create that environment. Use the skip_missing_interpreters option in your [tox] section to skip unavailable interpreters.
- Test Command Not Recognized: This issue often arises when tox tries to run a command that is not installed in the virtual environment. Ensure that all dependencies are listed under deps in the tox.ini file so tox installs them before running commands.
- Missing Package Errors: If you encounter errors about missing packages, check whether the packages are listed in deps. Dependencies in requirements.txt files can also be specified using the -r requirements.txt command, but be mindful of requirements.txt files that contain system-specific or complex dependencies, which may need alternative installation methods.
Some dependencies or commands may behave differently on various operating systems (e.g., Windows vs. Linux). You can specify OS-specific configurations in tox using the below conditions:
[testenv]
deps = pytest
commands =
   linux: pytest --junitxml=reports/linux-results.xml
   windows: pytest --junitxml=reports/windows-results.xml
How Do AI Coding Agents Use tox to Verify Their Own Changes?
AI coding agents such as Claude Code and GitHub Copilot coding agent can run tox directly in a terminal to check whether a code change still passes across every configured Python environment.
These agents work in a loop: edit a file, run a shell command, read the output, and try again. Because tox.ini already defines the exact environments and commands a project uses, an agent needs no separate instructions to run tests correctly. It runs the same tox command a human contributor would and reads the pass or fail summary tox prints for each environment.
The limitation is speed. tox recreates each virtual environment and reinstalls its dependencies by default, which can take minutes for a full envlist. An agent iterating on one failing test cannot wait for every environment to rebuild between edits. In practice, agents target a single environment, such as tox -e py311, and add the full matrix back in only once the change looks correct, the same shortcut a human developer already takes when working quickly.
This pattern extends to pull request checks. Some teams let an agent open a pull request only after a targeted tox run passes locally, so the full matrix already running in GitHub Actions confirms what the agent checked, rather than being the first place a regression is caught.
Conclusion
Ensuring consistent performance across Python environments is crucial for websites and web applications. To achieve this, Selenium Python with pytest and tox provides a robust framework for automated browser testing.
tox plays a key role by managing dependencies and configurations, ensuring tests run smoothly across different environments. Additionally, its integration with TestMu AI enables cross browser testing, allowing web applications to be tested on various browsers and platforms.
Citations
tox – automation project: https://tox.wiki/en/latest/
Author

Paulo Oliveira
Blogs: 16


Paulo is a Quality Assurance Engineer with more than 15 years of experience in Software Testing. He loves to automate tests for all kind of applications (both backend and frontend) in order to improve the team’s workflow, product quality, and customer satisfaction. Even though his main roles were hands-on testing applications, he also worked as QA Lead, planning and coordinating activities, as well as coaching and contributing to team member’s development. Sharing knowledge and mentoring people to achieve their goals make his eyes shine.
Reviewer

Samyak Goyal
Reviewer
Samyak Goyal is a Senior Member of Technical Staff at TestMu AI engineering Kane CLI, the command-line tool that runs browser automation from the terminal, where a flow described in natural language executes in a real Chrome browser and returns pass or fail with shareable proof. He is a backend engineer with 4+ years of experience, previously an SDE at Innovaccer, where he built APIs, introduced Kafka, and cut deployment from weeks to hours. Samyak also builds multi-agent systems, skill-orchestration frameworks, and a personal copilot that indexes 200+ microservice repositories.


Python Tox FAQs
Did you find this page helpful?
More Related Blogs
TestMu AI forEnterprise
Get access to solutions built on Enterprise
grade security, privacy, & compliance
- Advanced access controls
- Advanced data retention rules
- Advanced Local Testing
- Premium Support options
- Early access to beta features
- Private Slack Channel
- Unlimited Manual Accessibility DevTools Tests