

Power Your Software Testing with AI Agents and Cloud
The Native AI-Agentic Cloud Platform to Supercharge Quality Engineering. Test Intelligently and Ship Faster.


- TestMu AI (Formerly LambdaTest)
- /
- Blog
- /
- What is Pytest Coverage Report and How to Generate One
What is Pytest Coverage Report and How to Generate One
Find the Python code your tests never touch: set up pytest-cov, generate and read coverage reports, and gate your CI on a coverage threshold.
Last Updated on:
In Python development, creating automated tests is only one part of ensuring high-quality software. Equally important is understanding how much of your code is actually covered by tests.
pytest coverage provides insights into untested code, helping developers ensure that critical paths are thoroughly checked.
In this guide, we’ll dive into pytest code coverage, and show how to generate detailed pytest coverage reports.
Key Takeaways
To measure and generate Python code coverage, use the pytest-cov plugin to run tests and output reports, or use coverage.py directly for programmatic control. Run pytest --cov=your_package to generate a report showing which lines of code your tests executed and which they skipped.
- Best for standard test suites: pytest-cov is a plugin that integrates directly into your pytest session to measure code coverage without requiring a separate runner or extra invocation.
- Best for advanced programmatic control: coverage.py is the underlying engine that powers pytest-cov, which you can call directly to capture coverage in long-running daemons or merge parallel run data.
- Best for testing conditional logic: The --cov-branch flag enables branch coverage to track both arms of every conditional statement, catching tests that only cover the happy path.
- Best for CI/CD enforcement: The --cov-fail-under=N flag sets a minimum coverage threshold, causing the test suite to exit with a non-zero status and fail the build if coverage drops below that limit.
- Best for pipeline integration: Multiple report formats like terminal, HTML, XML/Cobertura, JSON, LCOV, and markdown allow you to view coverage locally or parse results in CI/CD quality gates.
- Best for cross-browser testing: TestMu AI runs your pytest coverage commands on a cloud Selenium grid to measure code coverage across real browser and operating system combinations.
What is pytest Coverage?
pytest coverage is the percentage of your Python source code that runs while a pytest test session executes. It is computed by coverage.py, exposed through the pytest-cov plugin, and reported per-file with the exact line numbers that were never reached.
High coverage does not prove correctness, since a line can run without being asserted on. It does prove the inverse: any line below 100% has zero protection against regression. Treat the report as a list of risks, not a grade.
With pytest-cov wired into your test run you can:
- See which lines of code executed during a run, with missing line numbers next to each module.
- Track branch coverage (both arms of every if) on top of line coverage with --cov-branch.
- Emit reports in any format your pipeline consumes: terminal, HTML, XML (Cobertura), JSON, LCOV, markdown, or annotated source.
- Block CI merges that drop coverage below a threshold using --cov-fail-under=N.
What is the pytest Coverage Report?
A pytest coverage report is the artifact pytest-cov emits at the end of a run: per-file line counts, missing line numbers, total coverage percentage, and (with --cov-branch) branch coverage figures.
In other words, a pytest coverage report shows which parts of your Python code are executed during tests. It highlights tested and untested lines, measures overall coverage percentages, and tracks branch coverage.
Each output format serves a different audience:
- term-missing: a terminal table for the engineer who just ran the suite. Shows exact missing line numbers per file.
- HTML: a clickable report for review during code review or refactoring. Each module opens to source with covered/missed lines highlighted.
- XML (Cobertura): the format Codecov, SonarQube, GitLab, and Bitbucket Pipelines parse for PR comments and quality gates.
- JSON / LCOV / markdown: machine-readable outputs for custom dashboards or PR summary appends (the markdown writer can target $GITHUB_STEP_SUMMARY directly per the pytest-cov reporting docs).
You can generate coverage reports in multiple formats, such as terminal, HTML, or XML, making it easy to review coverage locally or integrate it into CI/CD pipelines.
Why Use pytest for Coverage Reports
pytest already runs the tests; pytest-cov just adds the coverage layer without a second tool or a second invocation. Concrete reasons it has won this niche:
- One-flag enablement. pytest --cov=your_package turns on coverage for an entire test session. No separate runner, no rewrite of test discovery.
- Multi-process safe. When paired with pytest-xdist, coverage data from each worker is combined automatically, so distributed test runs still give a single, accurate report.
- Drop-in CI gate. --cov-fail-under=N exits non-zero below the threshold, which is enough to fail a GitHub Actions or Jenkins job. No extra script.
- Branch coverage built in. --cov-branch exposes both arms of every conditional, catching tests that only cover the happy path.
- Native pytest reporting. Output integrates with the same --cov-report formats Codecov, SonarQube, and similar QA dashboards already accept.

Note: Get 100 minutes of automated testing for free on TestMu AI. Try TestMu AI today!
pytest Code Coverage Reporting Tools
Using tools like pytest-cov and coverage.py, teams can generate comprehensive pytest coverage reports, analyze which parts of the codebase need additional testing, and track coverage trends over time.
Here are some of the most used pytest code coverage tools.
pytest-cov
pytest-cov is a code coverage plugin and command line utility for pytest. It also provides extended support for coverage.py.
Like coverage.py, you can use pytest-cov to generate HTML or XML reports in pytest and view a pretty code coverage analysis via the browser. Although using pytest-cov involves running a simple command via the terminal, the terminal command becomes longer and more complex as you add more coverage options. For instance, generating a command-line-only report is as simple as running the following command:
pytest --cov
The result of the pytest --cov command is shown below:

But generating an HTML report requires an additional command:
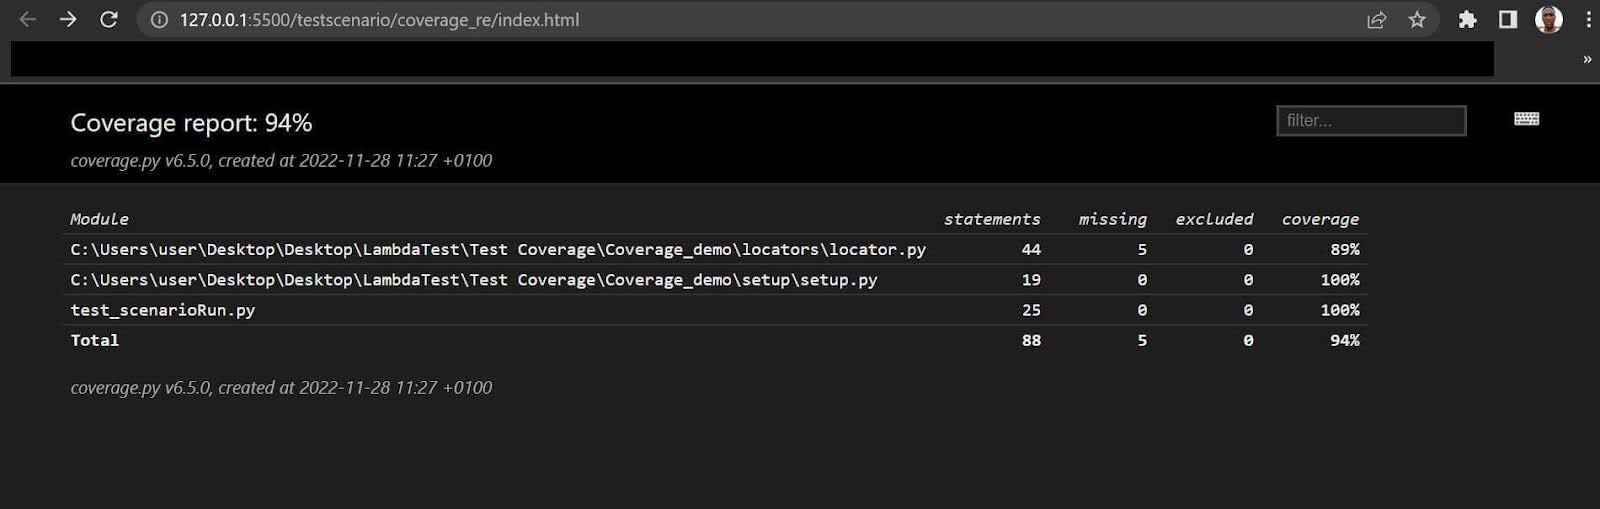
pytest --cov --cov-report=html:coverage_re
Where coverage_re is the coverage report directory. Below is the report when viewed via the browser:
Here is a list of widely-used command line options with --cov (verified against the pytest-cov 7.x reference):
| --cov option | Description |
|---|---|
| --cov=PATH | Measure coverage for a filesystem path. (multi-allowed) |
| --cov-report=type | Type of report to generate. Accepts HTML, XML, JSON, annotate, term, term-missing, lcov, or markdown. |
| --cov-config=path | Config file for coverage. Default: .coveragerc |
| --no-cov-on-fail | Do not report coverage if the test fails. Default: False |
| --no-cov | Disable coverage report completely (useful for debuggers). Default: False |
| --cov-reset | Reset cov sources accumulated in options so far. Mostly useful for scripts and configuration files. |
| --cov-fail-under=MIN | Exit non-zero if total coverage is below MIN. Use this in CI to block merges that drop coverage. |
| --cov-append | Append to existing .coverage data instead of overwriting. Default: False |
| --cov-branch | Enable branch coverage in addition to line coverage. |
| --cov-context | Set dynamic context (e.g., per-test) for the coverage data. |
coverage.py
coverage.py is the engine pytest-cov calls under the hood. You can also use it directly when you need finer control: capture coverage in long-running daemons, snapshot it across multiple non-pytest scripts, or programmatically merge data files from parallel runs. Two interfaces are supported: a command-line utility and a Python API.
The API path is the right choice when the same coverage workflow runs in many places (CI, local dev, scheduled jobs); the CLI is simpler for one-off measurements.
The CLI invocation that runs pytest under coverage:
coverage run -m pytest
This collects every test file pytest discovers (by default, files starting with test_ or ending in _test.py), records line execution into a .coverage data file, and leaves it for coverage report or coverage html to render. The Python API uses the same data file but lets you start, stop, and snapshot coverage from inside your own script, which is what the demo below relies on.
Explore the pytest-cov GitHub repository to access the official plugin for creating detailed pytest code coverage reports, complete with setup guides, examples, and configuration tips to boost your Python testing workflow.

Subscribe to the TestMu AI YouTube Channel and stay updated with the latest video tutorials on Selenium testing, Selenium Python, and more.
Demo: How to Generate pytest Code Coverage Report?
Generating a coverage report provides both a summary and detailed insights, helping improve overall code quality and test effectiveness.
The demonstration for generating pytest code coverage includes a test for the following:
- A plain name tweaker class example to show why you may not achieve 100% code coverage and how you can use its result to extend your test reach.
- Code coverage demonstration for registration steps using the TestMu AI eCommerce Playground, executed on the cloud grid.
We’ll use Python’s coverage module, coverage.py, to demonstrate the code coverage for all the tests in this tutorial on the pytest code coverage report. So you need to install the coverage.py module since it’s third-party. You’ll also need to install the Selenium WebDriver (to access WebElements) and python-dotenv (to mask your secret keys).
If you are new to Selenium WebDriver, check out our guide on what is Selenium WebDriver.
Create a requirements.txt file in your project root directory and insert the following packages:
Filename: requirements.txt
coverage
selenium
python-dotenv
pytest
Next, install the packages using pip:
pip install -r requirements.txt
As mentioned, coverage.py lets you generate and write coverage reports inside an HTML file and view it in the browser. You’ll see how to do this later.
Name Tweaker Class Test
We’ll start by considering an example test for the name tweaking class to demonstrate why you may not achieve 100% code coverage. And you’ll also see how to extend your code coverage.
The name tweaking class contains two methods. One is for concatenating a new and an old name, while the other is for changing an existing name.
Filename: plain_tests/plain_tests.py
class test_should_tweak_name:
    def __init__(self, name) -> None:
        self.name = name

    def test_should_addNames(self, name):
        if self.name == "LambdaTest":
            new_name = self.name+" "+name
            assert new_name == "LambdaTest Grid", "new_name should be LambdaTest Grid"
            return new_name
        else:
            return self.name

    def test_should_changeName(self, name):
        self.name = name
        assert self.name == "LambdaTest Cloud Grid", "new_name should be LambdaTest Cloud Grid"
        return name
To execute the test and get code coverage of less than 100%, we’ll start by omitting a test case for the else statement in the first method and ignore the second method entirely (test_should_changeName).
Filename: run_coverage/name_tweak_coverage.py
# Import the Pytest coverage plugin:
import coverage

# Start code coverage before importing other modules:
cov = coverage.Coverage()
cov.start()

# Main code to be covered----------:

import sys
sys.path.append(sys.path[0] + "/..")

from plain_tests.plain_tests import test_should_tweak_name

tweak_names = test_should_tweak_name("LambdaTest")
print(tweak_names.test_should_addNames("Grid"))

cov.stop()
cov.save()
cov.html_report(directory='coverage_reports')
Run the test by running the following command:
run_coverage/name_tweak_coverage.py
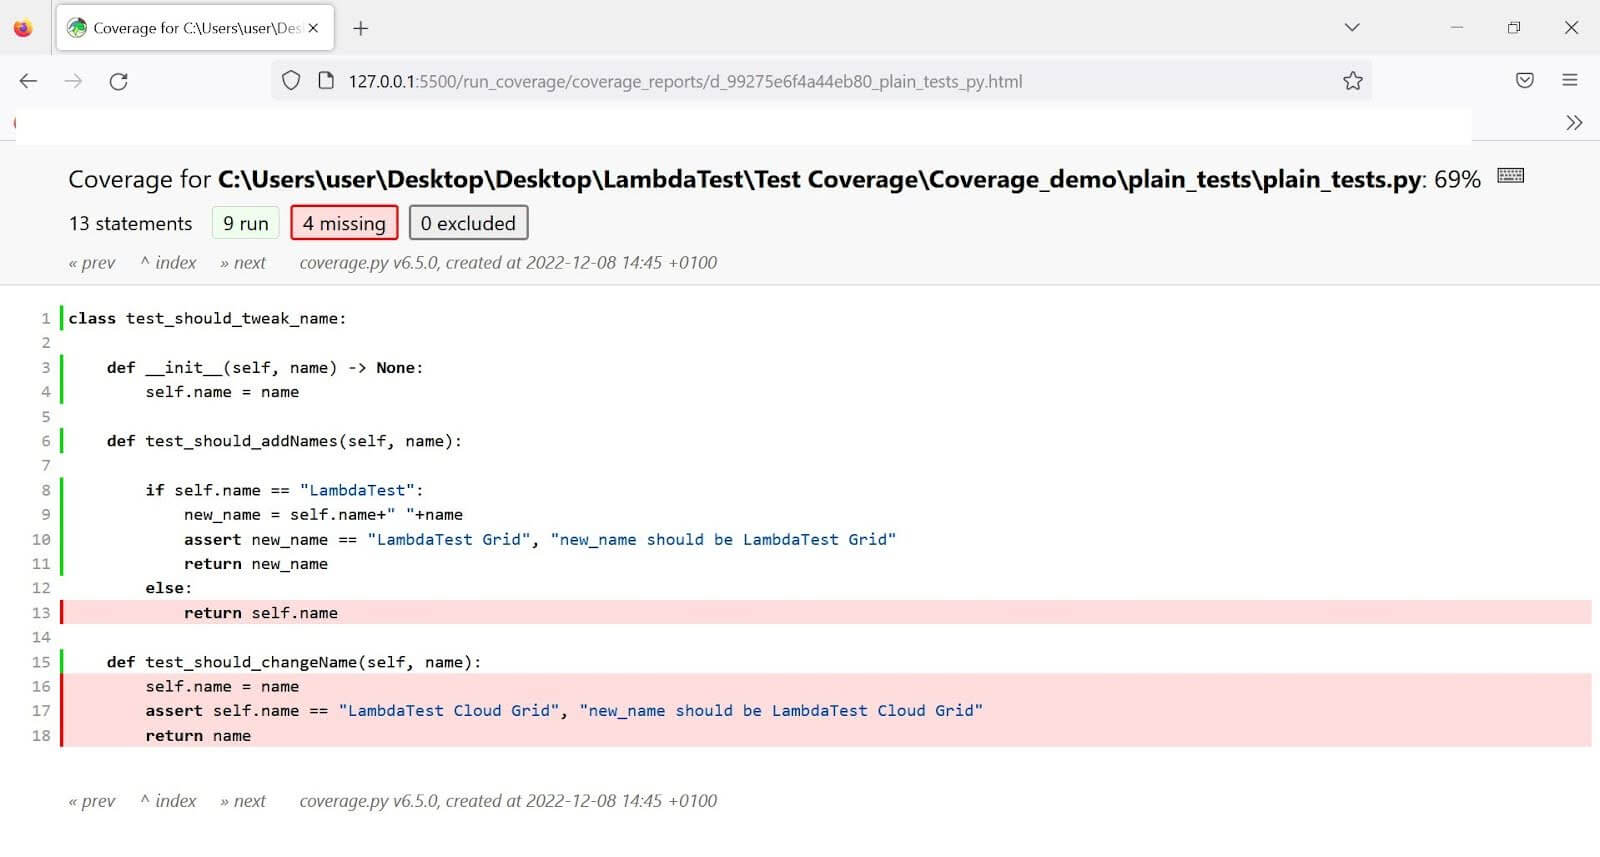
Go into the coverage_reports folder and run index.html via your browser. The test yields 69% coverage (as shown below) since it omits the two named instances.
Let’s extend the code coverage.
Although we deliberately ignored the second method in that class, it was easy to forget to include a case for the else statement in the test. That’s because we only focused on validating the true condition. Including a test case that assumes negativity (where the condition returns false) extends the code coverage.
So what if we add a test case for the second method and another one that assumes that the provided name in the first method isn’t "TestMu AI" (the legacy brand string used by the test class)?
LambdaTest Website Now TestMu AI — visit the new home of intelligent cross-browser and app testing.
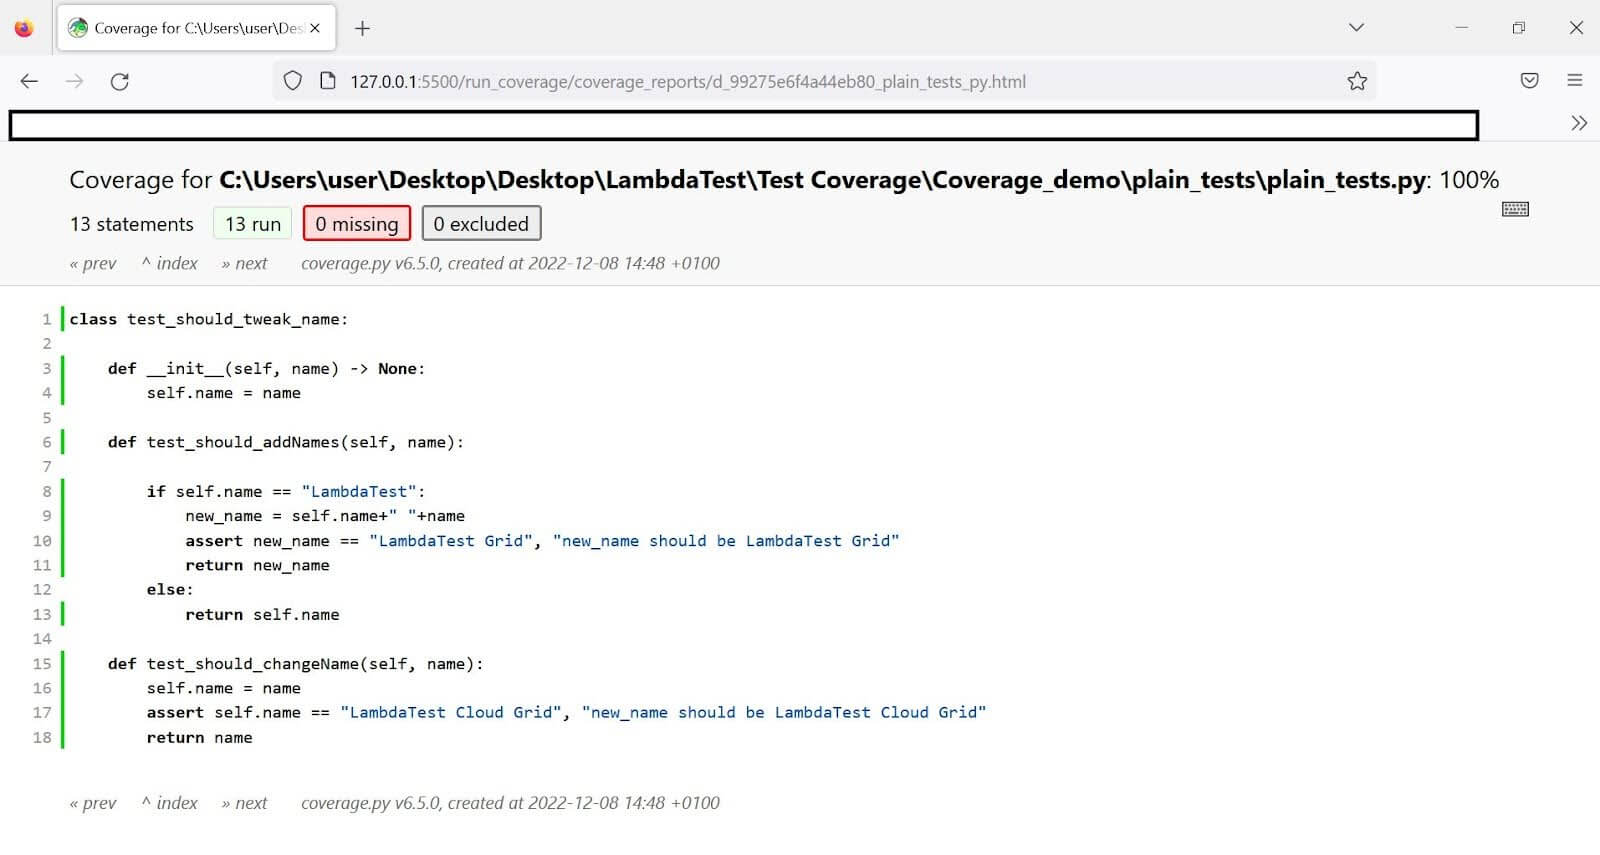
The code coverage yields 100% since we’re considering all possible scenarios for the class under test.
So, a more inclusive test looks like this:
Filename: run_coverage/name_tweak_coverage.py
# Import the Pytest coverage plugin:
import coverage

# Start code coverage before importing other modules:
cov = coverage.Coverage()
cov.start()

# Main code to be covered----------:

import sys
sys.path.append(sys.path[0] + "/..")

from plain_tests.plain_tests import test_should_tweak_name


tweak_names = test_should_tweak_name("LambdaTest")

will_not_tweak_names = test_should_tweak_name("Not LambdaTest")

print(tweak_names.test_should_addNames("Grid"))

print(tweak_names.test_should_changeName("LambdaTest Cloud Grid"))

print(will_not_tweak_names.test_should_addNames("Grid"))


# Stop code coverage and save the output in a reports directory---------:
cov.stop()
cov.save()
cov.html_report(directory='coverage_reports')
Adding the will_not_tweak_names variable covers the else condition in the test. Additionally, calling test_should_changeName from the class instance captures the second method in that class.
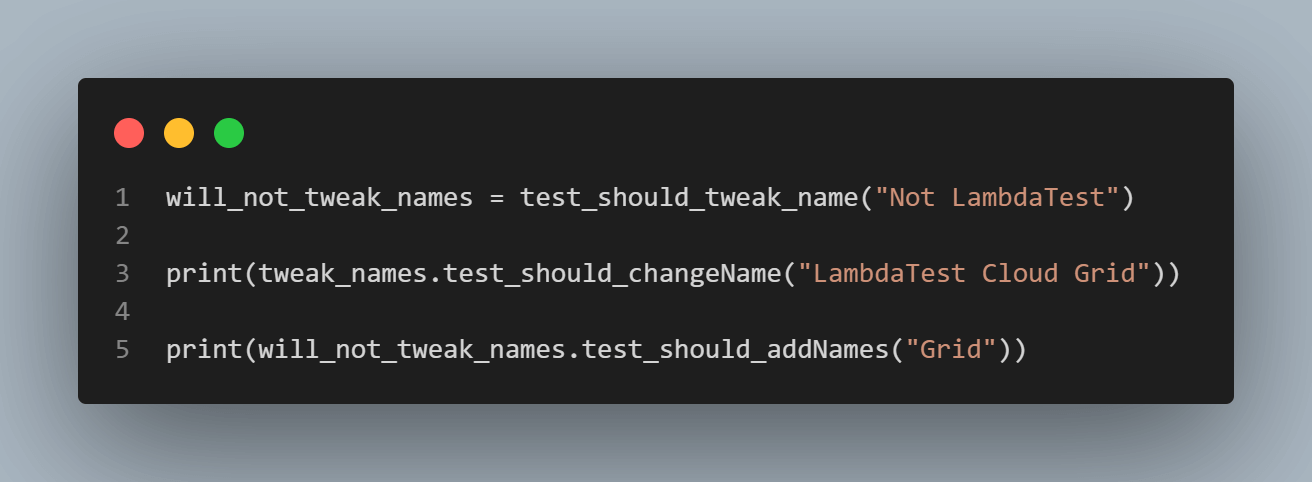
Extending the coverage this way generates 100% code coverage, as seen below:
Code Coverage on the Cloud Grid
We’ll use the previous code structure to implement code coverage on the cloud grid. Here, we’ll write test cases for the registration actions on the TestMu AI eCommerce Playground. Then, we’ll perform pytest testing on the TestMu AI cloud grid.
Tests will be run based on the registration actions without providing some parameters. This might involve failure to fill in some form fields or submitting an invalid email address.
TestMu AI is an AI-native test execution platform that runs Python web automation across 3,000+ browser-OS combinations on the cloud Selenium Grid and a real device cloud of 10,000+ Android and iOS devices.

Test Scenario 1:
| Submit the registration form with an invalid email address and missing fields. |
|---|
Test Scenario 2:
| Submit the form with all fields filled appropriately (successful registration). |
|---|
We’ll also see how adding the missing parameters can extend the code coverage. Here is our Selenium automation script:
Filename: setup/setup.py
from selenium import webdriver
from selenium.webdriver.firefox.options import Options as FirefoxOptions
from dotenv import load_dotenv
import os

load_dotenv('.env')

LT_GRID_USERNAME = os.getenv("LT_GRID_USERNAME")
LT_ACCESS_KEY = os.getenv("LT_ACCESS_KEY")

# Selenium 4 uses Options + set_capability(); desired_capabilities was removed in 4.0.
options = FirefoxOptions()
options.set_capability("browserVersion", "latest")
options.set_capability("LT:Options", {
    "username": LT_GRID_USERNAME,
    "accessKey": LT_ACCESS_KEY,
    "build": "pytest Coverage Demo",
    "name": "Firefox coverage run",
    "platformName": os.getenv("TEST_OS", "Windows 11"),
    "w3c": True,
})

# Credentials live in LT:Options, so the hub URL stays clean (no inline auth).
gridURL = "https://hub.lambdatest.com/wd/hub"

class testSettings:

    def __init__(self) -> None:
        self.driver = webdriver.Remote(command_executor=gridURL, options=options)

    def testSetup(self):
        self.driver.implicitly_wait(10)
        self.driver.maximize_window()

    def tearDown(self):
        if self.driver is not None:
            print("Cleaning the test environment")
            self.driver.quit()

Code Walkthrough:
First, import Selenium WebDriver and the FirefoxOptions class. Get your grid username and access key (passed as LT_GRID_USERNAME and LT_ACCESS_KEY) from Settings > Account Settings > Password & Security, and store them in your .env file so they never land in source control.
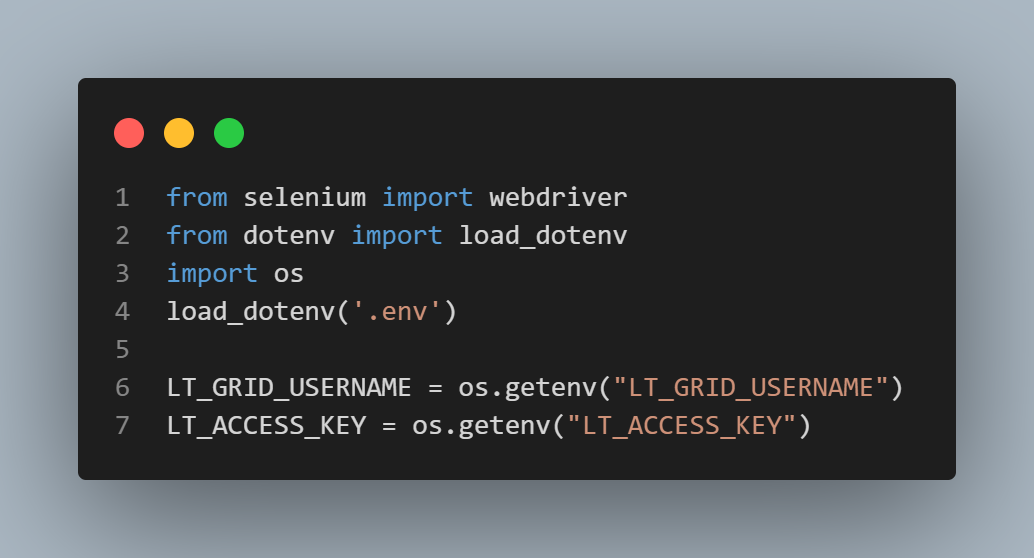
Selenium 4 removed the desired_capabilities argument, so we build the capabilities through FirefoxOptions().set_capability() instead. The LT:Options dictionary carries the TestMu AI grid metadata: username, access key, build name, test name, and platform. See the TestMu AI Selenium with PyTest docs for the full capability reference.

The gridURL stays credential-free; the username and access key flow through LT:Options instead of being inlined into the URL. We pass that URL and the options object into webdriver.Remote inside __init__.
Write a testSetup() method that initiates the test suite. It uses the implicitly_wait() function to pause for the DOM to load elements. It then uses the maximize_window() method to expand the chosen browser frame.
However, the tearDown() method helps stop the test instance and closes the browser using the quit() method.
Filename: locators/locators.py
from selenium.webdriver.common.by import By
from selenium.common.exceptions import NoSuchElementException

class element_locator:
    first_name = "//input[@id='input-firstname']"
    last_name = "//input[@id='input-lastname']"
    email = "//input[@id='input-email']"
    telephone = "//input[@id='input-telephone']"
    password = "//input[@id='input-password']"
    confirm_password = "//input[@id='input-confirm']"
    subscribe_no = "//label[@for='input-newsletter-no']"
    agree_terms = "//label[@for='input-agree']"
    submit = "//input[@value='Continue']"
    error_message = "//div[@class='text-danger']"

locator = element_locator()

class registerUser:
    def __init__(self, driver) -> None:
        self.driver=driver
    def error_message(self):
        try:
            return self.driver.find_element(By.XPATH, locator.error_message).is_displayed()
        except NoSuchElementException:
            print("All code in registration test covered")

    def test_getWeb(self, URL):
        self.driver.get(URL)

    def test_getTitle(self):
        return self.driver.title
    def test_fillFirstName(self, data):
        self.driver.find_element(By.XPATH, locator.first_name).send_keys(data)
    def test_fillLastName(self, data):
        self.driver.find_element(By.XPATH, locator.last_name).send_keys(data)
    def test_fillEmail(self, data):
        self.driver.find_element(By.XPATH, locator.email).send_keys(data)
    def test_fillPhone(self, data):
        self.driver.find_element(By.XPATH, locator.telephone).send_keys(data)
    def test_fillPassword(self, data):
        self.driver.find_element(By.XPATH, locator.password).send_keys(data)
    def test_fillConfirmPassword(self, data):
        self.driver.find_element(By.XPATH, locator.confirm_password).send_keys(data)
    def test_subscribeNo(self):
        self.driver.find_element(By.XPATH, locator.subscribe_no).click()
    def test_agreeToTerms(self):
        self.driver.find_element(By.XPATH, locator.agree_terms).click()
    def test_submit(self):
        self.driver.find_element(By.XPATH, locator.submit).click()
Start by importing the Selenium By object into the file to declare the locator pattern for the DOM. We’ll use the NoSuchElementException to check for an error message in the DOM (in case of invalid inputs).
Next, declare a class to hold the WebElements. Then, create another class to handle the web actions for the registration form.
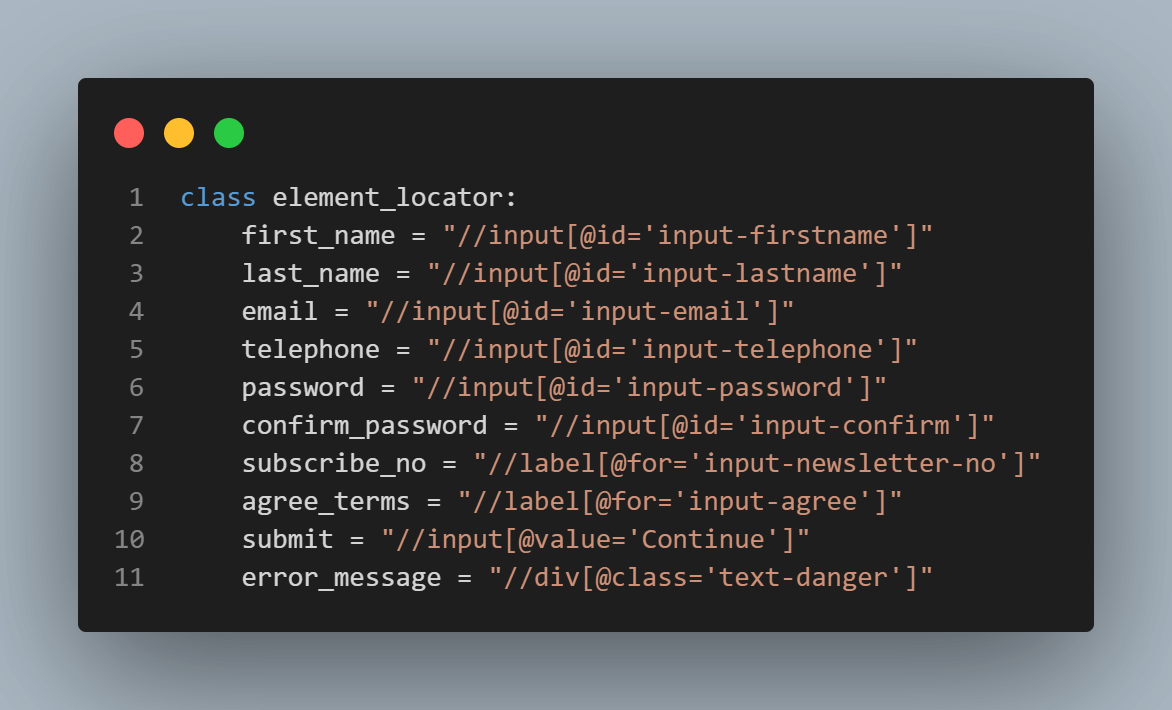
The element_selector class contains the WebElement locations. Each uses the XPath locator.
The registerUser class accepts the driver attribute to initiate web actions. You’ll get the driver attribute from the setup class while instantiating the registerUser class.
The error_message inside the registerUser class does two things. First, it checks for invalid field error messages in the DOM when the test tries to submit the registration form with unacceptable inputs. The check runs every time inside a try block. So, the test covers it regardless.
Secondly, it runs the code in the try block if it finds an input error message element in the DOM. This prevents the except block from running, flagging it as non-covered code.
Otherwise, Selenium raises a NoSuchElementException. This forces the test to log the print in the except block and mark it as covered code. This feels like a reverse strategy. But it helps code coverage capture more scenarios.
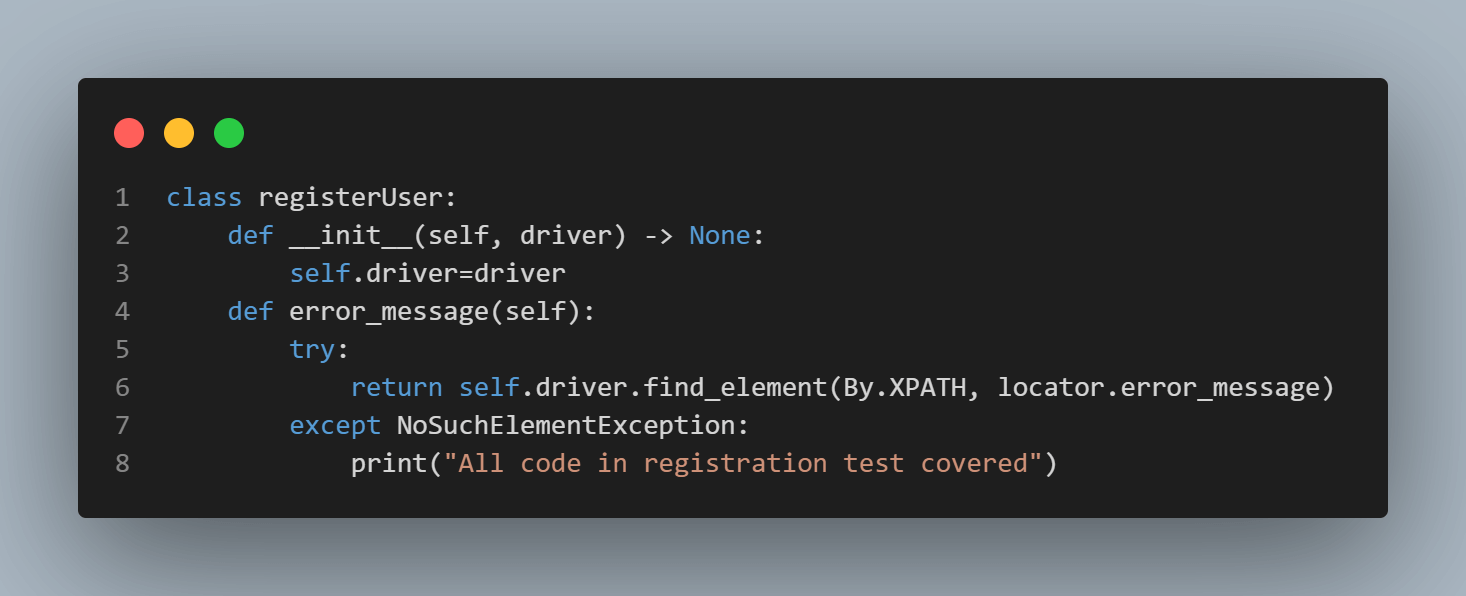
So, besides capturing omitted fields (web action methods not included in the test execution), it ensures that the test accounts for an invalid email address or empty string input.
Thus, if the error message is displayed in the DOM, the method returns the error message element. Otherwise, Selenium raises a NoSuchElementException, forcing the test to log the printed message.
The rest of the class methods are web action declarations for the locators in the element_locator class. Excluding the fields that require a click action, the other class methods accept a data parameter, a string that goes into the input fields.
But first, create a test runner file for the code coverage scenarios. You’ll execute this file to run the test and calculate the code coverage.
Filename: run_coverage/run_coverage.py
# Import the Pytest coverage plugin:
import coverage

# Start code coverage before importing other modules:
cov = coverage.Coverage()
cov.start()

# Main code to be covered----------:

import sys
sys.path.append(sys.path[0] + "/..")
from testscenario.scenarioRun import test_registration

registration = test_registration()
registration.it_should_register_user()

# Stop code coverage and save the output in a reports directory---------:
cov.stop()
cov.save()
cov.html_report(directory='coverage_reports')
The above code starts by importing the coverage module. Next, declare an instance of the coverage class and call the start() method at the top of the code. Once code coverage begins, import the test_registration class from scenarioRun.py. Instantiate the class as registration.
The class method, it_should_register_user, is a test method that executes the test case (you’ll see this class in the next section). Use cov.stop() to close the code coverage process. Then, use cov.save() to capture the coverage report.
The cov.html_report() method writes the coverage results into an HTML file inside the declared directory (coverage_reports).
And running this file executes the test and coverage report.
Now, let’s tweak the web action methods inside scenarioRun.py to see the difference in code coverage for each scenario.
Test Scenario 1: Submit the registration form with an invalid email address and some missing fields.
Filename: testscenario/scenarioRun.py
import sys
sys.path.append(sys.path[0] + "/..")

from locators.locator import registerUser
from setup.setup import testSettings
import unittest
from dotenv import load_dotenv
import os

load_dotenv('.env')

setup = testSettings()

test_register = registerUser(setup.driver)

E_Commerce_palygroud_URL = "https:"+os.getenv("E_Commerce_palygroud_URL")

class test_registration(unittest.TestCase):

    def it_should_register_user(self):
        setup.testSetup()
        test_register.test_getWeb(E_Commerce_palygroud_URL)
        title = test_register.test_getTitle()

        self.assertIn("Register", title, "Register is not in title")

        test_register.test_fillEmail("testrs@gmail")

        test_register.test_fillPhone("090776632")
        test_register.test_fillPassword("12345678")
        test_register.test_fillConfirmPassword("12345678")

        test_register.test_submit()

        test_register.error_message()

        setup.tearDown()
Pay attention to the imported built-in and third-party modules. We start by importing the registerUser and testSettings classes we wrote earlier. The testSettings class contains the testSetup() and tearDown() methods for setting up and closing the test, respectively. We instantiate this class as a setup.
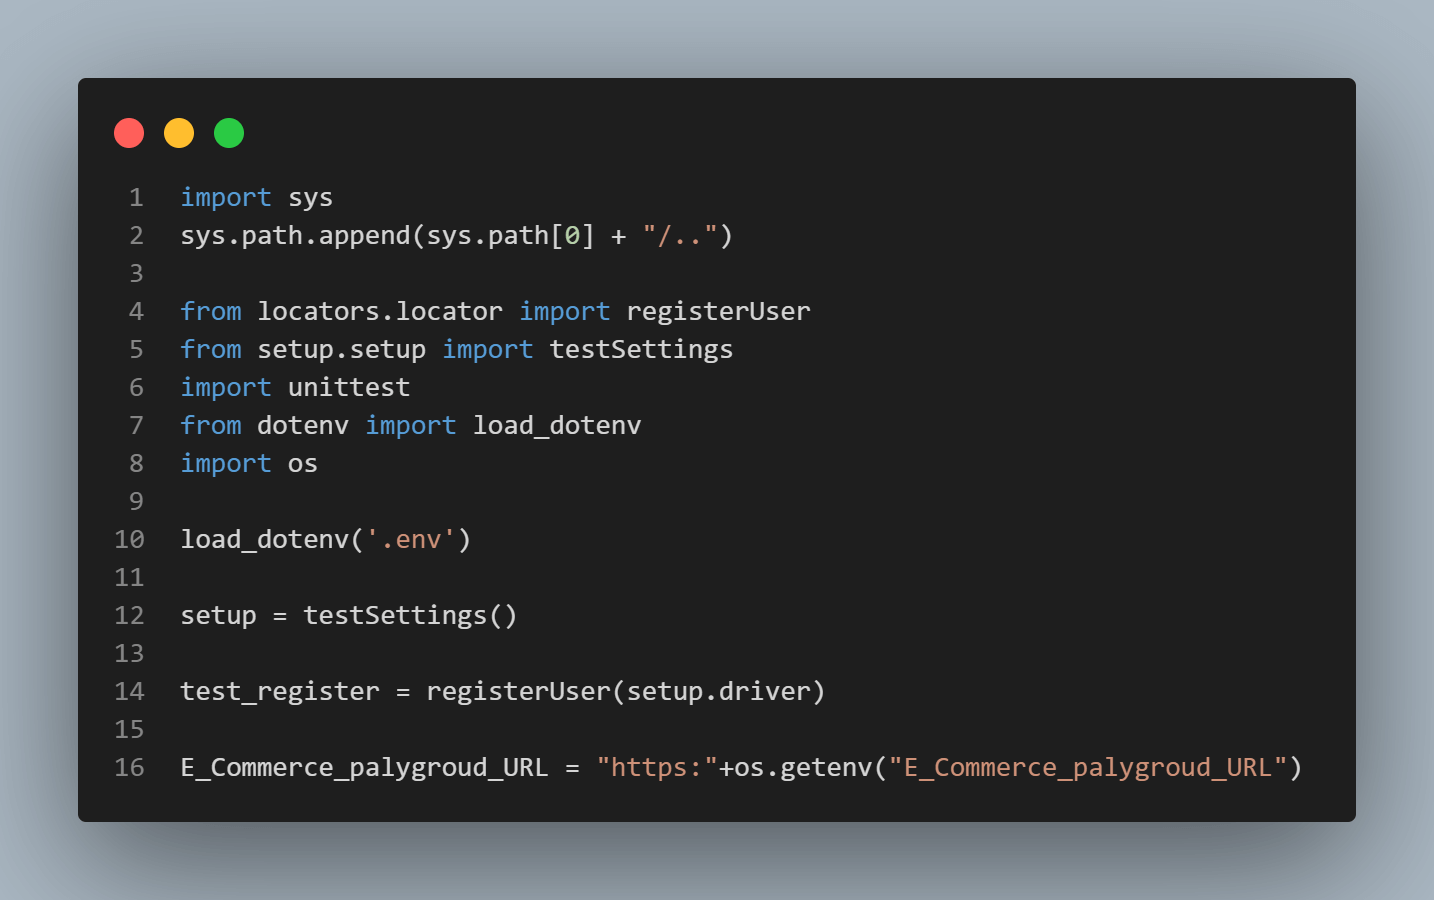
As seen below, the registerUser class instantiates as test_register using the setup.driver attribute. The dotenv package lets you get the test website’s URL from the environment variable.
The testSetup() method initiates the test case (it_should_registerUser method) and prepares the test environment. Next, we launch the website using the test_getWeb() method. This accepts the website URL declared earlier. The inherited property from the unittest test, assertIn, checks whether the declared string is in the title. Use the setup.tearDown() method to close the browser and clean the test environment.
As earlier stated, the rest of the test case omits some methods from the registerUser class to see its effect on code coverage.
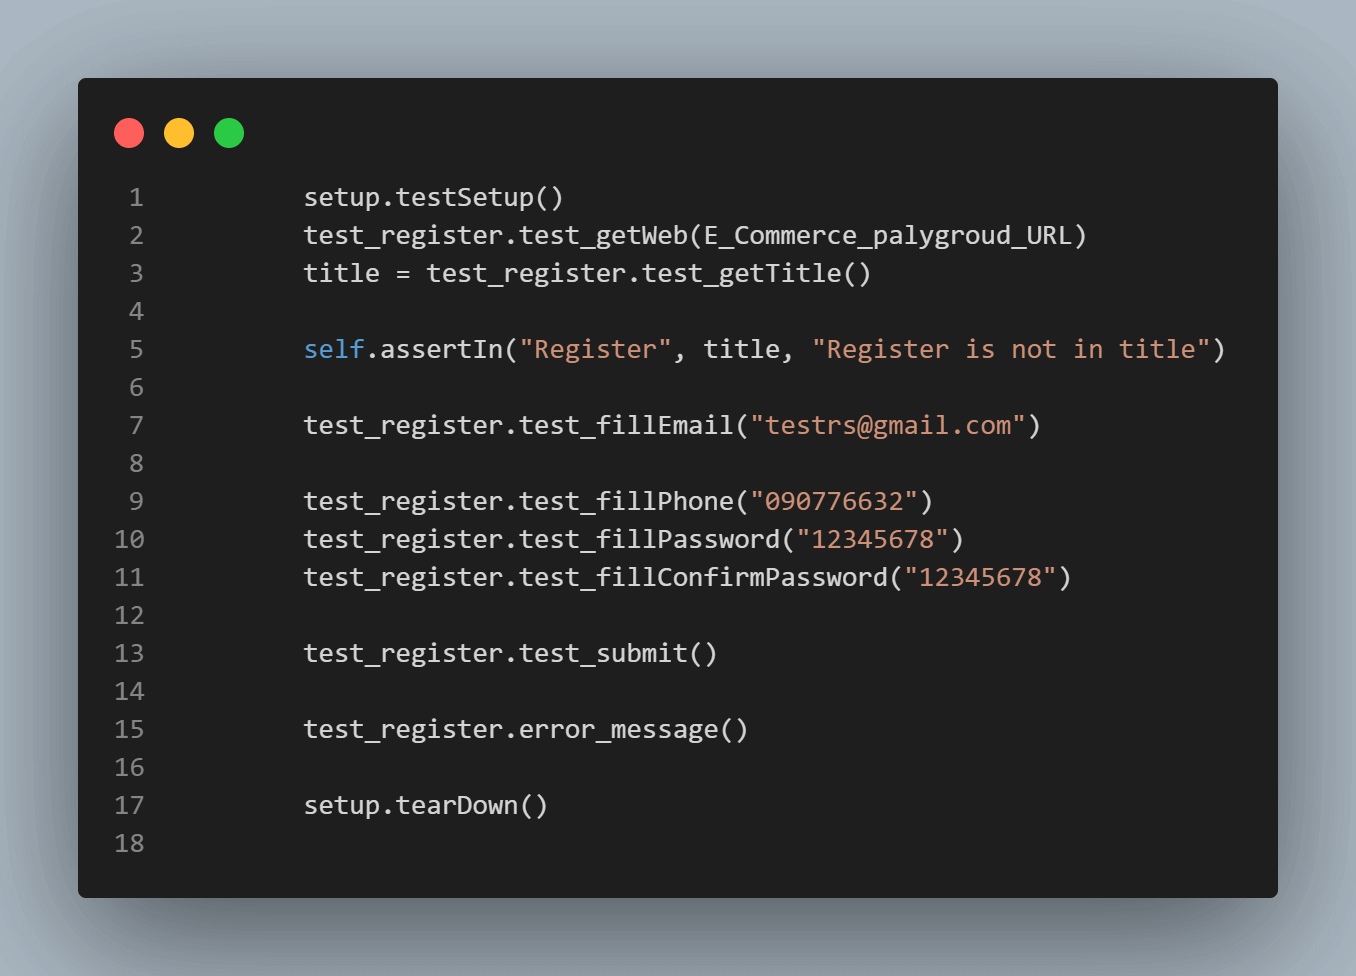
Test Execution:
To execute the test and code coverage, go into the test_run_coverage folder and run the run_coverage.py file using pytest:
pytest
Once the code runs successfully, open the coverage_reports folder and open the index.html file via a browser. The code coverage reads 94%, as shown below.
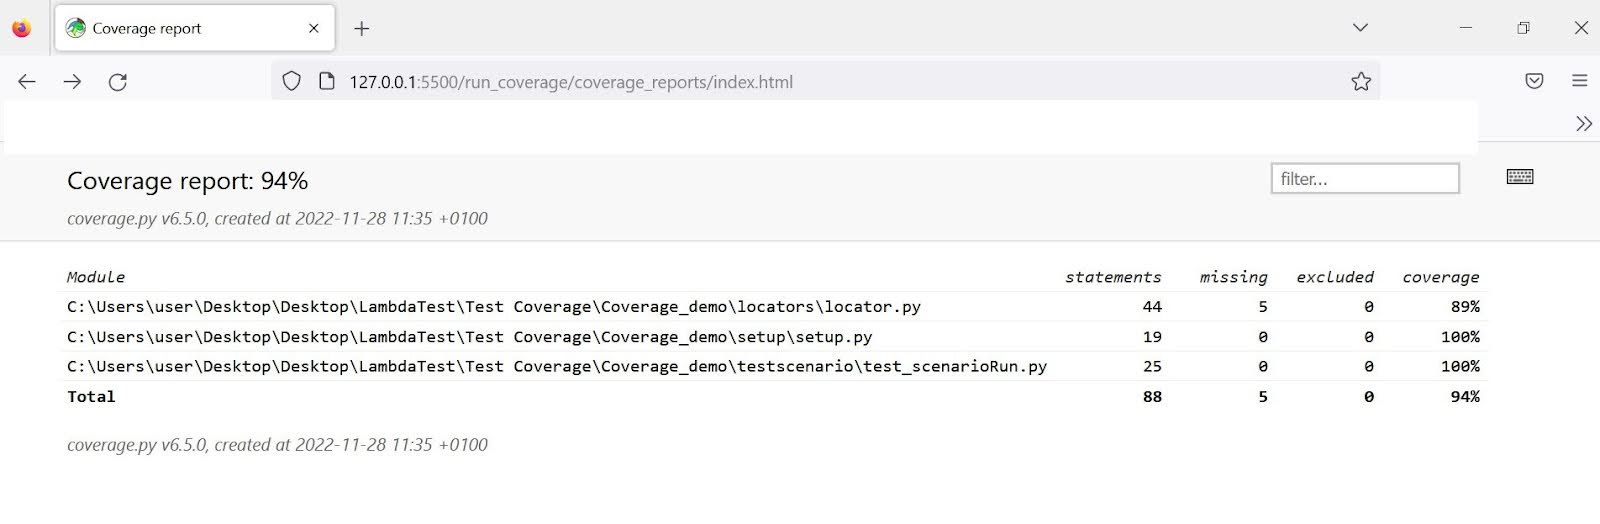
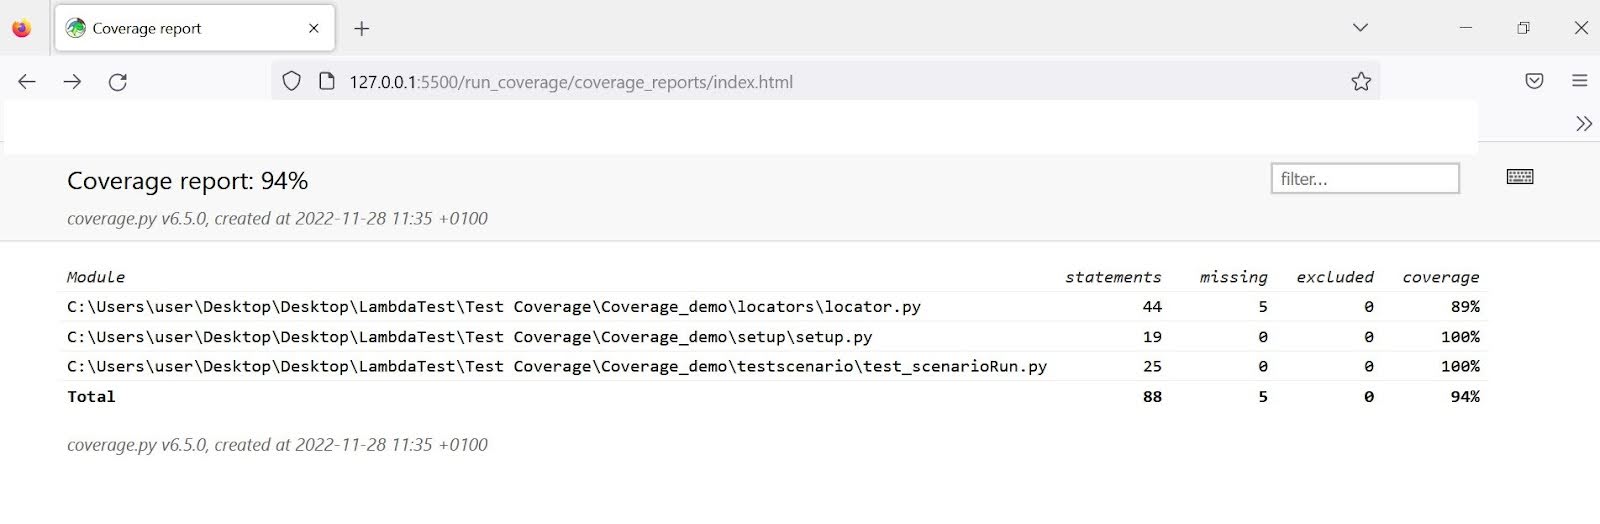
Although the other test files read 100%, locator.py covers 89% of its code, reducing the overall score to 94%. We omitted some web actions and entered an invalid email address while running the test.
Opening locator.py gives more insights into the missing steps (highlighted in red), as shown below.
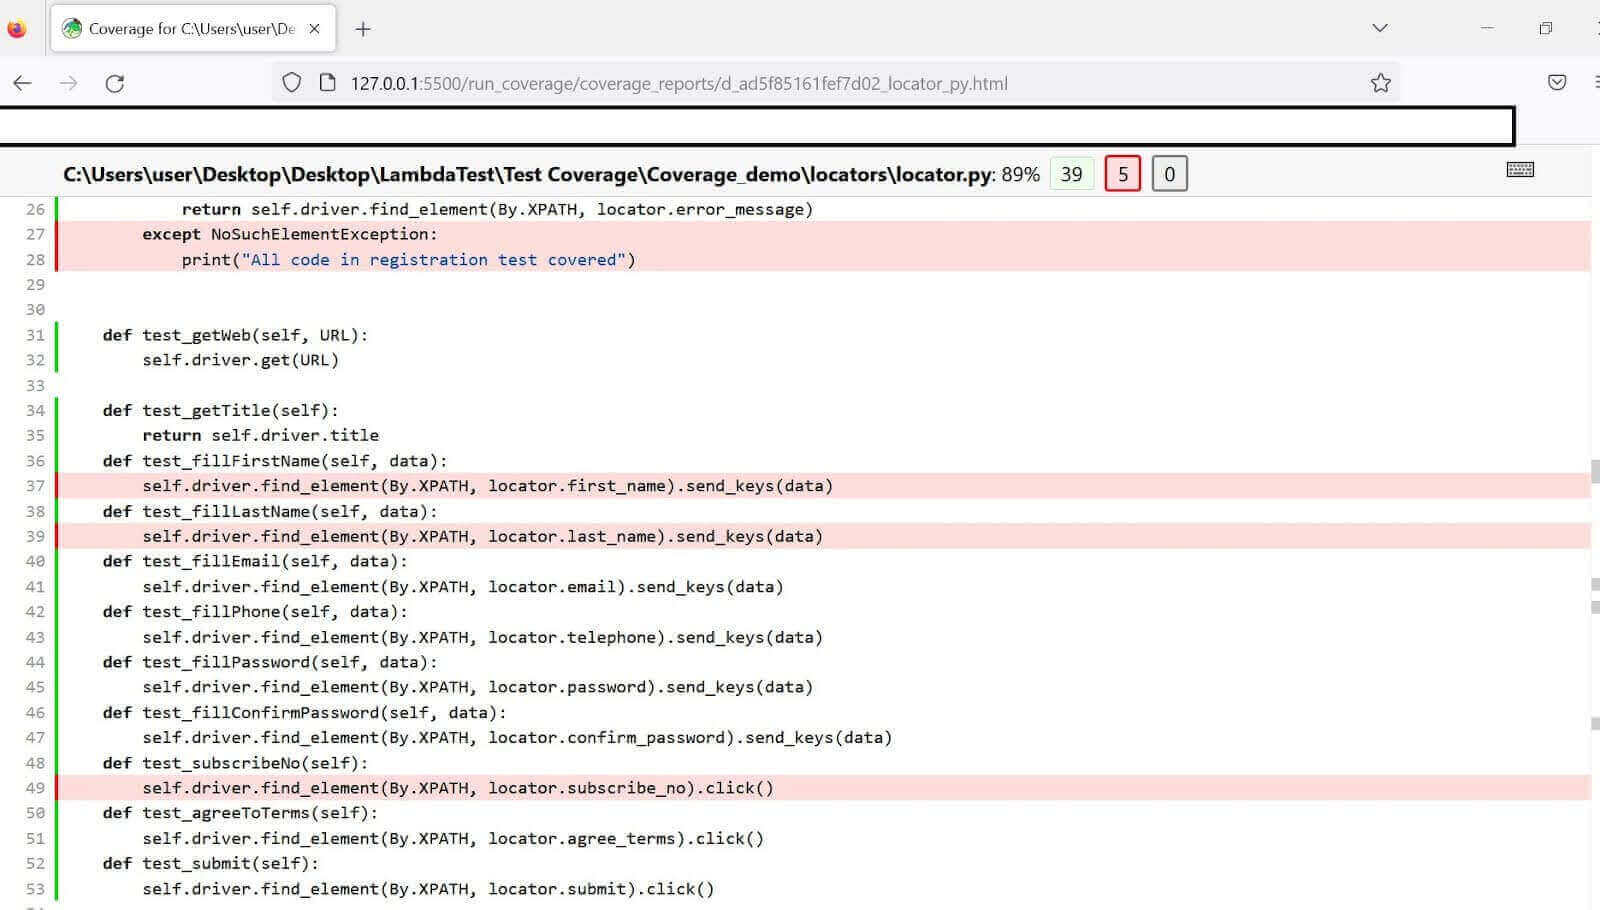
Although you might expect the coverage to flag the test_fillEmail() method, it doesn’t because the test provided an email address; it was only invalid. The except block is the invalid parameter indicator. And it only runs if the input error message element isn’t in the DOM.
As seen, the test flags the except block this time since the input error message appears in the DOM due to invalid entries.
The test suite runs on the cloud grid with some red flags in the test video, as shown below.
Test Scenario 2: Submit the form with all fields filled appropriately (successful registration).
import sys
sys.path.append(sys.path[0] + "/..")

from locators.locator import registerUser
from setup.setup import testSettings
import unittest
from dotenv import load_dotenv
import os

load_dotenv('.env')

setup = testSettings()

test_register = registerUser(setup.driver)

E_Commerce_palygroud_URL = "https:"+os.getenv("E_Commerce_palygroud_URL")

class test_registration(unittest.TestCase):


    def it_should_register_user(self):

        setup.testSetup()
        test_register.test_getWeb(E_Commerce_palygroud_URL)
        title = test_register.test_getTitle()

        self.assertIn("Register", title, "Register is not in title")

        test_register.test_fillFirstName("Idowu")
        test_register.test_fillLastName("Omisola")

        test_register.test_fillEmail("testrs@gmail.com")

        test_register.test_fillPhone("090776632")
        test_register.test_fillPassword("12345678")
        test_register.test_fillConfirmPassword("12345678")
        test_register.test_subscribeNo()
        test_register.test_agreeToTerms()
        test_register.test_submit()

        test_register.error_message()

        setup.tearDown()
Test Scenario 2 has a code structure and naming convention similar to Test Scenario 1. However, we’ve expanded the test reach to cover all test steps in Test Scenario 2. Import the needed modules as in the previous scenario. Then instantiate the testSettings and registerUser classes as setup and test_register, respectively.
To get an inclusive test suit, ensure that you execute all the test steps from the registerUser class, as shown below. We expect this to generate 100% code coverage.
Test Execution:
Go into the run_coverage folder and run the pytest command to execute the test_run_coverage.py file:
Open the index.html file inside the coverage reports via a browser to see your pytest code coverage report. It’s now 100%, as shown below. This means the test doesn’t omit any web action.

Below is the test suite execution on the cloud grid:
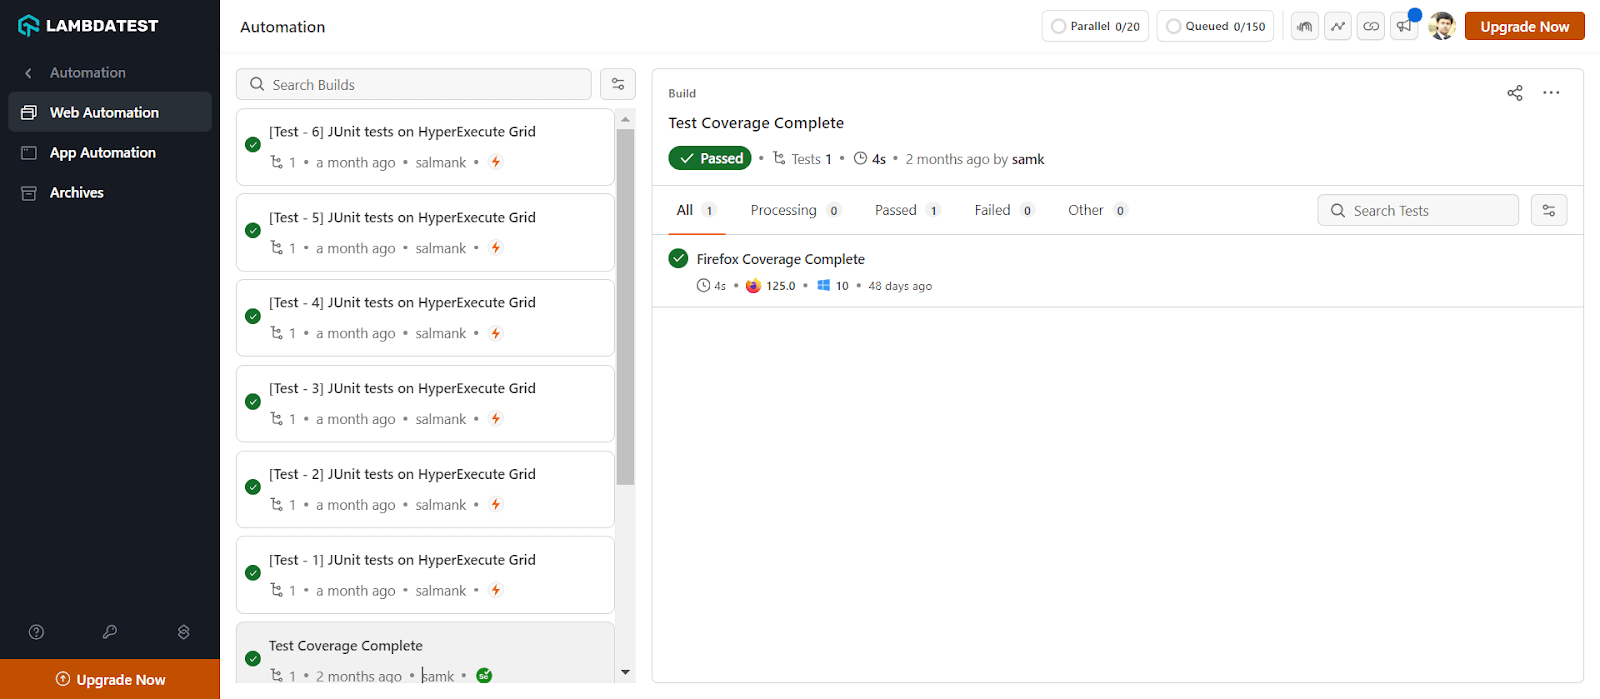
Conclusion
A pytest coverage report turns "we have tests" into a number you can act on. Start by running pytest --cov=your_package --cov-report=term-missing --cov-branch against your suite, read the missing-line list, and write tests for the highest-risk gaps first (auth, payment, error handlers). Once the suite is green, gate CI on coverage with --cov-fail-under=85 so regressions block the merge.
When local coverage looks good but a feature still breaks for users, the gap is usually environment, not lines of code. Run the same tests across the TestMu AI cloud Selenium grid on real browser-OS combinations, then read the integration steps in the Selenium with PyTest on TestMu AI docs to wire your pytest-cov run into the same build.
Note: This article was researched and drafted with AI assistance, then reviewed, fact-checked, and published by Idowu, Community Evangelist at TestMu AI, whose listed expertise includes Python and Selenium. Every command, code snippet, and product claim was verified against primary sources (pytest-cov 7.x docs, coverage.py 7.10.7, Selenium 4.x release notes). Read our editorial process and AI use policy for details.
Author

Idowu
Blogs: 2

Idowu Omisola is a technical writer and self-taught programmer with over 6 years of experience explaining software development and testing to developers. He is a Senior Technical Writer at ZenRows and has authored hundreds of articles across MakeUseOf, iGeeksBlog, ZenRows, and TestMu AI (formerly LambdaTest). On TestMu AI, he authored tutorials on Python load testing with Locust, Python unit testing with unittest, and pytest code coverage reports. He works with Python, JavaScript, and Go, and holds an MSc in Environmental Microbiology.
Reviewer

Sandeep Yadav
Reviewer
Sandeep Yadav is a Senior Software Engineer at TestMu AI (formerly LambdaTest), where he builds the platform's test intelligence and AI-native engineering systems. He has architected autonomous GitHub Apps, vector-search code intelligence, and self-diagnosing QA workflows, and designed distributed platforms that process 2M+ daily test executions and 1B+ events, turning high-volume test, log, and code data into intelligent, self-optimizing systems. He works on embedding reasoning models into production infrastructure to power autonomous review, root-cause analysis, and analytics workflows. He brings over four years of engineering experience with deep expertise in the Elastic Stack, Apache Kafka, and Redis. Earlier he engineered a GDPR-compliant, end-to-end-encrypted secure web-chat application at Mithi. A Facebook Hackercup 2021 Round 2 qualifier and merit-scholarship recipient, Sandeep holds a B.Tech in Electrical Engineering from Delhi Technological University.


Pytest Code Coverage FAQs
Did you find this page helpful?
More Related Blogs
TestMu AI forEnterprise
Get access to solutions built on Enterprise
grade security, privacy, & compliance
- Advanced access controls
- Advanced data retention rules
- Advanced Local Testing
- Premium Support options
- Early access to beta features
- Private Slack Channel
- Unlimited Manual Accessibility DevTools Tests