

Power Your Software Testing with AI Agents and Cloud
The Native AI-Agentic Cloud Platform to Supercharge Quality Engineering. Test Intelligently and Ship Faster.


- TestMu AI (Formerly LambdaTest)
- /
- Blog
- /
- How To Create A Cross Browser Compatible HTML Progress Bar?
How To Create A Cross Browser Compatible HTML Progress Bar?
We will learn how to create, style & animate an HTML progress bar using CSS & jQuery respectively. Also, the cross browser compatibility issues & fixes for the HTMl5 progress element.
Last Updated on:
Create a cross-browser HTML progress bar with the native HTML5 progress element by setting its value and max attributes, then overriding each browser's own pseudo-elements for consistent styling. The progress element has been Baseline widely available since July 2015, but Chrome, Firefox, and Edge each expose a different pseudo-element for the filled bar, so full cross browser compatibility still needs separate rules. This guide covers styling the progress bar, animating it with JavaScript, adding fallbacks for IE9 and below, and how AI tools now help write the cross-browser CSS.
Key Takeaways
- The HTML5 progress element uses value and max attributes and needs no JavaScript to render a basic progress bar.
- Chrome, Safari, and Opera style the filled portion of a progress bar with the -webkit-progress-value pseudo-element, while Firefox uses -moz-progress-bar.
- The progress element has been Baseline widely available in browsers since July 2015, according to MDN.
- Internet Explorer 9 and earlier render no native progress bar and need a JavaScript and CSS polyfill for a working fallback.
- The HTML meter element, not the progress element, is the correct choice for a static gauge like disk usage or a rating.
- AI coding assistants can generate the vendor-specific CSS for a cross-browser progress bar, and AI visual-testing tools can catch a rendering mismatch between browsers automatically.
HTML5 < progress > Element
The semantic HTML5 < progress > element is used as an indicator to display the state of completion or progress of a task, i.e. the amount of work which is yet to be done. HTML5 < progress > element acts as a visual feedback demonstration for a user to keep tabs on the state of progress of the given task being undertaken. Usually, it is displayed in the form of a HTML progress bar marked with numbers or percentage values.
Note: If you wish to display a gauge(disk space or storage), HTML5 progress bar element would not be the right choice. You should use HTML < meter > tag instead.
Syntax For Creating An HTML Progress Bar
< progress value="" max="" >< /progress >
The < progress tag > has 2 key attributes – value and max. These 2 attributes define how much part(value) of the total task(max) has been completed at present.
- Value: value attribute indicates the amount of task that is completed, which is the current value. It can be any number between 0 to max attribute. In case max attribute is absent, the value can range from 0 to 1. In case, the value attribute is absent, then the HTML progress bar will be indeterminate. It will no longer indicate the current state of completion.
- Max: max attribute represents the total amount of work necessary for completion of a task. Value of max cannot be less than 0 and by default is set to 1.
Here is a simple demonstration of HTML progress bar using the HTML5 progress element –
<!DOCTYPE html>
<html>
 <head>
 </head>
 <body>
   <span>Progress:</span>
   <progress value="40" max="100"></progress>
 </body>
</html>

Indeterminate vs Determinate States Of HTML5 Progress Bar Element
As we discussed above, an HTML progress bar element can have 2 states – Indeterminate or Determinate. It all depends on whether the value attribute is mentioned inside the < progress > tag is mentioned or not. In case the value attribute is not specified then the result would be an indeterminate HTML progress bar which does not display the current state of progress. The opposite is true in the case of a determinate HTML progress bar.
Here is an example for both cases –
<!DOCTYPE html>
<html>
 <head>
 </head>
 <body>
   <span>Indeterminate Progress Bar:</span>
   <progress max="100"></progress>
   <br><br>
   <span>Determinate Progress Bar:</span>
   <progress value="35" max="100"></progress>
 </body>
</html>

HTML5 Progress Bar Element – Cross Browser Compatibility
The HTML5 progress element is cross browser compatible across all major desktop and mobile browsers, matching the Baseline widely available status noted above. The only exception is IE9 and below. Later in the article, we will explore different ways to code necessary fallbacks to elevate our HTML progress bar cross browser compatibility by using a polyfill to add support for IE8-9.
Styling The HTML Progress Bar
Styling the HTML progress bar element is an extremely arduous task. The challenge here arises primarily because every single browser interprets the < progress > tag differently. Each of them uses its own specific pseudo-classes to style HTML progress bar. You can see in the figure below how various browsers render a basic HTML progress bar in a different manner. You need to add styling rules separately for each of the three browsers with different rendering engines –
- Blink/Webkit Browsers – Google Chrome, Opera and Safari
- Moz Browser – Mozilla Firefox
- Internet Explorer
If you wish to learn more about how modern browser work and Why Browsers Render Content Inconsistently, you can have a look at my previous article on Feature Detection For Cross Browser Compatibility.
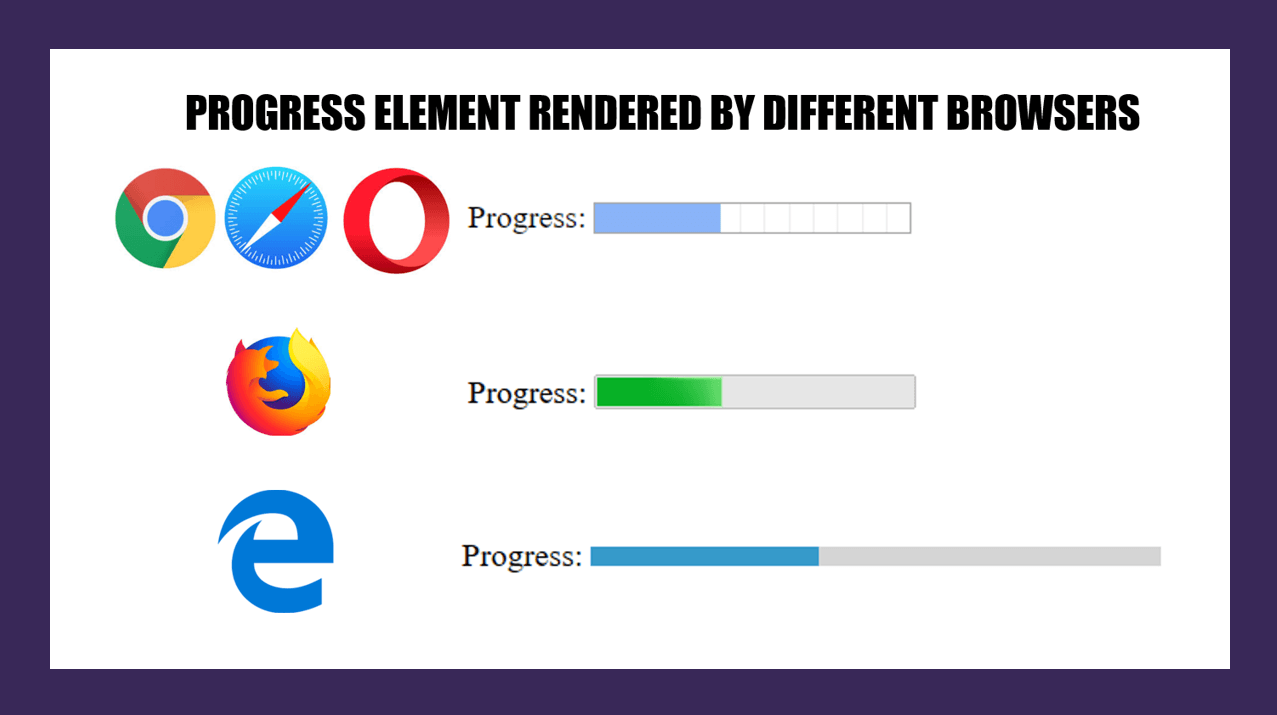
Before moving on to browser specific rules, let us look at the basic HTML5 progress bar element selector first. We can use the progress selector(or progress[value] selector) to change the background colour, height and the border radius of the progress bar.
progress{
            color: red; /*Works only with edge. Not applied to webkit and mozilla*/
            background-color: #6e6e6e; /*not applied to webkit. Works with firefox and Edge*/
            border: 0;
            width: 100px;
            height: 20px; /*works with all browsers*/
            border-radius: 9px; /*Not appied to value part in firefox. Works with Edge*/
        }
However, the background colour and border radius will not work with Google Chrome and other WebKit/Blink browsers as shown below. In fact, they will remove the default native styling and replace it with a green HTML progress bar and dark grey background. In Firefox, the background colour and border radius rules are applied to the outer HTML progress bar but not to the value. Microsoft Edge obeys all rules as intended.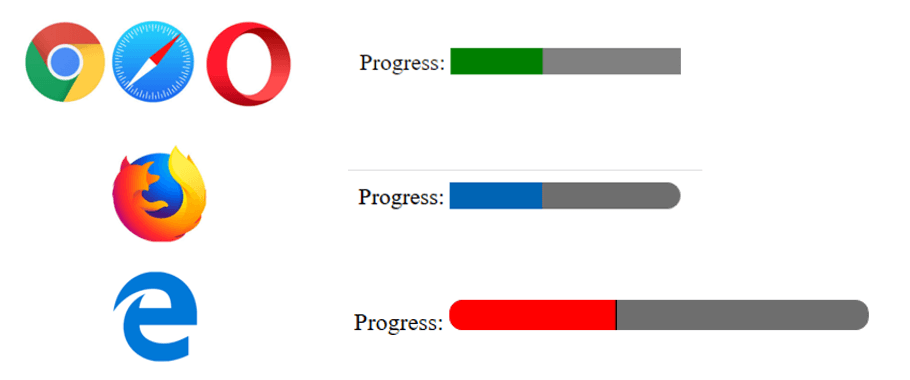
Now, in order to create a cross browser compatible HTML progress bar with uniform appearance across all browsers, we need to target pseudo-classes for both Webkit browsers(Chrome, Opera and Safari) and Firefox.
- Webkit browsers use 2 pseudo-classes to target HTML5 progress element : -webkit-progress-bar and -webkit-progress-value.
- -webkit-progress-bar : Used to style outer progress bar (container). You can change the background colour and the border-radius and box-shadow properties of the progress bar using this pseudo-class.
- -webkit-progress-value : used to style inner value bar. You can use this pseudo-class to change the colour of the value part of the progress bar.
- Mozilla Firefox uses a single pseudo class: -moz-progress-bar to style the value element of the HTML progress bar.
- Microsoft Edge and IE use : -ms-fill pseudo class to add styling like gradient background to value part of the progress bar.
- -webkit-progress-bar : Used to style outer progress bar (container). You can change the background colour and the border-radius and box-shadow properties of the progress bar using this pseudo-class.
- -webkit-progress-value : used to style inner value bar. You can use this pseudo-class to change the colour of the value part of the progress bar.
To sum it up, we now have the following CSS selectors to add styling rules to our HTML progress bar–
/* NON BROWSER SPECIFIC*/
       progress {
       }
       /* FOR WEBKIT BROWSERS*/
       progress::-webkit-progress-bar {
       }
       progress::-webkit-progress-value {
       }
       /* FOR FIREFOX */
       progress::-moz-progress-bar {
       }
       /* FOR MICROSOFT EDGE AND IE */
       custom-progress::-ms-fill {
       }
Do not forget to reset the default browser styles. To achieve this you would have to set the appearance and border properties to none as shown below –
progress {
            /* RESETS */
            -webkit-appearance: none;
            -moz-appearance: none;
            appearance: none;
            border: none;
        }
Basic HTML Progress Bar
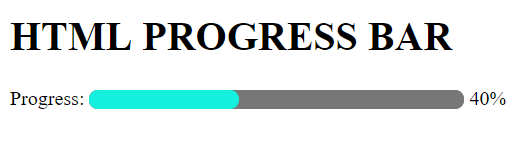
Now using these WebKit and Mozilla firefox pseudo classes, we can finally create our basic HTML progress bar with light grey background(#777), light blue value progress part ( rgb(20, 240, 221) ), and rounded corners( border-radius: 20px ).
<!DOCTYPE html>
<html>

<head>
    <style>
        /* IE and EDGE */
        progress {
            /* RESETS */
            -webkit-appearance: none;
            -moz-appearance: none;
            appearance: none;
            border: none;

            width: 300px;
            height: 15px;
            border-radius: 20px;
            background-color: #777;
            color: rgb(20, 240, 221);
        }

        /* WEBKIT BROWSERS - CHROME, OPERA AND SAFARI */
        progress::-webkit-progress-bar {
            background-color: #777;
            border-radius: 20px;
 }

        progress::-webkit-progress-value {
            background-color: rgb(20, 240, 221);
            border-radius: 20px;
        }

        /* MOZILLA FIREFOX */
        progress::-moz-progress-bar {
            background-color: rgb(20, 240, 221);
            border-radius: 20px;
        }
    </style>
</head>

<body>
   <h1>HTML PROGRESS BAR </h1>
   <span>Progress:</span>
   <progress value="40" max="100"></progress>
   <span> 40%</span>
</body>


</html>
HTML Progress Bar With Striped Gradient Background
We can take our styling a step further to create an HTML progress bar with stripes and gradient background. Simply add -webkit-linear-gradient and -moz-linear-gradient styling rules to ::-webkit-progress-value and ::-moz-progress-bar pseudo classes.
/* WEBKIT BROWSERS - CHROME, OPERA AND SAFARI */
       progress::-webkit-progress-bar {
           background-color: #777;
           border-radius: 20px;
       }

       progress::-webkit-progress-value {
           background-image:
               -webkit-linear-gradient(45deg, transparent 40%, rgba(0, 0, 0, .1) 40%, rgba(0, 0, 0, .1) 70%, transparent 70%),
               -webkit-linear-gradient(top, rgba(255, 255, 255, .25), rgba(0, 0, 0, .25)),
               -webkit-linear-gradient(left, #1abc9c, #3498db);
           border-radius: 20px;
       }

       /* MOZILLA FIREFOX */
       progress::-moz-progress-bar {
           background-image:
               -moz-linear-gradient(45deg, transparent 33%, rgba(0, 0, 0, 0.1) 40%, rgba(0, 0, 0, 0.1) 70%, transparent 70%),
               -moz-linear-gradient(top, rgba(255, 255, 255, 0.25), rgba(0, 0, 0, 0.25)),
               -moz-linear-gradient(left, #1abc9c, #3498db);
           border-radius: 20px;
       }

       /* MICROSOFT EDGE & IE */
       .custom-progress::-ms-fill {
           border-radius: 18px;
           background: repeating-linear-gradient(45deg, #1abc9c, #1abc9c 10px,#3498db 10px, #3498db 20px);
       }

Animated HTML Progress Bar
Now that you have learnt how to create and style progress bar using HTML progress element, the final step is to add animation. In most of the cases HTML progress bar are used in concurrence with JavaScript or jQuery. We will use JavaScript to add rightward expansion animation from 0 value to max value, incrementing in pre-defined steps. We will use the same striped gradient progress bar we made earlier and add animation to it – First we will create a variable called “progress”. Store the value of progress element of id “custom-bar” inside it. Set the “value” and “max” attributes of HTML Progress element to 0 and 100 respectively. As long as the value of variable “progress” is less than the max attribute value, “progress” variable keeps getting incremented by 10 after every 1 sec. So in 10 seconds the progress bar fill fill up from 0 to max value that is 100.
<!DOCTYPE html>
<html>

<head>
  <meta charset="utf-8">
  <style>
      /* CROSS BROWSER SELECTOR*/
      .custom-progress {
          /* RESETS */
          -webkit-appearance: none;
          -moz-appearance: none;
          appearance: none;
          border: none;

          width: 100%;
          height: 30px;
          border-radius: 20px;
          background-color: #777;
          color: #e74c3c;
      }

      /* WEBKIT BROWSERS - CHROME, OPERA AND SAFARI */
      .custom-progress::-webkit-progress-bar {
          background-color: #777;
          border-radius: 20px;
      }

      .custom-progress::-webkit-progress-value {
          background-image:
              -webkit-linear-gradient(45deg, transparent 40%, rgba(0, 0, 0, .1) 40%, rgba(0, 0, 0, .1) 70%, transparent 70%),
              -webkit-linear-gradient(top, rgba(255, 255, 255, .25), rgba(0, 0, 0, .25)),
              -webkit-linear-gradient(left, #f1c40f, #e74c3c);
          border-radius: 20px;
      }

      /* MOZILLA FIREFOX */
      .custom-progress::-moz-progress-bar {
          background-image:
              -moz-linear-gradient(45deg, transparent 33%, rgba(0, 0, 0, 0.1) 40%, rgba(0, 0, 0, 0.1) 70%, transparent 70%),
              -moz-linear-gradient(top, rgba(255, 255, 255, 0.25), rgba(0, 0, 0, 0.25)),
              -moz-linear-gradient(left, #f1c40f, #e74c3c);
          border-radius: 20px;
      }

      /* MICROSOFT EDGE & IE */
      .custom-progress::-ms-fill {
          border-radius: 18px;
          background: repeating-linear-gradient(45deg,
          #f1c40f,
          #f1c40f 10px,
          #e74c3c 10px,
          #e74c3c 20px);
      }
  </style>
  <style>
      .wrapper {
          width: 70%;
          margin: 0 auto;
          text-align: center;
      }
  </style>
</head>

<body>
  <div class="wrapper">
      <h1>Animating HTML Progress Bar Using JavaScript</h1>
      <progress id="custom-bar" class="custom-progress" max="100" value="0">0%</progress>
  </div>

  <script>
      setInterval(function () {
          var progress = document.getElementById('custom-bar');

          if (progress.value < progress.max) {
              progress.value += 10;
          }

      }, 1000);
  </script>
</body>

</html>

HTML Progress Bar With Increment/Decrement Controls
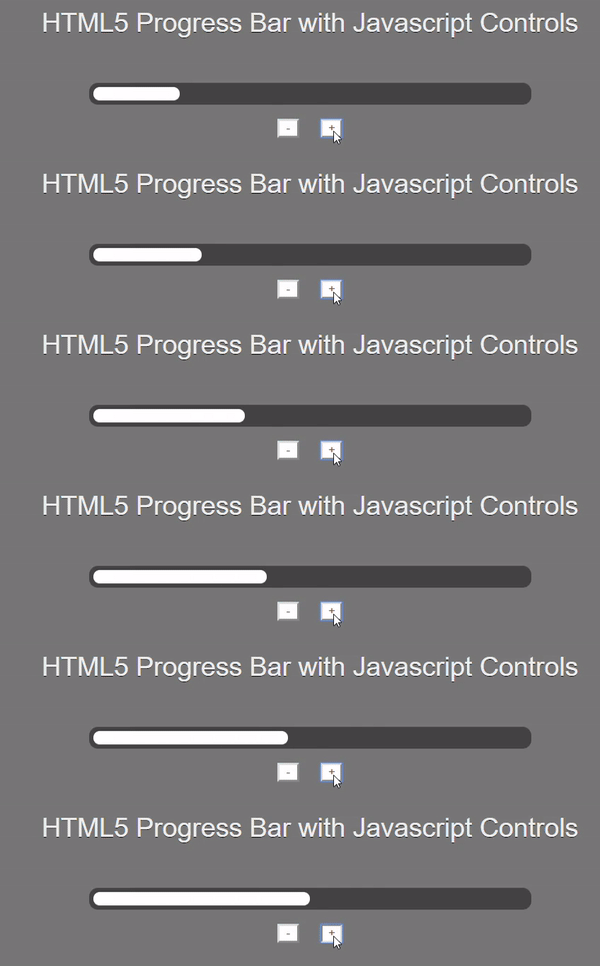
You can keep playing around with JavaScript/jQuery to create a fun variation of HTML progress bar by adding manual increment/decrement trigger controls to increase or decrease the progress value. This would closely resemble a range slider. Each button click would increase or decrease the current value of the progress bar by 5.
<!DOCTYPE html>
<html>
<head>
    <style>
        body {
            background: #777;
        }

        h1 {
            color: #eee;
            font: 30px Helvetica, Arial, sans-serif;
            text-shadow: 0px 1px black;
            text-align: center;
            margin-bottom: 50px;
            -webkit-font-smoothing: antialiased;
        }

        p {
            text-align: center;
        }

        button {
            background: #FFF;
            width: 25px;
            margin: 0 10px;
            color: #555;
        }
progress {
            display: block;
            height: 25px;
            width: 500px;
            margin: 1rem auto;
            padding: 5px;
            border: 0 none;
            background: #444;
            border-radius: 10px;
        }

        progress::-moz-progress-bar {
            border-radius: 10px;
            background: #FFF;
        }

        progress::-webkit-progress-bar {
            background: transparent;
        }

        progress::-webkit-progress-value {
            border-radius: 10px;
            background: #FFF;
        }
    </style>
</head>

<body>
    <h1>HTML5 Progress Bar with Javascript Controls </h1>
    <progress max="100" value="20"></progress>

        <button type="button" id="less">-</button> <button type="button" id="more">+</button>


    <!------ JQuery 3.3.1 ------>
    <script src="https://code.jquery.com/jquery-3.3.1.min.js"
        integrity="sha256-FgpCb/KJQlLNfOu91ta32o/NMZxltwRo8QtmkMRdAu8=" crossorigin="anonymous"></script>
    <script>
        $('#more').on('click', function () {
            $('progress').val($('progress').val() + 5);
            return false;
        });
        $('#less').on('click', function () {
            $('progress').val($('progress').val() - 5);
            return false;
        });
    </script>
</body>

</html>
Fallbacks For Cross Browser Compatible HTML5 Progress Bar Element In IE9 and Below
HTML5 Progress element is supported by all major browsers except IE9 and below. To add functionality to these browsers, one way is to code a fallback using div tags. However, this leads to additional code duplication and effort on the part of developers. An intuitive alternative is to use one of the most popular and widely used progress polyfills created by Lea Verou.
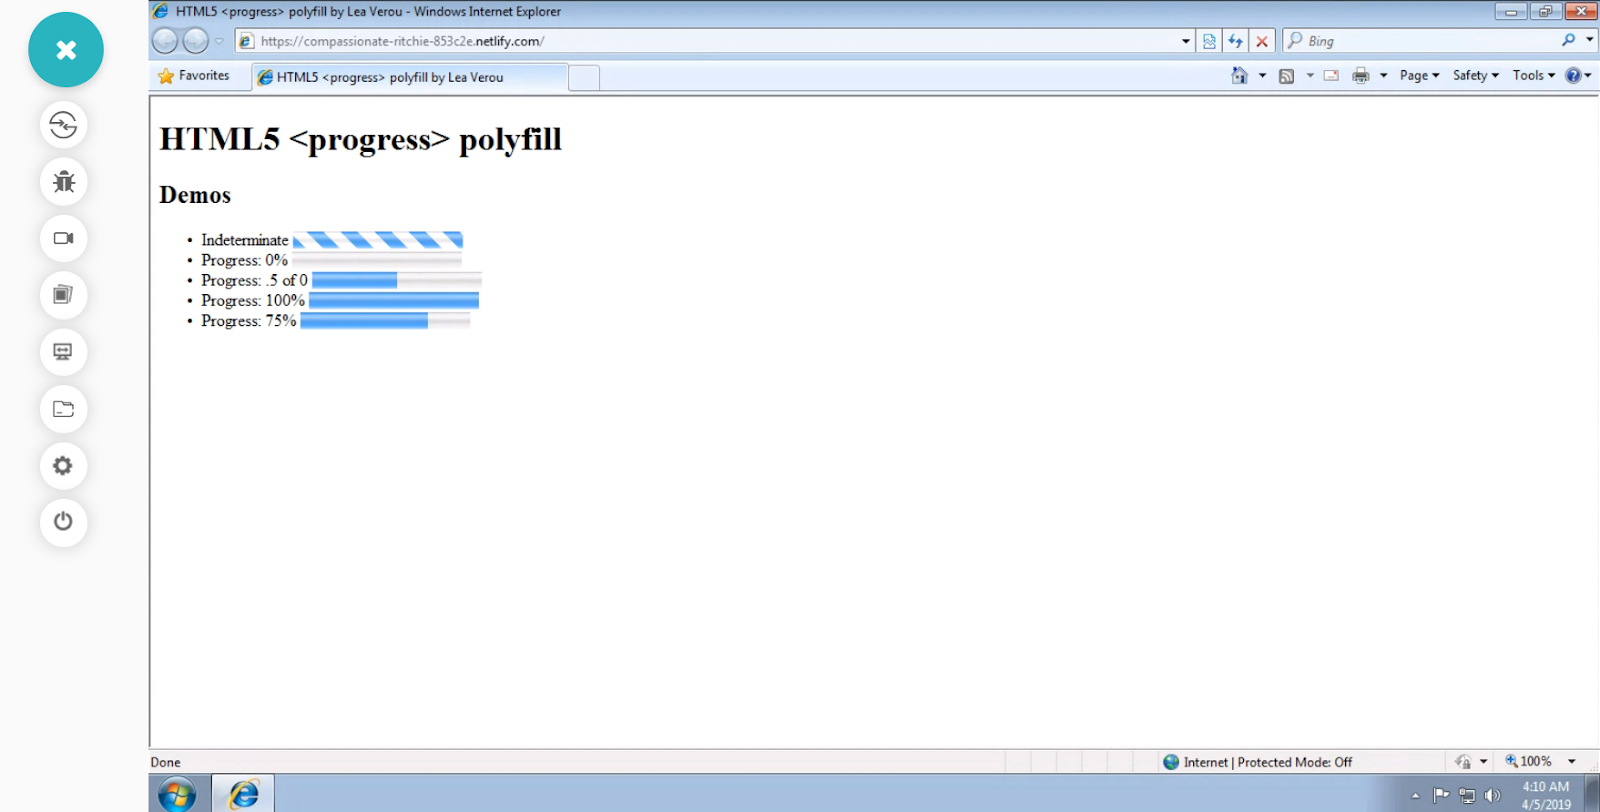
In order to ensure cross browser compatibility of HTML5 progress element for IE9 and 8, Simply add progress-polyfill.js and progress-polyfill.css files to your project. Here is a sample code below run on IE8 using TestMu AI Real Time Testing.
<!DOCTYPE html>
<html>
<head>
<meta charset="utf-8" />
<link href="https://lea.verou.me/polyfills/progress/progress-polyfill.css" rel="stylesheet" />
<script>
document.createElement('progress');
</script>
</head>
<body>
<h1>HTML5 <progress> polyfill</h1>
<h2>Demos</h2>
<ul>
<li>
<label>Indeterminate
<progress max="100"></progress>
</label>
</li>
<li>
<label for="progress1">Progress: 0%</label>
<progress max="10" value="0" id="progress1"></progress>
</li>
<li>
<label for="progress2">Progress: .5 of 0</label>
<progress max="0" value="0.5" id="progress2"></progress>
</li>
<li>
<label for="progress3">Progress: 100%</label>
<progress max="3254" value="3254" id="progress3"></progress>
</li>
<li>
<label>Progress: 75%
<progress max="0.8" value="0.6"></progress>
</label>
</li>
</ul>
<script src="http://lea.verou.me/polyfills/progress/progress-polyfill.js"></script>
</body>
</html>
HTML Progress Element Is Now Supported On IE9 & IE8 – TestMu AI Real Time Cross Browser Testing
Above mentioned is a screenshot for demonstrating HTML5 progress bar polyfill for IE9. I have made use of TestMu AI which is a cloud-based, cross browser testing tool offering more than 3000+ real browsers and browser versions running across different mobile and desktop devices. By performing cross browser testing on TestMu AI you can ensure your website or web-app renders seamless across different browsers. With in-built, developer tools for every browser you can easily debug and test your code for cross browser compatibility.
With that said, if you are curious to know more about additional resources visit Lea Verou’s website or the polyfill page.

How Are AI Tools Changing Cross-Browser Progress Bar Styling?
AI coding assistants now write the vendor-prefixed CSS for the progress bar automatically, and AI-based visual testing tools compare rendered screenshots across browsers to flag a pixel-level mismatch a developer would otherwise have to catch by eye.
- AI code generation: GitHub Copilot and Claude generate the -webkit-, -moz-, and -ms- pseudo-element rules for a progress bar from one style description, replacing manual lookup for each rendering engine.
- Automated visual regression: AI-based visual testing tools compare pixel-level screenshots of the same progress bar across Chrome, Firefox, and Edge and flag a mismatch instead of a developer checking each render by eye.
- AI-generated browser tests: AI test automation platforms turn a plain-language step like "check the progress bar reaches 100 percent" into a self-healing script that runs across browsers without hand-written locators.
- Limitation: AI tools do not replace running the page in a real browser engine; keyboard and screen-reader behavior for the progress bar still need manual verification on real devices.
Together these tools cut the manual cross-browser check from a side-by-side comparison in each browser to one automated pass that runs on every commit.
CONCLUSION
For many developers, creating highly customizable and modern HTML progress bar without the use of any jQuery plugins or libraries just by using simple HTML and CSS would be a big revelation. Even though HTML5 progress element enjoys excellent browser support, still developers need to be mindful of colossal variations across browsers resulting from different rendering engines and ensure that consistency in styling is properly enforced. Keep exploring complex gradient patterns, bar relative CSS styling coupled with JavaScript scroll based animations which can help to push the limits of your HTML progress bar to the zenith. For those looking to dive deeper, resources like our “Top 50+ HTML Interview Questions and Answers” guide can be invaluable.

Austin Siewert
Co-Founder, Steadfast Systems
Discovered @TestMu AI yesterday. Best browser testing tool I've found for my use case. Great pricing model for the limited testing I do 👏
2M+ Devs and QAs rely on TestMu AI
Deliver immersive digital experiences with Next-Generation Mobile Apps and Cross Browser Testing Cloud

Author

Nikhil
Blogs: 15


Nikhil Yadav is an experienced technologist and community evangelist with 12 years of experience in engineering leadership, product development, and UX design. He is currently Head of Engineering at AppTile and previously served as Vice President of Engineering at TestMu AI, where he led the Selenium-based distributed automation platform to advance cross-browser testing at scale. Nikhil's expertise spans frontend and UX development, including HTML5, CSS3, SASS/SCSS, Bootstrap, Materialize, Semantic UI, JavaScript, jQuery, Ajax, and React JS. He also has deep knowledge of distributed systems and cloud-native technologies such as Kubernetes, GoLang, Node.js, Python, Kafka, and ElasticSearch.


HTML Progress Bar FAQs
Did you find this page helpful?
More Related Blogs
TestMu AI forEnterprise
Get access to solutions built on Enterprise
grade security, privacy, & compliance
- Advanced access controls
- Advanced data retention rules
- Advanced Local Testing
- Premium Support options
- Early access to beta features
- Private Slack Channel
- Unlimited Manual Accessibility DevTools Tests