

Power Your Software Testing with AI Agents and Cloud
The Native AI-Agentic Cloud Platform to Supercharge Quality Engineering. Test Intelligently and Ship Faster.


- TestMu AI (Formerly LambdaTest)
- /
- Blog
- /
- How to Use Accessibility Inspector for iOS Apps
How to Use Accessibility Inspector for iOS Apps
Learn how to use the iOS Accessibility Inspector to enhance app accessibility. Learn to identify and fix accessibility issues easily.
Last Updated on:
Accessibility Inspector is Apple's built-in Xcode tool for finding accessibility defects in iOS, macOS, and watchOS apps. It reads the accessibility tree that VoiceOver consumes, flags missing labels, low contrast, and undersized hit regions, and runs only on macOS. This guide explains why accessibility matters in iOS apps, what Accessibility Inspector is, how to use it step by step, its shortcomings, how AI agents automate iOS accessibility checks, and best practices for iOS accessibility testing.
Key Takeaways
- Accessibility Inspector ships with Xcode and runs only on macOS, so Windows and Linux teams need a Mac or a cloud Mac to use Accessibility Inspector.
- Xcode > Open Developer Tool > Accessibility Inspector launches the tool, and a connected iPhone or iPad appears in the target list.
- Accessibility Inspector reports two classes of defect: problems inside a single element and problems moving between elements.
- The Audit tab in Accessibility Inspector automates checks such as element description, contrast, and hit-region size.
- Simulators report inaccurate network and load timings, so real iPhones and iPads are needed to confirm assistive technology behavior.
- WCAG sets a contrast ratio of 4.5:1 as the working minimum for text, with 7:1 required under the stricter level.
Why Accessibility Matters in iOS Apps?
iOS applications reach a large share of all mobile users worldwide. When an application has such high potential with a vast audience, it is the responsibility of developers and testers to build an inclusive application that everyone, with or without a disability, can use.
In addition, the more people use the application, the more beneficial it is for the business. The app can generate more data and earn more revenue if in-app purchases are allowed (a good example of this is eCommerce applications). Brands that provide accessible iOS apps also enjoy positive word of mouth amongst the users.
Moreover, legal complaints against organizations are on the rise today due to inaccessibility of the mobile applications. Several organizations and individuals have started to step up to make the application world inclusive for all. Legal cases end up in court or settlement, both of which are expensive affairs. Instead, this money can be put into hiring additional resources and making the iOS app accessible for all.
Key Takeaway: Accessible iOS apps widen the reachable audience and cut the legal exposure that inaccessible mobile applications create.
What Is an Accessibility Inspector?
Accessibility Inspector is a tool developed by Apple to debug accessibility issues. It can be used for macOS and iOS applications and even for apps that will run on Apple watches.
With Accessibility Inspector, accessibility issues can be identified using the following two scenarios:
- Issues in the core elements (its code, behavior, styling, etc.).
- Issues in navigating from one element to another (such as scrolling, pop-ups, dropdowns, etc).
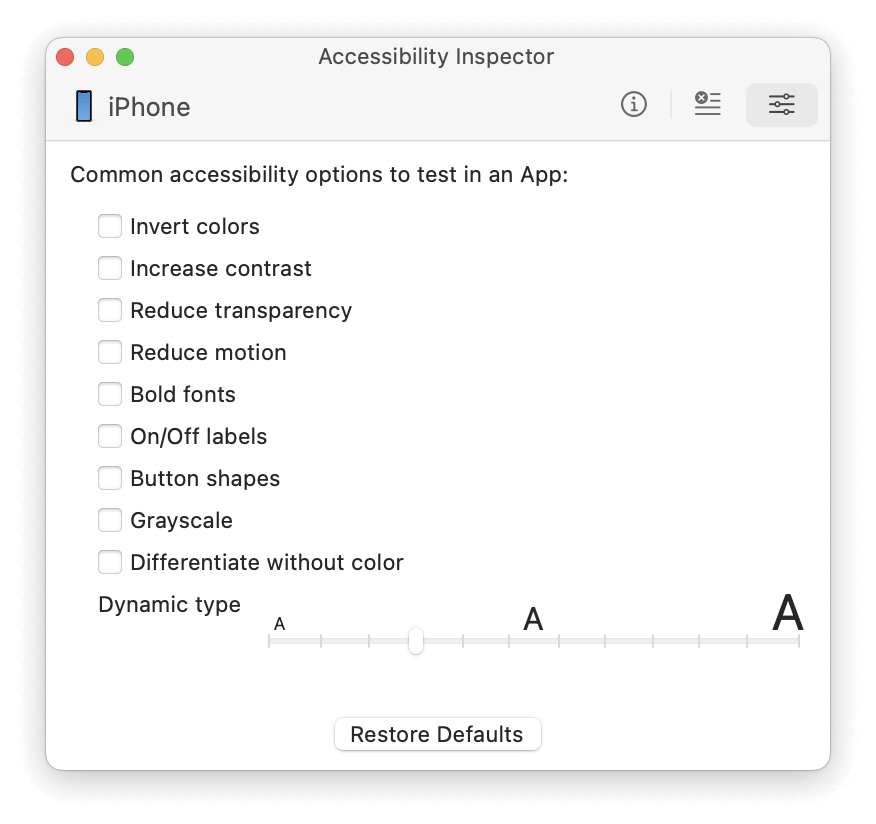
Accessibility Inspector With Reset Accessibility Settings
Both of these areas are worked upon by analyzing the code associated with each element, a process facilitated by the inspector. However, to ease things out, the Accessibility Inspector can provide suggestions for improvement in the iOS apps for issues such as inverted colors and contrast issues.
Key Takeaway: Accessibility Inspector inspects macOS, iOS, and watchOS apps, and reports defects both inside a single element and in the navigation between elements.
How to Use Accessibility Inspector for iOS Apps?
Accessibility Inspector is not a standalone application. It requires support and environment setup before you start performing accessibility testing of the iOS application.
Prerequisites
Verify that the following prerequisites are met:
- Enable macOS: The first step is to get a system running the Mac operating system. You have two options: either use a Mac, which comes with macOS pre-installed or set up a virtual machine with macOS.
- Install Xcode: Once you have the Mac operating system, install Xcode from the App Store, which is the official IDE that supports Accessibility Inspectors.
Testing iOS Apps Using Accessibility Inspector
To start testing the iOS application using the Accessibility Inspector, follow the below steps:
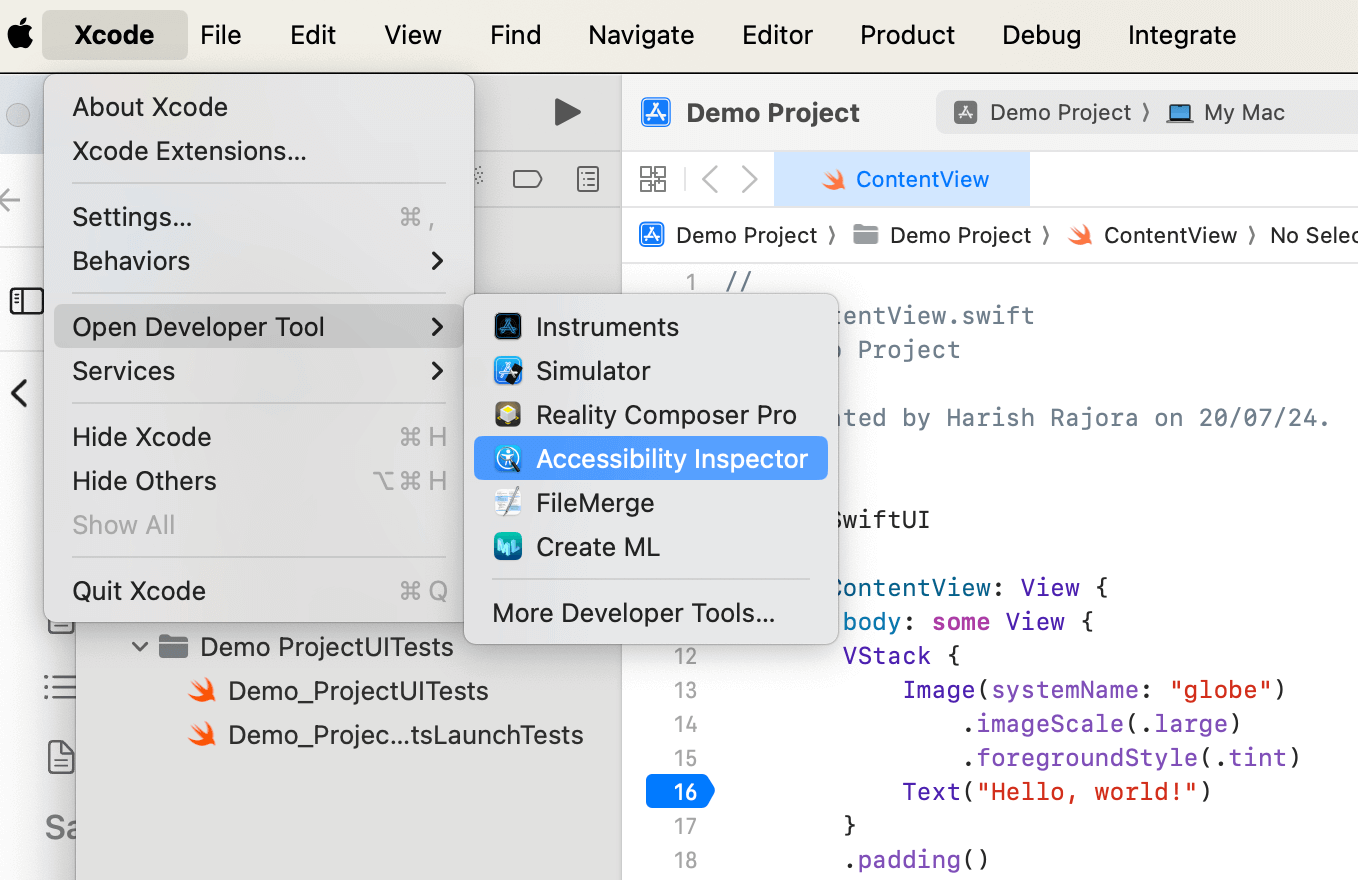
- On macOS, navigate to Xcode > Open Developer Tool > Accessibility Inspector.
- By default, the inspector is set to inspect elements from applications running on your Mac. If no device is connected, you can continue using the Accessibility Inspector for applications already running on Mac. For example, open a URL in a browser and test the accessibility of a web page.
- To inspect elements on an iPad or iPhone, connect the device to your Mac before opening the Accessibility Inspector.
- Once the device is connected, open the Accessibility Inspector, and the list of connected devices will be shown.
- Select the device where the app is running. This will display a list of apps that can be inspected.
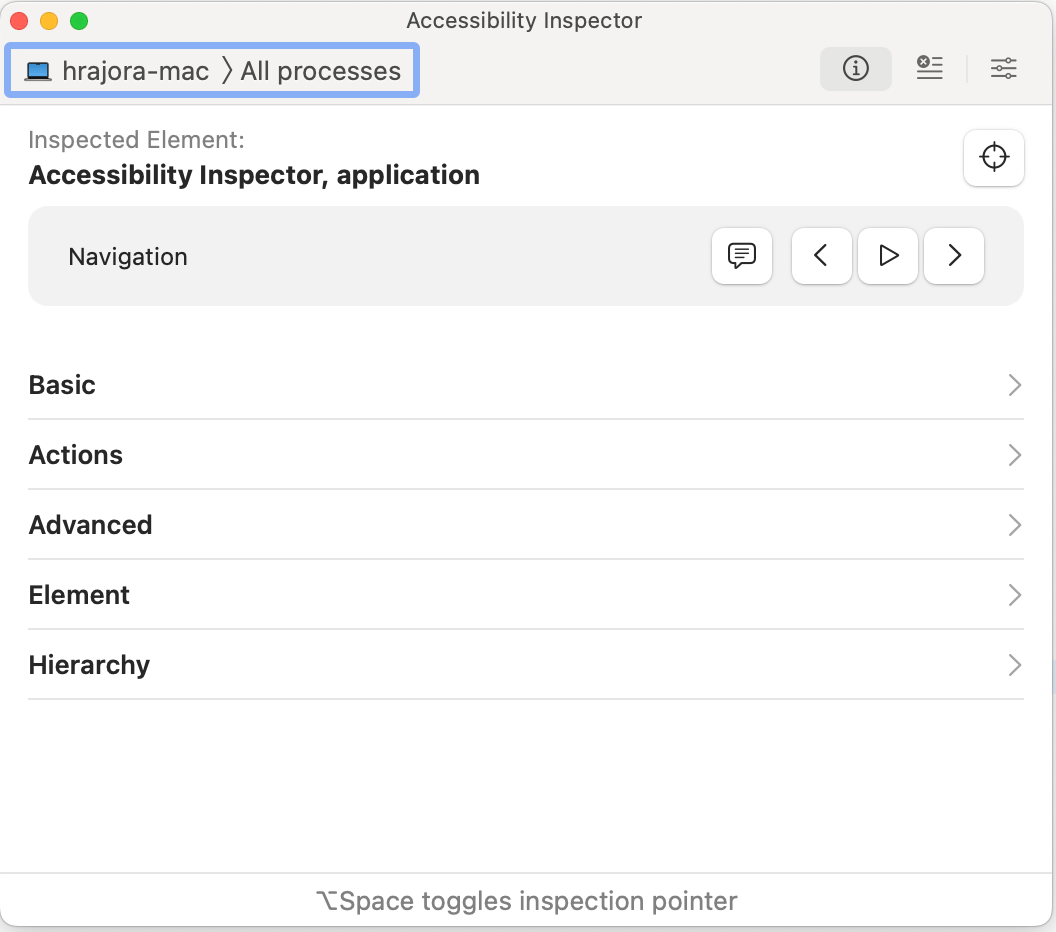
- Choose the target iOS app to continue inspecting. Once you select the iOS app, the inspector’s home screen will open, displaying elements like Basic, Actions, Advanced, etc.

Note: Test your iOS apps on the real device cloud. Try TestMu AI Today!
Key Takeaway: Accessibility Inspector opens from Xcode > Open Developer Tool > Accessibility Inspector, and inspecting a physical iPhone or iPad requires connecting the device to the Mac first.
Shortcomings of Accessibility Inspector
Accessibility Inspector is a great tool for inspecting accessibility issues and is one step towards an inclusive app world. However, there are some shortcomings of this tool that need to be kept in mind.
- Need for operating systems: Accessibility Inspector is available only on macOS, which limits its use for developers who might be working on other platforms or need cross-platform accessibility testing.
For people using Windows or Linux, procuring new Mac systems for everyone or installing virtual systems (which is not recommended due to false performance metrics) is a huge monetary and time investment.
- Absence of real devices: Accessibility Inspector uses Xcode, which uses simulators to run the application on Apple devices. Simulators are never a good idea, especially for iOS-based applications, due to memory shortage and movable devices (which raises issues like network lags).
They also provide incorrect metrics for vital parameters like network response time, load time, etc. It can create a false illusion of how the application works, which will come back to the team sooner than expected from the end-user.
- Need for physical devices: The Accessibility Inspector will require a device connected to the system in case real devices are used. However, the tester may require hundreds of devices with different specifications while performing cross-platform and cross-browser testing at scale. They will also require constant maintenance and upgrades.
Buying all the devices is a heavy dent in the balance sheet of the organization considering this is a recurring cost. In such a scenario, the team can leverage cloud-based AI testing platforms like TestMu AI, which offers a device farm of 5000+ latest and legacy iOS devices where you can test and debug your apps.
- Limited resource: Accessibility Inspector runs on limited resources provided by the host system, which in turn could be running on its share of resources in the case of virtual machines. Having limited resources that are shared by multiple applications can produce false timings.
For instance, an assistive device may start the reading process with a little delay. It is better to choose an option where resources are fast and not limited for smoother testing.
Key Takeaway: Accessibility Inspector is limited to macOS and to simulator sessions, so timing-sensitive checks still need real iOS devices.
Can AI Agents Automate iOS Accessibility Checks?
AI agents can run and triage accessibility audits, but they cannot replace a human VoiceOver walkthrough. Agents are good at the mechanical half of the work and weak at judging whether a label makes sense to a person.
The part that automates cleanly is the audit itself. XCTest exposes an accessibility audit API that runs the same class of checks the Audit tab in Accessibility Inspector performs, so the result becomes a test assertion instead of a screenshot a tester reads by hand:
- Run the audit in CI: An XCUITest that calls the accessibility audit API fails the build when an element has no description, contrast falls short, or a hit region is too small.
- Triage the output: A coding agent reads the audit report, maps each warning back to the SwiftUI or UIKit view that produced it, and opens one change per view.
- Draft the fix: Agents generate accessibilityLabel, accessibilityHint, and accessibilityTraits values, and add Dynamic Type support where a fixed font size blocks scaling.
- Drive the simulator: Agents that reach xcodebuild and simctl through a command line or an MCP server can build the app, boot a simulator, and re-run the audit without a person in the loop.
The limit is the same one every automated checker has. An audit proves a label exists, not that the label is correct. An agent will happily write accessibilityLabel of "Button" for a share icon, and the audit passes.
Order of operations matters here. Let the agent clear the machine-detectable findings, then compare what is left against other accessibility testing tools, and finish with a manual VoiceOver and Voice Control pass on a real device as part of regular mobile app testing.
Key Takeaway: AI agents automate the detectable half of iOS accessibility work, such as running audits and drafting accessibility labels, while a human VoiceOver pass remains the only check on whether a label is meaningful.
Best Practices for iOS Accessibility Testing
Apart from the predefined settings in the Accessibility Inspector, the tester should also consider other accessibility attributes that must be taken care of while performing mobile accessibility testing of iOS apps:
- Contrast: The WCAG guideline defines the contrast ratio to be at least 7:1 in stricter terms, but 4.5:1 is also acceptable. Below these limits, the elements become inaccessible to people with disabilities.
The more the contrast ratio, the better it is to distinguish between the elements and the more comfortably a viewer can view those elements together. The maximum contrast value of 21:1 is reached by complementary colors like black and white. The tester can use an online contrast checker to view the contrast values before settling on the colors.
- Media elements: While text elements can be read aloud by assistive devices, there is no way to know what video is played and what the subject is saying in it. The same is the case with image and audio elements (for people with hearing disabilities).
Therefore, it is important to pay special attention to media elements for accessibility issues while developing and testing the iOS application. The most common solution to this problem is to provide alt text for images to get the reference of the image and for video to give the transcript of the video being played.
- Logical segment division: It is recommended to divide the text into logical sections with appropriate headings. The headings, when read aloud, give the user context about the text that follows and also provide a logical path to remember the content, which is not possible in single long passages with multiple contexts.
Animations: Animations and any other type of transitions can make people uncomfortable who struggle with visual impairments. It is important to include the query prefers-reduced-motion, which helps the application understand whether the user has turned on the settings to minimize non-essential animation. In such a case, we can reduce animations on demand rather than for everyone all the time.
- Use descriptive links: A web page will contain a lot of links with redirection to the same website pages or third-party websites. While people without any disabilities can open the link and retrace it if it is irrelevant, people with visual impairment will not get the context if the link is not embedded in the correct word. Therefore, it’s important to use descriptive links that an impaired user can easily understand.
Key Takeaway: iOS accessibility testing covers contrast ratios, alt text and transcripts for media, logical heading order, reduced-motion support, and descriptive link text.
Conclusion
As a user without any impairments, it is easier to forget the features and requirements a mobile application should possess to make the lives of all people easier regardless of their abilities. However, a developer and a tester cannot think this way.
Building an application for iOS, which serves a very large user base worldwide, is a task that requires technical skills and responsible ethics. For this, the most sought-after solution out there is the Accessibility Inspector. It provides pre-built options to quickly inspect how the application looks when accessibility settings are turned on, or the user is using some assistive device.
Author

Harish Rajora
Blogs: 102


Harish Rajora is a software developer at TestMu AI with over 6 years of hands-on experience in Python and cross-platform application development across Windows, macOS, and Linux. He has authored 800+ technical articles and worked on large-scale projects, including GenAI applications and core engineering features used by millions. Harish has led DevOps initiatives building CI/CD pipelines with Jenkins, AWS, GitLab, and GitHub, and holds an M.Tech in Software Engineering from IIIT Allahabad.


Accessibility Inspector FAQs
Did you find this page helpful?
More Related Blogs
TestMu AI forEnterprise
Get access to solutions built on Enterprise
grade security, privacy, & compliance
- Advanced access controls
- Advanced data retention rules
- Advanced Local Testing
- Premium Support options
- Early access to beta features
- Private Slack Channel
- Unlimited Manual Accessibility DevTools Tests