
Next-Gen App & Browser Testing Cloud
Trusted by 2 Mn+ QAs & Devs to accelerate their release cycles

- TestMu AI (Formerly LambdaTest)
- /
- Blog
- /
- Automate Salesforce Case Creation and Updates With KaneAI
Automate Salesforce Case Creation and Updates With KaneAI
Automate Salesforce case creation and updates with KaneAI. Write tests in plain English to validate fields, routing, email-to-case, and status flows.

Saniya Gazala
Author
June 12, 2025
Every customer complaint, support request, and product question that comes into your business needs to go somewhere. In Salesforce, that place is a case. Salesforce case management is how support teams track what customers need, who is handling it, and whether it has been resolved.
But for the agents logging them, the admins configuring them, and the QA teams making sure they work, cases come with a surprising number of problems. Workflows break. Assignments go wrong. Status updates fail silently. And nobody finds out until a customer follows up, asking why nothing has happened.
Overview
How Does Salesforce Capture a Customer Request?
A case is the single record Salesforce uses to log a customer request and follow it all the way to resolution. It pulls the essentials into one place: who reached out, what they need, which agent owns it, and where the issue currently stands. A case can begin from a website form, an inbound support email, or an agent logging one during a live conversation.
Why Do Case Workflows Tend to Break?
- Incomplete case data: A skipped priority or a blank product field lets a case save with too little context, turning the first agent touch into a callback for basics instead of a fix.
- Misrouted cases: When assignment rules quietly stop firing, records land in the wrong queue or sit unowned, and SLAs slip before anyone notices.
- Channel intake failures: Email and web intake run at high volume, so when they fail after a change, requests simply stop arriving and go unlogged for days.
- Silent automation gaps: A status move that should email the customer and pause the SLA clock can fail without warning, making the team look unresponsive.
- Release regressions: Each Salesforce update can shift how a flow, validation, or component behaves, and case logic spanning several objects is especially exposed.
How Does KaneAI Keep Case Management Reliable?
KaneAI is a GenAI-native automation testing platform that lets anyone describe a case scenario in plain English and then runs it against your org automatically. It confirms that validation rules fire on missing fields, that routing drops cases into the correct queue, that email and web intake still create records, and that status changes trigger the automation behind them. Because its self-healing engine adjusts when Salesforce changes its interface, those same checks keep passing release after release without manual rework.
What Is a Case in Salesforce?
A case in Salesforce is a Service Cloud record that tracks a customer issue, question, or request from the moment it comes in to the moment it is resolved.
It is the central record for everything related to that customer interaction.
It holds: who raised it, what the problem is, which agent owns it, what has been done so far, and what the current status is.
Cases can be created in several ways. A customer fills out a form on your website. They send an email to your support address. An agent logs one manually during a phone call. Each of these creates a case record in Salesforce that the support team can track, update, and close.
For support managers, cases are the foundation of customer service reporting. For agents, they are the daily workspace. For admins and QA teams, they are one of the most critical salesforce case management workflows to keep working correctly, because when cases break, customers feel it directly.
Common Problems Teams Face with Salesforce Case Management
Most Salesforce case management problems are not agent error. They come from configuration gaps, missing validations, and untested workflows that surface only when something breaks in production.
According to Salesforce's own State of Service research, 78% of customer service agents struggle with tools and processes that slow them down. Bad case data and broken workflows are consistently at the top of that list.
Here is where those problems actually come from:
- Cases get created with missing or incorrect data. An agent skips the Priority field, or a web form comes in without a product category. The case saves, gets assigned, and sits in a queue with no context. The first agent action becomes a customer callback for basic info, not resolution. At 200 cases a day with a 10% miss rate, that is 20 cases daily, or roughly 100 unnecessary contacts a week.
- Cases do not get routed to the right agent. Assignment rules break after a config change and stop firing. Cases pile up in the wrong queue or sit unassigned. SLAs breach, and nobody knows why, because the failure is silent.
- Email-to-case and web-to-case stop working after a release. These channels create cases automatically and at high volume. When they break, cases simply stop coming in, often unnoticed until dozens of customer requests have gone unlogged. It is one of the most damaging silent failures in Service Cloud.
- Status updates do not trigger the right automations. An agent sets a case to Waiting on Customer, which should email the customer and pause the SLA timer. If the automation is broken, the email never sends, and the SLA keeps ticking, so it looks like your team is ignoring them.
- Case workflows break silently after every Salesforce release. Three major updates a year, each able to change how a flow runs, a validation rule fires, or a Lightning component behaves. Case workflows are especially vulnerable because they span multiple objects, automation layers, and integrations. Most teams find out only when a customer complains.
Note: The real problem: nobody is systematically checking that case creation and update workflows still work after every config change, customization, and seasonal release.
Use This Free Checklist to Catch Case Workflow Failures Before Your Next Release
How Does KaneAI Help in Fixing These Case Management Issues?
KaneAI by TestMu AI (formerly LambdaTest) is a GenAI-native testing agent that lets anyone write and run Salesforce case management tests in plain English, with no coding required.
Built from the ground up for high-speed quality engineering teams, KaneAI integrates seamlessly with test planning, execution, orchestration, and analysis. It lets anyone on your team, whether that is an admin, a QA engineer, or a support ops lead, use AI for QA testing to write and run end-to-end Salesforce test automation cases in plain English.
Here is how KaneAI Agent helps solve common case management issues:
- Missing fields: Write a plain English test that tries to save a case without a Priority field and checks whether the validation rule fires. KaneAI flags it if it does not.
- Broken routing: Describe a case creation scenario and tell KaneAI which queue it should land in. If the assignment rule misfires, you know immediately.
- Email-to-case and web-to-case failures: Simulate incoming submissions after every Salesforce release and verify cases are created correctly. Catch the failure in minutes, not days.
- Silent automation failures: Move a case to Waiting on Customer and verify the customer email sent and the SLA timer paused.
- Release regressions: Unlike traditional Selenium Salesforce testing scripts that break every time Salesforce updates its UI, KaneAI's auto-healing engine uses AI automation to adapt automatically. Your tests keep running through every release without manual fixes.
How to Create a Case in Salesforce Using KaneAI
Instead of writing a single line of code, you describe the workflow the same way you would explain it to a teammate. KaneAI executes the entire process automatically, validates outcomes, and flags failures instantly before they impact real users. If you are mapping out coverage first.
Here is what an end-to-end Salesforce test case creation and update workflow looks like in KaneAI:
- Open Salesforce.
- Enter the username in the username field.
- Enter the password in the password field.
- Click the Login button.
- Complete the TOTP verification step.
- Click Verify.
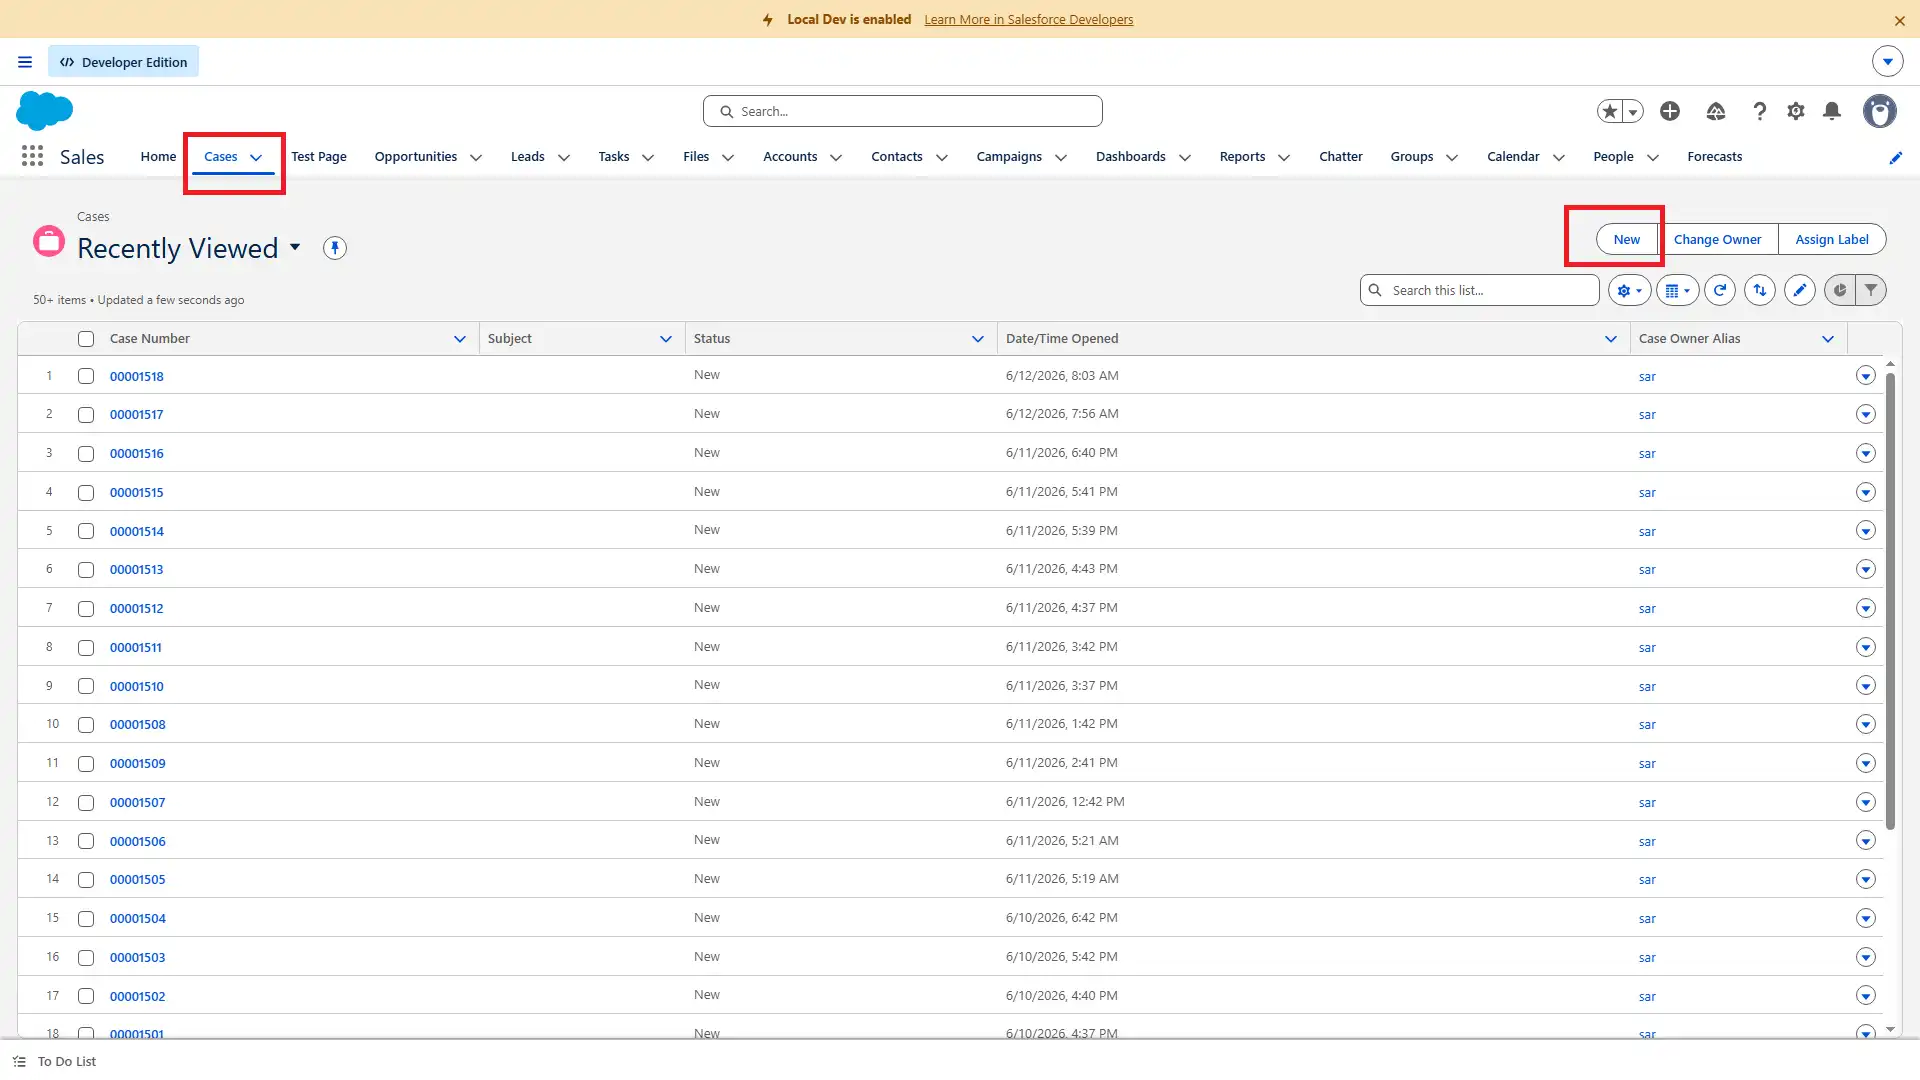
- Navigate to Cases from the top navigation.
- Click the New button above the cases list.
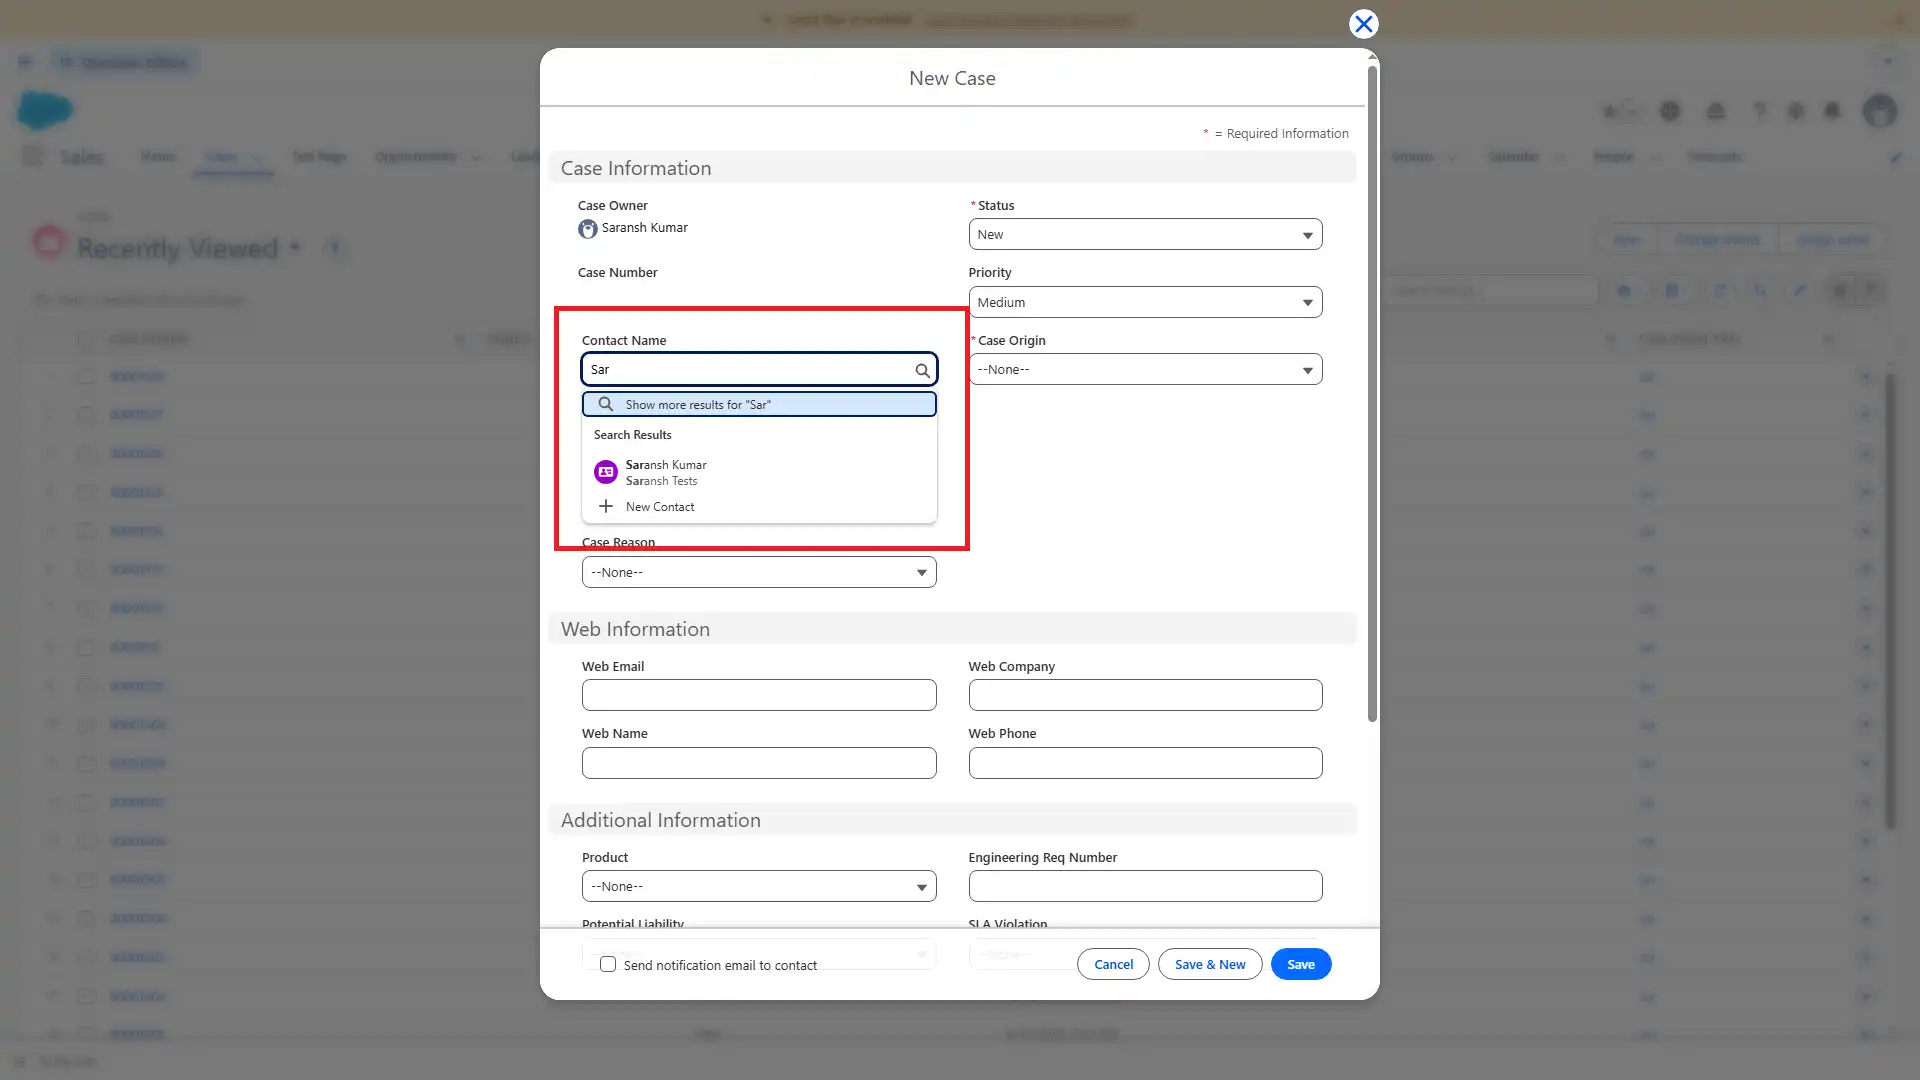
- Search and Select the name of the contact in the Contact Name field.
- Open Case Origin dropdown and select the Email option from dropdown.
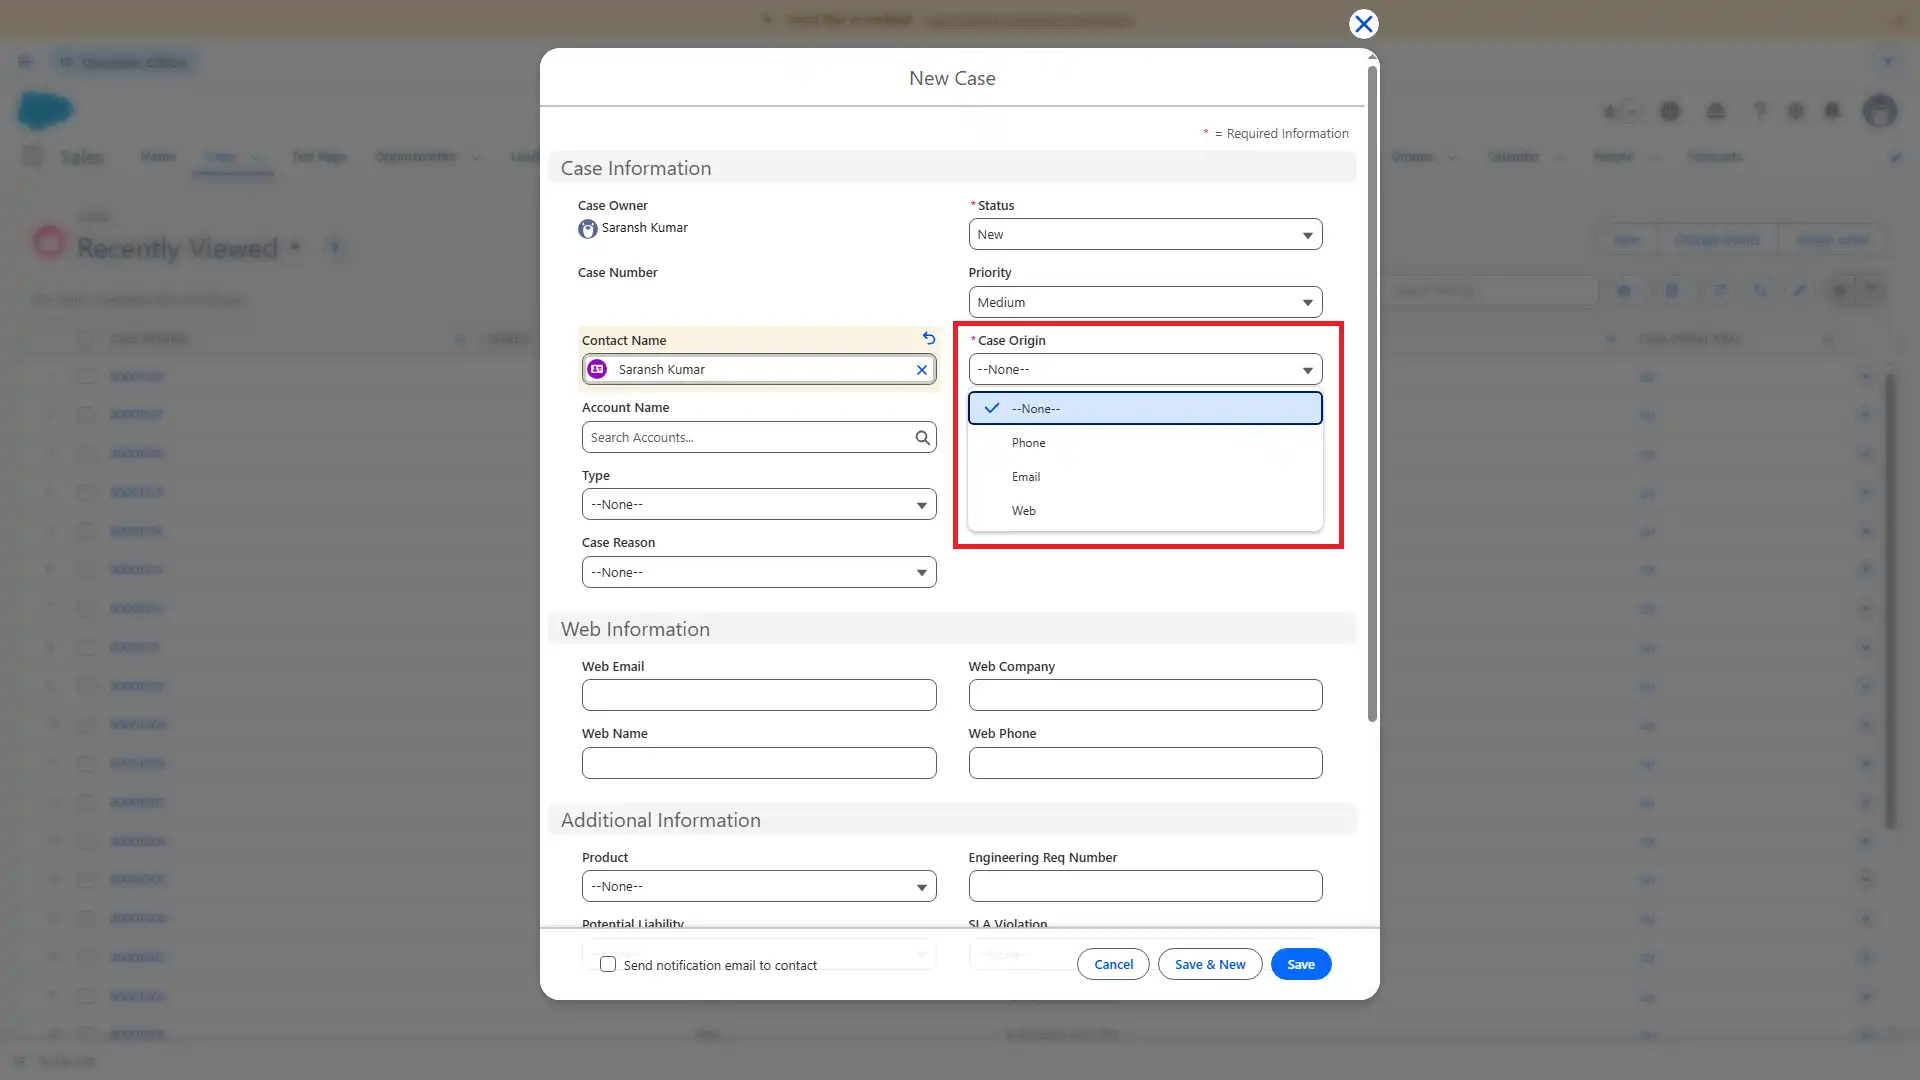
- Click Save to create the case.
- Open the edit icon next to the Priority field in the Details section.
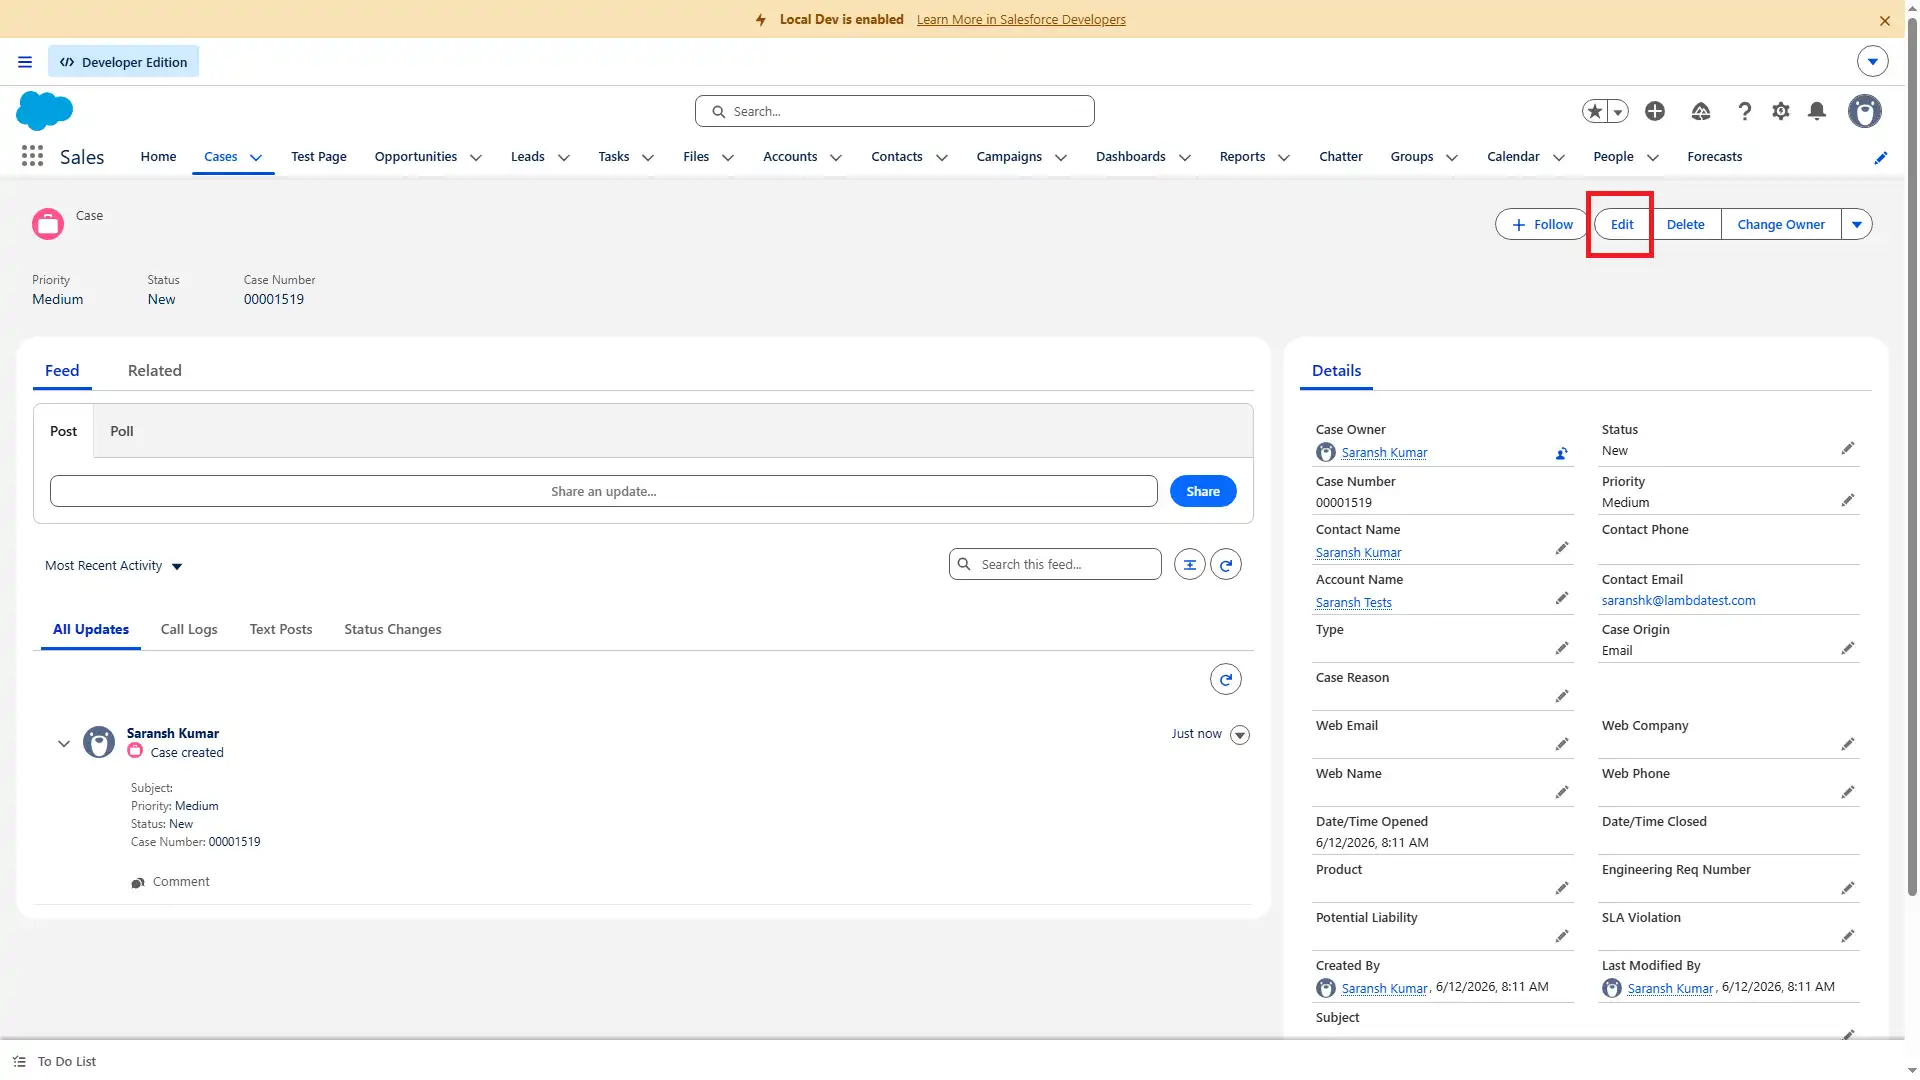
- Open the Priority dropdown and update the priority value from Medium to High.
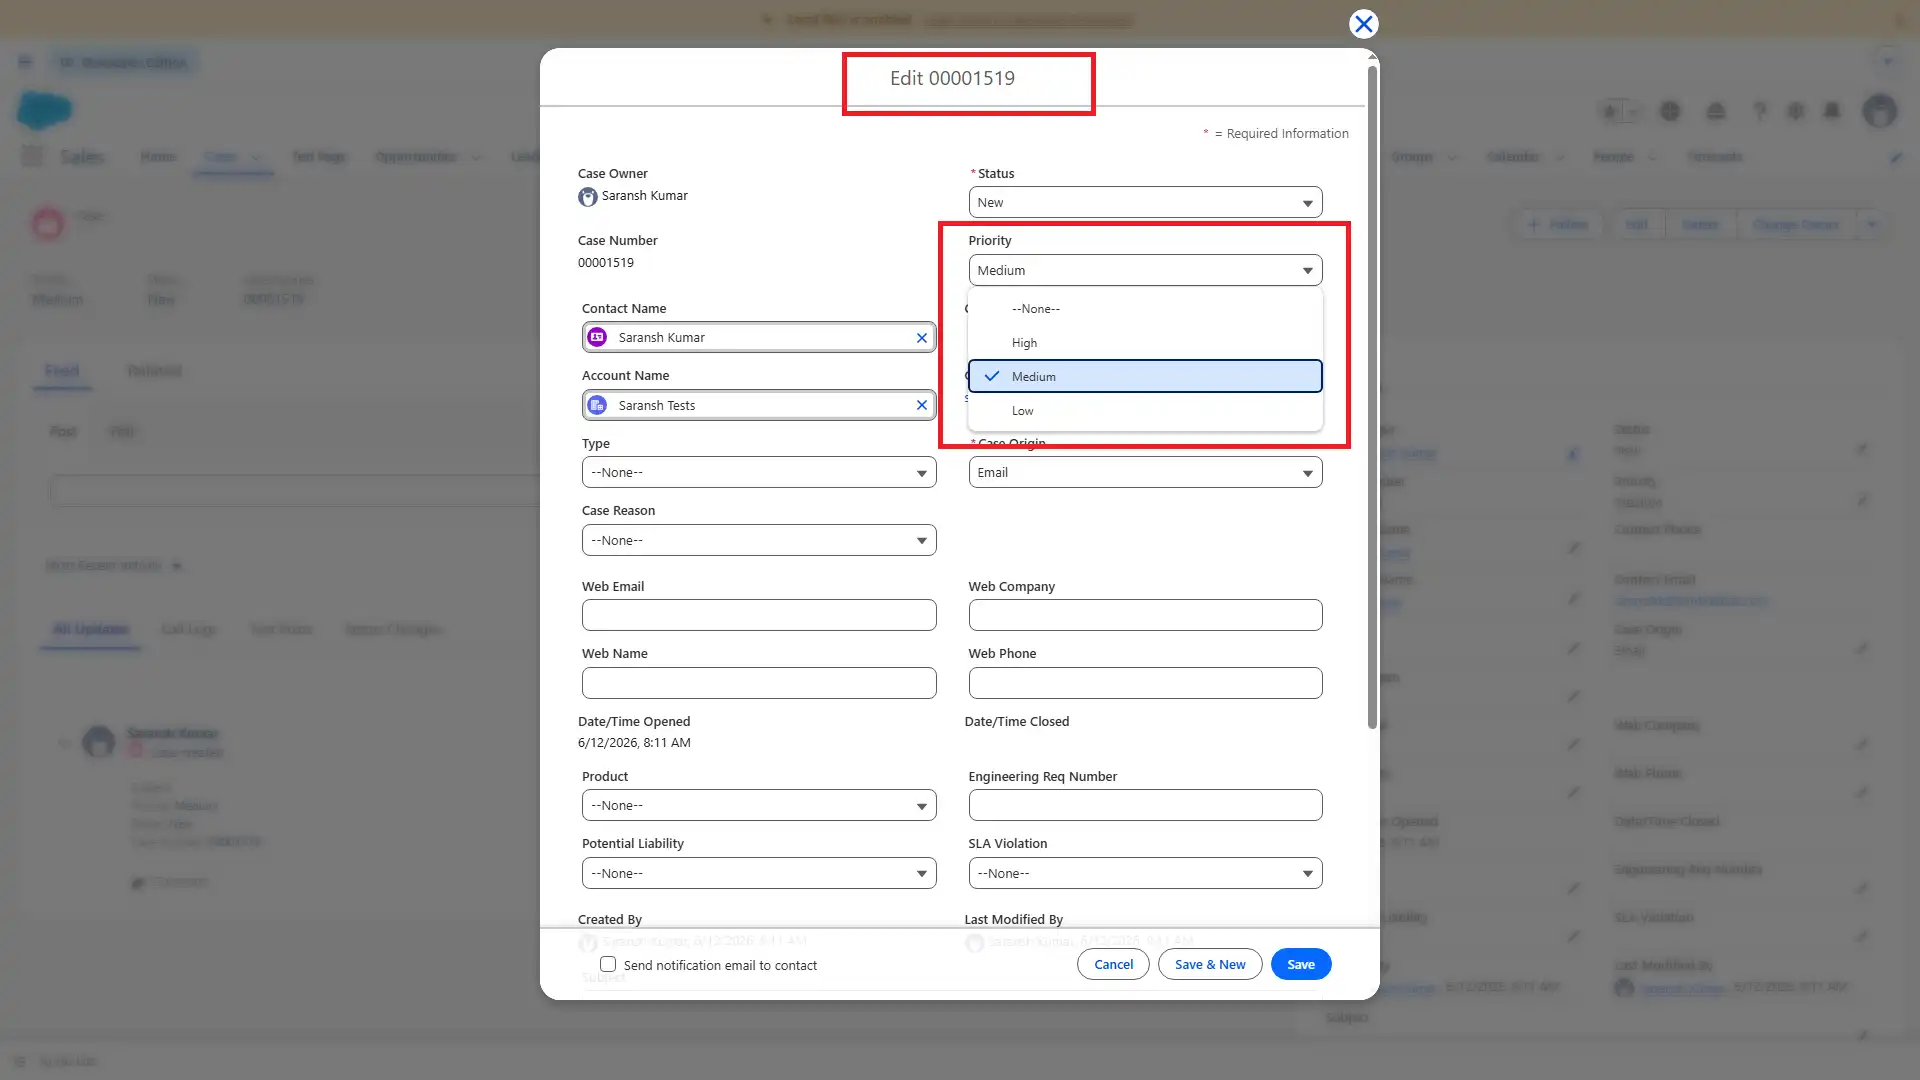
- Click Save.
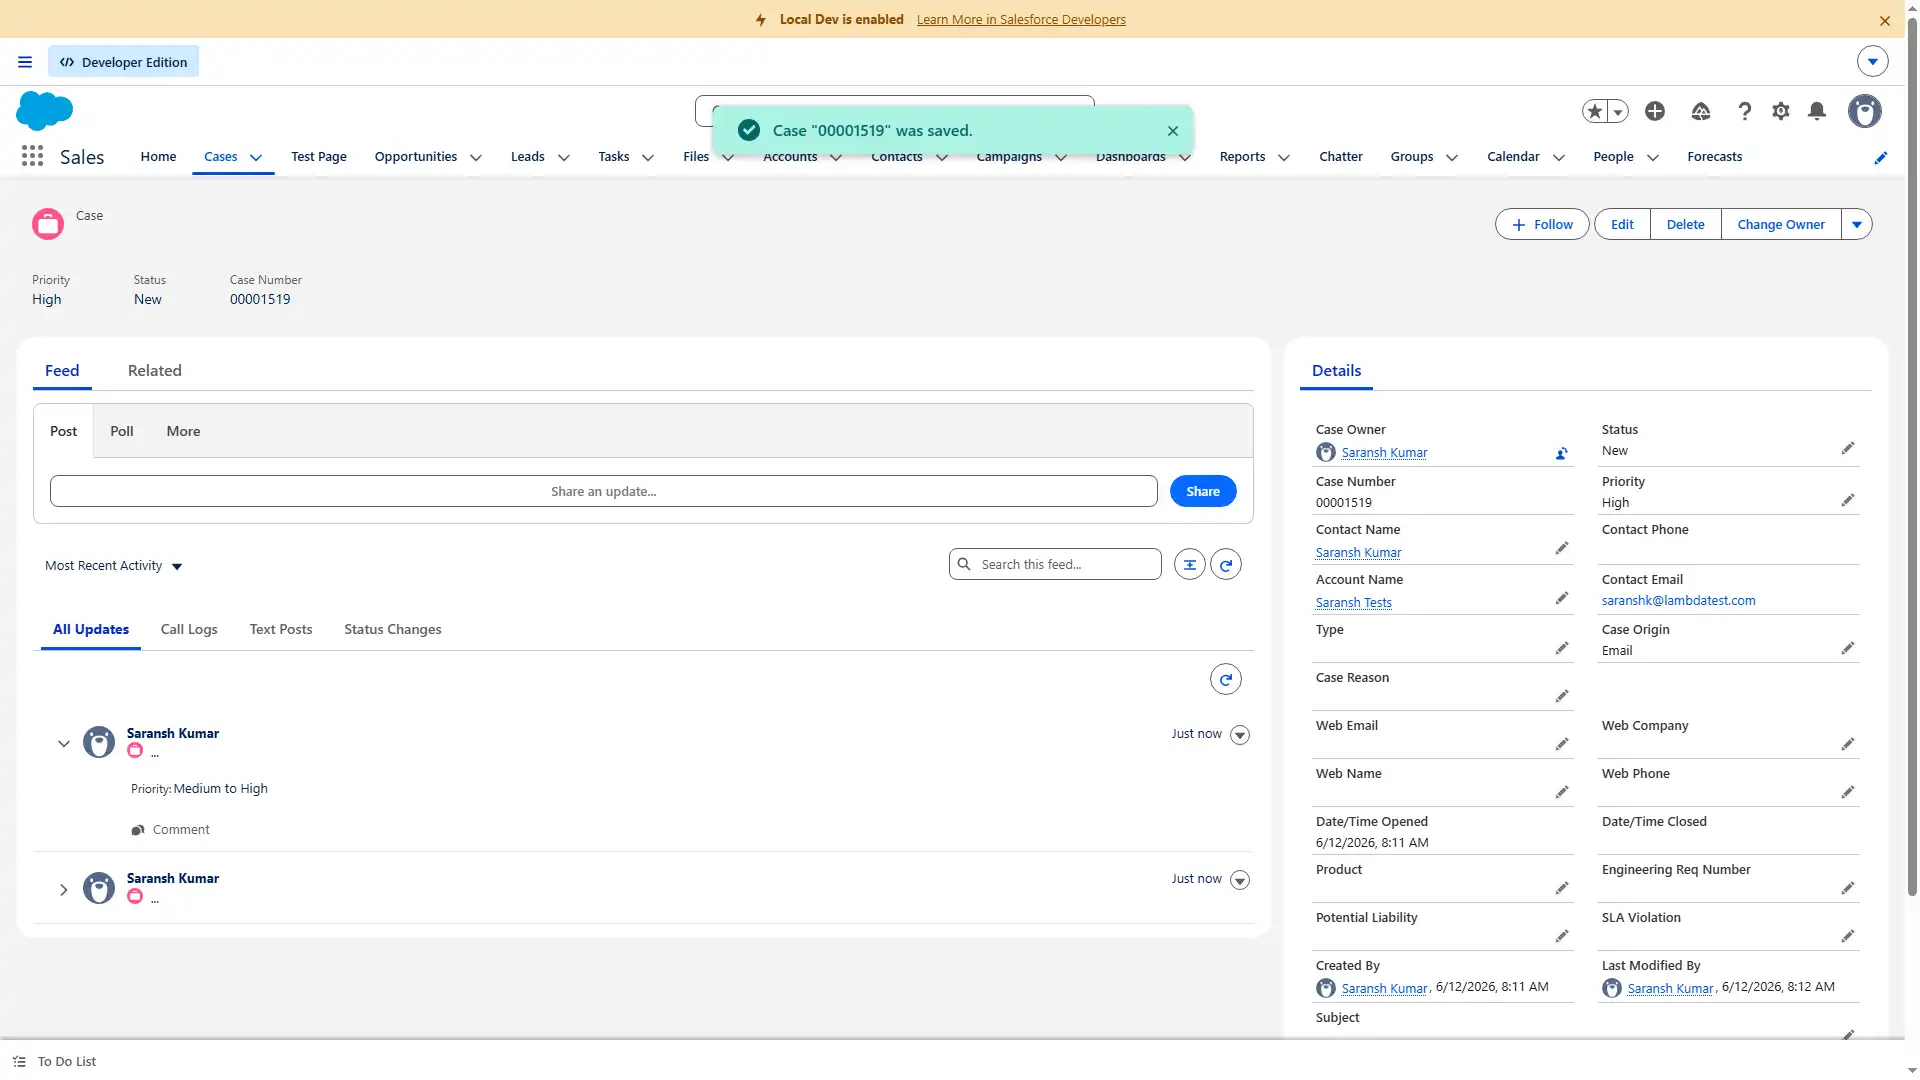
- Read the updated Priority value.
- Assert that the Priority field now displays High.
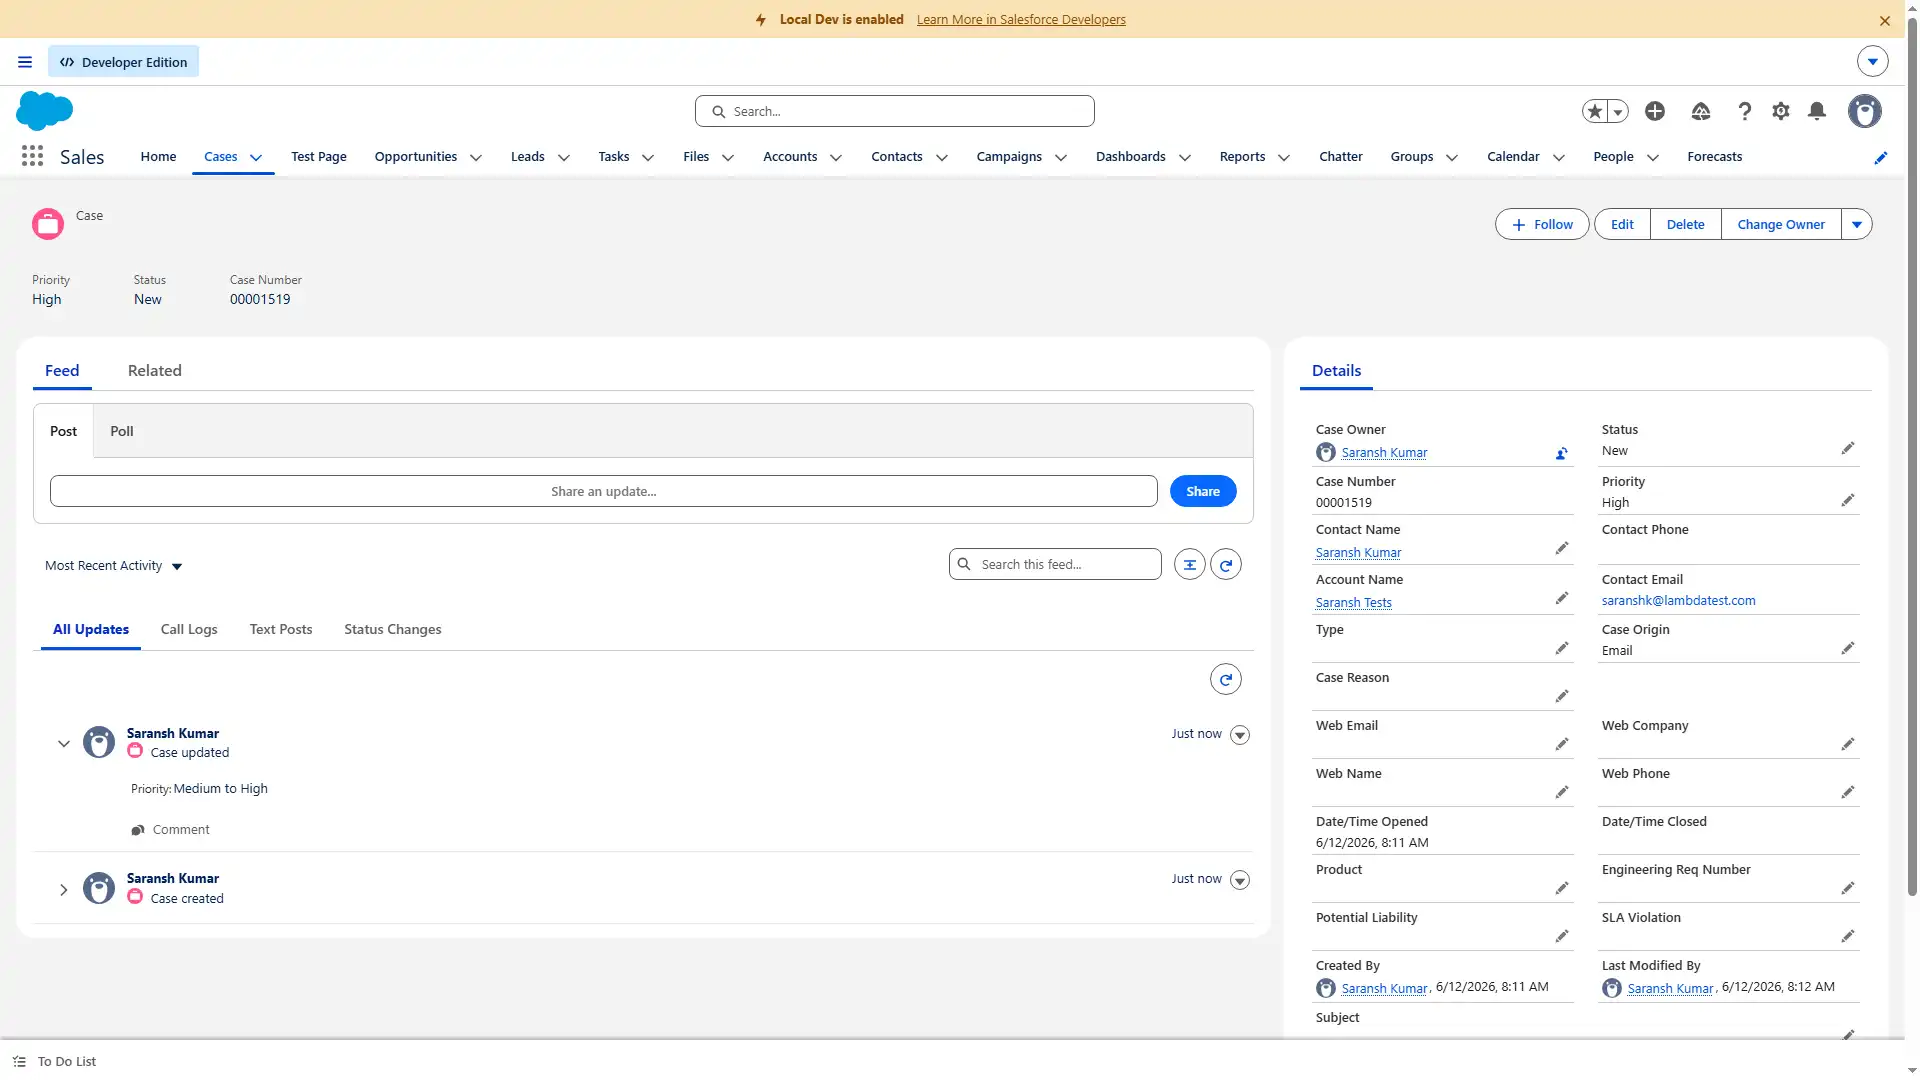
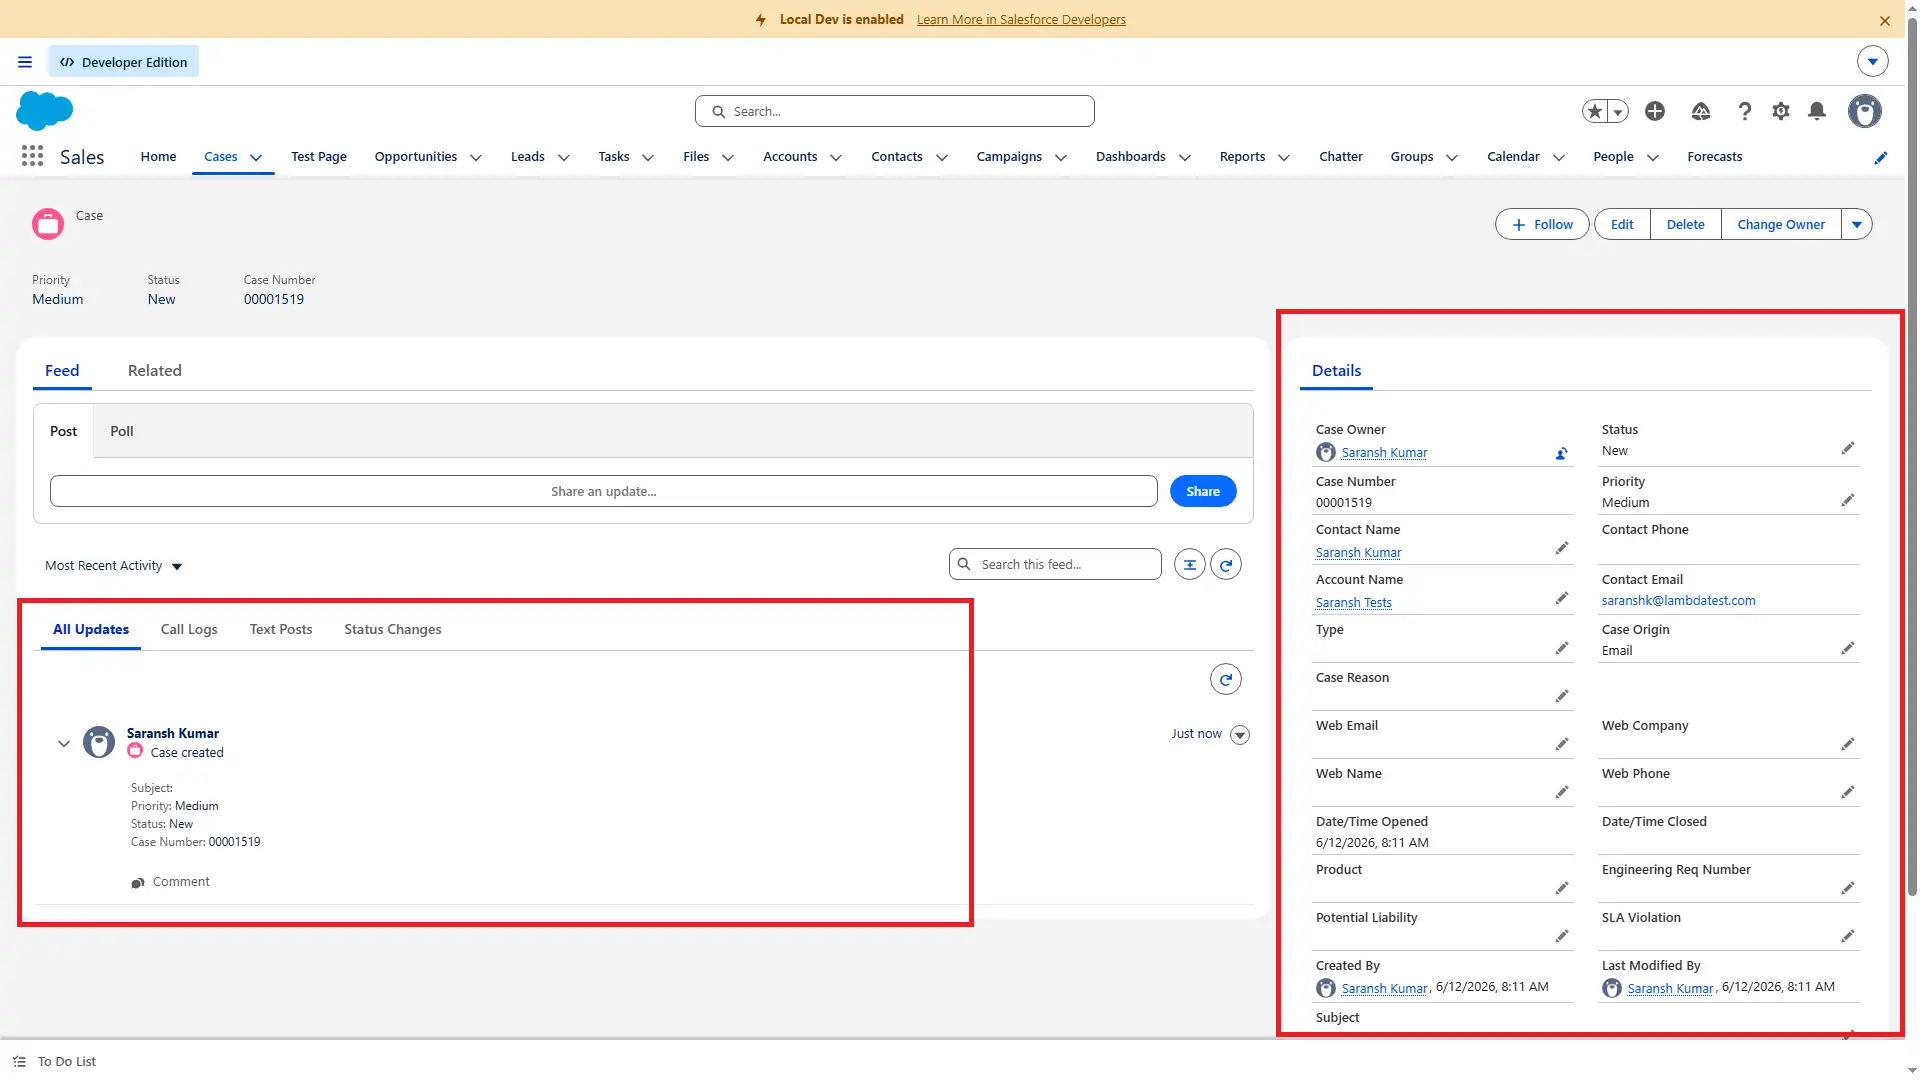
KaneAI automatically performs every step in the workflow, validates that the case is successfully created and updated, and immediately reports any failure if expected behavior does not occur.
To automate your Salesforce end-to-end workflows, follow the support documentation on getting started with KaneAI.
For continuous coverage, KaneCLI, the command-line execution layer behind KaneAI, runs these same plain English tests in a real Chrome browser straight from your CI/CD pipeline. KaneCLI supports headless runs and returns logs, JSON output, and clear pass/fail results.
Combined with native GitHub, Jira, and Slack connections, your Salesforce case management tests run on every deployment, not just when someone remembers to check.
Note: Protect every customer interaction by continuously testing your Salesforce case management workflows with KaneAI. Book a KaneAI demo.
How to Create a Case in Salesforce
Salesforce offers three ways to create a case: manual entry for phone and walk-in support, email-to-case for email channels, and web-to-case for website form submissions.
| Method | Best for | How the case is created | Agent effort |
|---|---|---|---|
| Manual entry | Phone and walk-in support | Agent logs the case directly in Salesforce | High (per case) |
| Email-to-Case | Email support channels | Incoming emails convert to cases automatically | None after setup |
| Web-to-Case | Website and self-service portals | Web form submissions create cases automatically | None after setup |
Method 1: Create a Case Manually (Recommended for Phone and Walk-in Support)
When an agent handles a customer call or in-person interaction, they log the case directly in Salesforce.
- Log in to Salesforce and open the Service app from the App Launcher.
- Click the Cases tab in the navigation bar.
- Click New.
- Fill in the required fields: Case Subject, Status, Priority, and Account or Contact name.
- Add a detailed description of the issue in the Description field.
- Set the Case Origin to Phone, if applicable.
- Click Save.
Once saved, Salesforce runs your assignment rules and routes the case to the correct agent or queue automatically. The assigned agent receives a notification, and the case appears in their queue. If you have set up an auto-response rule, the customer receives a confirmation email with the case number within minutes of submission.
To learn how to create a Salesforce case, follow the official Salesforce support documentation on Create Cases.
Method 2: Email-to-Case (Recommended for Email Support Channels)
Email-to-case automatically converts incoming customer emails into Salesforce case records. Once set up by your admin, it runs in the background without any manual effort from agents.
Admin setup steps:
- Go to Setup and search for Email-to-Case in the Quick Find box.
- Click Enable Email-to-Case and save.
- Under Routing Addresses, click New and enter the support email address you want to route from.
- Configure the routing settings: assign a queue, set a priority, and choose an auto-response template.
- Click Save and copy the Salesforce routing address provided.
- In your email server settings, forward incoming emails from your support address to the Salesforce routing address.
Once active, every email to your support address creates a case automatically with the subject, body, and sender details pre-populated.
To get started with Email-to-Case in Salesforce and help resolve customer email inquiries effectively, follow the official Salesforce support documentation on Email-to-Case in Salesforce.
Method 3: Web-to-Case (Recommended for Website and Self-Service Portals)
Web-to-case lets customers submit support requests through a form on your website. Each submission creates a case in Salesforce automatically.
Admin setup steps:
- Go to Setup and search for Web-to-Case in the Quick Find box.
- Enable Web-to-Case and select a default case origin and response template.
- Click Generate the Web-to-Case Form.
- Select the fields you want on the form (Subject, Description, Priority, Product, and so on).
- Click Generate to get the HTML code.
- Paste the HTML into the relevant page on your website.
Every form submission now creates a case in Salesforce with all the submitted data already mapped to the correct fields.
To create cases automatically from form submissions using Web-to-Case in Salesforce, follow the official Salesforce documentation on Web-to-Case in Salesforce
How to Update a Case in Salesforce
Creating a case is only the first step. Keeping it updated throughout its lifecycle is what keeps customers informed, SLAs on track, and your reporting accurate.
An outdated case is almost as damaging as a missing one, because it creates a false picture of where things stand.
Update Case Fields Manually
- Open the case record from the Cases tab or directly from the Service Console.
- Click Edit, or click directly on the field you want to change in Lightning Experience.
- Update the relevant fields: Status, Priority, Owner, or any custom fields your org uses.
- Click Save.
Every field update is logged automatically in the case history, giving your team a full audit trail of what changed, when, and who made the change.
Add a Case Comment
Case comments let agents log internal notes or send updates directly to the customer without changing the status of the case. They keep all communication tied to the case record rather than scattered across email threads.
- Open the case record.
- Scroll to the Case Comments related list.
- Click New.
- Type your comment and check Public if you want the customer to see it.
- Click Save.
Public comments trigger an email notification to the customer automatically, as long as your org has email notifications enabled for case comments.
To collaborate effectively and track case updates in Salesforce, use Case Comments to add public or private notes to cases. Follow the official Salesforce documentation on Create and Edit Case Comments.
Update Cases in Bulk Using Macros
For agents who update the same fields across many cases repeatedly, Salesforce macros save significant time. A macro can change a status, send an email, and log a note in a single click.
- Open the Service Console.
- Select the cases you want to update from the list view.
- Click Run Macro and choose the macro your admin has set up.
The macro applies all actions across every selected case at once. Macros are one of the most underused features in high-volume salesforce case management, but they are essential for busy support teams and should be part of your regression test suite.
To handle large volumes of similar customer cases efficiently, use Bulk Macros in Salesforce. Follow the official Salesforce documentation on Bulk Macros in Salesforce.
Change Case Status
Updating case status is the most frequent update agents make. Each status change can trigger automations like email notifications, SLA adjustments, or task creation, which is exactly why status based automation testing matters so much.
- Open the case record.
- Click the Status field.
- Select the new status from the dropdown: New, Working, Escalated, Waiting on Customer, or Closed.
- Click Save.

How to Assign and Route Cases in Salesforce
Getting a case to the right agent quickly is just as important as creating it correctly. A case sitting in the wrong queue for two hours can be the difference between meeting an SLA and breaching it.
Salesforce handles routing through assignment rules and queues.
Assignment rules automatically assign incoming cases to a specific agent or queue based on conditions you define, such as case origin, product type, priority level, or customer tier. To set one up, go to Setup, search for Case Assignment Rules, click New, and define your rule criteria.
Queues act as shared holding areas where groups of agents can pick up cases. When a case meets the criteria for a queue, it sits there until an available agent claims it. Queues work well for high-volume teams where cases do not need to go to a specific person.
Both assignment rules and queues should be part of your test case management and regression checklist. A routing failure is invisible until a customer escalates, which is exactly the kind of regression that Salesforce test automation platforms like KaneAI are designed to catch before it reaches production.
To assign and route cases efficiently in Salesforce using assignment rules and queues, follow the official Salesforce documentation on Assign Cases, which helps you set up assignment rules in Salesforce.
Conclusion
Case creation, updates, routing, and email and web channels all break in ways nobody notices until a customer complains. The fix is testing them on every change, in plain English, without maintaining scripts.
KaneAI does exactly that, and KaneCLI runs those tests in your CI/CD pipeline on every deployment. To wire it into your own org, follow the docs on getting started with KaneAI.
Start testing your Salesforce case workflows free with KaneAI and catch broken cases before your customers do.
Citations
Note: This article was researched and drafted with AI assistance, then reviewed, fact-checked, and published by Saniya Gazala, Community Evangelist at TestMu AI, whose listed expertise includes Automation Testing, Software Testing, Selenium, Cypress, Playwright, and Appium. Every product claim and link was verified against TestMu AI's live product and documentation pages. Read our editorial process and AI use policy for details.


Frequently asked questions
Did you find this page helpful?
More Related Hubs
TestMu AI forEnterprise
Get access to solutions built on Enterprise
grade security, privacy, & compliance
- Advanced access controls
- Advanced data retention rules
- Advanced Local Testing
- Premium Support options
- Early access to beta features
- Private Slack Channel
- Unlimited Manual Accessibility DevTools Tests