

Power Your Software Testing with AI Agents and Cloud
The Native AI-Agentic Cloud Platform to Supercharge Quality Engineering. Test Intelligently and Ship Faster.


- TestMu AI (Formerly LambdaTest)
- /
- Blog
- /
- How To Use Shared Libraries In A Jenkins Pipeline?
On This Page
- Jenkinsfile
- Jenkins Shared Library
- Why Use Jenkins Shared Library?
- Creating Jenkins Shared Library
- Configure Shared Library in Jenkins
- Referring Jenkins Shared Library from Pipeline
- Jenkins Shared Library with Java/Spring Boot Application
- Moving Common Pipeline steps to Jenkins Shared Library
- Update Jenkinsfile in Spring Boot Application to use Shared Library
- Accessing TestMu AI from Jenkins Shared Library
A Jenkins Shared Library packages reusable build, test, and deploy steps into one Git repository, so a team running several Spring Boot microservices that all build with Maven and push a packaged JAR to an artifactory need not repeat that logic in every Jenkinsfile. Declarative Pipeline syntax, recommended over the older Scripted Pipeline, is what calls those shared steps.
Jenkinsfile
In the world of Jenkins, a pipeline is the smallest unit every Jenkins user interacts with. Jenkins pipeline can be defined either by using a Jenkinsfile or GUI (Graphical user interface). We recommend Jenkinsfile over GUI, as GUI may prove ineffective for complex requirements.
Jenkinsfile is just a text file where we write pipeline code to define the Jenkins pipeline. It can be checked into source control like Git along with our project source code. In most cases, every application will have its own Jenkinsfile to build, test & deploy
There are two ways of writing a Jenkinsfile – One is called Scripted Pipeline, where syntax for pipeline is strictly Groovy. Another is a relatively new way of writing Jenkinsfile called Declarative Pipelines.
For starters,
- If Jenkinsfile starts with the word node, then it’s a Scripted pipeline.
- If Jenkinsfile starts with the word pipeline, then it’s a Declarative pipeline.
We would recommend using Declarative Pipeline as it offers more advantages over Scripted Pipeline.
Why Use Jenkins Shared Library?
Let’s say we have five different Spring Boot applications in our Microservice architecture. All of them need to be built using Maven, run Unit & Integration tests to ensure the integrity of code, packed as a JAR/WAR file & pushed to the artifactory.
Typically, all five applications need their own Jenkinsfile, but the content of the Jenkinsfiles is going to be mostly the same. Jenkins Shared Library avoids this repetition of pipeline code by creating a shared library.
In brief, here are steps to create & use the Jenkins shared library:
- Create a separate git repo for the Jenkins pipeline library & push the shared library code to that repo.
- Integrate the shared library repo in Jenkins under the Manage Jenkins section.
- Create Jenkinsfile in the project. In that Jenkinsfile, Import & use the shared library.

Creating Jenkins Shared Library
Jenkins Shared Libraries are usually pushed into a separate Git repository & checked out by Jenkins job during the job run.
Steps to create Jenkins shared library:
Step 1: Create vars folder
Create a separate project directory. Inside the project directory, create a directory called vars, which will host the shared library’s source code (usually in files with extension .groovy)
Step 2: Create Groovy file
Create a file called welcomeJob.groovy inside the vars folder. (camel casing is mandatory for file names). The filename welcomeJob will be used later by Jenkinsfile to access this Jenkins pipeline library.
vars
| --- welcomeJob.groovy
Step 3: Create call() function inside Groovy file
When a shared library is referred from the Jenkins job, Jenkins, by default, will invoke the call() function within our Groovy file. Consider the call() function like the main() method in Java. We can also specify parameters for the call() function if we want to.
def call(String name = 'User') {
		echo "Welcome, ${name}."
}
In the above example, the name is the parameter. Default value ‘User’ will be assigned to the name in case the parameter is not passed by Jenkinsfile.
Now commit & push the contents of the vars folder to a remote git repository.
Configure Shared Library in Jenkins
Now it’s time to configure the Shared Library in Jenkins.
Steps to configure Jenkins pipeline library:
Step 1: Open Jenkins in your browser. (if local, http://localhost:8080/)
Step 2: Click on manage jenkins on the left side menu.
Step 3: Click on configure system. Scroll down until you find the Global Pipeline Libraries section.
Step 4: Under the Library section, configure values as below.
- Name (remember, we will refer to this shared library from Jenkinsfile using this name).
- Default version (branch name of our Shared Library git repo).
- Under the Retrieval method, choose Modern SCM.
- Under Source Code Management, choose Git.
- Enter your Pipeline Shared Libraries repo URL under Project Repository
- Configure credentials if your repo requires credentials to checkout code
- Enter your Pipeline Shared Libraries repo URL under Project Repository
- Configure credentials if your repo requires credentials to checkout code
Step 5: Click on the save button.
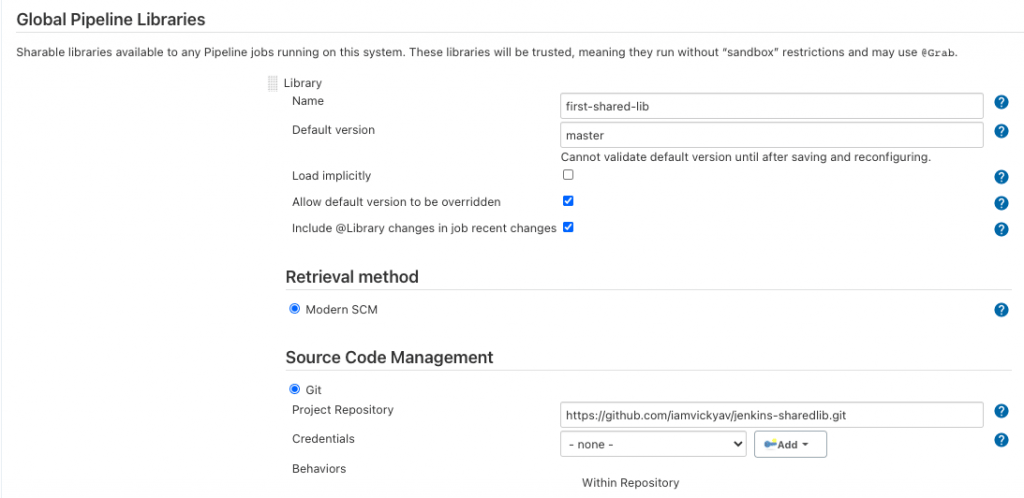
Now that our shared library is configured in Jenkins, let’s create a new Jenkins job to utilize this Jenkins pipeline library.
Referring Jenkins Shared Library from Pipeline
Now, let’s refer to the Jenkins shared library from the pipeline.
Steps to refer Jenkins pipeline library:
Step 1: In Jenkins, click on New Item on the left side menu, enter Jenkins job name & choose the pipeline as style & click on the OK button.
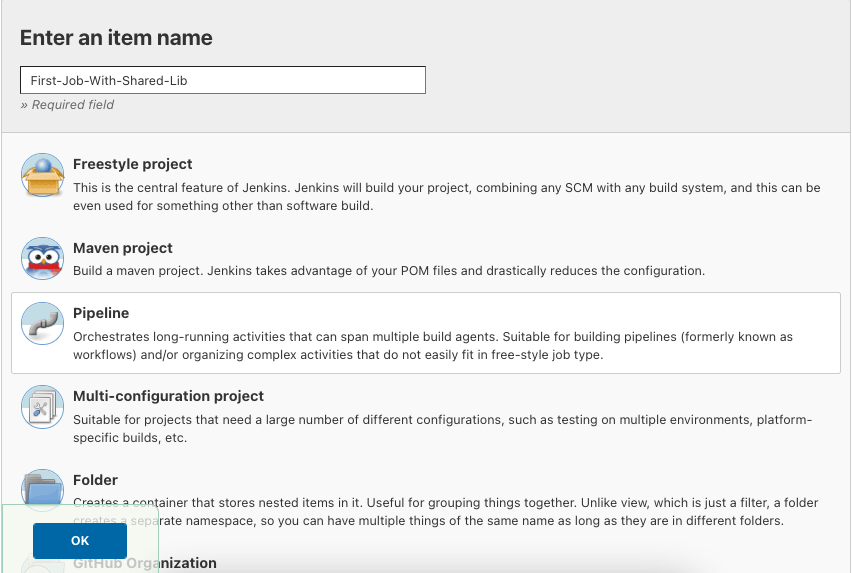
Step 2: Inside the job, scroll down to the pipeline section. Here we need our Jenkinsfile, which refers to the Shared Library. Loading Jenkinsfile into Jenkins job can be done via two approaches.
Approach 1 : Jenkinsfile – Manual approach (Not preferred for production)
- Under the pipeline section, you can see a script textbox where we can manually copy, paste the contents of our Jenkinsfile.
// Jenkinsfile
@Library('first-shared-lib') _
welcomeJob ‘lambdatest’
- Click on the save button.
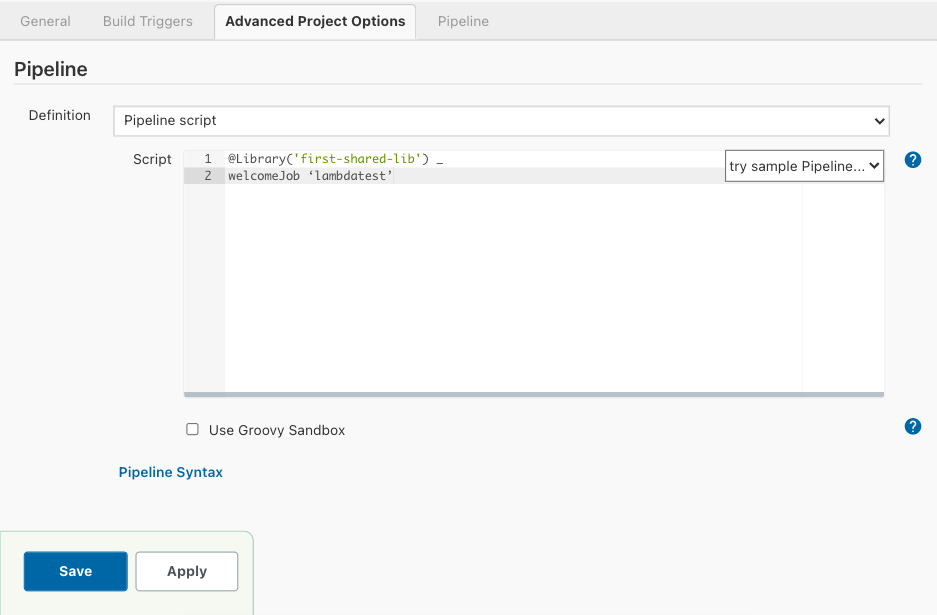
Approach 2 : Jenkinsfile – Refer from Git repository (Preferred Approach)
Instead of manually copy-pasting Jenkinsfile content, we can refer to Jenkinsfile committed in a Git repo.
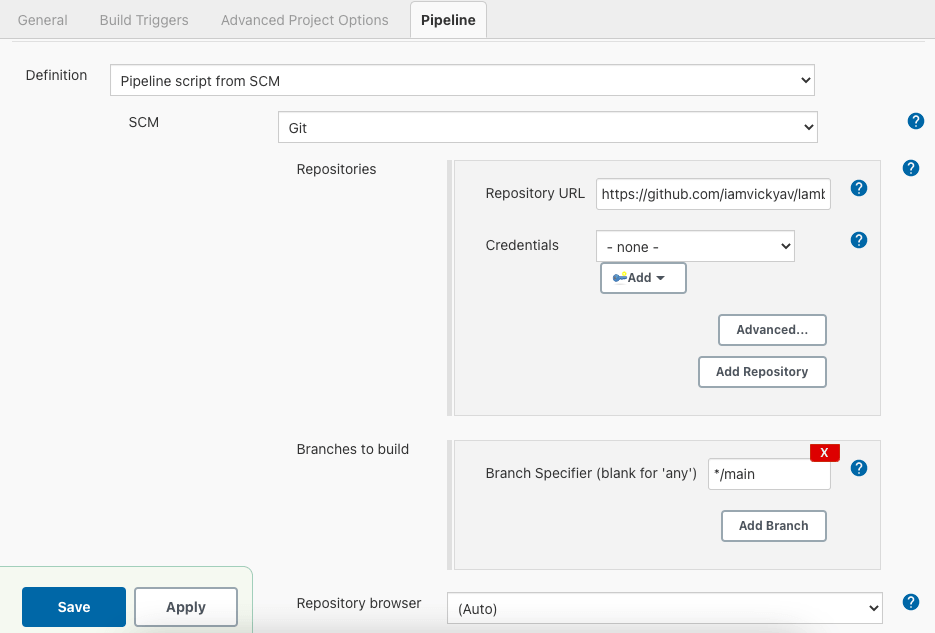
Step 1: In Jenkins job, under the pipeline section, choose pipeline script from SCM for Definition. Configure Git repo URL & credentials in case the repo needs authentication for code checkout.
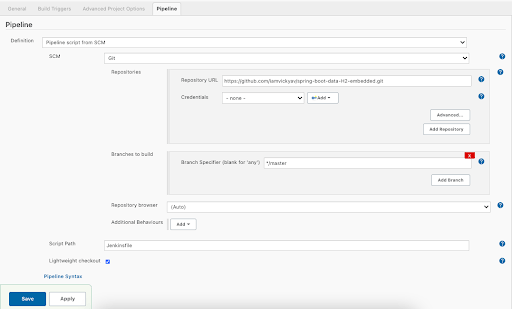
Step 2: Click on the Save button.
We recommend Approach 2 to load Jenkinsfile into the Jenkins job.
Step 3: Click on Build Now button on the left side menu to trigger the build.
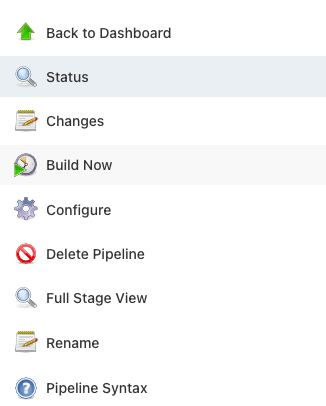
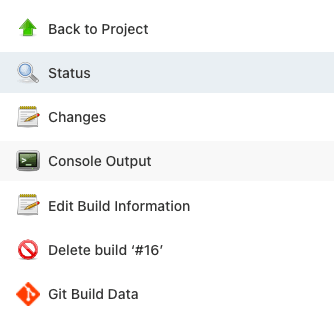
Step 4: Once the build is complete, check the logs by clicking on the Console Output from the left side menu.
You should see the Welcome, lambdatest message in the Console Output.
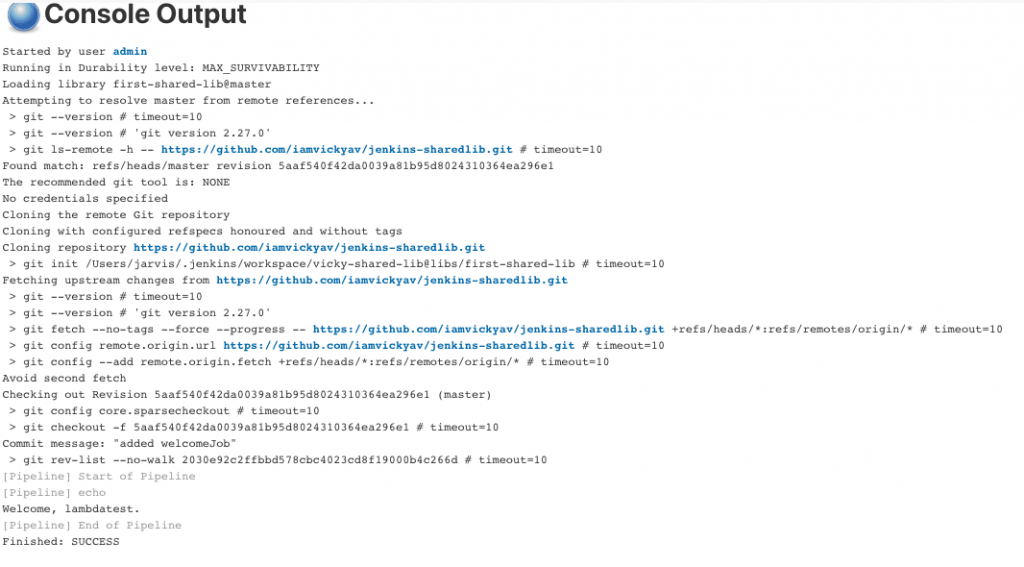
So we have successfully created & used a Jenkins shared library that prints the Welcome message. But what is the real use of this Jenkins pipeline library feature? Surely it’s not created just to print Welcome messages.
Jenkins Shared Library with Java/Spring Boot Application
Let’s take the example we discussed earlier in this article – Microservices architecture with five Spring Boot applications, with each of them having its Jenkinsfile.
Here is the sample Jenkinsfile to build, test & pack a Spring Boot application:
pipeline {
       agent any
       tools {
           maven 'Maven 3.5.0'
           jdk 'jdk8'
       }
       stages {
           stage("Tools initialization") {
               steps {
                   sh "mvn --version"
                   sh "java -version"
               }
           }
           stage("Checkout Code") {
               steps {
                   git branch: 'master',
                       url: "https://github.com/iamvickyav/spring-boot-data-H2-embedded.git"
               }
           }
           stage("Cleaning workspace") {
               steps {
                   sh "mvn clean"
               }
           }
           stage("Running Testcase") {
              steps {
                   sh "mvn test"
               }
           }
           stage("Packing Application") {
               steps {
                   sh "mvn package -DskipTests"
               }
           }
       }
 }
In brief, the above pipeline code will first load tools like Java & Maven, then checkout code from Git repo, clean up the workspace, then run the test case & finally pack the application as a JAR.
If you notice, other than the Git repo URL, the rest of the steps are applicable for any Spring Boot application. Instead of creating five different Jenkinsfiles, let’s create one Jenkins pipeline library & share it across all Spring Boot applications.
Moving Common Pipeline steps to Jenkins Shared Library
Let’s create a new shared library called jenkinsForJava by creating jenkinsForJava.groovy under the vars directory.
vars
| --- welcomeJob.groovy
| --- jenkinsForJava.groovy

// jenkinsForJava.groovy
def call(String repoUrl) {
  pipeline {
       agent any
       tools {
           maven 'Maven 3.5.0'
           jdk 'jdk8'
       }
       stages {
           stage("Tools initialization") {
               steps {
                   sh "mvn --version"
                   sh "java -version"
               }
           }
           stage("Checkout Code") {
               steps {
                   git branch: 'master',
                       url: "${repoUrl}"
               }
           }
           stage("Cleaning workspace") {
               steps {
                   sh "mvn clean"
               }
           }
           stage("Running Testcase") {
              steps {
                   sh "mvn test"
               }
           }
           stage("Packing Application") {
               steps {
                   sh "mvn package -DskipTests"
               }
           }
       }
   }
}
We moved our pipeline logic to the call() method in jenkinsForJava.groovy. Instead of hard coding the repoUrl, we made it dynamic by accepting the URL from the call() function’s parameter.
Now commit & push the vars/jenkinsForJava.groovy file.
Update Jenkinsfile in Spring Boot Application to use Shared Library
Let’s update the Jenkinsfile present in the root directory of the Spring Boot project with the following content:
@Library('first-shared-lib') _
jenkinsForJava 'https://github.com/iamvickyav/spring-boot-data-H2-embedded.git'
As the call() function in jenkinsForJava.groovy requires the Git repo URL, we passed it as a parameter here.
Note: By referring to jenkinsForJava shared library, Jenkinsfile in all our Spring Boot applications got shortened to just two lines – one for @Library import & the other for calling jenkinsForJava Shared Library.
Now commit & push the changes in Jenkinsfile to the remote repo.
Create a new Job for Spring Boot Application by following steps mentioned in Approach 2 – Jenkinsfile – Refer from Git repository (Preferred Approach) section.
Refer to the below screenshot for the final state of the job
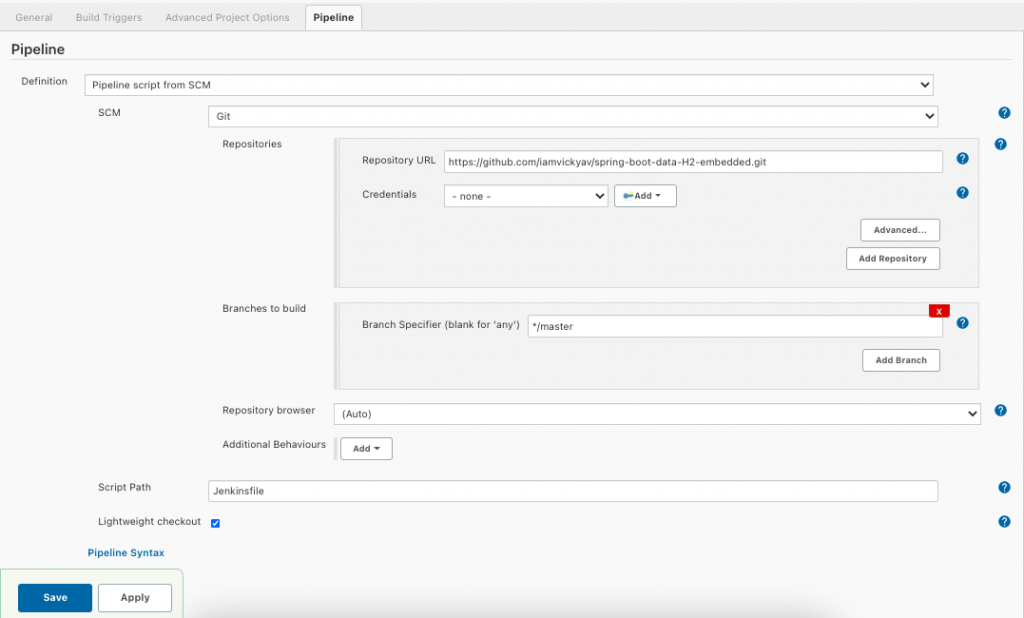
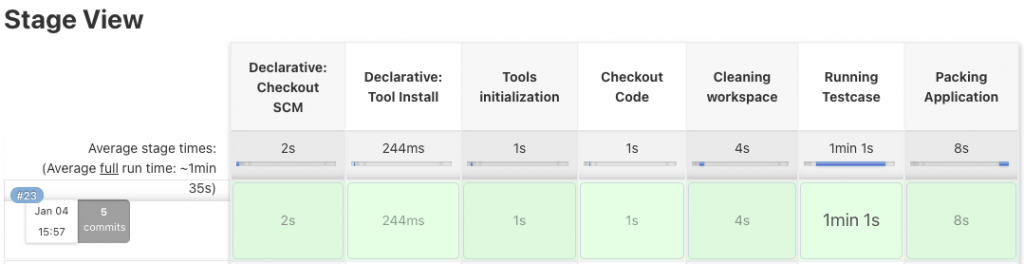
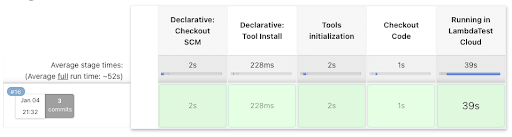
Run the job by clicking on Build Now from the left side menu after saving the job changes. You can see the build running in multiple stages, one after the other in the Stage View.
Accessing TestMu AI from Jenkins Shared Library
Let’s consider the following maven project, which contains Selenium Test cases to test the Sample To-Do App.
src/test/java/com/lambdatest/TestMu AI.java
package com.lambdatest

import java.net.MalformedURLException;
import java.net.URL;
import org.openqa.selenium.By;
import org.openqa.selenium.remote.DesiredCapabilities;
import org.openqa.selenium.remote.RemoteWebDriver;
import org.testng.annotations.BeforeTest;
import org.testng.annotations.Test;

public class LambdaTest {

   public RemoteWebDriver driver = null;
   String username = "";
   String accessKey = "";

   @BeforeTest
   public void setUp() throws Exception {
       DesiredCapabilities capabilities = new DesiredCapabilities();
       capabilities.setCapability("platform", "Windows 10");
       capabilities.setCapability("browserName", "Chrome");
       capabilities.setCapability("version", "87.0");
       capabilities.setCapability("resolution","1024x768");
       capabilities.setCapability("build", "First Test");
       capabilities.setCapability("name", "Sample Test");
       capabilities.setCapability("network", true);       capabilities.setCapability("visual", true);        capabilities.setCapability("video", true);        capabilities.setCapability("console", true);
       try {
           username = System.getProperty("username");
           accessKey = System.getProperty("accessKey");
           driver= new RemoteWebDriver(new URL("https://"+username+":"+accessKey+"@hub.lambdatest.com/wd/hub"), capabilities);
       } catch (MalformedURLException e) {
           System.out.println("Invalid grid URL");
       }
   }

   @Test(enabled = true)
   public void testScript() throws Exception {
       try {
           driver.get("https://lambdatest.github.io/sample-todo-app/");
           driver.findElement(By.name("li1")).click();
           driver.findElement(By.name("li2")).click();
           driver.findElement(By.id("sampletodotext")).clear();
           driver.findElement(By.id("sampletodotext")).sendKeys("Yey, Let's add it to list");
           driver.findElement(By.id("addbutton")).click();
           driver.quit();
       } catch (Exception e) {
           System.out.println(e.getMessage());
       }
   }
}
We want to run this test in TestMu AI’s cloud. Hence, we configured RemoteWebDriver with URL:
https://"+username+":"+accessKey+"@hub.lambdatest.com/wd/hub
Note: Sign Up on the https://www.lambdatest.com/ to get your username & accesskey.
Running Test in TestMu AI Cloud from Local
To execute the test in TestMu AI Cloud from your local, use the following command:
> mvn -Dusername=<USERNAME> -DaccessKey=<ACCESSKEY> test
Running Test in TestMu AI Cloud from Jenkins
You need to create TestMu AI Credentials in Jenkins Server:
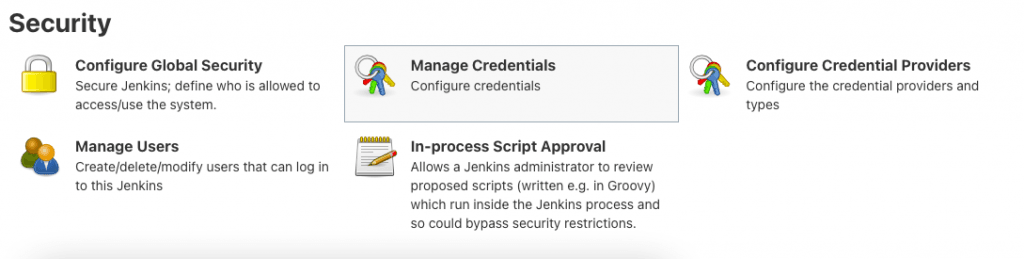
- Open Jenkins URL (http://localhost:8080 if local) & click on manage jenkins on the left side menu.
- Click on Manage Credentials.
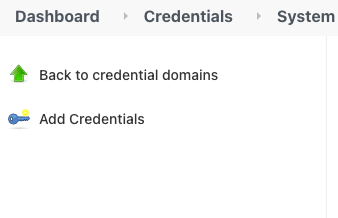
- Enter the Global credentials section & click on Add Credentials.
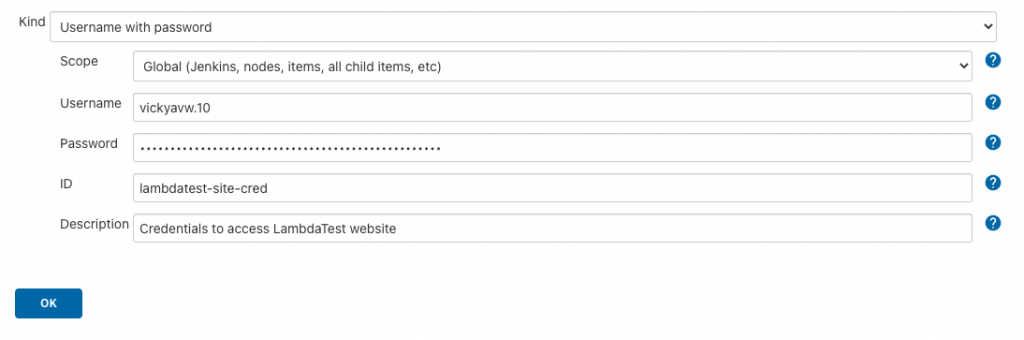
- Configure Username & Password with username & accessKey taken from TestMu AI site, respectively. Add credentials should look like something below:
Create JenkinsSharedLibrary to run test case on TestMu AI Cloud
- Create jenkinsTestMu AI.groovy under vars folder
vars
| --- welcomeJob.groovy
| --- jenkinsForJava.groovy
| --- jenkinsLambdaTest.groovy

def call(String repoUrl) {
   pipeline{
       agent any
       tools {
           maven 'Maven 3.5.0'
           jdk 'jdk8'
       }
       environment {
           LAMBDA_TEST_CRED = credentials('lambdatest-site-cred')
       }
       stages {
           stage("Tools initialization") {
               steps {
                       sh "mvn --version"
                       sh "java -version"
                   }
               }
           stage("Checkout Code") {
               steps {
                   git branch: 'main',
                   url: "${repoUrl}"
               }
           }
           stage("Running Testcase") {
               steps {
                   sh "mvn -Dusername=${LAMBDA_TEST_CRED_USR} -DaccessKey=${LAMBDA_TEST_CRED_PSW} test"
               }
           }
       }
   }
}
- We used environment block in pipeline code to load the credentials we created under the Manage Credentials section.
environment {
           		LAMBDA_TEST_CRED = credentials('lambdatest-site-cred')
      	}
- The entire credential is loaded into the LAMBDA_TEST_CRED variable.
_USR is appended with LAMBDA_TEST_CRED to access username & _PSW is appended with LAMBDA_TEST_CRED to access password (accessKey for TestMu AI portal).
- So our final mvn test command looks like below:
mvn -Dusername=${LAMBDA_TEST_CRED_USR} -DaccessKey=${LAMBDA_TEST_CRED_PSW} test

Create Jenkinsfile to use Shared Jenkins Library
- Create Jenkinsfile in source code repo with the following content
@Library('first-shared-lib') _
jenkinsLambdaTest 'https://github.com/iamvickyav/lambdatest-sample-repo.git'
- Now create a new job in Jenkins with pipeline as Job type & configure the pipeline section to refer to the Github repo.
- Click on the Save button & run the job by hitting Build now link from the left side menu. You should see test progress in the Jenkins Stage view.
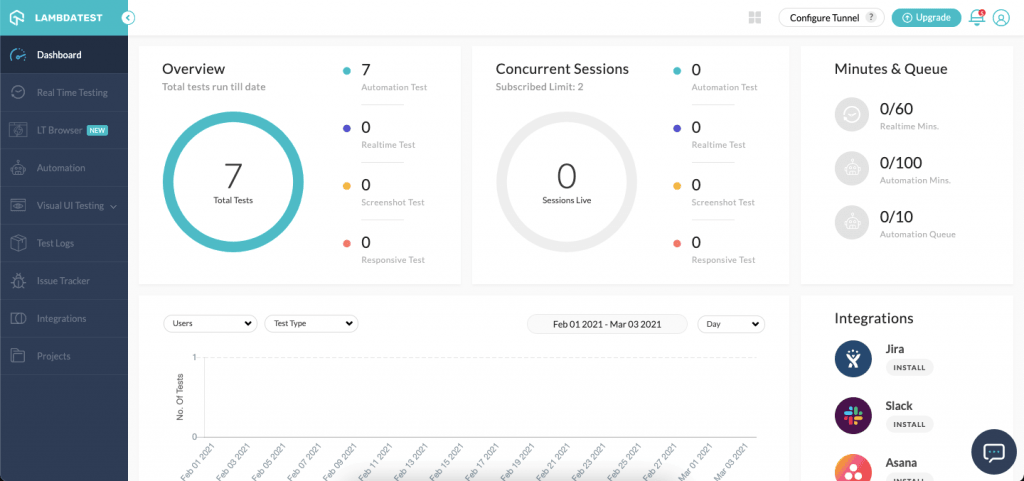
- You should also see the test report in TestMu AI cloud.
Wrapping Up
To summarize, in this Jenkins tutorial, we have discussed what is Jenkins shared library, when & how we can use it. Creating Jenkins jobs using GUI is the right place to start learning Jenkins. But it’s just the baby steps. We should not rely on GUI to create our project-related work instead, we should use Jenkinsfile to create our jobs. But it’s also important to learn how to use Jenkinsfile efficiently. Jenkins shared Library is just the first step in that direction.
I hope you found this article useful. Please let us know your feedback in the comment section below.
Author

Praveen Mishra
Blogs: 23


Praveen Mishra is a community contributor with 7 years of experience in B2B SaaS, specializing in testing automation and data-driven testing strategies. He holds a Bachelor's degree in Computer Applications (Computer Science) and has written 25+ technical articles on automation testing, CI/CD, cross-browser testing, and related topics. Praveen is followed by over 10,000 professionals from the QA community, including QA engineers, tech leaders, AI enthusiasts, and DevOps professionals, on LinkedIn.


Did you find this page helpful?
More Related Blogs
TestMu AI forEnterprise
Get access to solutions built on Enterprise
grade security, privacy, & compliance
- Advanced access controls
- Advanced data retention rules
- Advanced Local Testing
- Premium Support options
- Early access to beta features
- Private Slack Channel
- Unlimited Manual Accessibility DevTools Tests