
Next-Gen App & Browser Testing Cloud
Trusted by 2 Mn+ QAs & Devs to accelerate their release cycles

Getting Started With JUnit 5 And Mockito For Unit Testing
In this JUnit 5 Mockito tutorial, we will see how Mockito can be used with the JUnit unit testing framework and its new features in the bucket for JUnit 5.

Ruchira Shukla
December 22, 2025
This article is a part of our Learning Hub. For more in-depth resources, check out our hub on JUnit Tutorial.
Mockito is a unit testing framework for Java that simplifies the task of automation testing. It makes unit testing highly effective with clean tests, thanks to dependency injection and compile-time checks. In addition, Mockito helps improve the test independence of components being developed by helping you create objects that have no dependencies on a test-specific configuration. The most popular way of using Mockito is within the JUnit framework to help you write better tests.
For starters, mocking in unit testing is used for isolating the AUT (Application Under Test) from external dependencies. Mocking must be leveraged when implementation of external dependencies is not yet completed.
In this JUnit 5 Mockito tutorial, we will see how Mockito can be used with the JUnit unit testing framework for mocking in JUnit 5. Furthermore, delve into an extensive compilation of commonly asked JUnit Interview Questions and Answers. This resource is designed to aid interview preparation and enhance your proficiency.
Let’s get started!
Overview
Mockito, when integrated with JUnit 5, enhances unit testing in Java by simplifying dependency mocking, isolating test environments, and enabling cleaner, more maintainable code structures for automation testing.
What Is Mockito and Why Is It Used With JUnit 5?
Mockito is a mocking framework that helps create and manage mock objects, allowing testers to isolate the application under test (AUT) and simulate dependencies effectively.
- Simplified Mocking: Enables isolation of components by mocking external dependencies or services, ensuring focused testing of individual modules.
- Improved Readability: Reduces repetitive setup using annotations like @Mock, @Spy, and @InjectMocks, leading to cleaner and more maintainable test code.
- Seamless Integration: Works natively with JUnit 5’s extension model, simplifying mock initialization and reducing boilerplate code.
- Error Detection: Offers compile-time checks and behavioral validations, enhancing reliability and catching issues early in the test cycle.
- Enhanced Efficiency: Allows testing of incomplete or external modules by eliminating dependency bottlenecks, streamlining the development workflow.
How To Use Mockito With JUnit 5 Extensions?
JUnit 5 offers an extension model that integrates smoothly with Mockito, eliminating manual setup and improving test clarity and execution speed.
- Add Dependencies: Include
mockito-coreandmockito-junit-jupiterin your Maven or Gradle configuration for setup. - Use @ExtendWith: Annotate test classes with
@ExtendWith(MockitoExtension.class)to enable automatic mock initialization. - Initialize Mocks Automatically: No need to call
MockitoAnnotations.openMocks(); the extension handles it seamlessly. - Validate Behavior: Combine Mockito’s
when…thenReturnsyntax with JUnit assertions to verify expected outputs. - Simplify Maintenance: Keeps test classes concise, eliminating boilerplate setup and improving readability and maintainability.
JUnit 5 and Mockito together deliver a powerful, flexible, and scalable testing ecosystem. With support for mocking, extensions, and parallel execution, they simplify automation and ensure faster, more reliable test outcomes for modern Java applications.
Getting started with Mockito and JUnit 5
Mockito is an open-source test automation framework that internally uses Java Reflection API to create mock objects. Mock objects are dummy objects used for actual implementation. The main purpose of using a dummy object is to simplify the development of a test by mocking external dependencies and using them in the code.
As per my experience, you should mock objects in unit tests when the real object has a non-deterministic behavior or the real object is a callback function or the real object is yet to be implemented.
In this JUnit 5 Mockito tutorial, we will use Mockito with JUnit for performing Selenium automation testing. In case you are starting with JUnit, look at this article on how to setup JUnit environment for your first test?. However, you can also go through the Selenium JUnit tutorial to check out the basics of JUnit, from writing your first test to running tests in Selenium with examples.
Also Read – What is Selenium?
Mockito Installation
When you use Mockito in your unit tests, you will need to download the jar file and place it in a path that your build system can find. Mockito is available in two versions: mockito-core (which contains only the core of Mockito, and mockito-all (which contains all modules).
The preferred way of installing Mockito is to declare a dependency on mockito-core with a build system of choice. The second best way is to download the artifacts using a manual approach and add them to the classpath. You can also add dependencies to your existing Maven or Gradle project.
Also Read: Run JUnit Tests From Command Line
Add the following dependencies in your pom.xml:
<dependency> <groupId>org.mockito</groupId> <artifactId>mockito-core</artifactId> <version>4.1.0</version> <scope>test</scope> </dependency>
When using Gradle, this can be achieved by declaring the following dependency to your build.gradle:
compile("org.mockito:mockito-core:4.1.0")
The latest version of Mockito when writing this article is 4.1.0.

Annotations in Mockito
Like JUnit annotations, Mockito annotations are used to specify the behavior of the test code. It allows the users to focus more on their logic while still testing the code very effectively. This section of the JUnit 5 Mockito tutorial mainly focuses on Mockito annotations and how to use them in Selenium.
1. @Mock annotation in Mockito
Mock annotation is used to create a mock object.
@Mock
ToDoService serviceMock;
The @Mock annotation is always used with @RunWith, a class-level annotation. We will see in detail how both annotations are used to create and use a mock object in the next segment.
For now, let’s see the following syntactic example:
@RunWith(MockitoJUnitRunner.class)
public class DemoMock {
.....
}
2. @Spy annotation in Mockito
Spy annotation is used to create a real object and spy on that real object. This would help to call all the object methods while still tracking every interaction that is being mocked.
Below is the simple implementation of @Spy annotation:
@Spy
List<String> myList = new ArrayList<String>();

@Test
public void usingSpyAnnotation() {
   myList.add("Hello, This is LambdaTest");
   Mockito.verify(spyList).add("Hello, This is LambdaTest");
   assertEquals(1, spyList.size());
}
3. @Captor annotation in Mockito
Captor annotation is used to create an ArgumentCaptor instance to capture method argument values for further assertions.
Here is a simple implementation of @Captor annotation that captures MyMap’s key and values:
@Mock
HashMap<String, Integer> MyMap;
@Captor
ArgumentCaptor<String> keyCaptor;
@Captor
ArgumentCaptor<Integer> valueCaptor;
@Test
public void ArgumentCaptorTest()
{
   hashMap.put("A", 10);
   Mockito.verify(MyMap).put(keyCaptor.capture(), valueCaptor.capture());
   assertEquals("A", keyCaptor.getValue());
   assertEquals(new Integer(10), valueCaptor.getValue());
}
Also read – JUnit Asserts With Examples
4. @InjectMocks annotation in Mockito
InjectMocks annotation is used to mock a class with all its dependencies. This is quite useful to test the behavior completely.
In the below example, we will use @InjectMock Countries into Continent:
@Mock
Map<String, String> Countries;

@InjectMocks
MyDictionary dic = new Continent();

@Test
public void UseInjectMocksAnnotation() {
   Mockito.when(Countries.get("India")).thenReturn("asia");

   assertEquals("asia", dic.getContinent("India"));
}
Now that we have seen different Mockito annotations, let’s deep-dive into creating Mocks in the Mockito framework.
However, if you are intrigued to know more about JUnit Annotations in Selenium, you can go through the following video from the TestMu AI YouTube Channel and stay updated with more such videos on the JUnit tutorial with Selenium, Selenium Testing, Cypress Testing, and more.
How to create Mocks in Mockito?
In this section of the JUnit 5 Mockito tutorial, we will see different ways to create Mocks in the Mockito framework. In Mockito, we can create mock objects in two ways:
- Using @Mock annotation
- Using Mock() method
Using @Mock annotation to create Mocks
@Mock annotation minimizes repetitive mock objects and makes more readable test code and verification errors. It is available in the org.mockito package. Here is the code snippet of @mock annotation:
Using @Mock method to create Mocks
The Mockito.mock() method allows us to create a mock object of classes and interfaces. Here is the code snippet for a simple class mock:
MyList listMock = mock(MyList.class);
when(listMock.add(anyString())).thenReturn(false);
In the above code snippet, MyList is a class for which we have created a mock object by passing that as a parameter in the mock() method. The second line sets an expectation. When the add() method of MyList class is called, it has to return false.
To understand this more clearly, let’s take an example of an eCommerce application. Let’s assume a scenario where you have to test the checkout feature. There is a class Order which has a method checkout() that finalizes the order and processes the payment. We are deliberately overlooking other conditions for the sake of simplicity.
So the Order class would look something like this:
public class Order {

       public Order() {
       }

       public String checkout(PaymentProviderService payment) {
           try {
               return payment.processPayment().equalsIgnoreCase("Approved") ? "Success" : "Failure";
           }
           catch(Exception e) {
               return "Exception occurred at payment provider service when trying to checkout";
           }
       }
   }
In the above example, the checkout() method uses PaymentProviderService class for payment processing. The success or failure of checkout is based on the method processPayment().
So if we want to write test cases for checkout functionality, we also need to create an instance of the PaymentProviderService class. But we don’t want to depend on this class to start writing our unit tests. In this case, we would create a mock object of the PaymentProviderService class and continue writing tests for the Order class.
Here is the code snippet:
public class OrderTests {

       @Test
       public void checkoutOrderSuccessOnPaymentSuccess() {

           Order order = new Order();
           PaymentService ppMock = mock(PaymentService.class);
           when(ppMock.processPayment()).thenReturn("Approved");

           Assert.assertEquals(
               "Success",
               order.checkout(ppMock)
           );
       }
Code Walkthrough
I have created a test case for the Order class in the above code, which tests the successful order placement scenario.
PaymentProviderService ppMock = mock(PaymentProviderService.class);
The above line creates a mock object of the PaymentProviderService class. Now we can use this object to call the processPayment() method. We can write the expected behavior using when…thenReturn as:
when(ppMock.processPayment()).thenReturn("Approved");
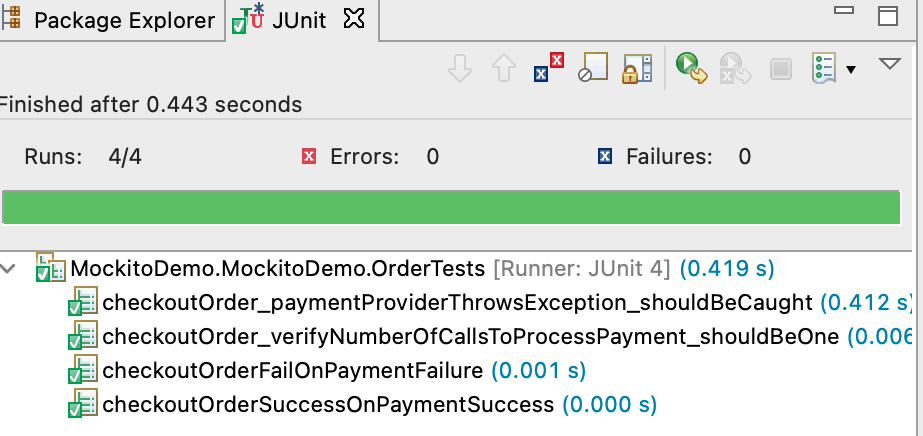
After that, we can assert the expected and actual outputs and perform the desired function. Likewise, we have created 4 unit tests for the Order class. The output of those tests on running them on IDE is shown below:
How to use Mockito with JUnit 5 extensions?
This section of the JUnit 5 Mockito tutorial is devoted to the usage of Mockito with JUnit 5. It shows how to add a mock object to a test case and verify its behavior with JUnit 5. JUnit 5 has an extension model that supports Mockito out-of-the-box. The JUnit 5 extension model allows users to provide custom annotations and behaviors for test doubles.
To start with, JUnit Jupiter dependencies need to be added apart from mockito-core dependencies. So following dependencies have to be added in pom.xml(for Maven):
 <dependency>
   <groupId>org.mockito</groupId>
   <artifactId>mockito-junit-jupiter</artifactId>
   <version>4.1.0</version>
   <scope>test</scope>
</dependency>
Here is how the dependencies can be added for Gradle:
dependencies{
testImplementation('org.mockito:mockito-core:4.1.0')
The extension eliminates the need for the MockitoAnnotations.openMocks() method call. So the above example can be modified as:
@ExtendWith(MockitoExtension.class)
public class OrderTestsUsingExtension {

           @Test
           public void checkoutOrderSuccessOnPaymentSuccess() {

               Order order = new Order();
               PaymentProviderService ppMock = mock(PaymentProviderService.class);
               when(ppMock.processPayment()).thenReturn("Approved");

               Assert.assertEquals(
                   "Success",
                   order.checkout(ppMock)
               );
           }
}
It’s simple, isn’t it? This makes our code more readable and clean. Also, it can detect incorrect stubbing.
The next section of this JUnit 5 Mockito tutorial, will showcase parallel testing in Selenium using Mockito and JUnit.
Austin Siewert
CEO, Vercel
Discovered @TestMu AI yesterday. Best browser testing tool I've found for my use case. Great pricing model for the limited testing I do 👏
2M+ Devs and QAs rely on TestMu AI
Deliver immersive digital experiences with Next-Generation Mobile Apps and Cross Browser Testing Cloud
This JUnit certification establishes testing standards for those who wish to advance their careers in Selenium automation testing with JUnit.
Here’s a short glimpse of the JUnit certification from TestMu AI:
How to perform parallel testing using Mockito and JUnit 5 on cloud Selenium Grid
JUnit 5 has the much-awaited capability of executing tests parallely, which significantly reduces the execution time. This is a life savior for testers as we have a huge no. of test cases in the real world. Leveraging this capability using an online Selenium Grid like TestMu AI would be more efficient.
Selenium testing tools like TestMu AI, allow you to perform on more than 3000 online browsers and operating system combinations.
Here is a quick video tutorial on the real-time browser testing.
In this section of the JUnit 5 Mockito tutorial, we will take a simple example to demonstrate parallel testing with Mockito and JUnit 5:
Problem Statement
- Navigate to .
- Validate the page title is “Most Powerful Cross Browser Testing Tool Online | TestMu AI.”
- Enter username and password.
- Click on the login button.
- Validate successful login by “Welcome – TestMu AI” message.
We will be executing this test case on the following browsers, versions, and platform combinations using TestMu AI remote Selenium Grid:
Browser | Version | Platform |
|---|---|---|
Chrome | 70.0 | WIN10 |
Safari | 14.0.2 | macOS Big Sur |
Firefox | 76.0 | WIN10 |
Browser
Version
Platform
Chrome
70.0
WIN10
Safari
14.0.2
macOS Big Sur
Firefox
76.0
WIN10
package MockitoDemo.MockitoDemo;
import org.junit.jupiter.api.AfterAll;
import org.junit.jupiter.api.AfterEach;
import org.junit.jupiter.api.Assertions;
import org.junit.jupiter.api.BeforeAll;
import org.junit.jupiter.api.BeforeEach;
import org.junit.jupiter.api.Test;
import org.junit.jupiter.api.parallel.Execution;
import org.junit.jupiter.api.parallel.ExecutionMode;
import org.junit.jupiter.params.ParameterizedTest;
import org.junit.jupiter.params.provider.Arguments;
import org.junit.jupiter.params.provider.MethodSource;
import org.openqa.selenium.By;
import org.openqa.selenium.WebElement;
import org.openqa.selenium.remote.DesiredCapabilities;
import org.openqa.selenium.remote.RemoteWebDriver;
import org.openqa.selenium.support.ui.ExpectedConditions;
import org.openqa.selenium.support.ui.WebDriverWait;
import java.util.stream.Stream;
import java.net.MalformedURLException;
import java.net.URL;
import java.util.concurrent.TimeUnit;
import static org.junit.jupiter.params.provider.Arguments.arguments;
@Execution(ExecutionMode.CONCURRENT)
public class CrossbrowserDemo {
String username = "YOUR_USER_NAME";
       String accesskey = "YOUR_ACCESS_KEY";

      static RemoteWebDriver driver = null;
      String gridURL = "@hub.lambdatest.com/wd/hub";
      String urlToTest = "https://www.lambdatest.com/";

      @BeforeAll
      public static void start() {
          System.out.println("=======Starting junit 5 tests in LambdaTest  Grid========");
      }

      @BeforeEach
      public void setup(){
          System.out.println("=======Setting up drivers and browser========");
      }

      public void browser_setup(String browser) {
          System.out.println("Setting up the drivers and browsers");
          DesiredCapabilities capabilities = new DesiredCapabilities();

          if(browser.equalsIgnoreCase("Chrome")) {
              capabilities.setCapability("browserName", "chrome");    //To specify the browser
              capabilities.setCapability("version", "70.0");        //To specify the browser version
              capabilities.setCapability("platform", "win10");        // To specify the OS
              capabilities.setCapability("build", "Running_Junit5Tests_In_Grid_Chrome");               //To identify the test
              capabilities.setCapability("name", "JUnit5Tests_Chrome");
              capabilities.setCapability("network", true);        // To enable network logs
              capabilities.setCapability("visual", true);            // To enable step by step screenshot
              capabilities.setCapability("video", true);            // To enable video recording
              capabilities.setCapability("console", true);            // To capture console logs
          }
          if(browser.equalsIgnoreCase("Firefox")) {
              capabilities.setCapability("browserName", "Firefox");  //To specify the browser
              capabilities.setCapability("version", "76.0");    //To specify the browser version
              capabilities.setCapability("platform", "win10");   // To specify the OS
              capabilities.setCapability("build", "Running_Junit5Tests_In_Grid_Firefox");    //To identify the test
              capabilities.setCapability("name", "JUnit5Tests_Firefox");
              capabilities.setCapability("network", true);      // To enable network logs
              capabilities.setCapability("visual", true);       // To enable step by step screenshot
              capabilities.setCapability("video", true);        // To enable video recording
              capabilities.setCapability("console", true);      // To capture console logs

          }
          if(browser.equalsIgnoreCase("Safari")) {
              capabilities.setCapability("browserName", "Safari");  //To specify the browser
              capabilities.setCapability("version", "14.0.2");    //To specify the browser version
              capabilities.setCapability("platform", "macOS Big Sur");   // To specify the OS
              capabilities.setCapability("build", "Running_Junit5Tests_In_Grid_Safari");    //To identify the test
              capabilities.setCapability("name", "JUnit5Tests_Firefox");
              capabilities.setCapability("network", true);      // To enable network logs
              capabilities.setCapability("visual", true);       // To enable step by step screenshot
              capabilities.setCapability("video", true);        // To enable video recording
              capabilities.setCapability("console", true);      // To capture console logs

          }
          try {
              driver = new RemoteWebDriver(new URL("https://" + username + ":" + accesskey + gridURL), capabilities);
          } catch (MalformedURLException e) {
              System.out.println("Invalid grid URL");
          } catch (Exception e) {
              System.out.println(e.getMessage());
          }

      }

      @ParameterizedTest
      @MethodSource("browser")
      public void launchAndVerifyTitle_Test(String browser) {
          browser_setup(browser);
          String methodName = Thread.currentThread()
                  .getStackTrace()[1]
                  .getMethodName();
          driver.get(urlToTest);
          driver.manage().window().maximize();
          driver.manage().timeouts().pageLoadTimeout(10, TimeUnit.SECONDS);
          String actualTitle = driver.getTitle();
          System.out.println("The page title is "+actualTitle);
          String expectedTitle ="Most Powerful Cross Browser Testing Tool Online | LambdaTest";
          System.out.println("Verifying the title of the webpage started");
          Assertions.assertEquals(expectedTitle, actualTitle);
          System.out.println("The webpage has been launched and the title of the webpage has been veriified successfully");
          System.out.println("********Execution of "+methodName+" has ended********");
      }

      @ParameterizedTest
      @MethodSource("browser")
      public void login_Test(String browser) {
          browser_setup(browser);

          String methodName = Thread.currentThread()
                  .getStackTrace()[1]
                  .getMethodName();
          driver.get(urlToTest);
          driver.manage().window().maximize();
          driver.manage().timeouts().pageLoadTimeout(10, TimeUnit.SECONDS);
          WebElement login = driver.findElement(By.xpath("//a[text()='Login']"));
          login.click();
          WebElement username = driver.findElement(By.xpath("//input[@name='email']"));
          WebElement password = driver.findElement(By.xpath("//input[@name='password']"));
          WebDriverWait wait = new WebDriverWait(driver,20);
          wait.until(ExpectedConditions.visibilityOf(username));
          username.clear();
          username.sendKeys("[email protected]");
          password.clear();
          password.sendKeys("ruchira@89");
          WebElement loginButton = driver.findElement(By.xpath("//button[text()='Login']"));
          loginButton.click();
          driver.manage().timeouts().pageLoadTimeout(10, TimeUnit.SECONDS);
          String actual = driver.getTitle();
          String expected = "Welcome - LambdaTest";
          Assertions.assertEquals(expected, actual);
          System.out.println("The user has been successfully logged in");
          System.out.println("********Execution of "+methodName+" has ended********");
      }

      @ParameterizedTest
      @MethodSource("browser")
      public void logo_Test(String browser) {
          browser_setup(browser);
          String methodName = Thread.currentThread()
                  .getStackTrace()[1]
                  .getMethodName();
          System.out.println("********Execution of "+methodName+" has been started********");
          System.out.println("Launching LambdaTest website started..");
          driver.get(urlToTest);
          driver.manage().window().maximize();
          driver.manage().timeouts().pageLoadTimeout(10, TimeUnit.SECONDS);
          System.out.println("Verifying of webpage logo started..");

          WebElement logo = driver.findElement(By.xpath("//*[@id="header"]/nav/div/div/div[1]/div/a/img"));
          boolean is_logo_present = logo.isDisplayed();
          if(is_logo_present) {
              System.out.println("The logo of LambdaTest is displayed");
          }
          else {
              Assertions.assertFalse(is_logo_present,"Logo is not present");
          }
          System.out.println("********Execution of "+methodName+" has ended********");
      }

      @AfterEach
      public void tearDown() {
          System.out.println("Quitting the browsers has started");
          driver.quit();
          System.out.println("Quitting the browsers has ended");
      }

      @AfterAll
      public static void end() {
          System.out.println("Tests ended");
      }

      static Stream<Arguments> browser() {
          return Stream.of(
                  arguments("Chrome"),
                  arguments("Firefox"),
                  arguments("Safari")
          );
      }

}
Code Walkthrough
Three tests will run in parallel in the above code on the mentioned browser OS combinations.
The @Execution(ExecutionMode.CONCURRENT) annotation defines the parallel mode in JUnit 5. The TestMu AI remote Selenium Grid initiates the execution based on the arguments defined in the capabilities.
The @ParameterizedTest annotation defines that the annotated method is parameterized where the @MethodSource annotation is used to provide the method name, which is used as a source of parameter values.
Also read – JUnit Parameterized Test For Selenium Automation With Examples
At last, the browser() method, which is the method source, has the browser names as the arguments.
After execution, we will get logs as below:
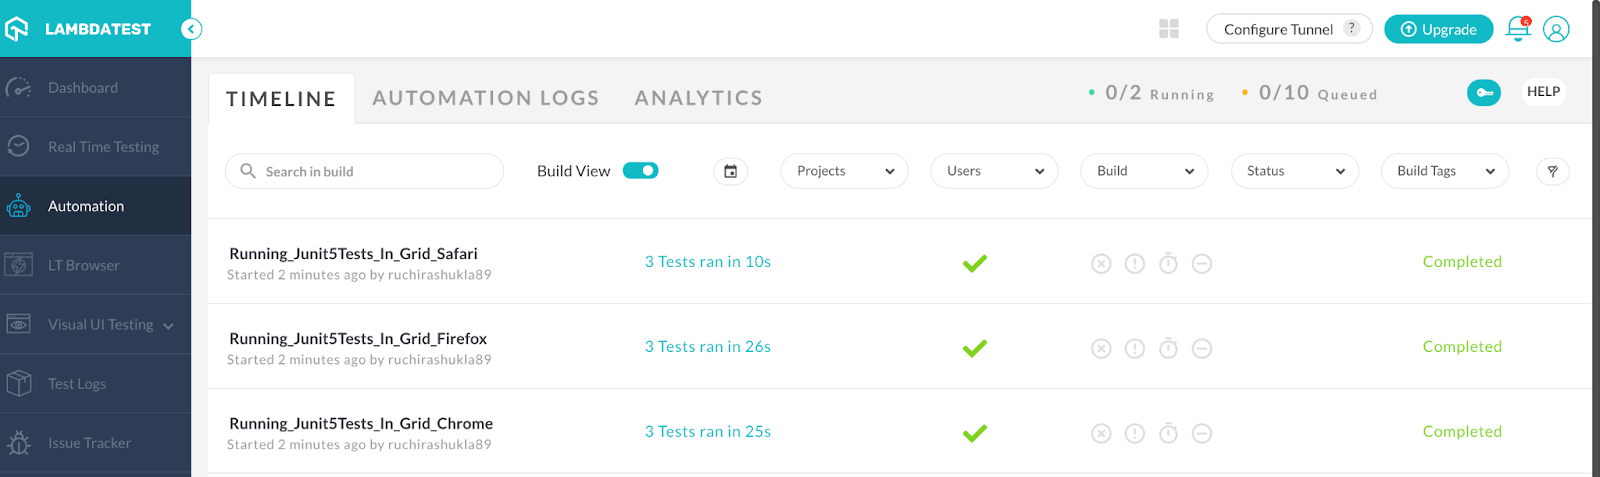
As we can see, three tests are executed in parallel on three different browsers where they took around 60 seconds to execute.
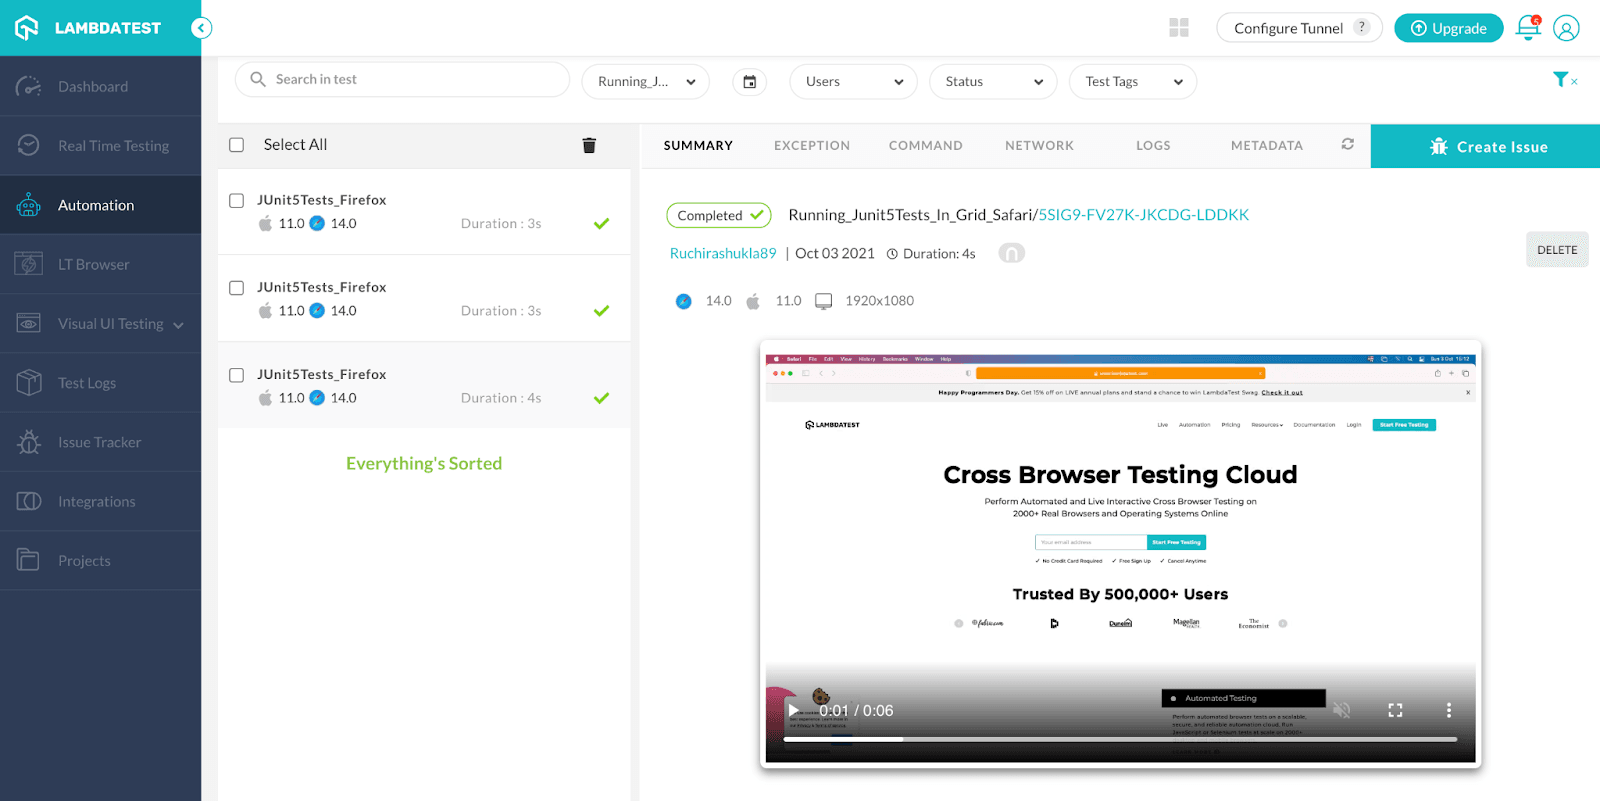
We can also get the video of each run to find the issue if a test fails.
So, if you’re curious to know more about performing parallel testing with JUnit 5 and Selenium, this video will help you get started. This video will guide you through different parallel parameters in JUnit testing, including methods – execute test methods in separate threads and classes – to execute test classes in separate threads.
Conclusion
In this JUnit 5 Mockito tutorial, we have gone through the basics of the Mocking and Mockito framework. Also, what are different annotations in Mockito and their use cases. In JUnit 5, the creation of mocks using Mockito has been made more simple by extension. We have also discussed the parallel execution of test cases in JUnit5 using TestMu AI cloud Selenium Grid. Though Mockito is highly utilized in unit testing, we can also leverage its extensive capabilities in integrating those unit tests for Selenium automation testing.
How have you used Mockito in your testing? Let us know in the comments below.
Happy Testing!
Frequently asked questions
Did you find this page helpful?
More Related Hubs
TestMu AI forEnterprise
Get access to solutions built on Enterprise
grade security, privacy, & compliance
- Advanced access controls
- Advanced data retention rules
- Advanced Local Testing
- Premium Support options
- Early access to beta features
- Private Slack Channel
- Unlimited Manual Accessibility DevTools Tests