
Next-Gen App & Browser Testing Cloud
Trusted by 2 Mn+ QAs & Devs to accelerate their release cycles

Angular Testing With Jasmine And Karma Using Selenium [Tutorial]
A comprehensive tutorial on how to perform Angular testing with Jasmine and Karma using Selenium.

Harita Ravindranath
January 12, 2026
In this Angular testing tutorial, we discuss in-depth the benefits of Unit testing and how to perform Angular testing with Jasmine and Karma using Selenium.
Angular unit testing best practices include isolating tests, using test doubles for dependencies, following the Arrange-Act-Assert pattern, covering all code paths, and utilizing mock data for predictability.
With the assumption that you are comfortable with Typescript and Angular applications, let’s get started!
Now perform live interactive manual testing of your Angular websites on TestMu AI. Furthermore, delve into an extensive compilation of commonly asked Jasmine Interview Questions. This resource is designed to aid interview preparation and enhance your Jasmine framework proficiency.
Overview
Angular testing with Jasmine and Karma using Selenium combines unit and end-to-end testing. Jasmine handles test logic, Karma runs tests in browsers, and Selenium automates real user interactions for complete application validation.
How to Set Up a Project Using Angular, Karma, and Jasmine?
Angular uses Karma as its test runner and Jasmine as its testing framework. Together, they provide a powerful setup for unit testing and maintaining code quality efficiently.
- Install Angular CLI: Open the terminal and install Angular CLI globally using npm install -g @angular/cli. This helps generate, build, and test Angular projects easily.
- Create a New Project: Run ng new angular-testing-demo and select defaults. Angular CLI automatically configures Karma and Jasmine for testing within your project structure.
- Navigate to Project Folder: Use cd angular-testing-demo to move into your project directory and prepare the environment for creating and running test cases.
- Check Default Test Setup: The generated Angular project includes a src/app/app.component.spec.ts file, which contains sample Jasmine unit tests for reference and learning.
- Run Initial Tests: Execute ng test to start the Karma test runner. This command compiles your project and runs existing Jasmine tests in the browser.
- Understand Karma Configuration: Open karma.conf.js to view configuration details like testing frameworks, browsers, and reporters used during Angular test execution.
- Modify or Add Tests: Edit app.component.spec.ts or create new .spec.ts files in respective component folders to include your own unit test cases.
- Use Jasmine Matchers: Jasmine provides intuitive matchers like toBe(), toEqual(), and toContain() that simplify writing readable and maintainable test assertions.
- View Test Results: When Karma runs, results appear in the terminal and browser window, showing passing and failing specs with detailed descriptions for easy debugging.
- Enable Continuous Testing: Karma automatically reruns tests whenever code changes. Keep ng test running in watch mode to maintain quick feedback during development.
How to Write Angular Unit Tests Using Jasmine?
Jasmine is the default testing framework for Angular applications. It allows developers to write clean, structured, and behavior-driven unit tests to validate component logic effectively.
- Locate the Spec File: Every Angular component has an associated spec.ts file. Open app.component.spec.ts to begin writing your first unit test.
- Understand the Test Structure: Jasmine tests are grouped with describe() blocks and individual test cases are defined inside it() functions with expectations.
- Import Required Modules: Import TestBed from Angular’s testing library and the component under test to configure and initialize the testing environment.
- Configure the TestBed: Inside beforeEach(), call TestBed.configureTestingModule() to declare the component and compile its template before running each test case.
- Create a Component Instance: Use TestBed.createComponent() to create a fixture, which provides access to both the component instance and the rendered template.
- Write the First Test: Add an it() block with an expectation like expect(component).toBeTruthy() to verify that the component initializes correctly.
- Test Component Properties: Add tests to check default values or method outputs by comparing expected and actual results using Jasmine’s matchers.
- Trigger Change Detection: Use fixture.detectChanges() to apply bindings and update the DOM whenever the component state changes during testing.
- Run the Tests: Execute ng test in the terminal to run all Jasmine tests. Karma will display the pass or fail status in the browser window.
- Refine and Expand Tests: As your project grows, add more spec files and test cases to cover services, directives, and pipes for complete Angular application coverage.
Introduction to Unit Testing
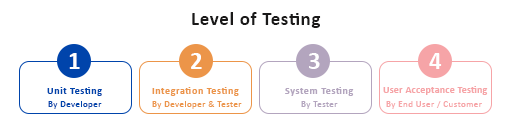
Unit testing is a type of software technique where individual units or components of an application are tested to ascertain they are working as expected. Unit tests are typically automation tests written and run by the software developer during the coding phase to test standalone modules of the application for its functional correctness. A unit can be an individual function, method, procedure, module, or object.
The main goal of Unit testing is to break the application source code into isolated units to identify, analyze and fix the defects arising from that particular unit. Testing a unit in isolation means testing without external resources like API endpoint or database. Instead, substitutes such as stub methods, mock objects or fakes will be used to harness a fake response and test code will be written based on that.
Example: A library named Moxios is used to mock API calls using Axios.
Developers and product owners often overlook Unit testing by pointing out limited development time and resources as reasons, making them proceed without it. And yes, this seldom works out. But the companies that are serious about the quality delivery of their product understands the significance of Unit testing and is diligent in enforcing it.
Since we are talking about Unit testing, it is also worth mentioning the most popular approaches that are used in combination with it – Test-Driven Development (TDD) and Behaviour-Driven Development (BDD).
Read More: TDD vs. BDD Comparison

Benefits of Unit testing
Unit testing is becoming more popular in the web development world. According to the reports presented by the fourth annual Developer Ecosystem Survey (2020) conducted by JetBrains, 77% of the developers stated that testing is an integral part of the development process in their companies or teams. Furthermore, 68% voted for Unit testing as the most popular approach.

Source
Larger or smaller, every project can enjoy the benefits of Unit testing. A few significant advantages are listed below:
- Helps identify and fix bugs early in the development cycle and save costs.
- Forces developers to improve the design of implementations as it is difficult to write unit tests for poorly written code.
- Ensures the developer that the new feature added is not breaking the existing code hence giving confidence in code quality.
- Simplified debugging fails; only the latest code needs to be if the test fails debugged.
- Aids in overall faster development.
- Allows better refactoring of code.
- Good Unit testing can even serve as project documentation. Developers, especially those who newly joined the team, can look at the unit tests to learn about the functionality provided by the unit, how to use it etc.
Limitations of Unit testing
It is equally important to understand the limitations of Unit testing. A few are listed below:
- It is impossible to catch every error in the program using Unit testing as it cannot evaluate every execution path. It cannot catch integration errors, complex broad system errors or non-functional attributes like usability, scalability, performance etc.
- The difficulty of setting up realistic and relevant unit tests. If they are not set correctly, it can diminish the value and accuracy of test results.
- If the Unit test involves just passing input and verifying the output for a method, it tends to be easy to create. However, it is not so simple if it includes something more complex like interaction with an external resource.
Unit testing With Angular Framework

Since Unit testing has become an integral part of development, all the major development frameworks now come with support for Unit testing. Numerous testing libraries and frameworks are available to reduce the amount of time taken to write tests.
In the further section of Angular testing with Jasmine and Karma tutorial, you will learn how to test Angular applications with Karma Testrunner and Jasmine framework using Selenium.
On a side note, you can refer to our detailed guide on Angular E2E Testing to learn how to perform End-To-End Testing With JavaScript And Karma.
But before that, let us know and understand why we are using them.
Why Karma?
Karma is the default test runner for applications created using Angular CLI. Being a direct product of the AngularJS team, Karma is very well suited for testing Angular or any other JavaScript-based project. Running on Node.js, Karma test runner can be seamlessly integrated with testing frameworks like Jasmine, Mocha, QUnit and integration services like Jenkins, CircleCI, TravisCI etc. In addition, it allows you to run your automated tests on various browsers and devices.
Karma uses a configuration file to set the startup file, the testing framework, the reporters, the browser and other things. It aims to bring a productive testing environment to developers by spending less time on setting up the configurations but more time on coding. Additionally, there is also good online documentation.
The NPM package download trends show that even in 2021 Karma is the most popular Test Runner for Angular Testing.

Source
Why Jasmine?
Jasmine is a testing framework for JavaScript that supports the Behavior-Driven Development (BDD) practice. It plays very well with Karma and is part of the default setup with Angular CLI. Jasmine is known to be feature-rich and provides easy integration with reporting. Also, it provides additional functions such as fakes, spies and pass-throughs. We will be performing Angular Testing with Jasmine.
Behaviour-Driven Development (BDD) is a testing practice that focuses on the application’s behavior. BDD allows you to write tests in human-readable (simple English) format so that even non-technical people can easily understand what is being tested. This plain English format used to write BDD test scenarios is known as the Gherkin language.
Also Read: Behavior Driven Development in Selenium With Gherkin
The BDD tests can act as living test documentation that is easy to maintain and can be consumed by all team members including product owners, business analysts, developers, testers, etc.

We will be writing our unit tests using Jasmine following the BDD approach. Then using Karma test runner, we can trigger the test execution from the CLI. Karma also has a watch mode that can automatically detect changes in development files and re-runs the test. Don’t worry! You will reach a better understanding once you start writing the unit tests.
Why Selenium?
Although Selenium is a tool that needs no introduction among software testers, because this article is primarily aimed at developers, let us first specify what is Selenium.
Selenium is a free open-source test automation framework that is used to automate web browsers. It allows you to validate websites and web apps across multiple devices, browsers and OS to ensure it is working properly as expected. Selenium Webdriver and Selenium Grid are the integral components of the Selenium automation framework.
If you are looking for ways to scale by running tests distributedly, Selenium Grid is the best choice. Selenium Grid allows you to run tests parallely on multiple machines (environments) against various browsers, OS and device combinations hence boosting the speed of the testing cycle without compromising on the test coverage.
In this Angular testing with Jasmine and Karma tutorial, we will be configuring the Jasmine framework with the online Selenium Grid provided by TestMu AI platform. TestMu AI serves you with a cloud-based Grid infrastructure through which you can access 3000+ desktop and mobile browser environments.

Now that you got a gist of the above discussed tools, let us move on to writing Unit test cases in an Angular application.
But before that let us set up a dummy project upon which we will be writing meaningful Unit tests.
Setting up an example project using Angular, Karma and Jasmine
You can find all the code samples used in this Angular testing tutorial from the GitHub repository. Let us begin by creating a new Angular app.
Following are my choice of tools.
- Angular CLI
- Visual Studio Code as IDE
You can run the below command to install Angular CLI globally.
npm install -g @angular/cli
Step 1: Create a new Angular project using Angular CLI. This will take care of Jasmine and Karma configuration for us out-of-the-box.
Step 2: Open the IDE, create a new project folder and run the following command in the terminal. Here, I am naming the project as “angular-unit-test”.
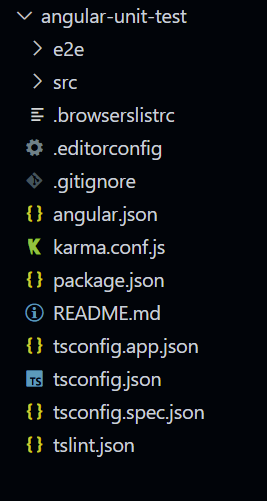
ng new angular-unit-test
The project is set up successfully with all the dependencies installed. The root folder structure now looks like this:
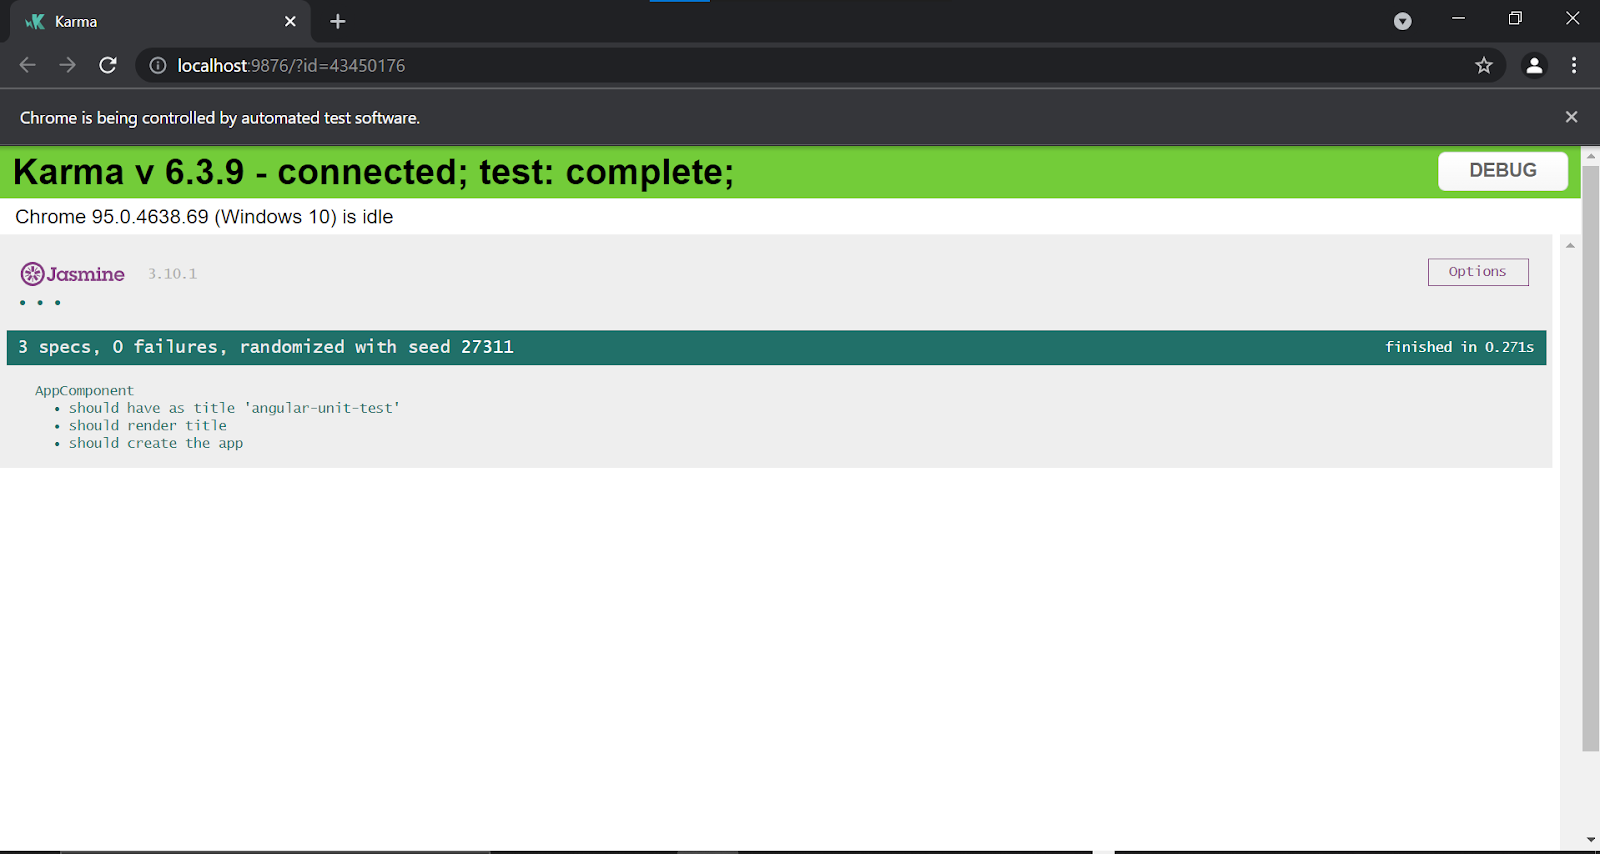
To run the test, pass the following command.
ng test

The test execution starts and a new browser instance gets opened. Observe the browser report and terminal logs.
Step 3: Let us start building our app by creating new components. For the demo, I will be creating a simple Angular app using Bootstrap containing the following components:
- Header
- Footer
- Login Form
- Signup Form
Run the following command to generate new components using Angular CLI.
ng g c folder_name/component_name
All my components have been placed inside a folder named “components” in src/app. To create a component named “header”, run the following command:
ng g c components/header
The header component is created successfully. Notice that 4 files are auto-generated for every component – html,css, ts and spec.
We will be writing our Unit test inside the spec.ts file. By default, the file will look like this:
Since explaining basic Angular things is out of this tutorial’s scope, I won’t be covering the app creation. Refer to the steps below to clone and set up my completed sample app.
git clone https://github.com/harita-gr/MyStay_app.git

npm install

npm start
Step 4: Configure testing in your Angular Project.
When we run the ng test, Angular takes the test configuration from the angular.json file.
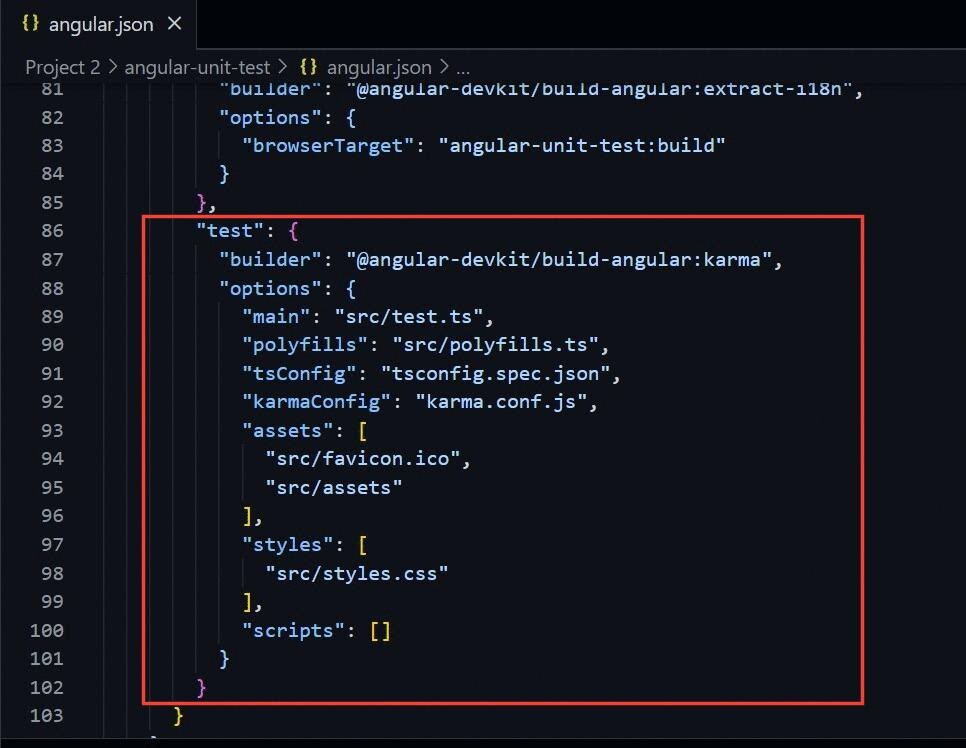
The test-related configuration mainly lies on the shoulder of these 2 files.
- test.ts – also known as test entry file, this file is used to load all spec.ts files from the project for testing
- karma.conf.js – here we specify configurations like browser, port, report, online grid etc.
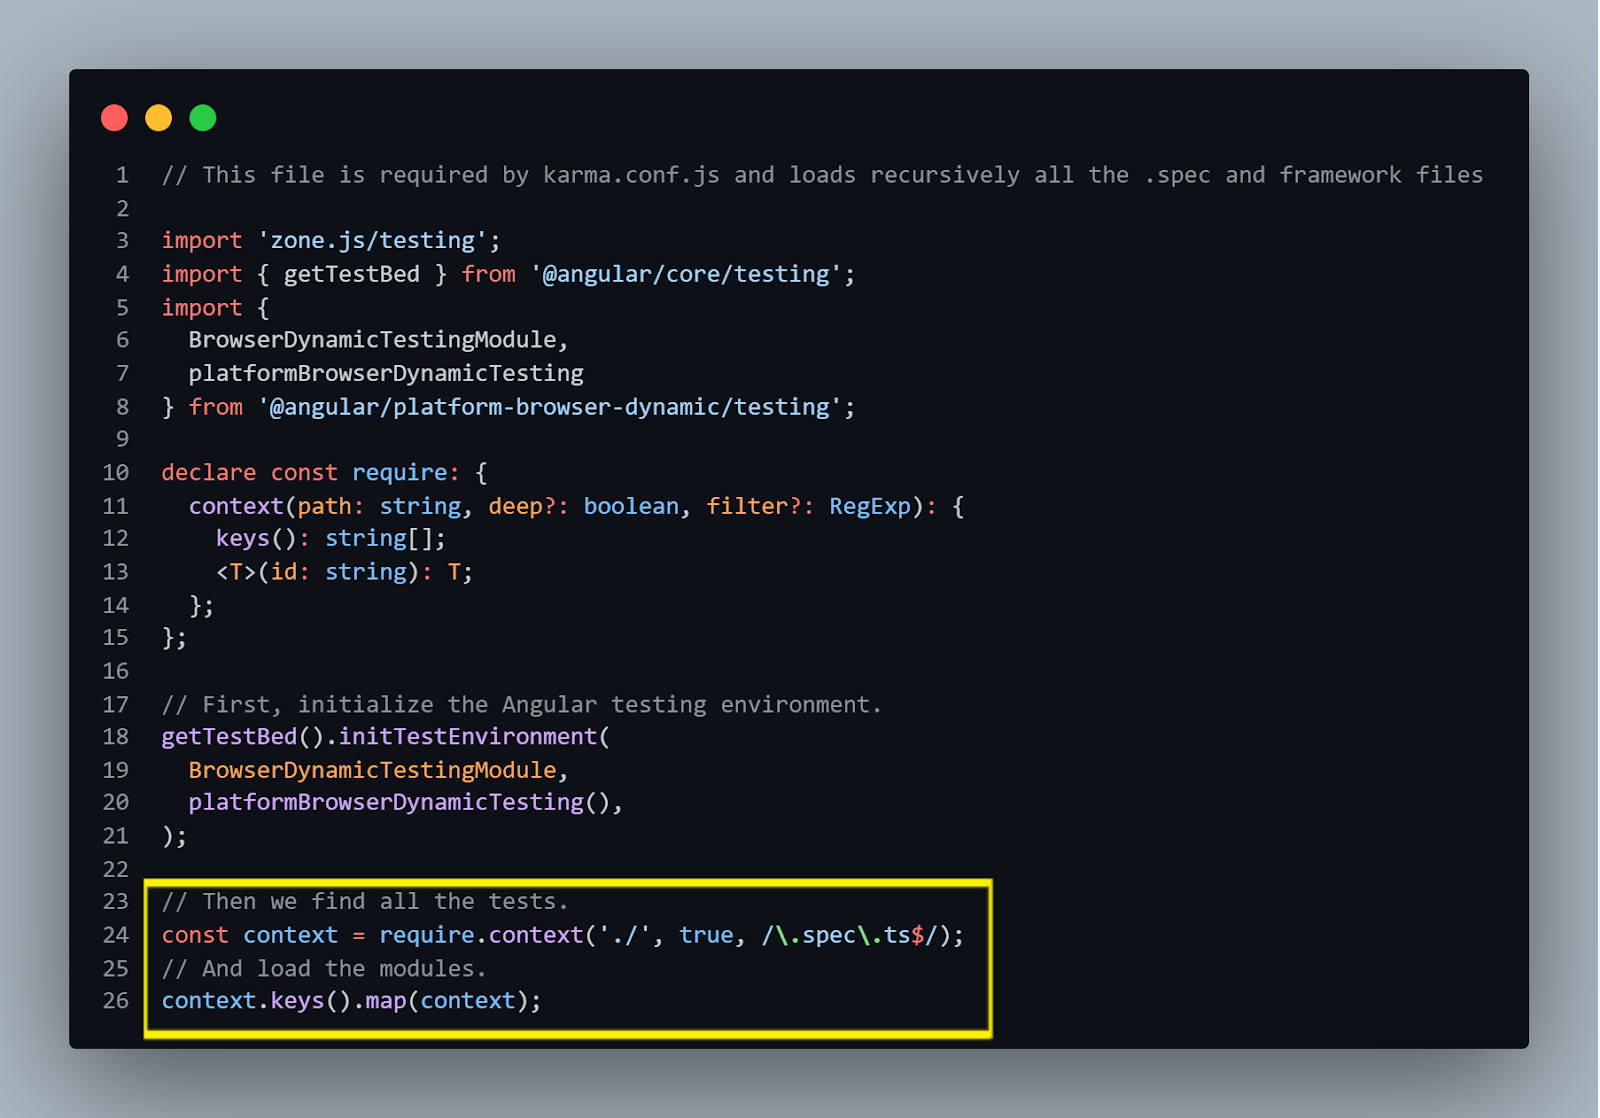
Let us take a look at our test.ts file. This file is the entry point of tests for the application. You don’t have to make any changes to the test.ts file.
Let us quickly grasp what is going on here.
- At the beginning of the file, we are initializing our Angular test environment using all the imports.
- After this, we find all the test files by matching their name against the regular expression (filename ending with spec.ts ) and load them.
TestBed is also initialized in this file. If you are wondering what TestBed is, it is a powerful Unit testing tool provided by Angular. It creates a dynamically constructed test module that emulates an Angular NgModule.
Now let us move on to the karma.conf.js file. But as you can notice, most of them are self-explanatory. So let us quickly go through some of them.
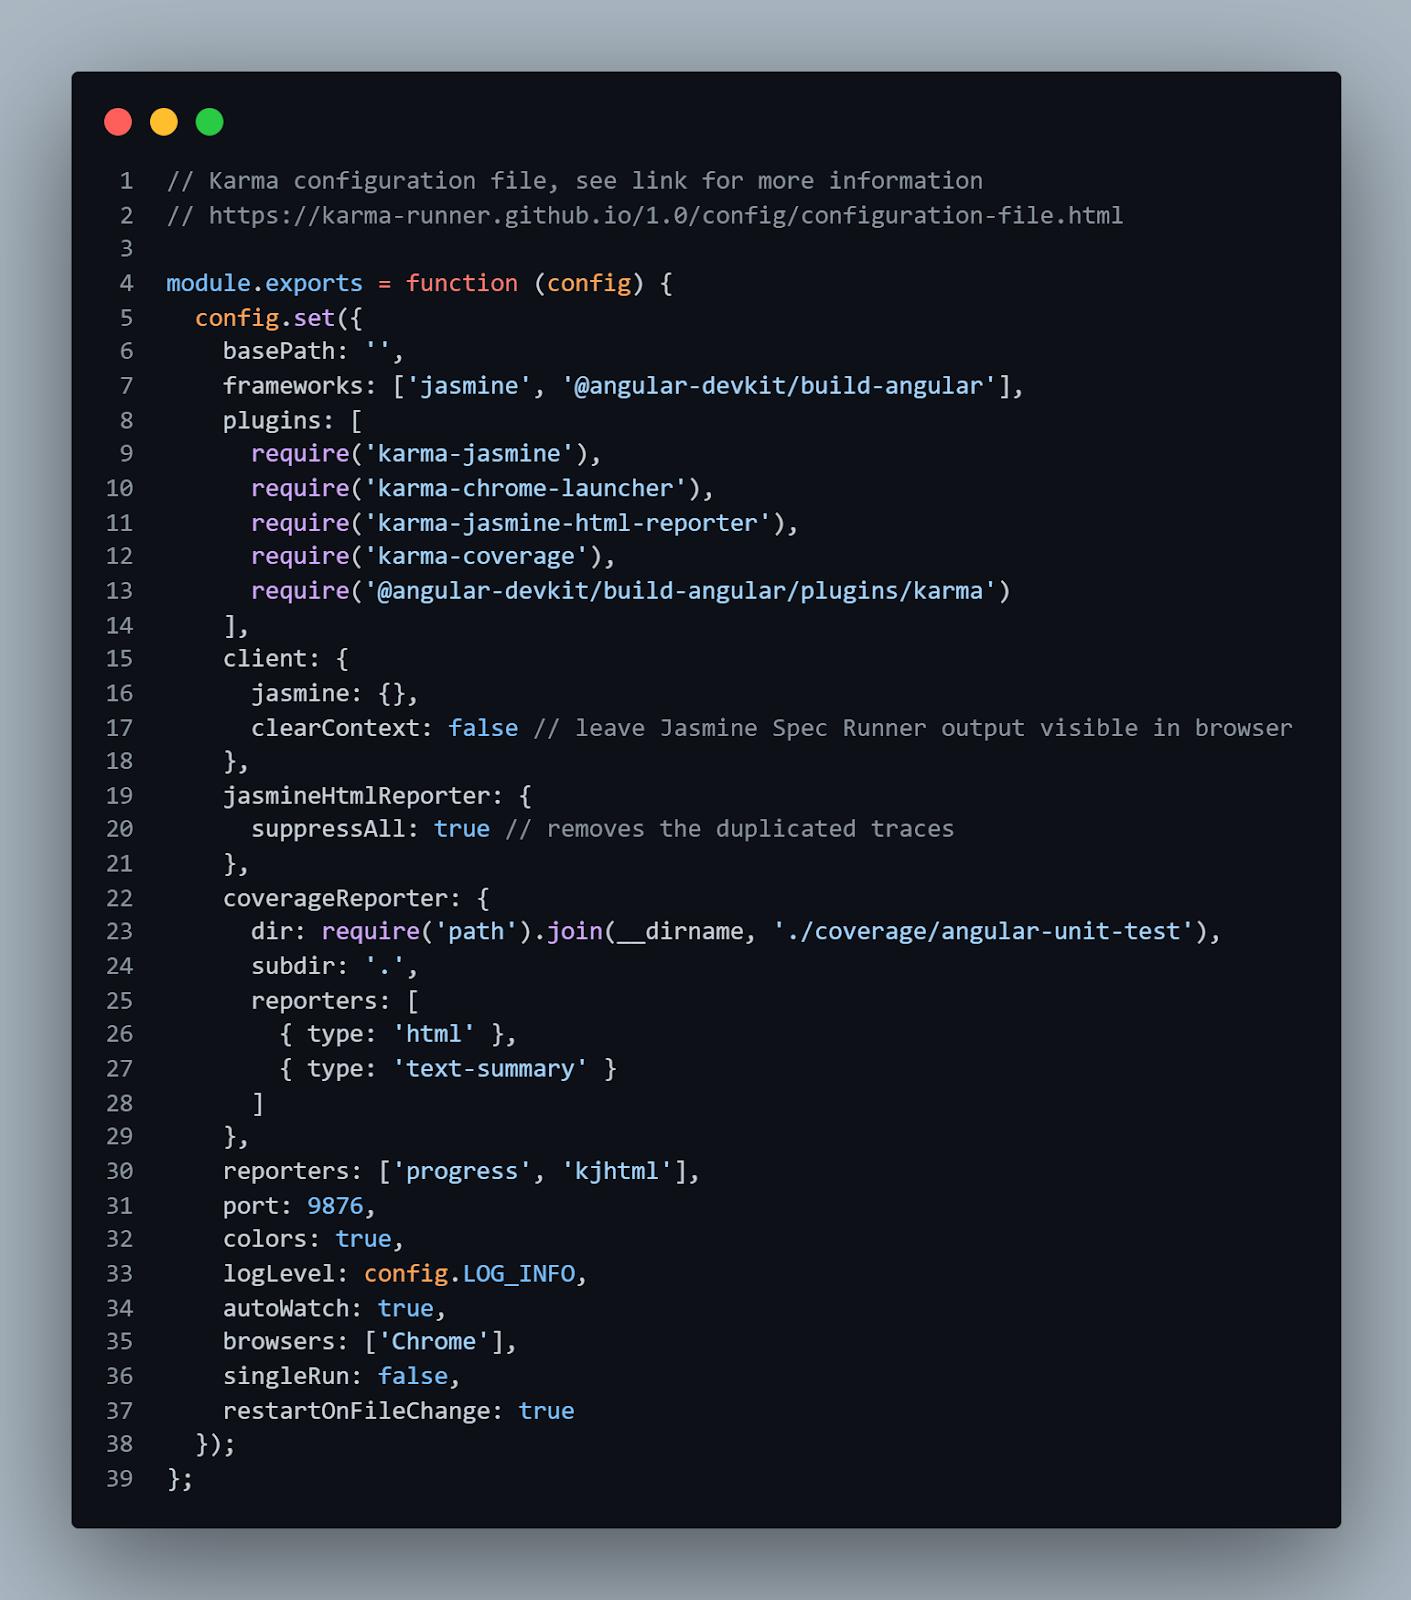
- frameworks – Here we set our test automation framework which is Jasmine by default. But you can go on and change it as per your project requirement.
- reporters – This is where we set our reporters. You can modify or add new ones.
- autoWatch – If this is set to true, the test will run in watch mode. When you change any file and save it, tests are re-build and re-run.
- port – This is where you can set your port.
- browsers -Here you can set the browsers on which the tests should run. By default it is Chrome. But you can install and add new browser launchers.
If you are running your tests on a local machine, this configuration is good enough. But since we will be using an online grid for running our tests, we need to make some additional configurations which are as follows.
- Set the webdriver configuration for running in the TestMu AI host.We need to pass a grid hostname, port, and user and access key. You can fetch your unique username and access key by creating a free TestMu AI account and navigating to your profile page.
// Lambdatest grid hostname and port
  var webdriverConfig = {
    hostname: "hub.lambdatest.com",
    port: 80,
    user: process.env.LT_USERNAME || 'YOUR_USERNAME',
    accessKey: process.env.LT_ACCESS_KEY || 'YOUR_ACCESSKEY',
  };
npm install -D karma-webdriver-launcher
plugins: [
      require("karma-jasmine"),
      require("karma-webdriver-launcher"),
      require("karma-jasmine-html-reporter"),
      require("karma-coverage"),
      require("@angular-devkit/build-angular/plugins/karma"),
    ],
customLaunchers: {
      chrome: {
        base: "WebDriver",
        config: webdriverConfig,
        browserName: "chrome",
        platform: "windows 8.1",
        version: "71.0",
        build:'Unit testing in Angular', //Build name
        name: "Unit test", // Test name
        pseudoActivityInterval: 5000, // 5000 ms heartbeat
      },
browsers: ["chrome"],
// Karma configuration file, see link for more information
// https://karma-runner.github.io/1.0/config/configuration-file.html

module.exports = function (config) {
  // Lambdatest grid hostname and port
  var webdriverConfig = {
    hostname: "hub.lambdatest.com",
    port: 80,
    user: process.env.LT_USERNAME || 'YOUR_USERNAME',
    accessKey: process.env.LT_ACCESS_KEY || 'YOUR_ACCESSKEY',
  };

  config.set({
    basePath: "",
    // hostname: 'localhost', // hostname, where karma web server will run
    frameworks: ["jasmine", "@angular-devkit/build-angular"],
    plugins: [
      require("karma-jasmine"),
      require("karma-webdriver-launcher"),
      require("karma-jasmine-html-reporter"),
      require("karma-coverage"),
      require("@angular-devkit/build-angular/plugins/karma"),
    ],
    client: {
      jasmine: {},
      clearContext: false, // leave Jasmine Spec Runner output visible in browser
    },
    jasmineHtmlReporter: {
      suppressAll: true, // removes the duplicated traces
    },
    coverageReporter: {
      dir: require("path").join(__dirname, "./coverage/angular-unit-test"),
      subdir: ".",
      reporters: [{ type: "html" }, { type: "text-summary" }],
    },
    reporters: ["progress", "kjhtml"],
    port: 9876,
    colors: true,
    logLevel: config.LOG_INFO,
    autoWatch: true,
    browsers: ["chrome","firefox","edge"],
    singleRun: false,
    restartOnFileChange: true,

    customLaunchers: {
      chrome: {
        base: "WebDriver",
        config: webdriverConfig,
        browserName: "chrome",
        platform: "windows 8.1",
        version: "71.0",
        build:'Unit testing in Angular', //Build name
        name: "Unit test", // Test name
        pseudoActivityInterval: 5000, // 5000 ms heartbeat
      },
      firefox: {
        base: "WebDriver",
        config: webdriverConfig,
        browserName: "Firefox",
        platform: "windows 10",
        version: "91.0",
        build:'Unit testing in Angular',
        name: "Unit test",
        pseudoActivityInterval: 5000, // 5000 ms heartbeat
      },
      edge: {
        base: "WebDriver",
        config: webdriverConfig,
        browserName: "MicrosoftEdge",
        platform: "windows 10",
        version: "93.0",
        build:'Unit testing in Angular',
        name: "Unit test",
        pseudoActivityInterval: 5000, // 5000 ms heartbeat
      }
    },
  });
};
That’s all! The final karma.conf.js file now looks like this.
Our test will start running on a cloud grid.
Go to the TestMu AI Automation Dashboard to access the results of your test execution.
Read: Automated Cross Browser Testing With Jasmine Framework & Selenium
This Selenium JavaScript testing tutorial for beginners and professionals will help you learn everything you need to know to work with JavaScript for Selenium automation testing.
You can follow the TestMu AI YouTube Channel and stay updated with the latest tutorials around Selenium testing, Cypress testing, CI/CD, and more.

Writing your first Angular Unit Test using Jasmine
We have successfully completed our test configuration.In this section of Angular testing with Jasmine, we will write unit test cases for Angular using Jasmine.
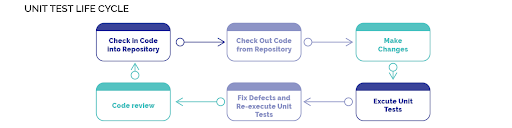
Understanding the Test Run flow
As mentioned earlier, associated with each component, a spec.ts file will be generated inside which we will be writing our test case. The default spec file generated for the App component app.component.spec.ts is shown below:

Let us understand the test run flow.
- Import all the tools we will be going to use like TestBed.
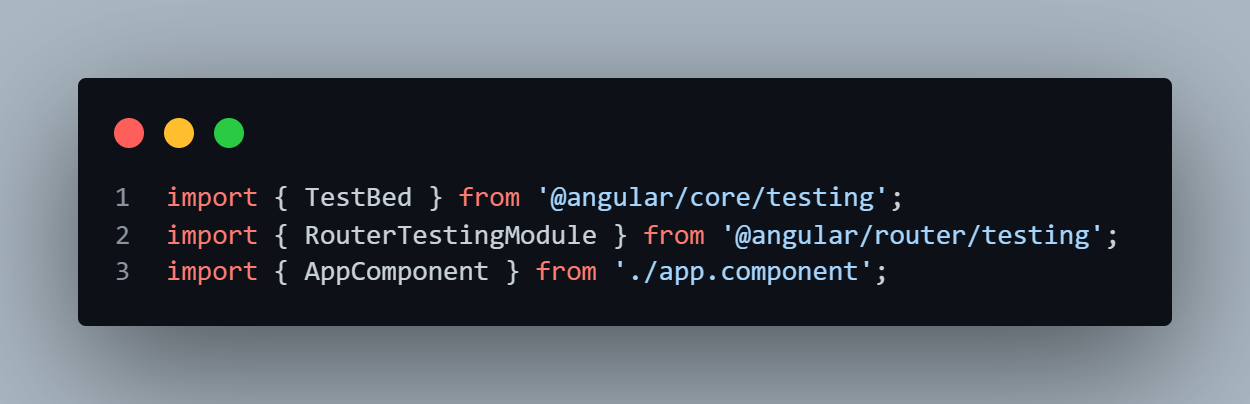
- Import all of the dependencies for this component.
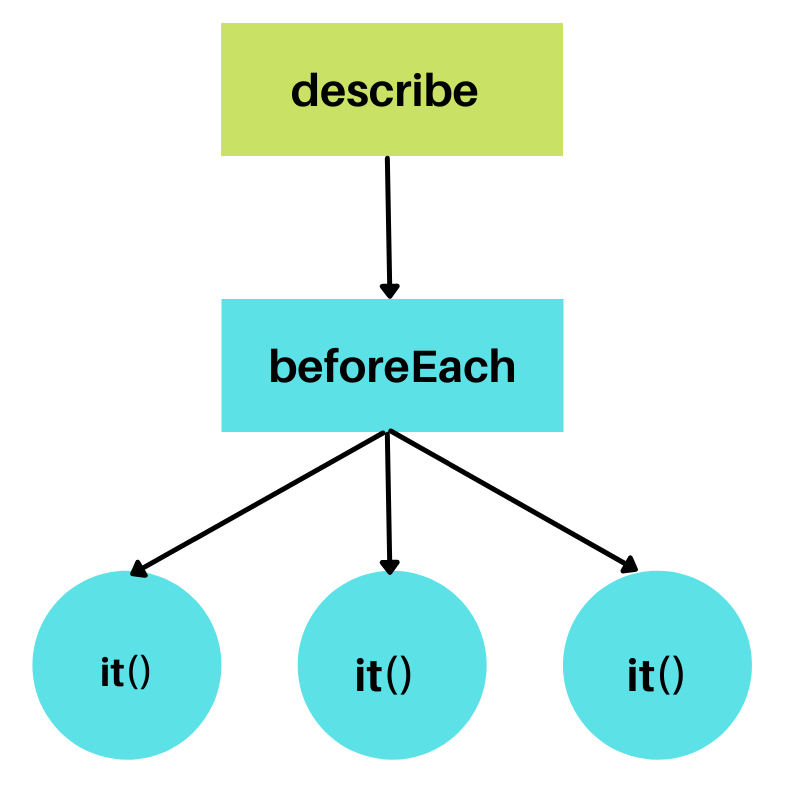
- To start our test block, we use the “describe” function, the title of which will be matching the component name under test.
describe(string, function)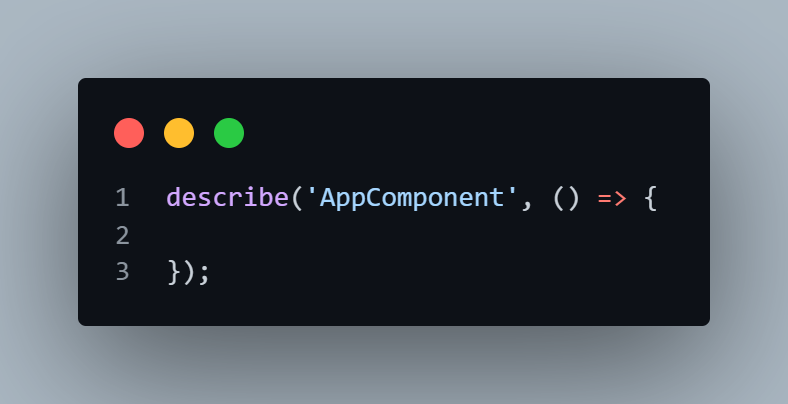
- Then we have the “it” function, which is used to define test cases. Meaningful names can be given to the test case.
it(string, function)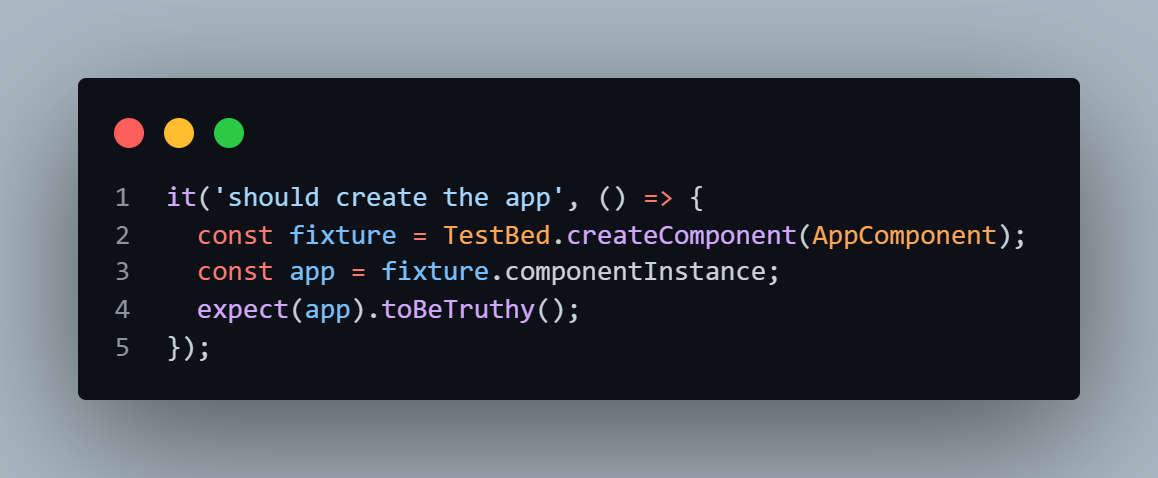
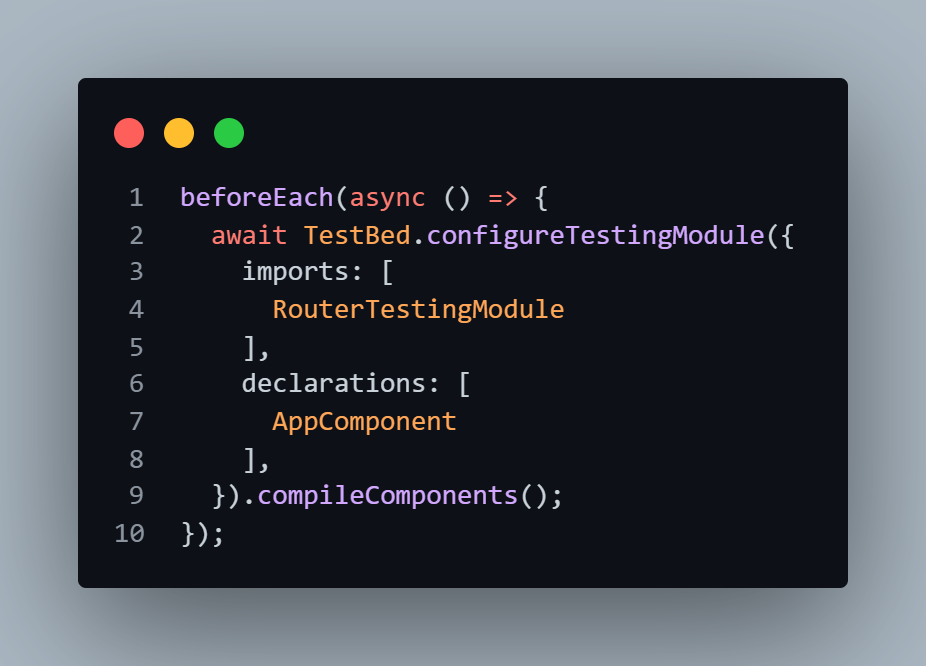
- Additionally, we also have setup and teardown functions which will be run before or after each “it” function. Here, “beforeEach” is defined which contains async code. The purpose of this is to await till all the async code is finished before continuing. This function is called before each test specification (it function) is run.
We have three Unit tests over here:
- First one verifies that the app is created successfully.
- Second one verifies the app title is equal to the expected value.
- Third one verifies that the title is rendered.
The overall run flow can be visualized as below:
Writing Unit test cases for Components
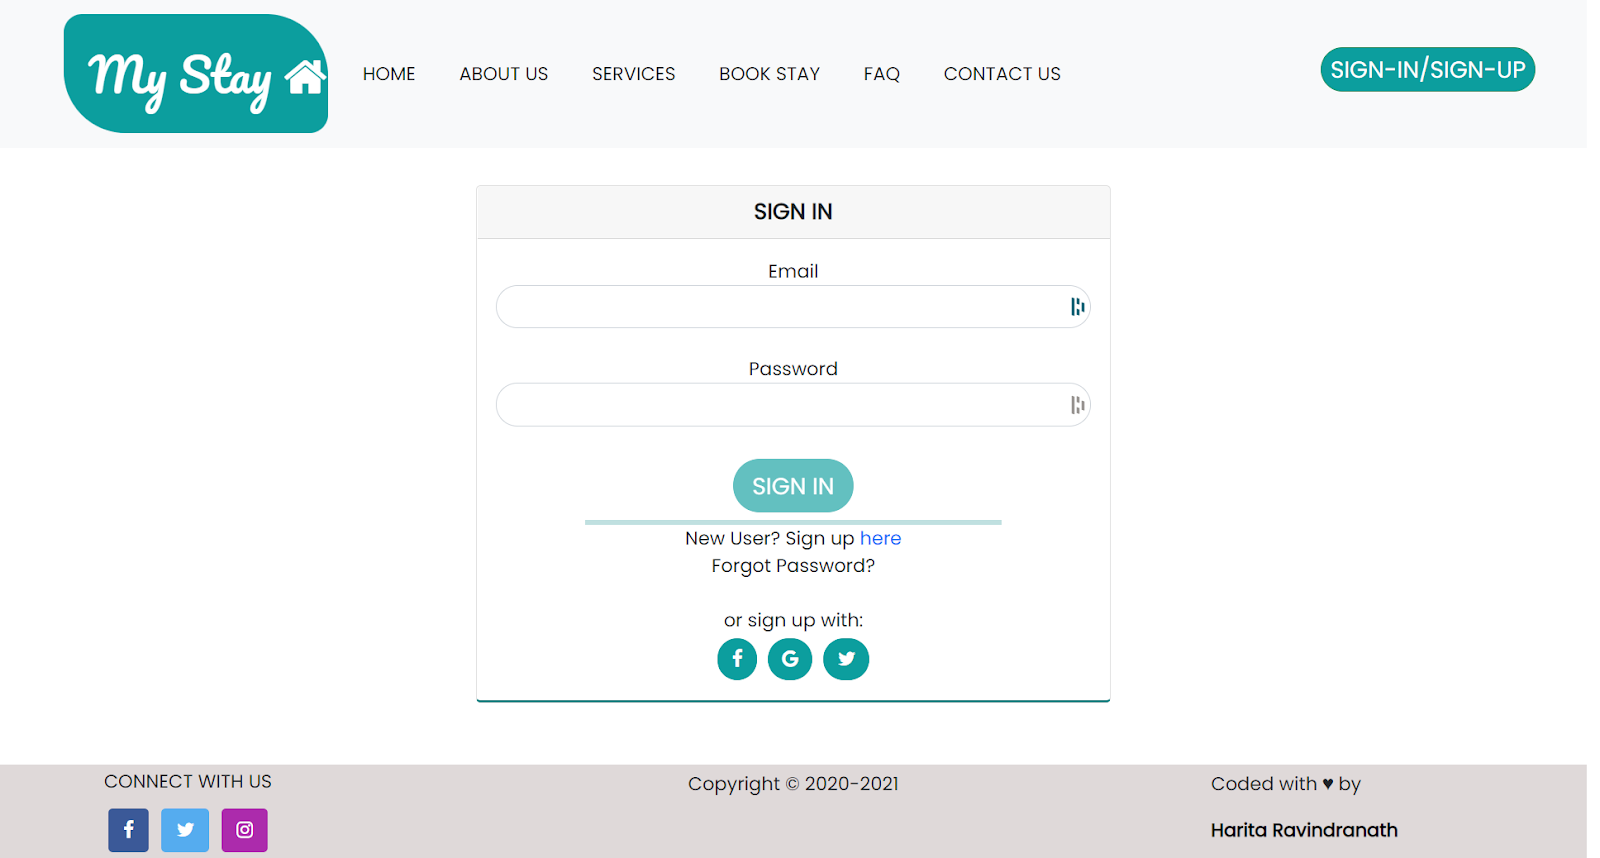
Now that you have an idea about how the test run flows, let us start by writing Unit test cases for the header component. To write meaningful tests, it is crucial to identify what you need to test.
For the header component, I want to verify the following cases:
- It should display a logo containing the text “My Stay”.
- It should have six nav links.
- It should navigate to the register page by clicking the signup/login button.
The code for testing the header component is shown below.
//header.component.spec.ts

import { ComponentFixture, TestBed, tick } from '@angular/core/testing';
import { By } from '@angular/platform-browser';
import { Location } from "@angular/common";

import { HeaderComponent } from './header.component';

describe('HeaderComponent', () => {
  let component: HeaderComponent;
  let fixture: ComponentFixture<HeaderComponent>;

  beforeEach(async () => {
    await TestBed.configureTestingModule({
      declarations: [ HeaderComponent ]
    })
    .compileComponents();
  });

  beforeEach(() => {
    fixture = TestBed.createComponent(HeaderComponent);
    component = fixture.componentInstance;
    fixture.detectChanges();
  });

  it('should create', () => {
    expect(component).toBeTruthy();
  });

  it('should display logo containing text "My Stay"', () => {
     const logoText =fixture.debugElement.query(By.css('.navbar-brand')).nativeElement;
     expect(logoText.textContent).toBe('My Stay ');
  });

  it('should contain 6 nav links', () => {
    const navLinks = fixture.debugElement.queryAll(By.css('li.nav-item'));
    expect(navLinks.length).toEqual(6);
  });

  it('navigates to register page on clicking signup/signin button', () => {
    const location: Location = TestBed.inject(Location);
    const button =fixture.debugElement.query(By.css('button.btn')).nativeElement;
    button.click();
    expect(location.path()).toBe('/user-register');
  });
});
Now I want to test my footer component. Following are the test cases:
- It should contain the copyright text
- It should contain three social media contact buttons
The code for testing footer component is shown below:
//footer.component.spec.ts

import { ComponentFixture, TestBed } from '@angular/core/testing';
import { By } from '@angular/platform-browser';

import { FooterComponent } from './footer.component';

describe('FooterComponent', () => {
  let component: FooterComponent;
  let fixture: ComponentFixture<FooterComponent>;

  beforeEach(async () => {
    await TestBed.configureTestingModule({
      declarations: [ FooterComponent ]
    })
    .compileComponents();
  });

  beforeEach(() => {
    fixture = TestBed.createComponent(FooterComponent);
    component = fixture.componentInstance;
    fixture.detectChanges();
  });

  it('should create', () => {
    expect(component).toBeTruthy();
  });

  it('should contain copyright text', () => {
    const text =fixture.debugElement.query(By.css('.copyright')).nativeElement;
    expect(text.textContent).toContain('Copyright');
  });

  it('should contain 3 social media contact buttons ', () => {
    const btns = fixture.debugElement.queryAll(By.css('a.btn'));
    expect(btns.length).toEqual(3);
  });
});
Lastly, I want to test my Login Component. Following are the test cases:
- It should be able to login by entering an email and password and submitting form
- It should route to register page by clicking the “Sign Up here” link
The code for testing the login component is shown below.
//login.component.spec.ts

import { ComponentFixture, TestBed } from '@angular/core/testing';
import { FormsModule } from '@angular/forms';
import { By } from '@angular/platform-browser';
import { Location } from "@angular/common";

import { LoginComponent } from './login.component';

describe('LoginComponent', () => {
  let component: LoginComponent;
  let fixture: ComponentFixture<LoginComponent>;

  beforeEach(async () => {
    await TestBed.configureTestingModule({
      imports: [FormsModule ],
      declarations: [LoginComponent],
    }).compileComponents();
  });

  beforeEach(() => {
    fixture = TestBed.createComponent(LoginComponent);
    component = fixture.componentInstance;
    fixture.detectChanges();
  });

  it('should create', () => {
    expect(component).toBeTruthy();
  });

  it('should be able to login by entering email and password and submitting form', () => {
    component.User['email'] = '[email protected]';
    component.User['password'] = '123456789';
    const loginBtn = fixture.debugElement.query(By.css('button.login-btn')).nativeElement;
    loginBtn.click();
    expect(component.submitted).toBeTrue;
  });


  it('should route to register page by clicking “Sign Up here” link', () => {
    const location: Location = TestBed.inject(Location);
    const link =fixture.debugElement.query(By.css('a')).nativeElement;
    link.click();
    expect(location.path()).toBe('/user-register');
  });
});
Now it is time to run the test cases. Execute the following command.
ng test
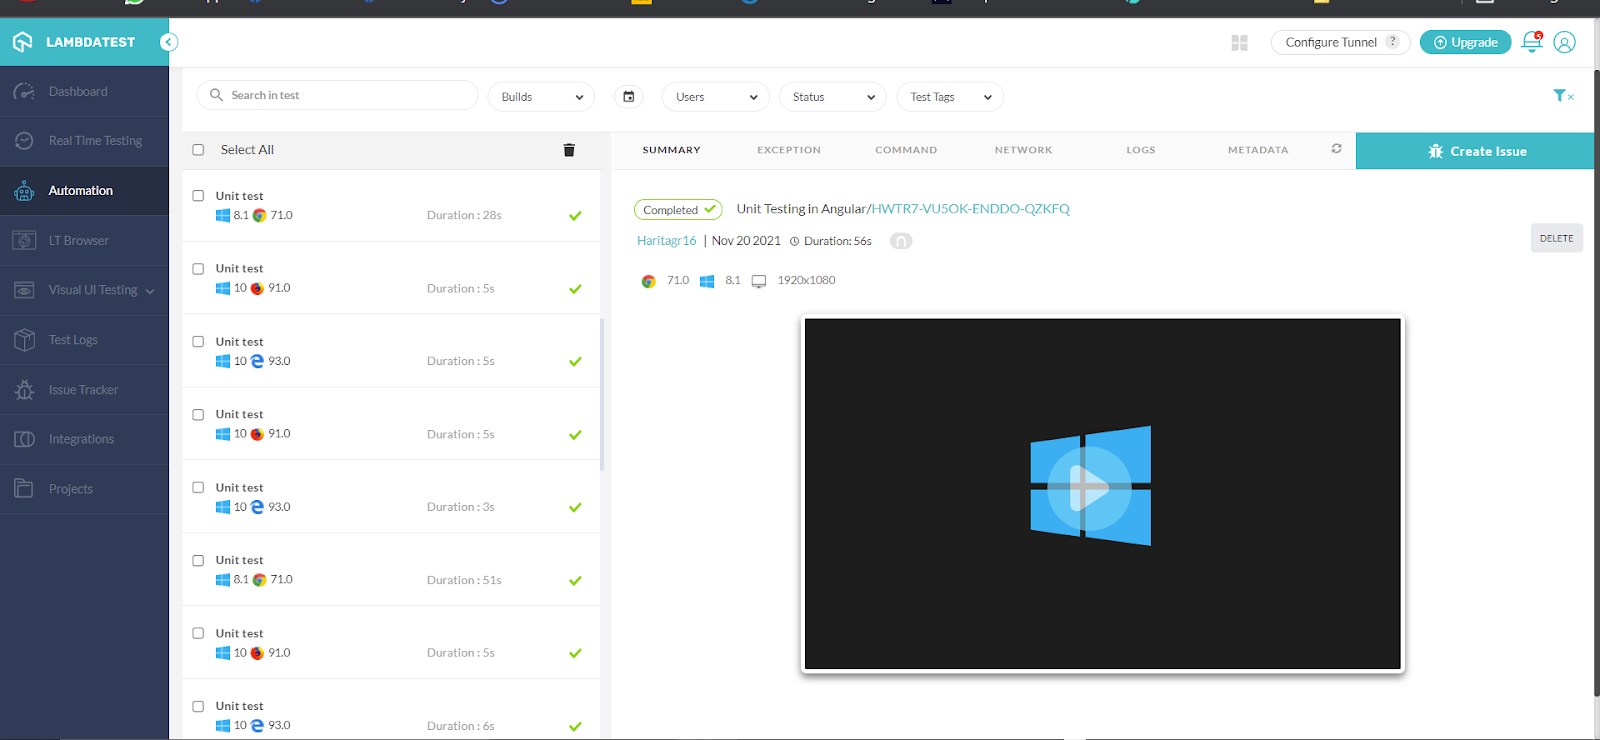
Go to the TestMu AI Automation Dashboard. You can notice the test starts running on a cloud-based Selenium grid.

Go to Automation Logs to see the detailed report of your tests.
We have successfully executed our Unit test cases in Angular.
Navigate to the TestMu AI Analytics Dashboard to view test performance metrics of your Unit tests. The Test Overview will provide a screenshot of tests with consistent behavior. Meanwhile, the Test Summary will show the total number of passed or failed tests, and any completed or queued tests.

Best Practices to Improve Unit testing
While performing Unit testing, here are some best practices one should keep in mind.
- Follow a consistent naming convention and test one code at a time
- Make sure that there is a corresponding unit test case to every module
- Before moving on to the next phase, all the bugs should be fixed. So you can end up with a clean and reliable code for committing.
- Continuously refactor test code
- Finally, focus more on the tests that affect the behavior of the system.
Austin Siewert
CEO, Vercel
Discovered @TestMu AI yesterday. Best browser testing tool I've found for my use case. Great pricing model for the limited testing I do 👏
2M+ Devs and QAs rely on TestMu AI
Deliver immersive digital experiences with Next-Generation Mobile Apps and Cross Browser Testing Cloud
You can take this certification as proof of expertise in the field of test automation with JavaScript to empower yourself and boost your career.
Here’s a short glimpse of the Selenium JavaScript 101 certification from TestMu AI:
Conclusion
In this Selenium JavaScript tutorial on Angular testing with Jasmine and Karma, we learnt how to perform Unit testing in Angular framework with Jasmine and Karma test runner using Selenium. We also covered practical implementation.
As the code base keeps on growing it becomes time-consuming to execute the unit tests locally in our system in addition to the limited scope test coverage. So, we utilized the online Selenium Grid provided by TestMu AI platform to leverage our test execution by running the unit tests parallelly across multiple custom-configured environments.
I hope you found this Angular testing tutorial useful!
Happy Testing!
Frequently asked questions
Did you find this page helpful?
More Related Hubs
TestMu AI forEnterprise
Get access to solutions built on Enterprise
grade security, privacy, & compliance
- Advanced access controls
- Advanced data retention rules
- Advanced Local Testing
- Premium Support options
- Early access to beta features
- Private Slack Channel
- Unlimited Manual Accessibility DevTools Tests