
Power Your Software Testing with AI Agents and Cloud
The Native AI-Agentic Cloud Platform to Supercharge Quality Engineering. Test Intelligently and Ship Faster.

- TestMu AI (Formerly LambdaTest)
- /
- Blog
- /
- A Guide To Download Selenium and Set It Up On Multiple IDEs
A Guide To Download Selenium and Set It Up On Multiple IDEs
Want to learn how to download Selenium, the free web automation tool? This guide offers everything you need to get started and run an automation test!
Last Updated on:
On This Page
- Understanding Selenium and Its Components
- System Requirements to Download Selenium
- How to Download and Setup Selenium IDE
- How to Download and Setup Selenium WebDriver
- Configure And Setup Selenium on Popular IDEs
- How to Download Selenium Grid
- Difference Between Local Grid and Cloud Grid
- AI Agents and Selenium
Download Selenium by installing the Selenium IDE extension from your browser store, adding the Selenium WebDriver language binding for Java, Python, C#, Ruby or JavaScript, and pulling the Selenium Grid server JAR from selenium.dev.
Selenium 4 ships Selenium Manager, which resolves ChromeDriver, GeckoDriver and EdgeDriver at runtime, so a manual driver download is now a fallback rather than a requirement.
This guide covers Selenium components, system requirements, IDE, WebDriver and Grid downloads, Eclipse, IntelliJ and PyCharm setup, AI agents, and local versus cloud grid.
Key Takeaways
- Selenium is distributed as three separate downloads: Selenium IDE as a browser extension, Selenium WebDriver as a language binding, and Selenium Grid as a server JAR.
- Selenium Manager shipped with Selenium 4.6 and downloads the matching browser driver automatically when no driver is found on the PATH.
- A manual ChromeDriver, GeckoDriver or EdgeDriver download is still useful for locked-down machines and offline build agents that cannot reach the driver endpoints.
- Eclipse and IntelliJ IDEA resolve the Selenium Java binding through a Maven dependency, while PyCharm installs the Python binding with pip.
- Selenium removed its dedicated Opera classes, so Opera is automated by pointing ChromeDriver at the Opera binary.
- A local Selenium Grid needs its own hub, nodes and browser installations, while a cloud grid supplies the browser and operating system combinations on demand.
Understanding Selenium and Its Components
Selenium is one of the most well-known open-source test automation frameworks. It enables test automation of websites or web applications across various operating systems and browsers. The framework automates web browsers for cross browser testing, cross platform testing, regression testing, and functional testing.
Additionally, it supports a variety of programming languages, including Python, C#, Java, JavaScript(Node.js), Ruby, and more, enabling testers to automate their website testing in whichever programming language they are most comfortable with.
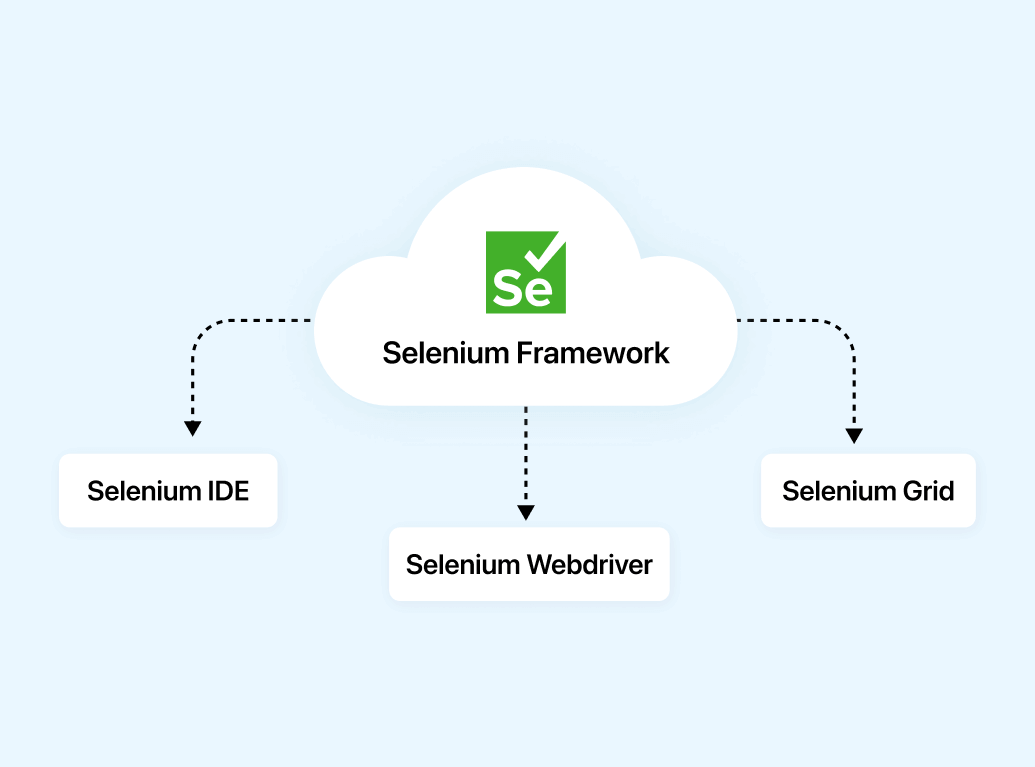
Selenium framework consists of three different components classified as:
Selenium IDE
Selenium IDE (Integrated Development Environment) provides a record and playback tool that will generate scripts based on actions performed on a browser. Selenium IDE provides a user-friendly interface that allows testers and developers to easily export automated test scripts in programming languages like Java, Python, Ruby, C#, and many more. It proves to be an ideal tool for beginners as it requires almost no prior programming knowledge. However, it is unable to create more complex test cases. For that, Selenium WebDriver and Selenium Grid can be used.
Selenium WebDriver
Selenium WebDriver offers a reliable and object-oriented method of automating browsers. Writing automation scripts in programming languages like Java, C#, Python, Ruby, and JavaScript is possible with Selenium WebDriver. By interacting with the browser directly, it may programmatically control it. Numerous browsers, including Chrome, Firefox, Safari, Microsoft Edge, and others, are supported by WebDriver.
Selenium Grid
Selenium Grid is also classified as Local Grid that enables parallel test execution by allowing you to split test execution across several physical or virtual machines. You can simultaneously run tests on several browsers, operating systems, and devices, thanks to its integration with Selenium WebDriver. Several nodes and a hub make up Selenium Grid. Tests are distributed to the available nodes for execution from the hub, which serves as a central location for test registration.

System Requirements to Download Selenium
This section on download Selenium provides a concise guide to begin the journey with Selenium. It covers two essential aspects of the preparation process – Understanding System Requirements and Selecting a Suitable Programming Language.
System Requirements for Running Selenium
We will look at the requirements for running Selenium in terms of the operating system used, browser, and programming language support.
Operating System
- Windows: Windows 7 or later version
- macOS: macOS 10.10 or later version
- Linux: Most distributions are supported like Ubuntu
Browser Support
- Google Chrome: Latest version (recommended)
- Mozilla Firefox: Latest version (recommended)
- Microsoft Edge: Latest version (recommended)
- Safari: Latest version (for macOS only)
- Opera: Latest version
Programming Language Support
- Java
- Python
- C#
- Ruby
- JavaScript (Node.js)
Choosing a Programming Language for Selenium
Selecting the right programming language is one of the crucial parts before starting with the test processes as it determines the execution speed of tests, support from the community to resolve errors you might face while using a language, and many more. We will explore the advantages and disadvantages of the most popular programming languages in this section of download Selenium guide.
Java
- Advantages: Strongly typed, widely used in enterprise environments, extensive Selenium documentation and community support, mature frameworks for testing like TestNG and JUnit.
- Disadvantages: Requires more boilerplate code, the steeper learning curve for beginners.
Python
- Advantages: Open source, simple syntax, easy to learn and read, large community support, rich set of libraries, good for prototyping and scripting. Have various testing frameworks such as pytest, unittest, and Behave.
- Disadvantages: Slower execution compared to other programming languages like Java or C#, may have less mature frameworks compared to Java.
- Advantages: Strongly typed, widely used in the Microsoft ecosystem, good for Windows application testing, Visual Studio IDE integration, and strong frameworks for testing like NUnit and SpecFlow.
- Disadvantages: Limited cross-platform support, fewer resources, and community support compared to Java or Python.
PHP
- Advantages: Versatile and widely supported, large developer community and extensive libraries with testing frameworks like Behat, Laravel Dusk, Codeception, and PHPUnit, suitable for web development and server-side scripting.
- Disadvantages: Slower than other programming languages, requires manual memory management, and can lead to less secure code if not used properly.
Ruby
- Advantages: Concise and readable syntax, good for web application testing, Ruby on Rails integration, popular in the startup community that also provides many testing frameworks like RSpec, Cucumber, Test::Unit, Capybara, Minitest, and many more.
- Disadvantages: Smaller community compared to Java or Python, fewer resources and frameworks.
JavaScript (Node.js)
- Advantages: JavaScript is widely used for web development, a unified language for front-end and back-end, a vast ecosystem of libraries, and good testing frameworks for, e.g., Mocha, Jest, Jasmine, and Karma.
- Disadvantages: Relatively new for Selenium, has fewer resources and community support compared to Java or Python, asynchronous nature can be challenging for beginners.
Selecting a Programming Language
When choosing a programming language for Selenium, consider the following factors:
- Familiarity: If you are already comfortable with a particular programming language, it may be a good choice as you can leverage your existing knowledge.
- Project Requirements: Consider the specific requirements of your project, such as the target platform, existing codebase, and integration with other tools or frameworks. Some languages may be better suited for certain scenarios.
- Community and Support: Check the availability of resources, documentation, tutorials, and community support for the programming language you are considering. A larger community can provide more help and resources when you encounter issues.
- Learning Curve: Assess the learning curve associated with each programming language. Some languages, like Python, have simpler syntax and are generally easier to learn for beginners.
- Team Collaboration: If you are working with a team, consider the skills and preferences of your team members. Choosing a language that aligns with the team’s expertise can facilitate collaboration and knowledge sharing.
Ultimately, the choice of programming language depends on your personal preferences, project requirements, and the resources available to you.
Now that we are aware of the different components of Selenium and its requirements. So let’s start with the setting up process for each component.
How to Download Selenium IDE and Setup
Let’s look at how to download Selenium IDE and running it on your system. We will see the process for various browsers like Chrome, Firefox, Microsoft Edge, and many more.
From the browser’s web store
Nowadays, most of us are using one of the following browsers: Chrome, Firefox, Microsoft Edge, Opera, and Brave. In this section, we will see how to download Selenium IDE and install it from the web store of the different browsers.
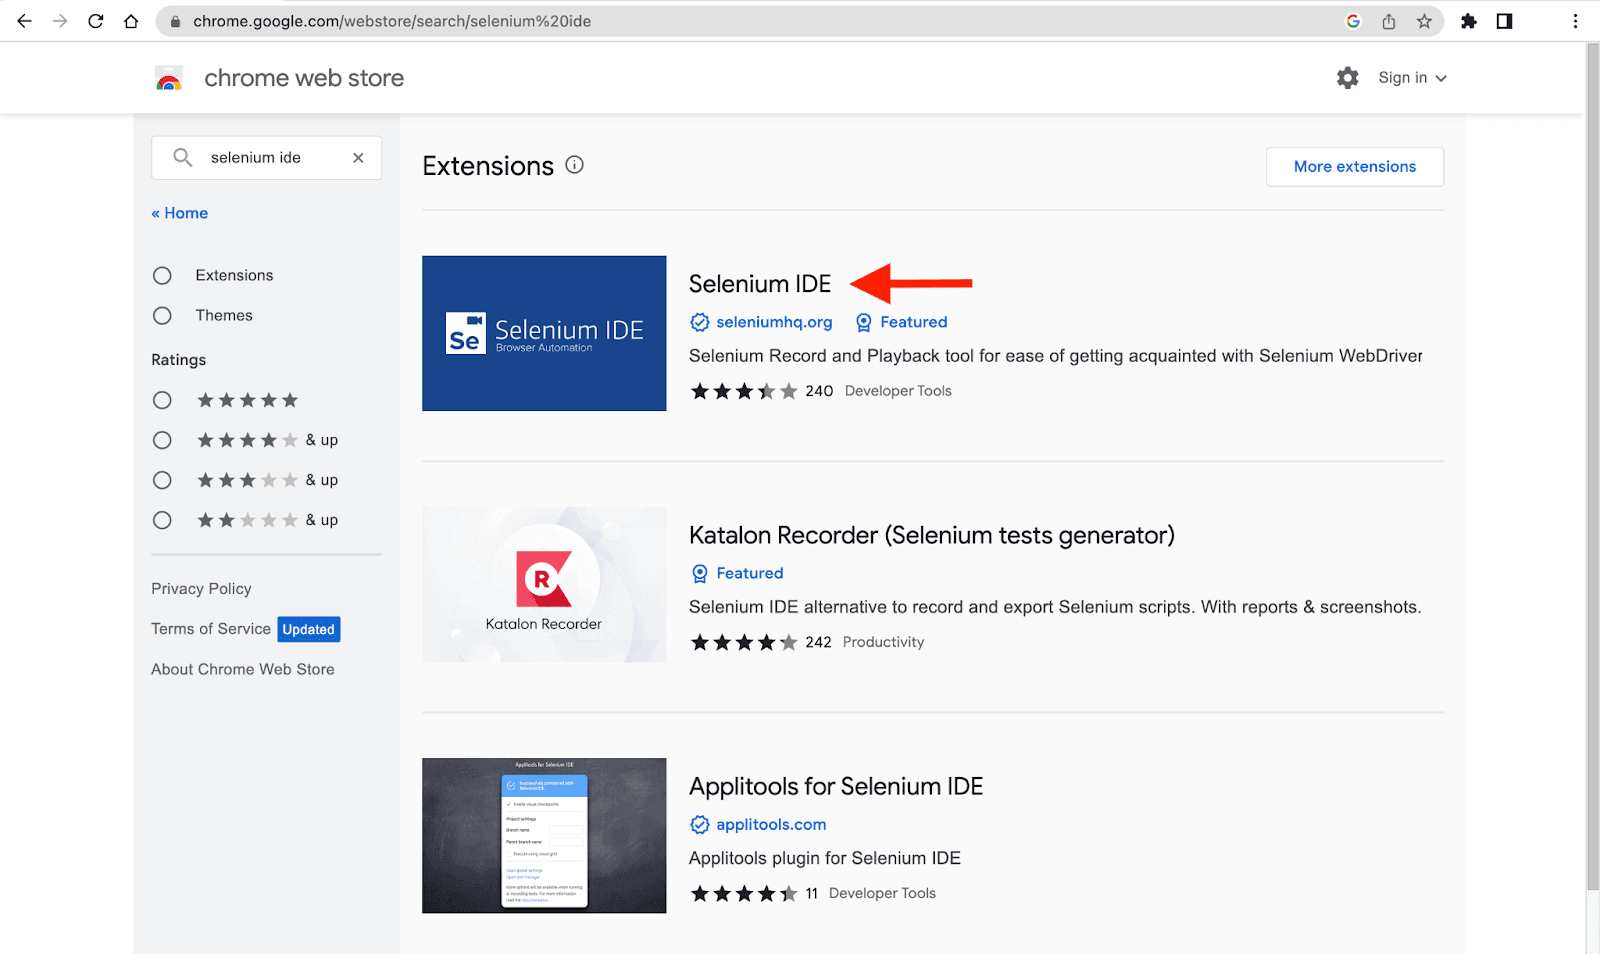
Chrome Browser
- Search for the Chrome web store in Chrome or click here
- Search for Selenium IDE in the search bar on the left side or click here and install it.
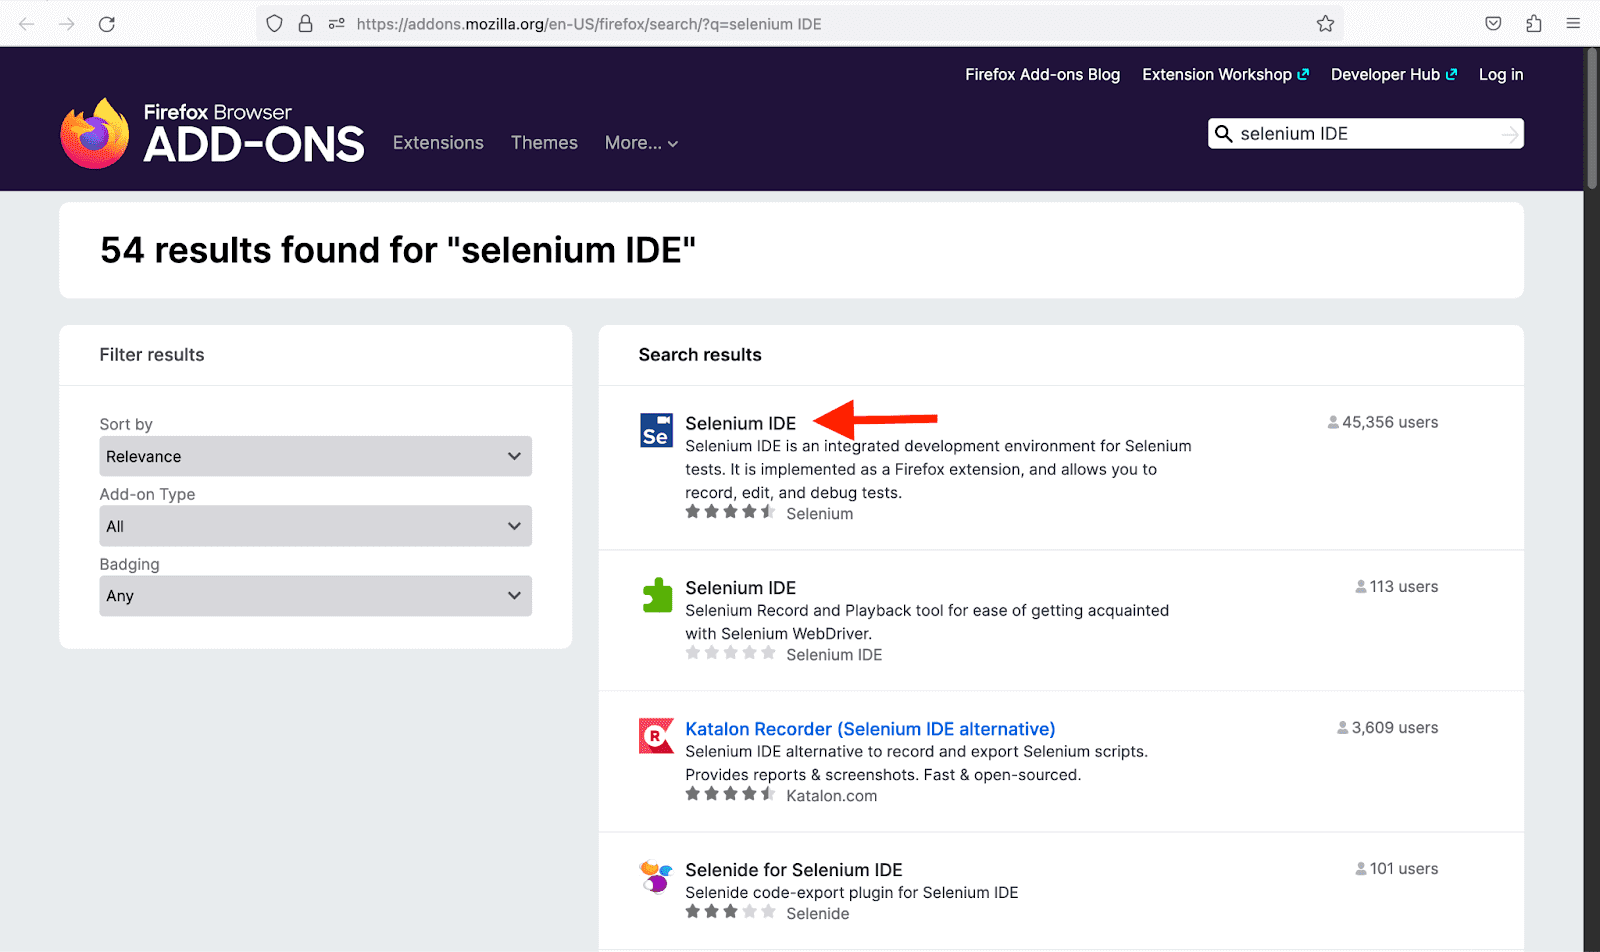
Firefox Browser
- From the hamburger on the top right corner of the browser, select Add-ons and themes or search for about:addons or click here.
- Search for Selenium IDE.
Edge Browser
- From the three dots icon on the top right corner, select Extensions or follow this link.
- Search for Selenium IDE in the search bar on the left side.
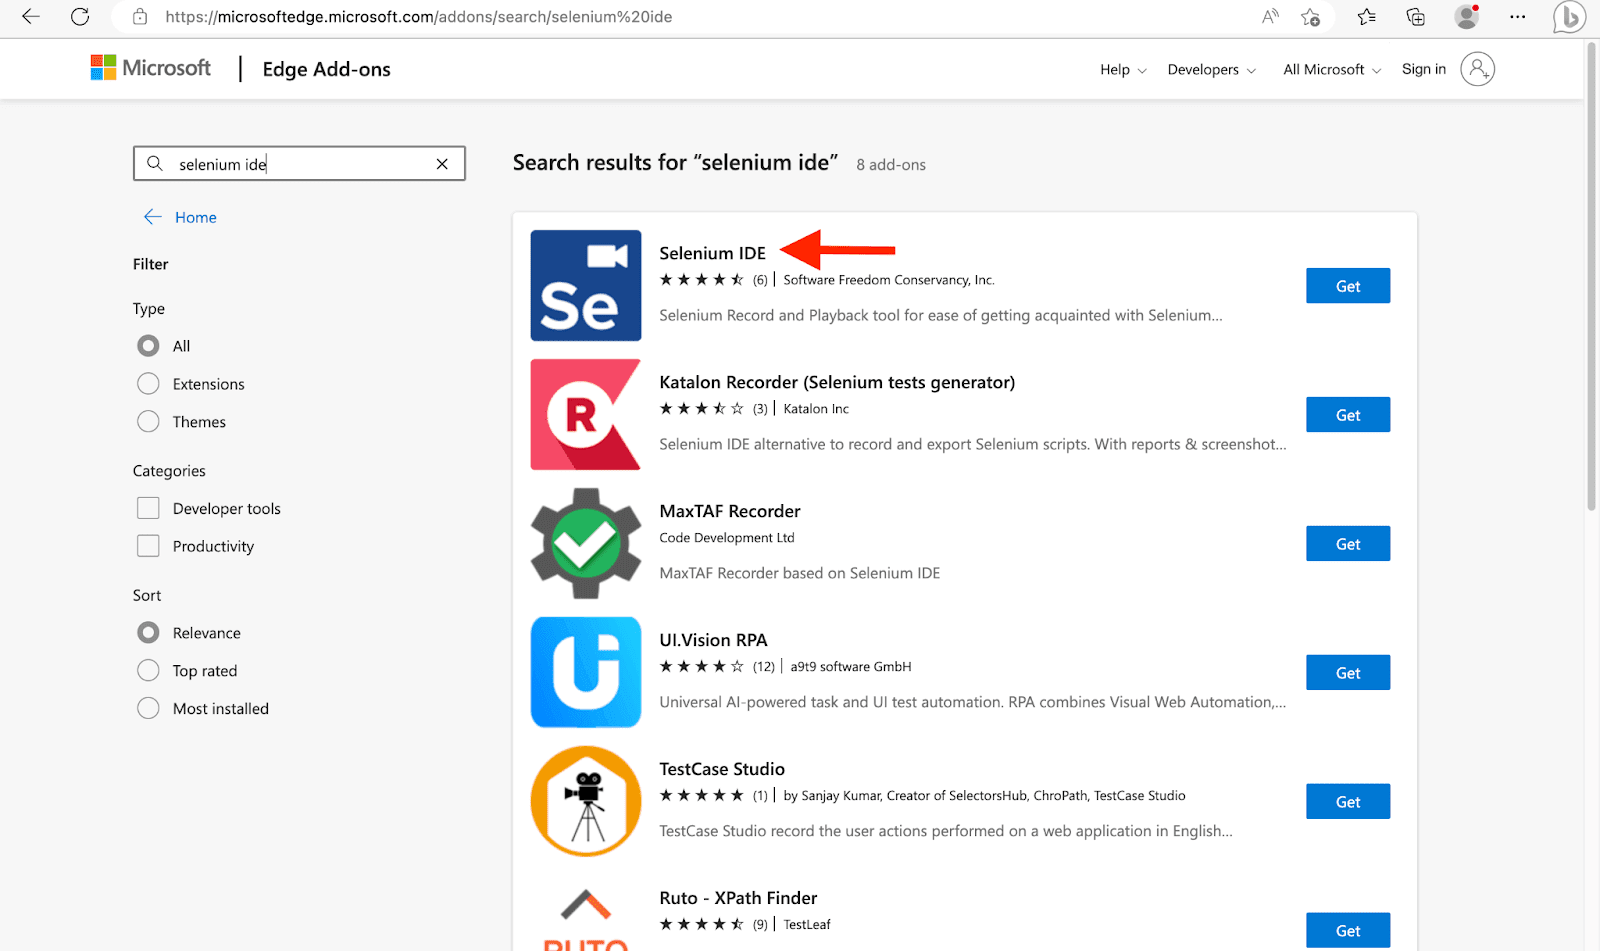
Browsers like Brave and Opera support the Chrome web store, so the installation process is the same as the process from the Chrome browser, which we discussed above. However, there has yet to be an official release for the Safari browser.
From official documentation
- Visit the Selenium IDE downloads page.
- Scroll down to the Selenium IDE section.
- Choose the appropriate Selenium download according to the latest version for Chrome, Firefox, or Edge browser.
- Follow the process to start the Selenium download.
How to Download Selenium WebDriver and Setup
A particular browser driver, such as ChromeDriver, GeckoDriver, MicrosoftWebDriver, OperaDriver, etc., serves as a link between the Selenium WebDriver API and the automated browser and is frequently used in conjunction with it.
In this section we will cover how to Download Selenium WebDriver and set up the correct browser driver for the browser you want to use with Selenium and will see how to instantiate the WebDriver Object.
There are 2 ways to add and set up WebDrivers:
- Explicitly Downloading and Installing/strong>
- Using Selenium WebDriver Manager (introduced with Selenium 4)
We are going to look at how to Explicitly download and Install WebDriver for different browsers and keep in mind that for the second part, where we use Selenium WebDriver Manager – we need not download and install drivers explicitly all requirements will be taken care of by the WebDriver Manager which will be discussed subsequently.
Explicitly Downloading and Installing WebDrivers
In this section of download Selenium guide, let’s set up the browser’s WebDriver by manually downloading it from their official release sources. It works for older (Selenium 3) and newer version (Selenium 4) of Selenium. In this section, we will see the process for various browsers like Chrome, Firefox, Edge, Opera, and Safari. In the later section, we will see how to use these downloaded drivers in the test environment to automate the browsers.
Chrome Browser
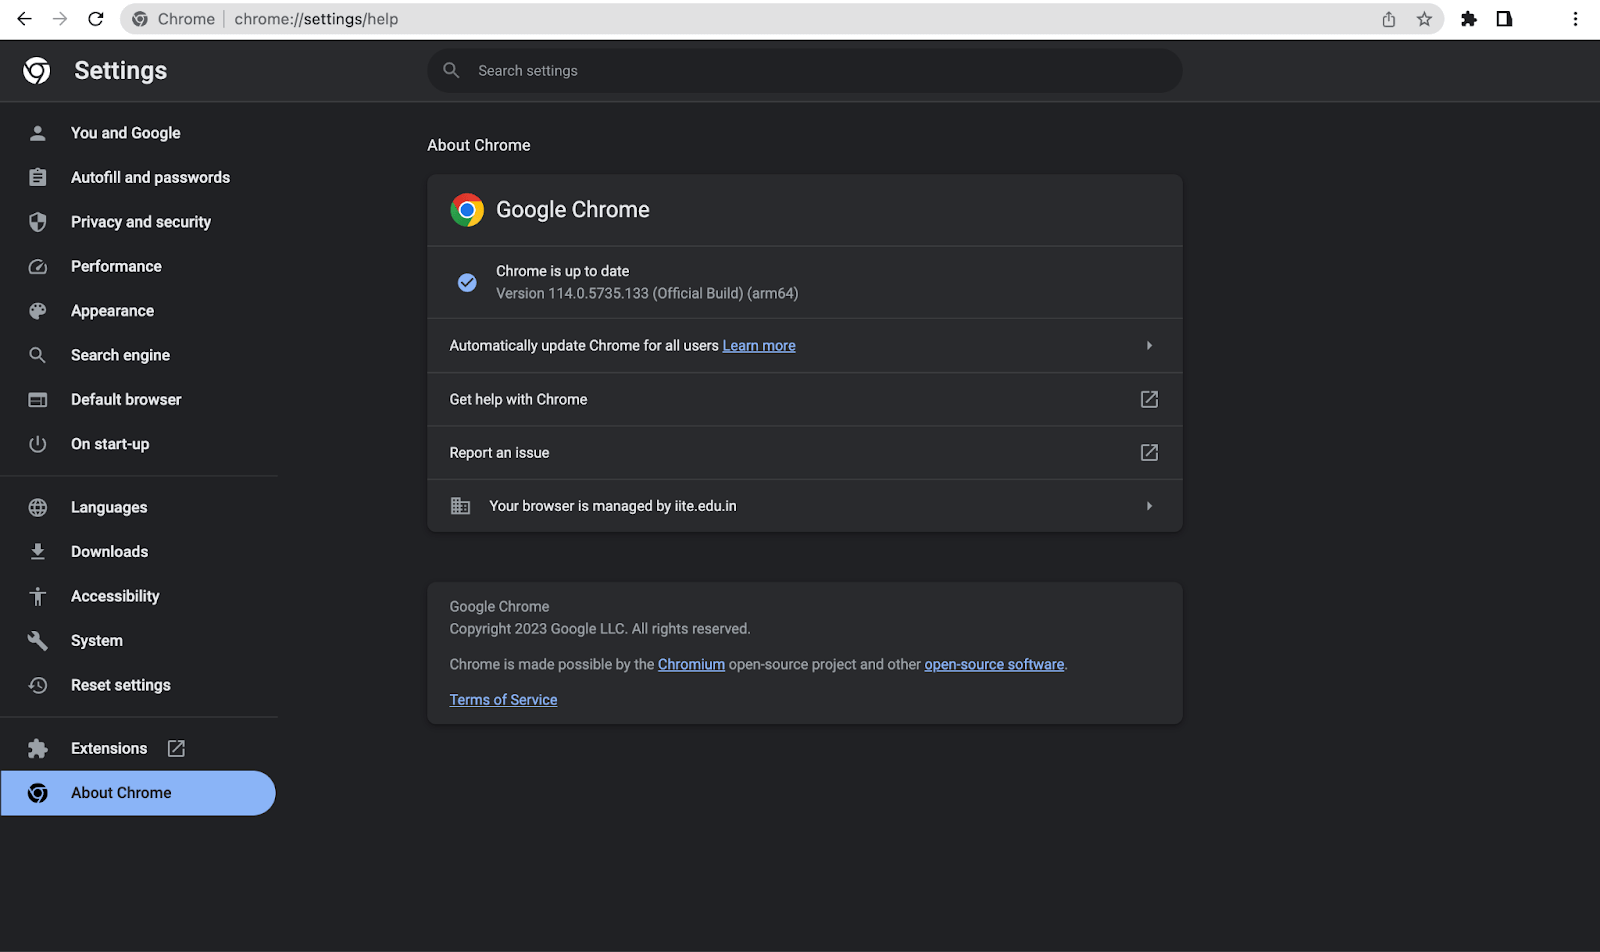
To control the Chrome browser, it provides the WebDriver named chromedriver. Let’s look at the steps to install the chromedriver.
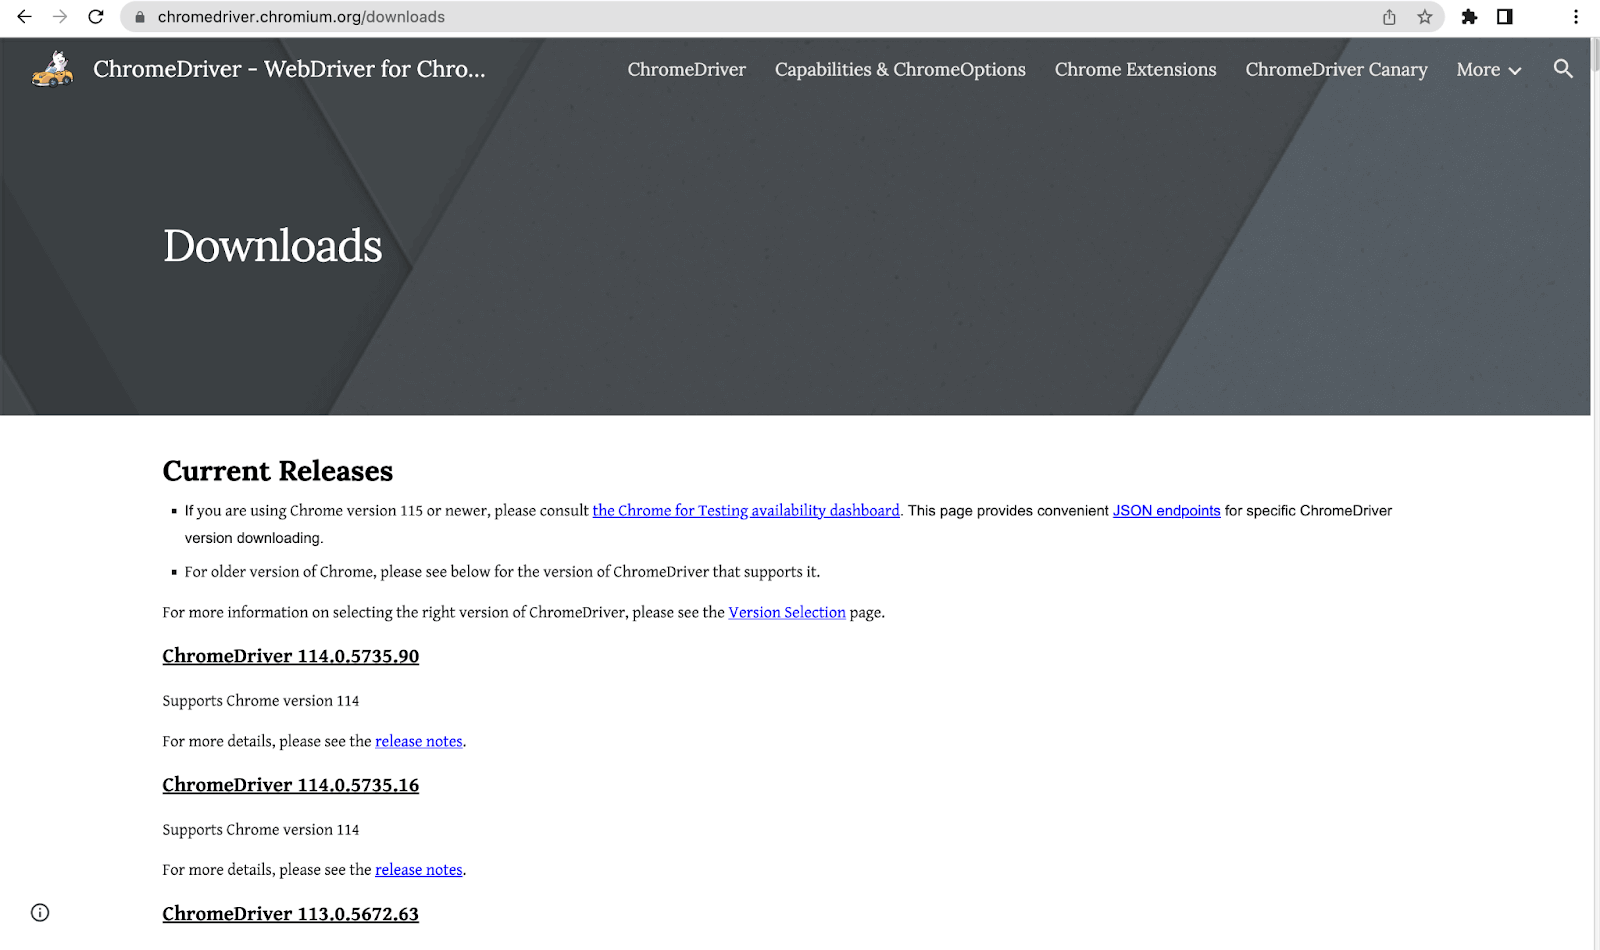
- Follow this ChromeDriver link to download it on your system.
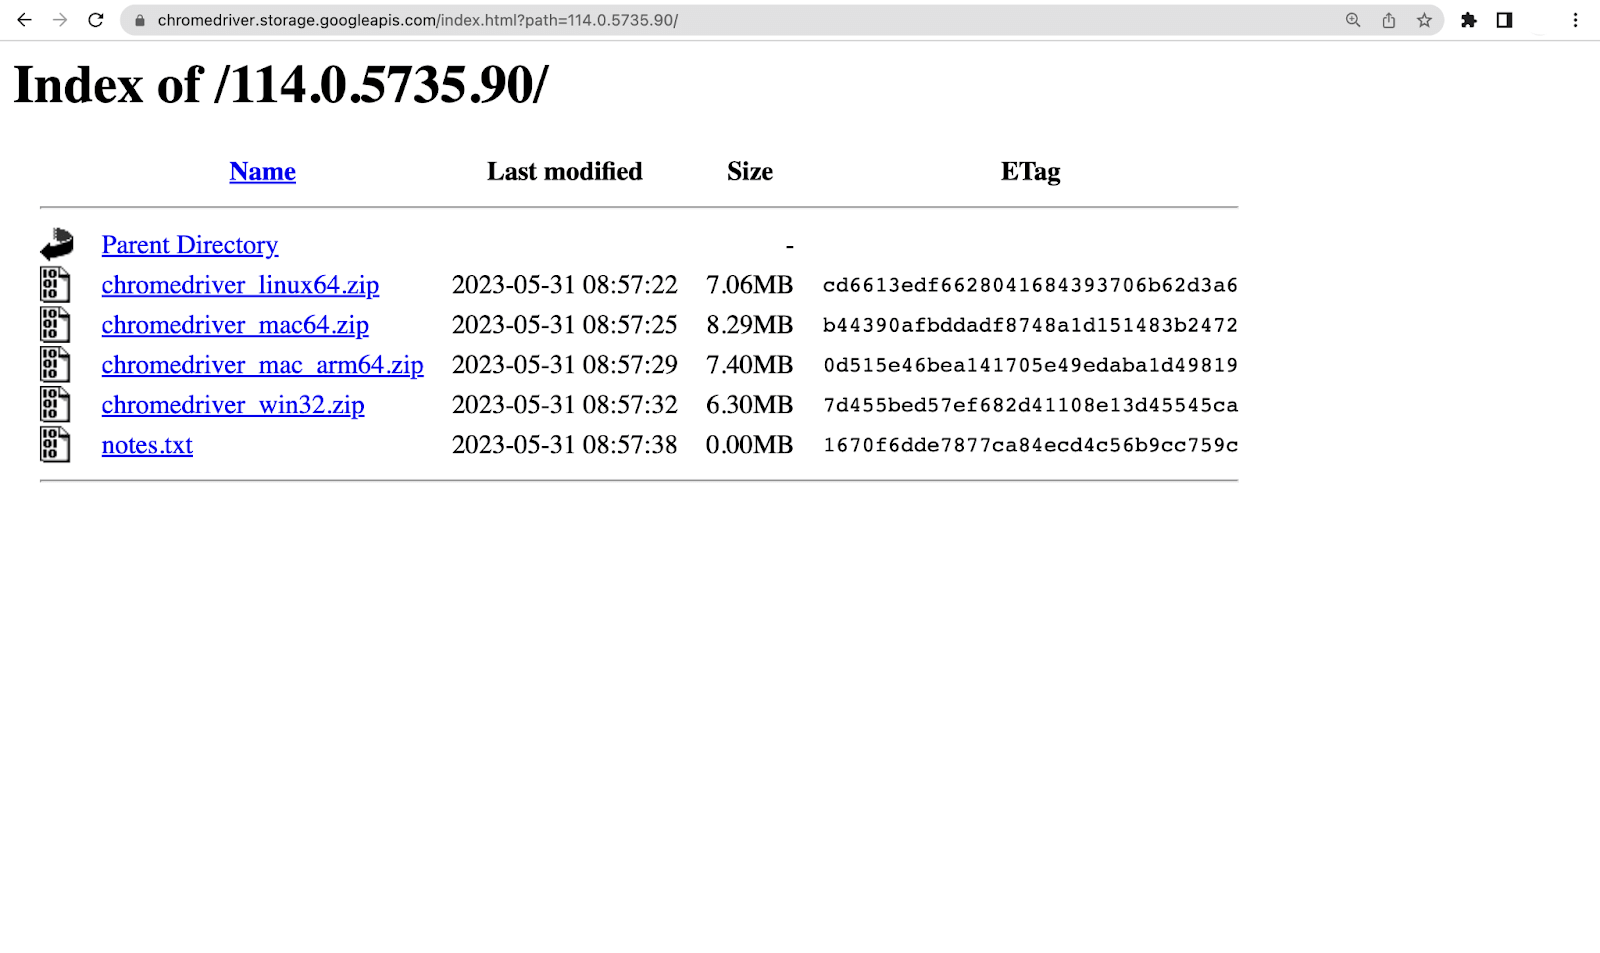
- Select the ChromeDriver according to the version of the Chrome browser. After that, we have to choose the operating system on which we desire to run it.
- Once the download is complete, extract the chromedriver.exe by unzipping the folder.
Firefox Browser
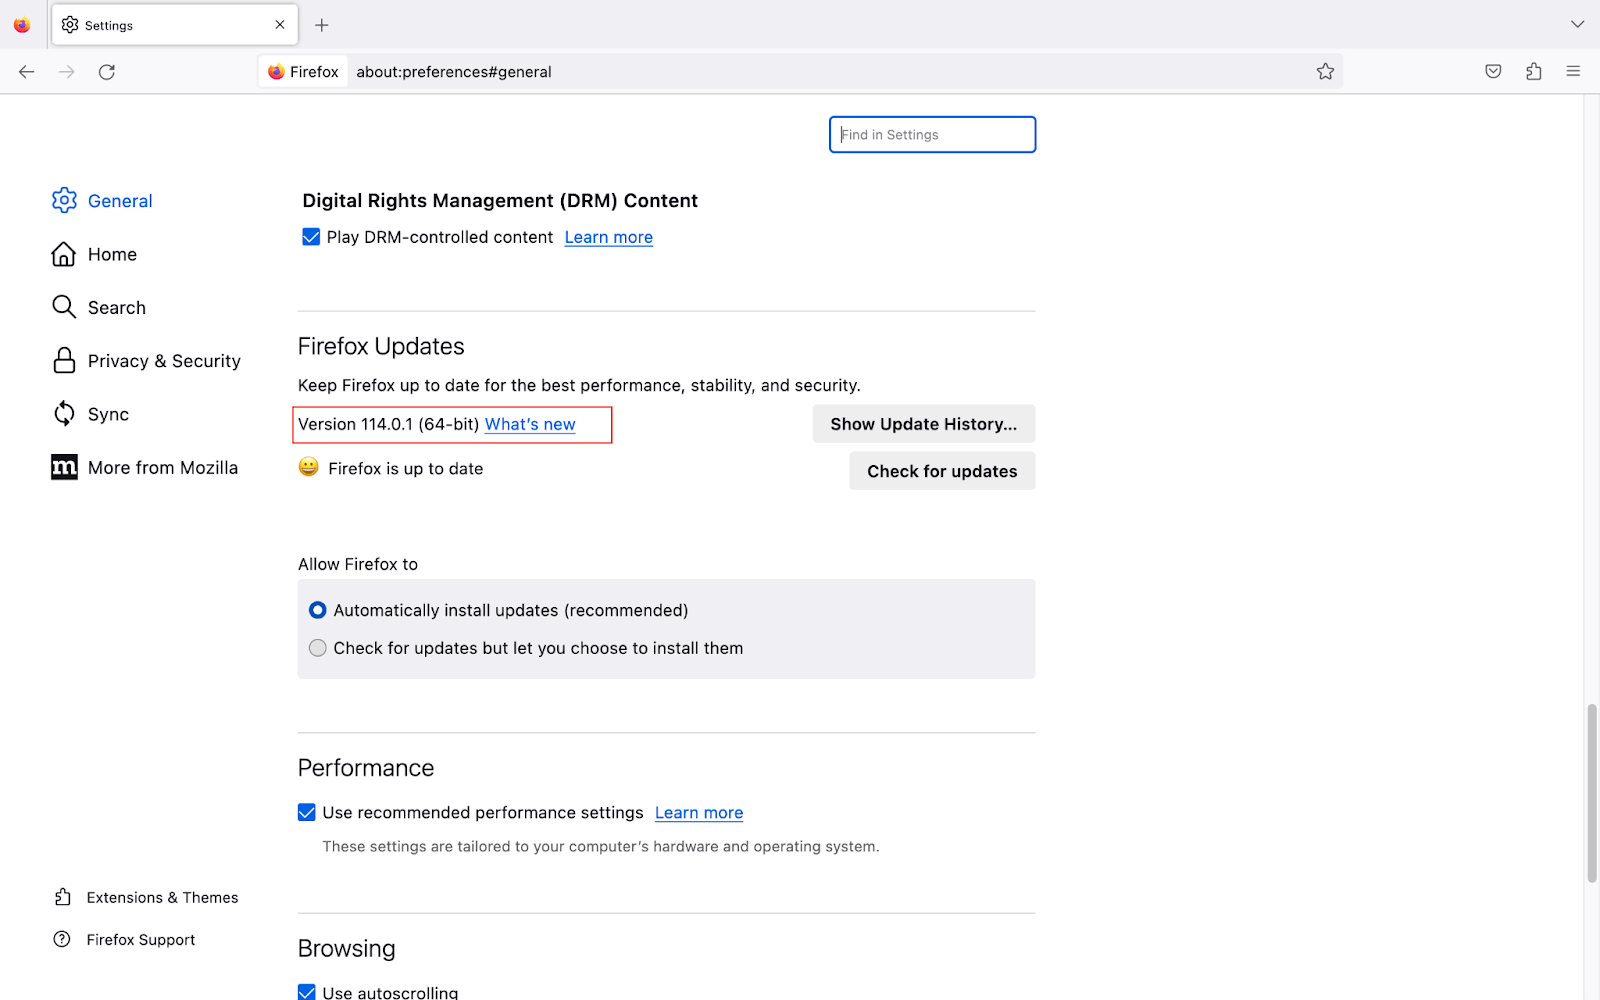
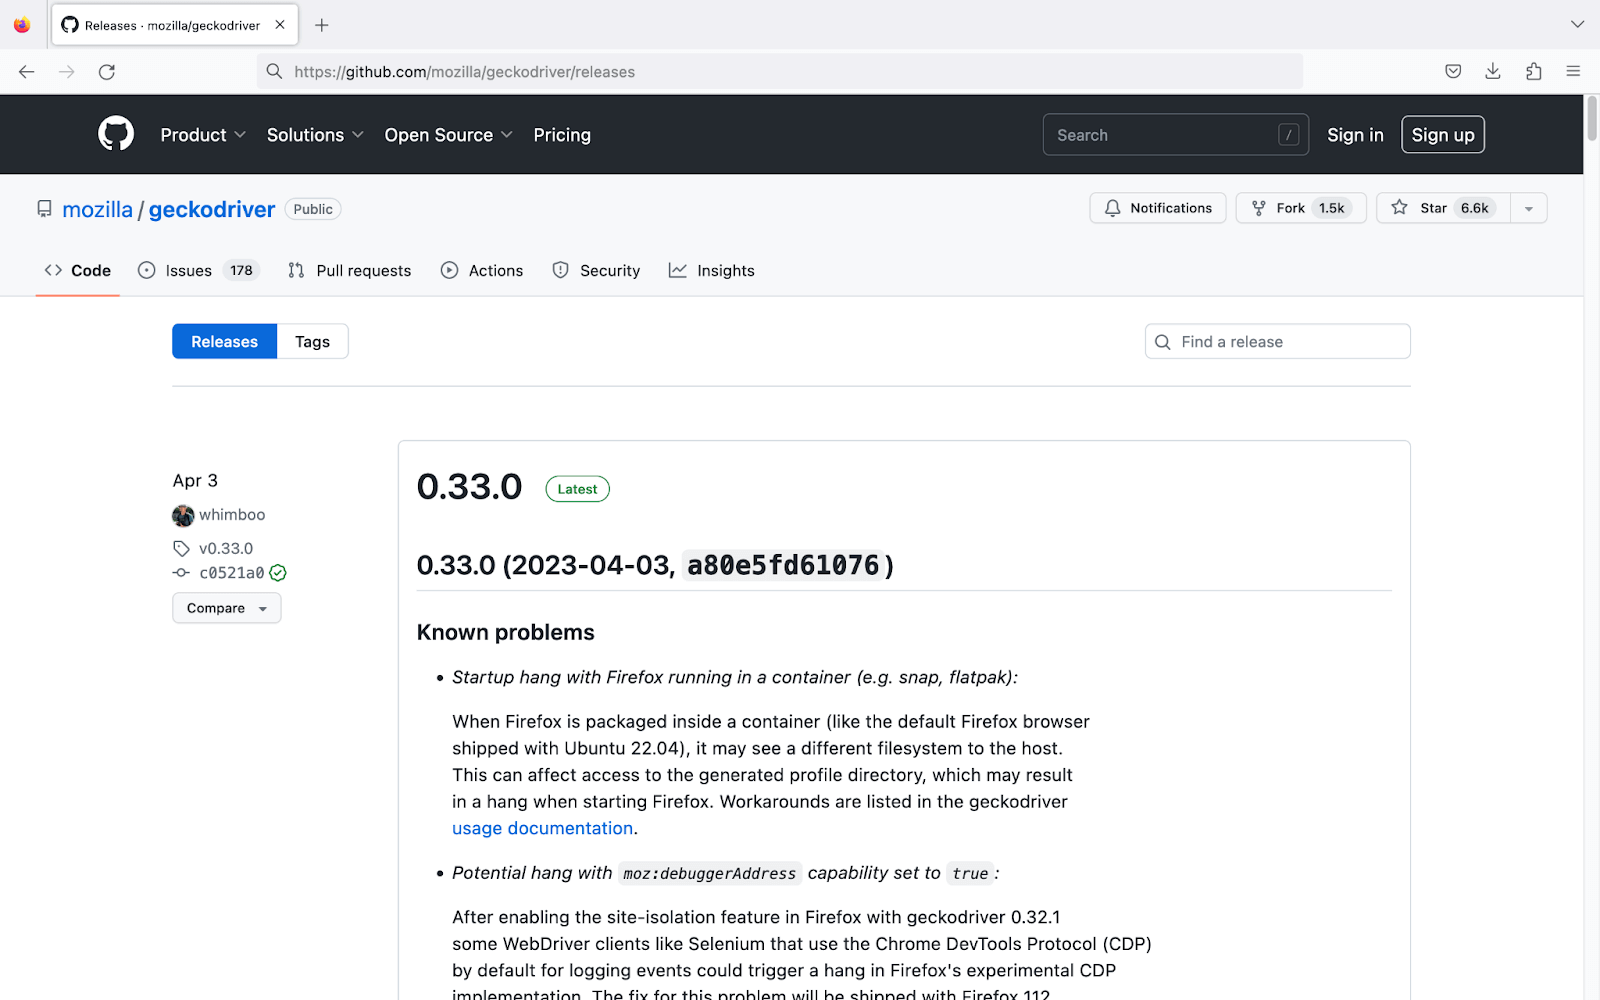
It offers the WebDriver name Geckodriver to control the Firefox browser. Let’s look at the steps to install the Geckodriver.
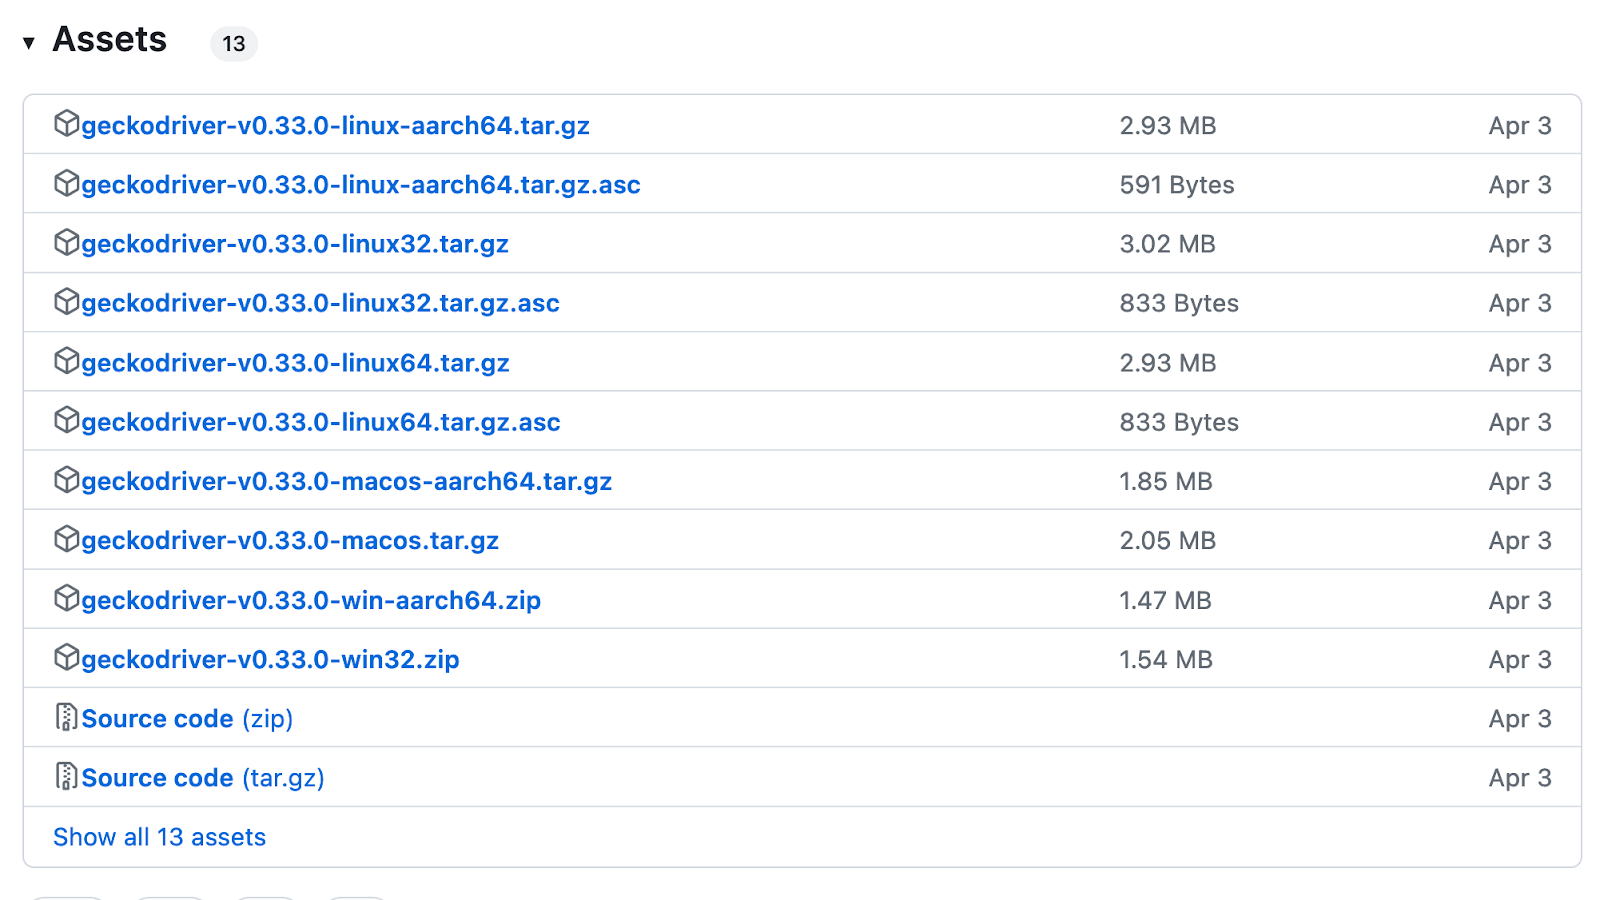
- Follow this Geckodriver link to download it on your system. From the Asserts, download Geckodriver according to the OS.
- Once the driver is downloaded, unzip it, and you will get a geckodriver.exe file.
Edge Browser
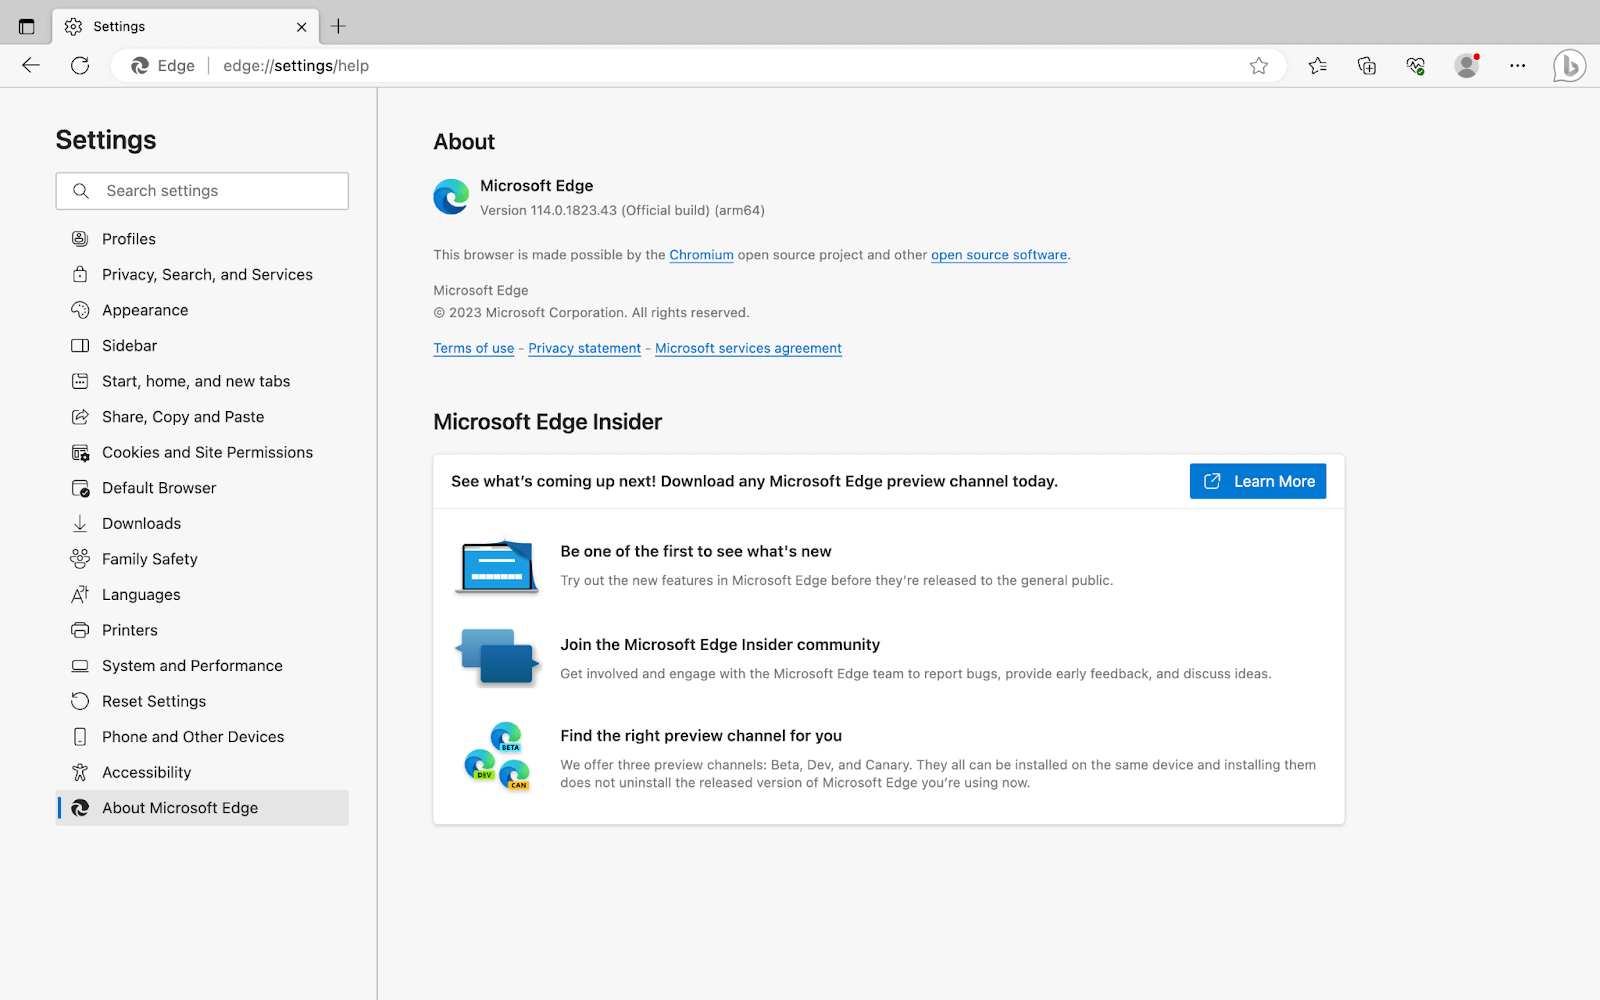
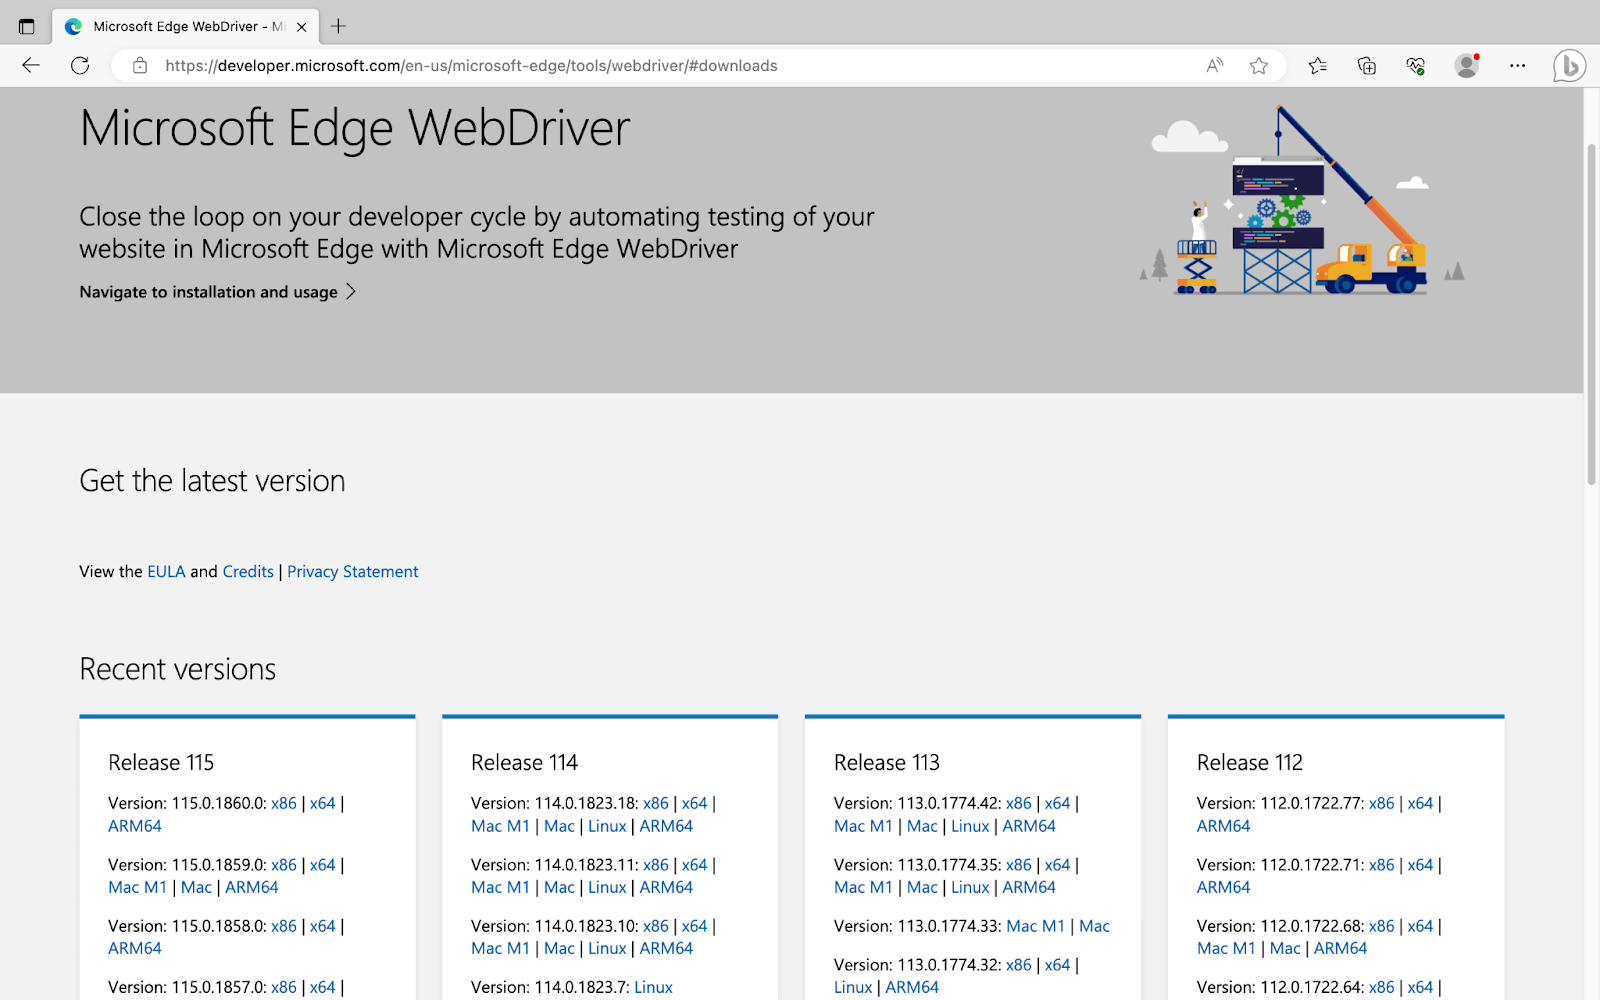
To control the Microsoft Edge browser, it provides an Edge Driver named msedgedriver. Let’s look at the steps to install the msedgedriver.
- Check the version of the Edge browser installed on your system. To check the version, go to the top right corner, select the three dots(⋯) icon -> Settings, and then select About Microsoft Edge from the left panel.
- Follow this msedgedriver link to download it on your system.
- Once the driver is downloaded, unzip it, and you will get a msedgedriver.exe file. In the next section, we will see how to use it.
Opera Browser
To control the Opera browser, it provides the WebDriver name operadriver. Let’s look at the steps to install the operadriver.
Selenium has since removed its dedicated Opera classes because OperaChromiumDriver was never updated for the W3C WebDriver protocol. The supported route today is ChromeDriver with the Opera binary set through ChromeOptions. Follow the steps below only if you maintain an existing operadriver setup.
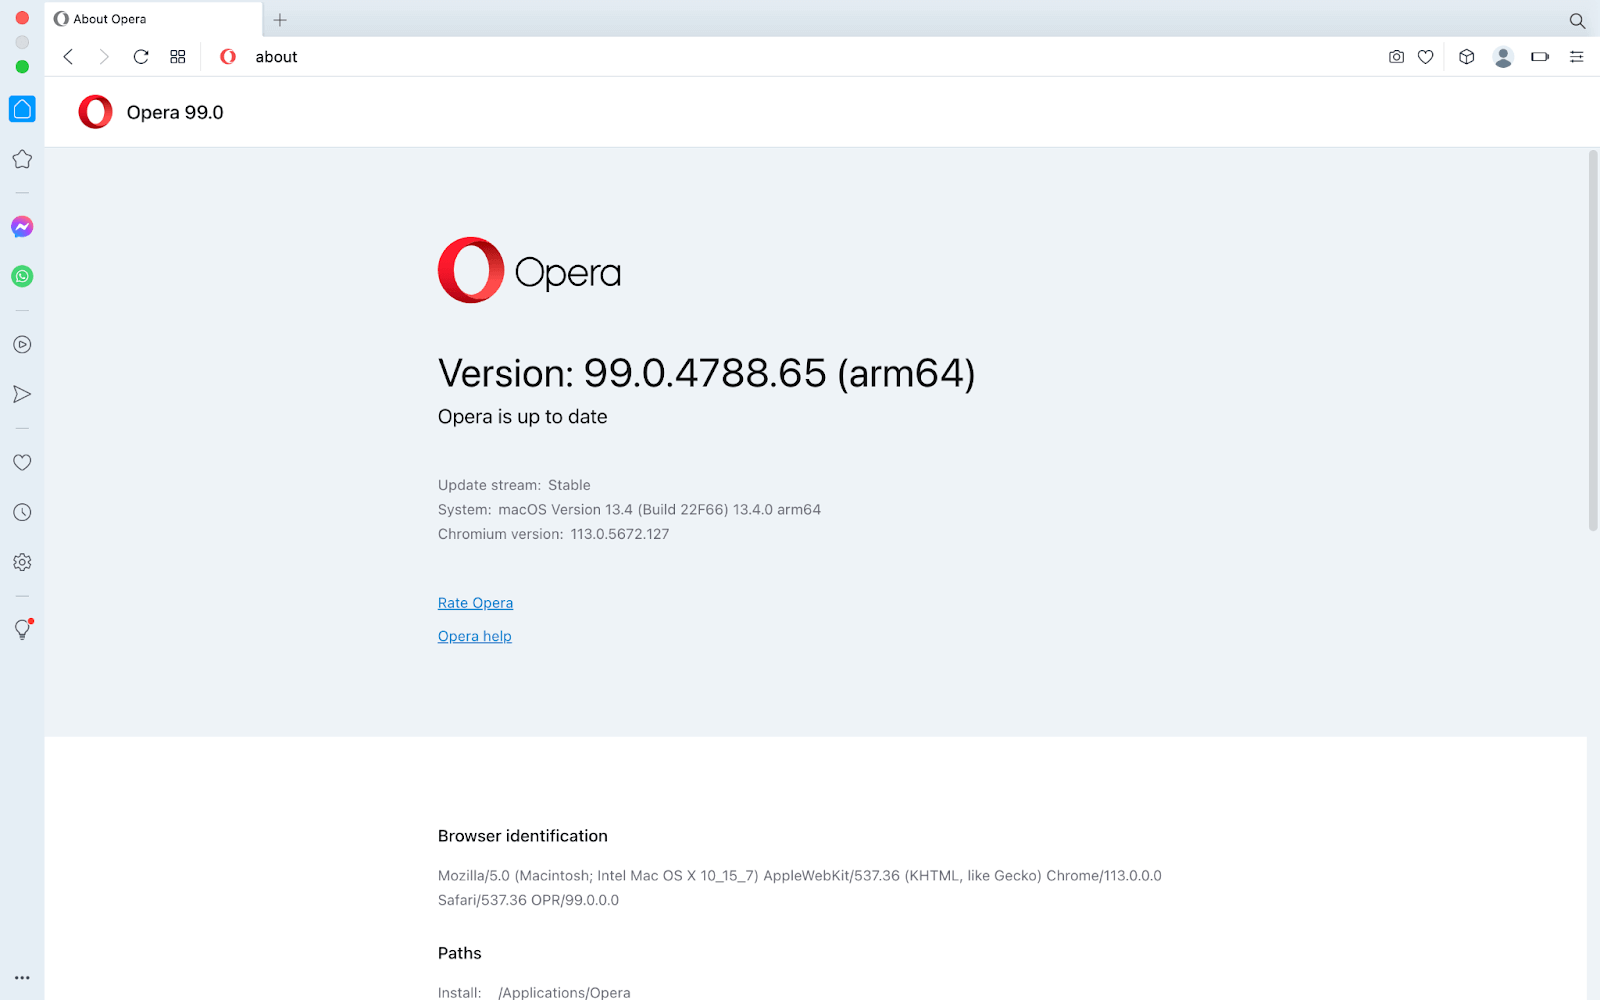
- Check the version of the Opera browser installed on your system. To check the version, type the command opera://about in the search bar.
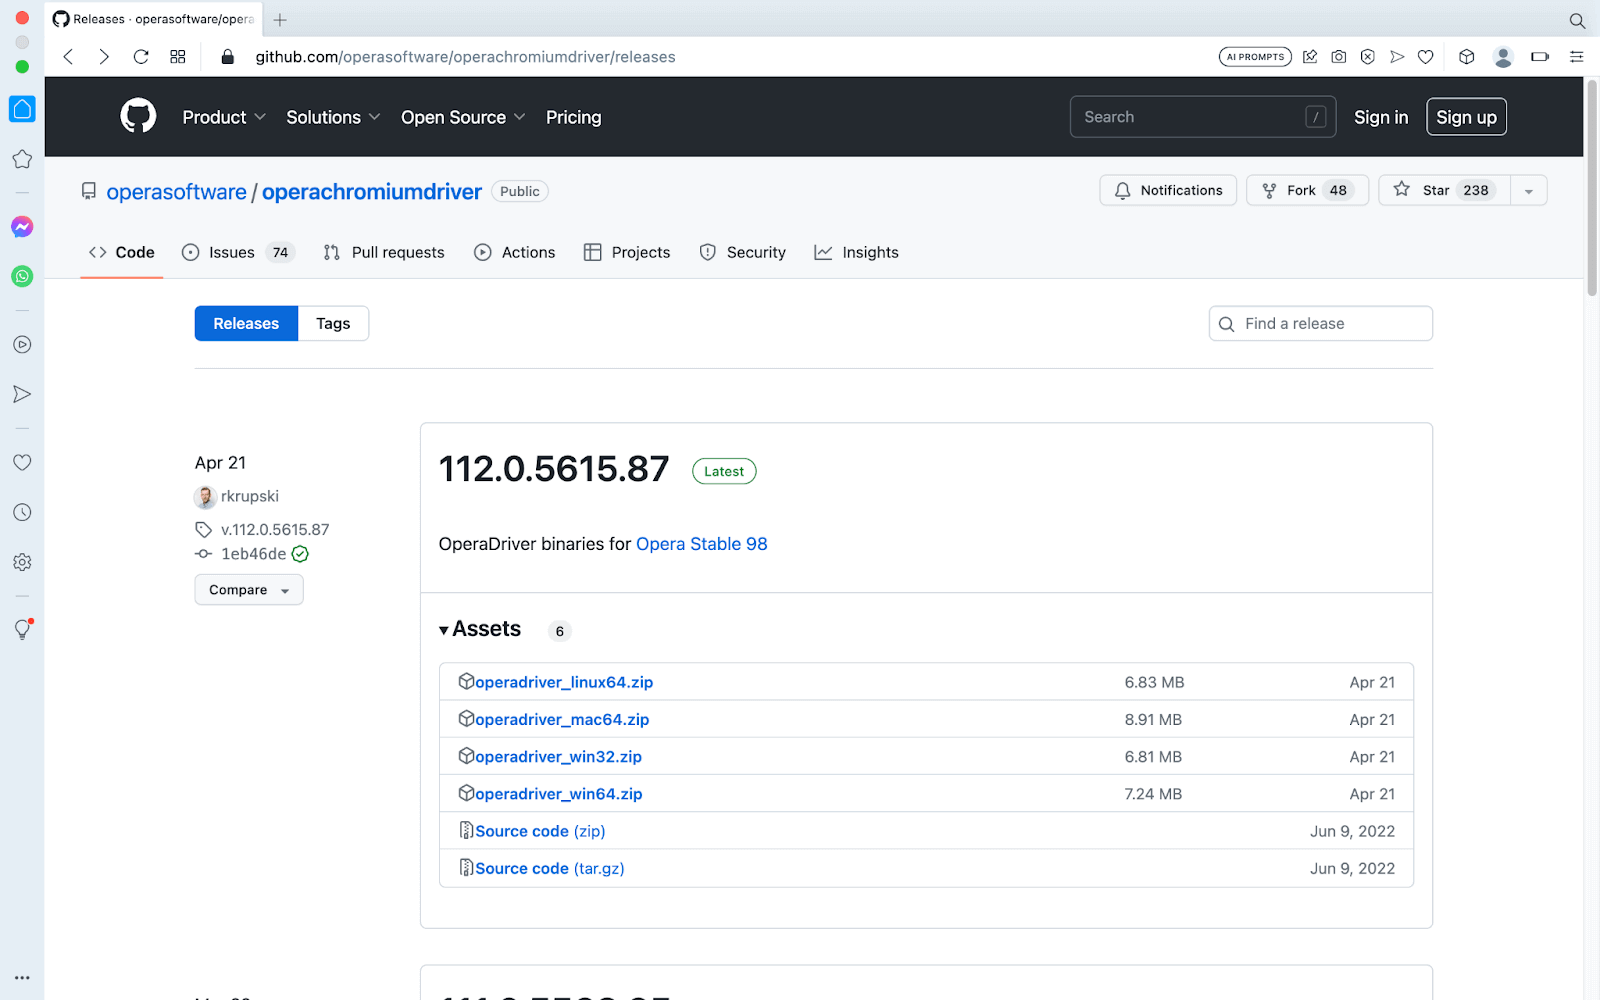
- Follow this operadriver link to download the appropriate version of the WebDriver on your system.
- Once the driver is downloaded, unzip it, and you will get an operadriver.exe file.
Safari Browser
It does not require a Safari driver; instead, most Selenium client libraries currently include safaridriver, the built-in driver for Safari. The web developer experience team at Apple looks after the safaridriver.
/usr/bin/safaridriver is the location of Apple’s executable safaridriver.
To enable the safaridriver, you need to run the following command in the terminal:
/usr/bin/safaridriver --enable
Setting Up WebDriver’s PATH in Different Operating Systems
This is only required if you are explicitly downloading and installing the browser drivers and trying to set it up manually.
There are 2 ways to use the WebDriver of a browser:
- By Explicitly mentioning the driver’s path in the code. This way is useful when you are using multiple versions of the same Browser for testing purposes. For this, you must give the driver executable the absolute file path in order to directly reference the driver’s path in your code. Each Language has a different syntax to do it.
- Adding the driver’s path in Environment Variables and then using it. Adding it to the system’s Environment Variables helps avoid the additional step of mentioning the driver’s location in the code. Let’s see how to do it in different operating systems.
Windows Operating System
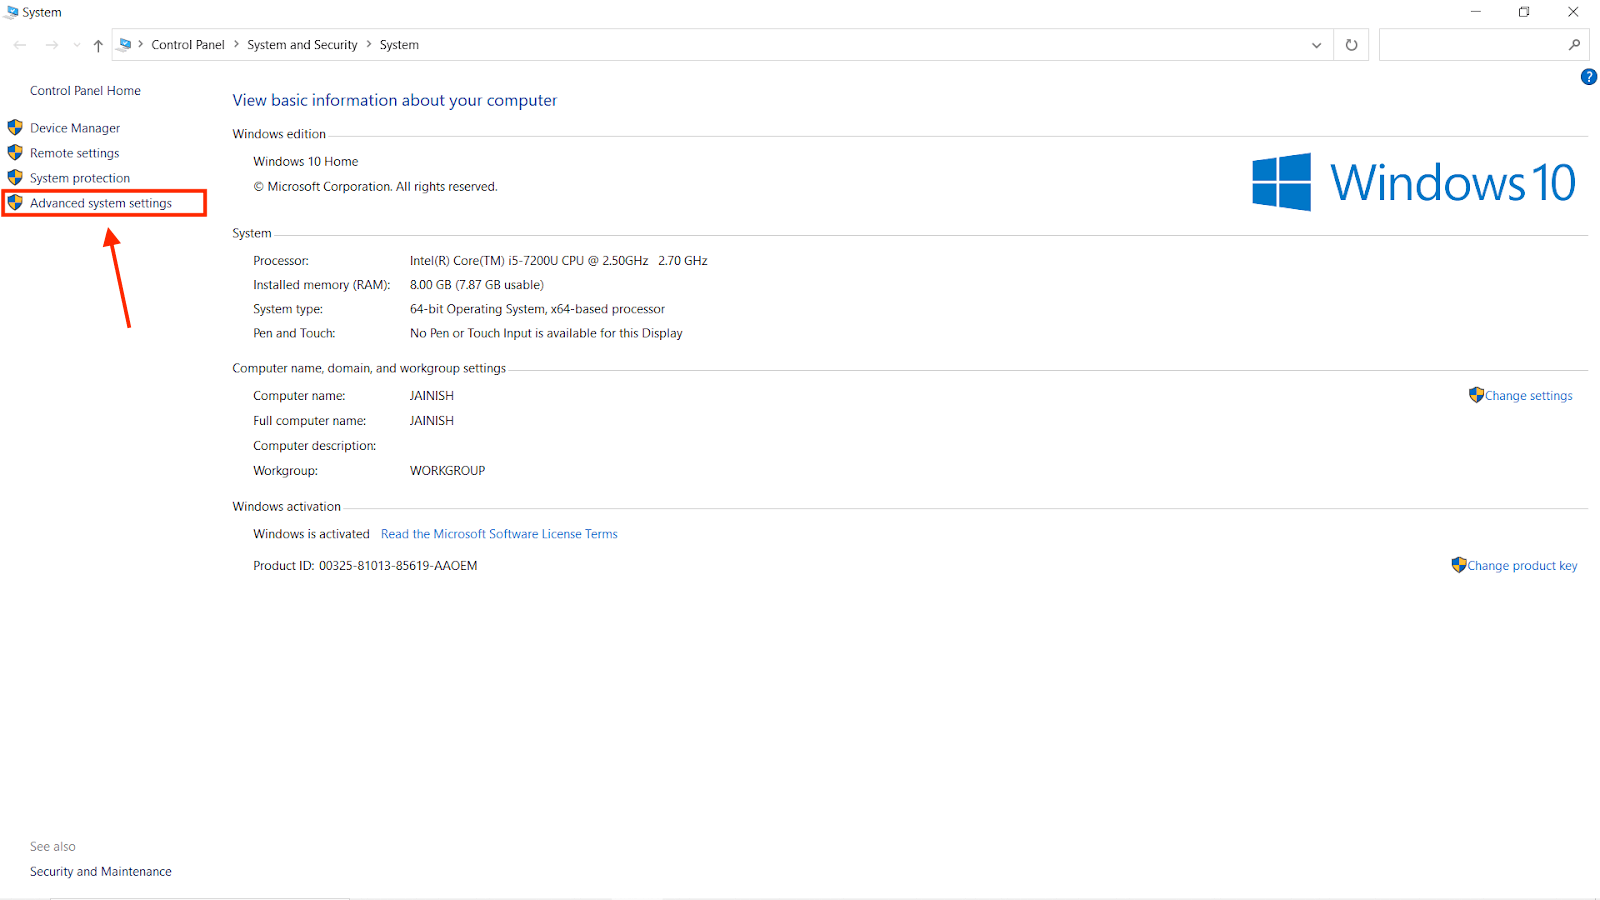
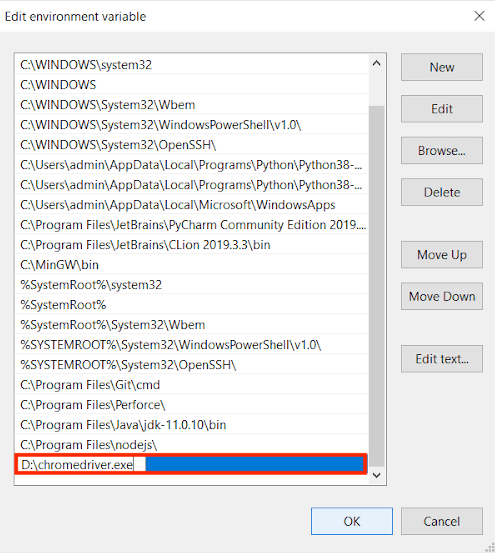
- Copy the path for the file chromedriver.exe; in my case, it is “D:\chromedriver.exe”.
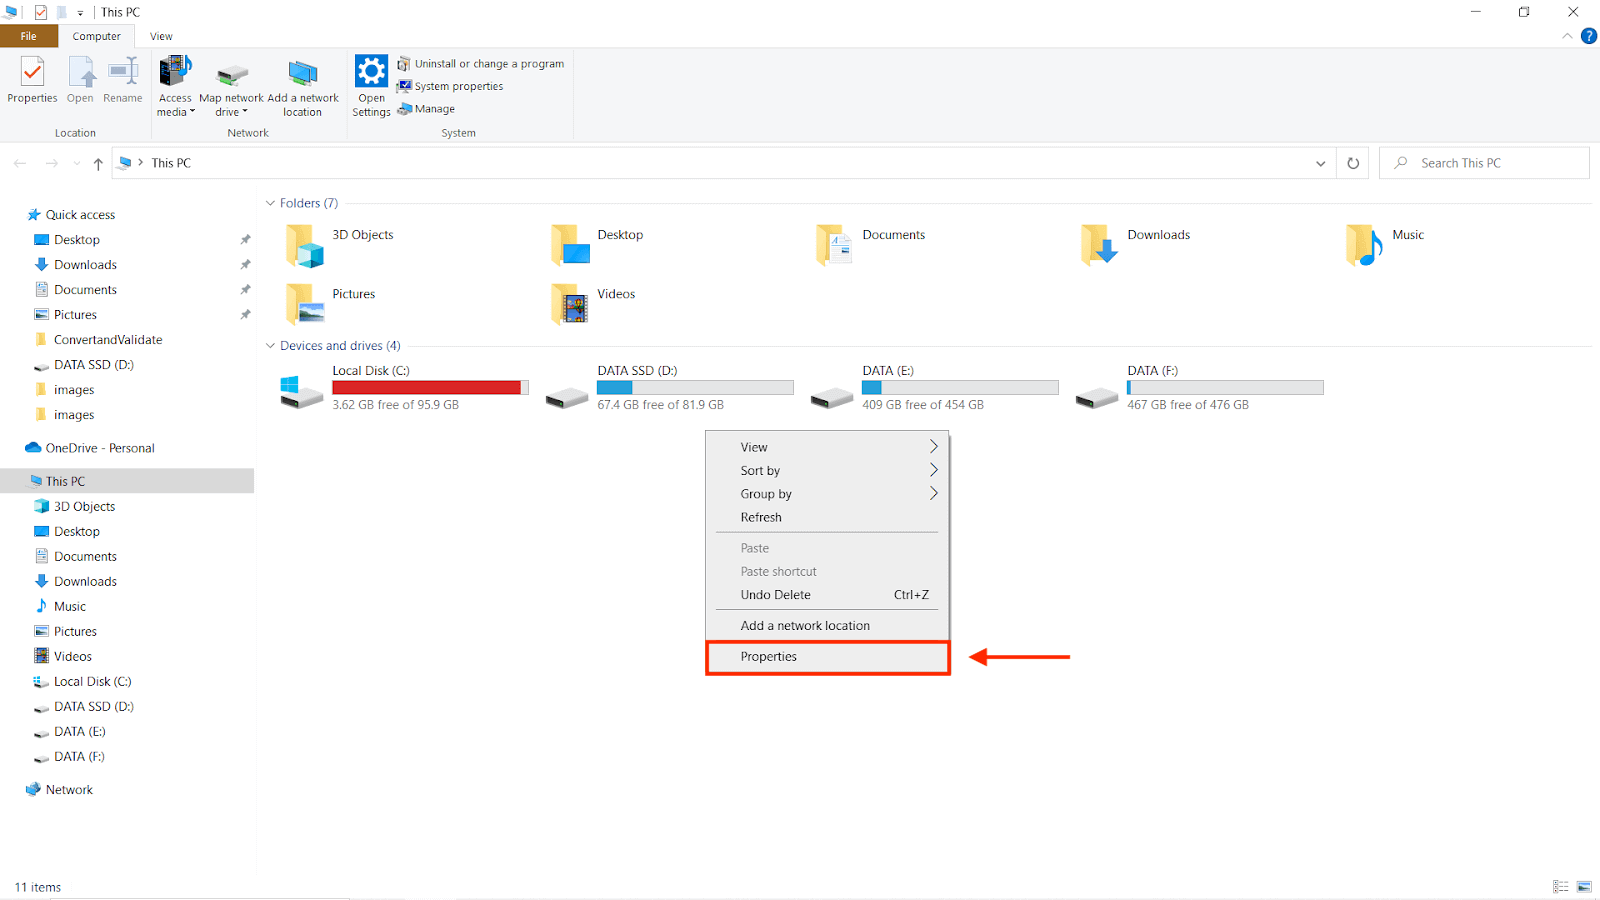
- Right-click on My Computer and click on Properties options.
- You will be redirected to a new window that will look similar to the image below; after that, select the Advanced System Settings option.
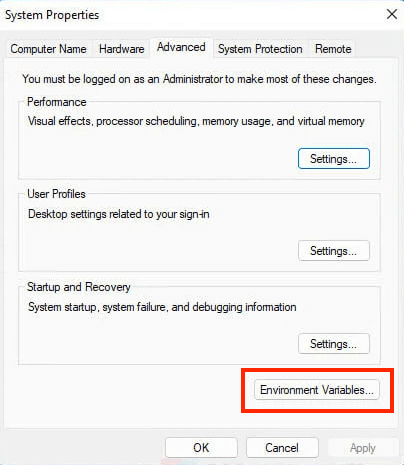
- From the system properties options, select the Environment Variables button.
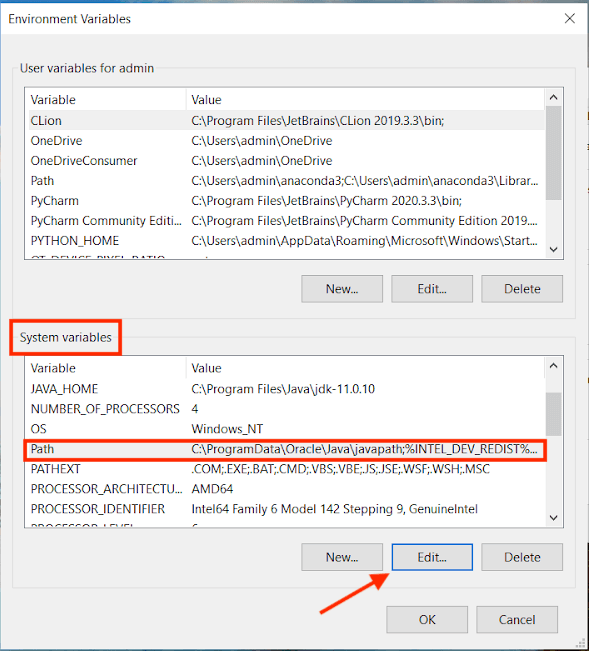
- Now, from the system variables, select the path and press the Edit button.
- Paste the copied path of the file and save the changes by pressing the OK button.
macOS Operating System
- Open the Finder and use ⌘+shift+G
- Go to the following path “/usr/local/bin”
- Add the “chromedriver.exe” file here
Linux Operating SystemIf you have already followed the steps to download ChromeDriver, skip steps 1, 2, and 3.
- Go to your temp folder:
cd /tmp/
- Download the latest Linux-based Chromedriver:
wget https://chromedriver.storage.googleapis.com/2.37/chromedriver_linux64.zip
- Extract Chromedriver from its archive:
unzip chromedriver_linux64.zip
- Move Chromedriver to the applications folder:
sudo mv chromedriver /usr/bin/chromedriver
If you want to explore how to set the environment variable for the driver using a terminal, follow the documentation by Selenium.
In the next section, we will see how to initialize the WebDriver using both ways.
Instantiating Selenium WebDriver Object
Till now we have covered how to download the WebDriver and set it up. Now we are going to see how to use it in different languages like Java, Python, JavaScript, and many more.
There are 2 ways:
- By mentioning the browser-specific driver path or using the Environment Variable path.
- According to the latest standards of Selenium Manager (introduced in the Selenium 4 version and above)
Before moving further let’s learn a bit about Selenium Manager.
Selenium Manager shipped with Selenium 4.6. It is a CLI (Command-Line Interface) program designed for cross-platform execution in the Rust programming language. The Selenium bindings transparently invoke Selenium Manager when a browser driver is not present in the PATH or when a third-party driver manager is not being used. For using any browser’s Driver, you just have to initialize it.
Note the naming: Selenium Manager is the built-in tool maintained by the Selenium project, while WebDriverManager is a separate third-party library. The code samples below use the third-party library, which stays a valid option on Selenium 3 and on builds that pin a driver version.
Let’s now look at how to create the WebDriver Object in different programming languages.
Java
Browser-specific driver path or using the Environment Variable path:
import org.openqa.selenium.WebDriver;
import org.openqa.selenium.chrome.ChromeDriver;
public class WebDriverManagerExample {

    public static void main(String[] args) {
    // If you want to use chromedriver for a specific location
     System.setProperty("webdriver.chrome.driver", "/path/to/chromedriver");

        // If you are using selenium 4 bindings then the below code will work fine even if the Environment Variable path is not setup.

       //  If you directly run the below code it will try to find the driver in Environment Variable.
        WebDriver driver = new ChromeDriver();

        driver.get("https://ecommerce-playground.lambdatest.io/");
        driver.quit();
    }
}
Using Selenium WebDriver Manager for a Maven project:
- Include the following Maven dependency in the pom.xml file for your project:
<dependencies>
    <dependency>
       <groupId>org.seleniumhq.selenium</groupId>
       <artifactId>selenium-java</artifactId>
       <version>4.10.0</version>
    </dependency>

    <dependency>
        <groupId>io.github.bonigarcia</groupId>
        <artifactId>webdrivermanager</artifactId>
        <version>5.4.0</version>
    </dependency>
</dependencies>
- It can be utilized as follows in Java code:
import io.github.bonigarcia.wdm.WebDriverManager;
import org.openqa.selenium.WebDriver;
import org.openqa.selenium.chrome.ChromeDriver;

public class WebDriverManagerExample {

    public static void main(String[] args) {
        // Setup WebDriverManager
        WebDriverManager.chromedriver().setup();

        // Create a new WebDriver instance
        WebDriver driver = new ChromeDriver();

        driver.get("https://ecommerce-playground.lambdatest.io/");
        driver.quit();
    }
}
Python
Browser-specific driver path or using the Environment Variable path:
from selenium import webdriver
# Setup webdriver_manager
# If you want to use chromedriver for a specific location
driver = webdriver.Chrome(executable_path="/path/to/chromedriver")
# If you directly run the below code it will try to find the driver in Environment Variable.
driver = webdriver.Chrome()
driver.get("https://ecommerce-playground.lambdatest.io/")
driver.close()
Using Selenium WebDriver Manager:
- Install the webdriver-manager package using pip:
pip install webdriver-manager
- The necessary WebDriver binaries can be downloaded automatically by using the webdriver-manager module. Here’s an illustration:
# selenium 3
from selenium import webdriver
from webdriver_manager.chrome import ChromeDriverManager
# Setup webdriver_manager
driver = webdriver.Chrome(ChromeDriverManager().install())
driver.get("https://ecommerce-playground.lambdatest.io/")
driver.close()
# selenium 4
from selenium import webdriver
from selenium.webdriver.chrome.service import Service as ChromeService
from webdriver_manager.chrome import ChromeDriverManager
# Setup webdriver_manager
driver = webdriver.Chrome(service=ChromeService(ChromeDriverManager().install()))
driver.get("https://ecommerce-playground.lambdatest.io/")
driver.close()
C#
Browser-specific driver path or using the Environment Variable path:
using System;
using OpenQA.Selenium;
using OpenQA.Selenium.Chrome;

namespace SeleniumWithChromeriver
{
    class Program
    {
        static void Main(string[] args)
        {
           // If you want to use chromedriver for a specific location
	     WebDriver driver = new ChromeDriver("/path/to/chromedriver");

           // If you directly run the below code it will try to find the driver in Environment Variable.
           WebDriver driver = new ChromeDriver();
               driver.NavigateTo("https://ecommerce-playground.lambdatest.io/");

            driver.Close();


        }
    }
}
Using Selenium WebDriver Manager:
- Using the dotnet CLI or NuGet Package Manager, install the WebDriverManager .Net package:
dotnet add package WebDriverManager.Net
- It can be utilized as follows in code:
using System;
using System.Collections.Generic;
using System.Text;
using Selenium.WebDriver;
using WebDriverManager;

namespace WebDriverManagerExample
{
    class Program
    {
        static void Main(string[] args)
        {
            // Initialize WebDriverManager
            WebDriverManager.ChromeDriver().Setup();

            IWebDriver driver = new ChromeDriver();

                       driver.NavigateTo("https://ecommerce-playground.lambdatest.io/");

            driver.Close();
        }
    }
}
PHP
Browser-specific driver path or using the Environment Variable path:
<?php

require_once('vendor/autoload.php');

use FacebookWebDriverRemoteDesiredCapabilities;
use FacebookWebDriverRemoteRemoteWebDriver;

// Provide the absolute path to the chromedriver executable
$driverPath = '/path/to/chromedriver';

// Set the desired capabilities
$capabilities = DesiredCapabilities::chrome();

// If you want to use chromedriver for a specific location
$driver = RemoteWebDriver::create($driverPath, $capabilities);

// If you directly run the below code it will try to find the driver in Environment Variable.
$driver = RemoteWebDriver::create($capabilities);

$driver->get('https://ecommerce-playground.lambdatest.io/');

$driver->quit();

?>
Using Selenium WebDriver Manager:
- Using Composer, install the php-webdriver/webdriver package:
composer require webdrivermanager/webdrivermanager
- It can be utilized as follows in code:
<?php

require_once 'vendor/autoload.php';

use WebDriverManagerWebDriverManager;


// Initialize WebDriverManager
WebDriverManager::setBrowser('chrome');

$driver = WebDriverManager::getDriver();

$driver->get('https://ecommerce-playground.lambdatest.io/');

$driver->quit();

?>
Ruby
Browser-specific driver path or using the Environment Variable path:
require 'selenium-webdriver'

# If you want to use chromedriver for a specific location
driver_path = '/path/to/chromedriver'

# Set the path for the chromedriver executable
Selenium::WebDriver::Chrome::Service.driver_path = driver_path

# If you directly run the below code it will try to find the driver in Environment Variable.
driver = Selenium::WebDriver.for :chrome

driver.get 'https://ecommerce-playground.lambdatest.io/'
driver.quit
Using Selenium WebDriver Manager:
- Using RubyGems, install the webdrivers gem:
gem install webdriver_manager
- It can be used as follows in Ruby code:
require 'webdriver_manager'
WebDriverManager.chromedriver.install
# Setup webdriver_manager
driver = Selenium::WebDriver.for :chrome
driver.get 'https://ecommerce-playground.lambdatest.io/'
driver.quit
JavaScript (Node.js)
const {By,Key,Builder} = require("selenium-webdriver");
require("chromedriver");
// If you want to use chromedriver for a specific location
const chromedriverPath = '/path/to/chromedriver';

async function example(){

       //If you directly run the below code it will try to find the driver in Environment Variable.
       let driver = await new Builder().forBrowser("chrome").build();

       await driver.get("https://ecommerce-playground.lambdatest.io/");
       await driver.quit();

}

example()
Using Selenium WebDriver Manager:
- Using npm, install the webdriver-manager package:
npm install webdriver-manager
- The necessary WebDriver binaries can be downloaded automatically by using the webdriver-manager module. Here’s an illustration:
const WebDriverManager = require('webdriver-manager');


// Initialize WebDriverManager
const chromeDriver = WebDriverManager.chromedriver();

chromeDriver.setup();

const driver = new chrome.ChromeDriver();

driver.get('https://ecommerce-playground.lambdatest.io/');

driver.quit();
Configure And Setup Selenium on Popular IDEs
There are 2 ways to do it,
- Standard way, where we download the language specific JAR files and add them to a plain Java project’s build path manually and set it up.
- Using a build tool like Maven, Gradle, etc., where we are not required to put the manual efforts as mentioned above, rather put such requirements into a build file, ex, pom.xml in case of maven which downloads the external JAR requirements and other such dependencies during project execution(building the project).
Eclipse IDE
Before moving forward with the installation of Eclipse IDE, it is mandatory to install Java on your system. Now let’s see how we will set up the IDE for automation tests.
Let’s look at the standard way in Java:
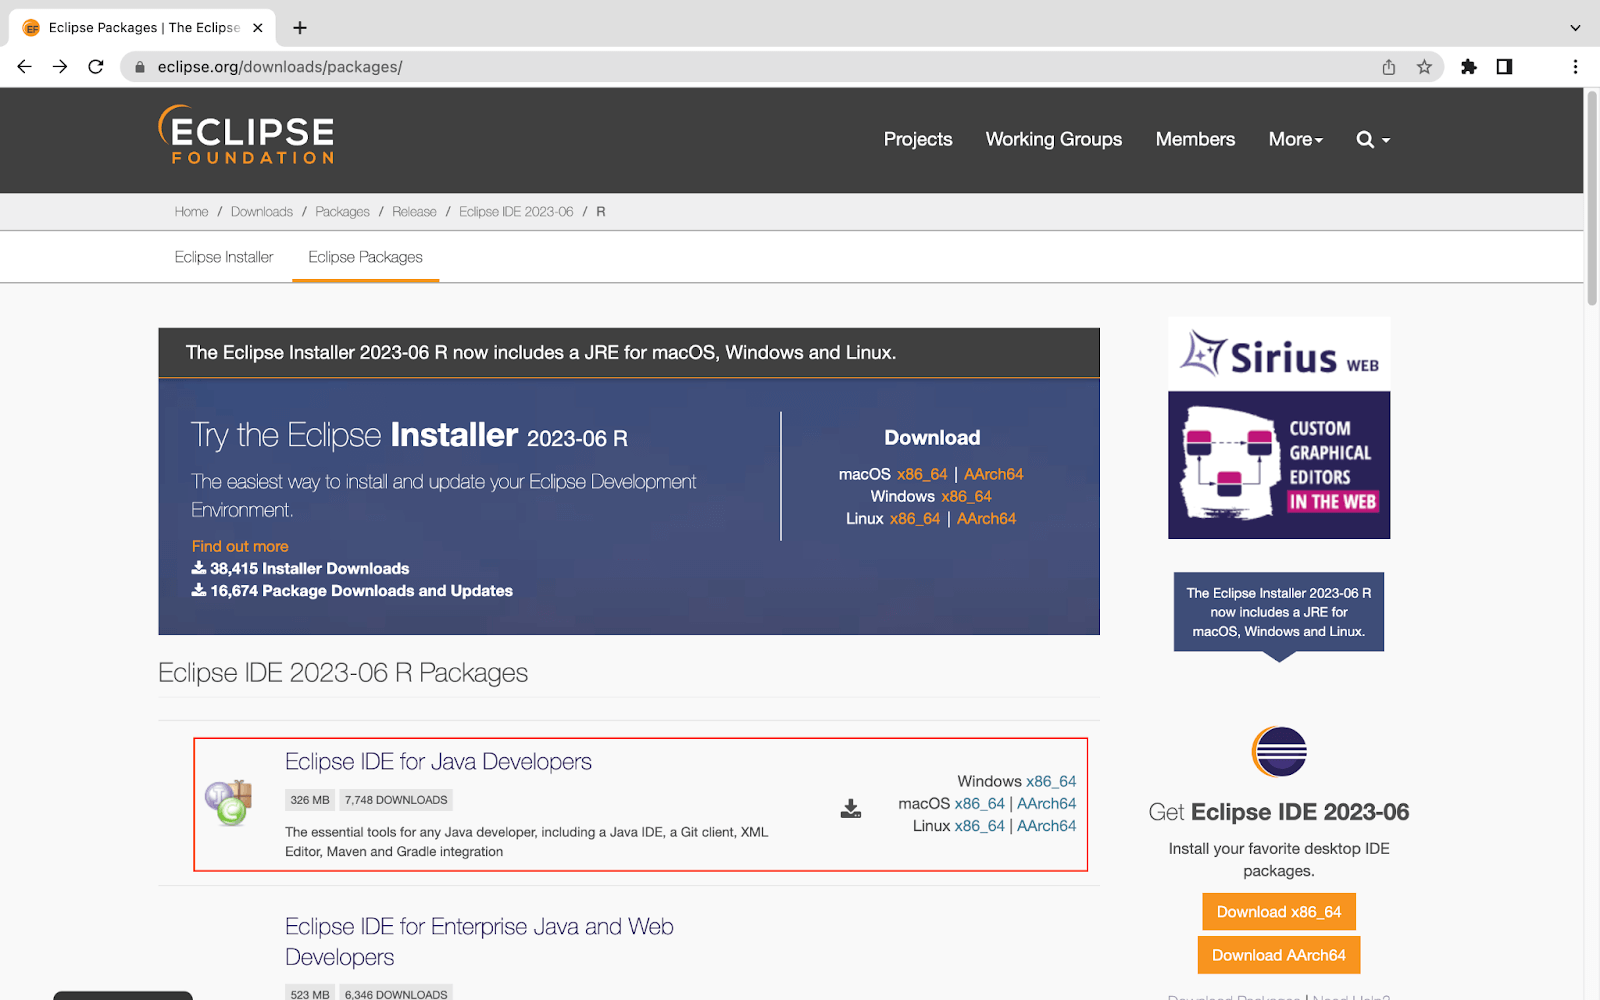
- Download Eclipse IDE for Java Developers from the official Eclipse website and install it on your system.
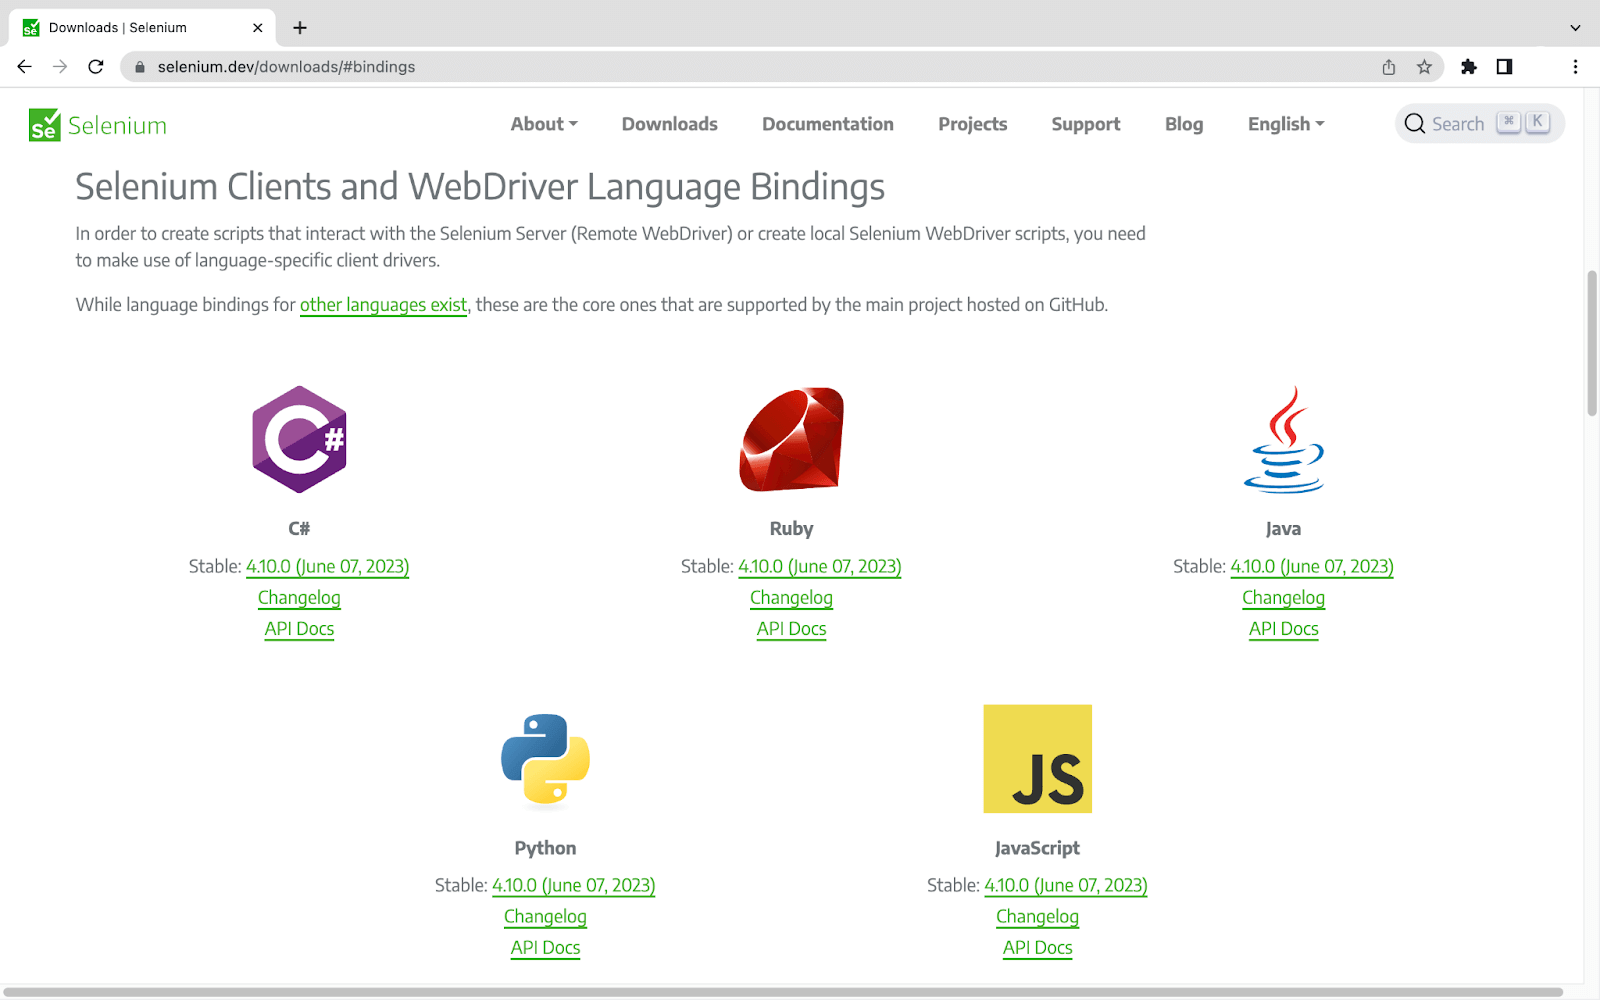
- Now, from the Selenium website, get the Selenium Client & WebDriver Language Bindings. The client libraries that correspond to your preferred language can be downloaded. For the Eclipse IDE Demo, we are using Java bindings.
- Open the Eclipse IDE followed by selecting your workplace or letting the default location be selected, then press OK/Launch.
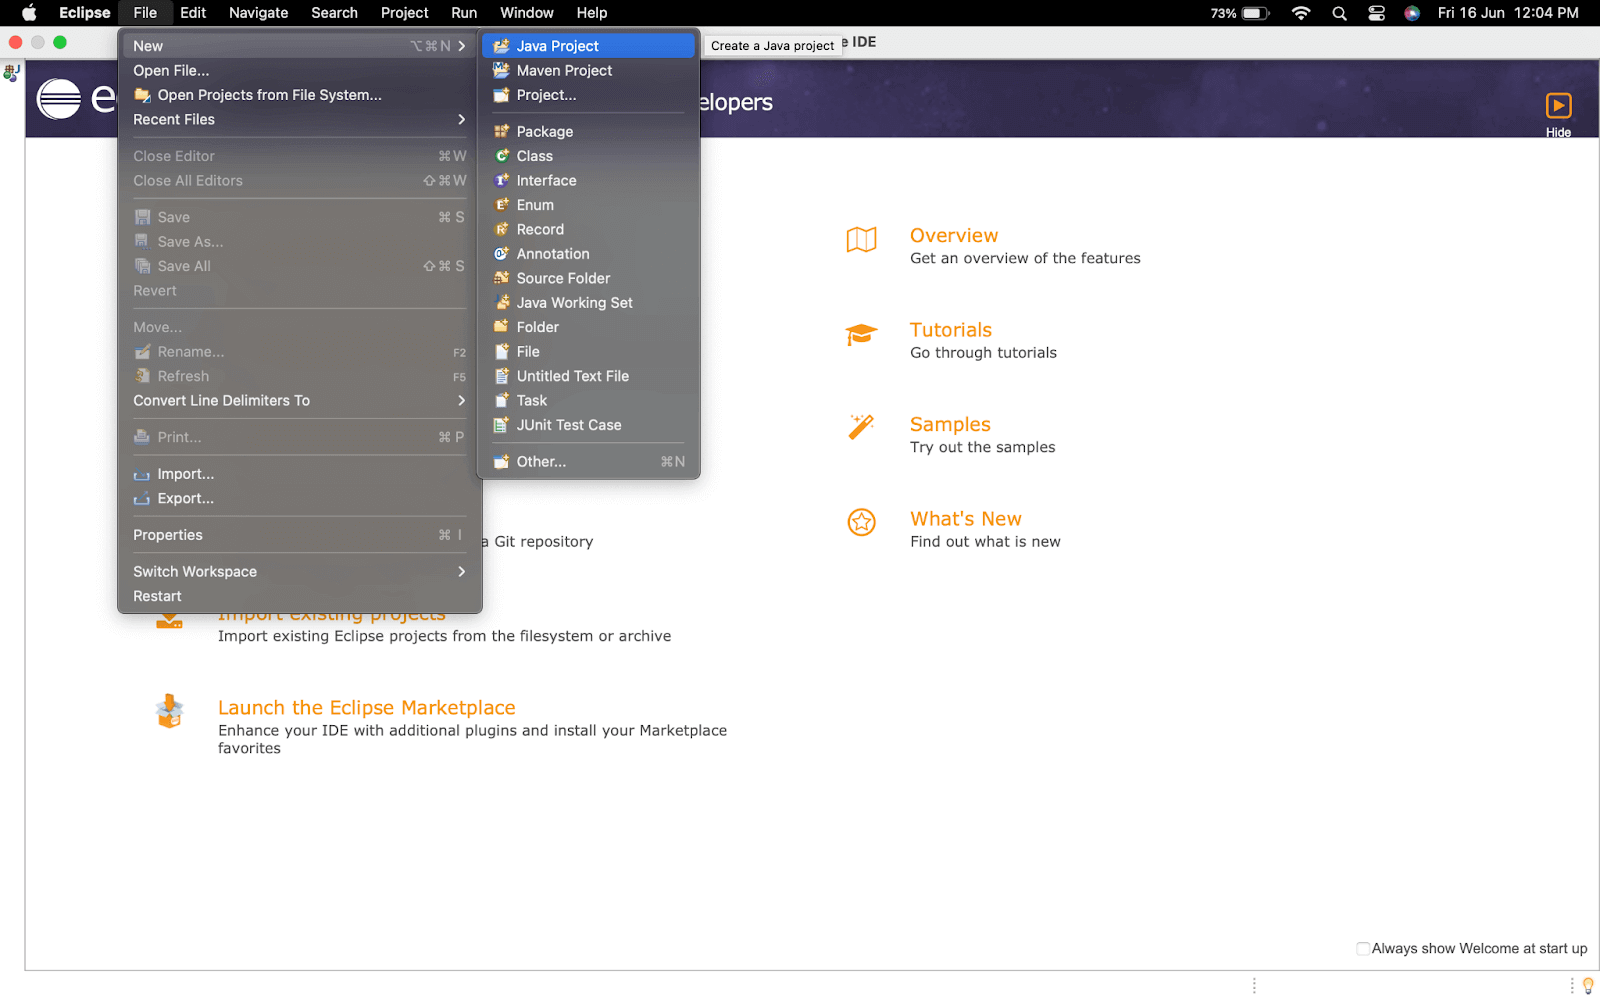
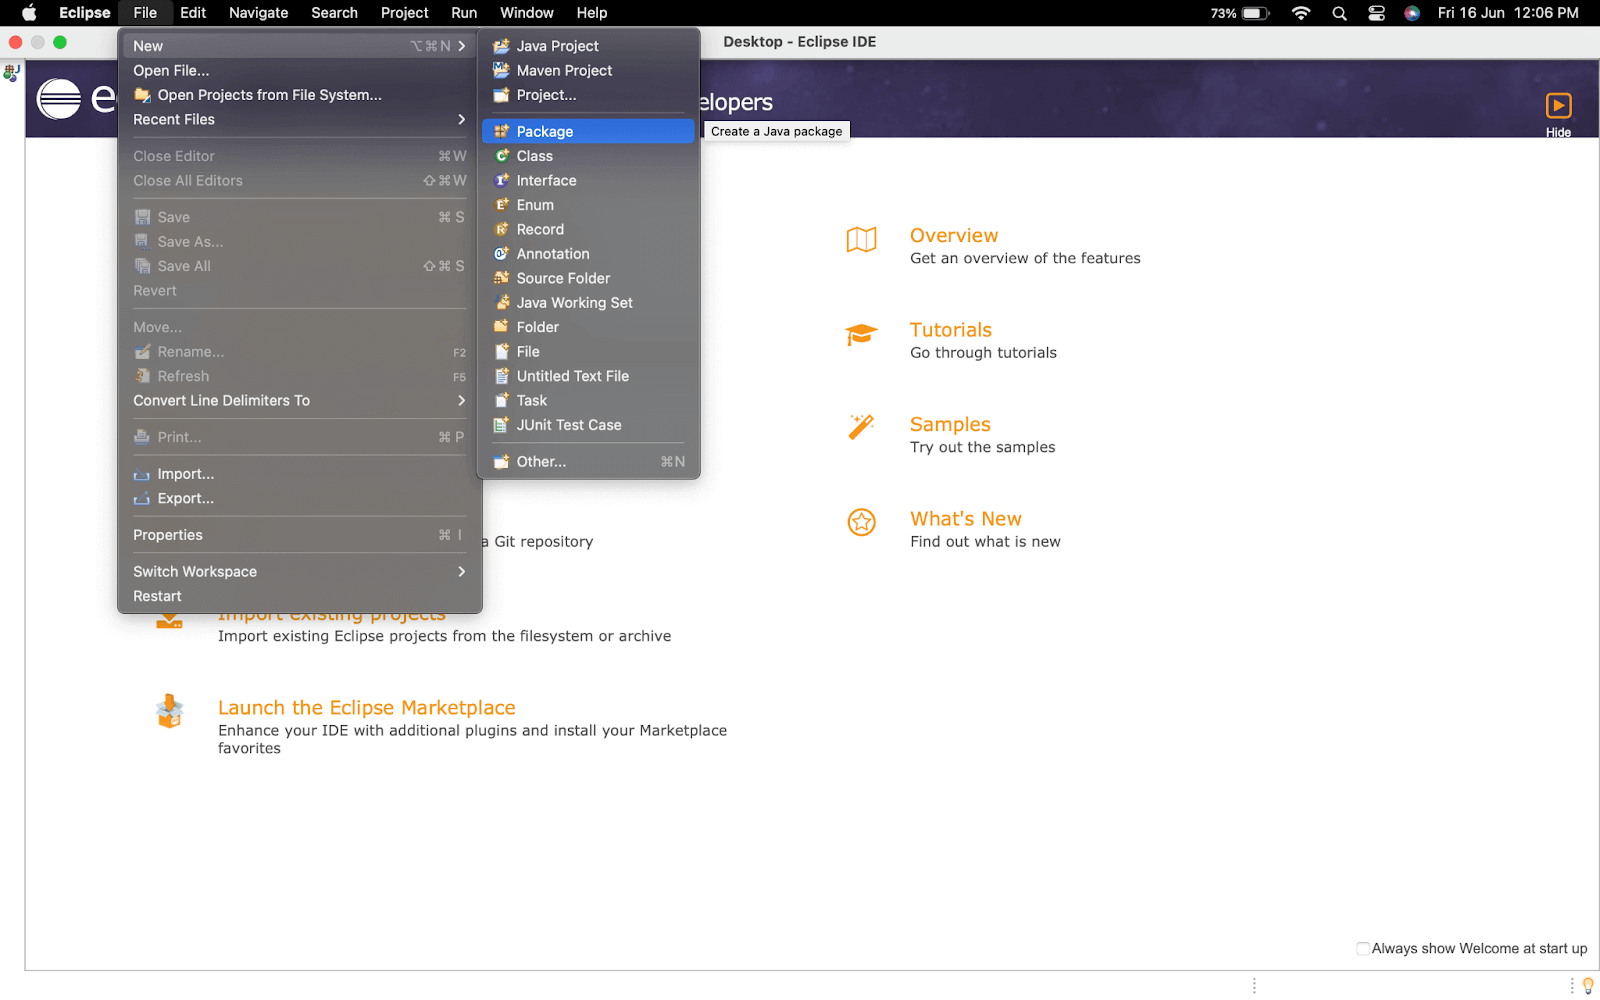
- Create a New Project by navigating to File > New > Java Project, as shown in the image below.
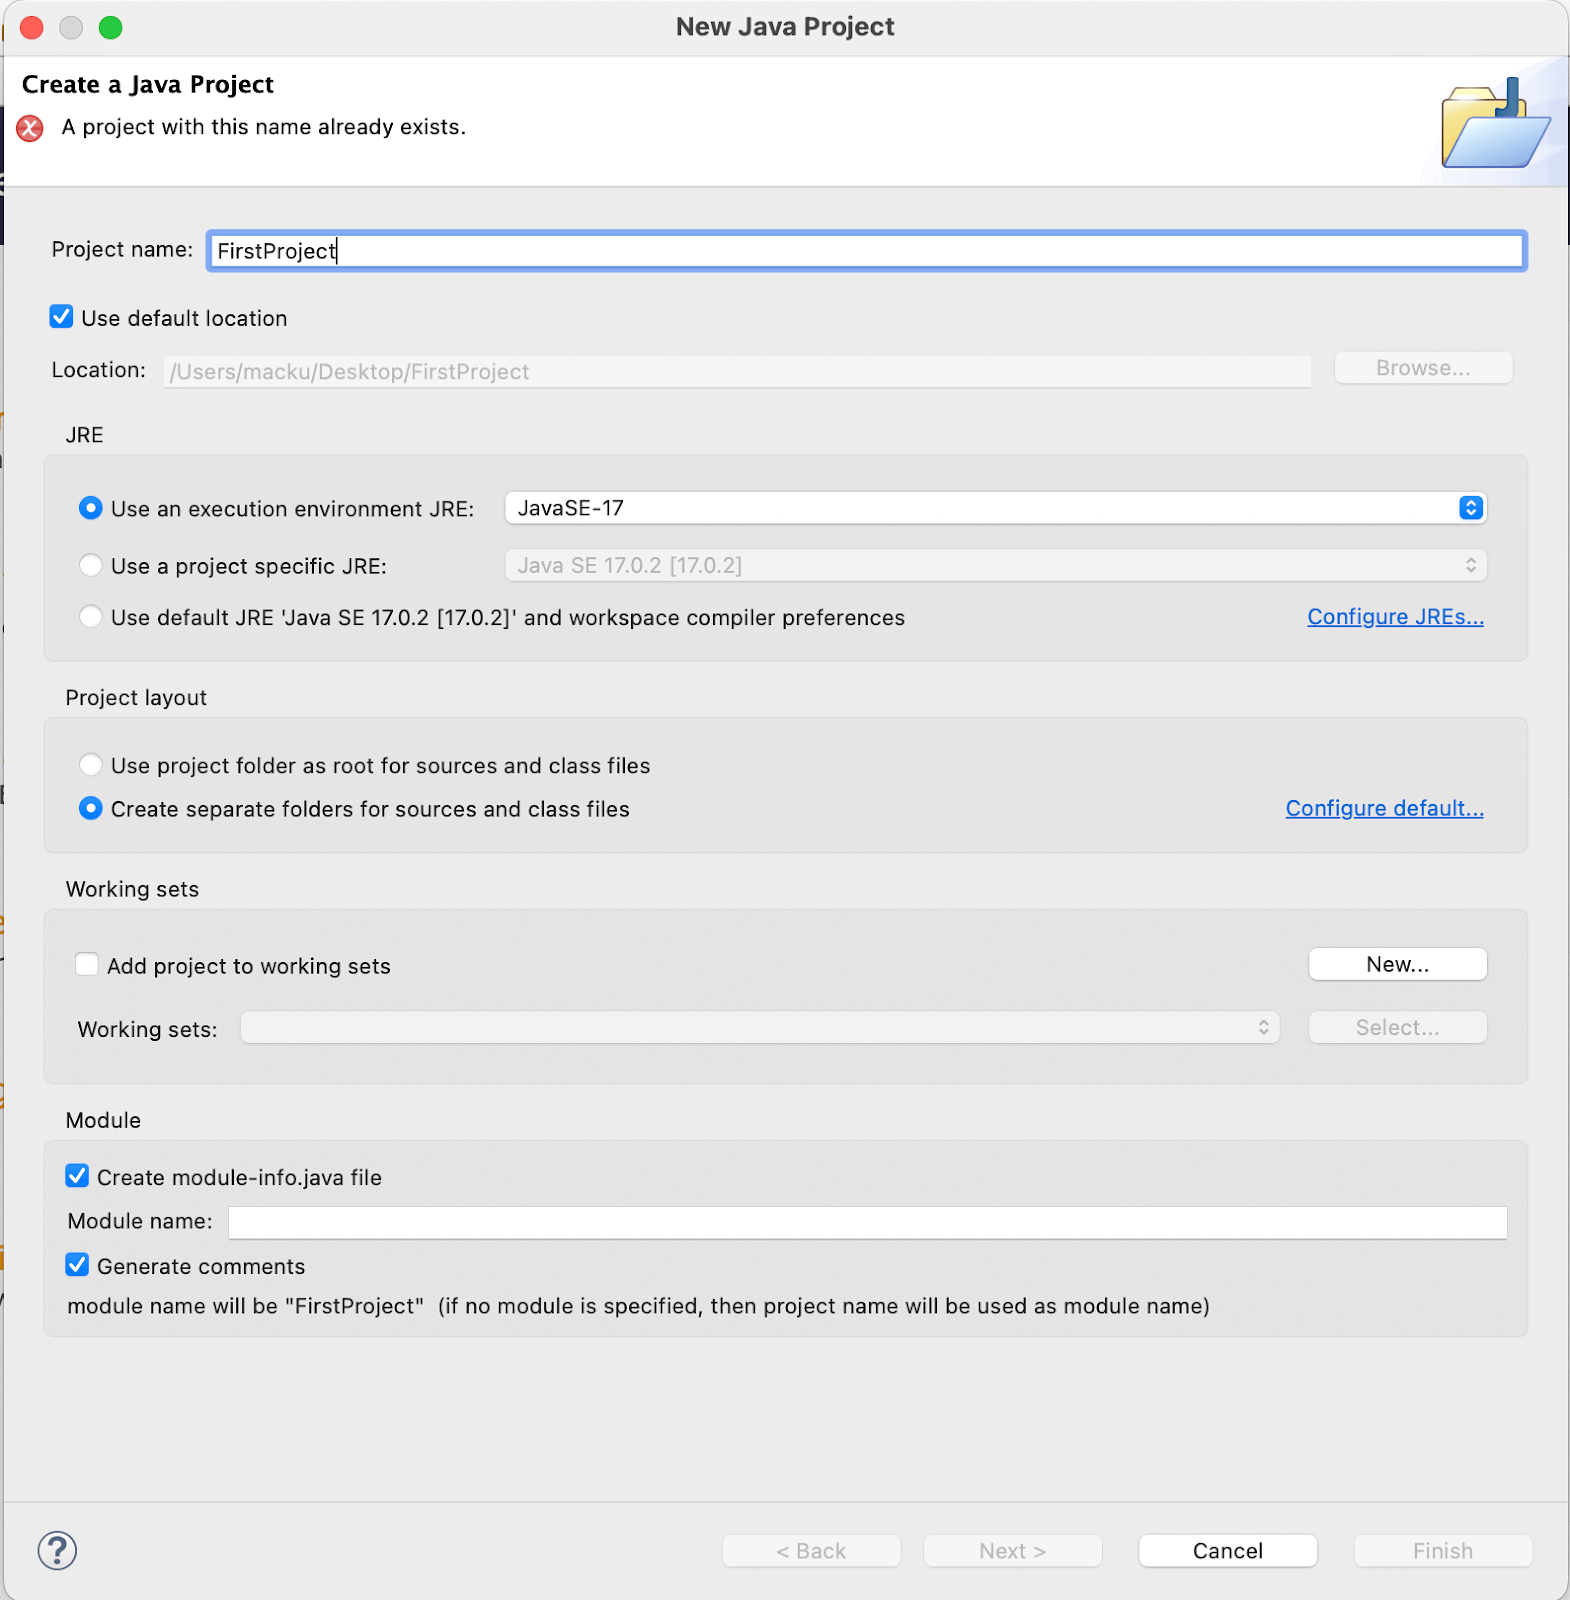
- Give a desired name to the project(FirstProject) and press the Finish button in the bottom right corner of the window.
- Now that your project is created, Right-click on the project and select File > New > Package(FirstProject) and give a desired package name. (Optional)
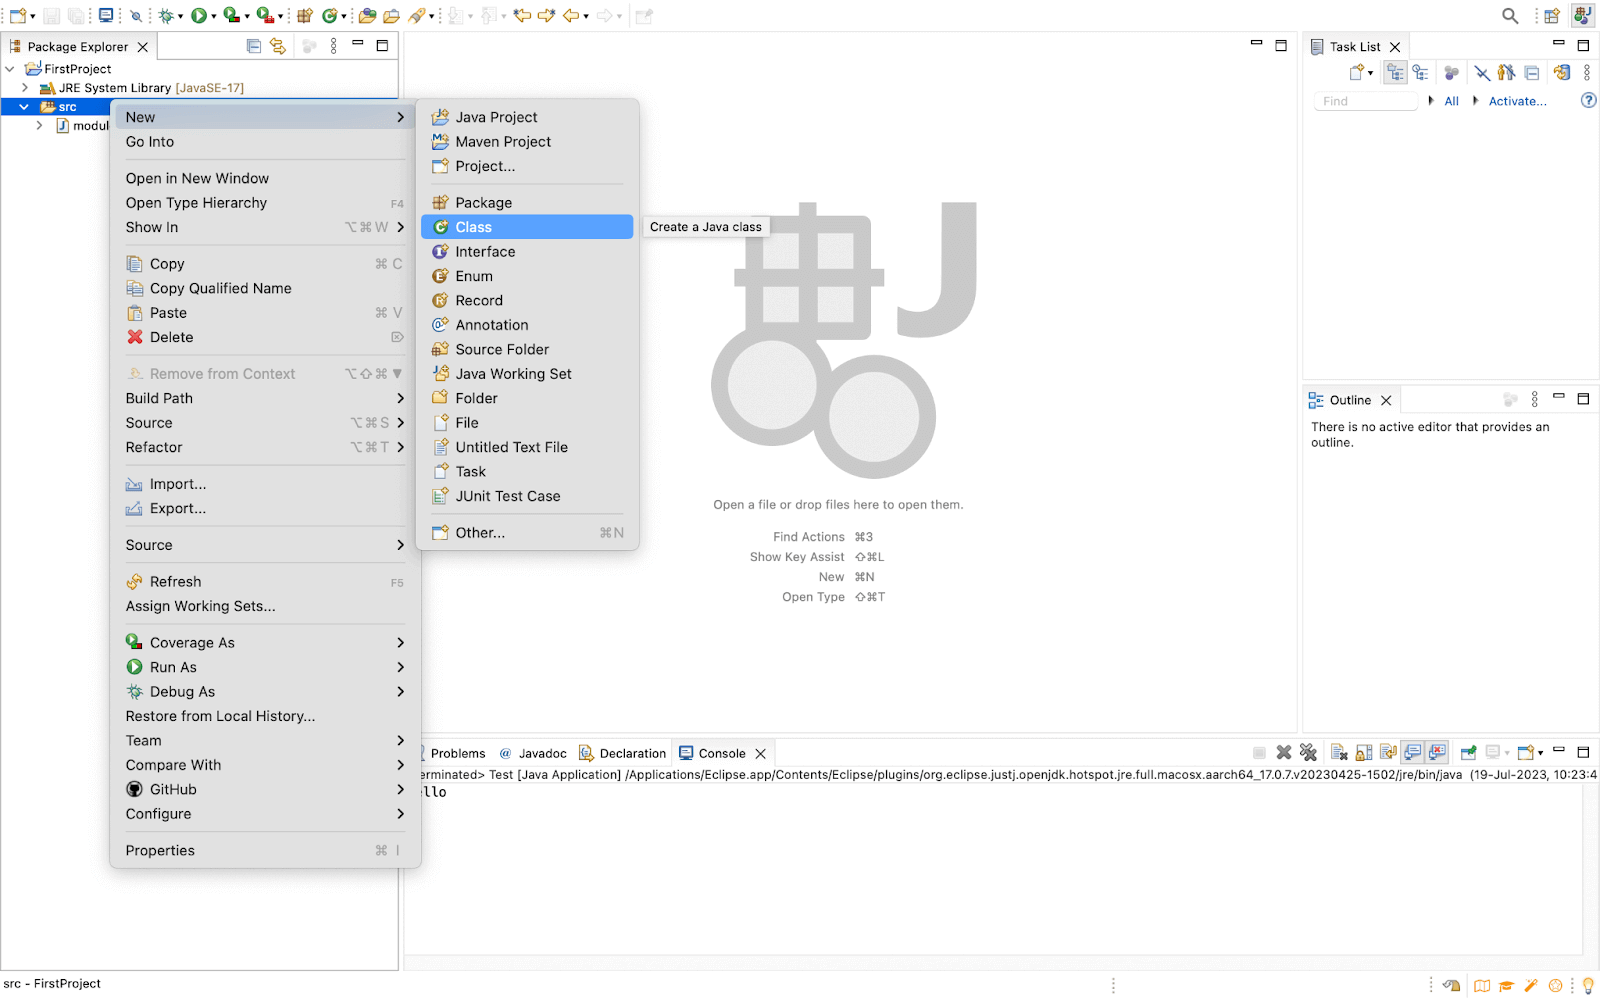
- You need to create a class in the same section where the package is created. To do so, right-click on the src, and go to New > Class.
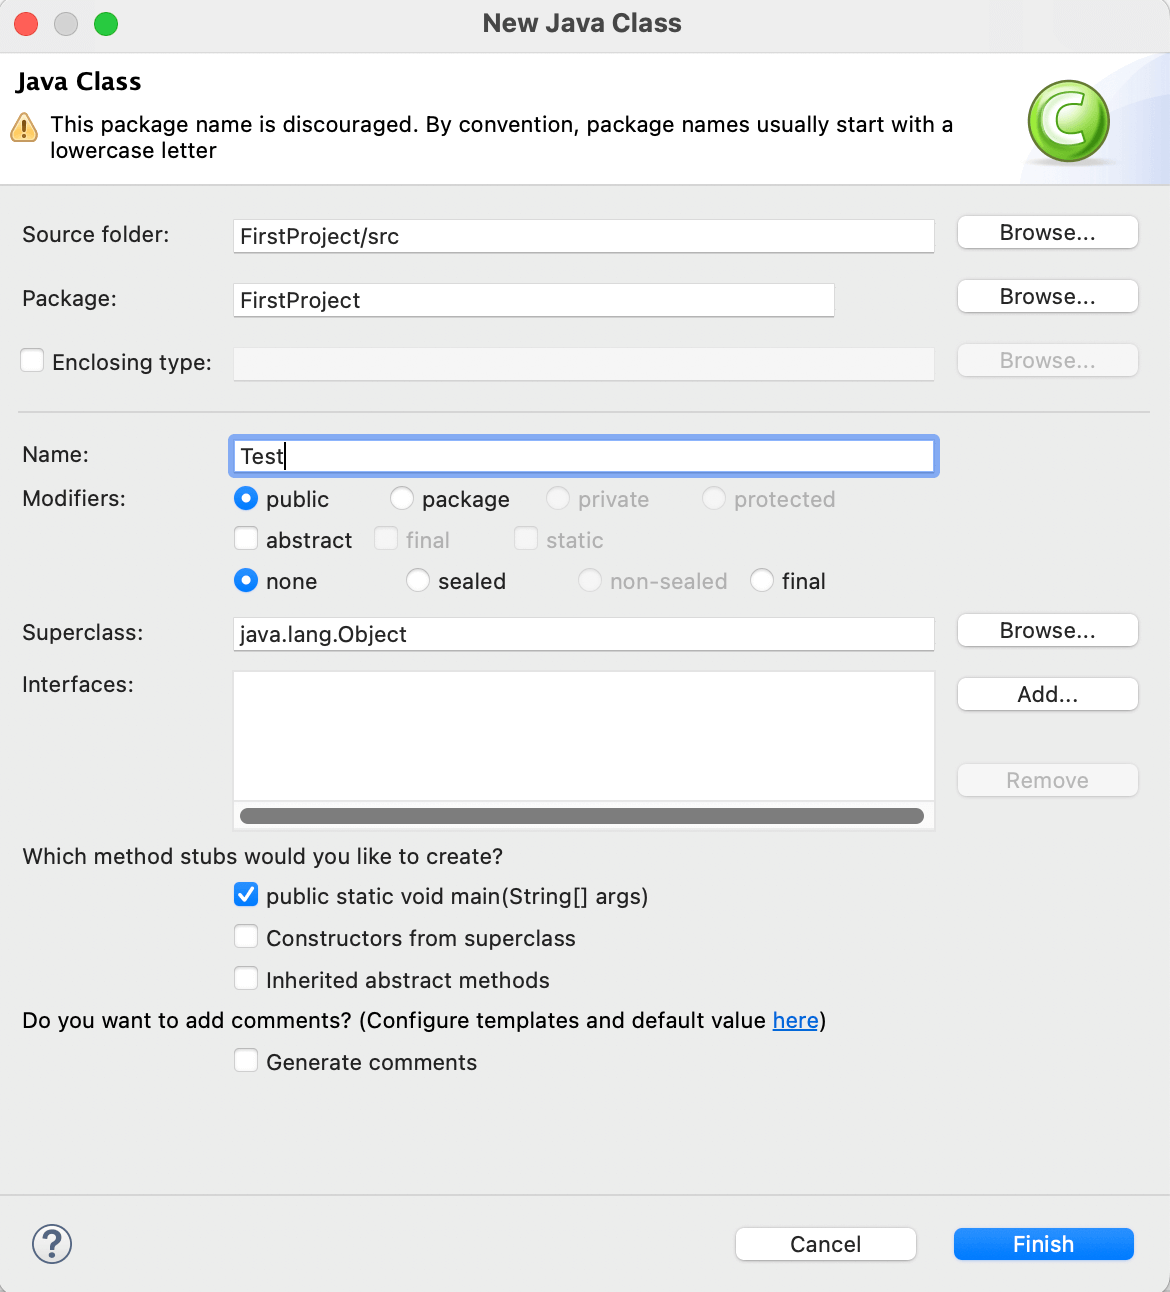
- Give a desired name to the class(Test) and press the Finish button in the bottom right corner of the window.
- Now, we need to import the libraries we installed for the Selenium WebDriver tutorial in the section above. To start with, right-click on the project and go to Build Path > Configure Build Path.
- Click on Add External JARs and navigate to the location where your downloaded JARs were saved.
- Now import all the < filename >.jar (pre-compiled) files from the main folder and from the lib folder except < filename >-sources.jar files. Reason for not adding < filename >-sources.jar: It contains the source code of the pre-compiled .jar files. It is required only if you want to customize the functionality of the pre-compiled .jar file. It will help to optimize the space. Note: THIS STEP IS IMPORTANT TO FOLLOW.
- Go to Module Dependencies which is located next to the Libraries and checkmark all.
- Click the Apply and Close button. The Referenced Libraries section of the package explorer has been populated with files. Now that Selenium WebDriver has been set up in our Eclipse project.
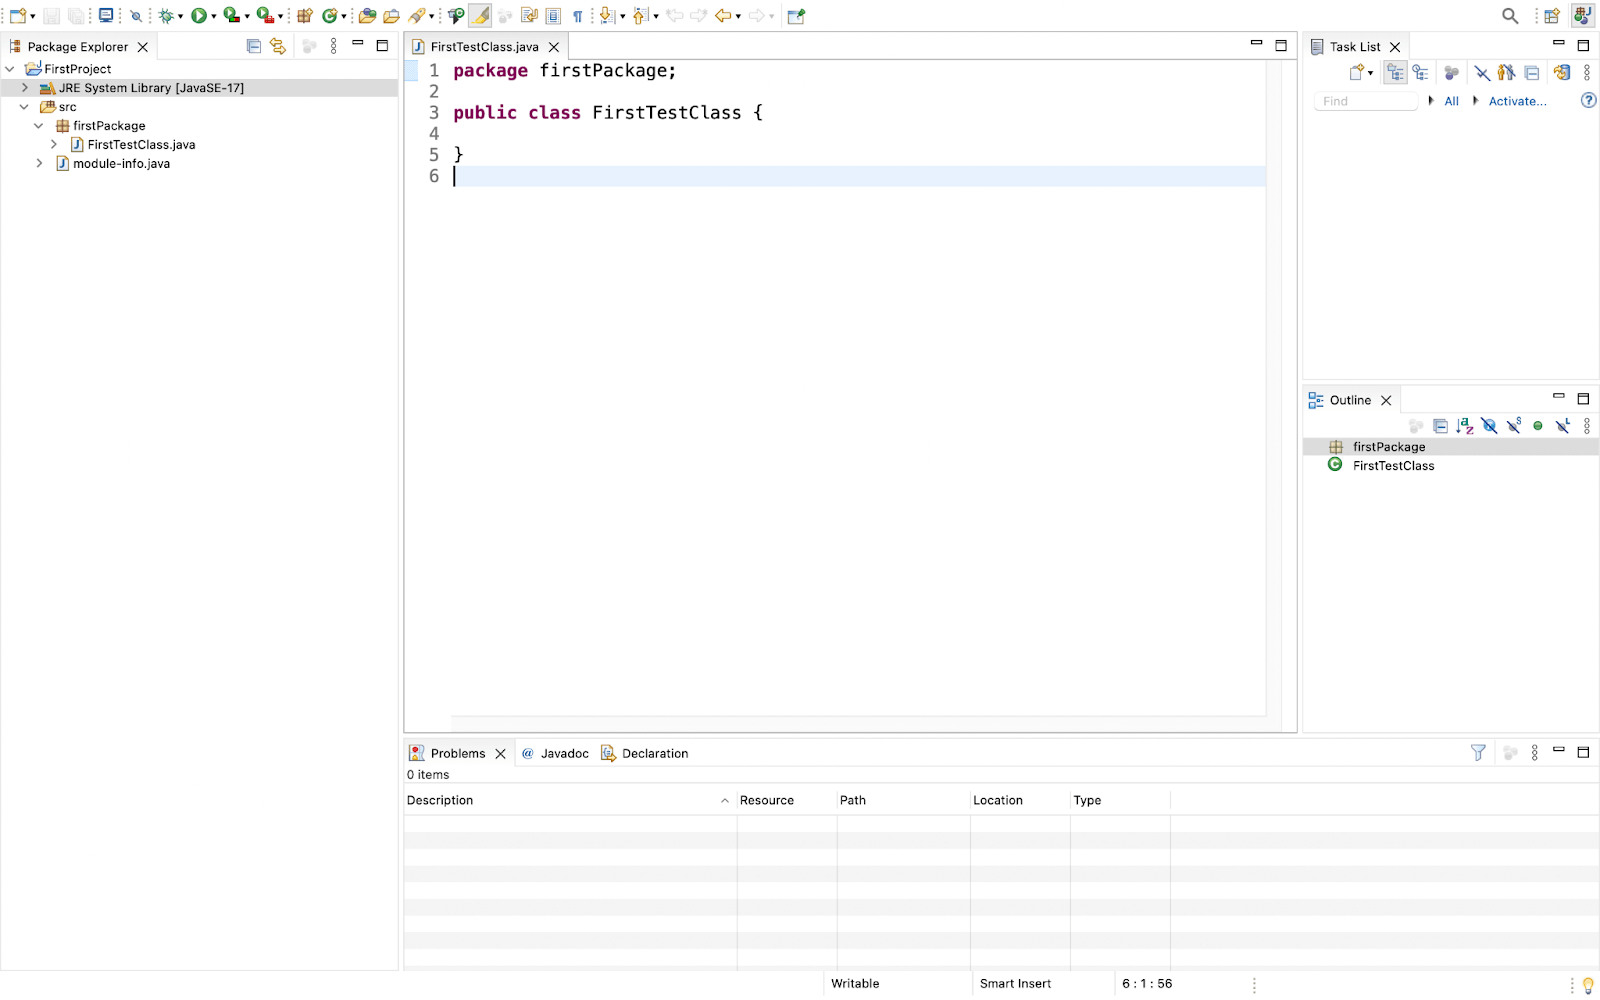
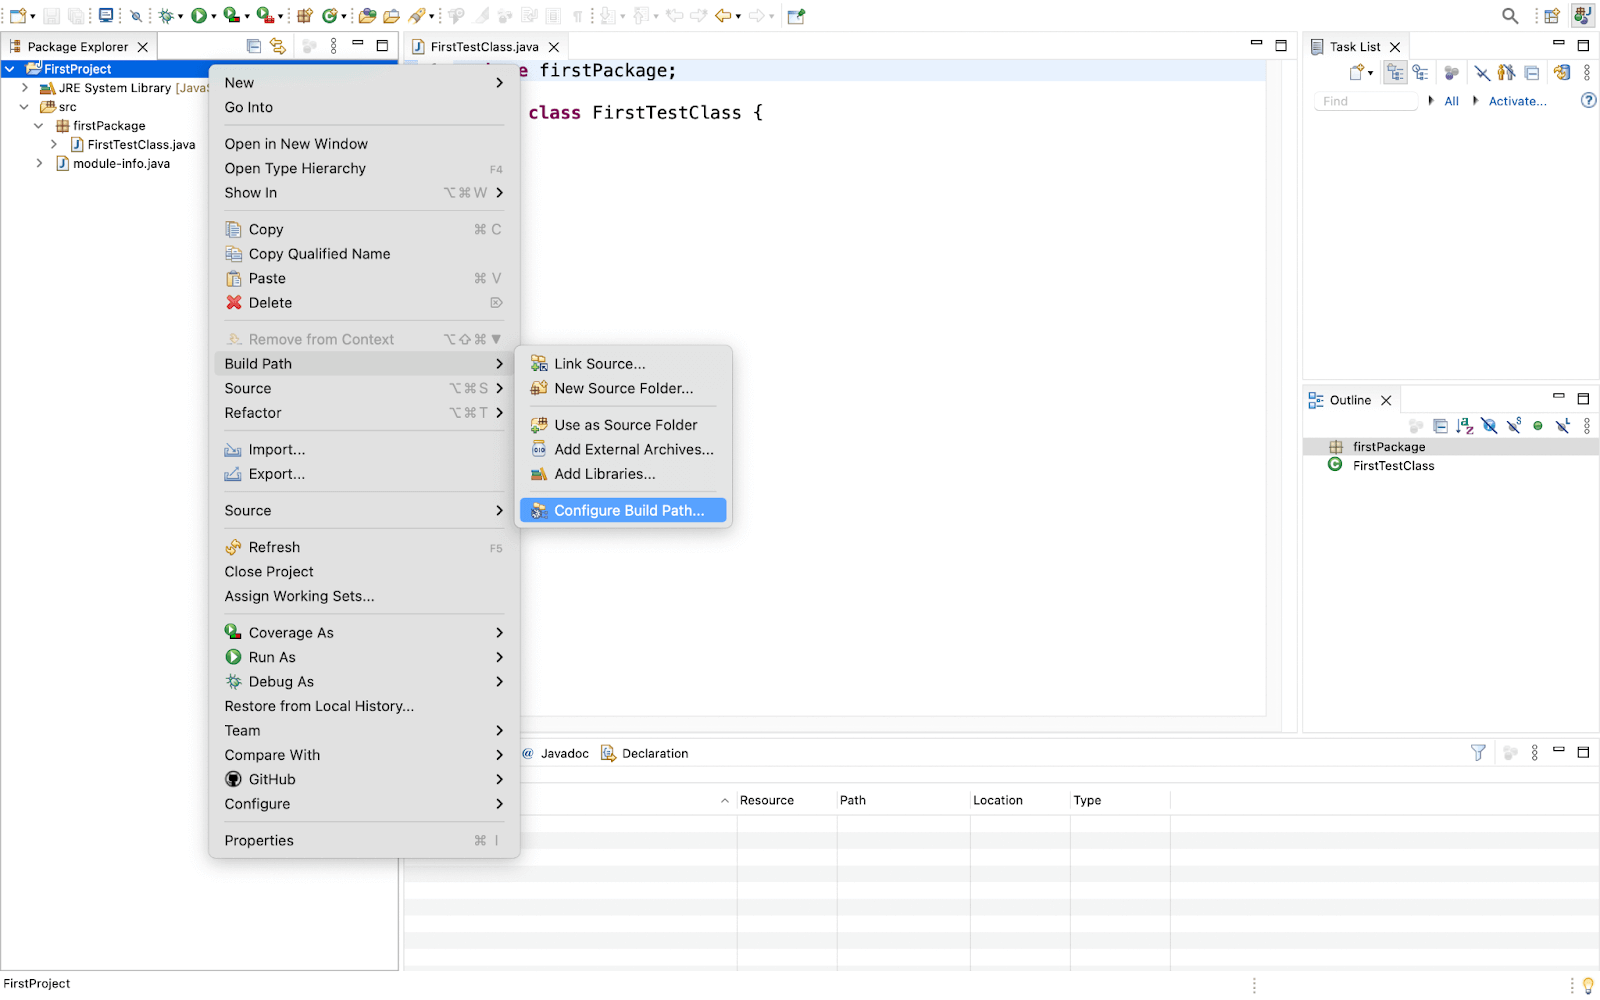
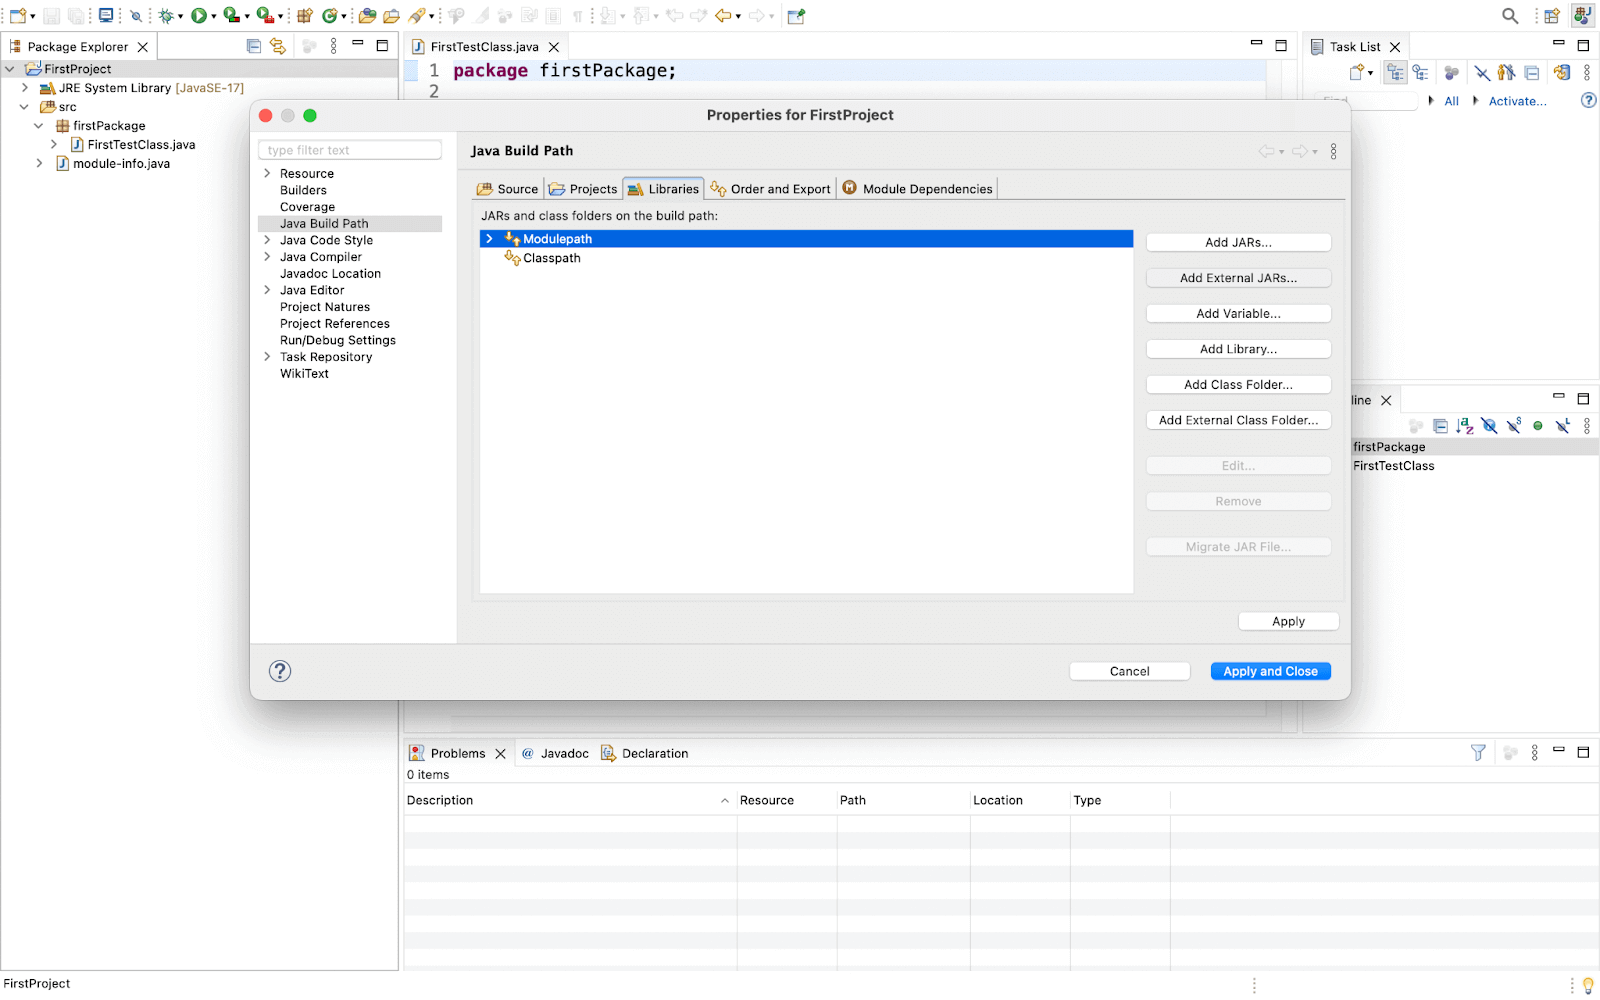
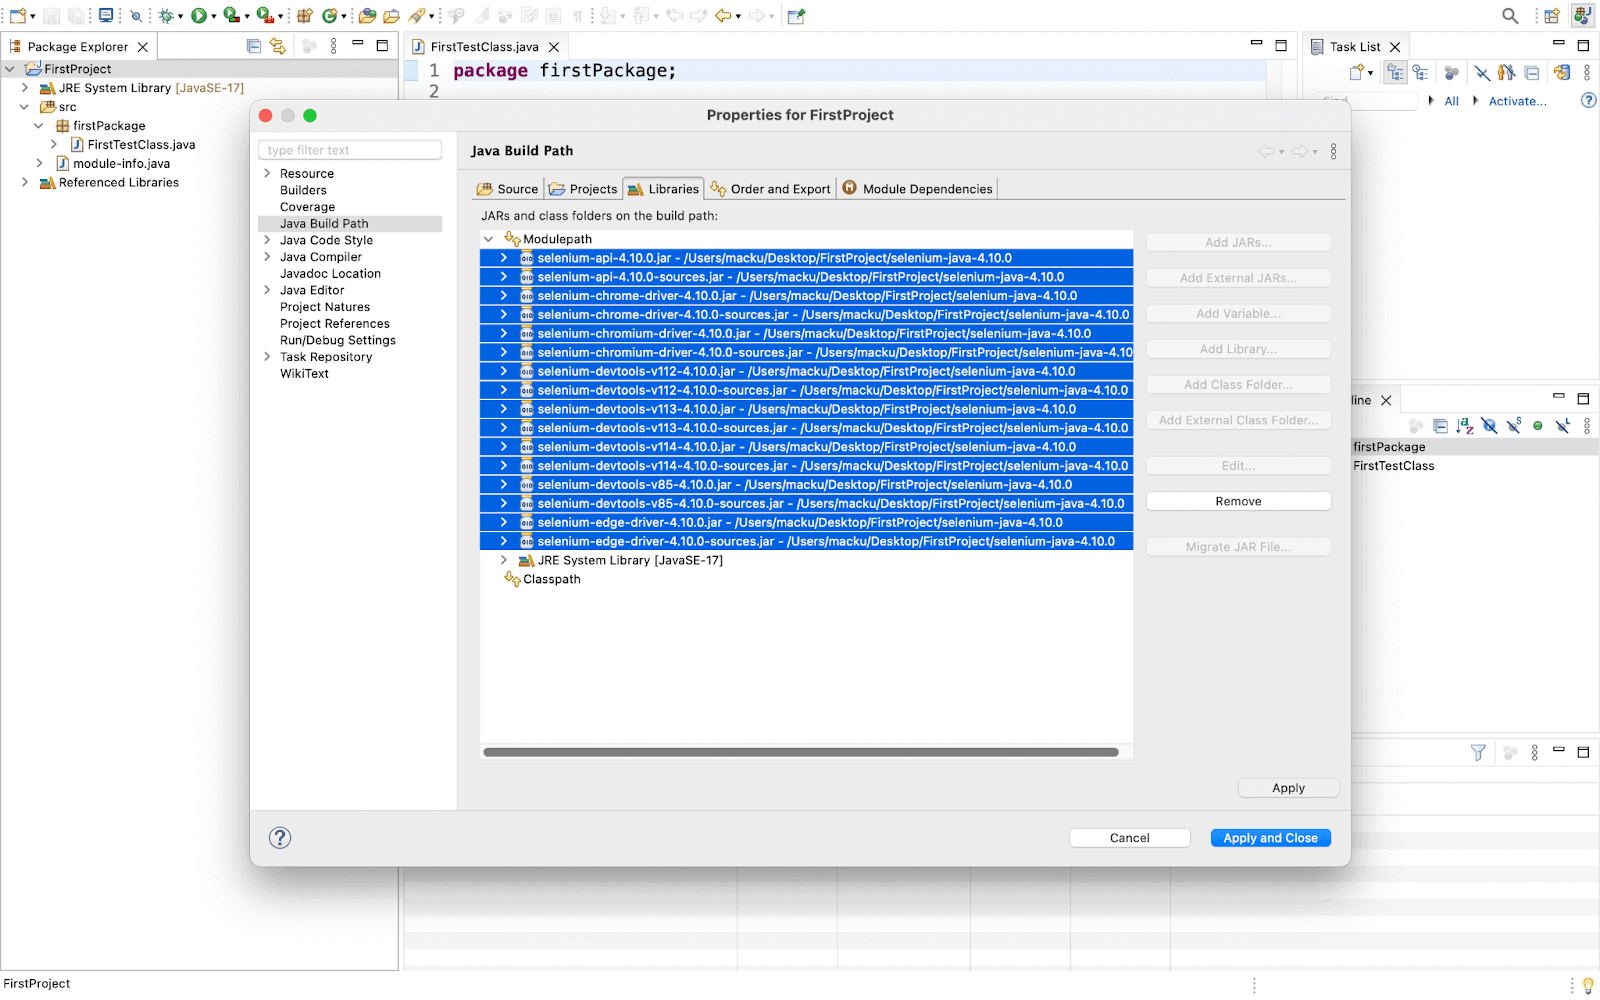
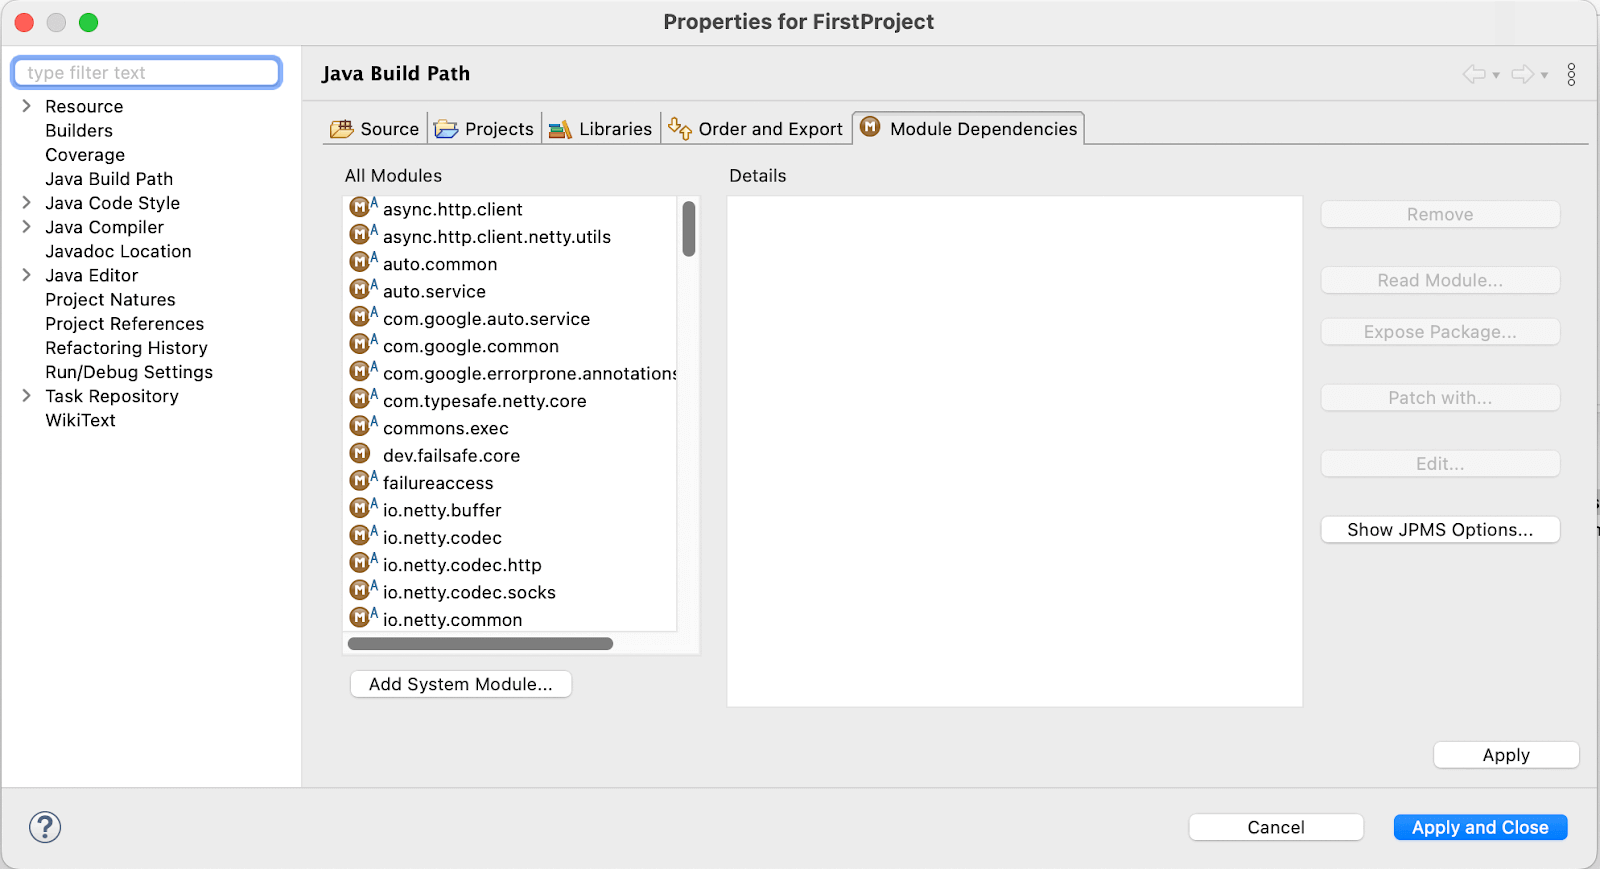
You can Verify the installation by running the following code:
import org.openqa.selenium.WebDriver;
import org.openqa.selenium.chrome.ChromeDriver;
import org.openqa.selenium.JavascriptExecutor;
public class Test {

	public static void main(String[] args) {

	   WebDriver driver=new ChromeDriver();

        // Launch Website
        driver.navigate().to("https://ecommerce-playground.lambdatest.io/");

        //Maximize the browser
        driver.manage().window().maximize();

        //Scroll down the webpage to the end
        JavascriptExecutor js = (JavascriptExecutor)driver;
        js.executeScript("scrollBy(0, document.body.scrollHeight)");

        driver.quit();
	}

}
Now run the file By right-clicking on Test.java > Run As > Java Application.
You can start creating testing scripts in Java at this point. However, If you want to add a dependency manager to your project you can continue further.
Using a build tool in Java(using Maven here):
- To add Maven to the project you can do it by right-clicking on the project name go to Configure > Convert to Maven Project.
- Now a dialog box will open, change details if you want, or just press Finish
- Add the dependencies in the porm.xml file.
- It will automatically add all the above dependencies and a new folder will be created named Maven Dependencies.
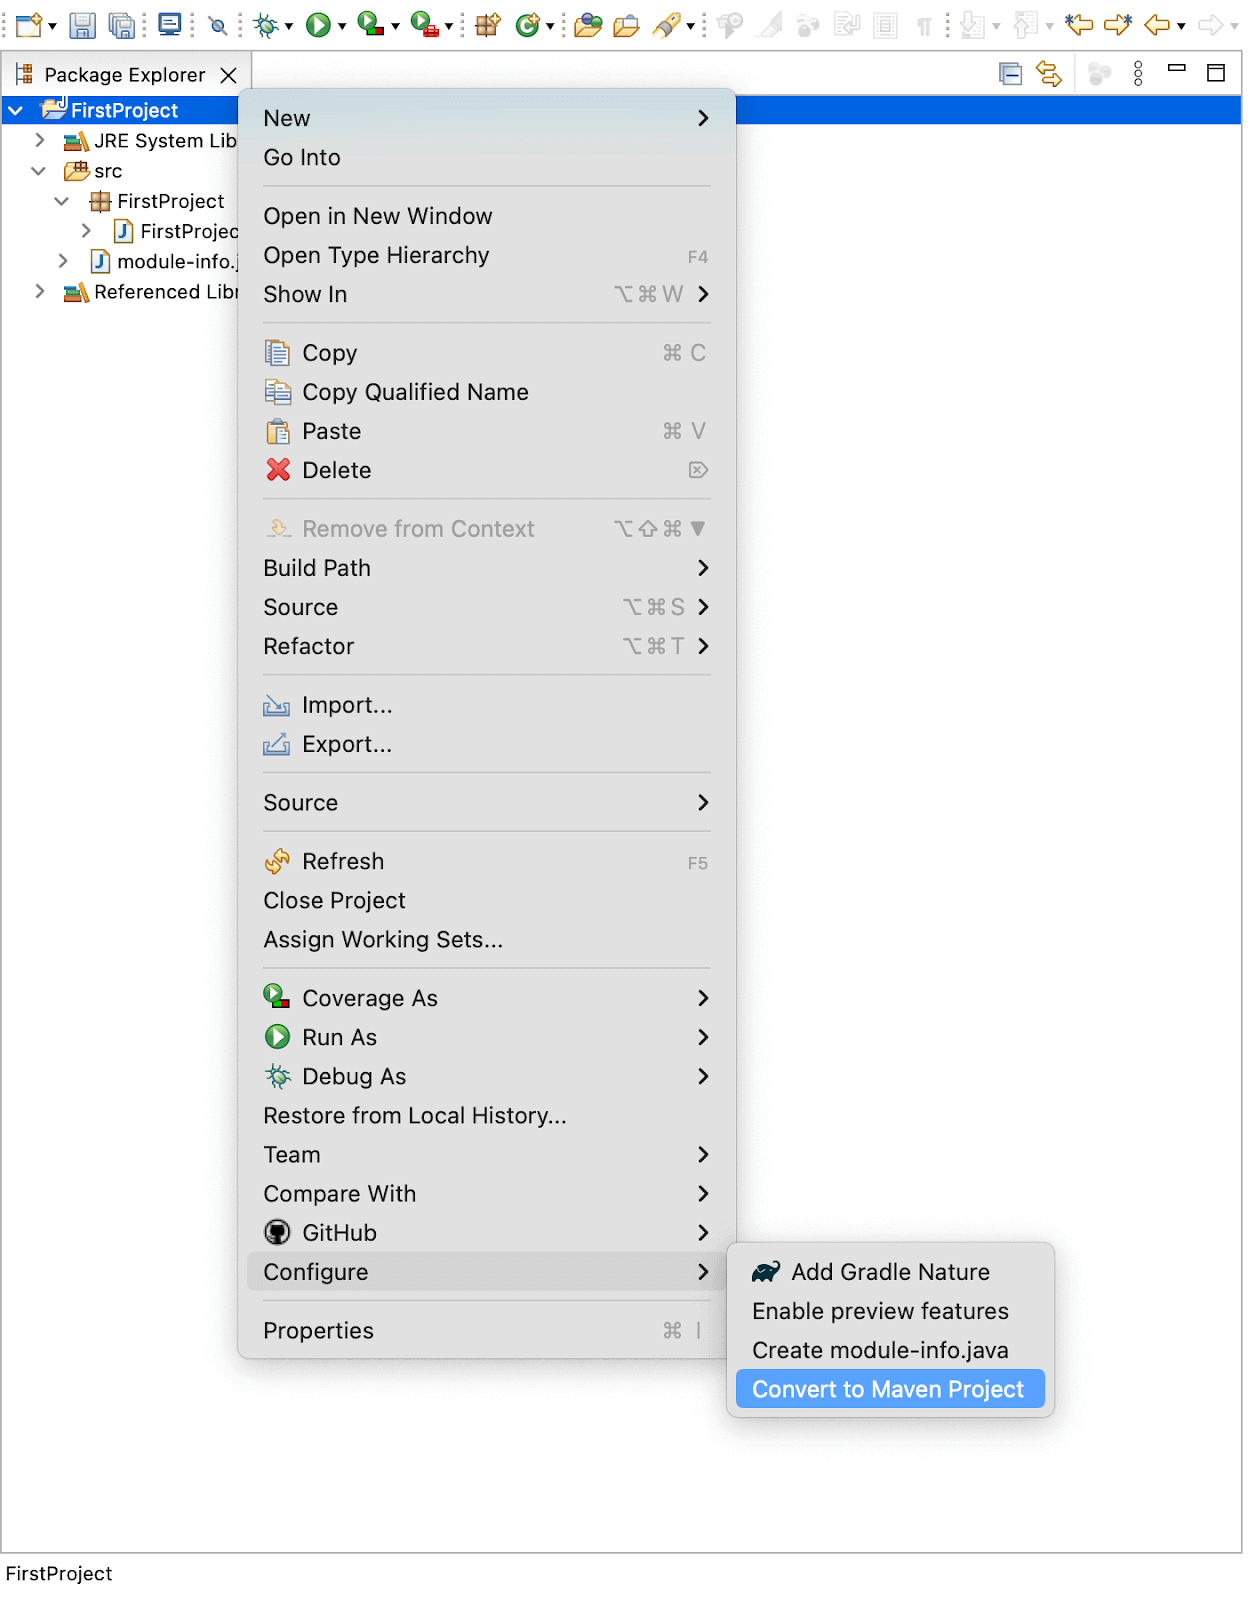
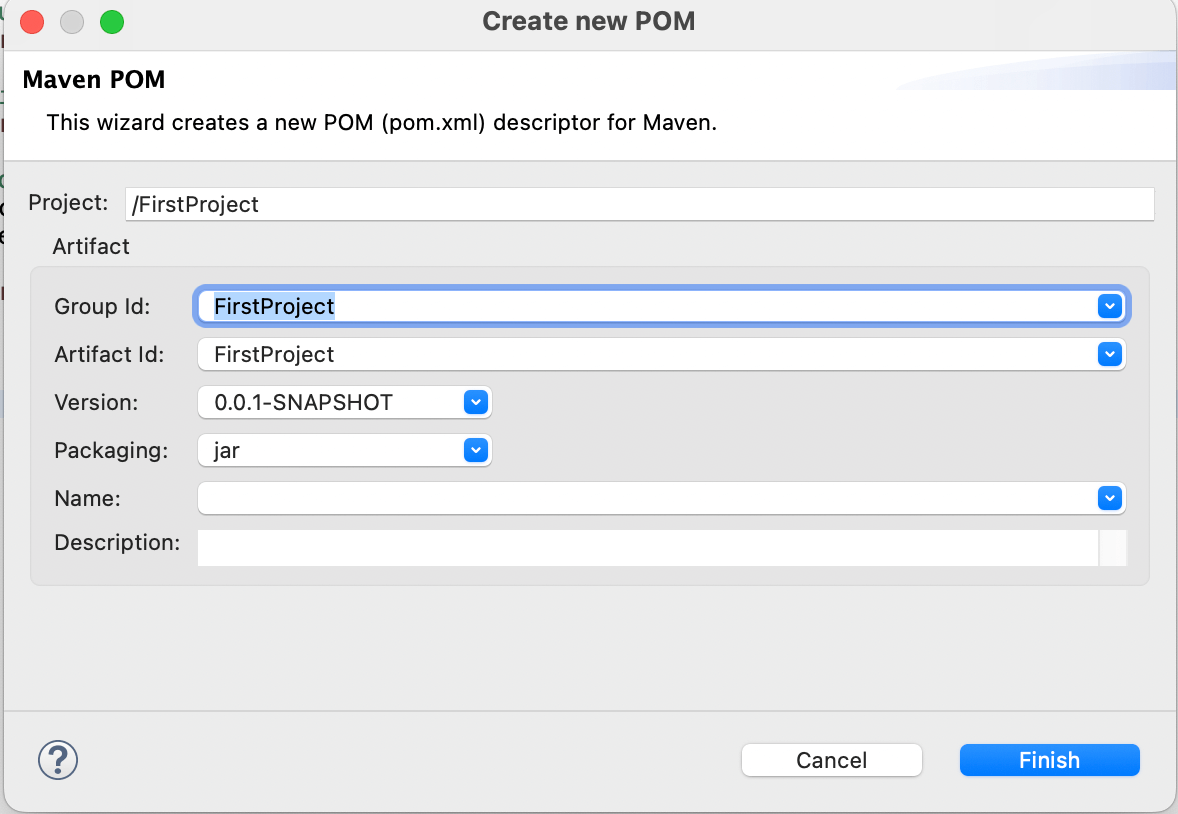
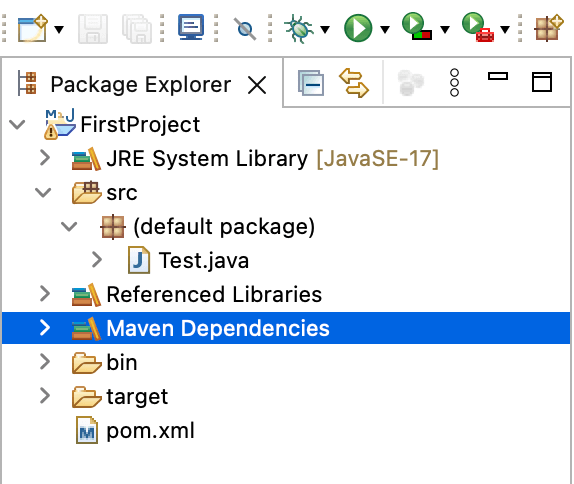
Now run the Java file normally as we ran earlier.
You can also add testing frameworks like JUnit and TestNG to your project to utilize the power of Java with its robust frameworks.
IntelliJ IDE
For IntelliJ IDE, there is a requirement to install Java on the system.
Let’s look at the standard way in Java:
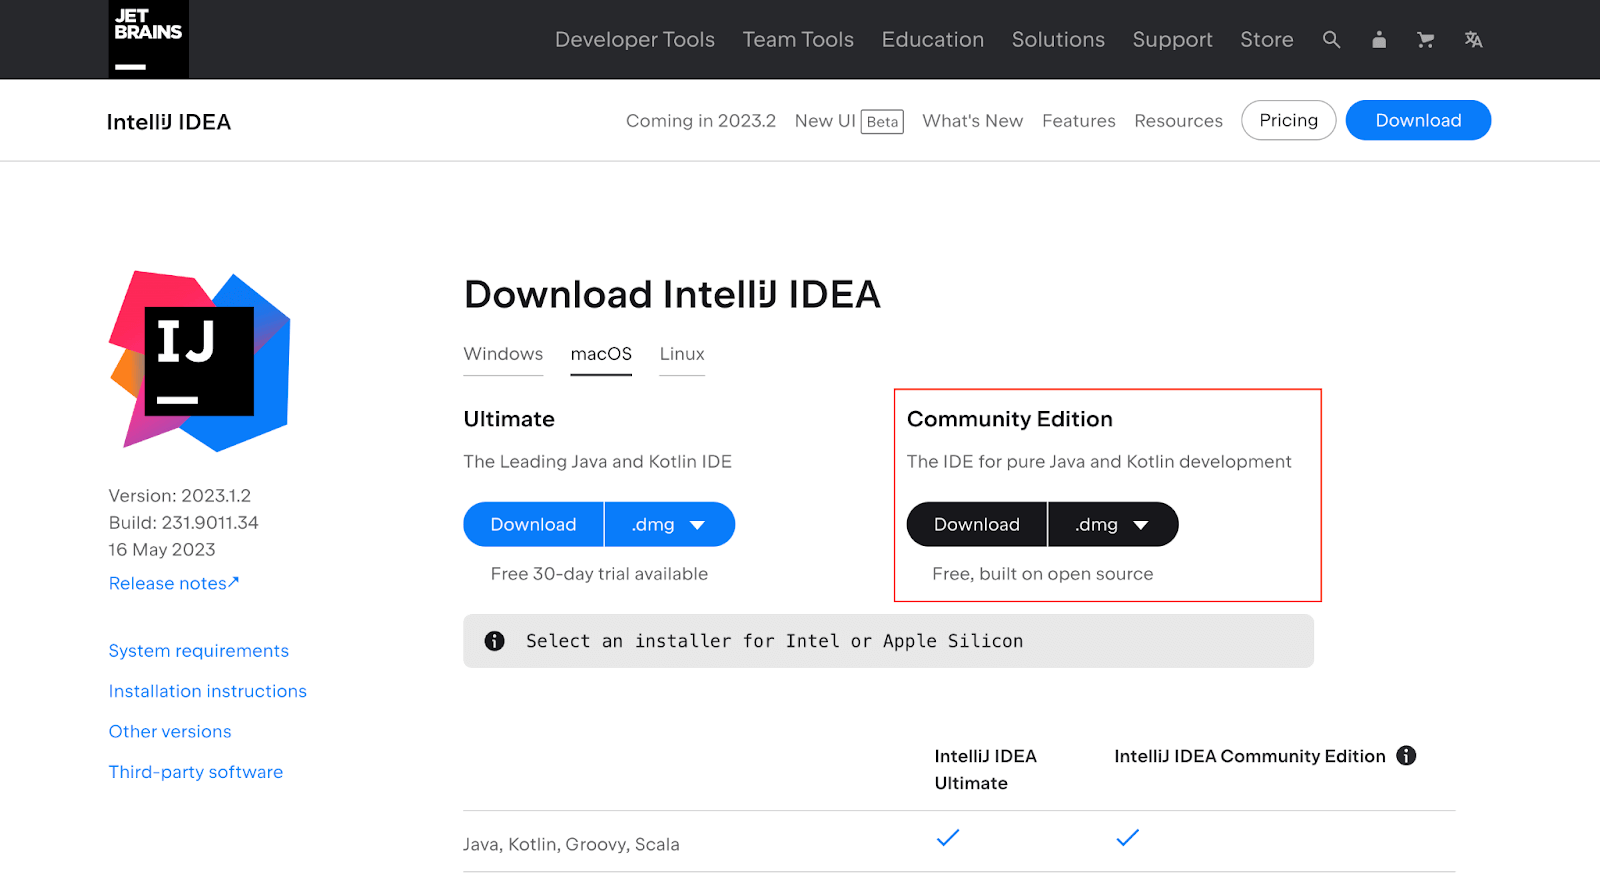
- Download the IntelliJ Community Edition. Once it is downloaded, install it on the system.
- Download the Selenium Client & WebDriver Language Bindings for Java.
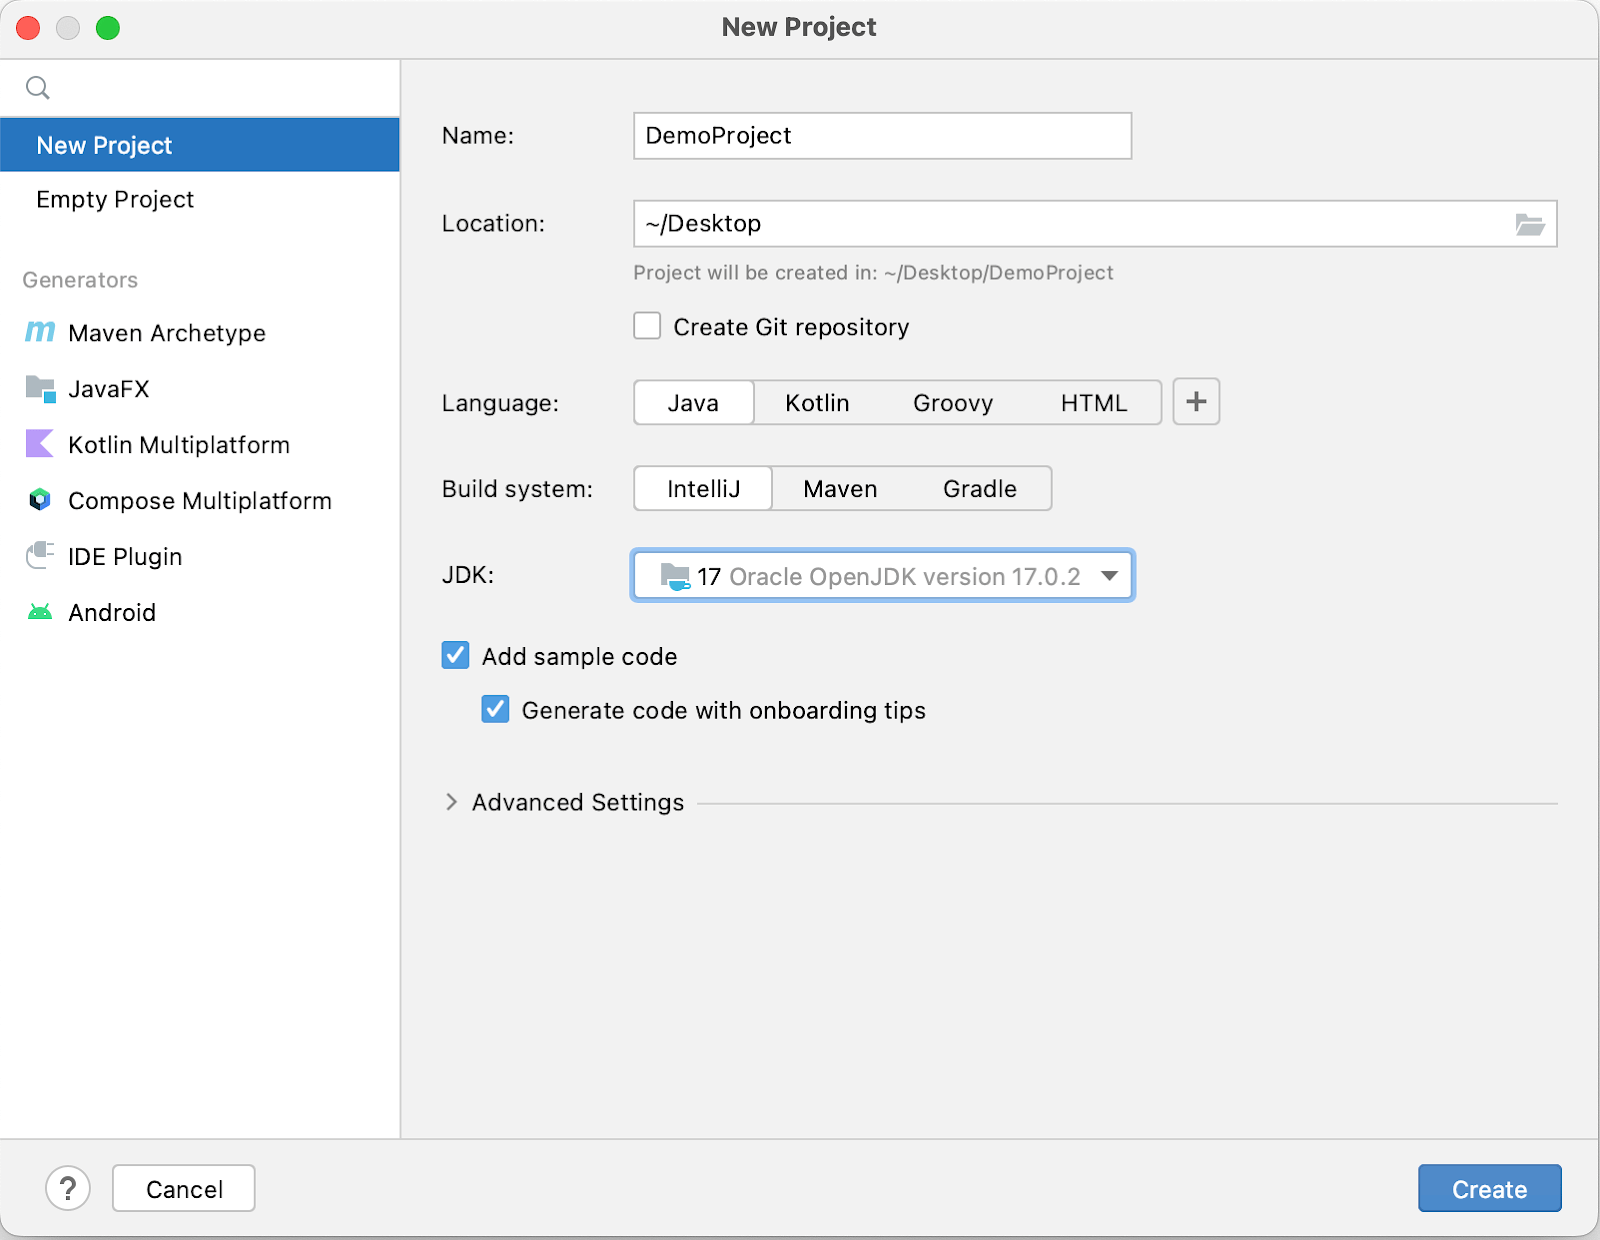
- Now select the New Project option from the available option.
- Give the desired name to the project and press the Create button.
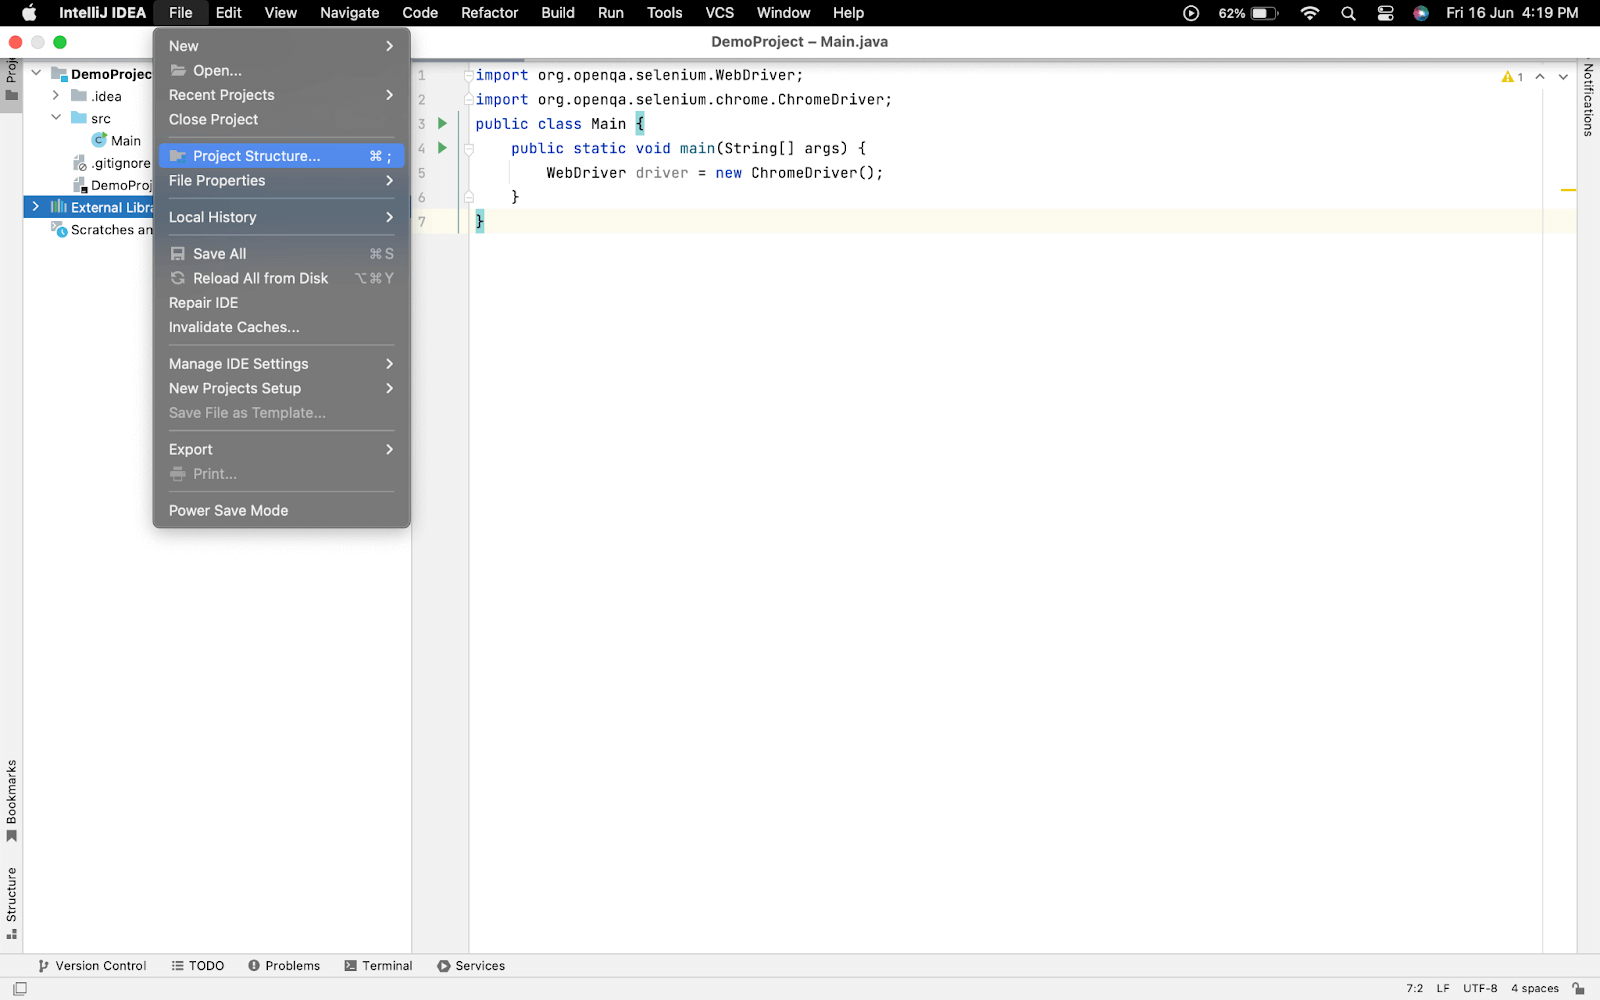
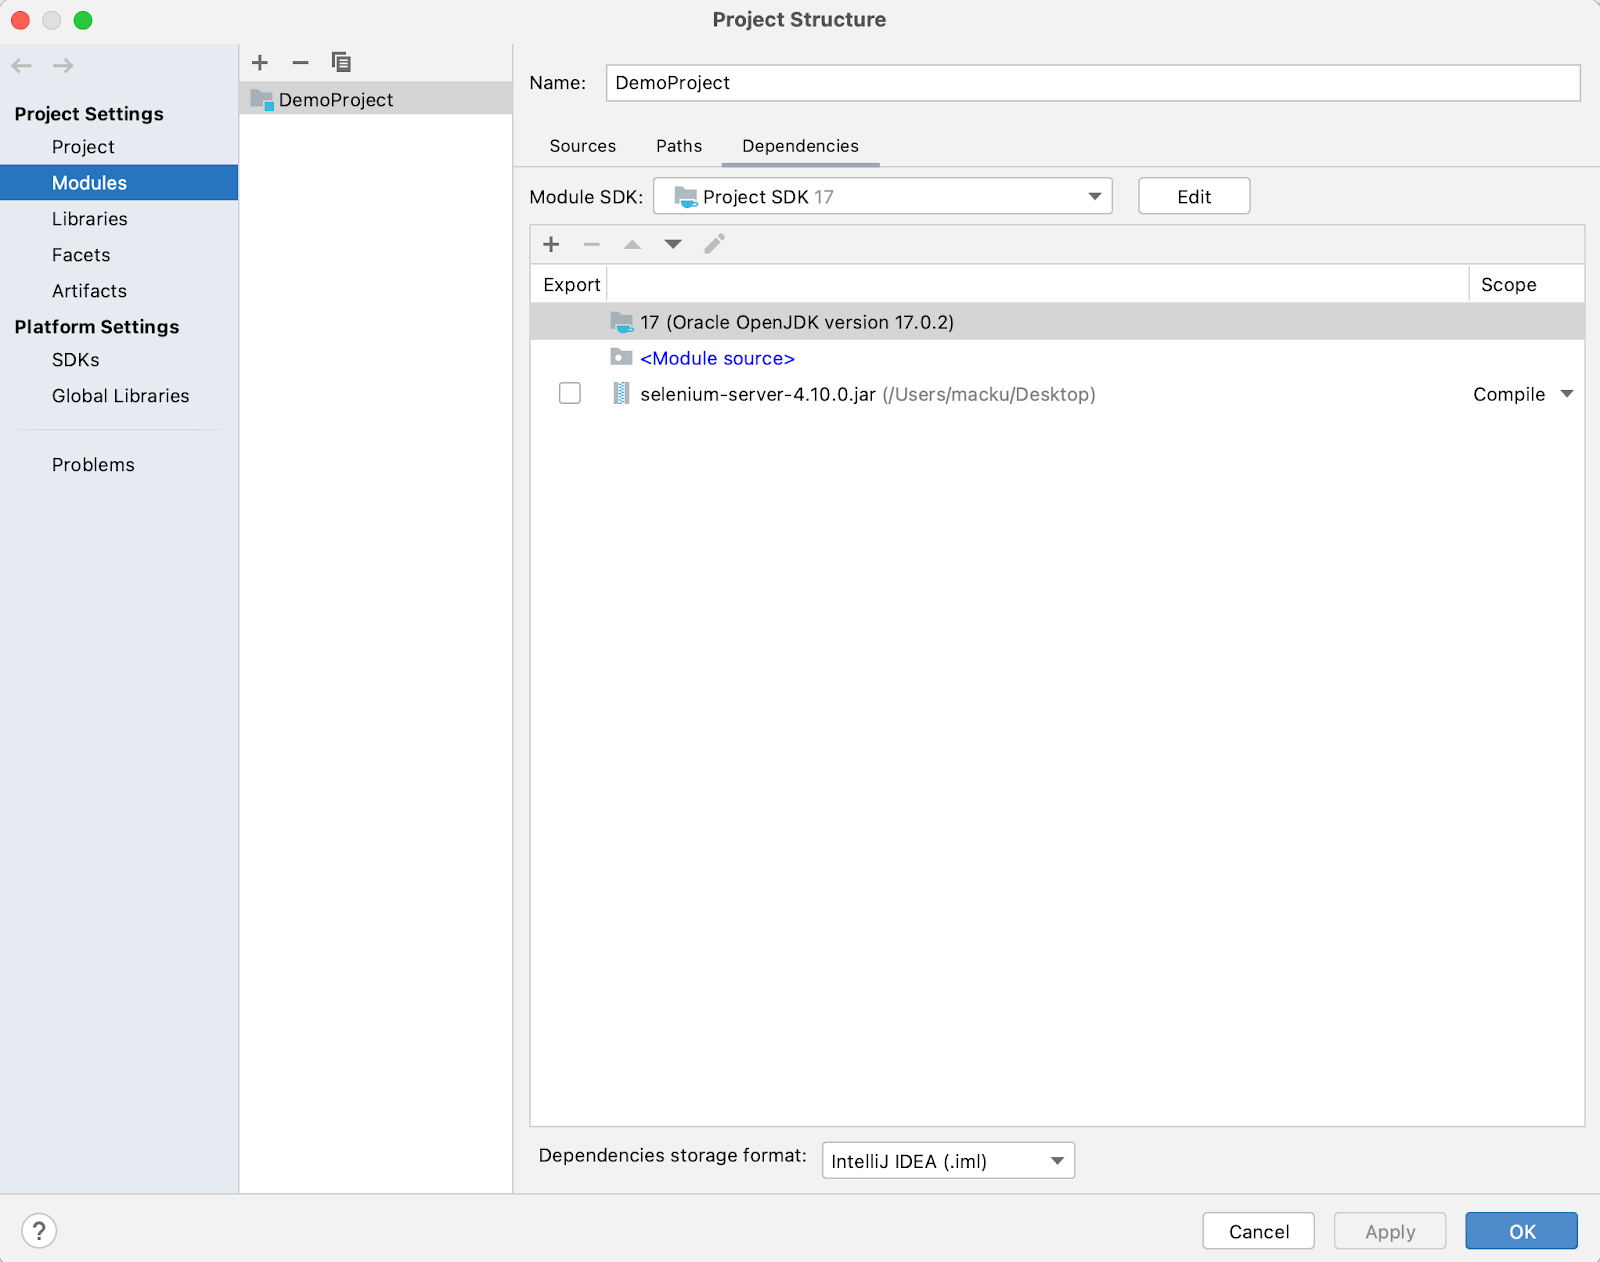
- Now, from File > Project Structure for, adding the Selenium .jar file.
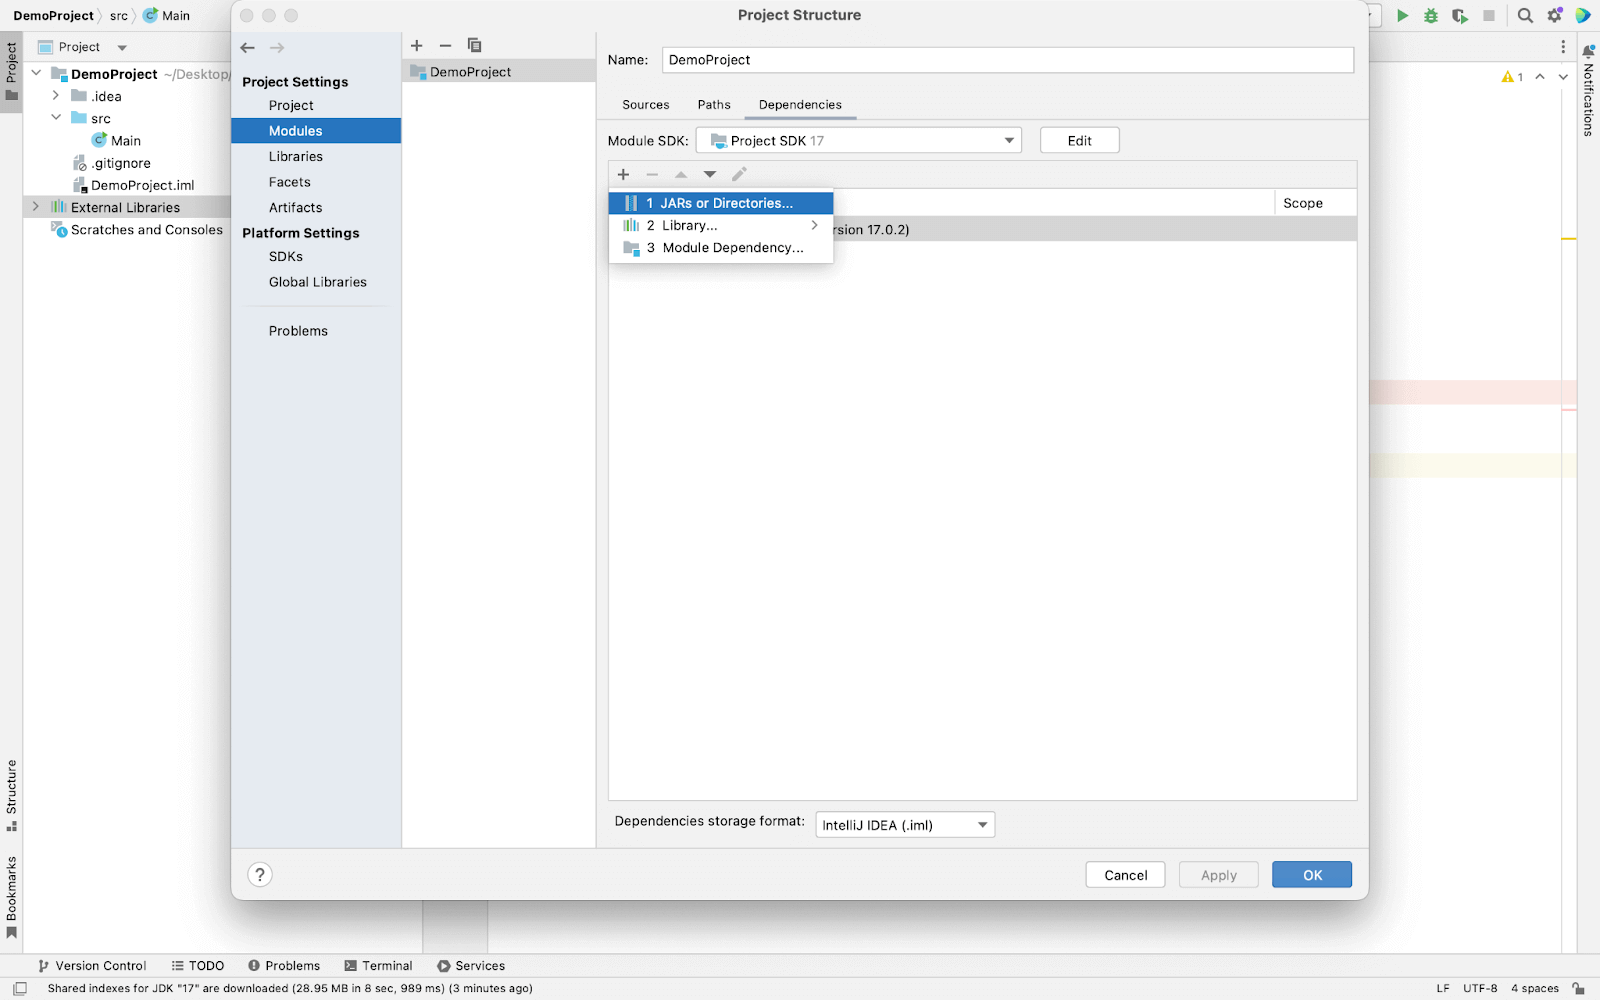
- From the left panel, select Modules > select Dependencies and press the (+) button then select JARs or Directories.
- Now import all the < filename >.jar (pre-compiled) files from the main folder and from the lib folder except < filename >-sources.jar files. Reason for not adding < filename >-sources.jar: It contains the source code of the pre-compiled .jar files. It is required only if you want to customize the functionality of the pre-compiled .jar file. It will help to optimize the space. Note: THIS STEP IS IMPORTANT TO FOLLOW.
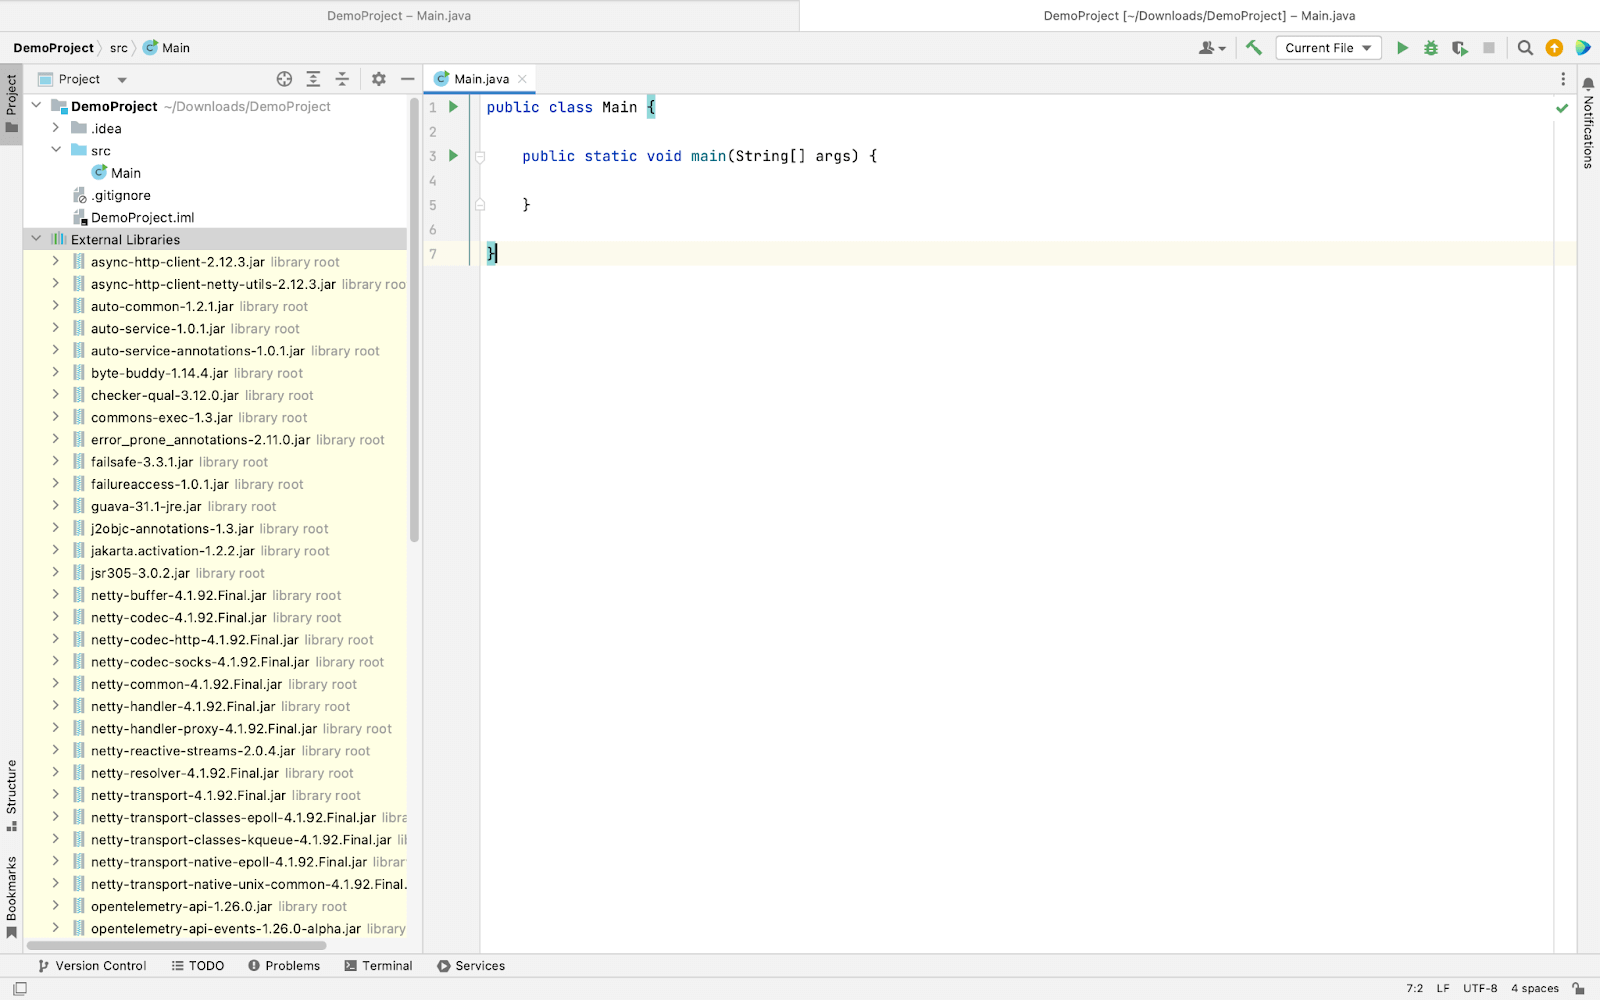
- Now, the IDE is ready to run the test using the Selenium WebDriver.
- You can verify the functionality of the Setup by running the following code.
import org.openqa.selenium.WebDriver;
import org.openqa.selenium.chrome.ChromeDriver;
import org.openqa.selenium.JavascriptExecutor;

public class Main {

    public static void main(String[] args) {

        // Instantiate a ChromeDriver class.
        WebDriver driver=new ChromeDriver();

        // Launch Website
        driver.navigate().to("https://www.testmuai.com/");

        //Maximize the browser
        driver.manage().window().maximize();

        //Scroll down the webpage to the end
        JavascriptExecutor js = (JavascriptExecutor)driver;
        js.executeScript("scrollBy(0, document.body.scrollHeight)");

        driver.quit();
    }

}
Using a build tool in Java(using Maven here):
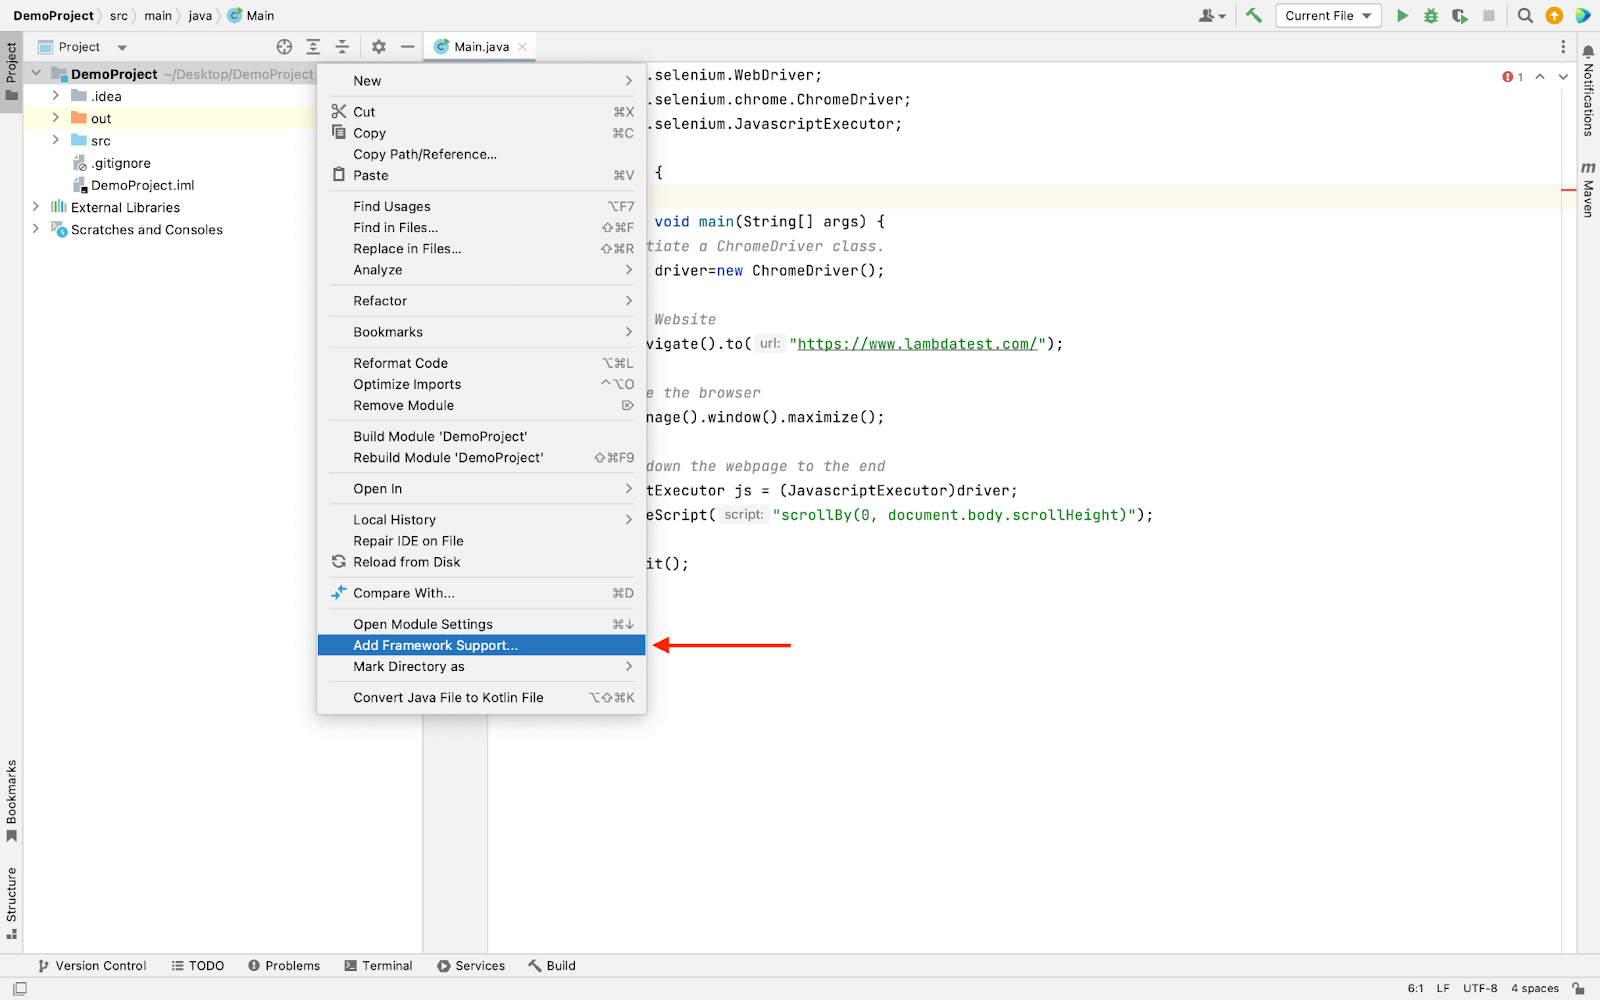
- Right-click on the project name and click Add Framework Support, as shown below:
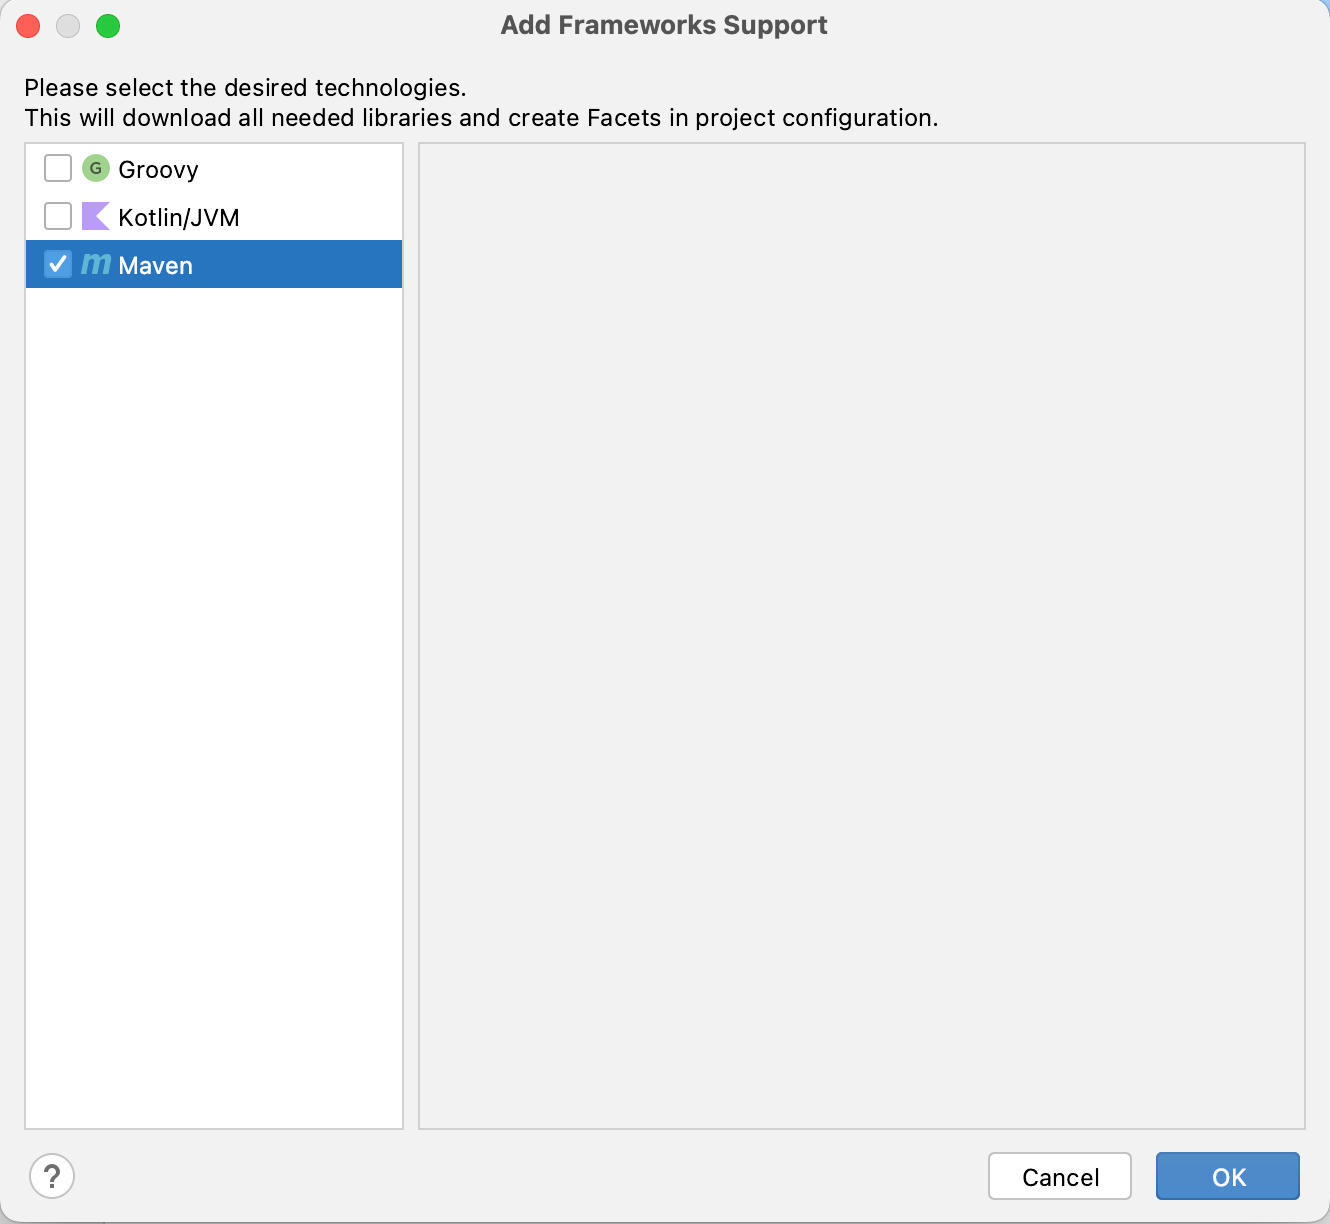
- Select Maven and click Ok.
- Add the dependencies in the porm.xml file.
- Now open the Maven from the right side as shown in the image.
- Now from the LifeCycle section press Clean.
- Once the cleaning process is complete press Install.
- Once all the required dependencies are installed it will update in the Dependencies.
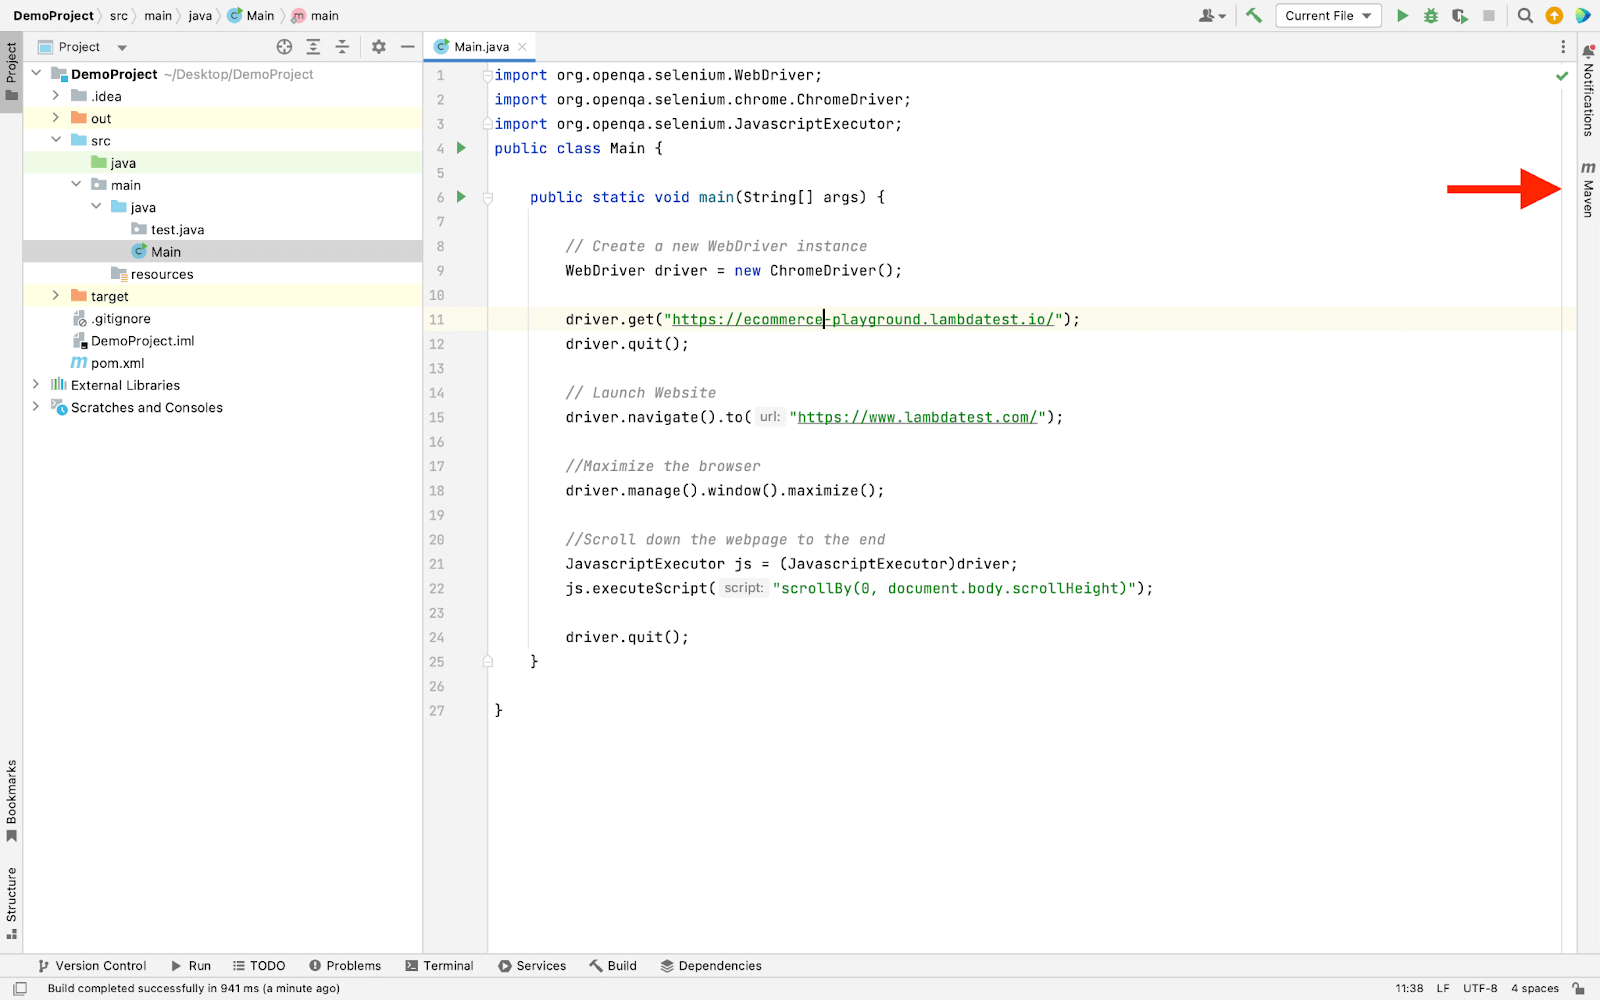
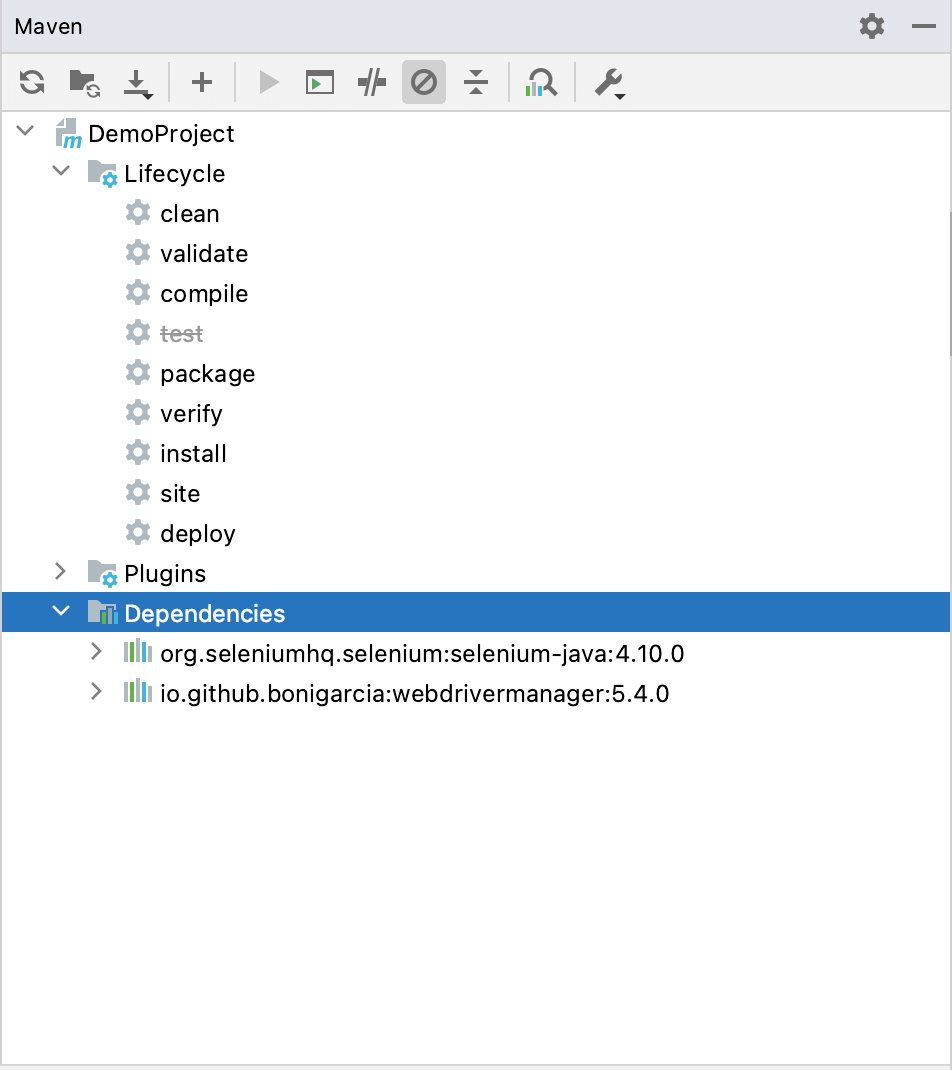
Now run the Java file normally as we ran earlier.
You can also add testing frameworks like JUnit and TestNG to your project to utilize the power of Java with its robust frameworks.
PyCharm
Python programming is done using the integrated development environment PyCharm. In addition to supporting Django web development, it offers code analysis, a graphical debugger, an integrated unit tester, integration with version control systems, and more. Let’s configure this IDE for Selenium.
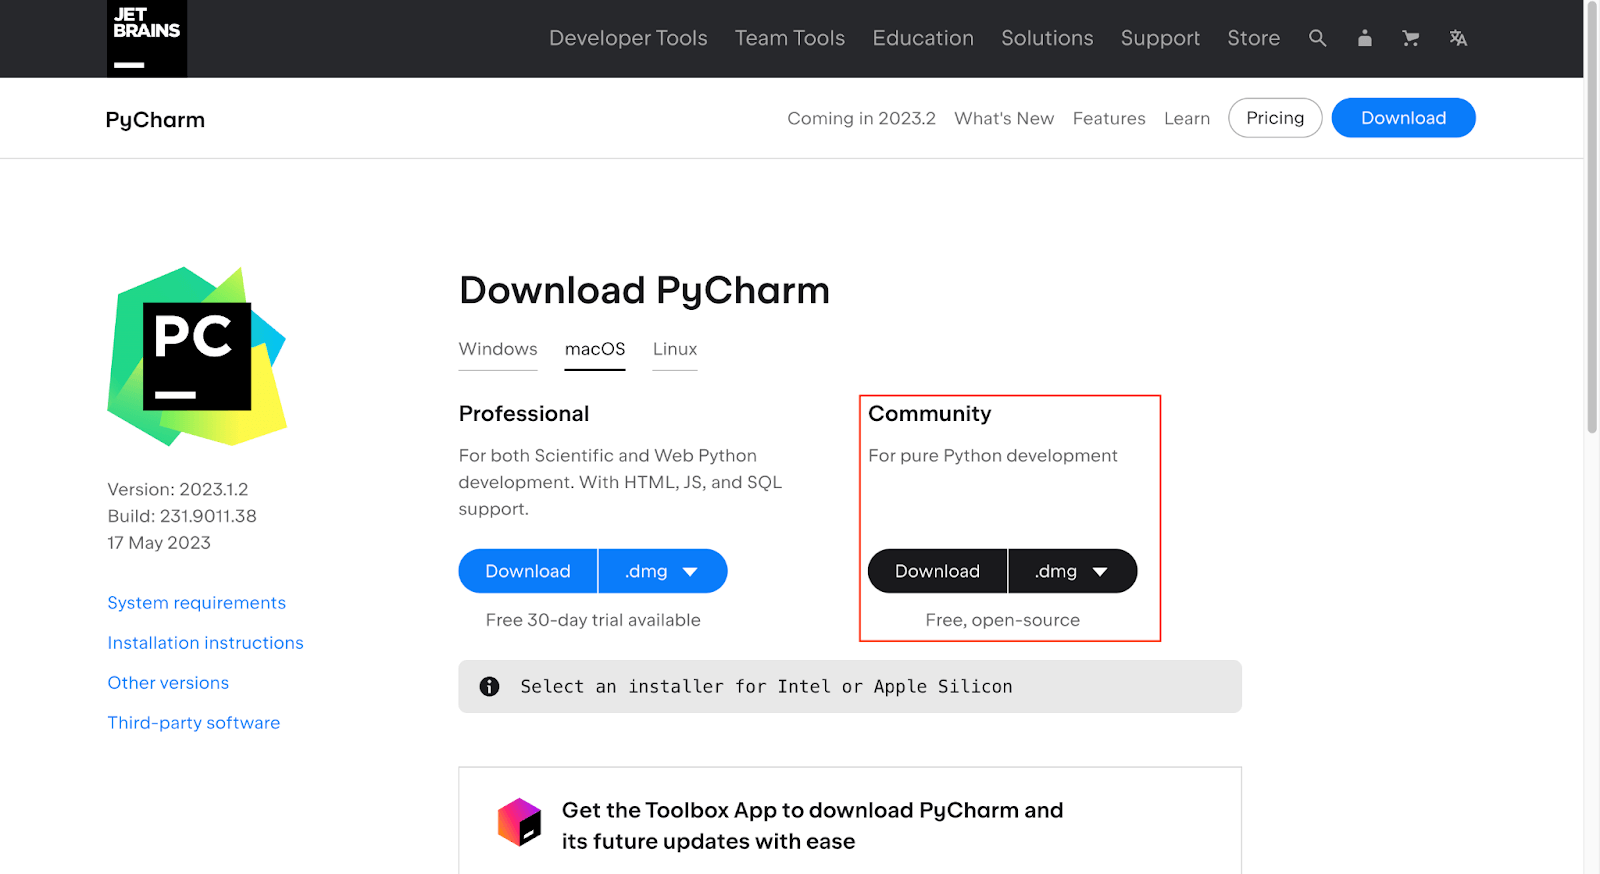
- Download the PyCharm Community Edition from the JetBrains website.
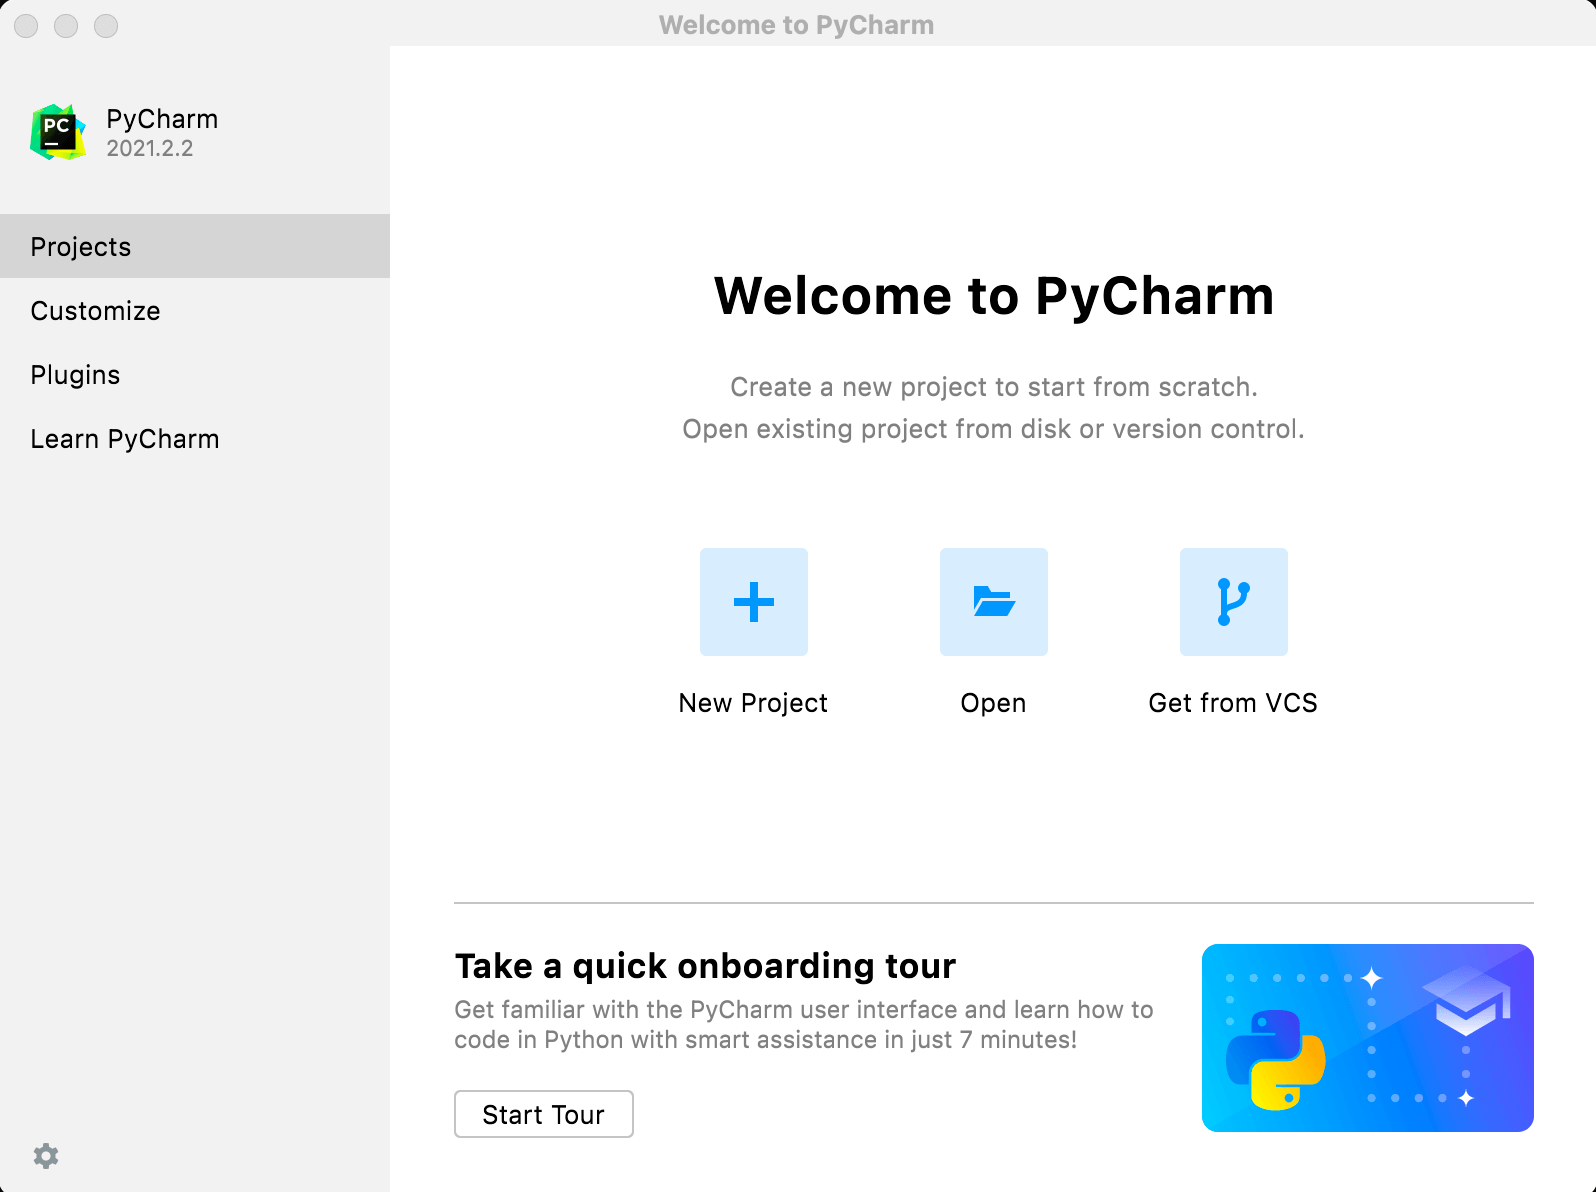
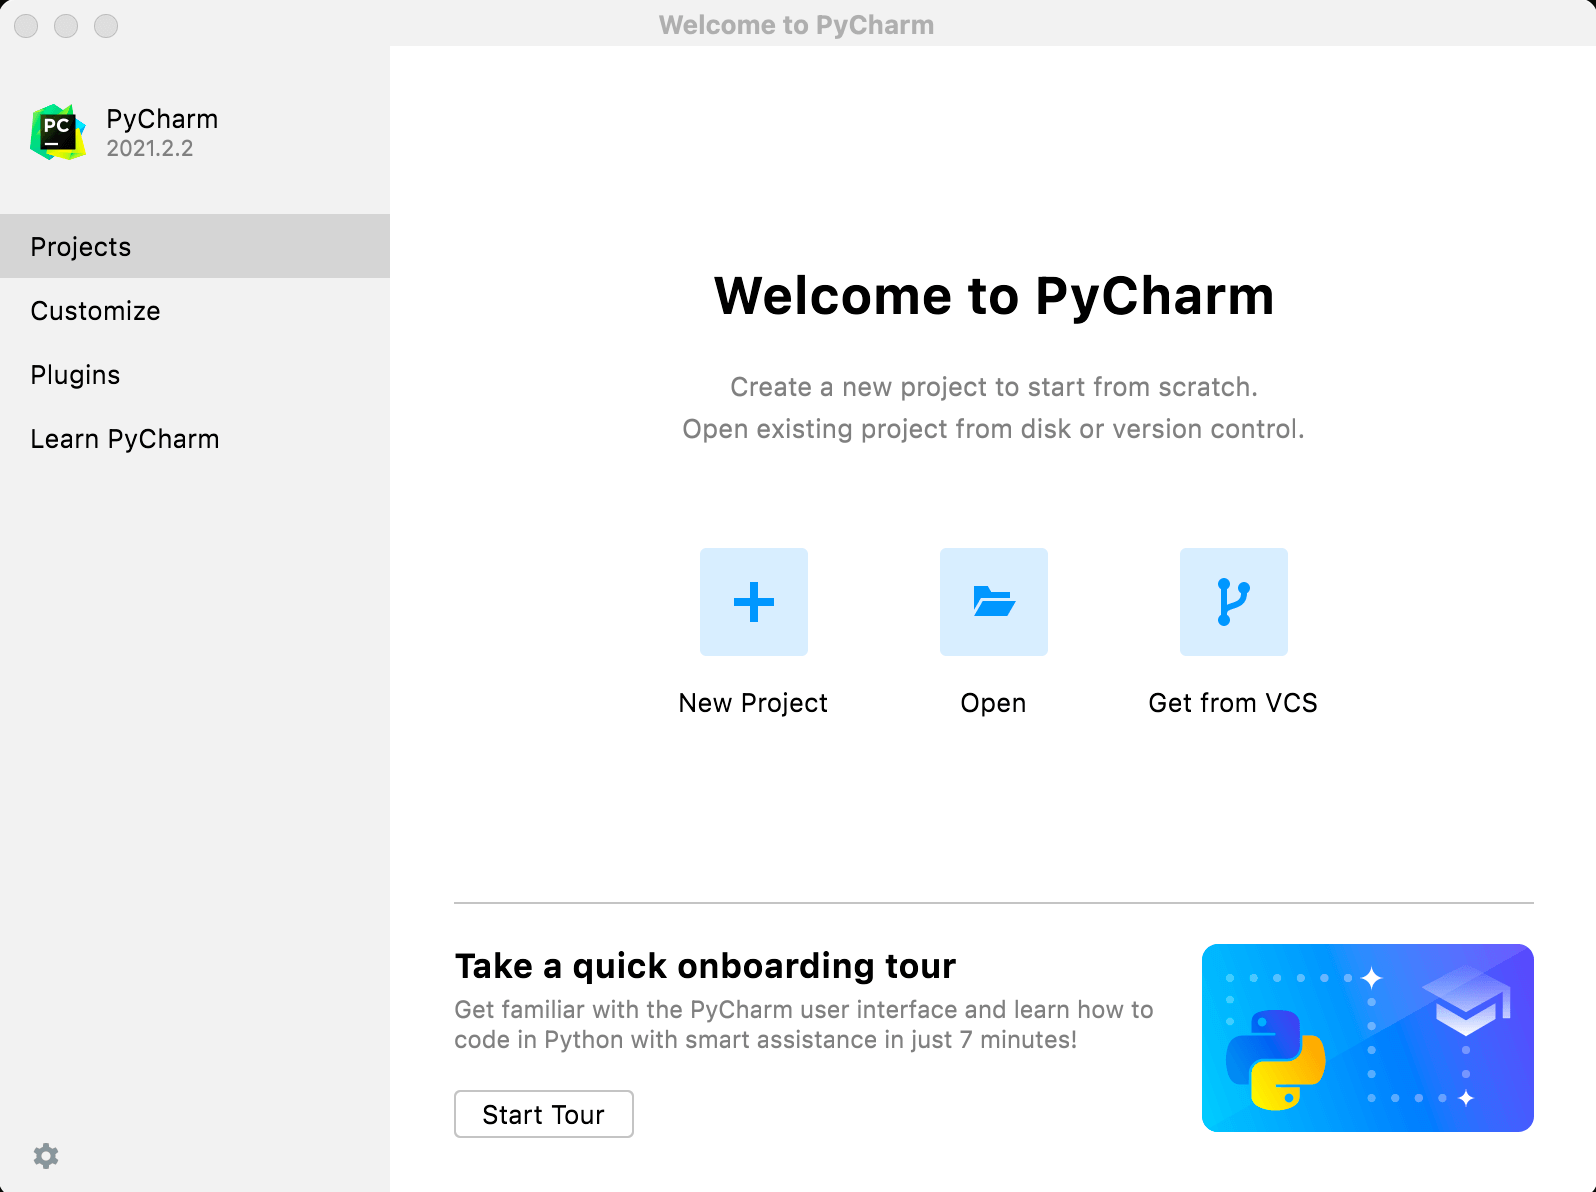
- Now select the New Project option from the available option.
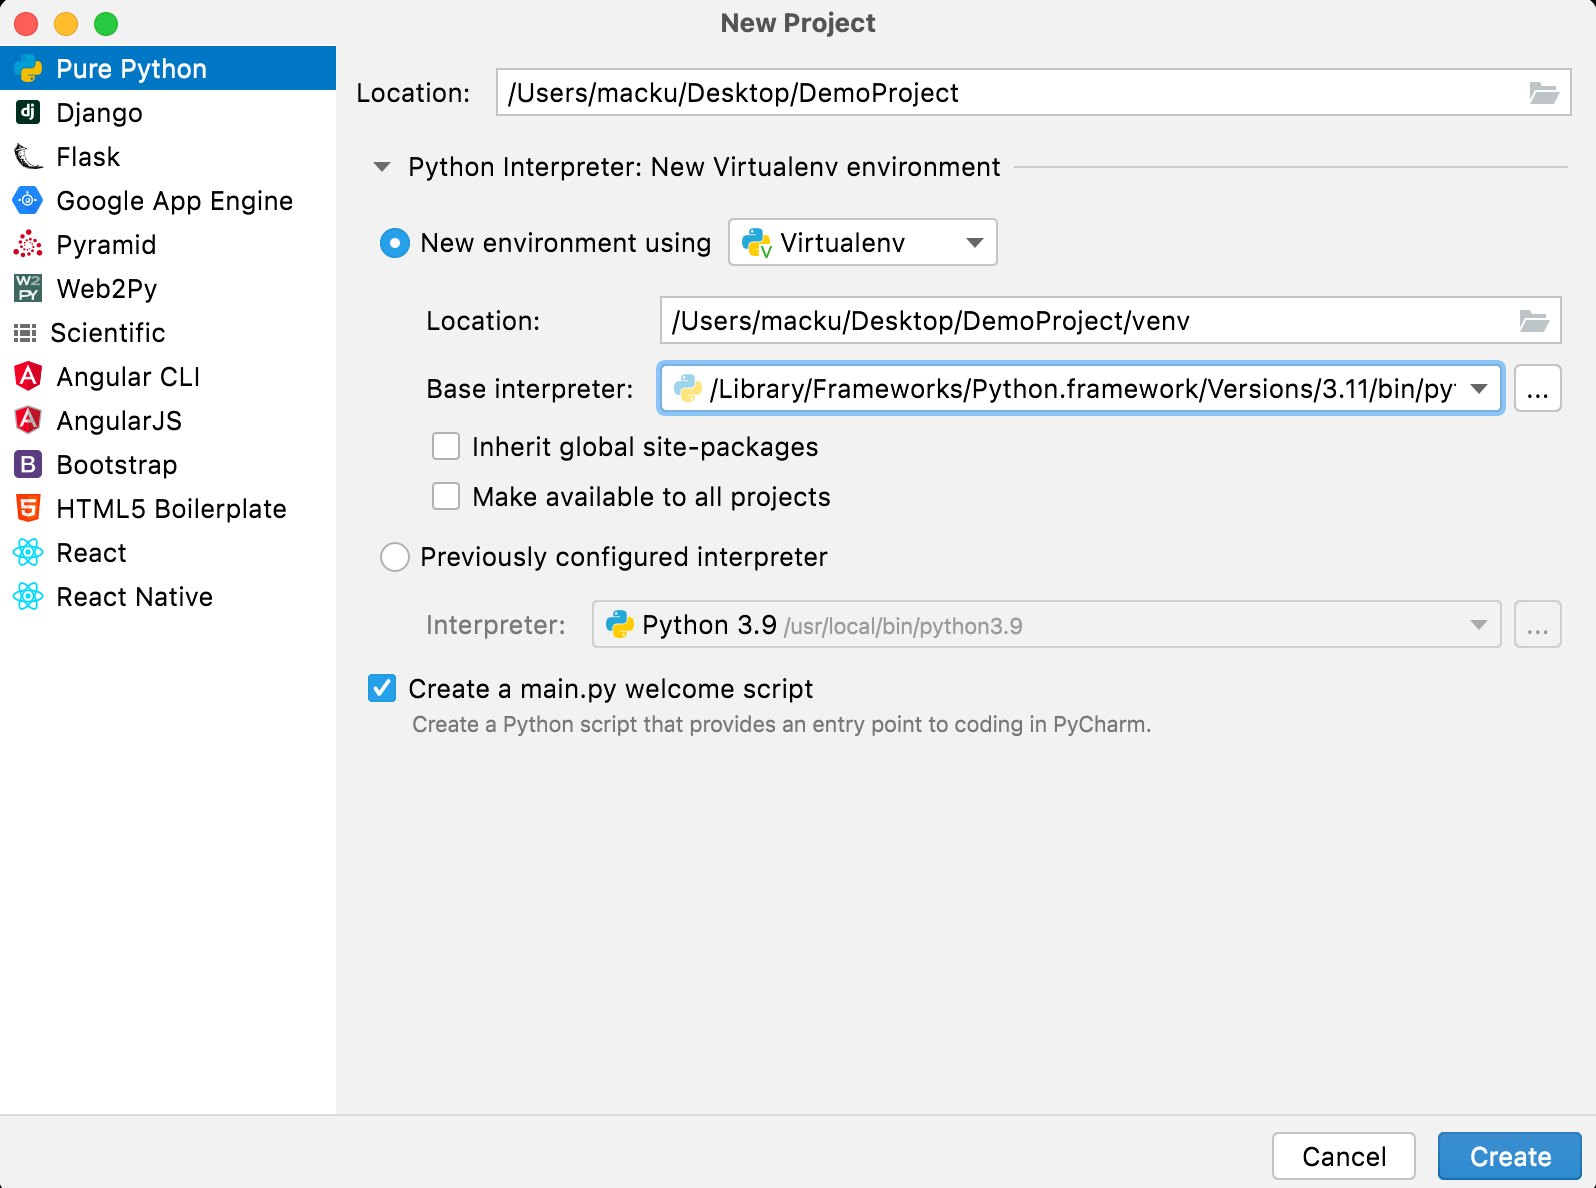
- Select the Pure Python project and give the desired name to the project and press the Create button.
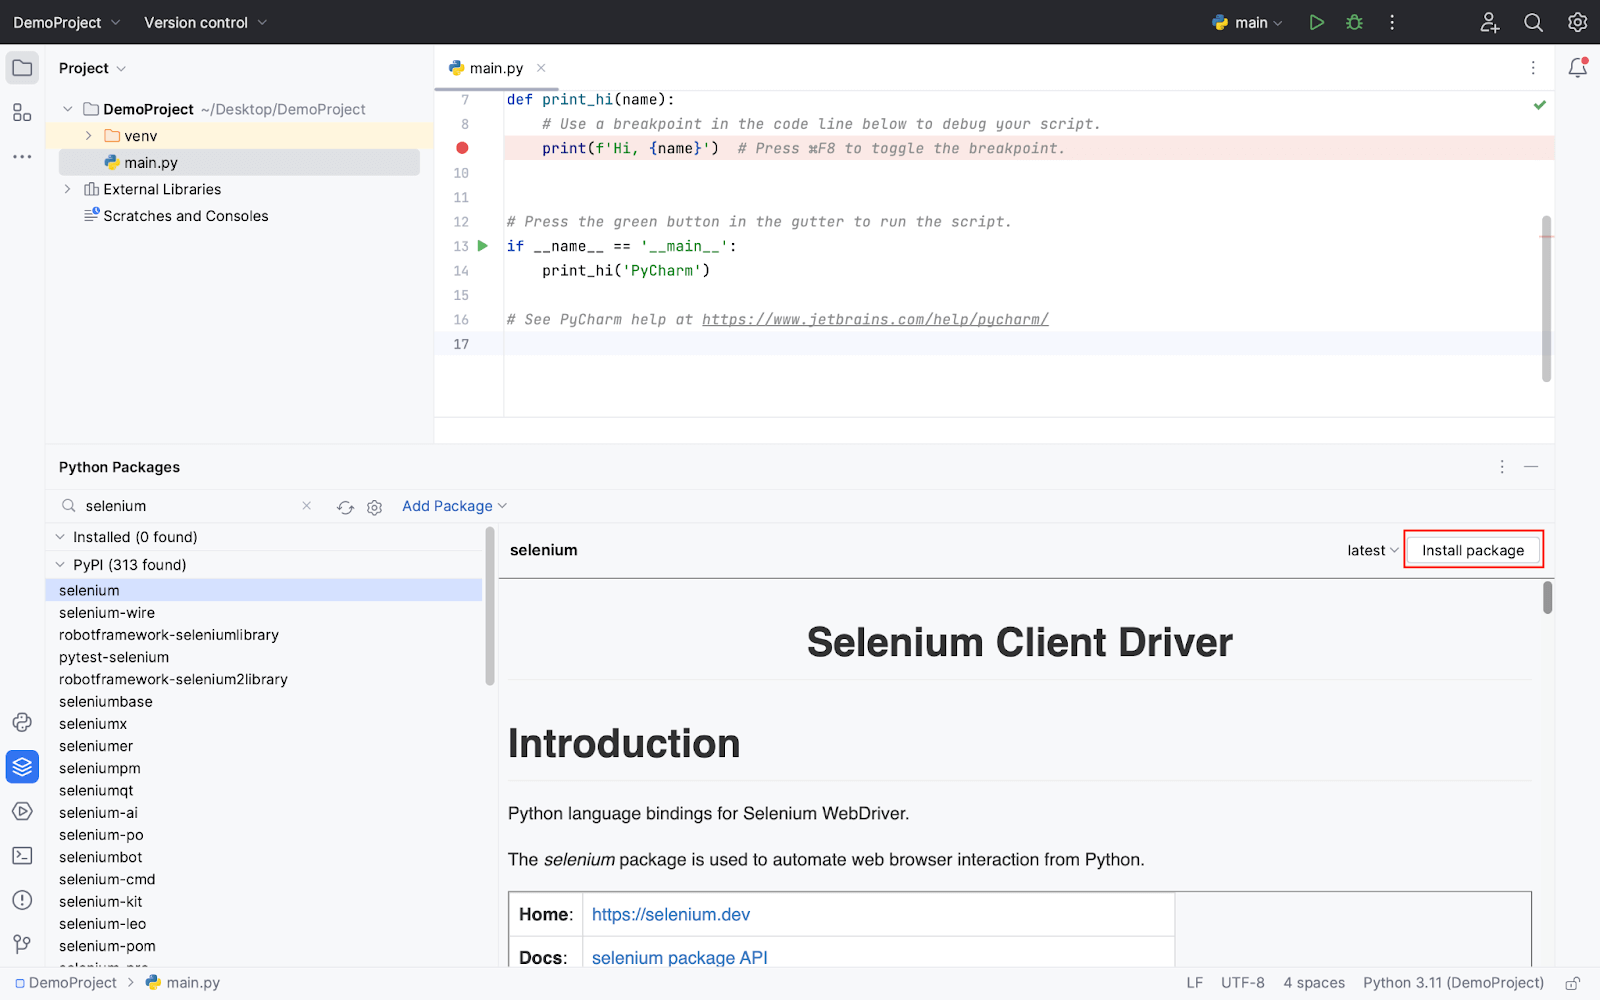
- Type “Selenium” into the new library search box, select the “Selenium” library and confirm by clicking the install package button.
- To verify the installation you can run the following script. The below code will open the TestMu AI website on the Chrome browser.
from selenium import webdriver


# Create a new instance of the ChromeDriver
driver = webdriver.Chrome()


# Open a website
driver.get("https://www.testmuai.com/")

print(driver.title)


# Close the browser
driver.close()
You can also use testing frameworks supported by Python like Pytest and Unittest. Check out our blog on Python Selenium with Chrome if you are interested in using Python to create and run automation scripts.
How to Download Selenium Grid
To run the test scripts with different browsers and configurations Selenium Grid is used. The Selenium Grid facilitates the distributed test execution. Selenium 4 continues to use the grid design concepts and operates on a hub-node architecture. In contrast to earlier Selenium releases (versions 3.x), the Selenium 4 Server jar includes all requirements necessary to execute a Grid. According to Selenium’s official documentation, Selenium Grid 4 has been created entirely from scratch and has no codebase in common with its predecessors. We will see how to install and run Selenium Grid correctly in this section.
Prerequisites
- Java 11 or higher installed (It is recommended to use the LTS version as it is more stable)
- It is recommended to install the browser(s) like Chrome, Firefox, etc.
- Install the required Browser driver(s) as discussed in the above section.
Note: No need to install any browser driver If you are using Selenium 4 and later versions.
Installation
- Download Selenium server .jar file Note: If you are installing the browser’s driver manually, make sure to download the .jar file in the same folder.
- Now you can run the server by following the command:
java -jar selenium-server-<version>.jar standalone
java -jar selenium-server-<version>.jar standalone --selenium-manager true
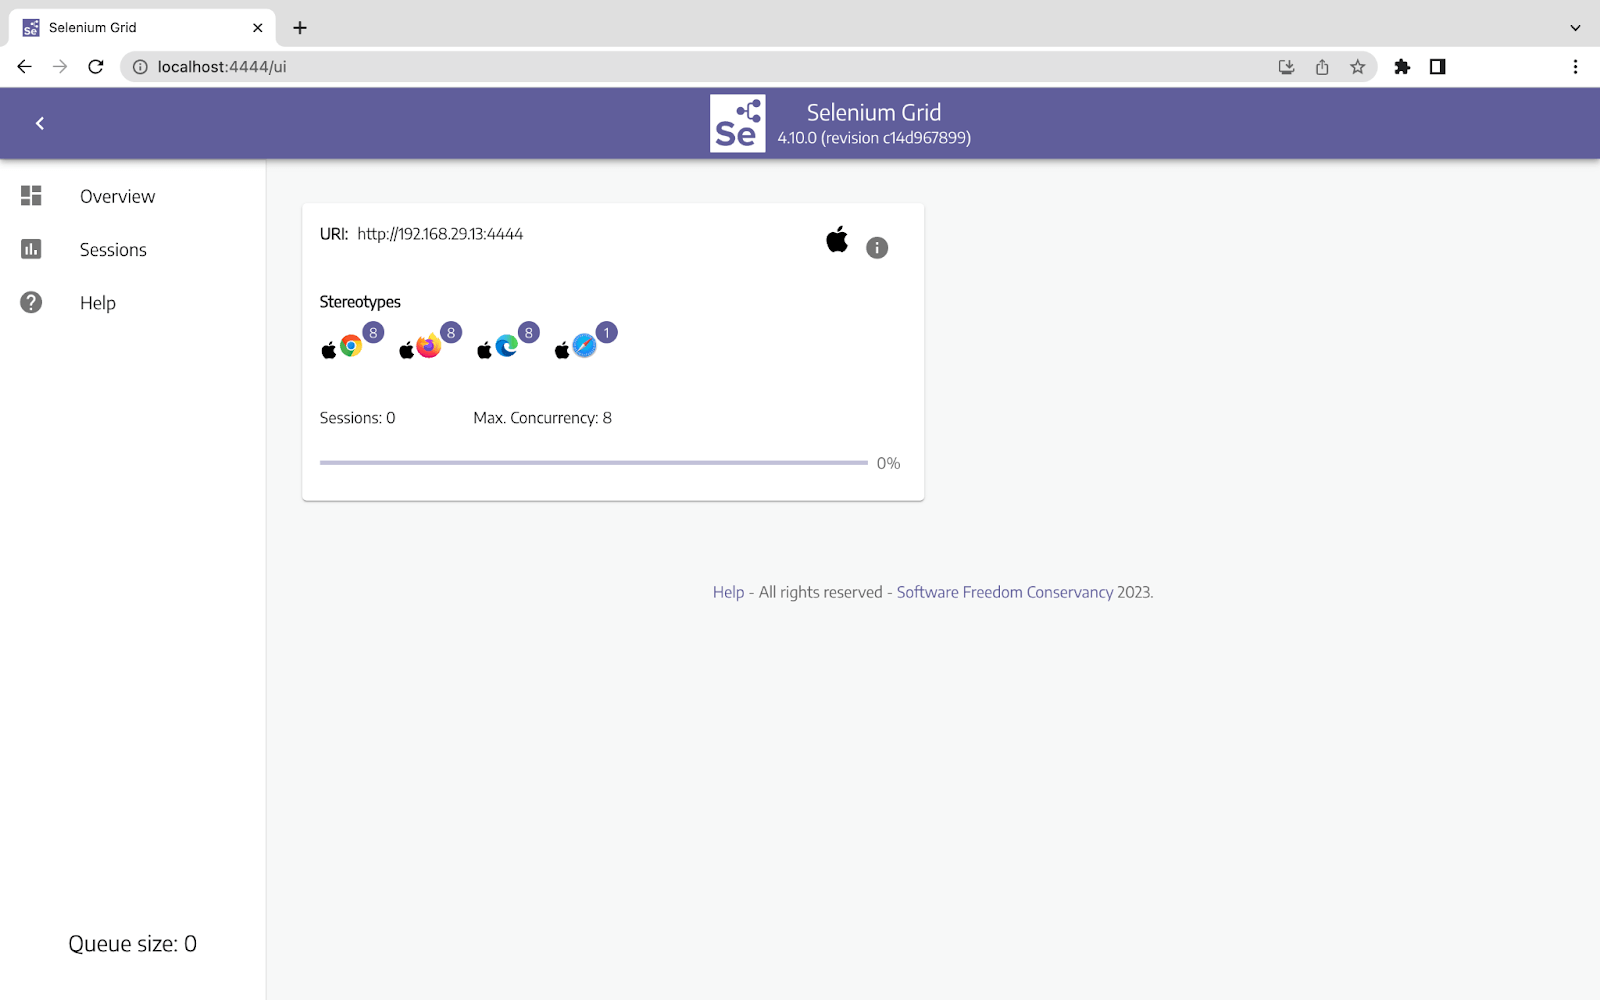
- Once the server is running, you can check it by typing http://localhost:4444 into a new tab of your browser. You can see the following result and now run your tests on the Local Grid.
You may check out our blog on Selenium Grid 4 for testing projects in a detailed manner.
While running tests on local grids Developers and Testers might face the following issues:
- Infrastructure Setup: Configuring a local Selenium Grid environment can be difficult and time-consuming.
- Resource management: In a local Selenium Grid, managing and allocating resources efficiently can be difficult.
- Parallel Tests: Managing concurrent test execution in a parallel fashion and preventing conflicts is not easy.
- Maintaining consistency: Coping with configurations across numerous nodes with various browser and platform versions.
- Test data management: Organizing and synchronizing test data between all nodes.
- Debugging and logging: Investigating problems in a distributed setting and gathering Logs.
- Maintenance and scalability: As the number of test cases and environments rises, questions about ongoing maintenance and scalability arise.
To overcome the above issues Cloud Grid is used. Before moving further with Cloud Grid let’s look at some key differences between Local and Cloud Grid.
Note: Automate Selenium and Appium tests with Capybara framework on TestMu AI cloud platform
Difference Between Local Grid and Cloud Grid
| Parameters | Local Grid | Cloud Grid |
|---|---|---|
| Definition | Selenium Grid setup runs on your local machine. | Selenium Grid configuration running on cloud computing resources controlled by a service provider. |
| Infrastructure | Demands locally installed virtual machines or specialized hardware. | Utilizes cloud-based infrastructure provided by the cloud provider. |
| Scalability | It is dependent on the available resources in your local setup. | Highly scalable, allowing for dynamic allocation of resources as per needs. |
| Maintenance | Requires maintenance over hardware, infrastructure, and Grid. | The infrastructure is managed and kept up to date by the cloud provider, including scalability. |
| Cost | Initial hardware and infrastructure setup costs and ongoing maintenance expenses. | The Pay-per-use pricing model is based on usage, reducing upfront costs. |
| Flexibility | Gives you additional options for customization and control because you have access to the setup directly. | Offers easier scalability choices but less control over the underlying infrastructure. |
| Accessibility | Restricted access through VPN setups or beyond the local network. | Global internet accessibility and remote execution and collaboration are both possible. |
| Setup Time | Infrastructure setup and Grid configuration need time and effort. | Setup is quick and simple and does not require infrastructure provisioning. |
Let’s learn a bit more about Cloud Grid and then we will see an example for Cloud Grid and run a test on it.
Digital experience testing platforms like TestMu AI offer a cloud grid that gives developers and software testers seamless cross-browser and cross-platform testing capabilities. It provides a scalable and dependable platform for testing web applications with its state-of-the-art infrastructure, assuring faultless user experiences across various devices and browsers.
Users can instantly access a wide range of real browsers and operating systems by utilizing TestMu AI’s Cloud Grid, doing away with the need to set up and maintain local Infrastructure. Parallel testing is possible with this cloud-based method, greatly cutting testing time and boosting productivity.
With the help of TestMu AI’s user-friendly interface and advanced debugging and teamwork features, teams may work together to find and fix problems. Its strong automation architecture also supports well-known testing frameworks, allowing developers to incorporate their current testing procedures smoothly. TestMu AI is the go-to solution for shortening the Software Development Life Cycle (SDLC) while delivering exceptional user experiences, whether it’s compatibility testing, responsive design testing, or automated testing.
Now that we have enough knowledge about Cloud Grid, it’s time to run a test on TestMu AI. We are using Python language to create a test script.
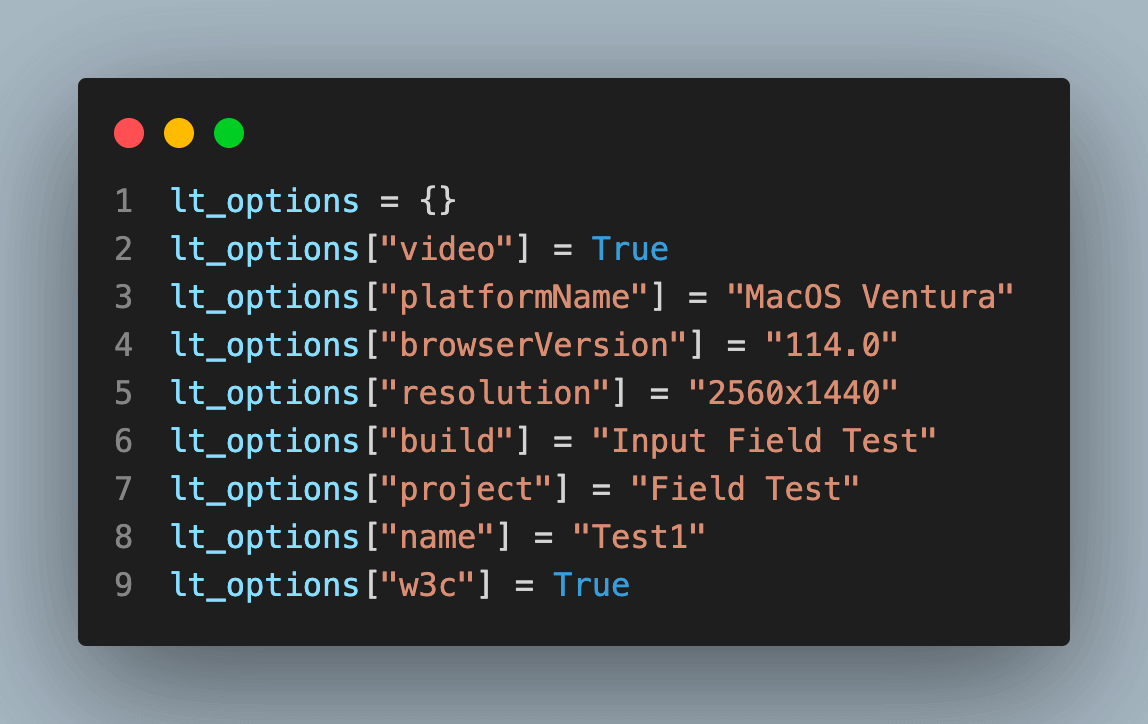
For this test, we are using a sample form. The test will be run on the MacOS Ventura operating system with Firefox version 114.0.
Before Running a Python test on TestMu AI, follow a few simple steps:
- Create an account on TestMu AI and complete all the required processes.
- Go to the dashboard by clicking the dashboard button on the top right corner or Follow this TestMu AI Dashboard.
- Get your credentials from the profile icon located in the top right corner, and then select the profile option it will redirect to the profile screen. Select Password & Security here; you can find your Username and Access Key and save it for future use. Or use this Profile link.
from selenium import webdriver
from selenium.webdriver.firefox.options import Options as FirefoxOptions
from selenium.webdriver.common.by import By

username = ""
access_key = ""

lt_options = {}
lt_options["video"] = True
lt_options["platformName"] = "MacOS Ventura"
lt_options["browserVersion"] = "114.0"
lt_options["resolution"] = "2560x1440"
lt_options["build"] = "Input Field Test"
lt_options["project"] = "Field Test"
lt_options["name"] = "Test1"
lt_options["w3c"] = True

def input_field_test():
    # To run the test on the platform
    remote_url = "http://{}:{}@hub.lambdatest.com/wd/hub".format(username, access_key)

    # adding the capability to the chrome
    options = FirefoxOptions()

    options.set_capability('LT:Options', lt_options)

    # initializing remote server
    driver = webdriver.Remote(command_executor=remote_url, options=options)
    driver.get("https://www.testmuai.com/selenium-playground/simple-form-demo/")
    message_field = driver.find_element(By.ID,"user-message")
    message_field.send_keys("Checking the field")
    get_value_btn = driver.find_element(By.ID,"showInput")
    get_value_btn.click()

    sum1 = driver.find_element(By.ID,"sum1")
    sum1.send_keys("10")
    sum2 = driver.find_element(By.ID,"sum2")
    sum2.send_keys("20")
    answer_btn = driver.find_element(By.XPATH,'//*[@id="gettotal"]/button')
    answer_btn.click()
    driver.quit()

if __name__=="__main__":
    input_field_test()
Now run the file using the following command
python <filename>.py
Understanding the code step by step:
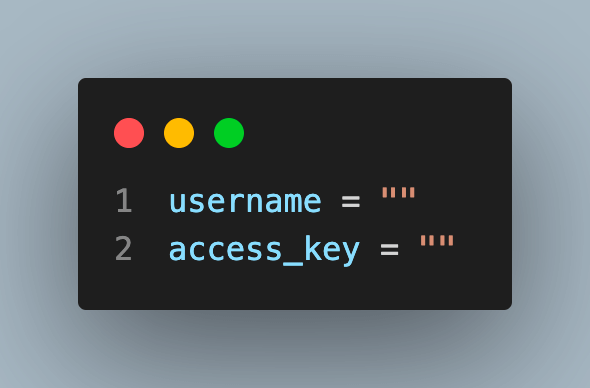
Add your credentials here as it will help the TestMu AI to run tests on your account:
Get your desired capabilities that can be generated from the capabilities generator.
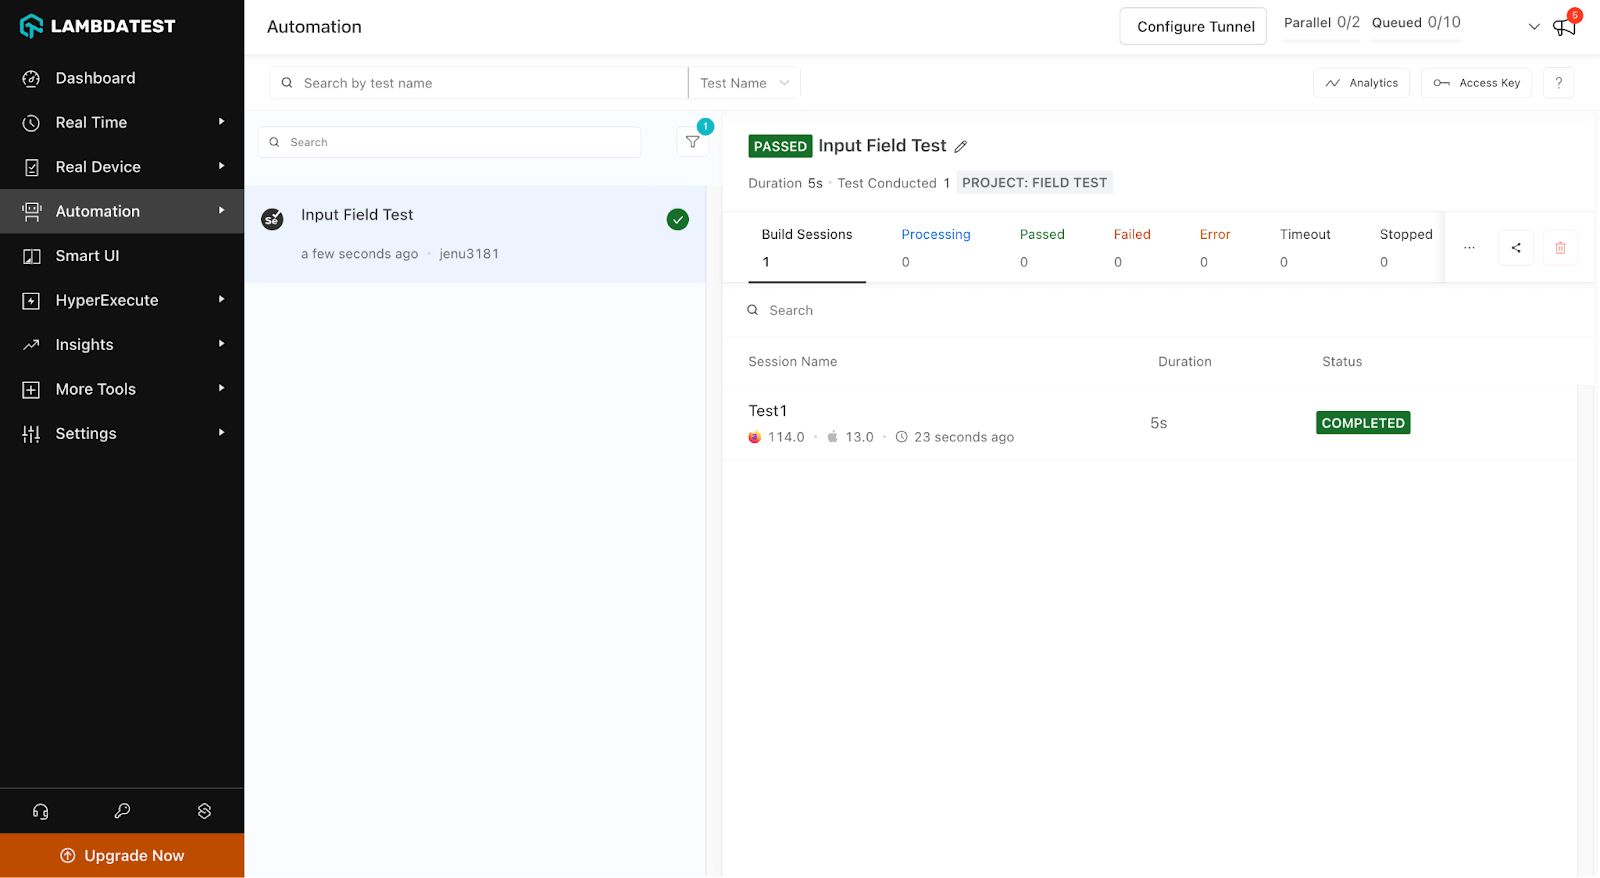
Visit the TestMu AI Dashboard where the test is visible. It will give output like the below image:
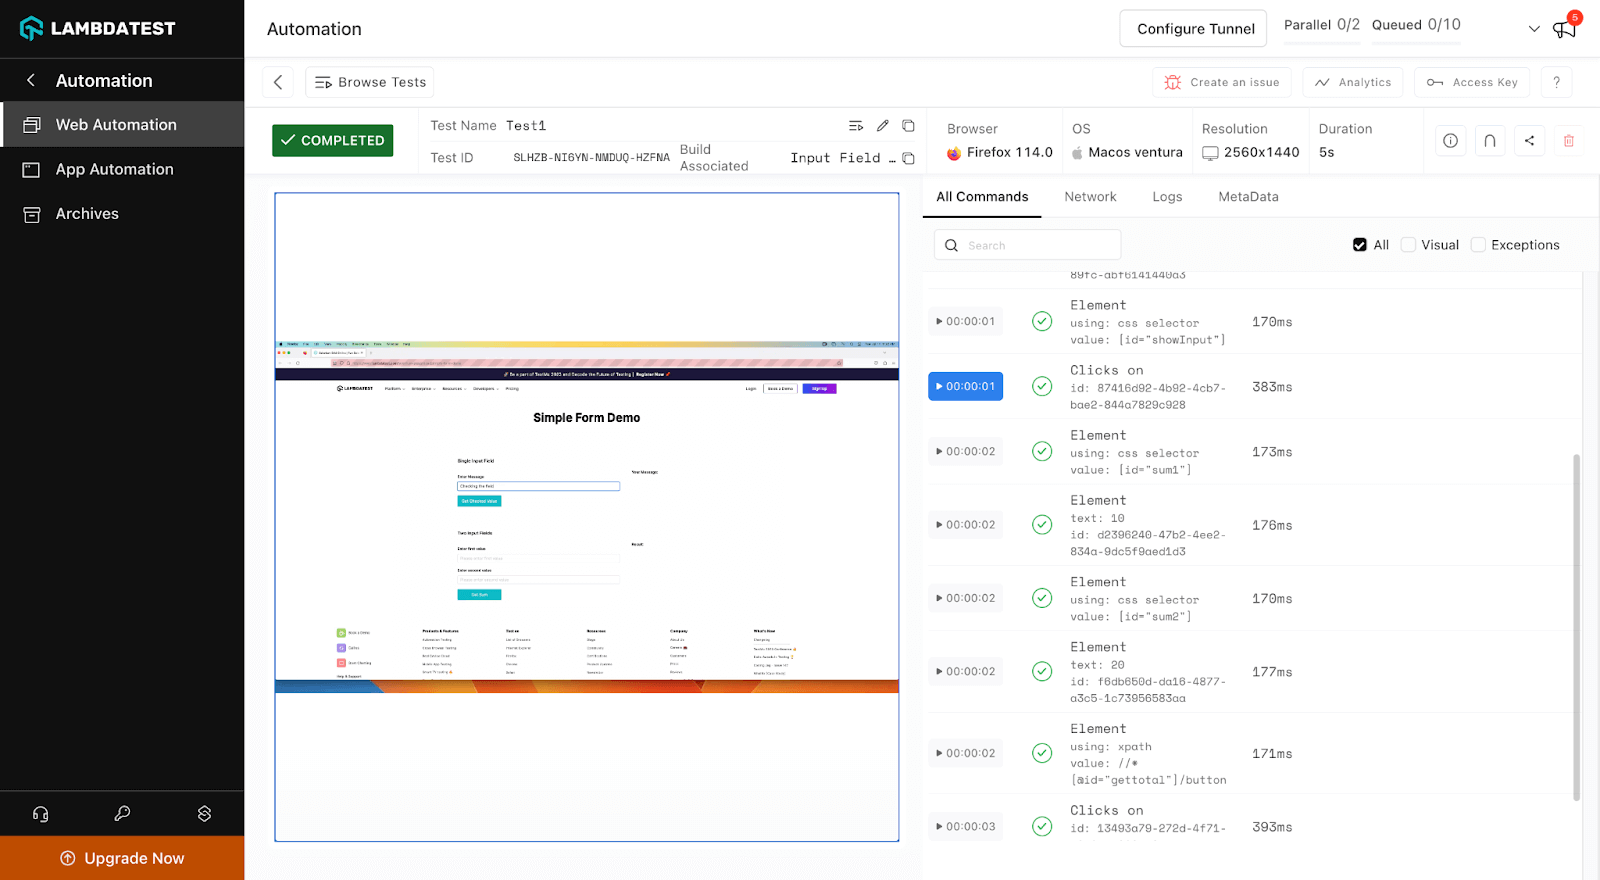
Explore various available test details to get a better idea of the platform.

How Do AI Agents Run Selenium Downloads Now?
AI agents drive Selenium through Model Context Protocol (MCP) servers that expose WebDriver commands as callable tools, so a coding assistant opens a browser and clicks elements from a plain English instruction. The install steps in this guide do not change, because an MCP server is a wrapper around the same bindings and drivers you just downloaded.
- MCP Selenium servers: community projects such as mcp-selenium speak the Model Context Protocol on one side and call Selenium WebDriver on the other.
- No official SeleniumHQ server: every MCP implementation is third party, so check the repository and pin a version before you connect it to an agent.
- Selenium Manager removes a step: the agent never has to fetch ChromeDriver itself, because the binding resolves the driver at session start.
- Language binding still required: the MCP server runs on your machine and imports the Selenium client library, so pip install selenium or the Maven dependency stays a prerequisite.
- Grid endpoint reuse: an agent can point the same RemoteWebDriver URL at a local hub or a cloud grid, so the setup covered earlier serves both.
The limitation is scale. An agent driving one browser session per instruction cannot replace a scripted suite, and every element lookup it invents still needs a stable locator to succeed.
Conclusion
In this blog, we covered how to download Selenium and set it up for an automation testing environment. We looked at the components namely Selenium IDE, Selenium WebDriver, and Selenium Grid. In addition to discussing the Selenium system requirements, we also discussed how to pick an appropriate programming language which enables you to make deft decisions.
By thoroughly explaining how to download Selenium IDE, Selenium WebDriver for various browsers, we moved beyond installation. We discussed how to set up various Integrated Development Environments (IDEs)- Eclipse, IntelliJ, and PyCharm.
After that, to ensure a seamless testing process, we verified the Selenium installation for each IDE. We explore How to download Selenium Grid and the differences between local and cloud grids, illuminating the various testing environments and their uses.
Overall, this blog covers all the important aspects of integrating and using Selenium in your project. So that the resultant website is robust and chances of error will be reduced by testing it thoroughly. If you are preparing for an interview, you can learn more through Selenium interview questions.
Author

Jainish Patel
Blogs: 6


Jainish Patel is a tech enthusiast specializing in web development. With a primary focus on React.js, React.native, and core front-end languages, He is well-equipped to tackle the ever-evolving world of web technologies. Building sleek and interactive Mobile and web applications is one of his strengths. Moreover, he is passionate about crafting seamless user experiences and transforming ideas into reality through programming. You can also follow him on Twitter.


Download Selenium FAQs
Did you find this page helpful?
More Related Blogs

TestMu AI forEnterprise
Get access to solutions built on Enterprise
grade security, privacy, & compliance
- Advanced access controls
- Advanced data retention rules
- Advanced Local Testing
- Premium Support options
- Early access to beta features
- Private Slack Channel
- Unlimited Manual Accessibility DevTools Tests