
Next-Gen App & Browser Testing Cloud
Trusted by 2 Mn+ QAs & Devs to accelerate their release cycles

How To Generate TestNG Reports In Jenkins?
Learn how to generate TestNG report in Jenkins in our latest blog. You will also learn how to share these TestNG reports in Jenkins through email. Generate & share a Jenkins Selenium report seamlessly!
December 26, 2025
TestNG is an open-source automated testing framework, where ‘NG’ of TestNG is Next Generation. It is similar to JUnit but designed to be better than JUnit, especially when testing integrated classes. With the help of simple annotations, grouping, sequencing & parametrization, TestNG overcomes most of the older system’s limitations and gives the developer the ability to write more versatile and efficient tests.
In our previous blogs, we have seen how to run Selenium tests in TestNG using an XML file, Parameterisation in TestNG, TestNG listeners, and much more. In this blog, we will find out how to generate a TestNG report in Jenkins. This will be particularly useful if you are into Selenium test automation.
Overview
The TestNG.xml file is central to configuring and managing TestNG test suites in Java. Using Eclipse, developers can easily create, organize, and execute test cases efficiently.
What Is the TestNG.xml File?
The TestNG.xml file defines how tests are grouped, executed, and reported. It specifies test classes, methods, and configurations, enabling controlled and repeatable test execution.
Different Tags in a TestNG.xml File
TestNG.xml uses several tags to organize tests:
- suite: Defines a suite of tests.
- test: Groups related classes or methods.
- classes: Lists the test classes to execute.
- methods: Specifies which methods to include or exclude.
Setting Up a TestNG Project in Eclipse
Begin by creating a Java project in Eclipse, adding the TestNG library via Maven or manually, and ensuring your project structure follows standard Java conventions.
How to Create a TestNG.xml File in Eclipse?
Right-click your project → New → Other → TestNG → TestNG Suite. Name your XML file and select the classes and methods to include. Eclipse automatically generates the XML with proper tags for execution.
Why Use TestNG in the First Place?
TestNG is quite popular among developers and testers for test creation. It offers several practical features like grouping, dependence, prioritization, ease of using multiple annotations, etc. If you are not a fan of TestNG, allow me to introduce you to a few of the several benefits offered by it, especially from Selenium perspective-
- It supports annotations.
- It has a flexible test configuration, ensuring that the code is multithread safe.
- Support for data-driven testing (with @DataProvider).
- Support for parameters.
- No more need for TestSuite and accompanies a powerful execution model.
- Supports a variety of tools and plugins, which include Jenkins, Eclipse, Maven, etc.
- Embeds BeanShell for further flexibility.
- It is designed to cover tests (almost all): Unit tests, Functional tests, End-to-end tests, Integration tests, etc.
- It uses more Java and OO concepts and features.
Importance of TestNG Annotations
Primarily, developers use annotation repeatedly to define a piece of code that is incorporated into the software or business logic used in the programming language Java to control the flow of methods. In Test Next Generation (TestNG), annotations play a significant role. When working on TestNG, testers need to consider the operations and uses of each annotation.
Although Annotations differ from project to project depending on their requirements, the execution flow remains intact for every single project. Below are different Annotations present in TestNG and their primary usage:
- @BeforeSuite: The annotated method will run before all tests in this suite have run.
- @AfterSuite: The annotated method will run after all tests in this suite have run.
- @AfterTest: The annotated method will run after all the test methods belonging to the classes inside the tag have run.
- @BeforeTest: The annotated method will run before any test method belonging to the classes inside the tag has run.
- @AfterGroups: The annotated method is a list of groups that the configuration method will run after. This method will run shortly after invoking the last test method that belongs to any of these groups.
- @BeforeGroups: The annotated method is a list of groups that the configuration method will run before. This method will run shortly before invoking the first test method that belongs to any of these groups.
- @AfterClass: The annotated method will run after all the current class test methods have been run.
- @BeforeClass: The annotated method will run before the first test method in the current class is invoked.
- @AfterMethod: The annotated method will run after each test method has been run.
- @BeforeMethod: The annotated method will run before each test method has been run.
- @Test: This annotated method is a part of a test case.
There are several benefits of the available TestNG Annotations–
- By looking up annotations, it describes the methods that it is interested in. Method names are also not limited to any pattern or format.
- We can pass annotations with additional parameters.
- Annotations are strongly typed so that the compiler can flag any errors right away.
- Test classes are no longer needed for extensions.
Watch this video to learn about the TestNG Annotations and how they help provide better structure and readability to the code.
Writing a Basic Test in TestNG
Now that we have essential elements in place let us see the primary steps involved in creating a TestNG test.
- Write the business logic of the test.
- Insert TestNG annotations in the code.
- Include the test information (e.g., the methods names, class names, group names, etc.) in a testng.xml file.
- Run TestNG.
Note: TestNG requires JDK 8 or higher. You can refer to our complete TestNG Tutorial to start from the basics.
Below is a straightforward test is written in TestNG:
package example1;

import org.testng.annotations.*;

public class SimpleTest {

 @BeforeClass
 public void setUp() {
   // here would be the code that will be invoked when this test is instantiated
 }

 @Test(groups = { "fast" })
 public void aFastTest() {
   System.out.println("Fast test executed");
 }

 @Test(groups = { "slow" })
 public void aSlowTest() {
    System.out.println("Slow test executed");
 }

}
Using @BeforeClass and @Test, i.e., after the test class is built & before any test method is run, the setUp() method will be invoked. We will run the group quickly in this example, so aFastTest() is invoked while a SlowTest() is skipped.
Things to Note:
- No need to implement an interface or extend a class.
- Even though the above example uses the JUnit conventions, it is the annotations that tell TestNG what our methods can be called any name you like.
- A test method could belong to one or multiple groups.
We can either invoke our test using the command line, the ant task (as shown below), or the XML file: once you have compiled your test class into the build directory.
<project default="test">

 <path id="cp">
   <pathelement location="lib/testng-testng-5.13.1.jar"/>
   <pathelement location="build"/>
 </path>

 <taskdef name="testng" classpathref="cp"
          classname="org.testng.TestNGAntTask" />

 <target name="test">
   <testng classpathref="cp" groups="fast">
     <classfileset dir="build" includes="example1/*.class"/>
   </testng>
 </target>

</project>
Use ant to invoke it:
c:> antBuildfile: build.xml
Output

The test results can be browsed using:
start test-output\index.html (on Windows)
If you don’t like this process of getting the test results, there’s an easier way to do it. It is also possible to generate the TestNG reports in Jenkins. There is a plugin Jenkins offers to accomplish this task. The plugin is the TestNG Results plugin. This next section will find out how to generate TestNG report in Jenkins with this plugin.
You might also like- Generate PHPUnit Coverage Report In HTML and XML
Austin Siewert
CEO, Vercel
Discovered @TestMu AI yesterday. Best browser testing tool I've found for my use case. Great pricing model for the limited testing I do 👏
2M+ Devs and QAs rely on TestMu AI
Deliver immersive digital experiences with Next-Generation Mobile Apps and Cross Browser Testing Cloud
With TestNG certification, you can challenge your skills in performing automated testing with TestNG and take your career to the next level.
Here’s a short glimpse of the TestNG certification from TestMu AI:
TestNG Results Plugin
TestNG Results plugin enables you to publish the results of TestNG created using org.testng.reporters.XMLReporter.TestNG The resulting XML file contains more details than the XML file of the JUnit framework. In graph and table reports, this plugin reveals such additional information. The plugin also makes it possible to import the XML TestNG reports in Jenkins from each build.
Now getting to the ‘how’ part of ‘how to generate TestNG report in Jenkins’- data is parsed using the output that org.testng.reporters.XMLReporter generates. The results are shown with a trend graph, and all the specifics of the failed tests are also presented. And that’s how TestNG reports in Jenkins look like!
Let’s find out more about a Jenkins Selenium report.
Features of TestNG Results Plugin
A Jenkins Selenium report generated using TestNG Results plugin offers the following features-
- The page layouts are intentionally designed so that they look very similar to Jenkins’s JUnit plugin. Also known for the fact JUnit inspires them.
- You will see a summary of passed/fail checks and passed/fail configuration methods on the project/build tab. To see the test failure, it also enlists the failed test cases with a direct connection.
- The test methods in the class result summary page are separated from the configuration method.
- In the Package result summary, we can see the order in which test methods were run during the regression run.
- The pass/failed pattern of previous job results will be seen in different graphs.
- Able to hide or expand tables that display package and class results.


Watch this video to learn how TestNG has become one of the most robust test automation frameworks and all you need to know to get started with TestNG in Selenium.
Utilities of TestNG Results Plugin
Using this plugin is very straightforward once you have configured your build to run TestNG-based test cases and figured out how to generate TestNG report in Jenkins. Simply trigger Publish TestNG Results in Post-Build Behavior.
This option enables the following properties to be configured:
- TestNG XML report pattern- This is a pattern for the file name that can be used to find the TestNG XML report files (for example, */target/testng-results.xml*). The path is either an Ant-style pattern (e.g., fileset) or a list of files and folders separated by the characters’;:,’. It is also vital that TestNG be configured to generate an XML Jenkins Selenium report using _org.testng.reporters. This is to ensure XMLReporter for this plugin functions properly.
- The Escape Test Description string- If checked, while displaying test method results, the plugin escapes the description string that is associated with the test method. Unchecking allows us to use HTML tags to format the description, which is enabled by default.
- The Escape exception messages- If checked, the plugin escapes the test method’s exception messages. Unchecking allows you to use HTML tags to format the exception message, e.g., embed links in the text. This is enabled by default.
- Show Failed Builds- If selected, the plugin includes results from the failed builds in the trend graph. This is disabled by default.
- In case this is a maven build, it is always better to configure the build step with -Dmaven.test.failure.ignore=true option. This results in the build with test failures being marked as Unstable, thus distinguishing it from the build that failed because of issues not related to the tests.
- Also, even when this option is selected, failed builds with no results and aborted builds will not be displayed in graphs.
- Marking the build as a failure on a failed configuration- This marks the build as failed if there are any configuration method failures.
- Configuring thresholds for marking the build as Unstable/Failed- A Threshold Mode can be configured by the user as a number of tests or a percentage of tests and then configured separately for these values. Even if there are several test failures or label the build as failed, even if there is a single test method failure, this allows for situations where we want the builds to be marked successful.
9 Of The Best Reporting Tools For Selenium

How to Generate TestNG Reports in Jenkins?
Now let us see how to generate TestNG Report in Jenkins. To be able to do this, you need to have all the required tools in your system.
Prerequisites-
- TestNG Project
- Jenkins – You can check Jenkins installation here.
- TestNG Results Plugin in Jenkins
Once you have all this installed, we can get started with a TestNG Project.
How To Create a TestNG Project?
In order to generate TestNG reports in Jenkins, we need to start from scratch. First, we will create a TestNG project. To create a TestNG project, you will need to follow the steps mentioned below-
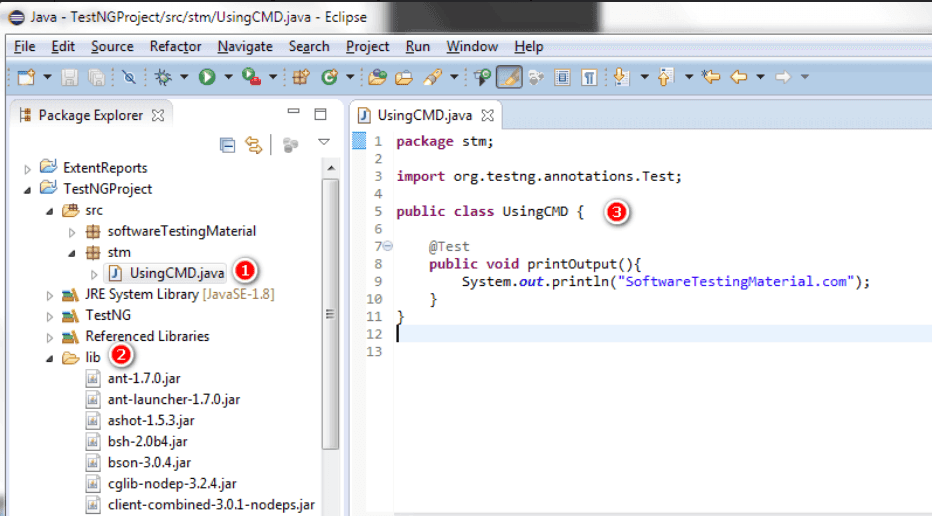
Step 1: Open Eclipse and create a Java class.
Step 2: Keep all the library files in a folder.
Step 3: Write a Java program.
The below snippet highlights all the three steps mentioned above.
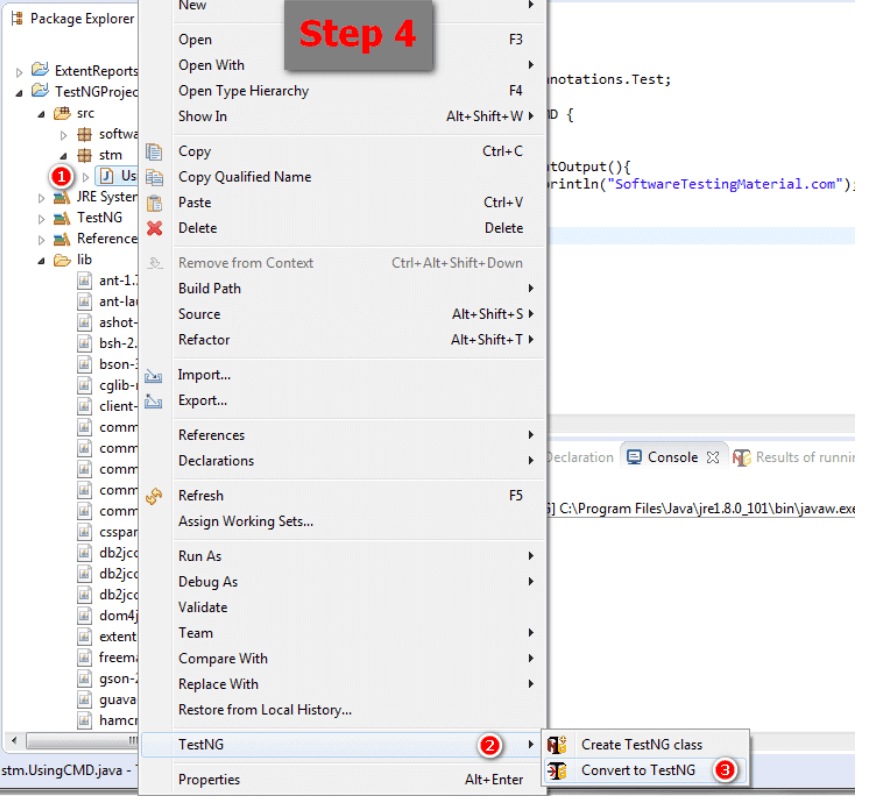
Step 4: Now convert the Java Program into TestNG.
Alternative Method- Another way you can create a TestNG Project is by creating a new TestNG project all from the beginning.
Step 1: Click File –> New –> Java Project

Step 2: Give it an arbitrary Project Name, say “FirstTestNGProject” and then click Next.

Step 3: Next step is to start importing the TestNG Libraries into the project. Click on the “Libraries” tab –> “Add Library”

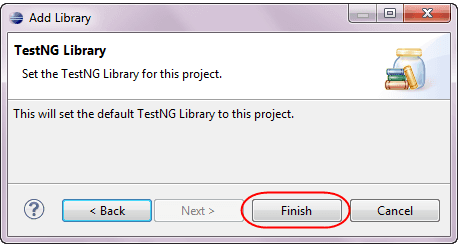
Step 4: Choose “TestNG” on the Add Library dialog, and click Next.

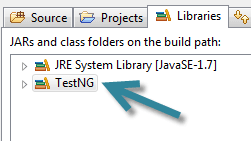
Step 5: Click on Finish.
It should be noticed that TestNG is included on the Libraries list.
Step 6: The JAR files containing the Selenium API will now be added. These files are located in the Java client driver we downloaded from http://docs.seleniumhq.org/download/.

Then, navigate to where the Selenium JAR files are placed.
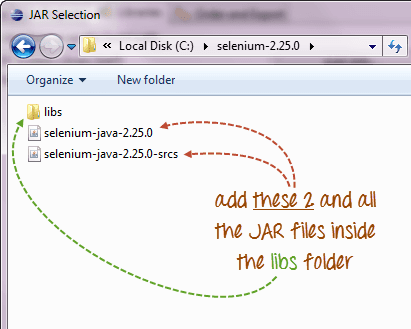
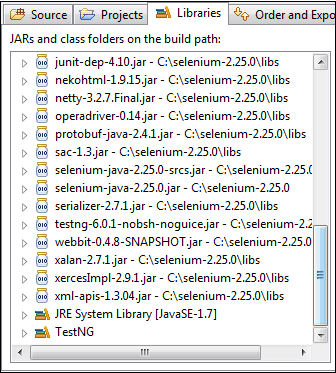
After adding the external JARs, the screen should appear like this.
Step 7: Click on Finish and confirm that our FirstTestNGProject is visible on Eclipse’s Package Explorer window.

After we have the TestNG project, the next step is to install Jenkins. You can refer to the guided steps for Jenkins installation in our Jenkins Tutorial.
Now that we have TestNG Project and Jenkins platform ready, the next step is to install TestNG Reports Plugin in Jenkins.
Installing TestNG Reports Plugin In Jenkins
The next and the most crucial step to know how to generate TestNG report in Jenkins is to install the TestNG Reports plugin. To install the plugin in Jenkins, follow these steps-
- Open Jenkins (localhost:8080).
- Click on ‘Manage Jenkins‘ → Click on ‘Manage Plugins‘
- Click on ‘Available‘ tab
- Select ‘TestNG Results Plugin‘
- Click on ‘Install Without Restart‘
- Open the ‘TestNGProject’ Job created earlier.
- Click on ‘Configure’ and scroll down to select ‘Post Build Actions’
- Click on ‘Add Post Build Actions’ dropdown list.
- And select ‘Publish TestNG Results‘.
- In the TestNG XML Report Pattern edit box enter ‘**/testng-results.xml‘ and click ‘Save‘
- We have already created a new project ‘TestNGProject ‘to run TestNG Tests and generate TestNG Reports after execution using Jenkins.
- Click on the ‘Build Now‘ button to execute it. This will invoke testng.xml from the batch file.
- Right-click on Build Number and click on Console Output to see the result.
- Once the execution is completed, there will be a link to view ‘TestNG Results’


There you go- that’s how to generate TestNG Report in Jenkins!
Alternative Method To Generate TestNG Reports in Jenkins
There’s another way to set up the TestNG reports in Jenkins Dashboard.
- Login into Jenkins.
- Manage Jenkins and Install TestNG Result Plugin.
- Please make sure that you restart Jenkins after the plugin installation.
- Next, go to Jenkins Home Page → Create New Jenkins Job and in Post-Build Action select → Publish TestNg Result.
- Now either give the complete path of your testng-result.xml or type **/testng-results.xml in TestNG XML report pattern to search inside your project workspace.
- Execute your Jenkins Job, and Now your Jenkins Selenium report or ‘TestNG Results’ would be visible in Your Jenkins Dashboard.


How to Share TestNG Reports in Jenkins?
In the sections above, we saw how to generate TestNG report in Jenkins or Jenkins Selenium report, as some like to call them. Once you have generated those TestNG reports in Jenkins, what would you like to do with them? The ultimate goal of generating a Jenkins Selenium report is to share them!
There is a possibility to send those email notifications directly from Jenkins along with the generated TestNG reports. In this section, we will learn how to email the generated Jenkins Selenium report to team members, leads or even managers.
Let’s see how we can accomplish this-
- Start ‘jenkins.war’ file to get started with Jenkins ( Assuming it is already installed ).
- Open Jenkins (
http://localhost:8080). - We would need a required set of Plugins before we start:
- Email Extension
- Email Extension Template Plugin
- TestNG Results
- Selenium HTML Report
- Configuration for Sending Email
- Go to Jenkins –> Manage Jenkins –> Configure System –> Email Notification
- Enter the email id in the “SMTP Server” edit field. For e.g. “smtp.gmail.com”
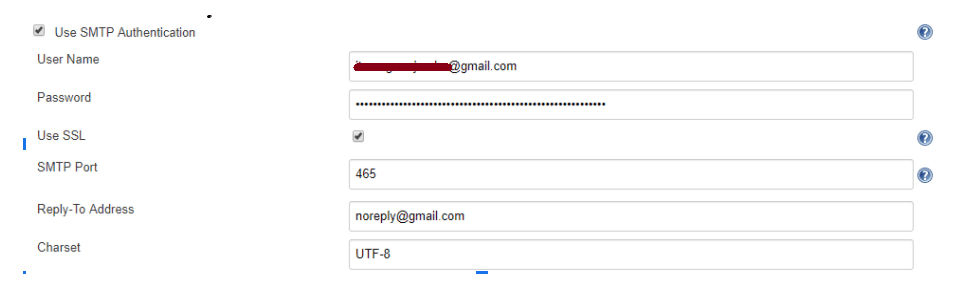
- Click on “Advanced” and configure as shown in the below image.
- Username and password need to be provided for the account from where we want to send the email notification( You can either use your corporate Email or personal based on situations).
- It is always better for testing purposes to check the “Test configuration by sending test email” checkbox to validate whether Email was sent successfully or not.
- Enter the recipient’s email address and click on “Test Configuration” button.
- If we can see the “Email was successfully sent” message, then it can be confirmed that the configuration is correct.
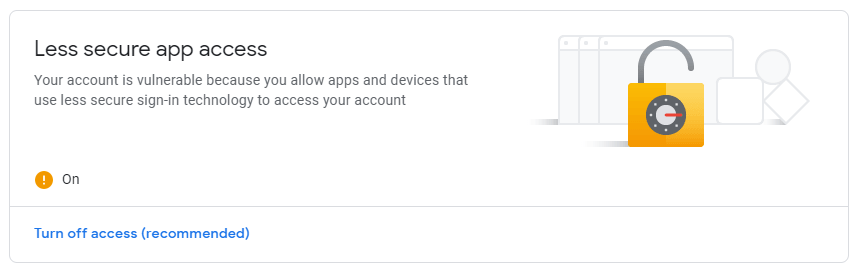
- If we see any error message, it could be either because the configuration is incorrect or security access issues. Follow the below steps to enable “Less secure app access.”
- Navigate to https://myaccount.google.com/
- Click on “Security“
- Go to the “Less secure app access” section and switch it on.


Yay! You are all set to send the email notification for TestNG reports in Jenkins!!
Now it’s time to test this.
- Go to Jenkins Dashboard
- Create a new Job.
- Let us create a new project named “VerifyEmailNotification”.
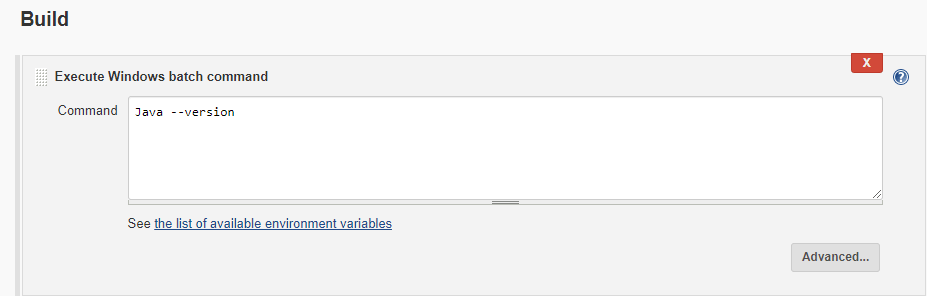
Give the Project Description and select ‘Execute Batch Command’ from the Build drop-down and enter any invalid commands as shown in the image below, as each unstable build will receive an email. (Then only email alerts will be sent if the build fails).
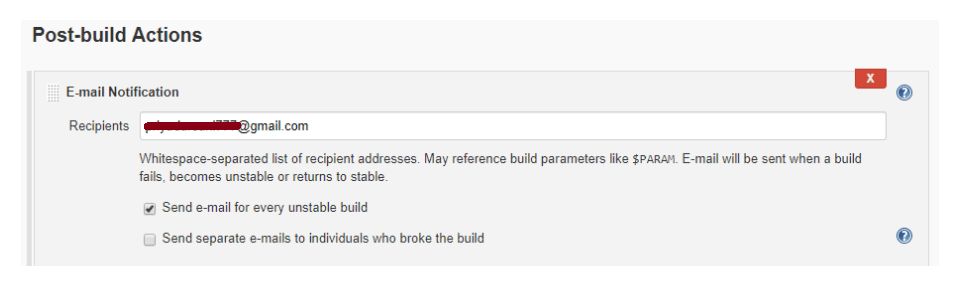
- Select “Email Notification” from “Post-build Actions” and add the email address of the recipient and check “Send email for every unstable build” as shown in the image below.
- Click on “Save.”
- Now click on “Build Now” to start the execution.
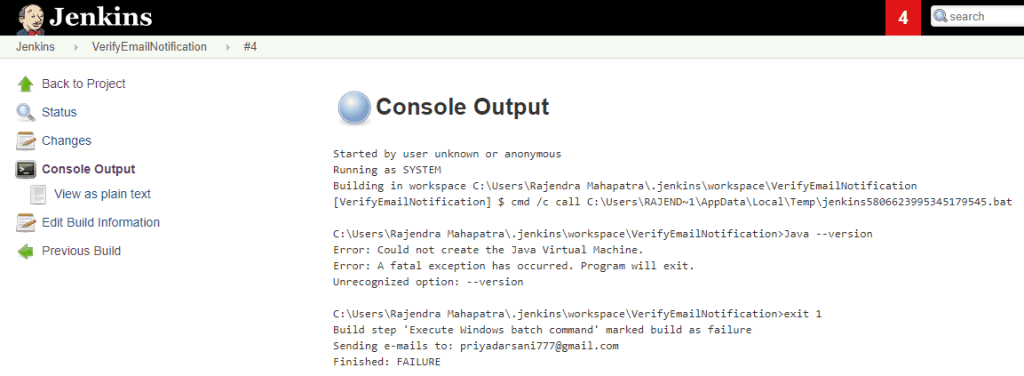
- Go to “Console Output” to verify the result.
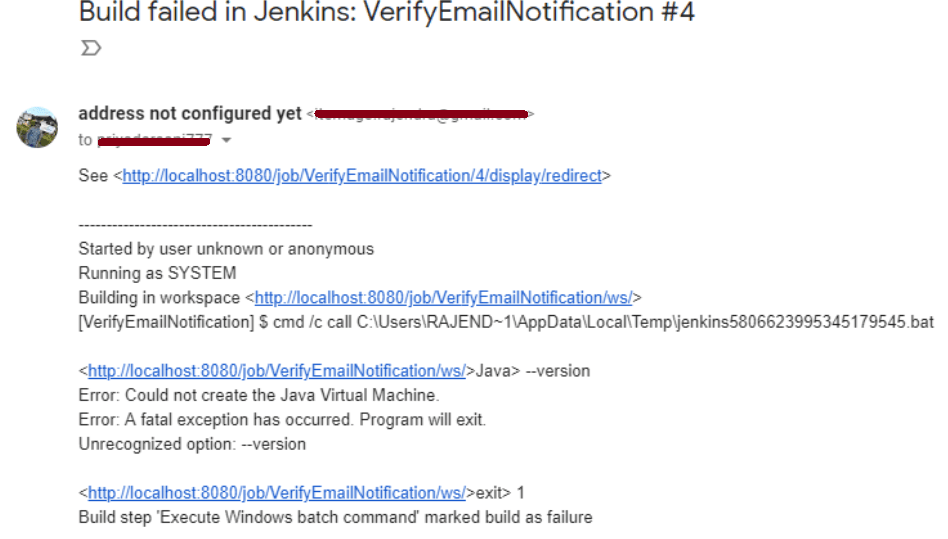
- Validate the recipient’s mail to confirm if the email was sent from Jenkins.

Now that we are confident our email notifications are working, let us configure Jenkins to attach a TestNG Report in the Email.
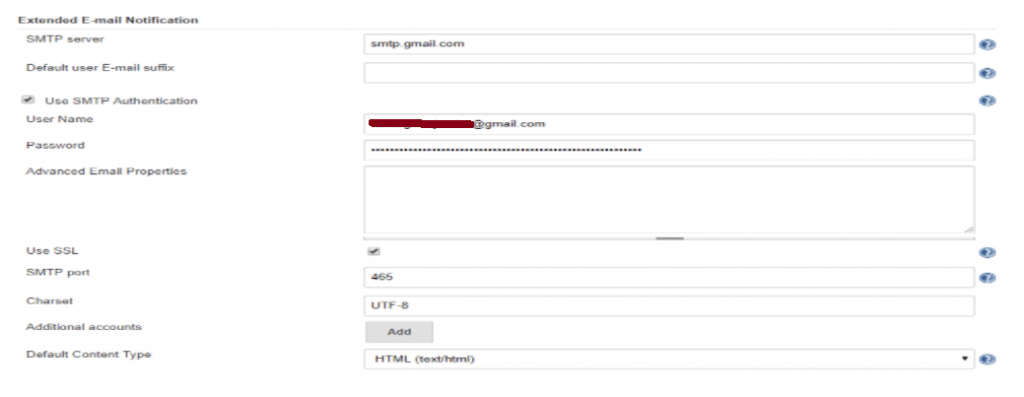
- Go to Jenkins –> Manage Jenkins –> Configure System –> Extended Email Notification
- Enter “smtp.gmail.com” in the “SMTP Server” edit field NOTE: Here, Gmail is taken just as an example.
- Next, click on “Advanced” and fill in the details as shown below.
- Click on “Save.”
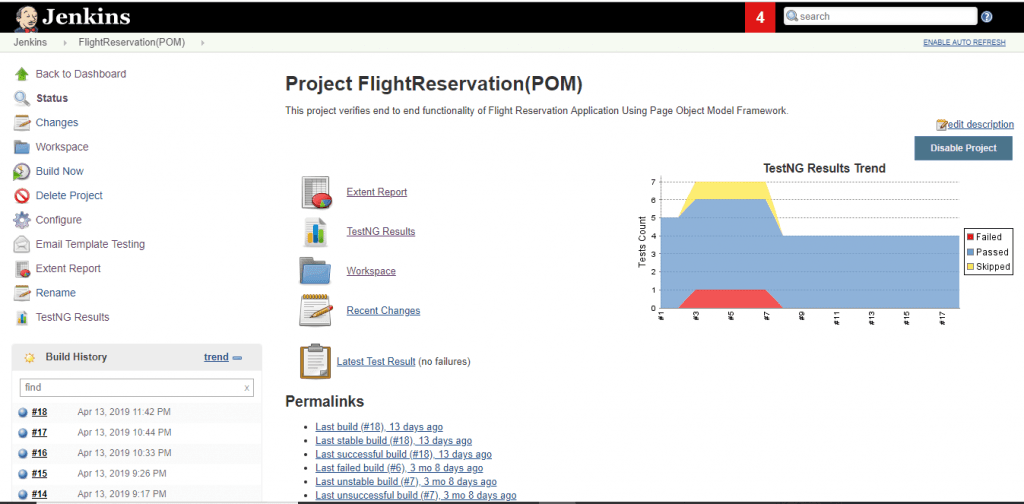
- Go to Jenkins dashboard and create either a new project, or you can choose an existing project. Here we have an existing project [Flight Reservation (POM)]
- Click on Configure on the left-hand side.
- Select “Editable Email Notification” from “Post-build Actions”
- Click on “Advanced Settings”
- Select “Always” from the “Add Trigger” dropdown.
- Click on “Advanced” and fill in the details as shown below.
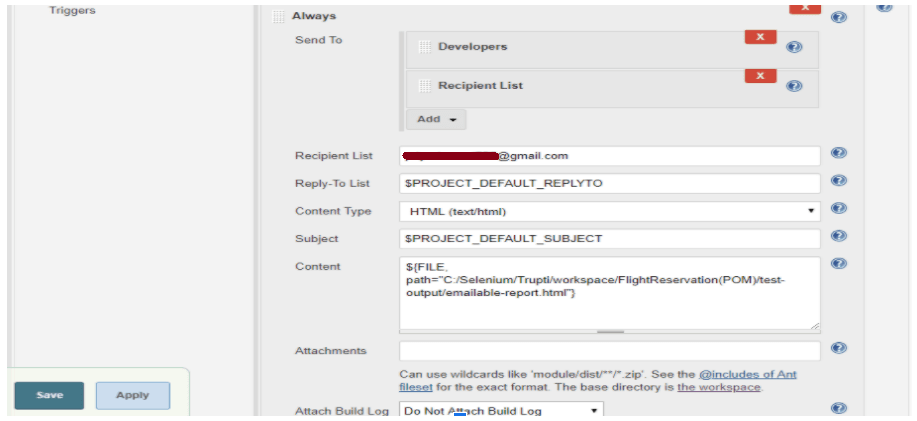
- Mention the path of emailable-report.html of TestNG in the Content edit field.
- Click on “Save.”
- Next, click on “Build Now” to start the execution of the job.
- Navigate to “Console Output” to check the result.
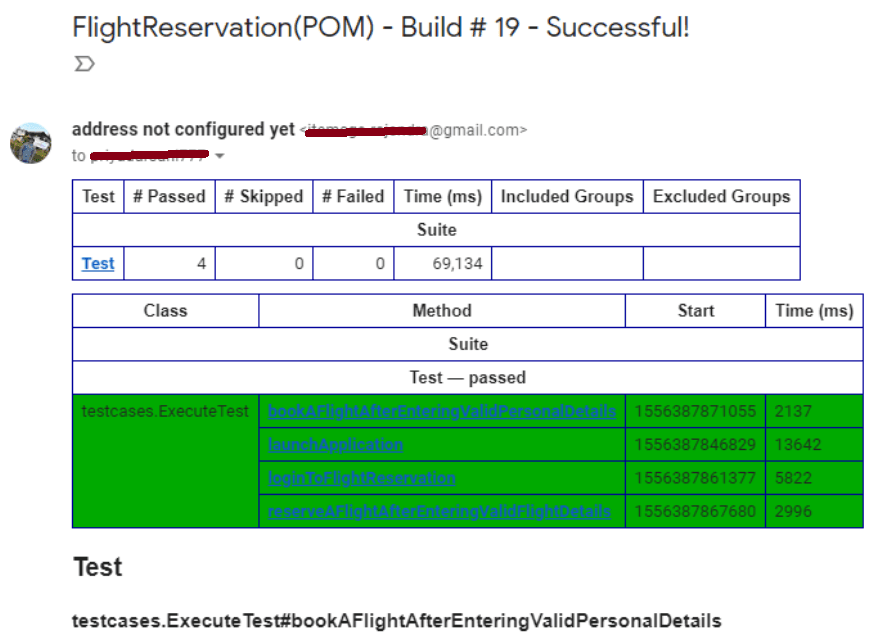
- Validate your recipient mail to see the Test Execution report.
- Mention the path of emailable-report.html of TestNG in the Content edit field.
- Click on “Save.”
- Next, click on “Build Now” to start the execution of the job.
- Navigate to “Console Output” to check the result.
- Validate your recipient mail to see the Test Execution report.
And here you go. Now you are ready to generate TestNG reports in Jenkins & share those Jenkins Selenium reports!

Wrapping Up
I hope this blog has helped you take report generation and sharing one step ahead. Now you not only know how to generate TestNG report in Jenkins, but you have also learned how to share those TestNG reports in Jenkins via Email. It’s time to elevate Jenkins & TestNG’s functioning by sending out the email notification with your very next Jenkins Selenium report. If you’re looking to enhance your TestNG skills further, check out our comprehensive TestNG interview questions answers guide here. Let me know how it goes in the comments section below.
Happy testing!

Author
Did you find this page helpful?
More Related Hubs
TestMu AI forEnterprise
Get access to solutions built on Enterprise
grade security, privacy, & compliance
- Advanced access controls
- Advanced data retention rules
- Advanced Local Testing
- Premium Support options
- Early access to beta features
- Private Slack Channel
- Unlimited Manual Accessibility DevTools Tests