
Next-Gen App & Browser Testing Cloud
Trusted by 2 Mn+ QAs & Devs to accelerate their release cycles

Getting Started With Automation Testing Using Selenium Ruby
In this Selenium Ruby tutorial, we'll take a look at how we can use Selenium Ruby for automated testing with some sample code that demonstrates this technique.

Roselyne Makena
January 19, 2026
Ruby is a programming language which is well suitable for web automation. Ruby makes an excellent choice because of its clean syntax, focus on built-in library integrations, and an active community. Another benefit of Ruby is that it also allows other programming languages like Java, Python, etc. to be used in order to automate applications written in any other frameworks. Therefore you can use Selenium Ruby to automate any sort of application in your system and test the results in any type of testing environment
In this Selenium Ruby tutorial, we’ll take a look at how we can use Selenium Ruby for automated testing with some sample code that demonstrates this technique. By the end of this post, you should have a good understanding of how Selenium Ruby works and what it does. In addition, you will also learn where to get started writing your own tests with Selenium-based frameworks and how to run the tests on a cloud Selenium Grid.
If you’re looking to improve your Selenium interview skills, check out our curated list of Selenium interview questions and answers.
What is Selenium?
Selenium is a browser-based test framework that allows one to automate user actions and interactions with web applications. You can use Selenium WebDriver APIs to devise test code using Selenium-supported languages like Ruby, Java, JavaScript, C#, and Python.
Selenium and Ruby can be used together, and one of the best ways to do it is through using a gem called selenium-webdriver. With this gem, you can easily automate your test cases using other Ruby-supported frameworks – which we shall introduce below. We will be using Ruby on Selenium in our example, but you can also use your preferred language for automation with Selenium.
Selenium is a powerful tool as it has support for most major web browsers and supports almost all OS platforms- Windows, Linux, and Mac. Selenium can be used to build both automated and manual test cases.
So, let’s get started with automation testing with Selenium Ruby.
How does Selenium WebDriver in Ruby work?
Selenium WebDriver is a Gem that wraps the WebDriver server and makes it easier to drive a browser. WebDriver is a program that can control a web browser.
Selenium WebDriver is used to drive the browser and perform actions on web pages. This tool is bundled with the selenium-webdriver project, and it consists of a Ruby Gem to ensure it can be easily consumed by Ruby. It also consists of code that drives any kind of browser supported by Selenium, such as Firefox, Chrome, Safari, Opera, and Internet Explorer.
If you want to learn more about selenium Selenium WebDriver, you could read this Selenium WebDriver tutorial.
There are several other Ruby Gems for Ruby automation testing, such as Capybara, which runs on top of Selenium; however we’ll be discussing Selenium in this blog.

Installing Selenium WebDriver
You could install Selenium WebDriver in two common ways:
- Using the Gemfile
Since it is available as a Gem, you could also install it using a Gemfile by including it as shown below:
gem 'selenium-webdriver', '>= 3.142.7'
And then run the bundle install on your terminal.
- Installing via Gem
You can also install it by running it as a command on the terminal. Simply run:
gem install selenium-webdriver
How to use Selenium with Ruby?
In Ruby, you can create an instance of the WebDriver class by either instantiating an object or by starting a session. The instantiated object returns a session object of the WebDriver.
To instantiate a driver with the session object, we would need to do the following
@my_driver = Selenium::WebDriver.for :firefox
@my_driver has an instance of Firefox at this point. With the session object, we can now execute certain commands. Let’s try some:
Basic Selenium Ruby methods
- Selecting elements
- @my_driver.find_element(:name, “elementName”) – Selects an element by its name.
- @my_driver.find_element(:id, “textBox1”) – Selected element has an ID of textBox1.
- Checkboxes
- @my_driver.get(1).is_checked? – Returns true if the checkbox is checked. Otherwise false.
- Radio buttons
- @my_driver.find_element(:name, “radio2”).click – Selects a radio button and then clicks it in order to select it.
- Dropdowns
- @my_driver.find_element(:name, “dropdown1”).click – Selects a dropdown and then clicks it in order to select it.
- Submit buttons
- @my_driver.find_element(:name, “submit”).click – Selects a submit button and then clicks it in order to select it.
- Form Elements
- text_box = @my_driver.find_element(:name, “textBox1”) – Selects element “textBox1” by its name.
- text_box.send_keys(“hello”) – Type in the word “hello”.
- Windows
- @my_driver.execute_script(‘window.open()’) – This will open a new window.
- @my_driver.quit_now – Closes the current browser window immediately.
- Timeouts
- @my_driver.implicitly_wait(0) – This is to wait for the element without specifying the time in seconds.
- @my_driver.implicitly_wait(30) – This is to wait for 30 seconds to load an element, e.g., window/frame, etc.
- @my_driver.implicitly_wait(10, TimeUnit::SECONDS) – This is to wait for elements within 10 seconds, and TimeUnit::SECONDS is a class that comes with Ruby.
These are just a few. There are many more methods and arguments that you can use to develop your automated tests using Selenium Ruby. I would cover those in the further blogs of this Selenium Ruby tutorial series.
You can easily program Selenium Ruby tests using any Selenium compatible library. We will implement a simple Selenium automation test in Ruby using the Test::Unit framework.
For developers or testers looking to elevate their Ruby skills to the next level, this Selenium Ruby 101 certification from TestMu AI can be just what you need.
Austin Siewert
CEO, Vercel
Discovered @TestMu AI yesterday. Best browser testing tool I've found for my use case. Great pricing model for the limited testing I do 👏
2M+ Devs and QAs rely on TestMu AI
Deliver immersive digital experiences with Next-Generation Mobile Apps and Cross Browser Testing Cloud
Here’s a short glimpse of the Selenium Ruby 101 certification from TestMu AI:
How to run the Selenium test using Test::Unit?
In this section of this article on Selenium Ruby, we will learn how to run the Selenium test using one of the most popular Ruby frameworks, Test::Unit. Let’s understand more about the Test::Unit framework before getting started.
What is Test::Unit?
Test::Unit is a basic unit testing framework for Ruby. Test::Unit was initially designed to test the Ruby Standard Library and has since expanded to cover almost all of the standard Ruby classes and modules.
Test::Unit uses subclassing for tests so that you can use inheritance for your test classes. The most basic skeleton for a Test class is shown below:
A Selenium script is a Ruby class that inherits the code from the Ruby library ‘Builder’ and contains methods that implement your test plans.
Pre-requisites
- Ruby
I’m using Ruby 3.0.3 and Selenium WebDriver 4.1.0. If you have an older version of Ruby or Selenium WebDriver, you can check the Ruby version by opening the terminal and typing the following.
ruby -v
You should expect to see results similar to or close to the following.

Note: If you do not have Ruby installed, you can download Ruby from the Ruby official documentation. You could use an older version of Selenium and Ruby – however, there might be some minor changes to watch out for.
- Selenium WebDriver
- Browser
- IDE
First, check whether you have Selenium WebDriver installed by typing the following in your terminal:
gem list selenium-webdriver
In my case, you can see I have Selenium WebDriver (4.1.0) locally installed already.

We will be using Firefox for this example. Other browsers supported and available for tests include Chrome, Microsoft Edge, and Opera.
We will be using Visual Studio Code, but you could use the IDE of your choice. Other popular Text editors include RubyMine, Sublime, Atom, etc.
Note: Run Selenium Ruby tests on 3000+ browsers. Try TestMu AI Now!
Demonstration: Automation Testing with Selenium Ruby
Let’s say you have an eCommerce website where we have a set of tests for demonstration purposes.
Problem Scenario
We start by defining the test cases that we want to cover. A test case is basically a definition of a set of expected behavior, along with the expected output that we expect to test against.
Test Cases
| Test Description | Test steps | Expected Results |
|---|---|---|
| Test that you can reach the homepage. | Visit the base page and assert that the homepage has been loaded. | The homepage should load the page. |
| Test that you can filter for an item on the filter box. | Visit the base page, search for an item in the search box and assert that the search filter page has been loaded. | The expected search filter page should load. |
Implementation
require 'selenium-webdriver'
require 'test-unit'


class  EcommerceTests < Test::Unit::TestCase
 def setup
   @my_driver = Selenium::WebDriver.for :firefox
   @url = "https://ecommerce-playground.lambdatest.io/"

   #get url
   @my_driver.get(@url)
   @my_driver.manage.timeouts.implicit_wait = 30

   @wait = wait = Selenium::WebDriver::Wait.new(:timeout => 7)

 end

 def test_search_functionality_should_yield_results

   @wait.until{@my_driver.title.include? "Your Store"}

   search_box = @my_driver.find_element(:name, "search")
   # First test assertion - title has loaded
   assert_equal("Your Store", @my_driver.title.to_s)

   search_box.clear
   search_box.send_keys("phone")
   search_box.submit
   sleep(5)
   search_title = @my_driver.find_element(:xpath, '//*[@id="entry_212456"]/h1').text

   # Second test assertion - title has loaded
   assert_equal("Search - phone", search_title)
 end

 def teardown
   @my_driver.quit
 end

end
Code Walkthrough
At the top of our class, we define the test case name. We then define a variable used to override a method of WebDriver (The driver). This is where we create an instance of WebDriver and pass it to the Selenium class, which we inherit from Test::Unit::TestCase.

Next, you need to set up the Selenium server. This step is similar to other testing frameworks and involves installing a Selenium server. It can be done by including the Selenium Gem.

In the EcommerceTests class we start by defining a new blank test case that inherits from the Test::Unit::TestCase class.

Then we initialize our variables in which we define what URL to visit and what to expect.
This is where we create an instance of Selenium::WebDriver and pass it to our class using the name @my_driver.
We then use the get method of Selenium::WebDriver to call the baseUrl method that returns a URL, which in this case is https://ecommerce-playground.lambdatest.com.

After the page has loaded fully, we search for the search box element by its name and make our first test using an assertion.
This also applies to the second assertion, where we add the assert_equal for the filtered item element.
Ending the browser session
The teardown method is a method that Selenium WebDriver implements to terminate the browser session or run methods that need to be completed at the end of the test run. This is important because the number of browser sessions is limited by the driver implementation.
A teardown method will be discarded if invoked before the teardown method for all old sessions has been executed. If two or more teardown methods are invoked simultaneously, only one will be executed, and the others will be discarded.
In this method, we invoke @my_driver.quit in order to terminate the browser session.
Here we are terminating three browser sessions. This can be shown in line 57: of closed browser sessions.

Execution
After running the script, we should observe the following:

As you can see we have our two assertions passing, with 0 errors and 0 failures.
What are Assertions in Selenium Ruby?
A test assertion is a point of critical code that we can test. Usually, assertions are used to verify some conditions, but they can also be used to verify certain values.
- assert_true is used to test that a condition is true, and an assert_match is used to verify a value.
- assert_match is used to verify a value. For example, we can assign an integer value to a variable, increment it by one, and then use the assert_match assertion to verify whether its value is equal to that of the initial state.
- assert_not_find is used to verify that a find operation did not find anything. It is especially useful to test that the find operation works correctly, but we cannot test for it, as it might fail for certain values.
- assert_exception method is used to authenticate a failure in a test case. If a failure occurs, the Exception object will be thrown with the message given in the assertion. When checking this method, we should also make sure that all expected exception classes are present.
- assert_not_send is used to query that a function call did not launch. In this assertion, we check that the function invoked is not sent as a parameter. Once the find operation is performed and does not find anything, an exception will be thrown. To check if expected exceptions are present, we can use the expect_exception method.
- assert_no_error specifies that a specified number of errors should be presented or none should be generated in your test case. Once an error is displayed in your Selenium WebDriver test case, that exception will be ignored by the assert no error conditions when it occurs again in another instance of the same test case.
- assert_raise is used to assert that a specific exception will be raised by the code.
These are just a few assertions that we can use in Ruby Test::Unit, but there are many more that you can check out.
What happens when the test fails?
If our assertion fails, we get a very descriptive error message that tells us exactly what went wrong. It will even point out the exact line where this occurred in our test file.
Furthermore, failures also tell us what went wrong and whether anything else worked as expected. It will also provide a stack trace of all methods called since the beginning of the test run so we can find out which method failed by looking at their call stacks.
Let’s have a look at an example of a failure below:
As an example, let’s change one assertion in our example above to have a different value so that we expect a failure.
Note: At line 22, Our new assert now reads “Nothing Here” and not “Your Store” – thus, we are setting up our test to fail.

On running this, we get the following:

Interpreting the failure
As we can see on line 23: there’s a failure indicated by the bright red color, and below it, we see that it’s the mismatch between the expected string and the actual string.
We can further see the summary of the failure at the end of the script.
Note: Automate Selenium and Appium tests with Capybara framework on TestMu AI cloud platform
Running Selenium Ruby Tests on Cloud Grid
Many Selenium cloud Grid services are provided. However, it is not easy for the users to choose the best one. Here is a list of some of the main things that people should consider before choosing any particular service.
- Supports cross-browser testing – For , you need to have a grid that can be used with any of the latest and legacy browsers. You should also check the list of browsers and browser versions that are supported by any particular cloud solution.
- Assures quality – The users should check the reviews and ratings of the cloud solution in order to know whether they work well or not. To assure quality, they should also check whether they are working with experienced staff or not because experienced people can ensure quality testing better than inexperienced ones.
- Supports parallel test execution – To do parallel testing, the users should be able to select any number of browsers that they can run at the same time. In the case of cloud grid solution, you will get many options like setting a parallel number of instances or choosing a particular cloud that can create instances that quickly. You can set as many parallels as you want to test your product with multiple browsers simultaneously.
- Run in a distributed environment – In order to run such kind of work in a distributed environment, the users should have the ability to choose any number of servers which will be used for running tests on that particular server. They should be able to deploy their scripts on multiple servers in order to do distributed testing.
- Easy to use and not complicated – Use a solution that is simple and easy. Any user should be able to use the solution without any difficulty. They should avoid selecting any service that is complicated because it can create a lot of problems for them.
- Logging – should be easily visible and readable by the user. It should also store a large number of users’ logs
- Reporting – The users should make automated reports in order to follow them. They should be able to make the reports automatic. The users should be able to see a lot of information about their work by making them automatic
- Scalability – Their cloud grid should have many instances that you can add and delete as per your requirement. The number of instances should also be scalable by which you can add more capacity to your grid if required and shut down the instance if it is not required anymore.
- Security and efficiency – A good cloud solution provider will have a solid security system set up for the protection of their users’ data. This may include secure logins, firewalls, encrypted data storage, and secure transactions using SSL and similar protocols. A full-time security team will be assigned to monitor any sign of hacking or misuse of data.
Cloud based automated browser testing platforms like TestMu AI allows you to run your scripts using different testing frameworks for example – Selenium, Cypress, Playwright, Puppeteer, Appium, etc., and execute them in multiple browsers at the same time – using a variety of devices on demand.
Automation testing tools like TestMu AI provides an online device farm of over 3000+ real devices running real operating systems to perform Selenium Ruby testing at scale. Here’s the glimpse of TestMu AI online Selenium Grid.
You can also subscribe to the TestMu AI YouTube Channel and stay updated with the latest tutorials around Selenium testing, Cypress E2E testing, CI/CD, and more.
How to run Selenium Ruby Tests on TestMu AI?
Running your Selenium Ruby test on TestMu AI is very quick and easy. Follow the below mentioned steps to get started:
- Login/Register at TestMu AI.
- Obtain your TestMu AI credentials by choosing the Automation option and checking the top right corner by clicking Access Key.
- Generate the desired capabilities using the TestMu AI Desired Capabilities Generator.
Be sure to select Ruby as we are using Ruby for this example. We will use the basic configurations selected for now and discuss the other settings in another tutorial.
- Export your Username and Access Key in environment variables.

For Linux/macOS:
export LAMDATEST_USERNAME="YOUR_USERNAME"
export LAMDATEST_ACCESS_KEY="YOUR ACCESS KEY"

For Windows: set LT_USERNAME="YOUR_USERNAME"
set LT_ACCESS_KEY="YOUR ACCESS KEY"
Code Changes to run tests on TestMu AI
In order to run your tests on TestMu AI, you would need to substitute your remote local webdriver with a RemoteWebdriver.
Thus our new changes should be as defined in the code below.
require 'selenium-webdriver'
require 'test-unit'

class EcommerceTests < Test::Unit::TestCase
 def setup
   username= "{LAMBDATEST_USERNAME}"
   accessToken= "{LAMBDATEST_ACCESS_KEY}"
   gridUrl = "hub.lambdatest.com/wd/hub"

   capabilities = {
     'LT:Options' => {
       "user" => username,
       "accessKey" => accessToken,
       "build" => "Ecommerce Test v.1",
       "name" => "Ecommerce Tests",
       "platformName" => "Windows 11"
     },
     "browserName" => "Firefox",
     "browserVersion" => "100.0",
   }


   @my_driver = Selenium::WebDriver.for(:remote,
                                     :url => "https://"+username+":"+accessToken+"@"+gridUrl,
                                     :desired_capabilities => capabilities)
   @url = "https://ecommerce-playground.lambdatest.io/"
   @wait = Selenium::WebDriver::Wait.new(:timeout => 30)

   #get url
   @my_driver.get(@url)

   @my_driver.manage.timeouts.implicit_wait = 30

 end

 def test_search_functionality_should_yield_results

   @wait.until{@my_driver.title.include? "Your Store"}

   search_box = @my_driver.find_element(:name, "search")
   # First test assertion - title has loaded
   assert_equal("Your Store", @my_driver.title.to_s)

   search_box.clear
   search_box.send_keys("phone")
   search_box.submit
   sleep(5)
   search_title = @my_driver.find_element(:xpath, '//*[@id="entry_212456"]/h1').text

   # Second test assertion - title has loaded
   assert_equal("Search - phone", search_title)
 end

 def teardown
   @my_driver.quit
 end

end
Note: Remember to replace your LAMBDATEST_USERNAME and LAMBDATEST_ACCESS_KEY with the ones you obtained after signing up on TestMu AI.
Test Results on TestMu AI
As you can see, the results run on the left tab and will be the most recent run at the top as can be seen below.
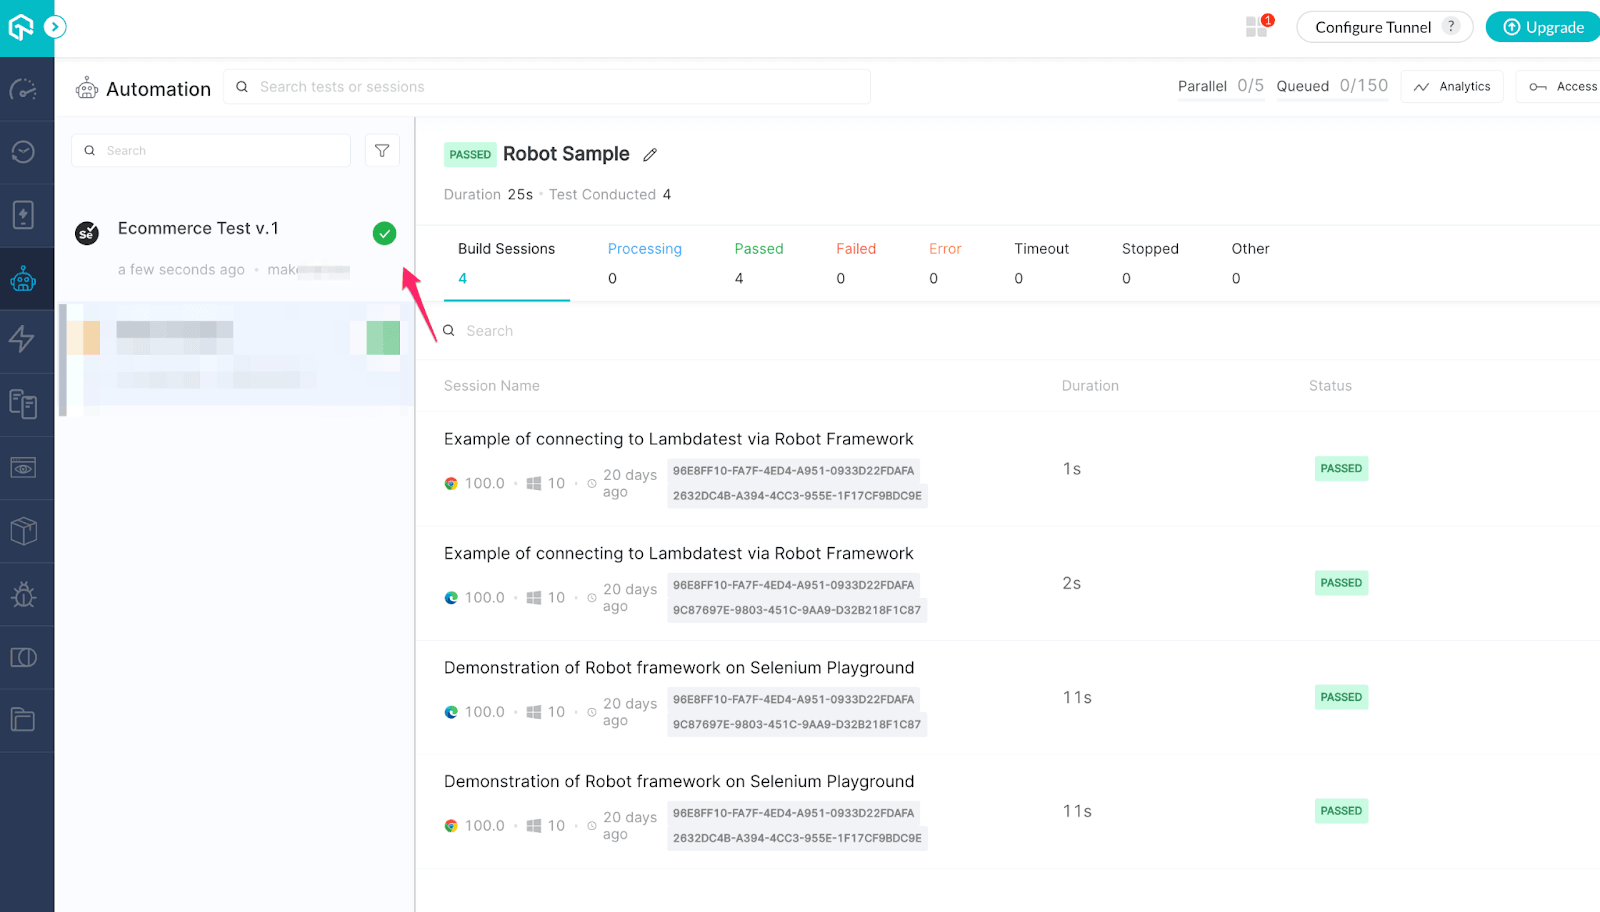
We now click the latest version of the Build and we now see the test results for this.
Evaluating the results run on the TestMu AI Dashboard

Here, you can see a video on the left – that shows the test results ran in the TestMu AI dashboard.
In this view, you can check whether your script passed all the executions or not, and you can also check some more parameters related to your test instances such as – Execution Status , Browser View, Browser Version, Device Type, Device Capabilities etc.
- All Commands Tab – This shows all the commands that the test script has executed.
- Selenium Logs Tab – This shows the logs of the WebDriver – such as configuration, capabilities, etc and would appear as shown below.

You will also see some views and tabs in the Selenium Ruby dashboard that show more details about your test scripts’ full execution overtime process.
You can navigate to the TestMu AI Analytics Dashboard to see performance of your tests. From the Test Summary section you can see the total number of tests passed or failed and from the Test Overview section, you can see the snapshot of consistent tests.

You will also note that there are options to run parallel tests – this will help you save time by running your tests in parallel and using different configurations in the process, which is something that can be covered in a separate article.
Conclusion
Like Java and Python, Ruby is a general-purpose programming language; however, it focuses on simplicity, precision, and productivity. Ruby being an array-based language, is very powerful for specific uses and works particularly well with ordered datasets. Moreover, since Ruby has a shorter learning curve and serves the purpose of a specialized tool for what you need for test automation, it is a preferred choice of many developers.
In this Selenium Ruby tutorial, we have seen how Selenium Ruby can be used for automation testing with code examples. By now, you must be comfortable writing your own Selenium Ruby tests and running them on a cloud Selenium Grid like TestMu AI.
Frequently asked questions
Did you find this page helpful?
More Related Hubs
TestMu AI forEnterprise
Get access to solutions built on Enterprise
grade security, privacy, & compliance
- Advanced access controls
- Advanced data retention rules
- Advanced Local Testing
- Premium Support options
- Early access to beta features
- Private Slack Channel
- Unlimited Manual Accessibility DevTools Tests