
Next-Gen App & Browser Testing Cloud
Trusted by 2 Mn+ QAs & Devs to accelerate their release cycles

How To Integrate Jenkins & Maven With Selenium?
Building a proper flow for Selenium test automation is essential & Selenium Maven, Jenkins integration is the best way to do so. This tutorial will help you integrate Maven and Jenkins with Selenium.

Himanshu Sheth
January 13, 2026
Jenkins is one of the popular tools for continuous integration, build management, and automation testing. Maven is a popular build automation tool that is widely used for Java projects. The combination of Selenium, Maven, Jenkins integration is the pinnacle of continuous integration and deployment.
As a part of automation testing, we’re sure your team comes up with numerous Selenium test automation scripts every other day. As Selenium itself is not used for Continuous integration, Selenium, Maven, and Jenkins integration are leveraged for build management and continuous integration. In this article, we look at the usage of Maven and Jenkins with Selenium.
Overview
What Is Selenium?
Selenium is an open-source framework for automating web applications. It allows testers to write scripts in multiple programming languages (Java, Python, C#, etc.) to perform automated testing on browsers like Chrome, Firefox, and Edge. Selenium supports functional, regression, and cross-browser testing, making it ideal for ensuring web applications behave correctly across different environments. Its components include Selenium WebDriver, Selenium IDE, and Selenium Grid for distributed testing.
What Is Maven?
Maven is a powerful project management and build automation tool primarily used for Java projects. It helps streamline the development process by handling project dependencies automatically, managing build lifecycle tasks (like compiling, testing, and packaging), and enforcing a consistent project structure. Maven’s declarative approach using pom.xml simplifies collaboration across teams and ensures all developers work with the same versions of libraries and plugins.
What Is Jenkins?
Jenkins is an automation server for continuous integration and continuous delivery (CI/CD). It allows you to automatically build, test, and deploy applications whenever code changes are made. Jenkins supports hundreds of plugins that integrate with version control systems, testing tools, and deployment platforms, enabling smooth, end-to-end automation. Its visual dashboard makes monitoring builds, test results, and deployment pipelines easy.
How to Automate Selenium with Maven and Jenkins Integration?
Automating Selenium tests with Maven and Jenkins involves a few steps:
- Set up Maven Project: Create a Maven project and add Selenium dependencies in the pom.xml file to automatically download all required libraries.
- Write Selenium Tests: Develop automation scripts using Selenium WebDriver, commonly in Java, to validate application functionality.
- Build with Maven: Run mvn clean test to compile your code and execute tests seamlessly through Maven’s build lifecycle.
- Configure Jenkins Job: Create a new Jenkins job and connect it to your source code repository such as GitHub or GitLab.
- Integrate Maven in Jenkins: Configure the Jenkins job to execute Maven build commands so Selenium tests run automatically whenever code changes occur.
- Schedule or Trigger Builds: Set automated triggers for test execution on every code commit or at defined time intervals.
- View Reports: Use Jenkins plugins like TestNG or JUnit to visualize detailed test reports and monitor build results in real time.
What Are the Advantages of Using Maven & Jenkins with Selenium?
Using Maven and Jenkins together with Selenium brings multiple benefits:
- Automated Dependency Management: Maven automatically downloads and manages required libraries, minimizing setup issues and ensuring consistency.
- Continuous Integration: Jenkins triggers tests on every code change, helping teams detect and fix defects early in the development cycle.
- Consistent Builds: Maven enforces a standardized build process, eliminating environment-related inconsistencies.
- Scalability: The setup easily scales to run automation suites across multiple environments and browsers.
- Faster Feedback: Teams receive immediate insights into code quality, performance, and test failures for quicker resolution.
- Simplified Reporting: Jenkins dashboards and plugins provide clear, detailed test results and execution logs.
- Improved Collaboration: Developers, testers, and QA teams can collaborate efficiently within the same automated CI/CD pipeline.
How Can Failure Analysis be Improved in Selenium Tests Executed Through Jenkins?
Integrating Jenkins with reporting tools like Allure or HTML Publisher generates detailed post-run reports with logs and screenshots. These insights help identify and fix failures faster, while automatic report linking in Jenkins enhances traceability and streamlines debugging.
Overview Of Selenium, Maven, & Jenkins
Maven is a popular build automation tool that is primarily used for Java projects. The advantage of using Maven is that Java libraries and plugins are downloaded on a dynamic basis from the Maven 2 Central Repository.
The dependencies and other essential build-related information are stored in a pom.xml file of the project. Once downloaded, the dependencies are stored in a local cache (.M2 repository), and the same is used for build generation. This simplifies the build process, as any new project dependency has to be added only in pom.xml, i.e., no manual downloading and installation packages are required.
Selenium is a widely used test automation framework for validating web applications across different combinations of browsers, platforms, and devices (or emulators). You can refer to our blogs on how Selenium Grid can be used for automated browser testing.
Jenkins is an open-source CI/CD tool that helps in the automation of activities related to build, test, and deployment. Jenkins has an extensive plugin ecosystem, is open-source, and a passionate community – factors that can be attributed to Jenkins’ features.
In this Maven and Jenkins with Selenium blog, we would be using TestNG, which is a popular test framework that is inspired by JUnit. It is widely used for testing areas such as functional testing, end-to-end testing, and more.
These are the set of tools that we would be using in the demonstration:
- Maven – Project management tool in Java [Link]
- TestNG – Popular test automation framework [Link]
- Selenium WebDriver – Library primarily used for automation of browser interactions [Link]
- Jenkins – Tool for Continuous Integration (CI) and Continuous Deployment (CD) [Link]
Here is the overall flow of information when Selenium, Maven, and Jenkins are integrated:
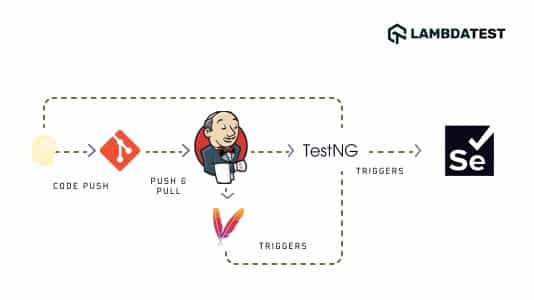
- Once the developer pushes code into the repository (e.g., GitHub), a Jenkins build is triggered.
- Maven downloads the dependent libraries & packages and starts performing the build. The information related to the test suite is available in testing.xml, and the same is also used in
pom.xml. - A build goal (e.g., install) for running the automated tests is set. The same is achieved through the maven-surefire-plugin.
- The maven-surefire-plugin tells TestNG to run the tests that are under the annotation @Test.
- Depending on the AUT (application under test) and the browser (& OS combination) on which cross browser tests are performed, the Selenium WebDriver invokes the corresponding browser instance and executes the same automation tests.
- Test results are published in HTML Reports, as the HTML Publisher plugin is used for report generation.
- Even if a single test case has failed, the complete test is marked with status ‘Failed.’
Advantages Of Using Maven & Jenkins With Selenium
Before we demonstrate the usage of Selenium Maven Jenkins integration, we will take a look at the main advantages of using Maven and Jenkins with Selenium:
- Whenever a change is made in the implementation, the changes are deployed on the test environment. Automation testing is performed continuously, and developers are kept informed about the build and test stage results.
- Test suites that comprise many test scenarios (or test combinations) might take a longer duration for automation testing. A nightly build run can be scheduled for build and execution on the Jenkins server in such cases.
- As Maven uses pom.xml, it reduces the overall dependency of the manual download of jar files. Also, the ‘Maven Project’ type in Jenkins helps in getting started with Selenium Maven, Jenkins integration with a few configuration settings.
- The Selenium Maven Jenkins integration setup is suited for developing and testing teams distributed across different geographical locations.
Prerequisites For Jenkins Selenium Project
For demonstration of Maven and Jenkins with Selenium, the following softwares should be installed (or available) on the machine from where tests are triggered:
- Eclipse IDE or IntelliJ IDEA (Maven comes by default in both these IDEs)
- Jenkins in .war format
- Chrome WebDriver matching with the version of the Chrome browser on your machine
- Microsoft Edge Driver
- Account on TestMu AI (as the tests are executed on TestMu AI’s cloud-based Selenium Grid)
This Jenkins Tutorial for beginners and professionals will help you learn how to use Jenkins, one of the most popular CI/CD tools used in DevOps.
Demonstrating Selenium Maven Jenkins Integration
For time-saving purposes, we would not look into every step of the creation of a Maven Project. In case you would like a quick recap of Maven with Selenium, you can refer to this Maven tutorial for Selenium test automation. The steps used for creating a Maven project in IntelliJ IDEA are similar to those used in creating a Maven project in Eclipse IDE.
Test Suite – 1
Test Scenario – 1 (Chrome on Windows 10)
- Navigate to this URL- https://lambdatest.github.io/sample-todo-app/.
- Choose the first two checkboxes.
- Enter ‘Happy Testing at TestMu AI’ in the textbox below with the following id = sampletodotext.
- Now, click on the Add Button and verify whether the text has been added or not.
Test Scenario – 2 (Tests on 4 different browser and OS combinations)
- Navigate to this URL- https://www.google.com.
- Search for “TestMu AI”.
- Click on the first test result.
- Now, raise an Assert if the Page Title does not match the expected title.
Implementation
The appropriate dependencies and plugins have to be added in the project’s pom.xml. Here are the key packages (or jars) that are a part of pom.xml:
- Selenium 4 (Alpha)
- TestNG framework (version 6.9.10)
- Maven Surefire plugin for execution of test suite which is a part of testng.xml
- Maven Surefire Report plugin for generating the test results report into an HTML format
<?xml version="1.0" encoding="UTF-8"?>
<project xmlns="http://maven.apache.org/POM/4.0.0"
         xmlns:xsi="http://www.w3.org/2001/XMLSchema-instance"
         xsi:schemaLocation="http://maven.apache.org/POM/4.0.0 http://maven.apache.org/xsd/maven-4.0.0.xsd">
    <modelVersion>4.0.0</modelVersion>

    <groupId>org.example</groupId>
    <artifactId>org.selenium4.CrossBrowserTest</artifactId>
    <version>1.0-SNAPSHOT</version>

    <properties>
        <project.build.sourceEncoding>UTF-8</project.build.sourceEncoding>
    </properties>

    <dependencies>
        <!-- https://mvnrepository.com/artifact/com.github.lambdatest/lambdatest-tunnel-binary -->
        <dependency>
            <groupId>org.testng</groupId>
            <artifactId>testng</artifactId>
            <version>6.9.10</version>
            <scope>test</scope>
        </dependency>
        <dependency>
            <groupId>org.seleniumhq.selenium</groupId>
            <artifactId>selenium-java</artifactId>
            <version>4.0.0-alpha-6</version>
        </dependency>
        <dependency>
            <groupId>org.seleniumhq.selenium</groupId>
            <artifactId>selenium-chrome-driver</artifactId>
            <version>4.0.0-alpha-6</version>
        </dependency>
        <dependency>
            <groupId>io.github.bonigarcia</groupId>
            <artifactId>webdrivermanager</artifactId>
            <version>4.1.0</version>
        </dependency>
        <!-- https://mvnrepository.com/artifact/org.slf4j/slf4j-nop -->
        <dependency>
            <groupId>org.slf4j</groupId>
            <artifactId>slf4j-nop</artifactId>
            <version>1.7.28</version>
            <scope>test</scope>
        </dependency>
        <!-- https://mvnrepository.com/artifact/junit/junit -->
        <dependency>
            <groupId>junit</groupId>
            <artifactId>junit</artifactId>
            <version>4.13</version>
            <scope>test</scope>
        </dependency>
        <dependency>
            <groupId>com.github.lambdatest</groupId>
            <artifactId>lambdatest-tunnel-binary</artifactId>
            <version>1.0.4</version>
        </dependency>
    </dependencies>

    <build>
        <defaultGoal>install</defaultGoal>
        <plugins>
            <plugin>
                <artifactId>maven-compiler-plugin</artifactId>
                <version>3.0</version>
                <configuration>
                    <source>1.8</source>
                    <target>1.8</target>
                </configuration>
            </plugin>
            <plugin>
                <groupId>org.apache.maven.plugins</groupId>
                <artifactId>maven-surefire-plugin</artifactId>
                <version>2.12.4</version>
                <configuration>
                    <suiteXmlFiles>
                        <!-- TestNG suite XML files -->
                        <suiteXmlFile>testng.xml</suiteXmlFile>
                    </suiteXmlFiles>
                </configuration>
            </plugin>
            <plugin>
                <groupId>org.apache.maven.plugins</groupId>
                <artifactId>maven-surefire-report-plugin</artifactId>
                <version>3.0.0-M5</version>
            </plugin>
        </plugins>
    </build>
</project>
If you intend to add any new plugin or jar to the above pom.xml, search for the same on the Maven Repository and add the corresponding dependency/plugin in the relevant section.
<?xml version="1.0" encoding="UTF-8"?>
<!DOCTYPE suite SYSTEM "http://testng.org/testng-1.0.dtd">
<suite name="Jenkins Maven Integration Tests" thread-count="5" parallel="tests">
    <!-- Add the location where the project is stored in your machine -->
    <test verbose="2" preserve-order="true" name="To Do App Test">
        <classes>
            <class name="org.selenium4.CrossBrowserTest"/>
        </classes>
    </test>
    <listeners>
        <listener class-name="org.selenium4.GoogleSearchTest"/>
    </listeners>

    <test name="Google Search Test - 1">
        <parameter name="browser" value="Chrome"/>
        <parameter name="version" value="latest"/>
        <parameter name="platform" value="Windows 10"/>
        <parameter name="resolution" value="1600x1200"/>
        <classes>
            <class name="org.selenium4.GoogleSearchTest"/>
        </classes>
    </test>

    <test name="Google Search Test - 2">
        <parameter name="browser" value="MicrosoftEdge"/>
        <parameter name="version" value="84.0"/>
        <parameter name="platform" value="Windows 10"/>
        <parameter name="resolution" value="1920x1080"/>
        <classes>
            <class name="org.selenium4.GoogleSearchTest"/>
        </classes>
    </test>

    <test name="Google Search Test - 3">
        <parameter name="browser" value="Chrome"/>
        <parameter name="version" value="latest"/>
        <parameter name="platform" value="macOS Mojave"/>
        <parameter name="resolution" value="2048x1536"/>
        <classes>
            <class name="org.selenium4.GoogleSearchTest"/>
        </classes>
    </test>

    <test name="Google Search Test - 4">
        <parameter name="browser" value="Firefox"/>
        <parameter name="version" value="latest"/>
        <parameter name="platform" value="OS X Mavericks"/>
        <parameter name="resolution" value="2560x1440"/>
        <classes>
            <class name="org.selenium4.GoogleSearchTest"/>
        </classes>
    </test>
</suite>
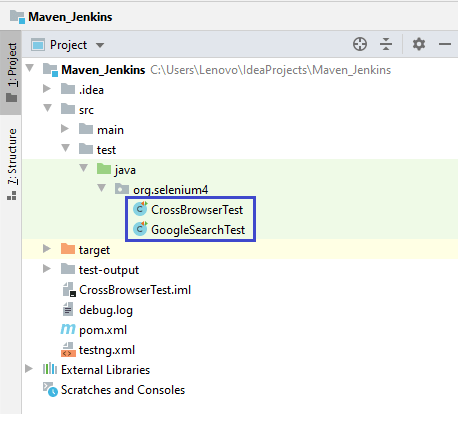
The test suite contains two test cases, namely test_Selenium4_ToDoApp() & test_Selenium4_GoogleSearch(). As shown below, the implementation of these test cases is stored in separate files, namely CrossBrowserTest.java and GoogleSearchTest.java, and both are a part of the package org.selenium4.
The Test scenario test_Selenium4_ToDoApp() is meant to be executed on Chrome (Latest version) for Windows 10. On the other hand, test scenario test_Selenium4_GoogleSearch() has to be executed on 4 different browser and OS combinations i.e. Chrome (latest) on Windows 10, Edge (84.0) on Windows 10, Chrome (latest) on macOS Mojave, and Firefox (latest) on OS X Mavericks.
The entries in testng.xml for test_Selenium4_GoogleSearch() have been aligned according to the browser capabilities generated by the TestMu AI capabilities generator. Shown below are the sample capabilities generated for Chrome (latest) & Windows 10 combination:

In the implementation, we would use TestNG listeners in Selenium WebDriver for automation testing. At the suite level, we define class names to implement listeners in the TestNG xml file. The @listeners annotation in TestNG is used for adding class org.selenium4.GoogleSearchTest.
As shown below, test name ‘Google Search Test – 1’ will take input parameters that specify browser, version, platform, and display resolution. These values would be passed to the test method as arguments by using parameterized annotations (i.e. @org.testng.annotations.Parameters(value={“browser”,”version”,”platform”, “resolution”}).
<listeners>
        <listener class-name="org.selenium4.GoogleSearchTest"/>
</listeners>

<test name="Google Search Test - 1">
    <parameter name="browser" value="Chrome"/>
    <parameter name="version" value="latest"/>
    <parameter name="platform" value="Windows 10"/>
    <parameter name="resolution" value="1600x1200"/>
    <classes>
        <class name="org.selenium4.GoogleSearchTest"/>
    </classes>
</test>
Austin Siewert
CEO, Vercel
Discovered @TestMu AI yesterday. Best browser testing tool I've found for my use case. Great pricing model for the limited testing I do 👏
2M+ Devs and QAs rely on TestMu AI
Deliver immersive digital experiences with Next-Generation Mobile Apps and Cross Browser Testing Cloud
CrossBrowserTest.java (Implementation of Test Scenario – 1)
package org.selenium4;

import org.openqa.selenium.By;
import org.openqa.selenium.JavascriptExecutor;
import org.openqa.selenium.WebDriver;
import org.openqa.selenium.remote.DesiredCapabilities;
import org.openqa.selenium.remote.RemoteWebDriver;
import org.testng.annotations.AfterClass;
import org.testng.annotations.BeforeClass;
import org.testng.annotations.Test;
import java.net.MalformedURLException;
import java.net.URL;

public class CrossBrowserTest {
    /*  protected static ChromeDriver driver; */
    WebDriver driver = null;
    String URL = "https://lambdatest.github.io/sample-todo-app/";
    public static String status = "passed";
    String username = "user-name";
    String access_key = "access-key";

    @BeforeClass
    public void testSetUp() throws MalformedURLException {
        /*
        WebDriverManager.chromedriver().setup();
        driver = new ChromeDriver();
        */
        DesiredCapabilities capabilities = new DesiredCapabilities();
        capabilities.setCapability("build", "Maven Parallel Testing with Jenkins Pipeline [Chrome]");
        capabilities.setCapability("name", "Maven Parallel Testing with Jenkins Pipeline [Chrome]");
        capabilities.setCapability("platform", "Windows 10");
        capabilities.setCapability("browserName", "Chrome");
        capabilities.setCapability("version","latest");
        capabilities.setCapability("tunnel",false);
        capabilities.setCapability("network",true);
        capabilities.setCapability("console",true);
        capabilities.setCapability("visual",true);

        driver = new RemoteWebDriver(new URL("http://" + username + ":" + access_key + "@hub.lambdatest.com/wd/hub"), capabilities);
        System.out.println("Started session");
    }

    @Test
    public void test_Selenium4_ToDoApp() throws InterruptedException {
        driver.navigate().to(URL);
        driver.manage().window().maximize();

        try {
            /* Let's mark done first two items in the list. */
            driver.findElement(By.name("li1")).click();
            driver.findElement(By.name("li2")).click();

            /* Let's add an item in the list. */
            driver.findElement(By.id("sampletodotext")).sendKeys("Happy Testing at TestMu AI");
            driver.findElement(By.id("addbutton")).click();

            /* Let's check that the item we added is added in the list. */
            String enteredText = driver.findElement(By.xpath("/html/body/div/div/div/ul/li[6]/span")).getText();
            if (enteredText.equals("Happy Testing at TestMu AI")) {
                System.out.println("Demonstration of Jenkins is complete");
            }
        } catch (Exception e) {
            System.out.println(e.getMessage());
        }
    }

    @AfterClass
    public void tearDown() {
        if (driver != null) {
            ((JavascriptExecutor) driver).executeScript("lambda-status=" + status);
            driver.quit();
        }
    }
}
GoogleSearchTest.java (Implementation of Test Scenario – 2)
package org.selenium4;

import org.junit.Assert;
import org.openqa.selenium.By;
import org.openqa.selenium.JavascriptExecutor;
import org.openqa.selenium.WebDriver;
import org.openqa.selenium.WebElement;
import org.openqa.selenium.remote.DesiredCapabilities;
import org.openqa.selenium.remote.RemoteWebDriver;
import org.testng.IExecutionListener;
import org.testng.annotations.AfterTest;
import org.testng.annotations.BeforeTest;
import org.testng.annotations.Parameters;
import org.testng.annotations.Test;
import java.net.MalformedURLException;
import java.net.URL;

public class GoogleSearchTest implements IExecutionListener {
    /* protected static EdgeDriver driver; */
    String URL = "https://www.google.com/";
    String search_string = "TestMu AI";
    WebDriver driver = null;
    WebElement search_box;
    String exp_title = "Power Your Software Testing with  AI Agents and Cloud| TestMu AI";
    public static String status = "passed";
    public static String username = "user-name";
    public static String access_key = "access-key";

    @Override
    public void onExecutionStart() {
        System.out.println("onExecutionStart");
    }

    @BeforeTest
    @Parameters(value={"browser","version","platform", "resolution"})

    public void testSetUp(String browser, String version, String platform, String resolution) throws Exception {
        /*
        WebDriverManager.edgedriver().setup();
        driver = new EdgeDriver();
        */
        DesiredCapabilities capabilities = new DesiredCapabilities();
        capabilities.setCapability("build", "Google Search - Maven Parallel Testing with Jenkins Pipeline");
        capabilities.setCapability("name", "Google Search - Maven Parallel Testing with Jenkins Pipeline");
        capabilities.setCapability("platform", platform);
        capabilities.setCapability("browserName", browser);
        capabilities.setCapability("version",version);
        capabilities.setCapability("tunnel",false);
        capabilities.setCapability("network",true);
        capabilities.setCapability("console",true);
        capabilities.setCapability("visual",true);

        try {
            driver = new RemoteWebDriver(new URL("http://" + username + ":" + access_key + "@hub.lambdatest.com/wd/hub"), capabilities);
        } catch (MalformedURLException e) {
            System.out.println("Invalid grid URL");
        }
        System.out.println("Started session");
    }

    @Test
    public void test_Selenium4_GoogleSearch() throws InterruptedException {
        driver.navigate().to(URL);
        driver.manage().window().maximize();

        try {
            /* Enter the search term in the Google Search Box */
            search_box = driver.findElement(By.xpath("//input[@name='q']"));
            search_box.sendKeys(search_string);

            search_box.submit();

            /* driver.manage().timeouts().implicitlyWait(3, TimeUnit.SECONDS); */
            /* Not a good programming practice, added for demonstration */
            Thread.sleep(3000);

            /* Click on the first result which will open up the TestMu AI homepage */
            WebElement lt_link = driver.findElement(By.xpath("//h3[.='Power Your Software Testing with  AI Agents and Cloud']"));
            lt_link.click();

            /* driver.manage().timeouts().implicitlyWait(3, TimeUnit.SECONDS); */
            /* Not a good programming practice, added for demonstration */
            Thread.sleep(5000);

            String curr_window_title = driver.getTitle();
            Assert.assertEquals(curr_window_title, exp_title);
        } catch (Exception e) {
            System.out.println(e.getMessage());
        }
    }

    @AfterTest
    public void tearDown() {
        if (driver != null) {
            ((JavascriptExecutor) driver).executeScript("lambda-status=" + status);
            driver.quit();
        }
    }

    @Override
    public void onExecutionFinish() {
        System.out.println("onExecutionFinish");
    }
}
Code Walkthrough
Step 1 – The necessary packages are imported before the actual implementation kicks off. Since the TestNG framework is used for testing; hence, its packages are also imported before its annotations can be used.
import org.testng.annotations.AfterClass;
import org.testng.annotations.BeforeClass;
import org.testng.annotations.Test;
import static org.junit.Assert.*;
import org.junit.Test.*;
Step 2 – The IExecutionListener is used for monitoring the start and end of the test suite, as the test scenario would be executed on different input combinations that are passed through the TestNG xml file.
The IExecutionListener contains two methods – onExecutionStart() and onExecutionFinish(). onExecutionStart() is invoked before the test start and onExecutionFinish() is invoked once the tests/test suites have finished execution.
public class GoogleSearchTest implements IExecutionListener {
    /* protected static EdgeDriver driver; */
    String URL = "https://www.google.com/";
    ................................
    ................................
    ................................

@Override
    public void onExecutionStart() {
        System.out.println("onExecutionStart");
    }

@Override
    public void onExecutionFinish() {
        System.out.println("onExecutionFinish");
    }
Step 3 – The method implemented under @BeforeTest annotation will run before any test method belonging to the class under that tag is run. As we are using parameterized testing with TestNG, the annotation @Parameters(value={“browser”,”version”,”platform”, “resolution”}) is added to the test method.
public class GoogleSearchTest implements IExecutionListener {
    /* protected static EdgeDriver driver; */
    String URL = "https://www.google.com/";
    String search_string = "TestMu AI";
    WebDriver driver = null;
    ..............................
    ..............................

    public static String status = "passed";
    public static String username = "user-name";
    public static String access_key = "access-key";
    ..............................
    ..............................

@BeforeTest
    @Parameters(value={"browser","version","platform", "resolution"})

public void testSetUp(String browser, String version, String platform, String resolution) throws Exception {
    ..............................
    ..............................
}
These parameters would be passed values from testng.xml, sample parameter shown below:
<test name="Google Search Test - 1">
        <parameter name="browser" value="Chrome"/>
        <parameter name="version" value="latest"/>
        <parameter name="platform" value="Windows 10"/>
        <parameter name="resolution" value="1600x1200"/>
        <classes>
            <class name="org.selenium4.GoogleSearchTest"/>
        </classes>
    </test>
Step 4 – The method testSetUp is a parameterized method that iteratively takes the test parameters from TestNG.xml until the end of the test suite is encountered.
As the tests are executed on the Selenium Grid cloud on TestMu AI, the credentials consist of a user-name & an access token that can be used to access the TestMu AI Grid – @hub.lambdatest.com/wd/hub.
public void testSetUp(String browser, String version, String platform, String resolution) throws Exception {

        DesiredCapabilities capabilities = new DesiredCapabilities();
        capabilities.setCapability("build", "Google Search - Maven Parallel Testing with Jenkins Pipeline");
        capabilities.setCapability("name", "Google Search - Maven Parallel Testing with Jenkins Pipeline");
        ..............................
        ..............................

        try {
            driver = new RemoteWebDriver(new URL("http://" + username + ":" + access_key + "@hub.lambdatest.com/wd/hub"), capabilities);
        } catch (MalformedURLException e) {
            System.out.println("Invalid grid URL");
        }
System.out.println("Started session");
The RemoteWebDrive API uses the remote URL and browser capabilities that are generated using the TestMu AI capabilities generator and passed to the method in the form of input parameters.
try {
       driver = new RemoteWebDriver(new URL("http://" + username + ":" + access_key + "@hub.lambdatest.com/wd/hub"), capabilities);
}
catch (MalformedURLException e)
Step 5 – The test method is implemented under the @Test annotation. The appropriate Selenium methods (findElement, sendKeys, submit, and more) are used to locate the Web Element and perform appropriate actions on the same.
@Test
    public void test_Selenium4_GoogleSearch() throws InterruptedException {
        driver.navigate().to(URL);
        driver.manage().window().maximize();

        try {
            /* Enter the search term in the Google Search Box */
            search_box = driver.findElement(By.xpath("//input[@name='q']"));
            search_box.sendKeys(search_string);
	      search_box.submit();
            ..........................................
		..........................................
	}
	..........................................
	..........................................
}
Step 6 – Blocking delays is not a good programming practice, but we have added few delays for observing the output.
WebElement lt_link = driver.findElement(By.xpath("//h3[.='TestMu AI: Power Your Software Testing with  AI Agents and Cloud
']"));
lt_link.click();

/* Not a good programming practice, added for demonstration */
Thread.sleep(5000);
..........................................
..........................................
Step 7 – The method that is implemented under @AfterTest annotation frees the resources allocated by the instantiated corresponding WebDriver.
@AfterClass
    public void tearDown() {
        if (driver != null) {
           ((JavascriptExecutor) driver).executeScript("lambda-status=" + status);
            driver.quit();
        }
}
Test Suite – 2
Test Scenario – 1 (Chrome on Windows 10)
- Navigate to the URL https://lambdatest.com
- Check the Page Title
- Compare the Page Title with the expected title
- Assert if the titles do not match
Implementation
It is the same as the one which is used for Test Suite-1, except for the artifactId and groupID.
<?xml version="1.0" encoding="UTF-8"?>
<project xmlns="http://maven.apache.org/POM/4.0.0"
         xmlns:xsi="http://www.w3.org/2001/XMLSchema-instance"
         xsi:schemaLocation="http://maven.apache.org/POM/4.0.0 http://maven.apache.org/xsd/maven-4.0.0.xsd">
    <modelVersion>4.0.0</modelVersion>

    <groupId>org.example</groupId>
    <artifactId>org.selenium.JenkinsMavenTest</artifactId>
    <version>1.0-SNAPSHOT</version>

    <properties>
        <project.build.sourceEncoding>UTF-8</project.build.sourceEncoding>
    </properties>

    <dependencies>
        <!-- https://mvnrepository.com/artifact/com.github.lambdatest/lambdatest-tunnel-binary -->
        <dependency>
            <groupId>org.testng</groupId>
            <artifactId>testng</artifactId>
            <version>6.9.10</version>
            <scope>test</scope>
        </dependency>
        <dependency>
            <groupId>org.seleniumhq.selenium</groupId>
            <artifactId>selenium-java</artifactId>
            <version>4.0.0-alpha-6</version>
        </dependency>
        <dependency>
            <groupId>org.testng</groupId>
            <artifactId>testng</artifactId>
            <version>6.8.8</version>
        </dependency>
        <dependency>
            <groupId>org.seleniumhq.selenium</groupId>
            <artifactId>selenium-chrome-driver</artifactId>
            <version>4.0.0-alpha-6</version>
        </dependency>
        <dependency>
            <groupId>io.github.bonigarcia</groupId>
            <artifactId>webdrivermanager</artifactId>
            <version>RELEASE</version>
            <scope>test</scope>
        </dependency>
        <!-- https://mvnrepository.com/artifact/org.slf4j/slf4j-nop -->
        <dependency>
            <groupId>org.slf4j</groupId>
            <artifactId>slf4j-nop</artifactId>
            <version>1.7.28</version>
            <scope>test</scope>
        </dependency>
        <dependency>
            <groupId>com.github.lambdatest</groupId>
            <artifactId>lambdatest-tunnel-binary</artifactId>
            <version>1.0.4</version>
        </dependency>
        <dependency>
            <groupId>junit</groupId>
            <artifactId>junit</artifactId>
            <version>4.12</version>
            <scope>test</scope>
        </dependency>
    </dependencies>

    <build>
        <defaultGoal>install</defaultGoal>
        <plugins>
            <plugin>
                <artifactId>maven-compiler-plugin</artifactId>
                <version>3.0</version>
                <configuration>
                    <source>1.8</source>
                    <target>1.8</target>
                </configuration>
            </plugin>
            <plugin>
                <groupId>org.apache.maven.plugins</groupId>
                <artifactId>maven-surefire-plugin</artifactId>
                <version>2.12.4</version>
            </plugin>
            <plugin>
               <groupId>org.apache.maven.plugins</groupId>
               <artifactId>maven-surefire-report-plugin</artifactId>
               <version>3.0.0-M5</version>
            </plugin>
        </plugins>
    </build>
</project>
CrossBrowserTest.java
package org.selenium.JenkinsMavenTest;

import org.junit.Assert;
import org.openqa.selenium.WebDriver;
import org.openqa.selenium.remote.DesiredCapabilities;
import org.openqa.selenium.remote.RemoteWebDriver;
import org.testng.annotations.AfterClass;
import org.testng.annotations.BeforeClass;
import org.testng.annotations.Test;
import java.net.MalformedURLException;
import java.net.URL;

public class CrossBrowserTest {
    /* protected static ChromeDriver driver; */
    WebDriver driver = null;
    String URL = "https://www.lambdatest.com";
    public static String status = "passed";
    public static String username = "user-name";
    public static String access_key = "access-key";
    public static String expected_title = "Power Your Software Testing with  AI Agents and Cloud | TestMu AI";

    @BeforeClass
    public void testSetUp() throws MalformedURLException {
        /* System.setProperty("webdriver.chrome.driver", "C:\EdgeDriver\chromedriver.exe"); */
        /*
        WebDriverManager.chromedriver().setup();
        driver = new ChromeDriver();
        */
        DesiredCapabilities capabilities = new DesiredCapabilities();
        capabilities.setCapability("build", "(Test -2) Maven Parallel Testing with Jenkins Pipeline");
        capabilities.setCapability("name", "(Test -2) Maven Parallel Testing with Jenkins Pipeline");
        capabilities.setCapability("platform", "Windows 10");
        capabilities.setCapability("browserName", "Chrome");
        capabilities.setCapability("version","latest");
        capabilities.setCapability("tunnel",false);
        capabilities.setCapability("network",true);
        capabilities.setCapability("console",true);
        capabilities.setCapability("visual",true);

        driver = new RemoteWebDriver(new URL("http://" + username + ":" + access_key + "@hub.lambdatest.com/wd/hub"), capabilities);
        System.out.println("Started session");
    }

    @Test
    public void test_Selenium4_Geolocation() throws InterruptedException {
    driver.navigate().to(URL);
        driver.manage().window().maximize();
        try {
                String page_title = driver.getTitle();
                Assert.assertEquals(page_title, expected_title);
        } catch (Exception e) {
            System.out.println(e.getMessage());
        }
    }

    @AfterClass
    public void tearDown() {
        if (driver != null) {
            driver.quit();
        }
    }
}
For the demonstration of Maven and Jenkins with Selenium, we would be executing these two test suites in parallel using the FreeStyle project and Jenkins pipeline.
Setting Up Jenkins For The Jenkins Selenium Project
Before creating a new job in Jenkins that builds the project mentioned earlier, we have to set up the Jenkins environment.
Step 1: The installation path of JDK has to be added to the System Environment Variable. This is also required for JRE (Java Runtime Environment).

Step 2: Download Jenkins in .war format and start Jenkins by executing the following command on the terminal:
java -Dhudson.model.DirectoryBrowserSupport.CSP="sandbox allow-scripts allow-popups allow-popups-to-escape-sandbox; style-src 'unsafe-inline' *;" -Dsvnkit.http.sslProtocols=TLSv1 -jar Jenkins.war --httpPort=9090
Instead of 8080 (default port number used by Jenkins), we start the Jenkins service on port 9090.
Read – How To Set Jenkins Pipeline Environment Variables?
Step 3: Visit localhost:9090 in the web browser to start using Jenkins.


Create a new user (with admin privileges). Login using that username to continue using Jenkins.
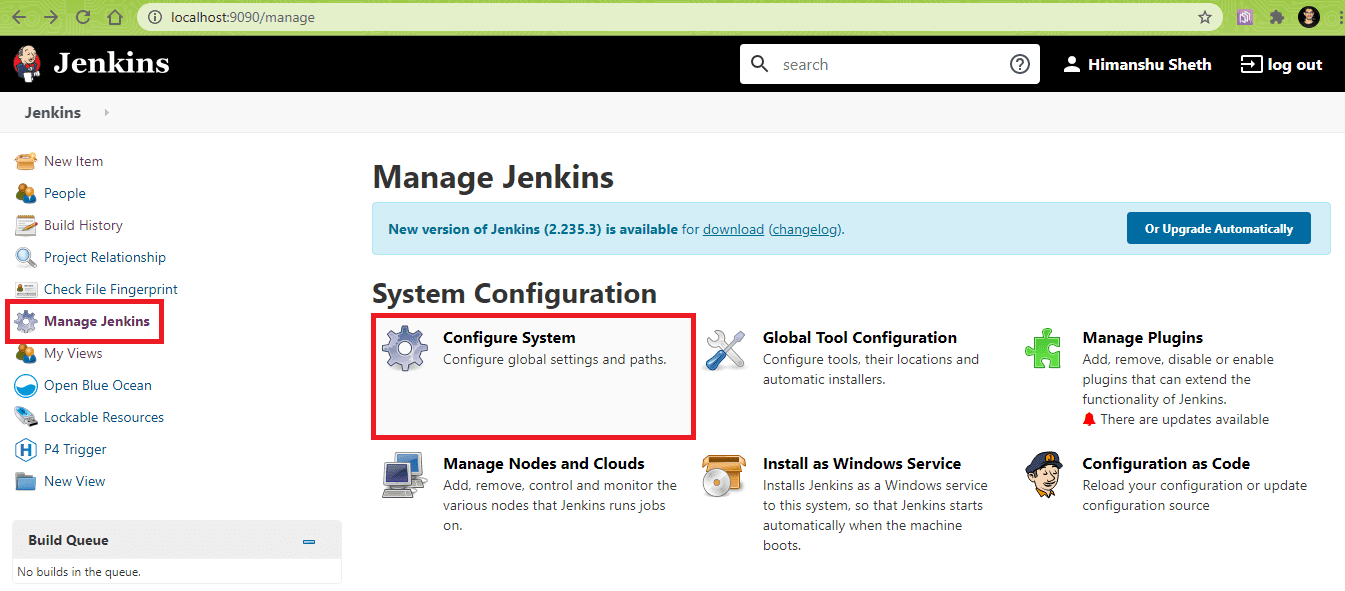
Step 4: As the project is using Maven and Jenkins with Selenium, the global settings and paths for Java & Maven have to be configured in Jenkins. For configuring these settings, navigate to ‘Configure System’ in the ‘System Configuration’ section.
In the item titled ‘Global properties’, add the following environment variables:
JAVA_HOME - <Location where JDK is installed>
MAVEN_HOME - <Location where Maven is installed>
In our case the entries are as below:
JAVA_HOME - C:Program FilesJavajdk1.8.0_251
MAVEN_HOME - C:apache-mavenapache-maven-3.6.3
Click on Apply and Save.
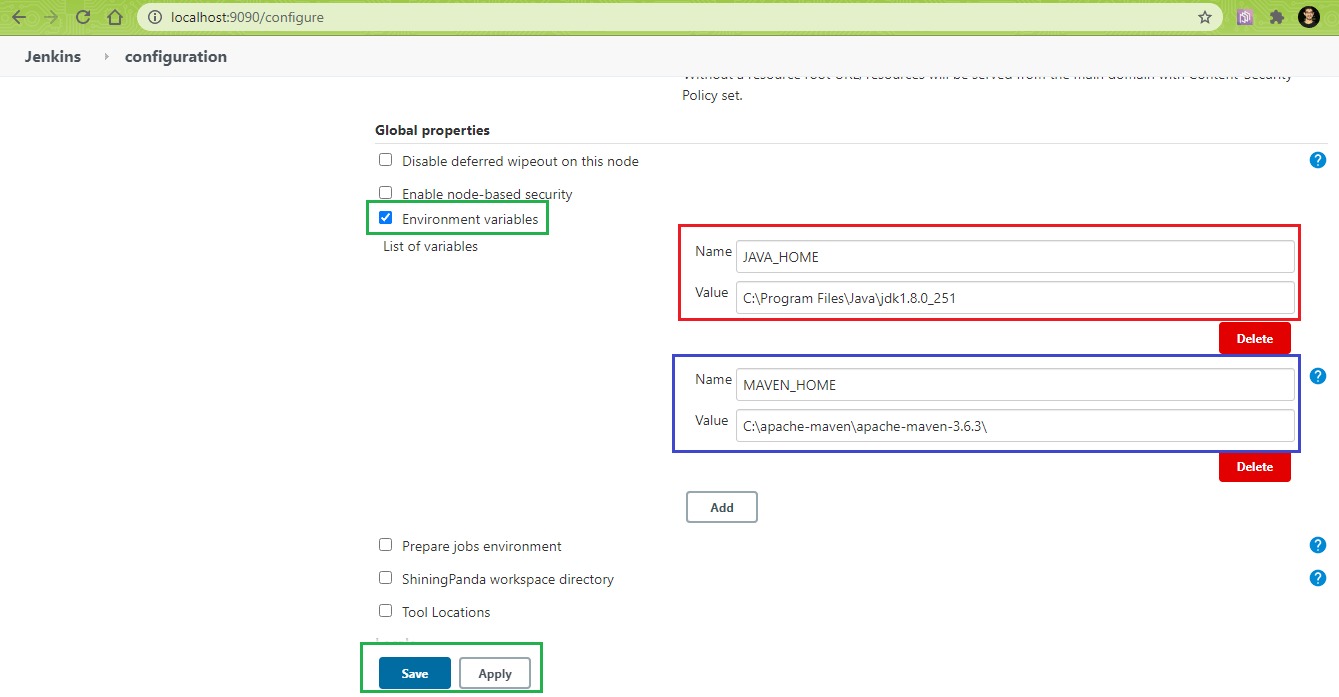
The addition of these environment variables in the System Configuration makes the settings public (i.e. can be used for Jenkins FreeStyle project and Jenkins Pipeline project).
Step 5: The HTML Publisher Plugin should be installed before the post-build action for the tests can be performed. The same can be done by navigating to ‘Manage Plugins’ and searching for ‘HTML Publisher Plugin’ in the ‘Available’ tab. Click on ‘Install’ for installing the plugin.
Note: For cross browser testing, it is recommended to use Jenkins in the .war format since the tests are executed in the non-headless mode only when Jenkins is used in the .war format.
Selenium Maven Jenkins Integration Using FreeStyle Project
For creating a FreeStyle project that uses Selenium Maven Jenkins integration as demonstration, perform the following steps on Jenkins UI (i.e. localhost:9090/)
(Note – The port number will vary based on the port used by Jenkins)
Step 1: In the ‘Jenkins UI’, click on ‘New Item’.

Step 2: Enter the job name as ‘TestMu AI – Selenium Maven Jenkins integration (Maven Project)’ and select ‘FreeStyle’ project.
Jenkins also provides an option to create a ‘Maven’ project where the configuration settings required for setting up the project are minimal. However, for this demonstration, we have used a ‘FreeStyle’ project.

Step 3: Go to the ‘Build’ ? ‘Invoke top-level Maven targets’. The Maven version should point to the version of Maven installed on the machine. In our case, it is Maven 3.6.3.
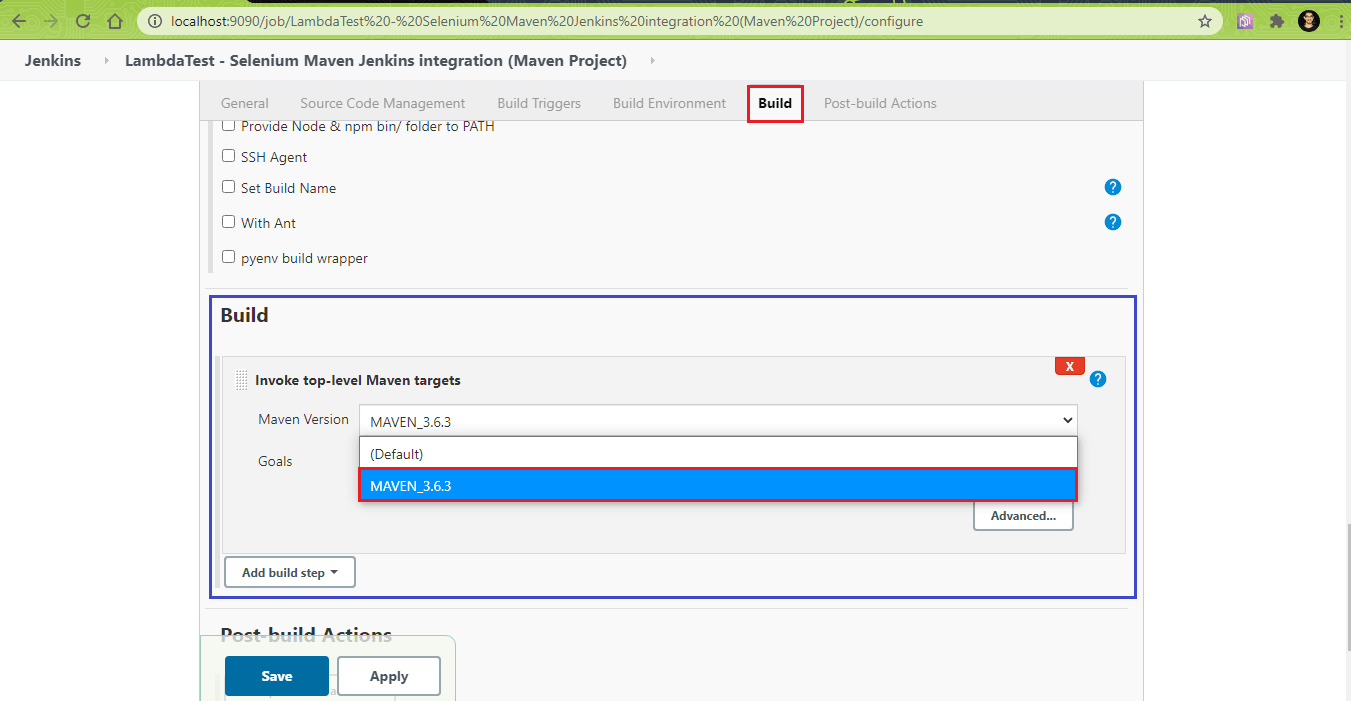
Step 4: Click on ‘Advanced’ to set the Goals, set the location of POM files for the two test suites. In our case, the project locations are below:

As we want to perform parallel builds, we use the following option with the mvn command:
mvn -T 4 clean install
This command will perform builds with 4 threads. In the ‘Goals’ section, you should enter -T 4 clean install. The same goal is set for the Maven builds for both the projects. In ‘POM’, give the absolute location of pom.xml
(i.e. Build 1 – C:\Users\Lenovo\IdeaProjects\Maven_Jenkins\pom.xml
Build 2 – C:\Users\Lenovo\IdeaProjects\Maven_Jenkins_2\pom.xml)

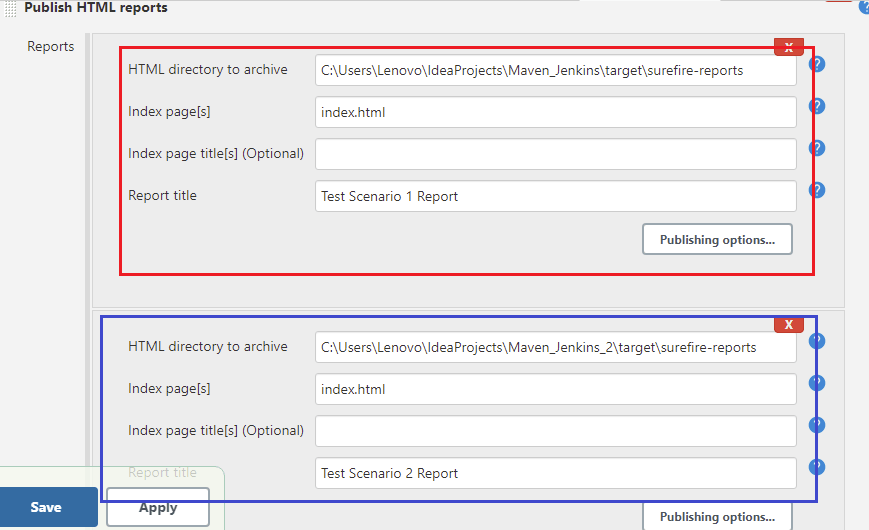
Step 5: The ‘post-Build action’ is to publish HTML reports that give information about the overall test scenario (i.e. number of tests passed/failed/skipped, etc.). Select ‘Publish HTML Reports’ in ‘Add post-build action’.

Step 6: The Maven Surefire Report plugin parses the generated TEST-*.xml files under ${project_dir}/target/surefire-reports and renders them using DOXIA. In ‘HTML directory to archive’, enter the absolute path of that location that contains surefire reports.
For Test Suite 1:
HTML directory to archive - ${project_dir_1}/target/surefire-reports
Index Page(s) - index.html
Report Title - Test Scenario 1 Report
For Test Suite 2:
HTML directory to archive - ${project_dir_2}/target/surefire-reports
Index Page(s) - index.html
Report Title - Test Scenario 2 Report
Step 7: The project is now build-ready. Click on the ‘Build Now’ option to trigger the build.

Step 8: Click on the ‘Console Output’ to witness the progress of build, test, and report stages.
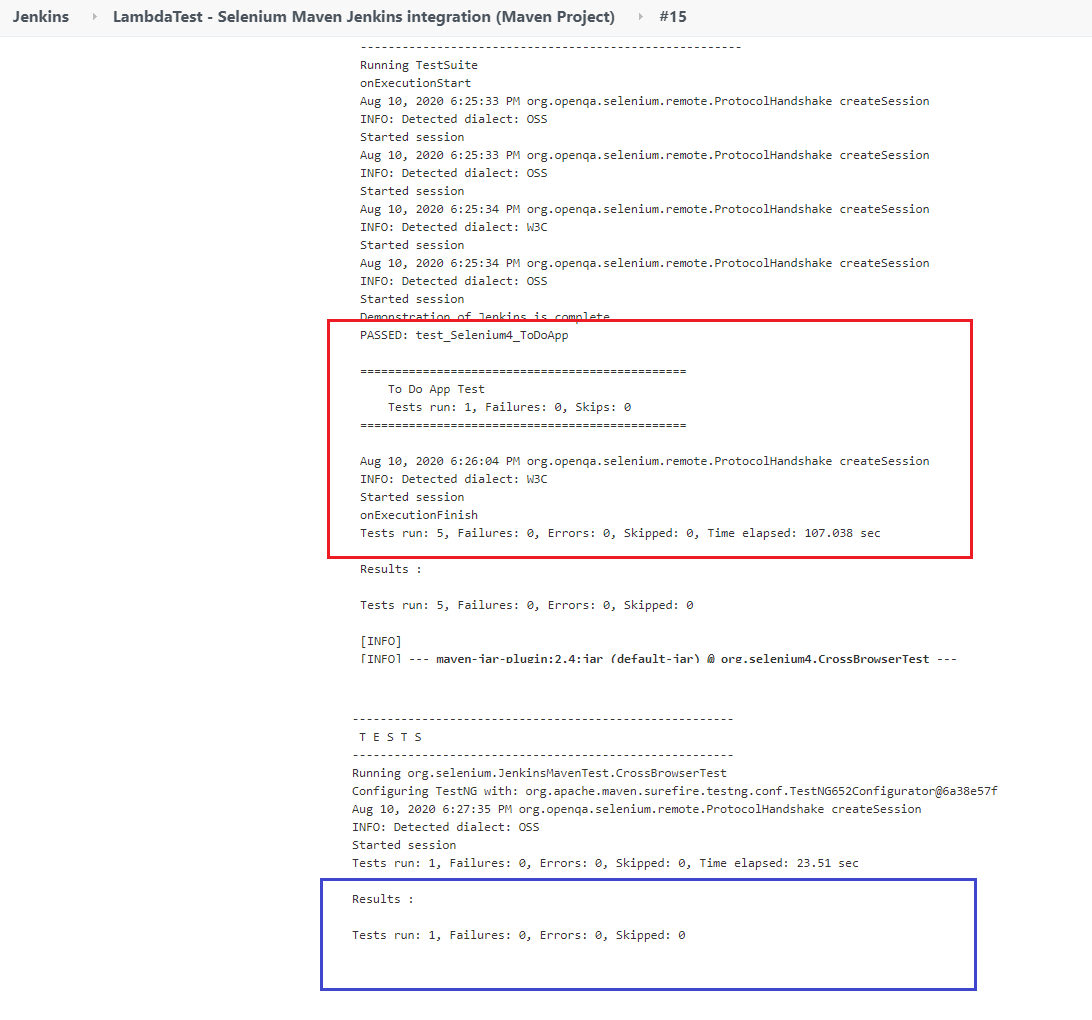
Step 9: As seen in the ‘Console logs; the tests are executed successfully – five test cases as a part of the first test suite and one test case as a part of the second test suite.
-------------------------------------------------------
 T E S T S
-------------------------------------------------------
Running TestSuite
onExecutionStart
Aug 10, 2020 6:25:33 PM org.openqa.selenium.remote.ProtocolHandshake createSession
INFO: Detected dialect: OSS
Started session
Aug 10, 2020 6:25:33 PM org.openqa.selenium.remote.ProtocolHandshake createSession
INFO: Detected dialect: OSS
Started session
Aug 10, 2020 6:25:34 PM org.openqa.selenium.remote.ProtocolHandshake createSession
INFO: Detected dialect: W3C
Started session
Aug 10, 2020 6:25:34 PM org.openqa.selenium.remote.ProtocolHandshake createSession
INFO: Detected dialect: OSS
Started session
Demonstration of Jenkins is complete
PASSED: test_Selenium4_ToDoApp

===============================================
    To Do App Test
    Tests run: 1, Failures: 0, Skips: 0
===============================================

Aug 10, 2020 6:26:04 PM org.openqa.selenium.remote.ProtocolHandshake createSession
INFO: Detected dialect: W3C
Started session
onExecutionFinish
Tests run: 5, Failures: 0, Errors: 0, Skipped: 0, Time elapsed: 107.038 sec

Results :

Tests run: 5, Failures: 0, Errors: 0, Skipped: 0

[INFO]
[INFO] --- maven-jar-plugin:2.4:jar (default-jar) @ org.selenium4.CrossBrowserTest ---
[INFO] Building jar: C:UsersLenovoIdeaProjectsMaven_Jenkins	argetorg.selenium4.CrossBrowserTest-1.0-SNAPSHOT.jar
[INFO]
[INFO] --- maven-install-plugin:2.4:install (default-install) @ org.selenium4.CrossBrowserTest ---
[INFO] Installing C:UsersLenovoIdeaProjectsMaven_Jenkins	argetorg.selenium4.CrossBrowserTest-1.0-SNAPSHOT.jar to C:UsersLenovo.m2
epositoryorgexampleorg.selenium4.CrossBrowserTest\1.0-SNAPSHOTorg.selenium4.CrossBrowserTest-1.0-SNAPSHOT.jar
[INFO] Installing C:UsersLenovoIdeaProjectsMaven_Jenkinspom.xml to C:UsersLenovo.m2
epositoryorgexampleorg.selenium4.CrossBrowserTest\1.0-SNAPSHOTorg.selenium4.CrossBrowserTest-1.0-SNAPSHOT.pom
[INFO] ------------------------------------------------------------------------
[INFO] BUILD SUCCESS
[INFO] ------------------------------------------------------------------------

-------------------------------------------------------
 T E S T S
-------------------------------------------------------
Running org.selenium.JenkinsMavenTest.CrossBrowserTest
Configuring TestNG with: org.apache.maven.surefire.testng.conf.TestNG652Configurator@6a38e57f
Aug 10, 2020 6:27:35 PM org.openqa.selenium.remote.ProtocolHandshake createSession
INFO: Detected dialect: OSS
Started session
Tests run: 1, Failures: 0, Errors: 0, Skipped: 0, Time elapsed: 23.51 sec

Results :

Tests run: 1, Failures: 0, Errors: 0, Skipped: 0
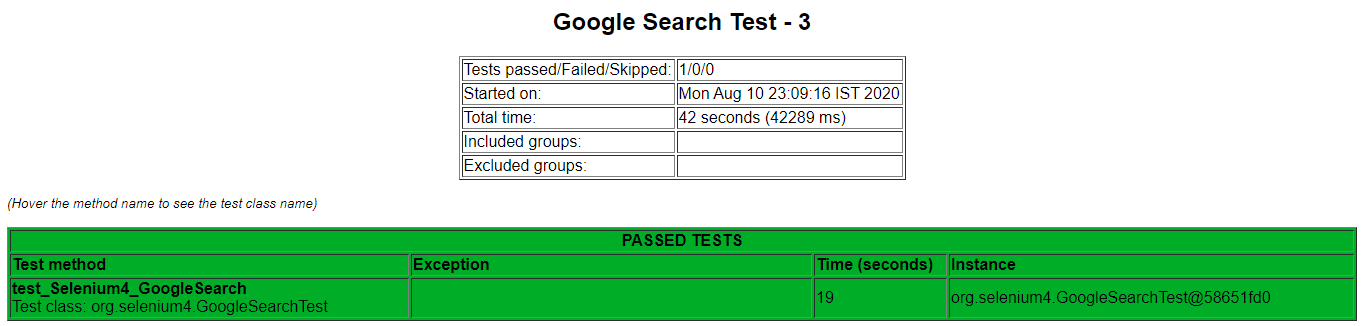
Here are the screenshots of the HTML reports that are generated for the two test suites by the HTML Publisher Plugin.
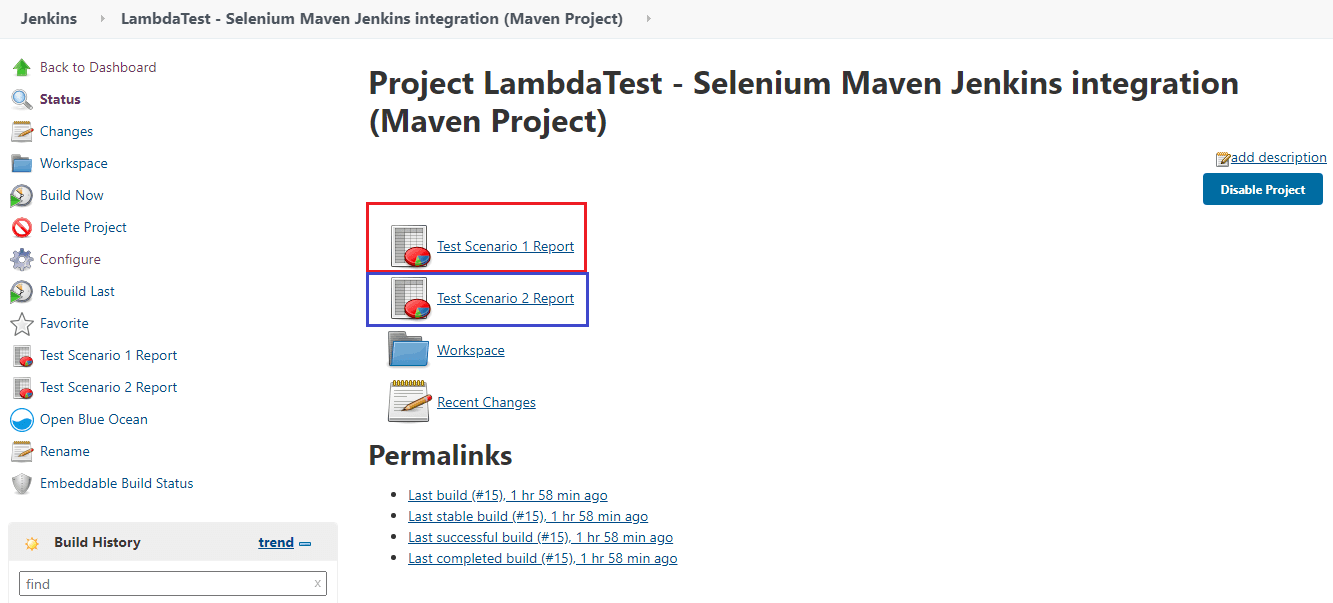
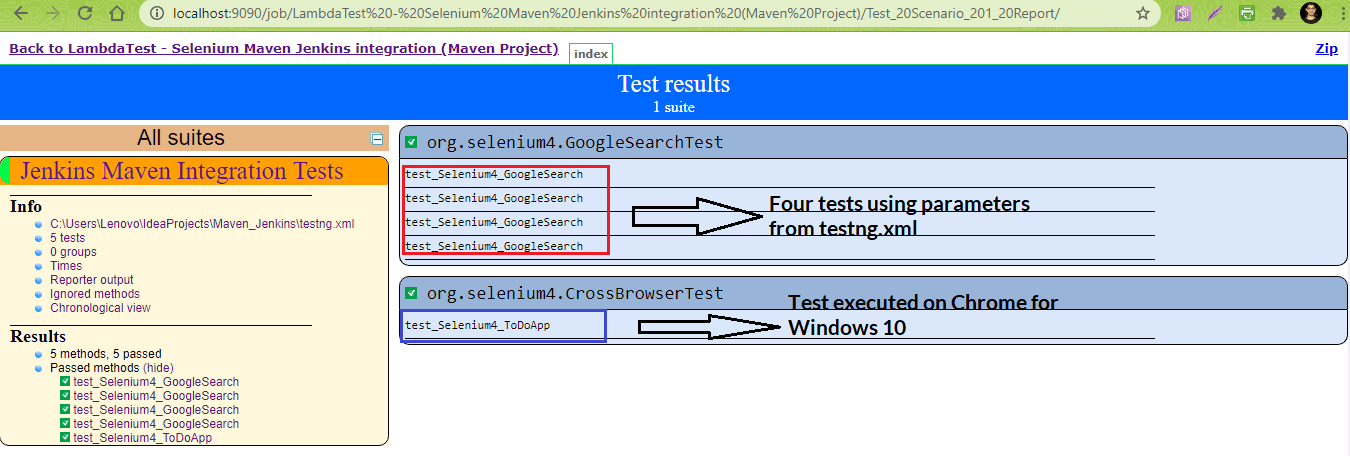
Report for Test Scenario – 1
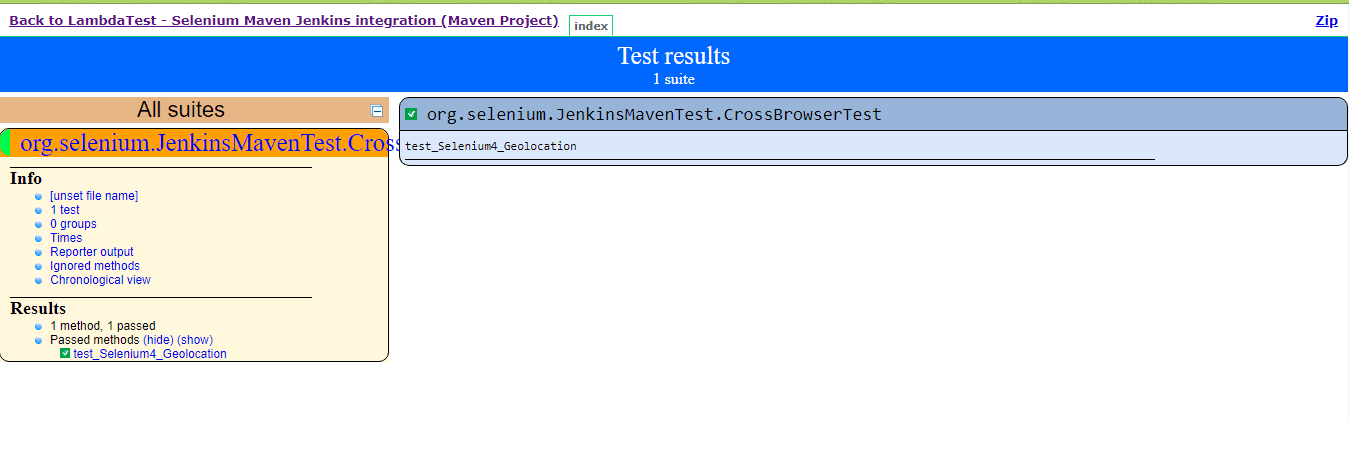
Report for Test Scenario – 2
Selenium Maven Jenkins Integration Using Jenkins Pipeline
In this section of Maven and Jenkins with Selenium demonstration, we would be using the Jenkins Pipeline that uses Domain Specific Language (DSL) for realizing Pipeline as Code.
The definition of a Jenkins Pipeline is normally written into a file named Jenkinsfile. This file would contain the steps necessary for running the Jenkins Pipeline. For a quick recap on the Declarative Jenkins Pipelines, you can check out this Jenkins Pipeline tutorial.
To integrate Maven and Selenium with the Jenkins Pipeline, you have to perform the steps mentioned below:
Step 1: Create a new item titled ‘TestMu AI – Selenium Maven Jenkins integration (Pipeline Project)’ of type ‘Pipeline’.

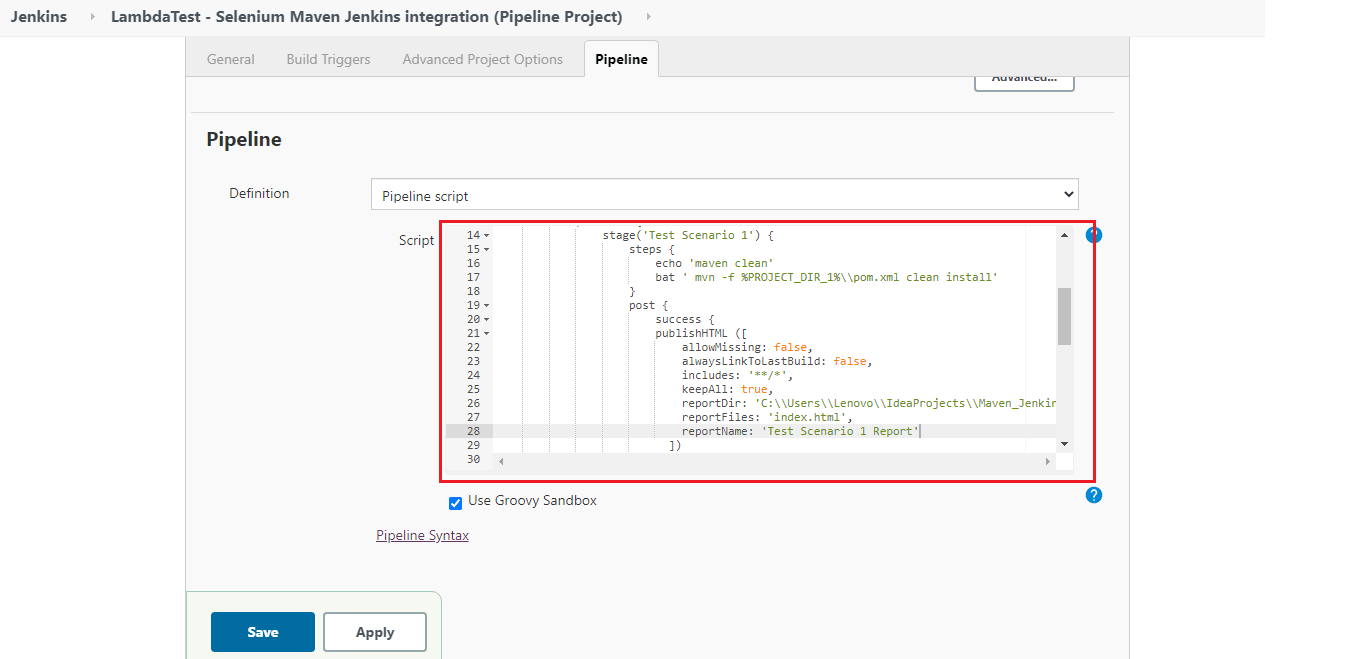
Step 2: In Pipeline definition, paste the contents of Jenkinsfile as shown below. Click on Apply and Save.
pipeline {
    agent any
    tools {
        maven 'MAVEN_3.6.3'
        jdk 'JDK_1.8.0_251'
    }
    stages {
        stage('Run Tests') {
            environment {
               PROJECT_DIR_1 = "C:\Users\Lenovo\IdeaProjects\Maven_Jenkins"
               PROJECT_DIR_2 = "C:\Users\Lenovo\IdeaProjects\Maven_Jenkins_2"
            }
            parallel {
                stage('Test Scenario 1') {
			 agent {
                        label "Slave_1"
                    }
                    steps {
                        echo 'maven clean'
                        bat ' mvn -f %PROJECT_DIR_1%\pom.xml clean install'
                    }
                    post {
                        success {
                        publishHTML ([
                            allowMissing: false,
                            alwaysLinkToLastBuild: false,
                            includes: '**/*',
                            keepAll: true,
                            reportDir: 'C:\Users\Lenovo\IdeaProjects\Maven_Jenkins\target\surefire-reports',
                            reportFiles: 'index.html',
                            reportName: 'Test Scenario 1 Report'
                          ])
                        }
                    }
                }
                stage('Test Scenario 2') {
			 agent {
                        label "Slave_2"
                    }
                    steps {
                        echo 'maven clean'
                        bat ' mvn -f %PROJECT_DIR_2%\pom.xml clean install'
                    }
                    post {
                        success {
                        publishHTML ([
                            allowMissing: false,
                            alwaysLinkToLastBuild: false,
                            includes: '**/*',
                            keepAll: true,
                            reportDir: 'C:\Users\Lenovo\IdeaProjects\Maven_Jenkins_2\target\surefire-reports',
                            reportFiles: 'index.html',
                            reportName: 'Test Scenario 2 Report'
                          ])
                        }
                    }
                }
            }
        }
    }
}
Step 3: In the post-build section, the HTML Publisher Plugin is used for creating the post-execution test reports for the two test scenarios.
Pipeline Walkthrough
Step 1: This specific Jenkins job can run on any Agent. The section with the tools directive contains all the tools that have to be installed automatically. The same is then also added to the PATH environment variable.
pipeline {
    agent any
    tools {
        maven 'MAVEN_3.6.3'
        jdk 'JDK_1.8.0_251'
    }
In the machine where the tests will be executed, JDK 1.8.0_251 and Maven 3.6.3 are installed. The alias maven and jdk point to the respective Maven and JDK versions.
Step 2: The environment directive is used for defining environment variables PROJECT_DIR_1 and PROJECT_DIR_2 that point to the location where Java projects are present. These environment variables can be used for all steps or stage-specific steps since they are defined in the main-stage ‘Run Tests.’

stages {
        stage('Run Tests') {
            environment {
               PROJECT_DIR_1 = "C:\Users\Lenovo\IdeaProjects\Maven_Jenkins"
               PROJECT_DIR_2 = "C:\Users\Lenovo\IdeaProjects\Maven_Jenkins_2"
            }
Step 3: The parallel directive in Jenkins is used for executing the Pipeline stages in parallel. In our case, the Jenkins Pipeline consists of two stages – Test Scenario 1 and Test Scenario 2.
stages {
        stage('Run Tests') {
            environment {
               PROJECT_DIR_1 = "C:\Users\Lenovo\IdeaProjects\Maven_Jenkins"
               PROJECT_DIR_2 = "C:\Users\Lenovo\IdeaProjects\Maven_Jenkins_2"
            }
            parallel {
                stage('Test Scenario 1') {
                    .........................................
                    .........................................
                }
                stage('Test Scenario 2') {
                    .........................................
                    .........................................
                }
            }
        }
    }
Step 4: The actions performed in both the stages are exactly similar except that they are performed on different projects. Stage ‘Test Scenario 1’ is executed on Node ‘Slave_1’ and Stage ‘Test Scenario 2’ is executed on Node ‘Slave_2’.
parallel {
                stage('Test Scenario 1') {
                    agent {
                        label "Slave_1"
                    }
		    .............
                .............
		    stage('Test Scenario 2') {
                    agent {
                        label "Slave_2"
                    }
In case you intend to execute the pipeline on any agent, you can skip using any particular agent name in these stages. You can refer to our What is Jenkins blog for understanding the creation of Nodes in Jenkins.
In our case, we created two Nodes (Slave_1 and Slave_2) and made them online before running the tests.


Step 5: In the next step, build is triggered. The command mvn clean install is then executed on pom.xml that is present in the project directory. We are using a Windows machine for execution hence we have used the bat (or batch) command for triggering the Maven build.
steps {
                echo 'maven clean'
                bat ' mvn -f %PROJECT_DIR_1%\pom.xml clean install'
            }
Step 6: The post-build action is used for publishing HTML reports for the respective stages. The actions are added under the ‘post’ directive. We want to invoke the test report creation only if the build is successful. Hence, the actions are under the success directive.
As seen in the demonstration using FreeStyle project, reportDir is set to the location where surefire reports are generated (i.e. ${project_dir}/target/surefire-reports). The reportFiles field is set to index.html (i.e. ${project_dir}/target/surefire-reports/index.html).
post {
            success {
                publishHTML ([                    allowMissing: false,                    alwaysLinkToLastBuild: false,                    includes: '**/*',                    keepAll: true,                    reportDir: 'C:\Users\Lenovo\IdeaProjects\Maven_Jenkins\target\surefire-reports',                    reportFiles: 'index.html',                    reportName: 'Test Scenario 1 Report'                  ])
                }
        }
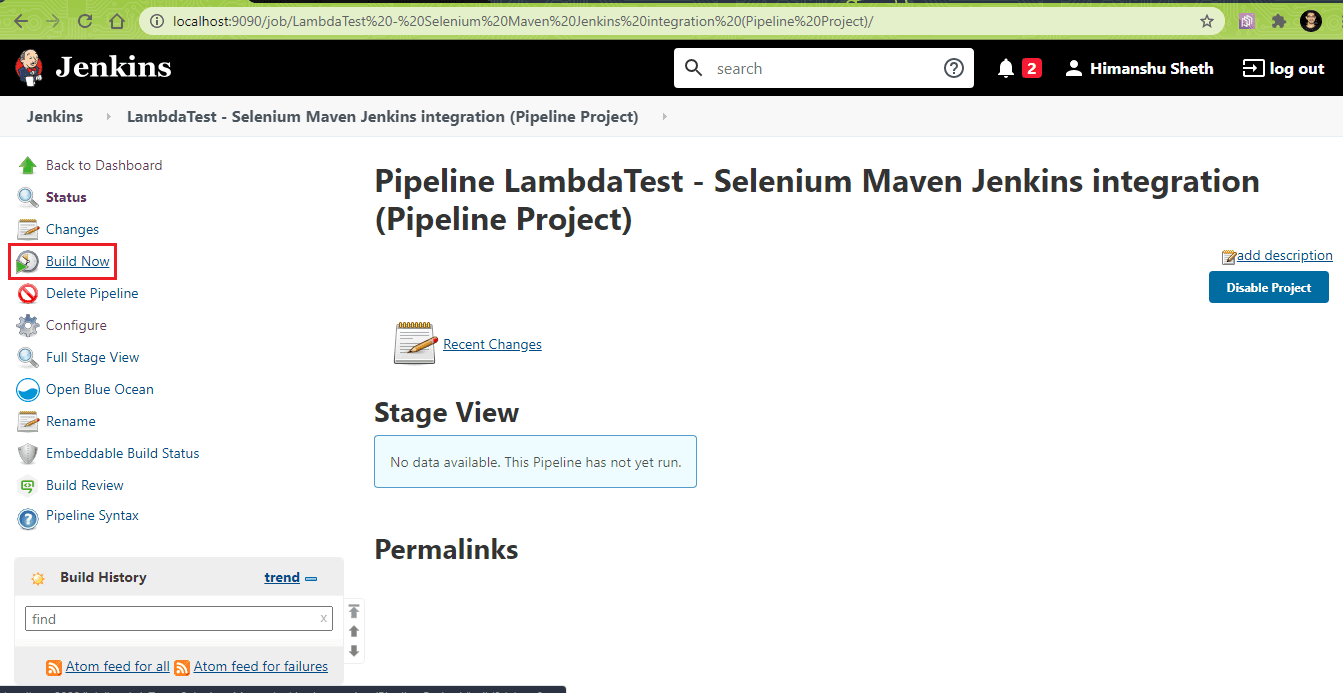
Once the Pipeline is added to Jenkinsfile, click on ‘Build Now’ to start the build process.
You can hover to any Stage and click on ‘Logs’ to have a look at the execution progress of that particular Stage. As seen from the Stage snapshot, the two stages are executed in parallel.
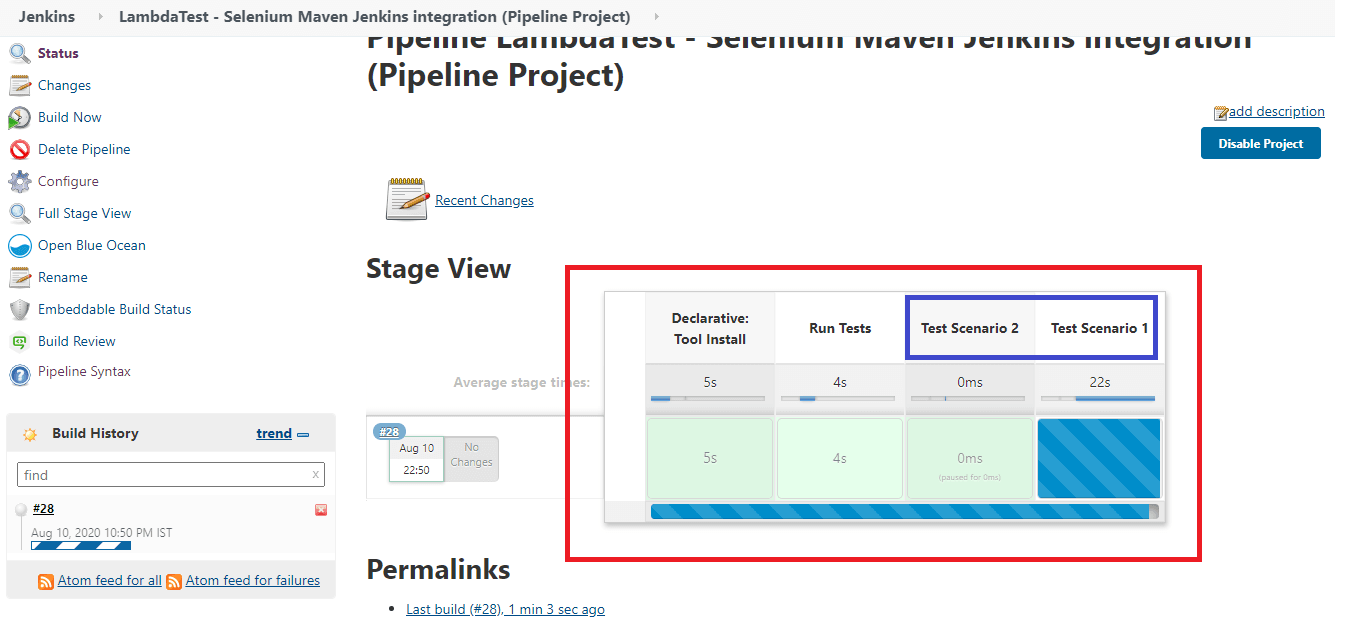
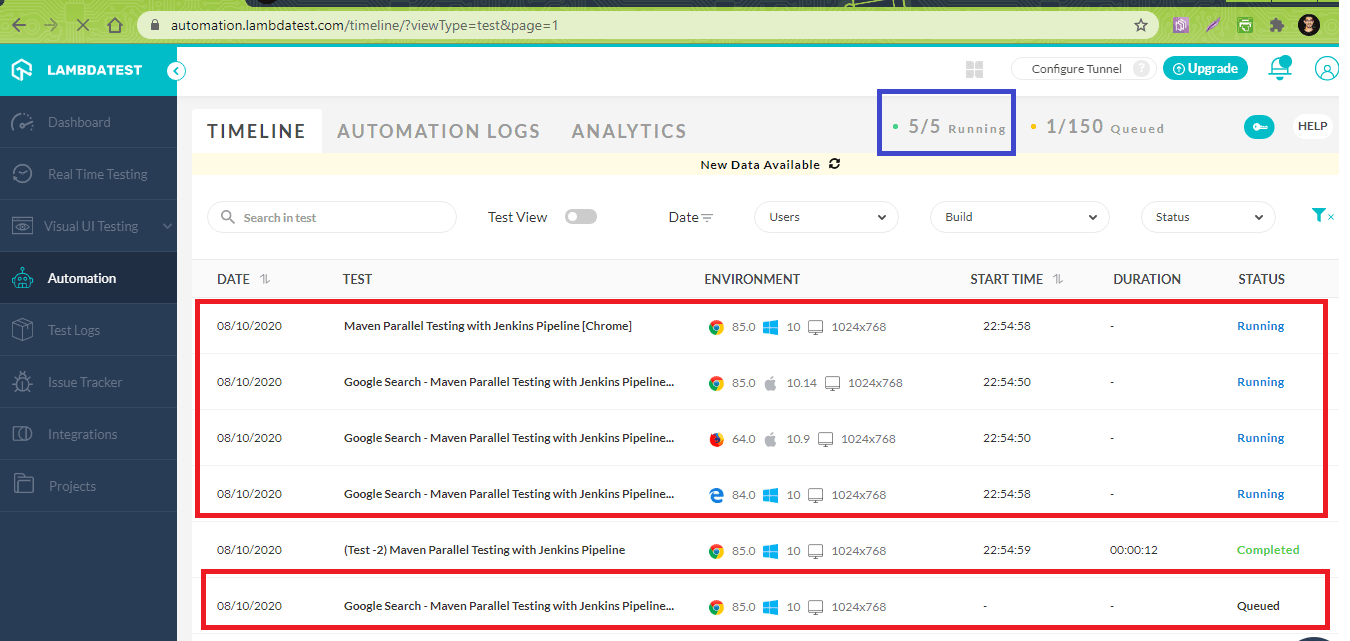
As we are using parallel stages with declarative Pipeline in Jenkins, the respective test cases are executed in parallel on the cloud-based Selenium grid on TestMu AI. As shown below, our plan on TestMu AI supports maximum five tests to be executed in parallel.
As shown below, the tests have executed successfully.
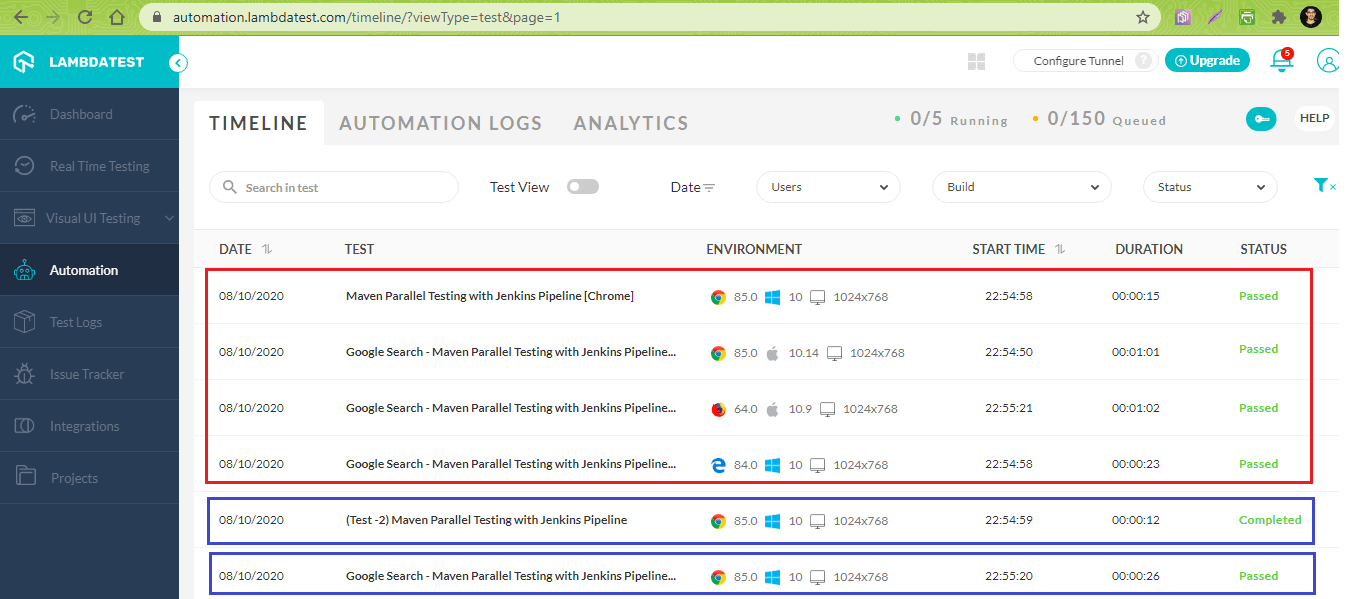
The total execution time was approximately 6 minutes. You can hover on to any stage to view the logs associated with that Stage.

As seen in the truncated logs, it is evident that steps in the two stages were executing in Parallel:

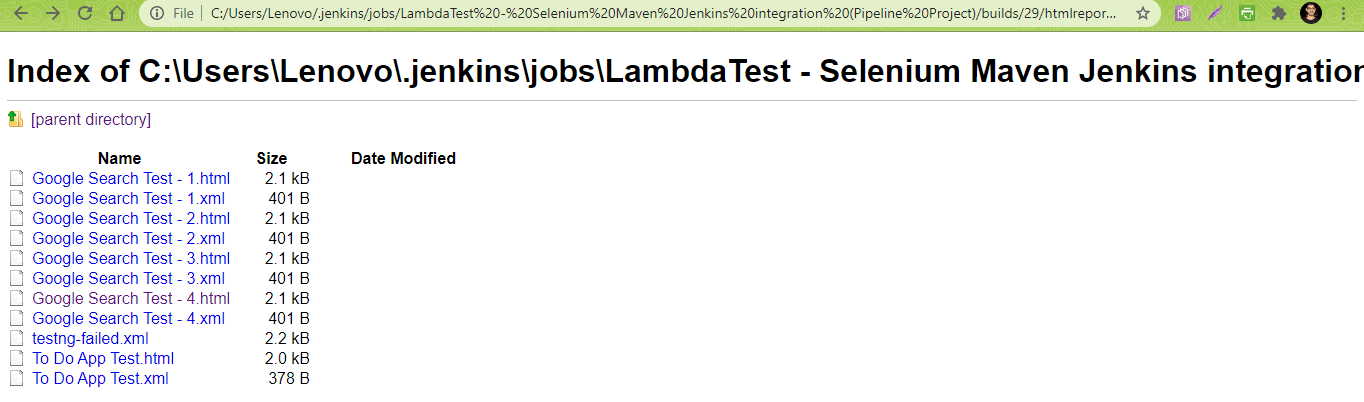
Here is the screenshot of the HTML reports that are generated as a part of the post-build action:

If you are preparing for an interview you can learn more through Selenium interview questions.
Wrapping up
Running Selenium tests in Jenkins gives the flexibility to run tests each time there is a software change, and those changes have to be tested against different input combinations. Maven is used in Java projects, as it eases the task of managing dependencies through the pom.xml file.
Freestyle projects in Jenkins should be used for projects that are not of high complexity. Jenkins Pipeline should be used when you want to define the deployment Pipeline as code. The parallel directive in Jenkins Pipeline should be used to leverage the parallel execution of Stages in Jenkins. Jenkins Pipeline can be integrated with a cloud-based Selenium Grid like TestMu AI, which also lets you integrate Maven and Jenkins with Selenium in a more efficient manner.
We hope that by following this tutorial, you will easily integrate Maven and Jenkins with Selenium. Thank you for reading!

Frequently asked questions
Did you find this page helpful?
More Related Hubs
TestMu AI forEnterprise
Get access to solutions built on Enterprise
grade security, privacy, & compliance
- Advanced access controls
- Advanced data retention rules
- Advanced Local Testing
- Premium Support options
- Early access to beta features
- Private Slack Channel
- Unlimited Manual Accessibility DevTools Tests