
Next-Gen App & Browser Testing Cloud
Trusted by 2 Mn+ QAs & Devs to accelerate their release cycles

What is Jenkins? Architecture, Installation, and Setup Explained
Ever wondered what is Jenkins? Learn how it works and what a Jenkin pipeline consists of. Find more in our deep dive guide.

Himanshu Sheth
January 13, 2026
This article is a part of our Content Hub. For more in-depth resources, check out our content hub on Jenkins Tutorial.
Continuous Integration & Continuous Delivery are integral parts of DevOps, as they are used for integrating multiple stages of the methodology. There are many CI/CD tools in the market but Jenkins; the Java-based open-source CI/CD tool tops the popularity list. A small survey conducted by us further escalates Jenkins’ popularity, leading up to the occasional query of ‘What is Jenkins?’

In this blog as we try to answer ‘what is Jenkins’, we also deep dive into what is Jenkins pipeline, how does Jenkins work, and more. We would also demonstrate continuous testing with Jenkins using the Jenkins Maven project and Jenkins pipelines. As you finish this blog, you’ll not only find out what is Jenkins, you will also gain sufficient confidence to use Jenkins for continuous testing in DevOps.
What Is Jenkins?
Jenkins is an open-source server that is written entirely in Java. It lets you execute a series of actions to achieve the continuous integration process, that too in an automated fashion.
This CI server runs in servlet containers such as Apache Tomcat. Jenkins facilitates continuous integration and continuous delivery in software projects by automating parts related to build, test, and deployment. This makes it easy for developers to continuously work on the betterment of the product by integrating changes to the project.
Jenkins automates the software builds in a continuous manner and lets the developers know about the errors at an early stage. A strong Jenkins community is one of the prime reasons for its popularity. Jenkins is not only extensible but also has a thriving plugin ecosystem.
Some of the possible steps that can be performed using Jenkins are:
- Software build using build systems such as Gradle, Maven, and more.
- Automation testing using test frameworks such as Nose2, PyTest, Robot, Selenium, and more.
- Execute test scripts (using Windows terminal, Linux shell, etc.
- Achieve test results and perform post actions such as printing test reports, and more.
- Execute test scenarios against different input combinations for obtaining improved test coverage.
- Continuous Integration (CI) where the artifacts are automatically created and tested. This aids in identification of issues in the product at an early stage of development.
At the time of what is Jenkins blog, it had close to 1500+ plugins contributed by the community. Plugins help in customizing the experience with Jenkins, along with providing support for accelerating activities related to building, deploying, and automating a project.
This Jenkins Tutorial for beginners and professionals will help you learn how to use Jenkins, one of the most popular CI/CD tools used in DevOps.
History Of Jenkins
In this section of What is Jenkins blog, We will loo at the history of Jenkins.
Jenkins has an early mover advantage since it has been in development since 2011. Kohsuke Kawaguchi created Jenkins (then called ‘Hudson’) while working at Sun Microsystems. Hudson was created in the summer of 2004 and the first release was in February 2005.
After the acquisition of Sun Microsystems by Oracle, a proposal was approved by the Hudson community for creating the Jenkins project. In February 2011, Oracle intended that the development of Hudson should continue hence, Hudson was forked instead of renaming it to Jenkins.
Though Hudson and Jenkins were being developed independently, Jenkins acquired significantly more projects & contributors than Hudson. Consequently, Hudson is no longer maintained by the community.
Jenkins Release Cycle
Like other open-source projects, Jenkins also produces two release lines – LTS (Long-Term Support) and Weekly (regular) releases. Jenkins is very good with releases, as stable releases happen every four weeks.
At the time of this ‘, what is Jenkins’ article, the latest version of Jenkins LTS was 2.235.2, and Jenkins Weekly was 2.249.
Salient Features Of Jenkins
Jenkins is more functionality-driven rather than UI-driven hence, there is a learning curve involved in getting to know what is Jenkins. Here are the powerful developer-centric features offered by Jenkins:
1. Easy Installation & Configuration
Jenkins is a self-contained Java program that is agnostic of the platform on which it is installed. It is available for almost all the popular operating systems such as Windows, different flavors of Unix, and Mac OS.
It is available as a normal installer, as well as a .war file. Once installed, it is easy to configure using its web interface.
2. Open-Source
As it is open-source, it is free for use. There is a strong involvement of the community which makes it a powerful CI/CD tool. You can take support from the Jenkins community, whether it is for extensibility, support, documentation, or any other feature related to Jenkins.
3. Thriving Plugin Ecosystem
The backbone of Jenkins is the community and the community members have been instrumental in the development (and testing) of close to 1500+ plugins available in the Update Center.
4. Easy Distribution
Jenkins is designed in such a manner that makes it relatively easy to distribute work across multiple machines and platforms for the accelerated build, testing, and deployment.
How Does Jenkins Work?
In this section of the What is Jenkins blog, we look at the internal functioning of Jenkins i.e. what happens once the developer commits changes to the repository and how CI/CD is realized in Jenkins. We also look at the Master-Agent architecture in Jenkins.
Architecture Of Jenkins
Before we dive into how does Jenkins works, we must understand the architecture of Jenkins. These are the series of steps that outlines the interaction between different elements in Jenkins:
- Developers do the necessary modifications in the source code and commit the changes to the repository. A new version of that file will be created in the version control system that is used for maintaining the repository of source code.
- The repository is continuously checked by the Jenkins CI server for any changes (either in the form of code or libraries) and changes are pulled by the server.
- In the next step, we ensure that the build with the ‘pulled changes’ is going through or not. The Build server performs a build with the code and an executable is generated if the build process is successful. In case of a build failure, an automated email with a link to build logs and other build artifacts is sent to the developer.
- In case of a successful build, the built application (or executable) is deployed to the test server. This step helps in realizing continuous testing where the newly built executable goes through a series of automated tests. Developers are alerted in case the changes have caused any breakage in functionality.
- If there are no build, integration, and testing issues with the checked-in code, the changes and tested application are automatically deployed to the Prod/Production server.
Here is the diagrammatic representation of the Jenkins architecture:

A single Jenkins server might not be sufficient to realize the following requirements:
- Testing needs to be performed on different environments (i.e. code written using different languages e.g. Java, Python, C, etc. are committed to the version control system), where a single server might not suffice the requirement.
- A single Jenkins server might not be sufficient to handle the load that comes with large-scale software projects.
In such scenarios, the distributed (or Master-Agent) architecture of Jenkins is used for continuous integration and testing. Diving deeper into how does Jenkins works, we take a look at the architecture of Jenkins.

Master- Agent Architecture In Jenkins
The master-agent (or distributed) architecture in Jenkins is used for managing distributed builds. The Master and Agent(s) communicate through the TCP/IP protocol.
These are the roles and responsibilities of the Jenkins Master and Agent(s):
Jenkins Master
The main server in Jenkins is the Master. Here are the jobs handled by Jenkins Master:
- Schedule build jobs
- Choosing the appropriate agent in the master-agent ecosystem for dispatching the builds.
- Monitor agents and take them online/offline as and when required.
- Presenting the build results (and reports) to the developer.
The Jenkins master can also execute the jobs directly but it is always recommended to select the appropriate agent(s) for build and execution-related tasks.
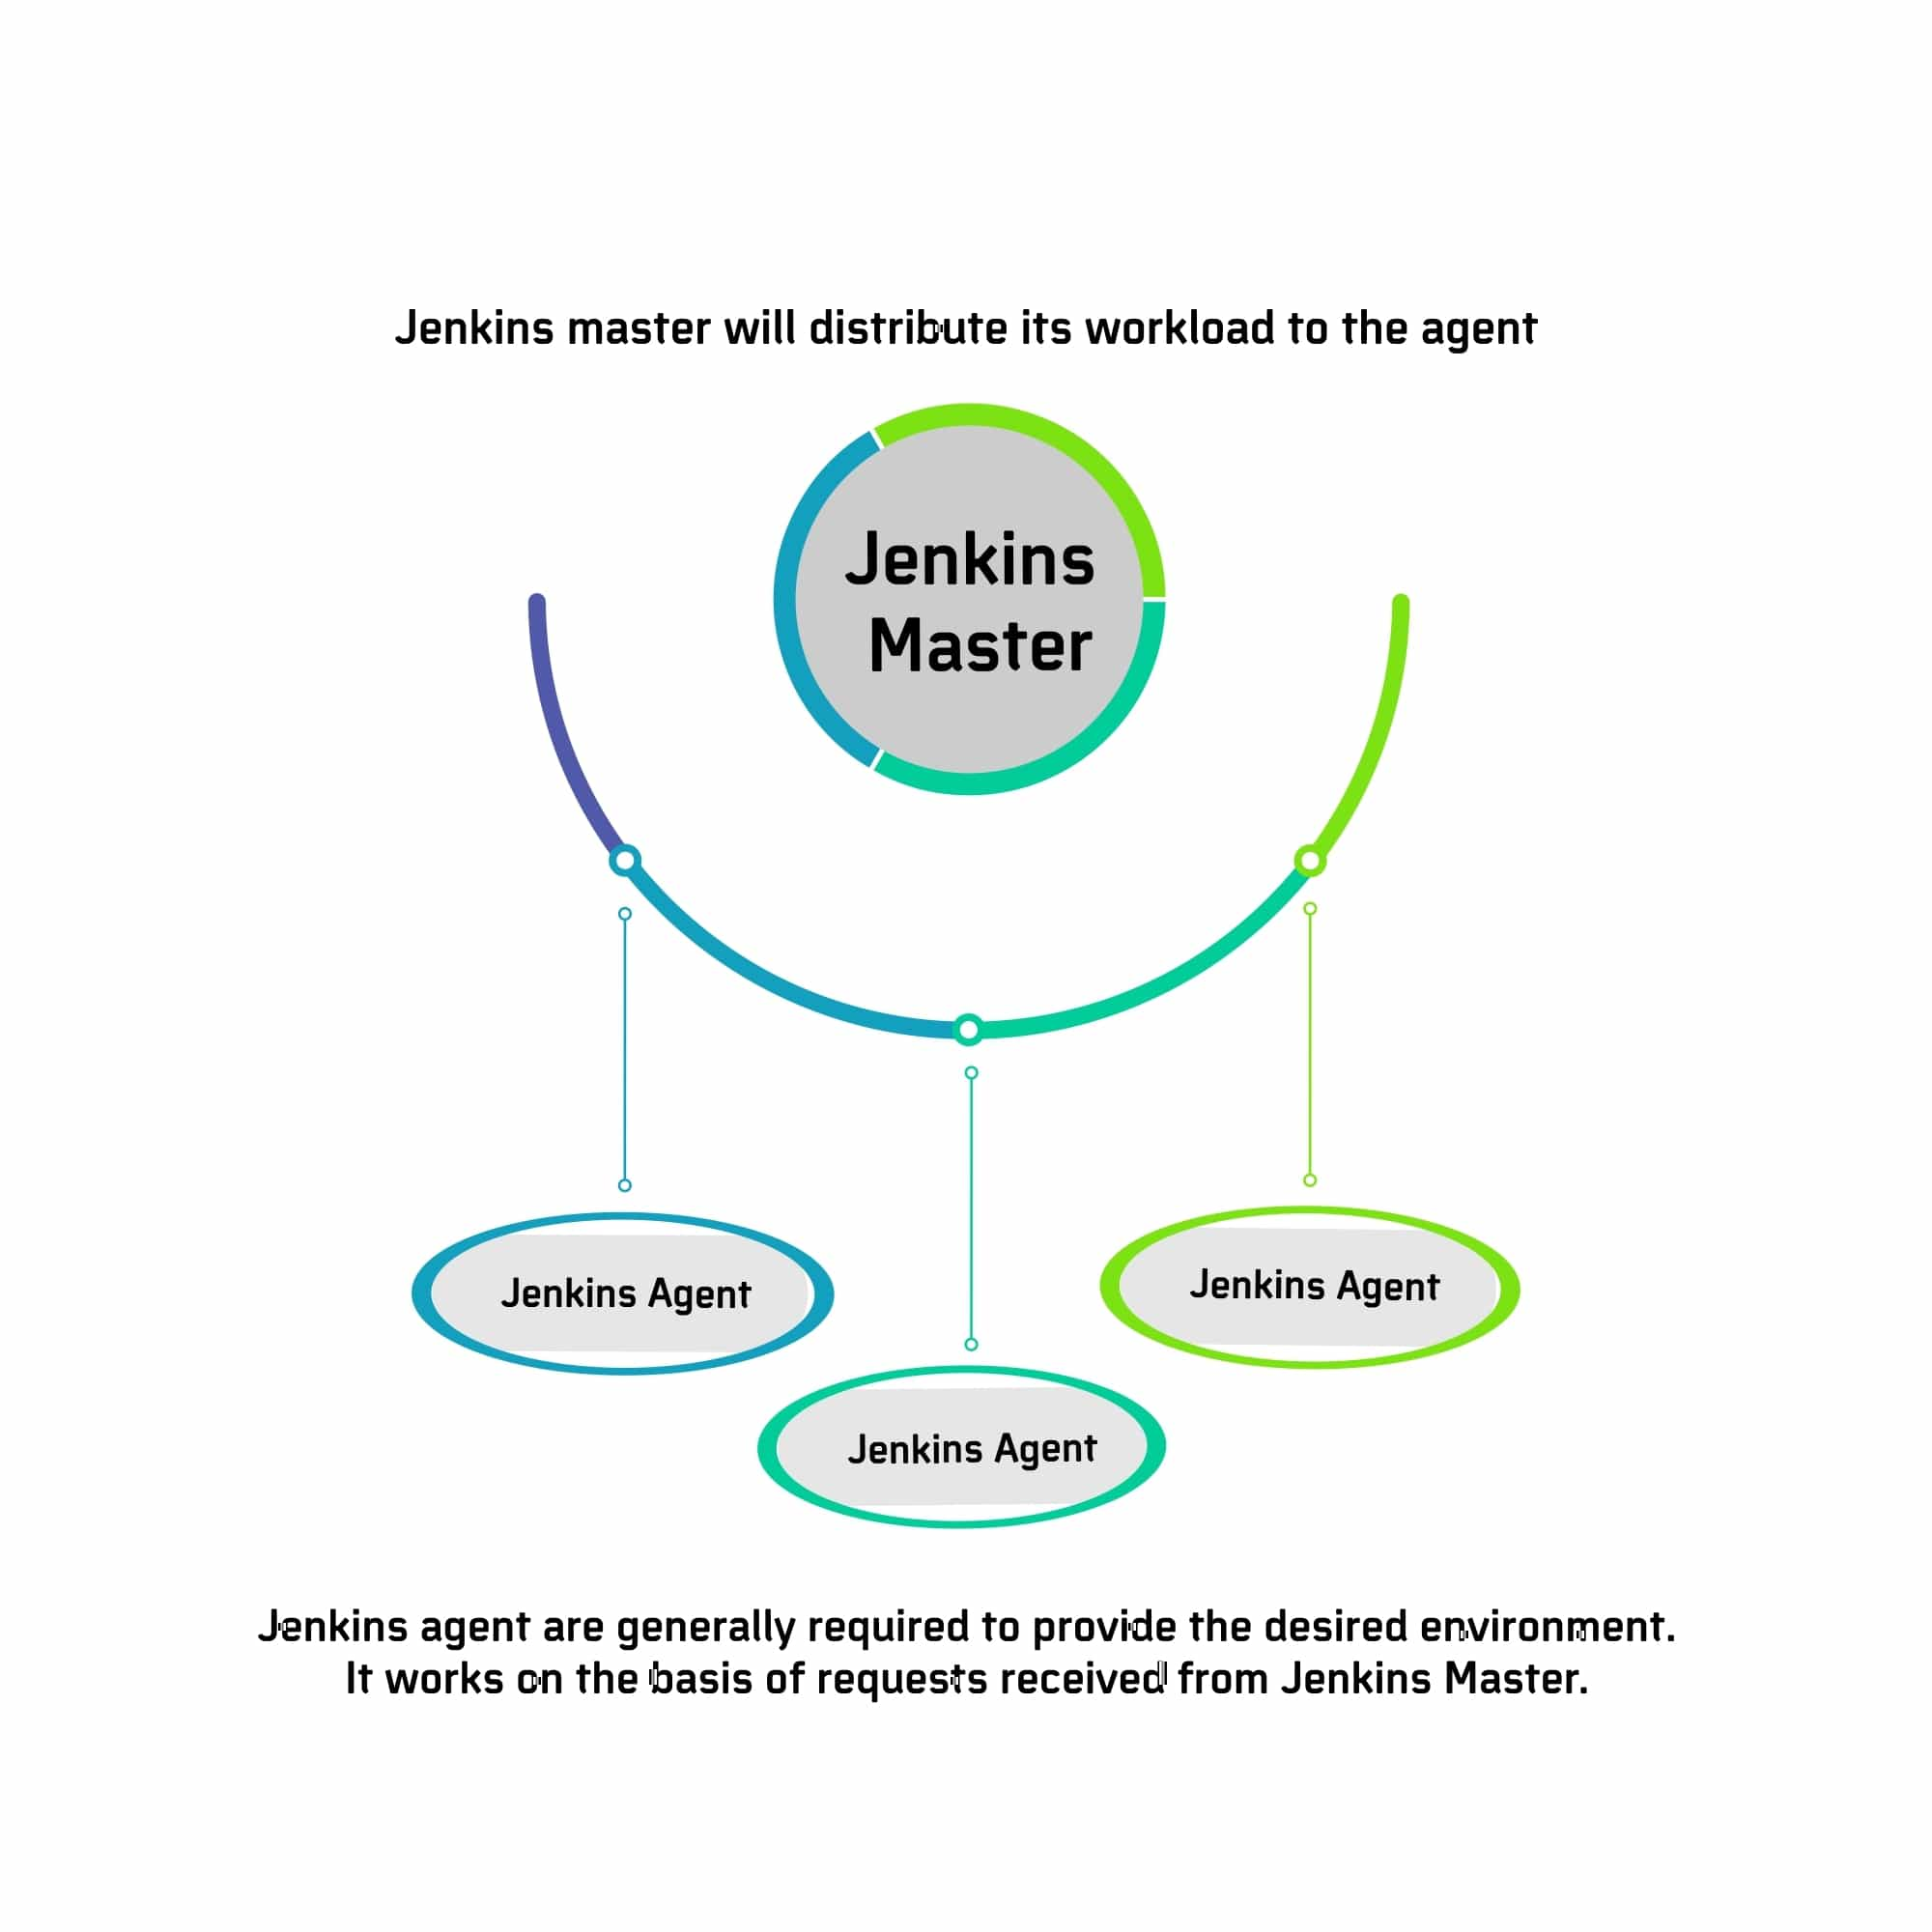
Jenkins Agent(s)
A agent is a remote machine that is connected to the Master. Depending on the project and build requirements, you could opt for ‘N’ number of agents. agents can run on different operating systems and depending on the ‘type of build request’, the appropriate Agent is chosen by the Master for build execution and testing.
Here are the jobs handled by the Jenkins Agent(s):
- Listen to commands from the Jenkins Master.
- Execute build jobs that are dispatched by the Master.
- Developers have the flexibility to run the build and execute tests on a particular agent or a particular type of Agent. The default option is Jenkins Master selecting the best-suited Agent for the job.
Here is a simple diagrammatic representation of how does Jenkins work, with multiple Jenkins Agents connected to the Jenkins Master:
How Does Jenkins Work In Master-Agent Architecture?
In the previous section of the What is Jenkins blog, we touched upon the brief responsibilities of Master and Agent(s) in Jenkins. Let’s look at exactly how does Jenkins works in the Master-Agent (or distributed) architecture:
In the Jenkins Master-Agent architecture shown below, there are three Agents, each running on a different operating system (i.e. Windows 10, Linux, and Mac OS).
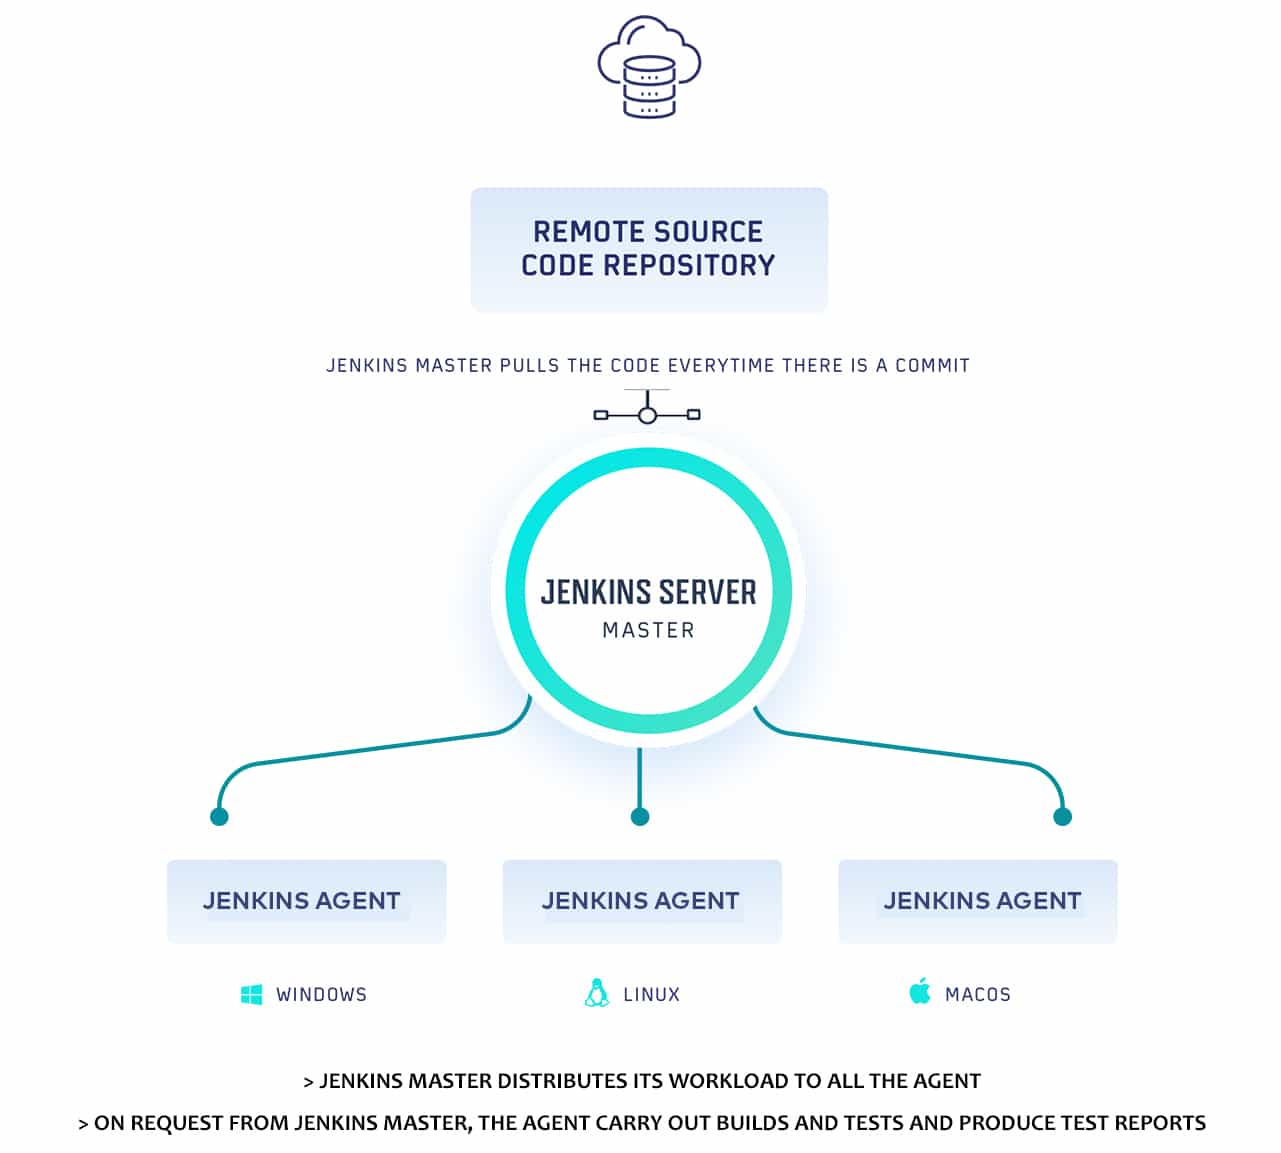
- Developers check-in their respective code changes in ‘The Remote Source Code Repository’ that is depicted on the left-hand side.
- Only the Jenkins master is connected to the repository and it checks for code-changes (in the repository) at periodic intervals. All the Jenkins Agents are connected to the Jenkins Master.
- Jenkins master dispatches the request (for build and test) to the appropriate Jenkins Agent depending on the environment required for performing the build. This lets you perform builds and execute tests in different environments across the entire architecture.
- The Agent performs the testing, generates test reports, and sends the same to the Jenkins Master for monitoring.
As developers keep pushing code, Jenkins Agents can run different builds versions of the code for different platforms. Jenkins Master (or Master Node) controls how the respective builds should operate.
In subsequent sections of the What is Jenkins blog, we would look at the steps for setting up Jenkins Master and Agents.
How To Install Jenkins?
In this section of What is Jenkins blog, we will show you how to install Jenkins on Windows 10. Jenkins is available for download for other operating systems like different flavors of Unix (e.g. UBuntu, Gentoo, FreeBSD, etc.), as well as Mac OS. You can also put Jenkins in the Docker Container. Please visit https://www.jenkins.io/download/ to download the required Jenkins installer.
Jenkins installer is also available as a generic Java Package (.war). If you are using Jenkins with Selenium for performing cross browser testing, we recommend using the .war file, as you can witness the execution of the test scenarios with automated tests executing on browsers in the non-headless mode.
Prerequisites For Jenkins Installation
- If JDK (Java SE Development Kit) is not present on the machine, download JDK 8 as per the configuration of your system (i.e. 32-bit or 64-bit). At the time of this article, the latest version of JDK for Windows was jdk-8u261-windows*.
- Add the JDK installation path in the System Environment variable. This also needs to be done for JRE (Java Runtime Environment).
- Add environment variable JAVA_HOME pointing to the location where JDK 8 is installed.

Steps To Install Jenkins (Using Jenkins Installer) On Windows 10
- Download the stable version of Jenkins for Windows
- Unzip the downloaded file and start the installation process. Just follow the steps mentioned on the installer screen until the installation is complete. You might be prompted to enter username and password, you can simply logon with the administrator account in your system and follow these steps.

- By default, Jenkins listens on port 8080. When the installation is complete, you would be required to enter the initialAdminPassword present in
< installation-directory >\Jenkins\secrets\ initialAdminPassword
- You would be prompted to create an Admin User. These credentials can be used for logging into Jenkins (instead of using initialAdminPassword).

- Jenkins is ready for usage.

- Optional Step (Changing port associated with Jenkins service)
In case some other service (in the machine where Jenkins is installed) is using the port 8080, Jenkins might face issues in starting up. You can either stop the service (on port 8080) using net stop command or change the port number associated with Jenkins.
Changing the port number is a better option since the services on port 8080 can still function along with Jenkins. For changing the port used by Jenkins, go to < Jenkins-installation-folder >\Jenkins\jenkins.xml
Search for httpPort in the file and change from 8080 to a preferred port of choice (e.g. 9090 in our case). As we mentioned in step-2 above, you need to have admin rights to perform this change.
Jenkins
  Jenkins
  This service runs a Jenkins automation server.

  <!-- if you'd like to run Jenkins with a specific version of Java, specify a full path to java.exe. The following value assumes that you have java in your PATH. -->
  %BASE%jreinjava
  -Xrs -Xmx256m -Dhudson.lifecycle=hudson.lifecycle.WindowsServiceLifecycle -jar "%BASE%jenkins.war" --httpPort=9090 --webroot="%BASE%war"
Once changes are done, restart the Jenkins service and open localhost:port-number (e.g. localhost:9090) in the web browser. Login using the user-name and password (created in step-4).

Steps To Install Jenkins (using .war) On Windows 10
- Download Jenkins installer in the .war format
- Jenkins can start directly from the command line (or terminal) by executing the following command:
java -Dhudson.model.DirectoryBrowserSupport.CSP="sandbox allow-scripts allow-popups allow-popups-to-escape-sandbox; style-src 'unsafe-inline' *;" -Dsvnkit.http.sslProtocols=TLSv1 -jar Jenkins.war --httpPort=9090
localhost:9090 in the web browser to start using Jenkins.
In this ‘what is Jenkins’ blog, we would be using Jenkins in the .war format as cross browser tests can be executed in the non-headless mode only with this format of Jenkins.

How To Configure Jenkins?
In this section of the ‘what is Jenkins’ blog, we look at how to do user management in Jenkins, assigning roles to users, and setting up Master and Agents in Jenkins.
User Management In Jenkins
To manage users in Jenkins, you should navigate to Manage Jenkins ? Configure Global Security. The ideal option is to let Jenkins’ own user database. You can create a user Anonymous that has only read access. Create entries for users you intend to add in the next step.
- In the Authorization strategy, select ‘Matrix-based security’.

- Click on the ‘Add user or group’ button and enter the intended user/group name in the next box.

- On the login page, you should create an account for the newly created user (e.g. Himanshu Sheth in our case) that was just given access.
Assign Roles To Users In Jenkins
For creating a role-based authorization strategy, Role-based Authorization Strategy plugin needs to be installed. For installing the plugin-
- Go to Manage Jenkins ? Manage Plugins ? Enter ‘Role-based Authorization Strategy’ under Available tab. Click ‘Install’ to install the plugin.
- Before assigning roles, it is important to change the Authorization strategy to Role-Based Strategy instead of Matrix-based security.

- In ‘Manage Jenkins’, you would see ‘Manage and Assign Roles’ as shown below.

- Create a new global role e.g. developer and select the permissions that you intend to assign to the role.

You can now assign Project Roles, Item roles, or Node roles. In our case, the role ‘developer’ should be able to access build jobs that start with L. Pattern is the Regex value of the job name and it should be [L]?.* Here is an example of item roles for the role titled ‘developer’.

How To Setup Master & Agent(s) In Jenkins?
Earlier in this ‘what is Jenkins’ blog section titled Master- Agent Architecture in Jenkins, we had a look at the architecture of Jenkins. Here, we will demonstrate the creation of Jenkins Agents (or Nodes) on Windows 10 to further understand how does Jenkins work.
Prerequisites For Agent Creation
Before we go ahead with the creation of Agent Node, the following settings have to be changed in the ‘Global Security’ settings in Jenkins:
- Go to ‘Manage Jenkins’ ? Configure Global Security and change the below settings:

- Go to ‘Authentication’ ? ‘Security Realm’ and change settings to ‘Jenkins’ own user database’.

- Go to ‘Authorization’ ? Strategy and change to ‘Project-based Matrix Authorization Strategy’. Enable ‘Read’ and ‘SystemRead’ properties for user ‘Anonymous users’. Enable ‘Connect’ in the ‘Agent section’ for user ‘Anonymous users’.

- Go to ‘Agents’ ? ‘TCP port for inbound agents’ and change the setting to ‘Random’.

- Go to ‘Agent ? Master Security’ and enable ‘Enable Agent → Master Access Control’. Change setting for ‘SSHD Port’ in ‘SSH Server’ section to ‘Disable’.

- Click on Apply and Save to save these settings.
Steps To Create Agent(s) In Jenkins
- With the completion of the prerequisites for Agent (or Node) creation, we go to the ‘Manage Jenkins’ section and go to ‘Manage Nodes and Clouds’.

- Click on New Node and give an appropriate name (e.g. Agent) to the Node. Enable the setting ‘Permanent Agent’ so that the agent is permanent to Jenkins.
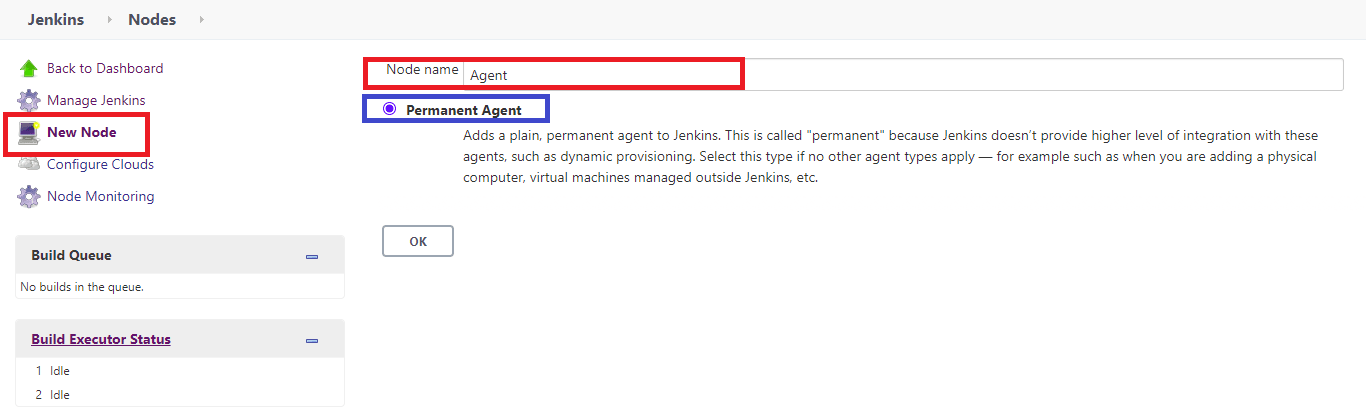
- In this step, you need to enter the details of the node agent machine. No (#) of executors is the number of jobs that the agent can run in parallel. We keep this setting as 2. Labels is the identifier for the agent and is useful if you want to execute jobs on that particular agent (through a Jenkins Pipeline).The Remote Root Directory is the location where the agent.jar will be stored and it could point to any directory in your machine. In our case, we set Remote Root Directory to
C:\Jenkins_Agent.In Usage, you can select ‘Use this node as much as possible’. As shown below, there are different ways in which the Agent can be launched but we select the option ‘Launch agent by connecting to the Master’.
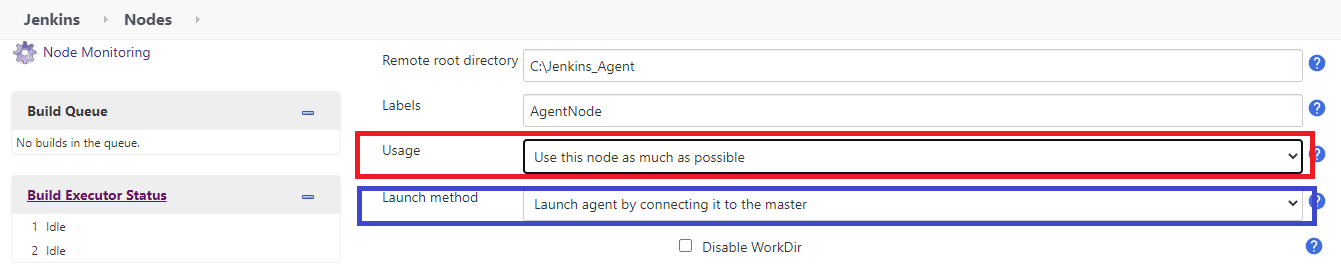
In Availability, you can keep ‘Keep this agent online as much as possible’ Rest of the settings can be kept in the default state. Click ‘Save’ to create the node named ‘Agent’.

- The new node named ‘Agent’ is created but its status is offline.
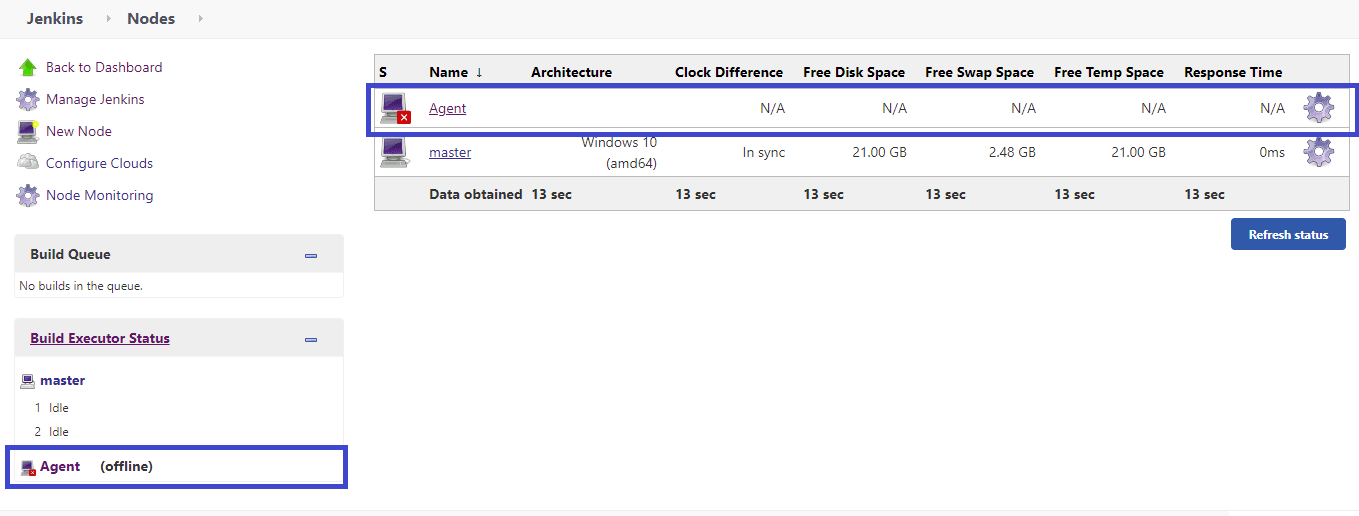
Click on the node named ‘Agent’ and you would be presented with different ways through which it can connect to Jenkins.
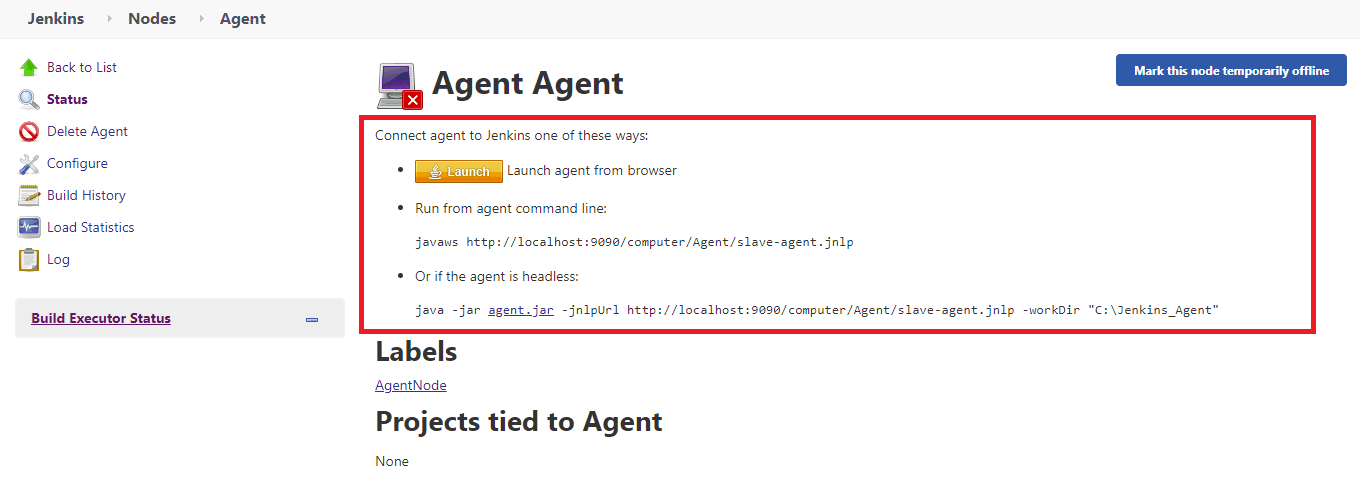
Click on the Launch button and save slave-agent.jnlp in the designated directory (i.e. in our case it is
C:\Jenkins_Agent). Click on agent.jar (mentioned in the option ‘If the agent is headless’) and save agent.jar in the same location. This jar will be used if you want to use the browser for testing in the headless mode.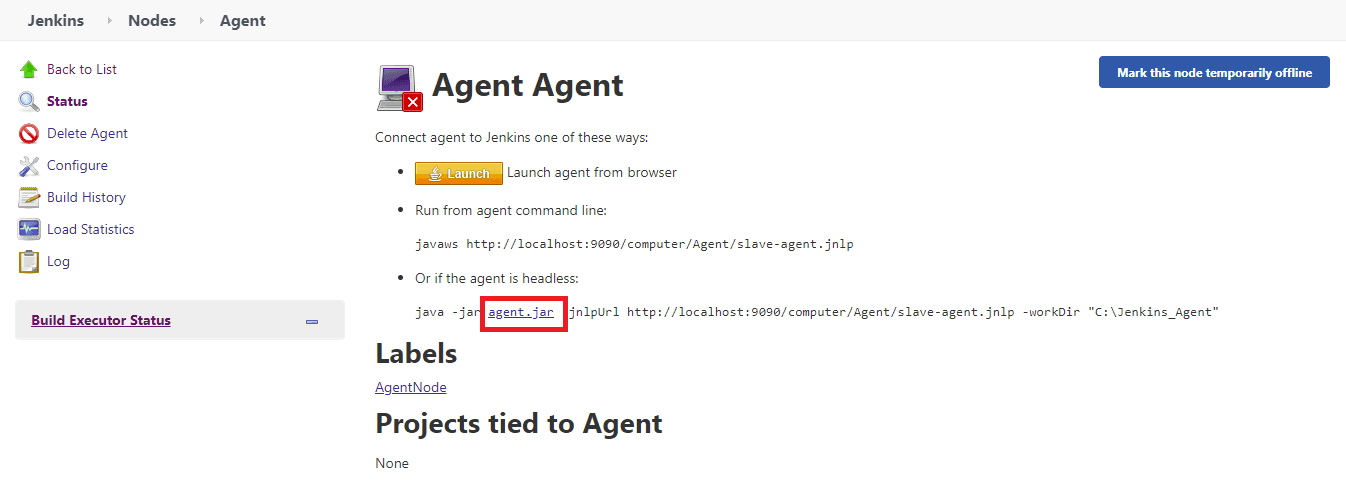
- To start the newly created Agent named ‘Agent’, go to the terminal and execute the following command:
javaws http://localhost:9090/computer/Agent/slave-agent.jnlp
java -jar agent.jar -jnlpUrl http://localhost:9090/computer/Agent/slave-agent.jnlp -workDir "c:Jenkins_Agent"
This would open the application named ‘Jenkins Remoting Agent’. Click on Run to start the application.
As you can see, the status of the node named ‘Agent’ is connected. The same can be verified by looking at the status of the corresponding Node.
Alternatively, you can execute the following command if the agent is to be used in the headless mode.
Here is the execution snapshot:

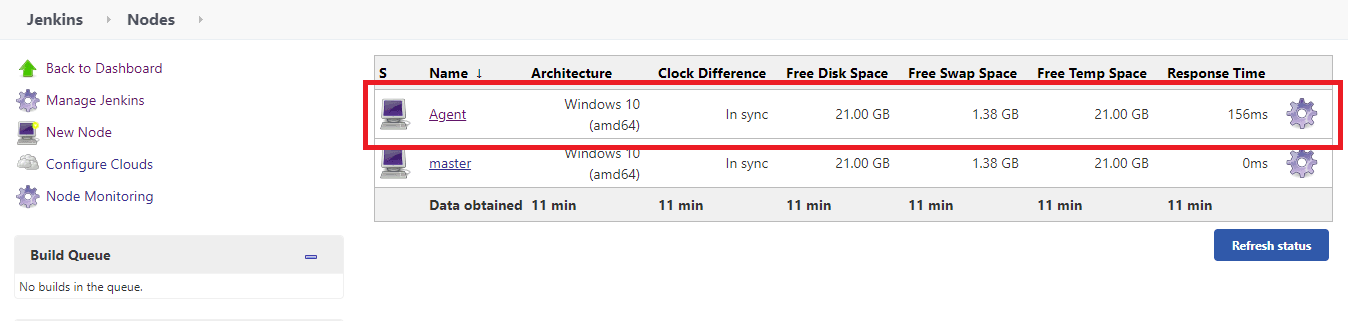
- Since a new agent is up & running, you can now execute jobs on the ‘Agent’ node.
What Is Jenkins Pipeline?
Pipeline in Jenkins is a group of jobs (or events) that are interlinked in a particular sequence. Jenkins Pipeline is a set or suite of plugins that provides support for implementation and integration of Continuous Delivery pipelines into Jenkins.
The Pipeline also provides a set of tools that are useful for modeling simple as well as complex delivery pipelines ‘as code’ through ‘Pipeline Domain-Specific Language (DSL)’ syntax.
Every job in the Jenkins pipeline has some dependency on one or more events. Continuous delivery pipeline in Jenkins consists of four states – Build, Deploy, Test, and Release. Each of these states consist of events that execute in a sequence.
What Is Jenkinsfile?
Now that you understand what is Jenkins pipeline, we can dive deeper into the concept. The entire definition of a Jenkins Pipeline is written into a text file called Jenkinsfile. It contains the steps required for running a Jenkins Pipeline. ‘Pipeline as code’ can be implemented using Jenkinsfile and Domain Specific Language (DSL) is used for defining the same.
Jenkinsfile can also be committed to the source control repository of the project. With Jenkinsfile, the CD Pipeline is also treated as a part of the application that is versioned, committed, and reviewed like any other piece of code.
Some of the major benefits of Jenkinsfile are:
- Single Jenkinsfile can be used for creating a Pipeline build process for all the branches and executing pull requests.
- The implementation in a Pipeline can be reviewed like normal source code.
- Audit trail of the Pipeline.
- Singular source for the Pipeline can be viewed as well as edited by multiple members associated with the project.
Though Pipeline can be defined either in web UI or with a Jenkinsfile, it is recommended to define what is Jenkins Pipeline in a Jenkinsfile and maintain the same in a source control repository.
Syntax For Defining A Jenkinsfile
To define what is Jenkins pipeline, Jenkinsfile can be written using the following types of Syntax:
a. Declarative
Declarative Pipeline is a recent feature of Jenkins Pipeline that makes reading and writing the Pipeline code a lot easier. Unlike Scripted Syntax with Pipelines, Declarative Syntax helps in controlling different aspects of the Pipeline in a simplistic manner.
b. Scripted
Scripted Pipeline is a more traditional way of writing a Jenkins Pipeline as code. It uses traditional Groovy-based syntax. The Web UI of Jenkins is normally used for writing the Scripted Pipeline in a Jenkinsfile.
Important Concepts Of Jenkins Pipeline
Moving on with what is Jenkins pipeline, here are some basic concepts that need to be well-understood if you are planning to use the Jenkins Pipeline:
a. Pipeline
The Pipeline consists of a set of instructions written as code. It defines the entire build process, which ideally consists of different stages for building, testing, and delivering the application.
b. Node
A node is a machine that is a part of the Jenkins environment. The Jenkins Pipeline executes on a node block that is usually a part of the Scripted Pipeline syntax.
c. Stage
Stage in a Jenkins Pipeline consists of a unique subset of tasks such as Build, Test, Deploy, etc. The Stage block is used by many plugins for providing the visualization of Jenkins status (and progress).
d. Step
Step is a single task that tells Jenkins what exactly needs to be done. For example, setting an environment variable can be done in a step, executing a build command can also be a step. On the whole, a Jenkins Pipeline constitutes a series of steps.
Advantages Of Using Jenkins Pipeline
Jenkins Pipeline is instrumental in adding a rich set of automation tools onto Jenkins. Hence, Jenkins can be used for simple continuous integration as well as for comprehensive CD pipelines.
These are some of the primary reasons for using the Jenkins Pipeline:
- As the Jenkins Pipeline is implemented as code, it can be checked in the source control repository. Teams can view, edit, as well as iterate upon the delivery pipeline.
- Jenkins Pipelines are robust. A Pipeline is automatically resumed in case the server witnesses an unplanned restart.
- Pipeline process can pause and wait for input for any input from the user.
- Pipelines are versatile as they can be used for realizing complex CD requirements, including performing work in parallel.
- Jenkins Pipelines are extensible by plugin developers and users with Pipeline Shared Libraries.
Declarative Pipeline Sample
Here is a simple example of a Declarative Pipeline-
pipeline {
    agent any
    stages {
        stage('Build') {
            steps {
            }
        }
        stage('Test') {
            steps {
            }
        }
        stage('Deploy') {
            steps {
            }
        }
    }
}
The pipeline blocks define the work that has been done through the defined Pipeline. Listed down here are some of the essential details of this Pipeline:
- Agent ‘any’ means the Pipeline stages can be executed on any available Agent.
- ‘Build’, ‘Test’, and ‘Deploy’ are the different stages in the pipeline. Each of them will run in a sequential manner.
- Instructions inside ‘Steps’ indicates the work that needs to be performed as a part of a particular ‘Stage’. For example, sh ‘build command’ can be used for triggering a build command in the ‘Build’ stage.
We have not covered the Scripted Pipeline, as that is beyond the scope of this blog. In the later part of the What is Jenkins blog, we would demonstrate the usage of the Declarative Pipeline for the Maven project.
Demonstration Of Jenkins
We hope the above sections have helped to answer the following questions- what is Jenkins, how does Jenkins work, and what is Jenkins Pipeline. In this section, we demonstrate the usage of Jenkins with the Maven project and Pipeline project.
Test Scenario
- Navigate to https://lambdatest.github.io/sample-todo-app/
- Choose the first two of the checkboxes
- Type ‘Happy Testing at TestMu AI’ in the textbox with an id ‘sampletodotext’
- Select the ‘Add’ Button and check whether the text has been added or not
Implementation
The TestNG test framework is used for performing Selenium test automation. For a quick recap on TestNG, you can refer to this guide for creating TestNG Project In Eclipse.
package org.selenium4;

import org.openqa.selenium.chrome.ChromeDriver;
import org.testng.annotations.AfterClass;
import org.testng.annotations.BeforeClass;
import org.testng.annotations.Test;
import org.openqa.selenium.By;
import org.openqa.selenium.WebElement;
import java.util.Map;
import java.util.*;
import io.github.bonigarcia.wdm.WebDriverManager;

public class CrossBrowserTest {
    protected static ChromeDriver driver;
    String URL = "https://lambdatest.github.io/sample-todo-app/";

    @BeforeClass
    public void testSetUp() {
        WebDriverManager.chromedriver().setup();
        driver = new ChromeDriver();
    }

    @Test
    public void test_Selenium4_ToDoApp() throws InterruptedException {
        driver.navigate().to(URL);
        driver.manage().window().maximize();

        try {
            /* Let's mark done first two items in the list. */
            driver.findElement(By.name("li1")).click();
            driver.findElement(By.name("li2")).click();

            /* Let's add an item in the list. */
            driver.findElement(By.id("sampletodotext")).sendKeys("Happy Testing at TestMu AI");
            driver.findElement(By.id("addbutton")).click();

            /* Let's check that the item we added is added in the list. */
            String enteredText = driver.findElement(By.xpath("/html/body/div/div/div/ul/li[6]/span")).getText();
            if (enteredText.equals("Happy Testing at TestMu AI")) {
                System.out.println("Demonstration of Jenkins is complete");
            }
        } catch (Exception e) {
            System.out.println(e.getMessage());
        }
    }

    @AfterClass
    public void tearDown() {
        if (driver != null) {
            driver.quit();
        }
    }
}
<?xml version="1.0" encoding="UTF-8"?>
<project xmlns="http://maven.apache.org/POM/4.0.0"
         xmlns:xsi="http://www.w3.org/2001/XMLSchema-instance"
         xsi:schemaLocation="http://maven.apache.org/POM/4.0.0 http://maven.apache.org/xsd/maven-4.0.0.xsd">
    <modelVersion>4.0.0</modelVersion>

    <groupId>org.example</groupId>
    <artifactId>org.selenium4.SeleniumGrid4</artifactId>
    <version>1.0-SNAPSHOT</version>

    <properties>
        <project.build.sourceEncoding>UTF-8</project.build.sourceEncoding>
    </properties>

    <dependencies>
        <!-- https://mvnrepository.com/artifact/com.github.lambdatest/lambdatest-tunnel-binary -->
        <dependency>
            <groupId>org.testng</groupId>
            <artifactId>testng</artifactId>
            <version>6.9.10</version>
            <scope>test</scope>
        </dependency>
        <dependency>
            <groupId>org.seleniumhq.selenium</groupId>
            <artifactId>selenium-java</artifactId>
            <version>4.0.0-alpha-6</version>
        </dependency>
        <dependency>
            <groupId>org.testng</groupId>
            <artifactId>testng</artifactId>
            <version>6.8.8</version>
        </dependency>
        <dependency>
            <groupId>org.seleniumhq.selenium</groupId>
            <artifactId>selenium-chrome-driver</artifactId>
            <version>4.0.0-alpha-6</version>
        </dependency>
        <dependency>
            <groupId>io.github.bonigarcia</groupId>
            <artifactId>webdrivermanager</artifactId>
            <version>RELEASE</version>
            <scope>test</scope>
        </dependency>
        <!-- https://mvnrepository.com/artifact/org.slf4j/slf4j-nop -->
        <dependency>
            <groupId>org.slf4j</groupId>
            <artifactId>slf4j-nop</artifactId>
            <version>1.7.28</version>
            <scope>test</scope>
        </dependency>
    </dependencies>

    <build>
        <plugins>
            <plugin>
                <artifactId>maven-compiler-plugin</artifactId>
                <version>3.0</version>
                <configuration>
                    <source>1.8</source>
                    <target>1.8</target>
                </configuration>
            </plugin>
            <plugin>
                <groupId>org.apache.maven.plugins</groupId>
                <artifactId>maven-surefire-plugin</artifactId>
                <version>2.12.4</version>
            </plugin>
        </plugins>
    </build>
</project>
We have used IntelliJ for development. You could use Eclipse or any preferred IDE for development.
Code WalkThrough
The implementation under the @BeforeClass annotation sets the browser capabilities for the Chrome browser.
@BeforeClass
    public void testSetUp() {
        WebDriverManager.chromedriver().setup();
        driver = new ChromeDriver();
The test case test_Selenium4_ToDoApp() is implemented under the @Test annotation. Selenium methods such as find_element_by_name(), driver.find_element_by_id(), etc. are used for locating the web elements on which operations have to be performed. Selenium commands such as click(), sendKeys(), etc. are applied on the necessary web elements.
@Test
    public void test_Selenium4_ToDoApp() throws InterruptedException {
        driver.navigate().to(URL);
        driver.manage().window().maximize();

    try {
            ...............
            ...............
        }
Declarative Pipeline Example in Jenkins
In this section of What is Jenkins blog, we demonstrate the usage of the Declarative Jenkins pipeline for Maven project.
Setting Up The Project
Perform the following steps to setup the project:
- Create a ‘new Item’ after logging in to Jenkins. Enter the item name ‘Jenkins Declarative Pipeline Demonstration’. Select Pipeline as the Project Type.

- The following Jenkins Plugins are installed by navigating to the pluginManager i.e. localhost:/pluginManager/
- Blue Ocean Plugin – https://plugins.jenkins.io/blueocean
- Blue Ocean Pipeline Editor Plugin – https://plugins.jenkins.io/blueocean-pipeline-editor
- Configuration as a Code Plugin – https://plugins.jenkins.io/config-file-provider
- JUnit Plugin – https://plugins.jenkins.io/junit/
- HTML Publisher Plugin – https://plugins.jenkins.io/htmlpublisher
- Maven Integration Plugin – https://plugins.jenkins.io/maven-plugin
- Maven Info Plugin – https://plugins.jenkins.io/maven-info
- Maven SureFire Plugin – https://maven.apache.org/surefire/maven-surefire-plugin/
- Pipeline implementation for Blue Ocean Plugin – https://plugins.jenkins.io/blueocean-pipeline-api-impl
- Pipeline Maven Integration Plugin – https://plugins.jenkins.io/pipeline-maven
- Configure the global settings and paths (for Java and Maven) by navigating to ‘Configure System’ in the System Configuration section.
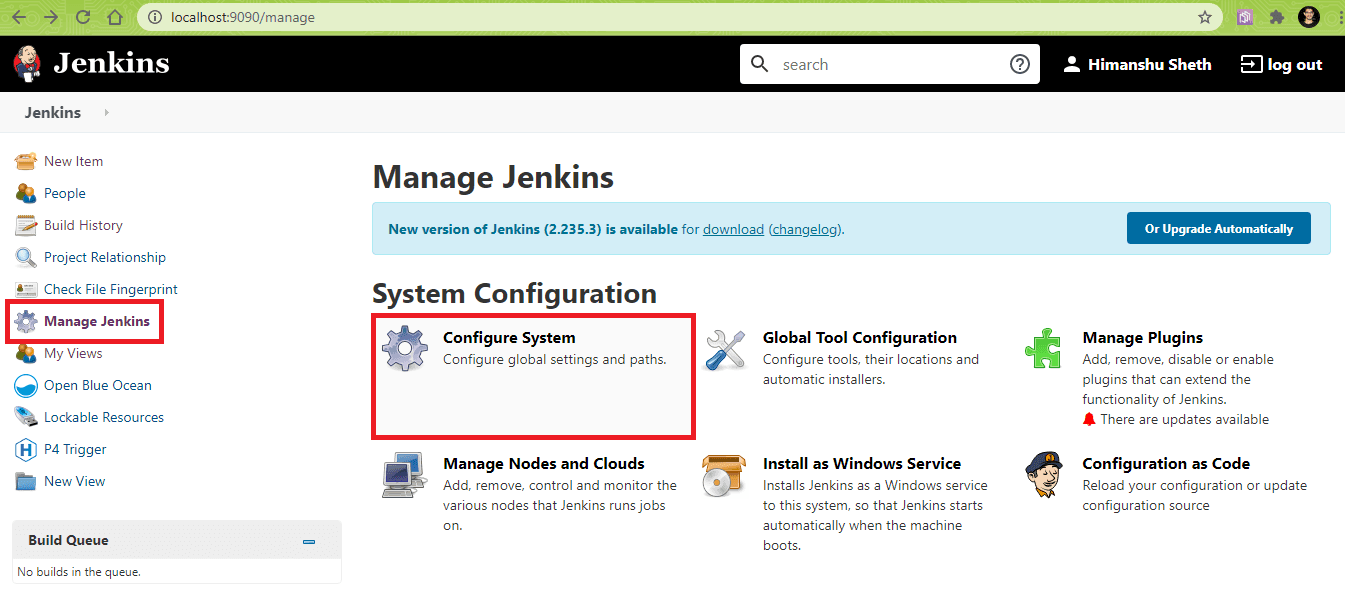
Navigate to the configuration item titled ‘Global properties’ and add the following environment variables:
- JAVA_HOME – < Location where JDK is installed >
- MAVEN_HOME – < Location where Maven is installed >
In our case the entries are as below:
- JAVA_HOME – C:\Program Files\Java\jdk1.8.0_251
- MAVEN_HOME – C:\apache-maven\apache-maven-3.6.3\
Click on Apply and Save.
- The added environment variables will be used in the Pipeline.

- Blue Ocean Plugin – https://plugins.jenkins.io/blueocean
- Blue Ocean Pipeline Editor Plugin – https://plugins.jenkins.io/blueocean-pipeline-editor
- Configuration as a Code Plugin – https://plugins.jenkins.io/config-file-provider
- JUnit Plugin – https://plugins.jenkins.io/junit/
- HTML Publisher Plugin – https://plugins.jenkins.io/htmlpublisher
- Maven Integration Plugin – https://plugins.jenkins.io/maven-plugin
- Maven Info Plugin – https://plugins.jenkins.io/maven-info
- Maven SureFire Plugin – https://maven.apache.org/surefire/maven-surefire-plugin/
- Pipeline implementation for Blue Ocean Plugin – https://plugins.jenkins.io/blueocean-pipeline-api-impl
- Pipeline Maven Integration Plugin – https://plugins.jenkins.io/pipeline-maven
- JAVA_HOME – < Location where JDK is installed >
- MAVEN_HOME – < Location where Maven is installed >
- JAVA_HOME – C:\Program Files\Java\jdk1.8.0_251
- MAVEN_HOME – C:\apache-maven\apache-maven-3.6.3\
Adding these environment variables in the System Configuration section makes the settings public (i.e. it can be used across different jobs in Jenkins).
With this, we are all set to write our first declarative Pipeline!
Writing The Declarative Pipeline
In the project titled ‘Jenkins Declarative Pipeline Demonstration’, click on Configure. In the project configuration window, click on the Pipeline Tab.

Under Pipeline ‘Definition’, select Pipeline Script. Paste the contents of the following Jenkinsfile in the Script box. Click on Apply and Save.
pipeline {
    agent any
    tools {
        maven 'MAVEN_3.6.3'
        jdk 'JDK_1.8.0_251'
    }
    stages {
        stage('Build') {
            environment {
                PROJECT_DIR = "C:\Users\Lenovo\IdeaProjects\CrossBrowserTest"
            }
            steps {
                echo 'maven clean'
                bat ' mvn -f %PROJECT_DIR%\pom.xml clean install'
            }
        }
    }
    post {
            success {
                        echo 'Now Archiving'
                        junit allowEmptyResults: true, testResults: '**/surefire-reports/*.xml'
                }
        }
}
Pipeline Walkthrough
- This particular Jenkins job can run on any Agent.
pipeline {
    agent any
tools {
        maven 'MAVEN_3.6.3'
        jdk 'JDK_1.8.0_251'
    }

stage('Build') {
            environment {
                PROJECT_DIR = "C:\Users\Lenovo\IdeaProjects\CrossBrowserTest"
            }
steps {
                echo 'maven clean'
                //ABC indicates the folder name where the pom.xml file resides
                bat ' mvn -f %PROJECT_DIR%\pom.xml clean install'
            }
post {
            success {
                        echo 'Now Archiving'
                        junit allowEmptyResults: true, testResults: '**/surefire-reports/*.xml'
                }
        }
}
Once we have added the Pipeline to the Jenkinsfile, click on ‘Open Blue Ocean’ link to run the job. Alternatively, you could also issue a Build by clicking on the ‘Build Now’ option, in which case you need not install the Blue Ocean plugin.

Click on ‘Run’ to run the job.

As shown below, the configuration of tools (i.e. JDK and Maven) was successful.

The Steps ‘Build’ and post-build action ran without any issues.

This is the Stage View of the current Jenkins pipeline. The Declarative Tools install stage completed in 2 seconds and the Build stage took 3 minutes and 25 seconds.

You can hover to any stage and have a look at the logs of that particular stage. As shown in the Console Output, the test scenario was executed successfully where the Chrome WebDriver was instantiated and required actions were performed on the webpage under test.
Truncated Console Logs are below:
[INFO] --- maven-compiler-plugin:3.0:testCompile (default-testCompile) @ org.selenium4.CrossBrowserTest ---
[INFO] Changes detected - recompiling the module!
[INFO] Compiling 1 source file to C:UsersLenovoIdeaProjectsCrossBrowserTest	arget	est-classes
[INFO]
[INFO] --- maven-surefire-plugin:2.12.4:test (default-test) @ org.selenium4.CrossBrowserTest ---
[INFO] Surefire report directory: C:UsersLenovoIdeaProjectsCrossBrowserTest	argetsurefire-reports

-------------------------------------------------------
 T E S T S
-------------------------------------------------------
Running org.selenium4.CrossBrowserTest
Configuring TestNG with: org.apache.maven.surefire.testng.conf.TestNG652Configurator@299a06ac
Starting ChromeDriver 84.0.4147.30 (48b3e868b4cc0aa7e8149519690b6f6949e110a8-refs/branch-heads/4147@{#310}) on port 45010
Only local connections are allowed.
Please see https://chromedriver.chromium.org/security-considerations for suggestions on keeping ChromeDriver safe.
ChromeDriver was started successfully.
[1595945821.200][WARNING]: Timed out connecting to Chrome, retrying...
Jul 28, 2020 7:47:03 PM org.openqa.selenium.remote.ProtocolHandshake createSession
INFO: Detected dialect: W3C
Demonstration of Jenkins is complete
Tests run: 1, Failures: 0, Errors: 0, Skipped: 0, Time elapsed: 93.655 sec

Results :

Tests run: 1, Failures: 0, Errors: 0, Skipped: 0
Maven Project Example In Jenkins
Next up in this what is Jenkins blog, we dive into using Maven with Jenkins. Maven project in Jenkins takes advantage of the POM files and reduces the overall effort spent on the configuration of the project.
Setting Up The Project
Perform the following steps to setup the Maven project:
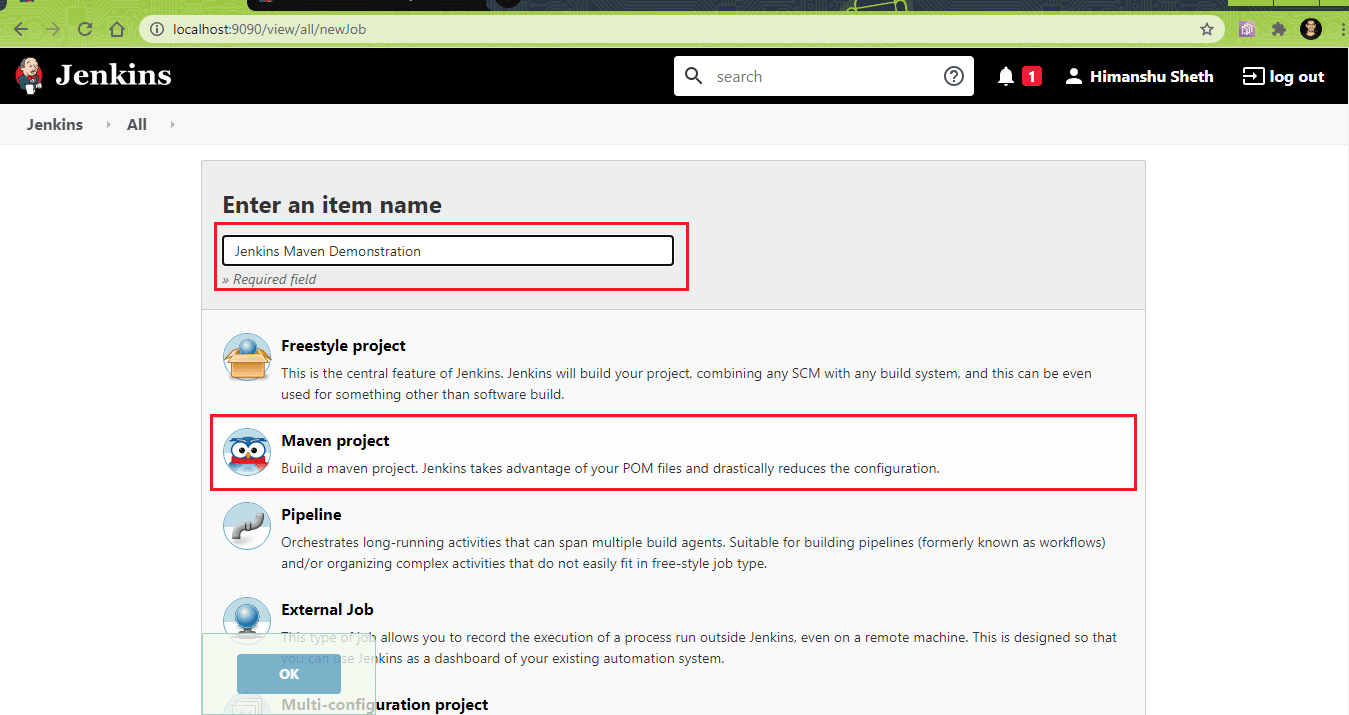
- Create a ‘new Item’ after logging in to Jenkins. Enter the item name ‘Jenkins Maven Demonstration’. Select Maven project as the project type and click OK.
- The following Jenkins Plugins are installed by navigating to the pluginManager i.e.
http://localhost:< port_associated_with_Jenkins >/pluginManager/. The same set of plugins were also installed for the Jenkins Pipeline demonstration.- Blue Ocean Plugin – https://plugins.jenkins.io/blueocean
- Blue Ocean Pipeline Editor Plugin – https://plugins.jenkins.io/blueocean-pipeline-editor
- Configuration as a Code Plugin – https://plugins.jenkins.io/config-file-provider
- JUnit Plugin – https://plugins.jenkins.io/junit/
- HTML Publisher Plugin – https://plugins.jenkins.io/htmlpublisher
- Maven Integration Plugin – https://plugins.jenkins.io/maven-plugin
- Maven Info Plugin – https://plugins.jenkins.io/maven-info
- Maven SureFire Plugin – https://maven.apache.org/surefire/maven-surefire-plugin/
- Pipeline implementation for Blue Ocean Plugin – https://plugins.jenkins.io/blueocean-pipeline-api-impl
- Pipeline Maven Integration Plugin – https://plugins.jenkins.io/pipeline-maven
- Now, go to the Build Tab and enter the details in Root POM and Goals & Options. In Root POM, enter the location of the directory where project pom.xml is located. We enter clean test in Goals & Options so that a clean build is performed.
- Root POM –
< Project-Directory >\pom.xml - Goals and Options – clean test
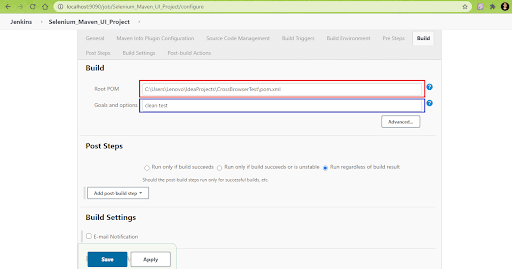
Post build, if a test report is required, you can add the relevant ‘Add post-build step’ in the Post Steps tab.
- Root POM –
- Click on Apply and Save. Click on Build Now (or choose the same project from ‘Open Blue Ocean’) to start the build process.

- Blue Ocean Plugin – https://plugins.jenkins.io/blueocean
- Blue Ocean Pipeline Editor Plugin – https://plugins.jenkins.io/blueocean-pipeline-editor
- Configuration as a Code Plugin – https://plugins.jenkins.io/config-file-provider
- JUnit Plugin – https://plugins.jenkins.io/junit/
- HTML Publisher Plugin – https://plugins.jenkins.io/htmlpublisher
- Maven Integration Plugin – https://plugins.jenkins.io/maven-plugin
- Maven Info Plugin – https://plugins.jenkins.io/maven-info
- Maven SureFire Plugin – https://maven.apache.org/surefire/maven-surefire-plugin/
- Pipeline implementation for Blue Ocean Plugin – https://plugins.jenkins.io/blueocean-pipeline-api-impl
- Pipeline Maven Integration Plugin – https://plugins.jenkins.io/pipeline-maven
- Root POM –
< Project-Directory >\pom.xml - Goals and Options – clean test
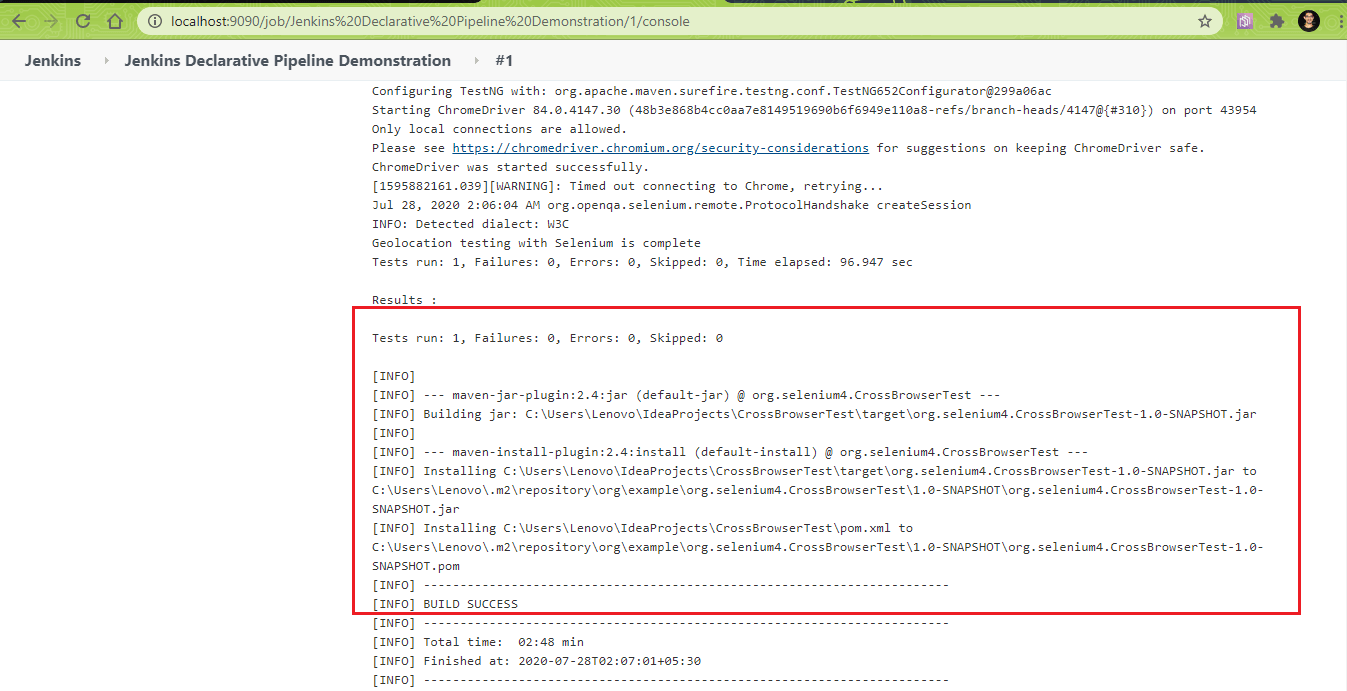
As seen in the Console Logs, the test was executed successfully.
[INFO] --- maven-resources-plugin:2.6:testResources (default-testResources) @ org.selenium4.CrossBrowserTest ---
[INFO] Using 'UTF-8' encoding to copy filtered resources.
[INFO] skip non existing resourceDirectory C:UsersLenovoIdeaProjectsCrossBrowserTestsrc	est
esources
[INFO]
[INFO] --- maven-compiler-plugin:3.0:testCompile (default-testCompile) @ org.selenium4.CrossBrowserTest ---
[INFO] Changes detected - recompiling the module!
[INFO] Compiling 1 source file to C:UsersLenovoIdeaProjectsCrossBrowserTest	arget	est-classes
[INFO]
[INFO] --- maven-surefire-plugin:2.12.4:test (default-test) @ org.selenium4.CrossBrowserTest ---
[INFO] Surefire report directory: C:UsersLenovoIdeaProjectsCrossBrowserTest	argetsurefire-reports

-------------------------------------------------------
 T E S T S
-------------------------------------------------------
Running org.selenium4.CrossBrowserTest
Configuring TestNG with: org.apache.maven.surefire.testng.conf.TestNG652Configurator@299a06ac
Starting ChromeDriver 84.0.4147.30 (48b3e868b4cc0aa7e8149519690b6f6949e110a8-refs/branch-heads/4147@{#310}) on port 39047
Only local connections are allowed.
Please see https://chromedriver.chromium.org/security-considerations for suggestions on keeping ChromeDriver safe.
ChromeDriver was started successfully.
[1595948996.334][WARNING]: Timed out connecting to Chrome, retrying...
[1595949004.487][WARNING]: Timed out connecting to Chrome, retrying...
Jul 28, 2020 8:40:15 PM org.openqa.selenium.remote.ProtocolHandshake createSession
INFO: Detected dialect: W3C
Demonstration of Jenkins is complete
Tests run: 1, Failures: 0, Errors: 0, Skipped: 0, Time elapsed: 94.51 sec
Results :

Tests run: 1, Failures: 0, Errors: 0, Skipped: 0
Advantages & Shortcomings Of Jenkins
We hope this ‘what is Jenkins’ blog helped you in understanding the CI server in a more practical sense. Before you jump on the Jenkins bandwagon, it is essential to understand its advantages and shortcomings. We have listed them down to make the choice easier for you-
Advantages Of Jenkins
In this section of what is Jenkins tutorial, let’s look at some of the significant advantages of using Jenkins:
- Jenkins is open-source and free to use. It is a preferred CI/CD tool by early-stage startups as well as large corporations since it has been under development since a long time.
- It is a rich plugin ecosystem. At the time of this article, there were close to 1500+ plugins available for use.
- Jenkins can be integrated with popular cloud platforms such as Amazon EC2, Google Cloud, VMWare vSphere, Digital Ocean, and more.
- Jenkins Pipelines can be extremely useful for realizing CD requirements for large-scale projects.
Shortcomings Of Jenkins
Jenkins also its own share of shortcomings (not necessarily disadvantages). These are some of the major shortcomings of Jenkins:
- As a product, Jenkins is more ‘feature’ driven and ‘developer’ centric. Users who are obsessed with user interfaces may have to go through a learning curve to use Jenkins.
- Setting changes (including plugin installations) might result in issues such as Jenkins not starting up, etc. In such scenarios, you have to search online for a solution and fortunately you would find one as Jenkins has a large user-base!
Overall, Jenkins is a powerful CI/CD tool that is truly built for developers!
Also, explore 50+ Commonly Asked Jenkins Interview Questions in 2023. Perfect for interview prep or boosting your Jenkins knowledge.

It’s A Wrap
We appreciate your effort to stay glued to this lengthy ‘what is Jenkins’ blog and reaching this far! Jenkins is an excellent CI/CD tool that has excellent functionalities and the best part is that it is free to use. Based on what we discussed in this what is Jenkins blog, we can conclude that Jenkins has features that boost release agility by providing CI services.
Jenkins Pipeline is another feature that enhances the offerings of Jenkins, as it lets you implement a Pipeline as Code using Domain Specific Language (DSL). Though there are other CI/CD tools in the market, Jenkins thrives on its community and powerful set of features (particularly Jenkins Pipeline) that offers faster feedback through CI tools.
Plugins, extensibility, and online community are the core USPs of Jenkins. To improve the usability and functionality of tools like Jenkins, you can use cloud-based cross browser testing platforms. One such platform is TestMu AI that also offers a Jenkins Plugin to accelerate your automated browser testing activities. With TestMu AI, you can perform tests on 3000+ combinations of browsers, operating systems, and devices.
Happy Testing!
Frequently asked questions
Did you find this page helpful?
More Related Hubs
TestMu AI forEnterprise
Get access to solutions built on Enterprise
grade security, privacy, & compliance
- Advanced access controls
- Advanced data retention rules
- Advanced Local Testing
- Premium Support options
- Early access to beta features
- Private Slack Channel
- Unlimited Manual Accessibility DevTools Tests