
Next-Gen App & Browser Testing Cloud
Trusted by 2 Mn+ QAs & Devs to accelerate their release cycles

How To Write End-To-End Tests Using Cypress App Actions
In this blog on Cypress App Actions, you will learn how Cypress App Actions differs from Page Object Model and how you will run tests with Cypress App Actions in a cloud grid like TestMu AI.

Enrique
December 24, 2025
Cypress is a popular end-to-end testing framework that simplifies the process of writing and executing tests for web applications. One of its powerful features is App Actions, which allows developers to simulate real user interactions, such as clicking buttons, filling forms, and navigating through the app. In this guide, you’ll learn how to write end-to-end tests using Cypress App Actions to ensure your web app performs seamlessly under various user scenarios, while making your tests more reliable and efficient.
Overview
Cypress App Actions enable testers to manipulate an application’s state directly, bypassing the user interface (UI) for faster and more efficient end-to-end testing.
What Are App Actions in Cypress?
Cypress App Actions provide a faster way to interact with an application’s internal logic rather than relying on UI-based workflows. This makes tests more efficient and resilient to UI changes.
App Actions are shortcuts or custom commands that interact directly with an app’s internal state instead of simulating UI actions. They extend Cypress’s capabilities by allowing users to:
- Modify application state programmatically without using the UI.
- Speed up tests by skipping redundant UI interactions.
- Automate complex scenarios like login, data setup, or form submission quickly.
Each action is re-run when the state changes, making them ideal for dynamic applications where UI testing can be time-consuming.
How Are Cypress App Actions Different from Page Object Model?
Understanding the difference between App Actions and POM helps testers choose the right structure for their automation framework. While POM organizes test code, App Actions focus on performance and speed.
While the Page Object Model (POM) focuses on encapsulating UI interactions into reusable functions, App Actions allow direct access to the application state.
Comparison:
- POM: Keeps tests organized but can slow execution due to heavy reliance on UI elements.
- App Actions: Offer better performance by bypassing UI, improving test speed and reliability.
App Actions enhance reusability and performance but can be harder to debug without a structured hierarchy like POM.
Why Use Cypress App Actions?
- Using App Actions helps teams achieve faster execution, higher test coverage, and stable test performance without being limited by UI constraints.
- Using App Actions reduces test execution time drastically by removing UI dependency.
- In a real-world to-do app example, tests that took 9 seconds via UI completed in just 1 second with App Actions.
- This approach improves efficiency for large-scale applications and ensures faster test feedback cycles.
Cypress App Actions revolutionize how end-to-end tests are executed by combining speed, flexibility, and reduced dependency on UI interactions. They empower teams to build scalable, maintainable, and high-performing test suites that deliver rapid and reliable results.
What are App Actions?
App Actions are shortcuts or actions inside your application that will help you change and manipulate your application’s state without using the graphical user interface (GUI).
Actions are one of the most exciting new features of Cypress automation tool. They enable you to extend your app’s functionality by adding an unlimited number of custom commands. They are the equivalent of writing a Cypress module but with much higher developer velocity.
Each action has its state, so any time the state changes, the test will be re-run automatically. With Cypress App actions, you can automatically log users, fill out forms, click buttons, and much more with little or no effort.
Austin Siewert
CEO, Vercel
Discovered @TestMu AI yesterday. Best browser testing tool I've found for my use case. Great pricing model for the limited testing I do 👏
2M+ Devs and QAs rely on TestMu AI
Deliver immersive digital experiences with Next-Generation Mobile Apps and Cross Browser Testing Cloud
Cypress App Actions vs. Page Object Model
The page object model is a popular design pattern when it comes to Cypress E2E testing.
The Cypress page object model serves some good purposes, like preventing code duplication, but like anything else, the page object model design pattern has its pros and cons.
Page Object Model (POM)
Page objects help to keep tests organized and maintainable by encapsulating DOM interactions into reusable functions. This way, if the UI changes, you only need to update the page object methods rather than doing changes in your entire test suite.
However, page objects can easily become too long to read or understand when your project grows larger and larger, making it challenging to find the relevant code for a particular test.
App actions, on the other hand, are written as general-purpose functions that can be reused across multiple tests. The most important benefit to Cypress App Actions is that it completely bypasses the user interface, making your test suites much more performant.
This makes them more flexible since you can create many custom actions, but also more difficult to debug since there is no clear structure. When deciding which approach to take, it’s essential to weigh the tradeoffs and decide what will work best for your specific needs.
Shortcomings of Page Object Model?
- Page objects can be tricky to work with because they introduce an additional state level into your tests that is separate from the application’s initial state.
- Page objects make it difficult for you to debug and may lead you astray when trying to understand exactly what went wrong with a test case since the tests depend on the previous state instead of the initial state of the application.
- Page objects could make your test cases extremely slow and inefficient since they always have to use the user interface to interact with the application.
You can learn more about it through this blog on Cypress best practices.
Why Cypress App Actions?
Let’s say we have a sample to-do application in which a user can add and delete to-do items, and there are also featureful to-dos at once.
Let’s say we want to test the button which deletes all to-dos. To perform Cypress testing of this feature, we first visit the page with Cypress, add the to-dos, and then press the delete button to see if this new feature works.
If we have done this the regular way (using the graphical user interface) and not by using Cypress App Actions, it will take some time for Cypress to type some to-dos in a text input and add them one by one. Therefore the application needs more time to be thoroughly tested.
However, this amount of time looks insignificant in this basic example. What if you had an extensive application and your tests needed the application to run some actions for them to run?
If you decide to use the GUI, it will significantly lower your application’s performance and make your test suites run for hours.
That’s when Cypress App Actions come in, with app actions, you no longer need to interact with the user interface.
If you want some to-dos to be added to the list, you can easily write an action inside of your application (app action), which will do that for you without interacting with the graphical user interface, making it work instantly, cutting out all the time required for the user interface to respond.

How to run tests using Cypress App Actions?
I will create a simple one-page front-end-only to-do list application where users can add, check, uncheck, and delete to-dos.
The application is written in React with the help of TailwindCSS to make it look better. Here is the code of the application.
// App.jsx
import React, { useState } from 'react'

const App = () => {
  const [todos, setTodos] = useState([])
  const [input, setInput] = useState('')

  const addTodoHandler = e => {
    e.preventDefault()
    if (!input) return
    setTodos([...todos, { title: input, done: false }])
    setInput('')
  }

  const updateTodoHandler = (index, done) => {
    const newTodos = [...todos]
    newTodos[index].done = done
    setTodos(newTodos)
  }

  const deleteHandler = index => {
    const newTodos = todos.filter((todo, i) => i !== index)
    setTodos(newTodos)
  }

  const deleteAll = () => {
    setTodos([])
  }

  return (
    <div className='w-full p-10 max-w-md mx-auto flex flex-col gap-5'>
      <h2 className='text-center font-bold text-3xl mb-4'>To do APP</h2>

      <form className='flex flex-col gap-1' onSubmit={addTodoHandler}>
        <input
          className='outline-none px-5 py-2 rounded-lg border'
          placeholder='Add new todo'
          type='text'
          data-cy='new-todo-input'
          value={input}
          onChange={e => setInput(e.target.value)}
        />
        <button
          data-cy='submit-button'
          className='py-2 px-5 rounded-lg bg-gray-100 hover:bg-gray-200 active:bg-gray-100'
        >
          Submit
        </button>
        <button
          onClick={deleteAll}
          type='button'
          data-cy='delete-all-button'
          className='py-2 px-5 rounded-lg bg-red-100 hover:bg-red-200 text-red-500'
        >
          Delete All
        </button>
      </form>
      <div className='flex flex-col gap-5'>
        {todos?.map((todo, _idx) => (
          <div
            key={_idx}
            data-cy='todo-item'
            className='flex justify-between items-center select-none gap-5 p-2 border rounded-lg cursor-pointer hover:bg-gray-100'
          >
            <div className='flex items-center gap-2 w-full'>
              <input
                onChange={e => updateTodoHandler(_idx, e.target.checked)}
                checked={todo.done}
                type='checkbox'
                data-cy='todo-checkbox'
              />
              <p data-cy='todo-title'>{todo.title}</p>
            </div>

            <button
              onClick={() => deleteHandler(_idx)}
              className='text-sm text-red-500  hover:bg-red-100 rounded-sm p-2 z-50'
              data-cy='todo-delete-button'
            >
              Delete
            </button>
          </div>
        ))}
      </div>
    </div>
  )
}

export default App
As you might have noticed, I have added a new attribute for specific HTML tags, for example, the submit button has a new attribute of data-cy='submit-button’ this will be useful as a selector in our spec files to get access to the element, this is also one of the best practices of writing tests for Cypress test automation.
We can also create a new custom command in our cypress/support/commands.js file for this selector and re-use it later on.
Cypress.Commands.add('getBySel', (selector, ...args) => {
  return cy.get(`[data-cy=${selector}]`, ...args)
})
Example usage:
cy.getBySel('submit-button').should(...)
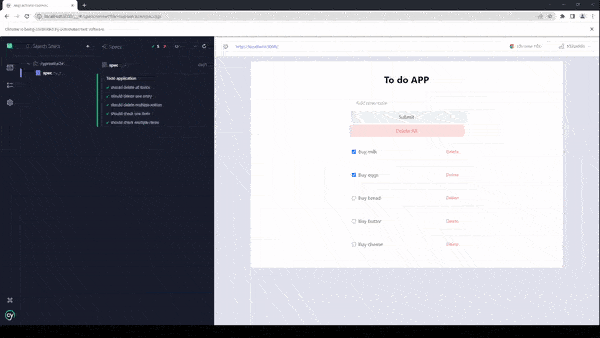
This is what the application looks like:

Now that it is set up and works perfectly, it is time to install Cypress and write some tests.
Installing Cypress
Installing Cypress is quite easy and straightforward.
- Run the following command to install Cypress.
yarn add -D cypress

package.json file.{
"cypress:open": "cypress open",
"cypress:run": "cypress run"
}
yarn cypress:open


cypress/e2e folder, and we can run it with Cypress.
Editing the Cypress configurations
Since we are running a React application, I will set the baseURL of the Cypress configurations so that we can access our app easily.
Here is my Cypress config file in ./cypress.config.js
// cypress.config.js
const { defineConfig } = require('cypress')

module.exports = defineConfig({
  e2e: {
    setupNodeEvents (on, config) {
      // implement node event listeners here
    },
    // setting up the base URL of our application
    baseUrl: '<http://localhost:3000>'
  }
})
As I mentioned above, our goal here is to do some tests that require the application to at least have two or three to-do entries inside of it.
If we had to use the old approach to run these tests, we’d have to use the user interface to type the todo titles and add them to the list, and after that, run the tests on them.
So let’s try it and see why it’s not the right choice.
Running tests without Cypress App Actions (regular approach)
This is how the tests are written without Cypress App Actions (using the UI).
let todos = ['Buy milk', 'Buy eggs', 'Buy bread', 'Buy butter', 'Buy cheese']

describe('Todo application', () => {
  beforeEach(() => {
    cy.visit('/')

    todos.forEach(todo => {
      cy.getBySel('new-todo-input').type(todo)
      cy.getBySel('submit-button').click()
    })
  })

  it('should delete all todos', () => {
    cy.getBySel('delete-all-button').click()
    cy.getBySel('todo-item').should('not.exist')
  })

  it('should delete one entry', () => {
    cy.getBySel('todo-delete-button')
      .first()
      .click()
    cy.getBySel('todo-item').should('have.length', todos.length - 1)
  })

  it('should delete multiple entries', () => {
    // deletes two items
    for (let i = 0; i < 2; i++) {
      cy.getBySel('todo-delete-button')
        .first()
        .click()
    }

    cy.getBySel('todo-item').should('have.length', todos.length - 2)
  })

  it('should check one item', () => {
    cy.getBySel('todo-checkbox')
      .first()
      .click()

    cy.getBySel('todo-checkbox').should('be.checked')
  })

  it('should check multiple items', () => {
    cy.getBySel('todo-checkbox')
      .first()
      .click()

    cy.getBySel('todo-checkbox')
      .eq(1)
      .click()

    cy.getBySel('todo-checkbox')
      .first()
      .should('be.checked')
    cy.getBySel('todo-checkbox')
      .eq(1)
      .should('be.checked')
  })
})
As you can see in the beforeEach hook, we are inserting some data into the application, this happens before each of the tests or it blocks.
Now, let’s run the tests and see why this method of testing applications is actually not optimal or efficient.

The total time required for the tests to complete was 9 seconds, for such a small application like this, it is considered a very low performant test suite.

Also, this depends heavily on the user interface and element selectors, if one of the selectors of your application changes in future updates, your code will not be able to locate the elements and your tests will easily fail.
Using Cypress App Actions
Now it’s time to run the same Cypress UI tests using app actions and see why they are a better choice and how they can improve the test performance.
In order to use certain functions inside of our application, we have to set it as a property of the window object and re-use those functions inside our spec files.
So, let’s add the functions that we want to the window object
useEffect(() => {
    if (window.Cypress) {
      // the "todos" argument will be an array of todos
      // example: [{ title: "Run some tests", done: false }]
      window.addTodos = todos => setTodos(todos)
    }
}, [])
With the use of the useEffect lifecycle hook, we’ll be able to use the window object inside of a React application, read more about React useEffect hook.
The addTodos function will enable us to send an array of to-dos to the application without using the user interface.
Now we can use the addTodos function inside of our spec files.
To access the window object, Cypress has provided us with the window() function, which we can call anywhere in our tests. We chain the invoke() function to it and pass the method’s name on the window object and the arguments it requires.
The spec file for app actions ./cypress/e2e/spec.cy.js
let todos = ['Buy milk', 'Buy eggs', 'Buy bread', 'Buy butter', 'Buy cheese']

describe('Todo application', () => {
  beforeEach(() => {
    cy.visit('/')

    cy.window().invoke(
      // name of the method
      'addTodos',
      // ...args (in this case we only have one argument "todos")
      todos.map(todo => ({ title: todo, done: false }))
    )
  })

  it('should delete all todos', () => {
    cy.getBySel('delete-all-button').click()
    cy.getBySel('todo-item').should('not.exist')
  })

  it('should delete one entry', () => {
    cy.getBySel('todo-delete-button')
      .first()
      .click()
    cy.getBySel('todo-item').should('have.length', todos.length - 1)
  })

  it('should delete multiple entries', () => {
    cy.getBySel('todo-delete-button')
      .first()
      .click()

    cy.getBySel('todo-delete-button')
      .first()
      .click()

    cy.getBySel('todo-item').should('have.length', todos.length - 2)
  })

  it('should check one item', () => {
    cy.getBySel('todo-checkbox')
      .first()
      .click()

    cy.getBySel('todo-checkbox').should('be.checked')
  })

  it('should check multiple items', () => {
    cy.getBySel('todo-checkbox')
      .first()
      .click()

    cy.getBySel('todo-checkbox')
      .eq(1)
      .click()

    cy.getBySel('todo-checkbox')
      .first()
      .should('be.checked')
    cy.getBySel('todo-checkbox')
      .eq(1)
      .should('be.checked')
  })
})
Now, let’s run the tests and see the performance of the test suite.
As you can see, we are running exactly the same tests that we did before, but now we are getting a total time of tests of only 1 second which is almost 800% more efficient than the previous test.
This will make your application much more performant in the long run, which would have been very difficult to run if we’d had to interact with the UI.
Bonus: Running Cypress App Actions in the cloud with TestMu AI
TestMu AI’s latest feature (HyperExecute) now allows developers to run their end to end tests with the latest Cypress version available (Version 10.0).
In this short tutorial on Cypress App Actions, I will show you how to run the same tests we wrote in the Cypress cloud on TestMu AI.
TestMu AI provides an online device farm that allows you to run your Cypress automation tests on over 50 different real browsers and operating systems to increase the overall test coverage of your web application. This is achieved by running the same test scripts on various combinations of browsers and operating systems.
Check out the Cypress tutorial below to dive deep into the basics of the Cypress framework.
Subscribe to the TestMu AI YouTube channel for tutorials around Selenium testing, Playwright browser testing, Appium, and more.
Changing the configurations
Before starting configuring our tests for TestMu AI, let’s make our application available on a public URL.
I have deployed the to-do application on Vercel, which is public and available for TestMu AI to run tests on.
Updating the cypress.config.js
const { defineConfig } = require('cypress')

module.exports = defineConfig({
  e2e: {
    setupNodeEvents (on, config) {
      // implement node event listeners here
    },
    // changed
    baseUrl: 'https://app-actions-cypress.vercel.app'
  }
})
Now our application is ready to be tested on TestMu AI.
Downloading the HyperExecute CLI
Go to this page and scroll until you see the table for the HyperExecute CLI executable files and download the one for your operating system.

After you do that, move the file to the root directory of your application ./hyperexecute.exe
Austin Siewert
CEO, Vercel
Discovered @TestMu AI yesterday. Best browser testing tool I've found for my use case. Great pricing model for the limited testing I do 👏
2M+ Devs and QAs rely on TestMu AI
Deliver immersive digital experiences with Next-Generation Mobile Apps and Cross Browser Testing Cloud
HyperExecute YAML file
All the test configurations that we need relating to TestMu AI will be specified inside this file.
Now, create a .yml with a name of your choice; I have named it TestMu AI.yml. This is what my YAML file looks like for this specific test.
version: 0.1
runson: win
cypress: true
concurrency: 2
autosplit: true

pre:
  - npm install
  - npm install cypress --save-dev
cacheKey: '{{ checksum "package.json" }}'
cacheDirectories:
  - node_modules
testDiscovery:
  mode: static
  type: raw
  command: ls cypress/e2e
testRunnerCommand: npx cypress run  --spec ./cypress/e2e/$test --browser=chrome-95.0 --headed --config video=false
cypressOps:
  Build: "Hyperexecute Cypress Sample Build"
  Tags: ["Hyperexecute", "Cypress", "Windows", "Autosplit"]
  BuildTags: ["Hyperexecute-Cypress"]
The testDiscovery key is very important, with this, you can tell LambaTest where to look for your test files, and you can specify your directory inside of the command property.
In my case, I have only one spec file, which is inside the ./cypress/e2e/ directory. The ls cypress/e2e command ensures that every file inside that directory will be picked up and tested.
With the testRunnerCommand key, you can run a regular Cypress command. You can also configure it by specifying arguments and flags. In this case, we are specifying it to run on a chrome browser version 95.0, and the browser is headed, etc.
After this, we can perform Cypress UI automation on TestMu AI by uploading the tests using the HyperExecute CLI.
In your terminal, run the following command:
./hyperexecute.exe --user <your-lambda-test-username> --key <your-lambda-test-access-key> --config <your-.yml-file>
After replacing the user, access key, and config flags with your actual TestMu AI username and access key, and the YAML configuration file, in this case, TestMu AI.yml, run the command.
You can get your access key through the HyperExecute tab in the TestMu AI dashboard.

HyperExecute will pick up the configurations and upload your test files to TestMu AI.

You will also see your tests running on the HyperExecute tab on TestMu AI.

You can see the status of your tests either by looking up the test on the TestMu AI dashboard or the HyperExecute CLI.

The Cypress 101 certification is intended for those who have already acquired some familiarity with Cypress and wish to improve their understanding and end-to-end testing skills. It is suitable for developers and testers who want to take their Cypress knowledge to the next level.

Conclusion
App Actions and Page Object Model are two different ways to test an application, but they have their use cases. App actions, as the name suggests, are about writing down actions in the application code, which can change the state of your application and re-using them inside your test suites.
Frequently asked questions
Did you find this page helpful?
More Related Hubs
TestMu AI forEnterprise
Get access to solutions built on Enterprise
grade security, privacy, & compliance
- Advanced access controls
- Advanced data retention rules
- Advanced Local Testing
- Premium Support options
- Early access to beta features
- Private Slack Channel
- Unlimited Manual Accessibility DevTools Tests