
Next-Gen App & Browser Testing Cloud
Trusted by 2 Mn+ QAs & Devs to accelerate their release cycles

pytest Fixtures: A Detailed Guide With Examples
Learn about pytest fixtures, their benefits, and how they simplify test setup, teardown, and dependency management for efficient and reusable testing.

Himanshu Sheth
February 20, 2026
This article is a part of our Content Hub. For more in-depth resources, check out our content hub on Selenium pytest Tutorial.
While writing your Selenium automation scripts, you’d often require data that you want to share across multiple tests. This is done by using objects which are used to instantiate the particular dataset. In pytest, this can be easily done with the help of fixtures.
Consider a test scenario where MySQL queries are executed on a database. The execution time here depends on the size of the database and the operations can be highly CPU intensive depending on its size.
In such cases, repetitive implementation and execution are avoided by using pytest fixtures as they feed data to the tests such as DB connections. They also help to instantiate Selenium WebDriver for browsers under test, URLs to test, etc.
In this blog, we look at pytest fixtures and why you should use it for Python automation testing.
Overview
Why Use pytest Fixtures?
pytest fixtures simplify test setup, teardown, and dependency management, enabling more efficient and reusable testing. By using fixtures, you can avoid repetitive test setups and ensure that resources like database connections or Selenium WebDriver are consistently managed.
- Improved Efficiency: Fixtures handle common setup and teardown tasks, reducing redundant code.
- Test Reusability: They allow sharing data and resources across multiple tests, ensuring tests are modular and easy to maintain.
- Streamlined Workflow: Fixtures integrate seamlessly with test cases, ensuring that necessary resources are automatically prepared before the tests are run.
What Are pytest Fixtures?
pytest fixtures are functions that provide a fixed baseline for tests by setting up the necessary resources before the test executes. They ensure that resources are cleaned up afterward, maintaining a smooth testing flow:
- Setup and Teardown: Fixtures handle setup before the test and cleanup afterward, reducing the need for redundant code.
- Automatic Invocation: The pytest framework automatically calls the fixture based on matching argument names in the test function.
Scope of pytest Fixtures
The scope of a pytest fixture controls how long the fixture lasts and how many times it is invoked. It determines whether the fixture is run once per function, module, class, or session:
- Function Scope: The default scope, where the fixture is run once per test function.
- Session Scope: The fixture is invoked once per entire testing session.
- Module/Class Scope: The fixture runs once per module or class, reducing setup overhead for large test suites.
Automated Browser Testing with pytest Fixtures
pytest fixtures are especially useful for browser automation with Selenium, where the WebDriver is initialized once before tests begin and closed after all tests are completed. This optimizes resource usage and improves test execution times:
- Efficiency in Setup: By using fixtures for WebDriver initialization, browsers are loaded once, avoiding repetitive setup for each test.
- Test Flexibility: Fixtures can be customized for different browsers, providing a consistent setup across test cases.
Parameterized pytest Fixtures
With parameterized fixtures, you can run the same test across different configurations, like testing on multiple browsers (Chrome, Firefox, etc.) with the same fixture logic. This allows for more flexible and scalable test automation:
- Reusable Logic: The same fixture can be used across multiple browsers without rewriting setup code.
- Scalable Testing: Easily extend tests to handle different inputs, ensuring comprehensive coverage without additional setup.
What Are pytest Fixtures?
pytest fixtures are functions attached to the tests which run before the test function is executed. Fixtures are a set of resources that have to be set up before and cleaned up once the Selenium test automation execution is completed.
The pytest fixture function is automatically called by the pytest framework when the name of the argument and the fixture is the same.
A function is marked as fixture using the following marker:
@pytest.fixture
Shown below is a sample pytest fixture function for this Selenium Python tutorial:
@pytest.fixture
def fixture_func():
   return "fixture test"
def test_fixture(fixture_func):
    assert fixture_func == "fixture test"
In the sample code shown above, the fixture function is fixture_func() method. It is called when the test_fixture() function is invoked for execution. The return value of the fixture function is passed as an argument to test_fixture(). Assert is raised if the value returned by fixture_func() does not match the expected output.
Scope of pytest Fixtures
The scope of a fixture function indicates the number of times a fixture function is invoked. Here are the detailed description of the pytest fixtures scope in this Selenium Python tutorial:
- Function: This is the default value of the fixture scope. Fixture with function scope is executed once per session.
- Package (or Session): A pytest fixture with scope as Session is created only once for the entire Selenium test automation session. Session scope is ideal for usage as WebDriver handles are available for the Selenium test automation session.
- Module: As the name indicates, a fixture function with scope as Module is created (or invoked) only once per module.
- Class: The fixture function is created once per class object.
The scope of pytest fixture function can be supplied with the @pytest.fixture marker.
# Fixture function with function scope for Selenium automation in this Selenium Python tutorial
@pytest.fixture(scope="function")

# Fixture function with session scope
@pytest.fixture(scope="session")

# Fixture function with module scope
@pytest.fixture(scope="module")

# Fixture function with class scope
@pytest.fixture(scope="class")
Note: Automate websites with pytest across 5000+ real environments. Try TestMu AI Today!
Automated Browser Testing With pytest Fixtures
As of now, the latest versions of Python and pytest are 3.13.2 and 8.3.4, respectively. However, this blog uses Python 3.6.6 and pytest 5.4.1.
In automated browser testing with Selenium, the web browser has to be loaded before the Selenium test automation is performed. Loading the browser before every test is not a good practice.
Rather, the web browser should be loaded once before the tests have started and closed once the tests are complete. pytest fixtures are extremely useful when you are performing automated browser testing.
Common Selenium WebDriver implementation can be a part of the fixture function, particularly – initialization of the Selenium WebDriver for browser under test & cleanup of resources after the completion of tests.
For demonstrating automated browser testing with pytest fixtures and Selenium WebDriver, I’ll consider the Selenium test automation scenarios mentioned below in this Selenium Python tutorial:
Test Scenario (Using Chrome):
- Navigate to the URL TestMu AI Sample App.
- Select the first two checkboxes.
- Send ‘Happy Testing at TestMu AI’ to the textbox with id = sampletodotext.
- Click the Add Button and verify whether the text has been added or not.
Test Scenario (Using Firefox):
- Navigate to the official website of Google.
- Search for “TestMu AI”.
- Click on the first test result.
- Raise an Assert if the page title does not match the expected title.
As there are two different Selenium test automation cases, we would need two pytest fixtures functions for initialization and de-initialization of resources for Chrome and Firefox browser respectively.
Implementation:
# Import the 'modules' that are required for execution for Selenium test automation
import pytest
from selenium import webdriver
from selenium.webdriver.chrome.options import Options
from selenium.webdriver.common.keys import Keys
import time
from time import sleep
import sys

#Fixture for Firefox
@pytest.fixture(scope="class")
def driver_init(request):
    ff_driver = webdriver.Firefox()
    request.cls.driver = ff_driver
    yield
    ff_driver.close()

#Fixture for Chrome
@pytest.fixture(scope="class")
def chrome_driver_init(request):
    chrome_driver = webdriver.Chrome()
    request.cls.driver = chrome_driver
    yield
    chrome_driver.close()

@pytest.mark.usefixtures("driver_init")
class BasicTest:
    pass
class Test_URL(BasicTest):
    def test_open_url(self):
        self.driver.get('https://www.google.com/')
        self.driver.maximize_window()
        title = "Google"
        assert title == self.driver.title

        search_text = "LambdaTest"
        search_box = self.driver.find_element_by_xpath("//input[@name='q']")
        search_box.send_keys(search_text)

        time.sleep(5)

        # Option 1 - To Submit the search
        # search_box.submit()

        # Option 2 - To Submit the search
        search_box.send_keys(Keys.ARROW_DOWN)
        search_box.send_keys(Keys.ARROW_UP)
        time.sleep(2)
        search_box.send_keys(Keys.RETURN)

        time.sleep(5)

        # Click on the LambdaTest HomePage Link
        title = "Cross Browser Testing Tools | Free Automated Website Testing | LambdaTest"
        lt_link = self.driver.find_element_by_xpath("//h3[.='LambdaTest: Cross Browser Testing Tools | Free Automated ...']")
        lt_link.click()

        time.sleep(10)
        assert title == self.driver.title
        time.sleep(2)

@pytest.mark.usefixtures("chrome_driver_init")
class Basic_Chrome_Test:
    pass
class Test_URL_Chrome(Basic_Chrome_Test):
    def test_open_url(self):
        self.driver.get('https://lambdatest.github.io/sample-todo-app/')
        self.driver.maximize_window()

        self.driver.find_element_by_name("li1").click()
        self.driver.find_element_by_name("li2").click()

        title = "Sample page - lambdatest.com"
        assert title ==  self.driver.title

        sample_text = "Happy Testing at LambdaTest"
        email_text_field =  self.driver.find_element_by_id("sampletodotext")
        email_text_field.send_keys(sample_text)
        time.sleep(5)

        self.driver.find_element_by_id("addbutton").click()
        time.sleep(5)

        output_str =  self.driver.find_element_by_name("li6").text
        sys.stderr.write(output_str)

        time.sleep(2)
Code Walkthrough:
All the necessary modules for this Selenium Python tutorial example are imported at the beginning of the implementation. Two pytest fixtures functions are created, one for each Selenium test automation case as different browsers are used for testing.
The chrome_driver_init() function is decorated with the @pytest.fixture indicating that it will be used as a fixture function. The scope of the fixture is set to class.
The request.cls will be set to None for a scope that is not of type class. Since the scope of the pytest fixtures function is set to class, request.cls is nothing but the test class that is using the function. For the test Test_URL_Chrome(), request.cls.driver will be the same as Test_URL_Chrome.driver which is the reference to the Chrome WebDriver instance.
The code after yield is run as a finalizer. Once the test is executed, the Selenium WebDriver is shut down using the close method of Selenium test automation.
The implementation for the other fixture function i.e. driver_init() is the same, except that the browser being used is Firefox.
To ensure that the WebDriver is initialized only once, the fixtures are applied to the respective base classes i.e. BaseTest() and Basic_Chrome_Test(). The test classes would be extended from the respective base class.
The fixture functions [driver_init() and chrome_driver_init()] are passed as arguments to the corresponding test functions. Test_URL is the test class that is extended from the base class BasicTest.
Test_URL_Chrome is the test class that is extended from the base class Basic_Chrome_Test. Both classes contain a single test. The tests locate the required web elements on the web page.
Once located, appropriate Selenium methods [find_element_by_name(), find_element_by_id()] and necessary operations [i.e. click(), submit(), send_keys(), etc.] are performed on those elements. As this part of the Selenium Python tutorial focuses on pytest fixtures, we would not get into the minute details of the Selenium test automation implementation.
The following command is used for executing Selenium test automation:
pytest --capture=no --verbose <file_name.py>
Shown below in this Selenium Python tutorial is the execution snapshot which indicates that both the tests executed successfully.

Parameterized pytest Fixtures
What if you need to execute the same tests on different web browsers e.g. Chrome, Firefox, Opera, etc., with separate pytest fixtures functions that instantiate the Selenium WebDriver for the required web browser.
It is recommended to have a single fixture function that can be executed across different input values. This can be achieved via parameterized pytest fixtures, which I’ll show next in this Selenium Python tutorial.
Parameterized driver_init fixture that takes input as Chrome and Firefox are below:
@pytest.fixture(params=["chrome", "firefox"],scope="class")
Declaration of params with @pytest.fixture contains a list of values (i.e. Chrome, Firefox) for each of which the fixture function will be executed. The value can be accessed using request.param function. Porting the code from a normal (i.e. non-parameterized) fixture to a parameterized fixture does not require any change in the feature implementation.
To demonstrate parameterized pytest features, I would execute the following test cases on Chrome and Firefox browsers:
Test Scenario (Chrome, Firefox):
- Navigate to the TestMu AI Sample ToDo App.
- Select the first two checkboxes.
- Send ‘Happy Testing at TestMu AI’ to the textbox with id = sampletodotext.
- Click the Add Button and verify whether the text has been added or not.
As the Selenium test automation needs to be executed on Chrome and Firefox browsers, we first create a parameterized fixture function that takes these as arguments. Depending on the browser being used for testing, an appropriate WebDriver instance for the browser is initiated i.e. if the param value is chrome, WebDriver for Chrome browser is initialized.
As shown below in this Selenium Python tutorial, request.param is used to read the value from the fixture function. The remaining implementation of the Fixture function remains the same as a non-parameterized fixture function.
@pytest.fixture(params=["chrome", "firefox"],scope="class")
def driver_init(request):
    if request.param == "chrome":
        web_driver = webdriver.Chrome()
    if request.param == "firefox":
        web_driver = webdriver.Firefox()
    request.cls.driver = web_driver
    yield
    web_driver.close()
Implementation:
# Import the 'modules' that are required for execution for Selenium test automation

import pytest
import pytest_html
from selenium import webdriver
from selenium.webdriver.chrome.options import Options
from selenium.webdriver.common.keys import Keys
import time
from time import sleep
import sys

@pytest.fixture(params=["chrome", "firefox"],scope="class")
def driver_init(request):
    if request.param == "chrome":
        web_driver = webdriver.Chrome()
    if request.param == "firefox":
        web_driver = webdriver.Firefox()
    request.cls.driver = web_driver
    yield
    web_driver.close()

@pytest.mark.usefixtures("driver_init")
class BasicTest:
    pass
class Test_URL_Chrome(BasicTest):
    def test_open_url(self):
        self.driver.get('https://lambdatest.github.io/sample-todo-app/')
        self.driver.maximize_window()

        self.driver.find_element_by_name("li1").click()
        self.driver.find_element_by_name("li2").click()

        title = "Sample page - lambdatest.com"
        assert title ==  self.driver.title

        sample_text = "Happy Testing at LambdaTest"
        email_text_field =  self.driver.find_element_by_id("sampletodotext")
        email_text_field.send_keys(sample_text)
        time.sleep(5)

        self.driver.find_element_by_id("addbutton").click()
        time.sleep(5)

        output_str =  self.driver.find_element_by_name("li6").text
        sys.stderr.write(output_str)

        time.sleep(2)
Code Walkthrough:
As shown below in this Selenium Python tutorial, request.param is used to read the value from the pytest fixtures function. The remaining implementation of the Fixture function remains the same as a non-parameterized fixture function.
Rest of the implementation remains the same as Test Case (1) which is demonstrated in the section Automated Browser Testing using Selenium & pytest Fixtures. The only change is that we have used a parameterized fixture function to execute the test on Chrome and Firefox browsers.
Shown below is the Selenium test automation execution on the browsers under test:

As seen in the terminal snapshot, the test code test_open_url() is invoked separately for input values chrome and firefox.

Parameterized Test Functions
Along with parameterized test fixtures, pytest also provides decorators using which you can parameterize test functions. The @pytest.mark.parametrize decorator enables the parameterization of arguments for a test function. Using this decorator, you can use a data-driven approach to testing as Selenium test automation can be executed across different input combinations.
Here is how @pytest.mark.parametrize decorator can be used to pass input values:
@pytest.mark.parametrize("input_arg_1, input_arg_2,...,input_arg_n",
                         [("input_val_1", "input_val_2",...,"input_val_n")])
As shown in the official documentation of parameterization in pytest, the expected output can also be supplied along with the input parameters.
In this pytest tutorial, learn how to use parameterization in pytest to write concise and maintainable test cases by running the same test code with multiple data sets.
To demonstrate parameterization in test functions, we perform Selenium test automation where separate web pages are opened for Chrome and Firefox browsers. Assert is raised if the page title does not match the expected title.
Implementation:
# Import the 'modules' that are required for execution

import pytest
import pytest_html
from selenium import webdriver
from selenium.webdriver.chrome.options import Options
from selenium.webdriver.common.keys import Keys
import time
from time import sleep
import sys

@pytest.mark.parametrize(
                         "test_browser, test_url",
                         [
                             ("chrome", "https://www.lambdatest.com/"),
                             ("firefox", "https://www.lambdatest.com/blog/"),
                         ]
                        )
def test_open_url(test_browser, test_url):
    if test_browser == "chrome":
        web_driver = webdriver.Chrome()
        expected_title = "Cross Browser Testing Tools | Free Automated Website Testing | LambdaTest"
    if test_browser == "firefox":
        web_driver = webdriver.Firefox()
        expected_title = "LambdaTest | A Cross Browser Testing Blog"

    web_driver.get(test_url)
    web_driver.maximize_window()

    assert expected_title ==  web_driver.title

    time.sleep(5)

    web_driver.close()
Code Walkthrough:
As shown in the implementation above for this Selenium Python tutorial, two input arguments of type string (test_browser and test_url) are supplied to the @pytest.mark.parametrize decorator. The input values are separated by comma (,) and enclosed under [].
The test function uses the input arguments added via the decorator for performing the Selenium test automation.
The rest of the implementation is self-explanatory and we would not get into details of the same. Shown below in this Selenium Python tutorial is the execution snapshot which indicates that Selenium test automation was executed across both the input combinations.

Sharing pytest Fixtures Across Tests
There might be cases where pytest fixtures have to be shared across different tests. Sharing of pytest fixtures can be achieved by adding the pytest fixtures functions to be exposed in conftest.py. It is a good practice to keep conftest.py in the root folder from where the Selenium test automation execution is performed.
Shown below is conftest.py where parameterized fixture function driver_init() is added.
conftest.py:
# Import the 'modules' that are required for execution

import pytest
from selenium import webdriver

@pytest.fixture(params=["chrome", "firefox"])
def driver_init(request):
    if request.param == "chrome":
        web_driver = webdriver.Chrome()
    if request.param == "firefox":
        web_driver = webdriver.Firefox()
    request.cls.driver = web_driver
    yield
    web_driver.close()
As driver_init() fixture function is now a part of conftest.py, the implementation of fixture function is removed from the test code and @pytest.mark.usefixtures decorator with input as fixture function is added in the test file.
@pytest.mark.usefixtures("driver_init")
Below is the snippet of the implementation in the test file:
import pytest
import pytest_html
from selenium import webdriver
from selenium.webdriver.chrome.options import Options
from selenium.webdriver.common.keys import Keys
import time
from time import sleep
import sys

@pytest.mark.usefixtures("driver_init")
class BasicTest:
    pass
class Test_URL_Chrome(BasicTest):
    def test_open_url(self):
        self.driver.get('https://lambdatest.github.io/sample-todo-app/')
        self.driver.maximize_window()
        ...............................
        ...............................
Rest of the implementation remains the same as the one demonstrated in the section Parameterized pytest Fixtures. As seen from the code snippet, the fixture implementation is no longer a part of the test code as it is now shifted to conftest.py. We do not import conftest.py in the test code as the pytest framework automatically checks its presence in the root directory when compilation is performed.

Skip and xfail Tests in pytest
There are cases where a test might not be relevant for a particular platform or browser. Rather than executing the Selenium test automation case for that platform and expecting it to fail, it would be better if the test is skipped with a valid reason.
A skip in pytest means that the test is expected to pass only on if certain conditions are met. Common cases are executing certain cross browser tests on the latest browsers such as Chrome, Firefox, etc. and skipping on Internet Explorer with a reason.
A xfail means that the test is expected to fail due to some reason. A common example is a test for a feature that is yet to be implemented. If the test marked as xfail still happens to pass, it is marked as xpass (and not pass).
xfail tests are indicated using the following marker:
@pytest.mark.xfail
Tests can be skipped for execution using the following marker:
@pytest.mark.skip
Tests that skip, xpass, or xfail are reported separately in the test summary. Detailed information about skipped/xfailed tests is not available by default in the summary and can be enabled using the –r option
pytest -rxXs
Skipping Test Functions
A test function that has to be skipped for execution can be marked using the skip decorator along with an optional reason for skipping the test.
@pytest.mark.skip(reason="reason to be skipped")
def test_a_feature():
    .................
For conditional skip, the @pytest.mark.skipif marker can be used to skip the function if a condition is True. In the example shown below for this Selenium Python tutorial, test_function() will not be executed (i.e. skipped) if the Python version is less than 3.8.
@pytest.mark.skipif(sys.version_info < (3, 8), reason="requires python3.8 or higher")
def test_function():
    ...............
xfail – Marking Test Functions Expected to Fail
The xfail marker is used to mark a test function that is expected to fail.
@pytest.mark.xfail
def test_func():
    .................
If a test fails only under a certain condition, the test can be marked as xfail with a condition and an optional reason that is printed alongside the xfailed test.
@pytest.mark.xfail(sys.platform == "win64", reason="Test cannot be executed on Win 64 platform")
def test_func():
    .................
xfail and skip markers can also be used along with fixtures in pytest. The respective markers can be supplied along with the parameters in a parameterized fixture.
Sample code snippet is below:
@pytest.mark.parametrize(
    "test_browser, test_url",
    [
        pytest.param("firefox", "https://lambdatest.github.io/sample-todo-app/", marks=pytest.mark.xfail),
        pytest.param("chrome", "https://www.lambdatest.com/blog/", marks=pytest.mark.basic),
        pytest.param("safari", "https://www.lambdatest.com/blog/", marks=pytest.mark.skip),
    ]
)
To demonstrate the usage of xfail and skip markers with parameterized fixtures, we take sample test cases which are executed on Chrome, Firefox, and Safari browsers. As seen in the snippet above:
- Test on Firefox is marked as xfail.
- Test on Chrome is a regular test and marked with a marker pytest.mark.basic.
- Test on Safari is marked as skip hence, it will not be executed.
Implementation:
# Import the 'modules' that are required for execution

import pytest
import pytest_html
from selenium import webdriver
from selenium.webdriver.chrome.options import Options
from selenium.webdriver.common.keys import Keys
import time
from time import sleep
import sys

@pytest.mark.parametrize(
    "test_browser, test_url",
    [
        pytest.param("firefox", "https://lambdatest.github.io/sample-todo-app/", marks=pytest.mark.xfail),
        pytest.param("chrome", "https://www.lambdatest.com/blog/", marks=pytest.mark.basic),
        pytest.param("safari", "https://www.lambdatest.com/blog/", marks=pytest.mark.skip),
    ]
)

def test_open_url(test_browser, test_url):
        if test_browser == "firefox":
            web_driver = webdriver.Firefox()
            web_driver.get(test_url)

            web_driver.maximize_window()

            web_driver.find_element_by_name("li1").click()
            web_driver.find_element_by_name("li2").click()

            title = "Sample page - lambdatest.com"
            assert title ==  web_driver.title

            sample_text = "Happy Testing at LambdaTest"
            email_text_field =  web_driver.find_element_by_id("sampletodotext")
            email_text_field.send_keys(sample_text)
            time.sleep(5)

            web_driver.find_element_by_id("addbutton").click()
            time.sleep(5)

            output_str =  web_driver.find_element_by_name("li6").text
            sys.stderr.write(output_str)
        if test_browser == "chrome":
            web_driver = webdriver.Chrome()
            web_driver.get(test_url)
            title = "LambdaTest | A Cross Browser Testing Blog"

            assert title ==  web_driver.title

        time.sleep(2)
        web_driver.close()
The test case to be executed on Firefox is marked as xfail but the test case passes. Hence, the final status of the test on Firefox is xpass. Test on Chrome browser is marked with a marker pytest.mark.basic. It executes successfully and hence the status is pass.
The final test is on Safari browser and is marked with the skip marker. Hence, it is skipped for execution.
Shown below in this Selenium Python tutorial is the execution snapshot:
We use the earlier example to demonstrate usage of xfail and skip markers, with the markers applied on the individual test cases.
# Import the 'modules' that are required for execution

import pytest
import pytest_html
from selenium import webdriver
from selenium.webdriver.chrome.options import Options
from selenium.webdriver.common.keys import Keys
import time
from time import sleep
import sys

@pytest.mark.xfail
def test_chrome_url():
    web_driver = webdriver.Chrome()
    web_driver.get("https://lambdatest.github.io/sample-todo-app/")

    web_driver.maximize_window()

    web_driver.find_element_by_name("li1").click()
    web_driver.find_element_by_name("li2").click()

    title = "Sample page - lambdatest.com"
    assert title ==  web_driver.title

    sample_text = "Happy Testing at LambdaTest"
    email_text_field =  web_driver.find_element_by_id("sampletodotext")
    email_text_field.send_keys(sample_text)
    time.sleep(5)

    web_driver.find_element_by_id("addbutton").click()
    time.sleep(5)

    output_str =  web_driver.find_element_by_name("li6").text
    sys.stderr.write(output_str)
    time.sleep(2)
    web_driver.close()

@pytest.mark.xfail
def test_firefox_url():
    web_driver = webdriver.Firefox()
    web_driver.get("https://www.lambdatest.com/blog/")

    web_driver.maximize_window()

    title = "LambdaTest | A Cross Browser Testing Blog"
    assert title ==  web_driver.title
    time.sleep(2)
    web_driver.close()

@pytest.mark.skip
def test_safari_url():
    web_driver = webdriver.Safari()
    web_driver.get("https://www.lambdatest.com/")

    web_driver.maximize_window()

    title = "Cross Browser Testing Tools | Free Automated Website Testing | LambdaTest"
    assert title ==  web_driver.title
    time.sleep(2)
    web_driver.close()
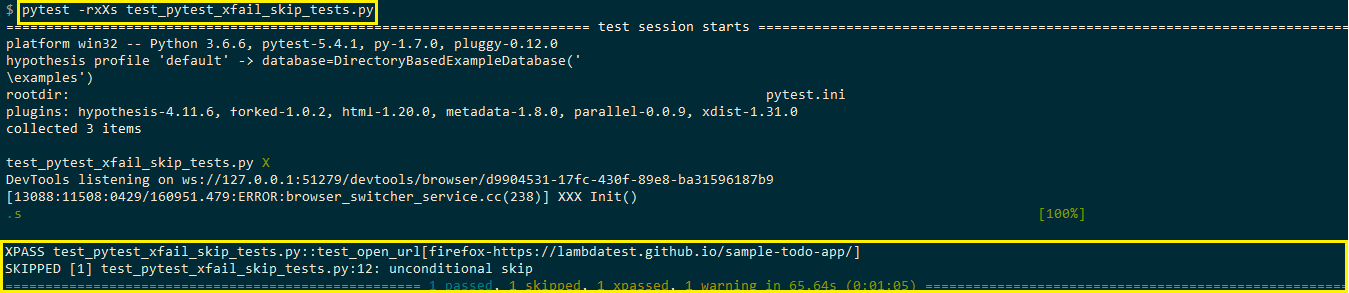
The test cases test_chrome_url() and test_firefox_url() are marked as xfail but they execute successfully. Hence, the result for these test cases is xpass. On the other hand, the final test test_safari_url() is marked with pytest.mark.skip marker and hence, will be skipped from execution.
Shown below is the execution snapshot:

We use the earlier example to demonstrate usage of xfail and skip markers, with the markers applied on the individual test cases.
# Import the 'modules' that are required for execution

import pytest
import pytest_html
from selenium import webdriver
from selenium.webdriver.chrome.options import Options
from selenium.webdriver.common.keys import Keys
import time
from time import sleep
import sys

@pytest.mark.xfail
def test_chrome_url():
    web_driver = webdriver.Chrome()
    web_driver.get("https://lambdatest.github.io/sample-todo-app/")

    web_driver.maximize_window()

    web_driver.find_element_by_name("li1").click()
    web_driver.find_element_by_name("li2").click()

    title = "Sample page - lambdatest.com"
    assert title ==  web_driver.title

    sample_text = "Happy Testing at LambdaTest"
    email_text_field =  web_driver.find_element_by_id("sampletodotext")
    email_text_field.send_keys(sample_text)
    time.sleep(5)

    web_driver.find_element_by_id("addbutton").click()
    time.sleep(5)

    output_str =  web_driver.find_element_by_name("li6").text
    sys.stderr.write(output_str)
    time.sleep(2)
    web_driver.close()

@pytest.mark.xfail
def test_firefox_url():
    web_driver = webdriver.Firefox()
    web_driver.get("https://www.lambdatest.com/blog/")

    web_driver.maximize_window()

    title = "LambdaTest | A Cross Browser Testing Blog"
    assert title ==  web_driver.title
    time.sleep(2)
    web_driver.close()

@pytest.mark.skip
def test_safari_url():
    web_driver = webdriver.Safari()
    web_driver.get("https://www.lambdatest.com/")

    web_driver.maximize_window()

    title = "Cross Browser Testing Tools | Free Automated Website Testing | LambdaTest"
    assert title ==  web_driver.title
    time.sleep(2)
    web_driver.close()
The test cases test_chrome_url() and test_firefox_url() are marked as xfail but they execute successfully. Hence, the result for these test cases is xpass. On the other hand, the final test test_safari_url() is marked with pytest.mark.skip marker and hence, will be skipped from execution.
Shown below is the execution snapshot:

To further enhance your Python testing with pytest fixtures, you can consider using cloud-based testing platforms such as TestMu AI.
It is an AI-powered test execution platform that lets you perform automation testing with pytest on real browsers, ensuring comprehensive test coverage and eliminating the hassle of local environment configuration. You can leverage its cloud grid capabilities to execute tests in parallel, significantly reducing test execution time and improving overall test efficiency.
Austin Siewert
CEO, Vercel
Discovered @TestMu AI yesterday. Best browser testing tool I've found for my use case. Great pricing model for the limited testing I do 👏
2M+ Devs and QAs rely on TestMu AI
Deliver immersive digital experiences with Next-Generation Mobile Apps and Cross Browser Testing Cloud
Wrapping Up!
pytest fixtures are functions that are run before each function to which it is applied is executed. Fixtures can be used for simple unit testing as well as testing for complex scenarios. pytest fixtures are ideal for usage in cross browser testing as browser resources need not be instantiated every time when a test is executed.
Function, module, class, and session are the different scopes available with fixture functions. pytest Fixtures, as well as test functions, can be parameterized. conftest.py is used to share fixtures across tests.
Feel free to retweet and share this article with your peers! Do let us know of any queries or doubts you might have in the comment section down below. That’s it for now!
Frequently asked questions
Did you find this page helpful?
More Related Hubs
TestMu AI forEnterprise
Get access to solutions built on Enterprise
grade security, privacy, & compliance
- Advanced access controls
- Advanced data retention rules
- Advanced Local Testing
- Premium Support options
- Early access to beta features
- Private Slack Channel
- Unlimited Manual Accessibility DevTools Tests