
Next-Gen App & Browser Testing Cloud
Trusted by 2 Mn+ QAs & Devs to accelerate their release cycles

Run iOS Apps on macOS: Easy Step-by-Step
Run iOS apps on macOS using simulators, real devices, Apple Silicon, or cloud testing platforms with this easy step-by-step guide.

Wasiq Bhamla
March 6, 2026
When testing an iOS application, especially when you need to run iOS apps on macOS for validation, running it on a real device gives you the closest experience to what end users will have.
However, during early development, maintaining a wide range of physical devices is expensive. Testers should start on iOS simulators and move to real devices before deploying to the App Store.
Overview
What Are the Available Methods to Run iOS Apps on macOS?
There are several ways to run iOS apps on macOS, including simulators, native Apple Silicon support, and real device testing. The best method depends on your development phase, hardware needs, and testing objectives.
- Using the iOS Simulator with Xcode: Run and debug iOS applications locally on macOS without requiring a physical iPhone device.
- Using Apple Silicon Native Mode: Launch supported iPhone and iPad apps directly on Apple Silicon Macs through shared ARM architecture compatibility.
- Using a Cloud-Based Real Device Platform: Execute and validate apps on remotely hosted physical iOS devices through browser-based access.
- Using iPhone Mirroring with a Real Device: Interact with a connected iPhone screen on macOS for hardware-accurate live testing scenarios.
Should You Choose an iOS Simulator or a Real Device?
Selecting between a simulator and a physical device depends on your testing depth, speed requirements, and hardware dependencies. Each option serves a distinct role across development, validation, and production preparation stages.
- When to Choose a Simulator: Use simulators during early development for quick interface checks, layout debugging, and repeated execution cycles.
- When to Choose a Real Device: Use real devices before release to validate hardware behavior, performance metrics, notifications, and deployment workflows.
What Are the Prerequisites to Run iOS Apps on macOS?
Before running iOS apps on macOS, you need a few essential tools and resources set up correctly. These prerequisites ensure that the development environment and application builds are compatible with Apple’s ecosystem.
- macOS: Xcode requires macOS. It is not available on Windows or Linux. You need macOS 15 (Sequoia) or later to run the latest Xcode version.
- Xcode: Available for free on the Mac App Store. The download is over 12 GB, so allow time for installation.
- Apple account: Required for Xcode installation and for iPhone Mirroring.
- Application build files: iOS simulators use .app or .app.zip files. Real devices use .ipa files. These are different builds for different targets, so confirm you have the correct file type before starting.
Once these requirements are met, you are ready to run iOS apps on macOS using simulators, real devices, or cloud platforms.
What Are the Different Ways to Run an iOS App on a Mac?
Let us explore the different ways you can run your iOS application on your macOS machine:
- Using the iOS Simulator with Xcode: Test and run apps directly on your Mac using the built-in iOS Simulator.
- Using Apple Silicon Native Mode (Designed for iPhone/iPad): Run iPhone and iPad apps natively on Apple Silicon Macs if the developer allows it.
- Using a Cloud-Based Mobile Testing Lab like TestMu AI: Access and test iOS apps on real devices hosted in the cloud.
- Using a Real iOS Device with iPhone Mirroring: Mirror and interact with your iPhone directly on your Mac.
One thing you should note is that, in iOS, there are different builds for different target devices. That means that for iOS simulators, the application build will have .app or .app.zip extension, while for iOS real devices, it will have .ipa file extension.
For demonstration purposes, let us use the WebDriverIO demo iOS application for running on the iOS simulator and the TestMu AI Proverbial application for running on an iOS real device.
Using the iOS Simulator with Xcode
The iOS simulator is available with the XCode development tool and is one of the most common ways to run iOS apps on macOS during development.
Xcode is an Integrated Development Environment (IDE) that runs exclusively on macOS. There is no official version of Xcode for Windows, which can be challenging for developers who do not have access to a Mac.
However, developers looking for ways to work with Xcode for Windows often explore alternative solutions such as cloud-based Mac environments, remote macOS systems, or online iOS testing platforms.
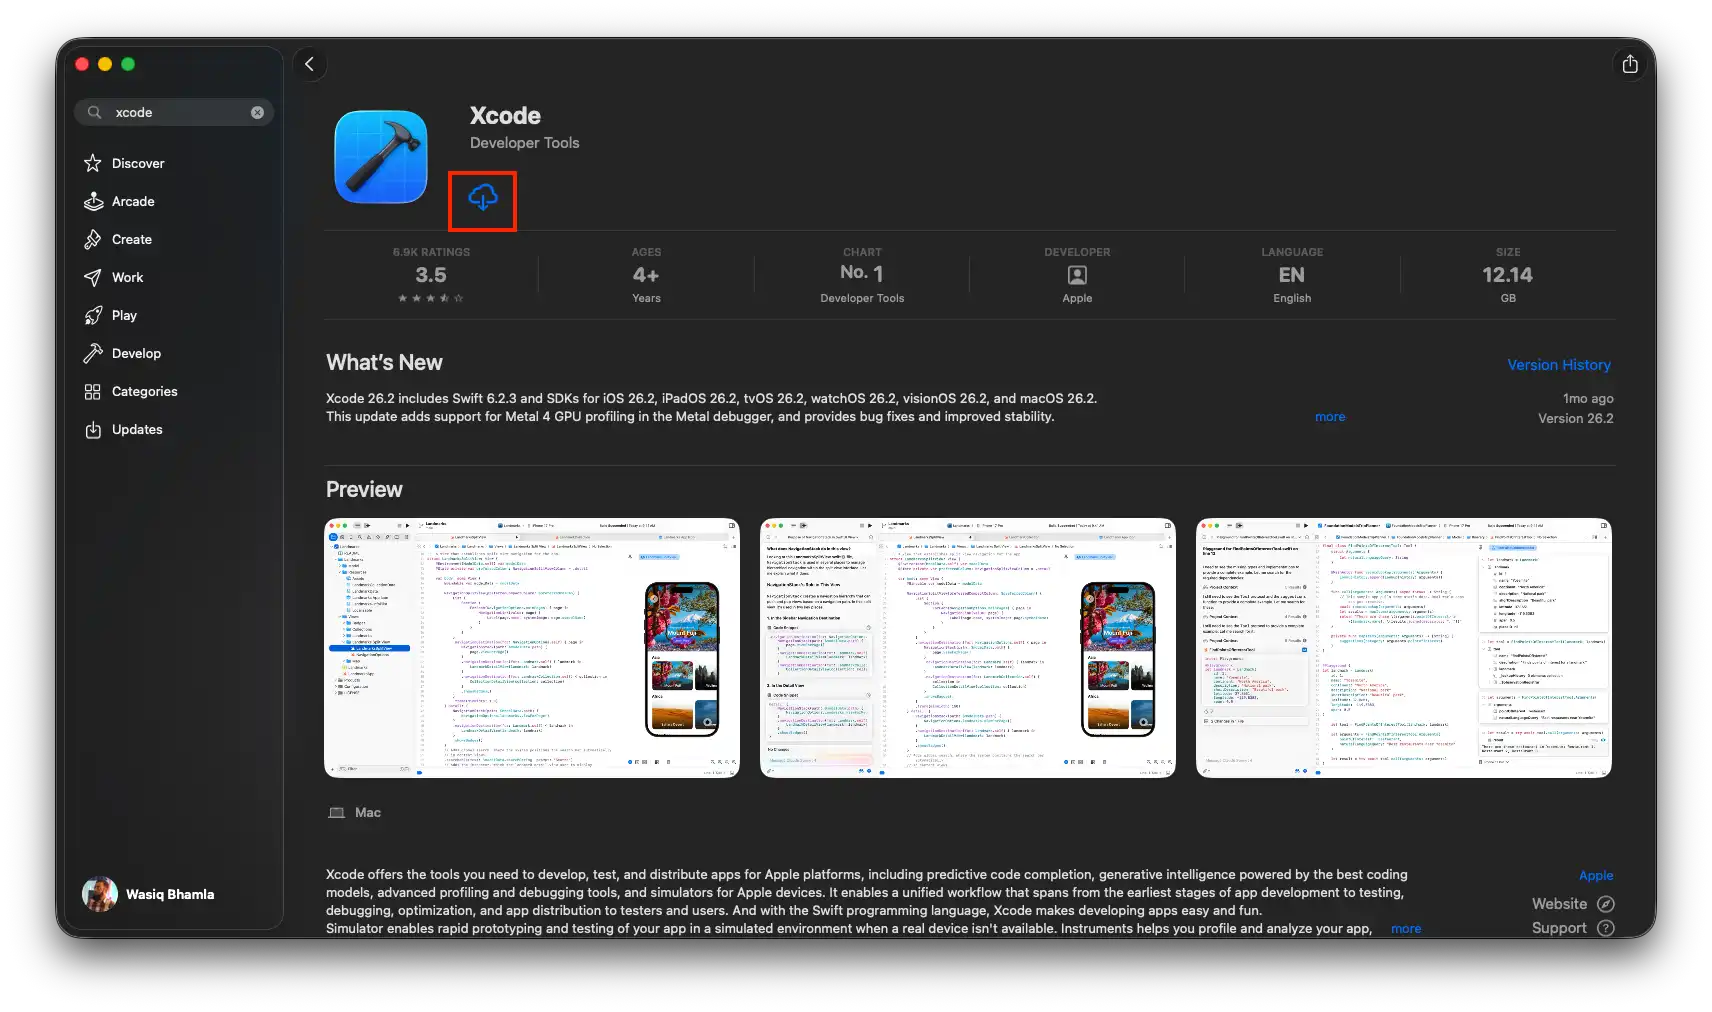
Install XCode
To install an iOS simulator, open the Mac App Store, search for Xcode, and click the download button. The installation will take some time as the package exceeds 12 GB.
Install the iOS Simulator Runtime
Once XCode is installed, open the app from the Mac's Spotlight search or from the Applications folder. Once the XCode application has launched, open its settings menu under XCode > Settings…, and open the Components tab as shown below:
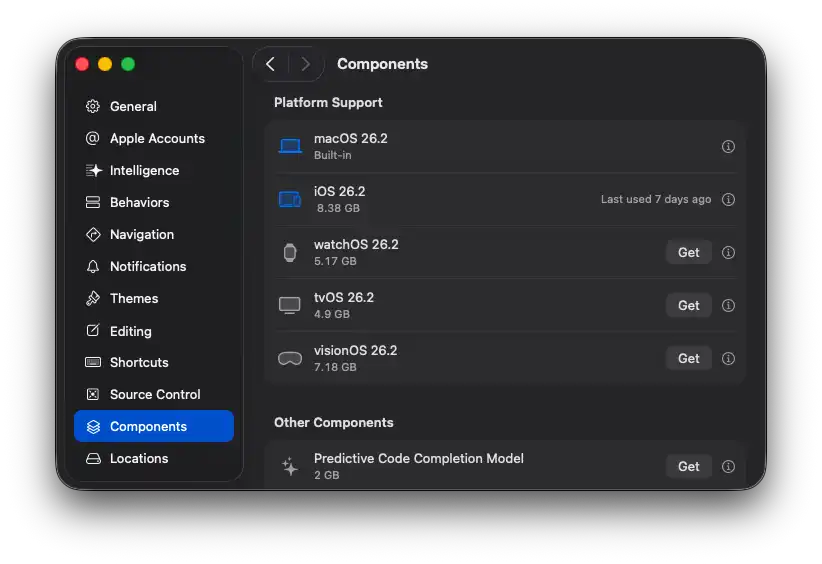
You can also install older simulator runtimes from this screen. For example, you can download an iPhone 16 simulator runtime for backward compatibility testing alongside the latest iOS version.
Sometimes, XCode would download the latest iOS platform automatically, but if it does not download, you can manually download from this screen by clicking on the Get button corresponding to the iOS platform.
Open the iOS Simulator
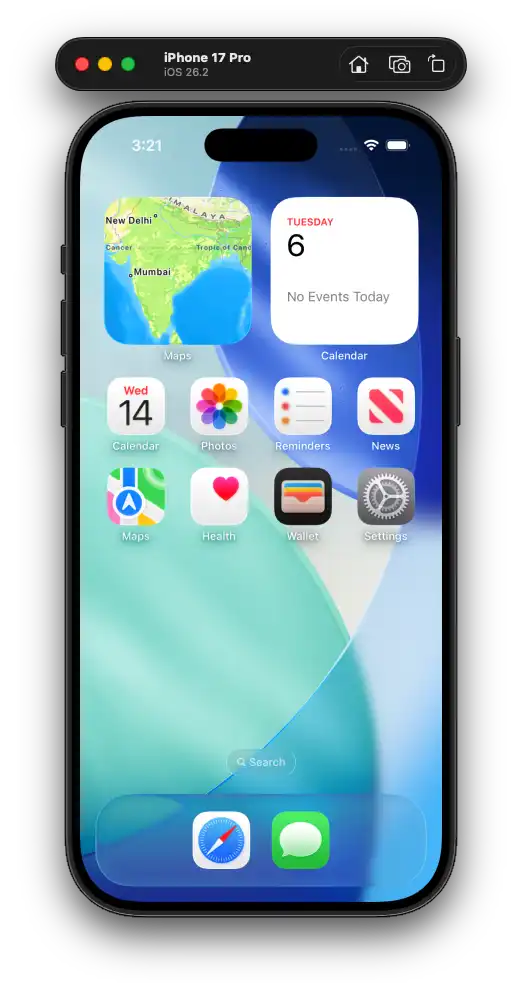
Once the iOS platform component is installed, you can open the simulator by navigating to XCode > Open Developer Tool > Simulator in the XCode application, or you can directly access the Simulator.app from the Mac OS spotlight search.
In the Simulator application, navigate to File > Open Simulator > [Device Name] to launch any supported device. For demonstartion purpose, we will use the iPhone 17 Pro.
You can also launch simulators from the command line, which is useful for mobile automation testing workflows:
xcrun simctl boot "iPhone 17 Pro"This command boots the simulator programmatically. Use xcrun simctl list devices to see all available simulator devices and their states.
Install Your App on the Simulator
Installing your application under test on the iOS simulator is very easy. You will need your target application with the .app file extension.
If the development team has provided a .zip file extension, you must first unzip that file, after which a .app file will be unzipped.
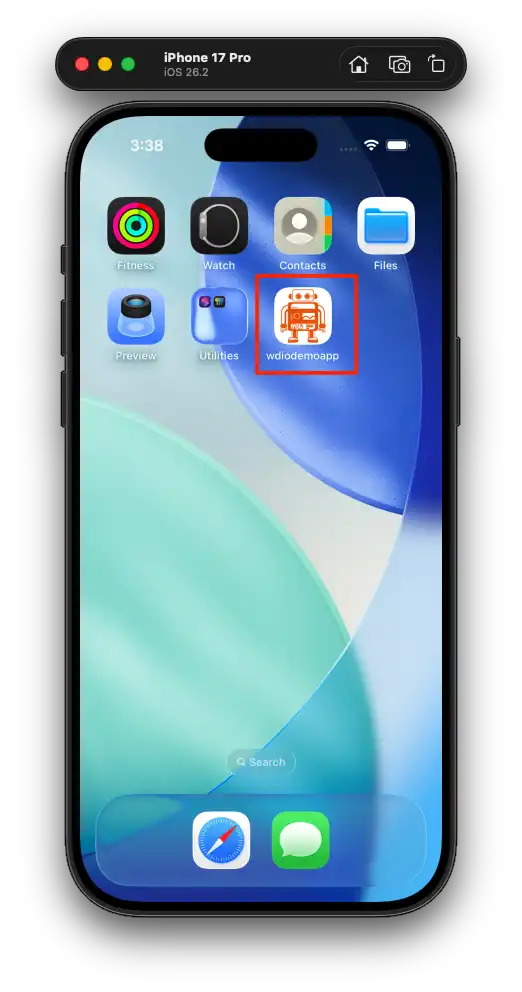
Once you find that file, you just have to drag and drop that application file into your simulator.

After the drag-and-drop, you will see the installed application icon on the simulator home screen, confirming the app is ready to run locally on the simulator.
Open Your App on the Simulator
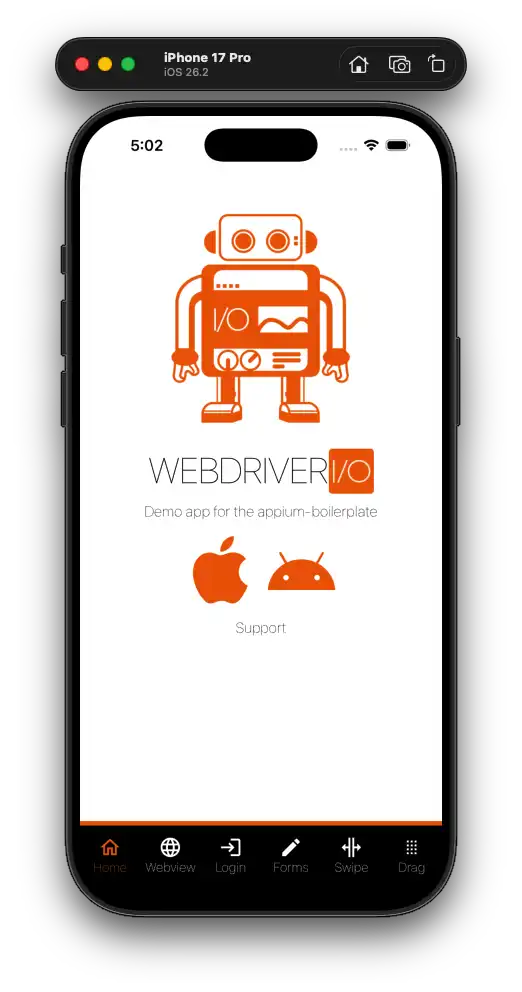
Click the application icon on the simulator screen to launch it. The app will open exactly as it would on a physical device, with the exception of hardware features that simulators cannot replicate.
Using Apple Silicon Native Mode (Designed for iPhone/iPad)
If you have a Mac with Apple Silicon (M1, M2, M3, or M4 chip), you can run certain iOS apps directly on macOS without a simulator, providing another way to run iOS apps on macOS natively.
Apple labels these apps as "Designed for iPhone" or "Designed for iPad" in the Mac App Store.
This method works because Apple Silicon Macs share the same ARM architecture as iPhones and iPads. However, it has limitations for testing:
- Developer Opt-in Required: The app developer must have enabled Mac compatibility. Not all apps are available this way.
- No Debug Tools: You cannot attach Xcode instruments or debuggers to these apps the way you can with a simulator build.
- Touch Input Emulation: You use trackpad clicks instead of touch gestures. Hold the Option key to simulate multi-touch. Some gesture-heavy apps may not work well.
To find available apps, open the Mac App Store, search for the app name, and switch to the iPhone & iPad Apps tab in the search results. If the app appears, click Get to install it.
This approach is useful for quick functional checks, but does not replace simulator or real device testing for mobile app testing service workflows that require full device capabilities.
From experience testing dozens of iOS applications, simulators help catch UI layout issues early, but hardware-dependent and environment-specific bugs often only appear on real devices. That is why cloud-based real device platforms are one of the most practical solutions for scalable validation.
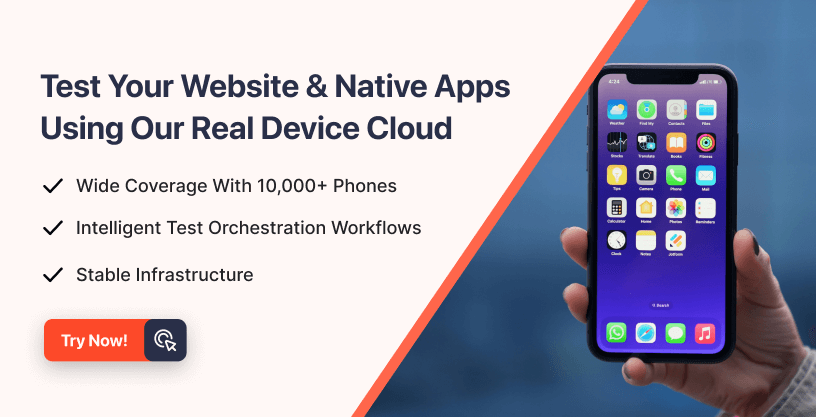
Note: Run your iOS application tests across 10,000+ real devices and OS combinations. Try TestMu AI Now!
Using Cloud Platform for Real Device
If you need to test on iOS devices that you do not physically own, you can use a cloud-based mobile testing platform such as TestMu AI. It allows you to run iOS apps on macOS-connected environments remotely while executing web and mobile tests at scale.
As a full-stack Agentic AI Quality Engineering platform, TestMu AI enables teams to plan, author, execute, and analyze tests intelligently across 10,000+ real devices, browsers, and OS combinations, without maintaining physical device infrastructure.
After signing up, you get access to a wide range of real iOS devices from their collection, allowing you to validate your application across multiple models and OS versions.
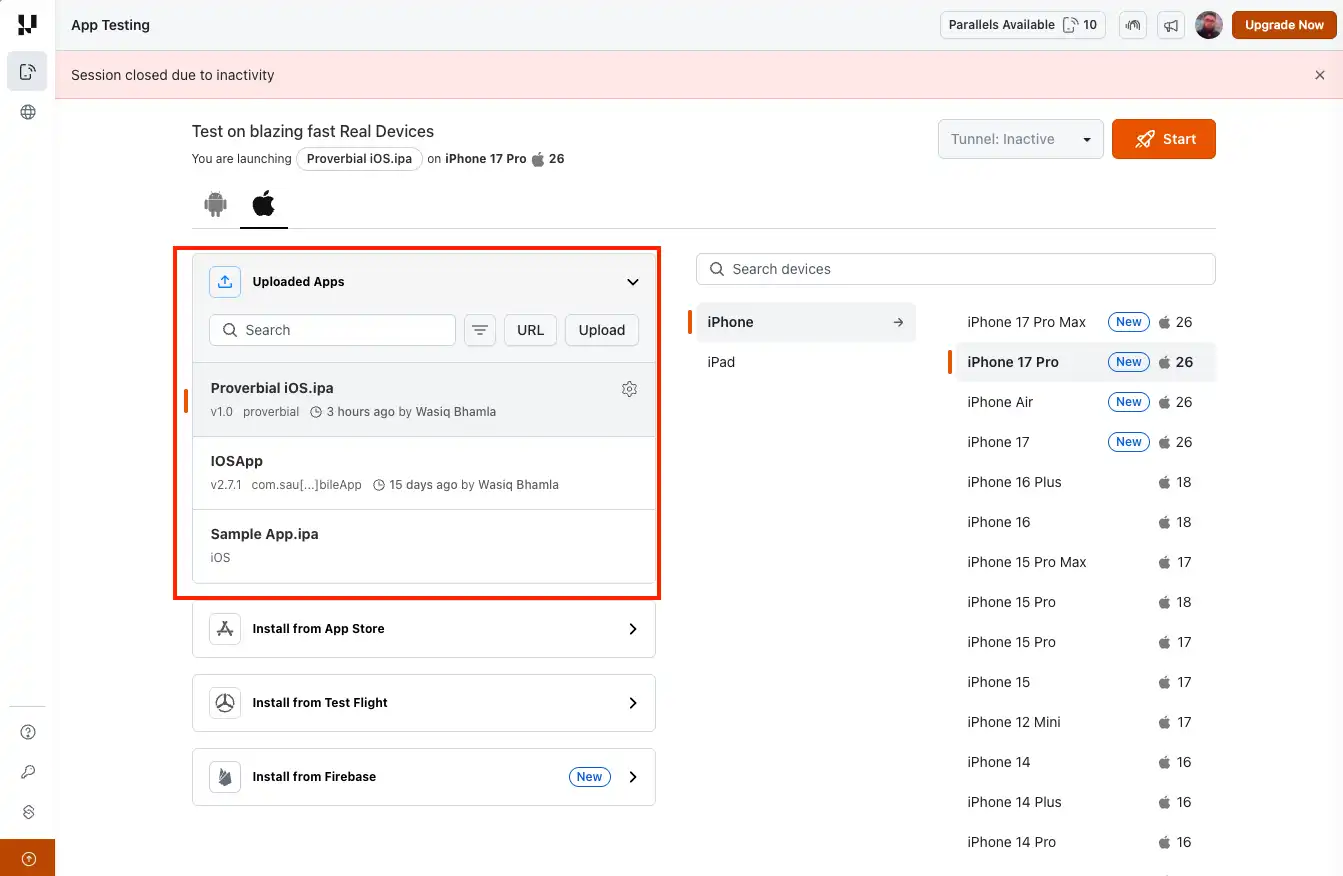
How to Start a Manual iOS Session
You can start a manual testing session on TestMu AI by navigating to Real Device > App Testing on the dashboard sidebar navigation. You will see the following screen once you navigate to the App Testing menu:
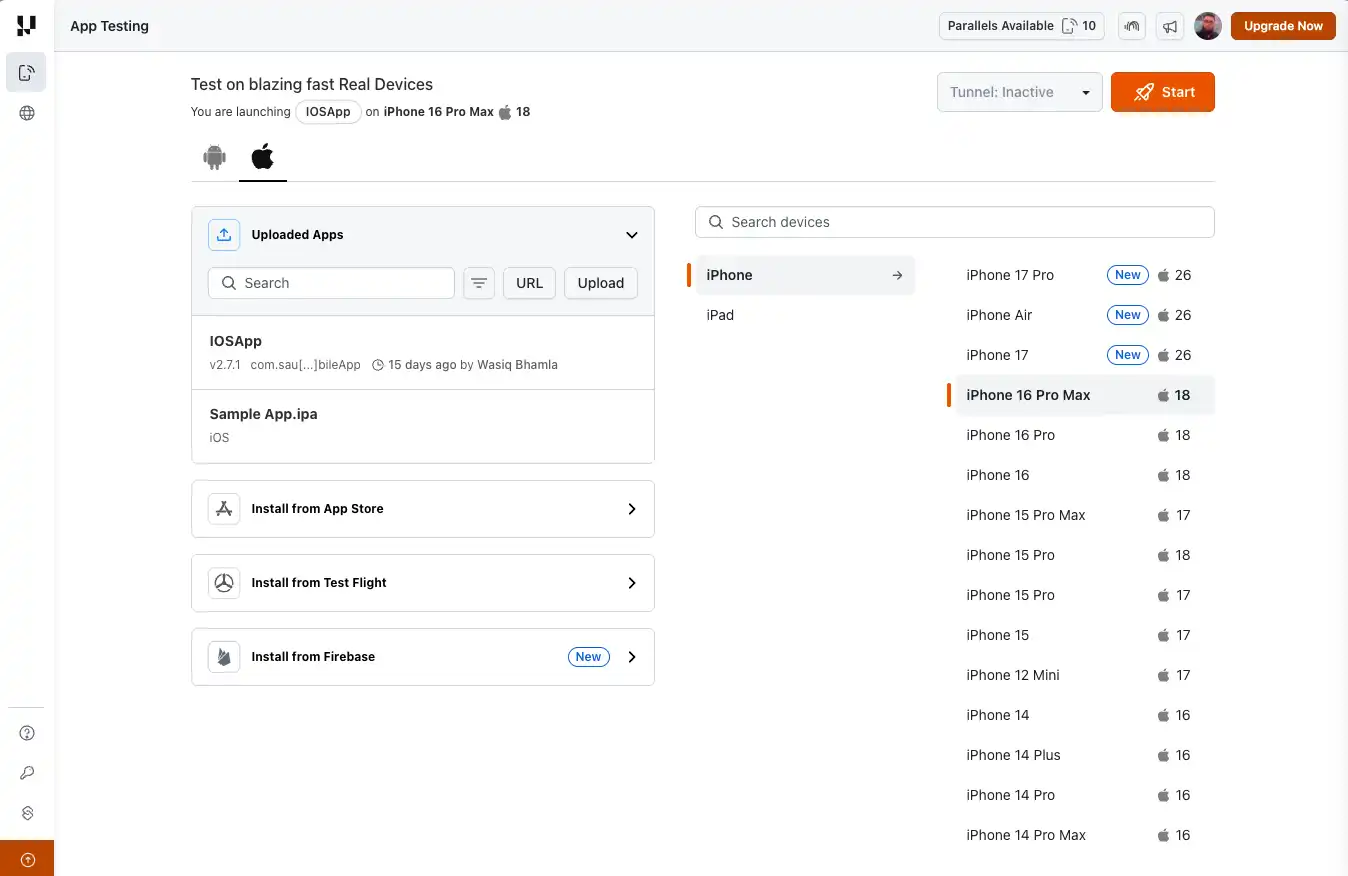
On this screen, select your uploaded application from the list and choose the required device. Once the session starts, you will see the device with your application launched and ready for interaction, enabling you to test on iOS devices remotely in real time.
Upload Your App to the Cloud
From the App Testing page, upload your application to the TestMu AI server. If your application is hosted on the App Store, TestFlight, or Firebase, you can connect to the host provider directly and select your hosted application.
If you upload from the upload section, you will see all uploaded applications listed. Select the one you want to test and choose a device to start working.
Install Your App on a Cloud Device
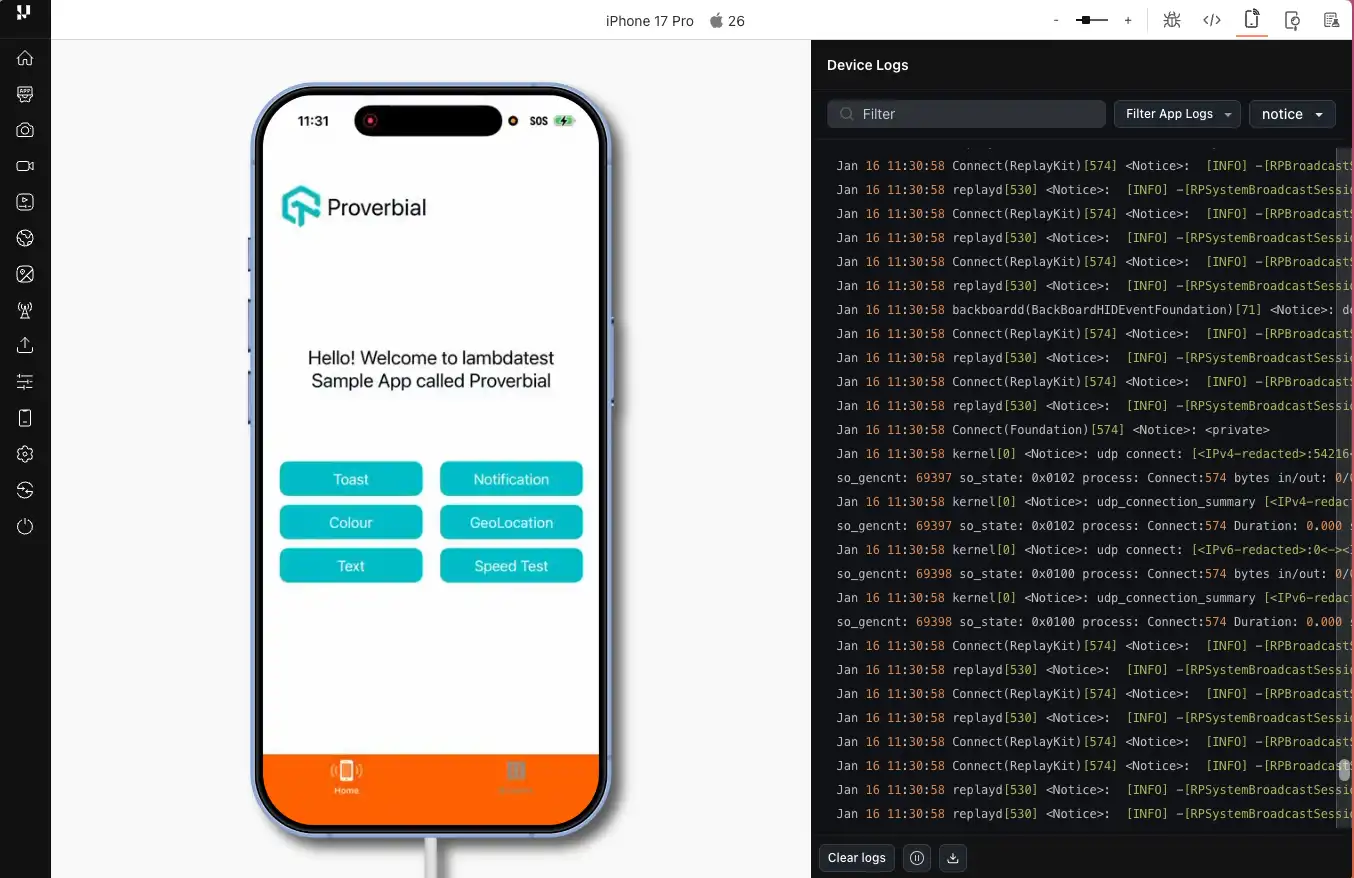
When you select your application and device, the manual session automatically installs the application on the device and launches it.
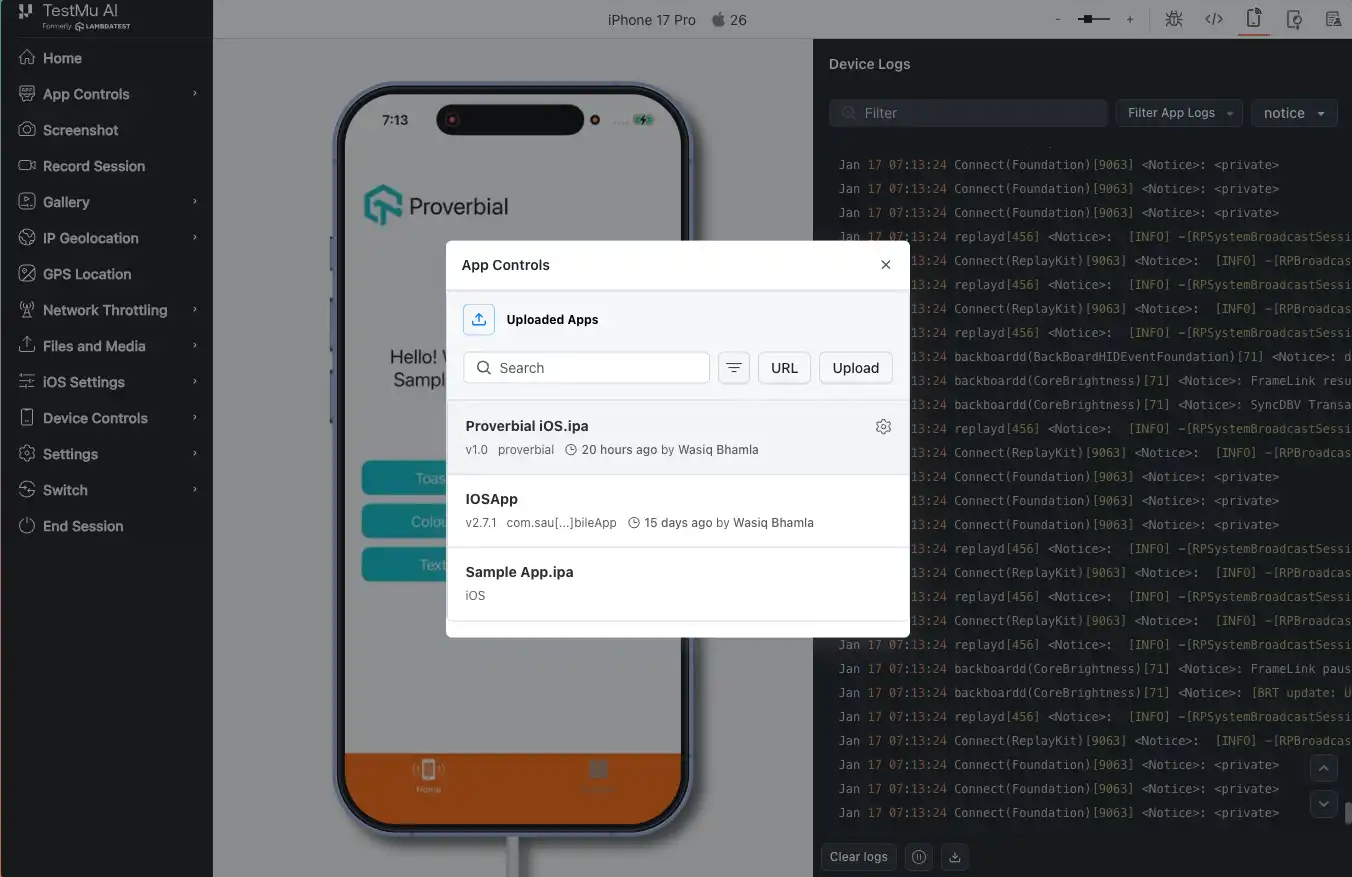
You can also install additional applications during a running session by navigating to App Controls > Install New App from the left sidebar.
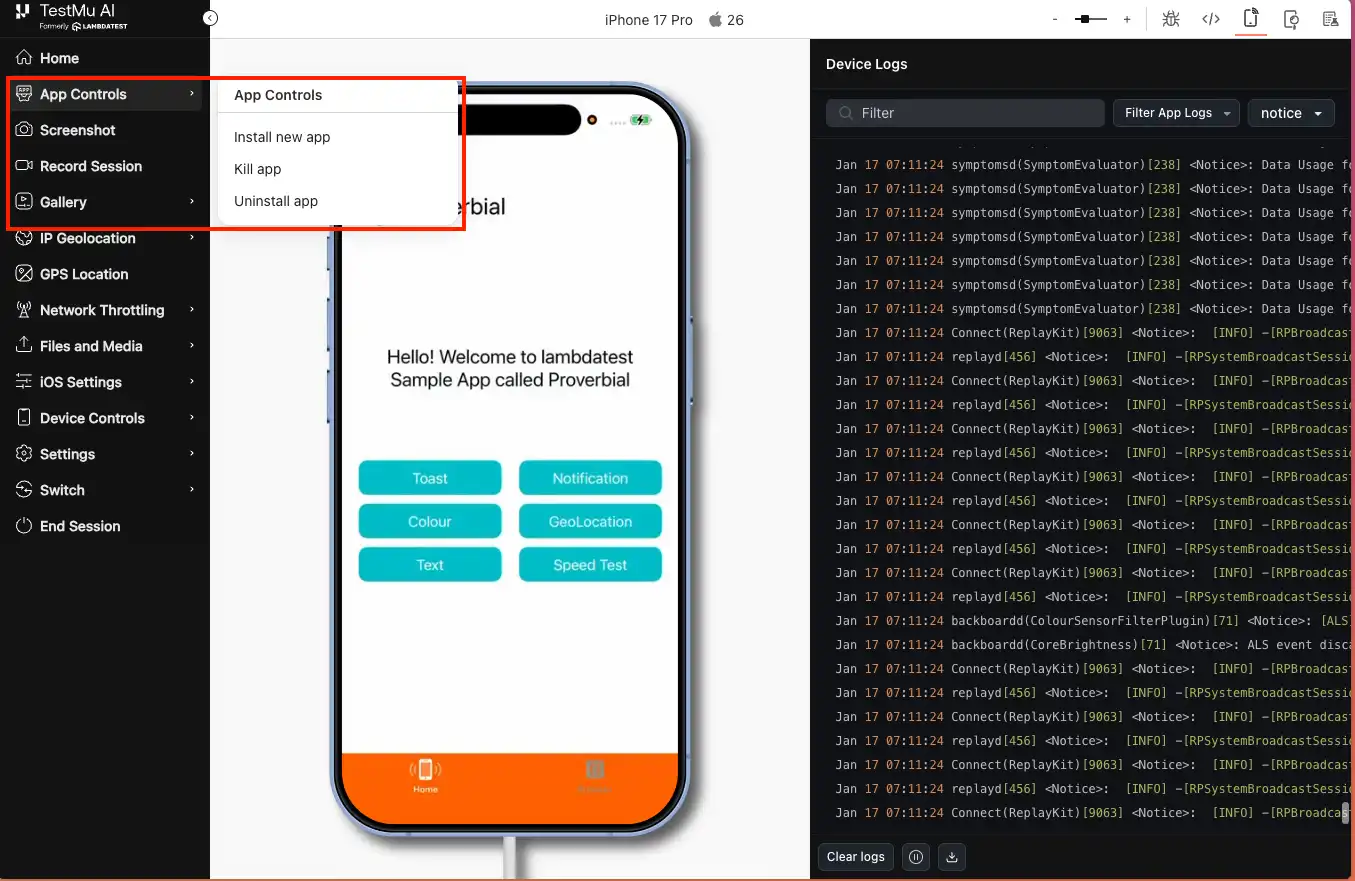
Clicking this option opens a modal dialog where you can select your target application.
For real device testing at scale, a cloud device farm eliminates the overhead of maintaining local hardware.
TestMu AI supports both iOS real devices and Android emulator online access from the same platform, so you can test on iOS devices and Android environments without maintaining separate infrastructure. This eliminates the need to separately configure an Android emulator for Mac alongside your iOS testing setup.
Run XCUITest Directly from Xcode on Real Devices
For teams already using Xcode for automation, switching between local builds and cloud dashboards can slow down workflows. To simplify this process, TestMu AI provides the LambdaMax Xcode plugin, which allows developers to execute automated tests on real cloud devices directly from Xcode.
This integration is especially useful for teams running UI automation using the XCUITest framework.
How Does the LambdaMax Plugin Work?
The plugin uses a post-build script inside Xcode to:
- Application Upload: Uploads the application build to the real device cloud after the Xcode build process completes.
- Test Suite Upload: Uploads the corresponding XCUITest package required for automation execution.
- Test Execution Trigger: Initiates an XCUITest run on selected iPhone device models in the cloud.
- Execution Response: Returns test execution details within the workflow for visibility and tracking.
- Build Scheme Integration: Allows developers to control device selection, project naming, and execution settings directly from the Xcode scheme configuration.
Installing the LambdaMax Plugin in Xcode
To enable XCUITest app testing on real cloud devices directly from Xcode, you need to configure a Run Script action within your build scheme. This setup connects your local XCUITest framework execution to the cloud device grid without leaving the Xcode environment.
- Open Xcode: Launch Xcode on your macOS machine.
- Edit Scheme: Navigate to Product → Scheme → Edit Scheme from the top menu bar.
- Access Build Settings: Expand the Build section from the sidebar panel.
- Open Post Actions: Select the Post Actions option under the Build configuration.
- Add Script Action: Click the + icon and add a new Run Script Action.
- Paste Execution Script: Insert the provided automation script into the Run Script section.
- Update Credentials: Replace Username and AccessKey with your TestMu AI account credentials.
- Configure File Paths: Set the correct local file paths for your application and test suite files.
- Run Execution: Click the Run (Play) button in Xcode to trigger execution on real cloud devices automatically.
Follow this support documentation on the LambdaMax XCode Plugin, to perform XCUITest for iOS app testing.
Using a Real iOS Device with iPhone Mirroring
With iOS 18 and macOS Sequoia or later, you can connect your real iOS device to macOS using the built-in iPhone Mirroring application, allowing you to run iOS apps on macOS through a live mirrored device.
This option does not require any external application and is ideal for live device testing, since you are interacting with an actual iPhone rather than a simulator.
Mirror Your Device on the Mac
To connect your iOS device to your Mac OS machine, you need to make sure that:
- Sign in with the Same Apple Account: Ensure your iOS device is signed in to the same Apple Account as your Mac.
- Enable Wi-Fi and Bluetooth: Confirm that both your iPhone and Mac have Wi-Fi and Bluetooth turned on.
- Keep iPhone Locked and Nearby: Make sure your iPhone is locked and placed close to your Mac to establish the mirroring connection.
Once connected, you will see your iPhone screen in the Mirroring application on your Mac.
To disconnect your iPhone device from the mirroring application, you can simply quit the mirroring application or unlock your iPhone device.
Install Your App on the Real iOS Device
Drag and drop the .ipa file into the Mirroring application window. This automatically installs the application on the real device. After installation, you can interact with the app from the Mirroring application by tapping and swiping on the mirrored screen.
When Should You Use a Simulator vs Real Devices?
Choosing between an iOS simulator and a real device depends on your development stage, testing goals, and how you plan to run iOS apps on macOS efficiently.
Simulators are ideal for rapid debugging and UI validation, while real devices are essential for performance accuracy and production readiness.
| Feature | iOS Simulator | Real iOS Device |
|---|---|---|
| Speed | Faster boot and execution | Slightly slower due to physical hardware |
| Cost | Free with Xcode | Requires physical device or cloud access |
| Hardware Testing | Limited (no real GPS, camera, sensors) | Full hardware validation |
| Performance Accuracy | Not fully representative | Real-world performance metrics |
| Network Conditions | Simulated | Actual carrier/Wi-Fi behavior |
| Push Notifications | Limited testing | Fully supported |
| CI/CD Integration | Easy for basic tests | Required for production validation |
| Best For | UI debugging and early testing | Final validation and regression testing |
However, the iOS Simulator has specific limitations that make real device testing essential before production deployment:
- No Push Notifications: The simulator does not support APNs (Apple Push Notification Service) testing.
- No Camera or Bluetooth: Hardware-dependent features like camera capture, Bluetooth pairing, and NFC cannot be tested on simulators.
- No GPS Accuracy Testing: The simulator allows setting a custom location, but it cannot replicate real-world GPS signal variations.
- No Battery or Performance Profiling: Memory pressure, CPU throttling, and battery drain under real usage conditions are only measurable on physical devices.
- No App Store Distribution Testing: Provisioning profiles, code signing, and app installation from TestFlight require real devices.
Conclusion
You now know the different ways to run iOS apps on macOS for effective testing. Start with simulators during early development for fast iteration. Use Apple Silicon native mode for quick functional checks. Move to cloud-based real devices or iPhone Mirroring when you need hardware-accurate results before App Store deployment.
Choose your approach based on what stage of testing you are in and what device capabilities your application depends on.
By selecting the right method based on your testing stage, you can confidently run iOS apps on macOS with accurate and scalable validation.
Citations
- Apple Support – Use iPhone Mirroring on Mac
- Apple Support – Use iPhone and iPad Apps on Mac with Apple Silicon
- Apple Developer Documentation – Running iOS Apps in macOS
- Apple Developer Documentation – Getting Started with iOS Simulator
- Xcode Official Documentation
- XCTest Documentation
- XCUIAutomation Documentation
Frequently asked questions
Did you find this page helpful?
More Related Hubs
TestMu AI forEnterprise
Get access to solutions built on Enterprise
grade security, privacy, & compliance
- Advanced access controls
- Advanced data retention rules
- Advanced Local Testing
- Premium Support options
- Early access to beta features
- Private Slack Channel
- Unlimited Manual Accessibility DevTools Tests