HyperExecute On-Premise User Guide
This guide is for teams that run HyperExecute on-premise, inside their own network. It takes you from a fresh machine to a scheduled workflow that runs on its own, and covers what to do when something breaks.
HyperExecute on-prem works the same way as the SaaS platform for most tasks. This page focuses on the parts that are different and links to the SaaS documentation for everything else.
What you can do by the end of this guide
- Install the HyperExecute CLI and point it at your on-prem deployment.
- Trigger a job from your machine or your CI pipeline.
- Group jobs under a Project and set up a scheduled Workflow.
- Pause a workflow during a maintenance window.
- Find results, rerun failures, and fix the most common errors on your own.
How on-prem differs from SaaS
Read this table once before you start.
| Area | SaaS | On-prem |
|---|---|---|
| Dashboard | Public TestMu AI dashboard with all products | Your organization's own dashboard host. The HyperExecute menu has Jobs and Projects |
| CLI target | Public HyperExecute endpoints by default | Pass your deployment host with --onprem-host. Help > Hyperexecute CLI gives you the full command |
| Network | Public internet endpoints must be reachable | Your machine or CI agent must reach your deployment host. Corporate proxies and internal certificates may apply |
| Operating systems | Linux, Windows and macOS | Linux and Windows. See Private Cloud benefits |
| Environments | Managed by TestMu AI | Defined by your admin. Jobs with no environment fall back to the org default |
| Test discovery | mode: local or mode: remote | mode: remote only |
| Git access | GitHub (Marketplace app or token) or Bitbucket | Depends on how your deployment is set up, for example your own or a dedicated GitHub App. Ask your admin which Git providers you can use |
| Analytics | Full Intelligent Test Analytics | Not available (see Private Cloud benefits). Use job reports, the job Insights (Beta) tab and the Organisation Summary |
The end-to-end journey
Follow these steps in order. Click any card to jump to the full instructions.
Each step below lists what to do, what is specific to on-prem, and where the full feature docs live.
Before you start
Collect these from your admin before step 1.
- Your on-prem dashboard URL.
- Your on-prem host value for the CLI.
- A dashboard login. Your username and access key come from the dashboard itself (step 1).
- Your role, for example Org Admin or member.
- Proxy details, if your machine reaches the network through a corporate proxy.
- Access to the Git repository that holds your tests, connected to HyperExecute by your admin. Supported Git providers depend on your deployment, so confirm yours is connected.
Step 1: Find your way around the dashboard
Sign in to your organization's HyperExecute dashboard. The HyperExecute menu on the left has:
- Projects: your test suites, their workflows and their jobs.
- Jobs: every job in the organization, with filters for Status, Label, Team, Users, Type and Date.
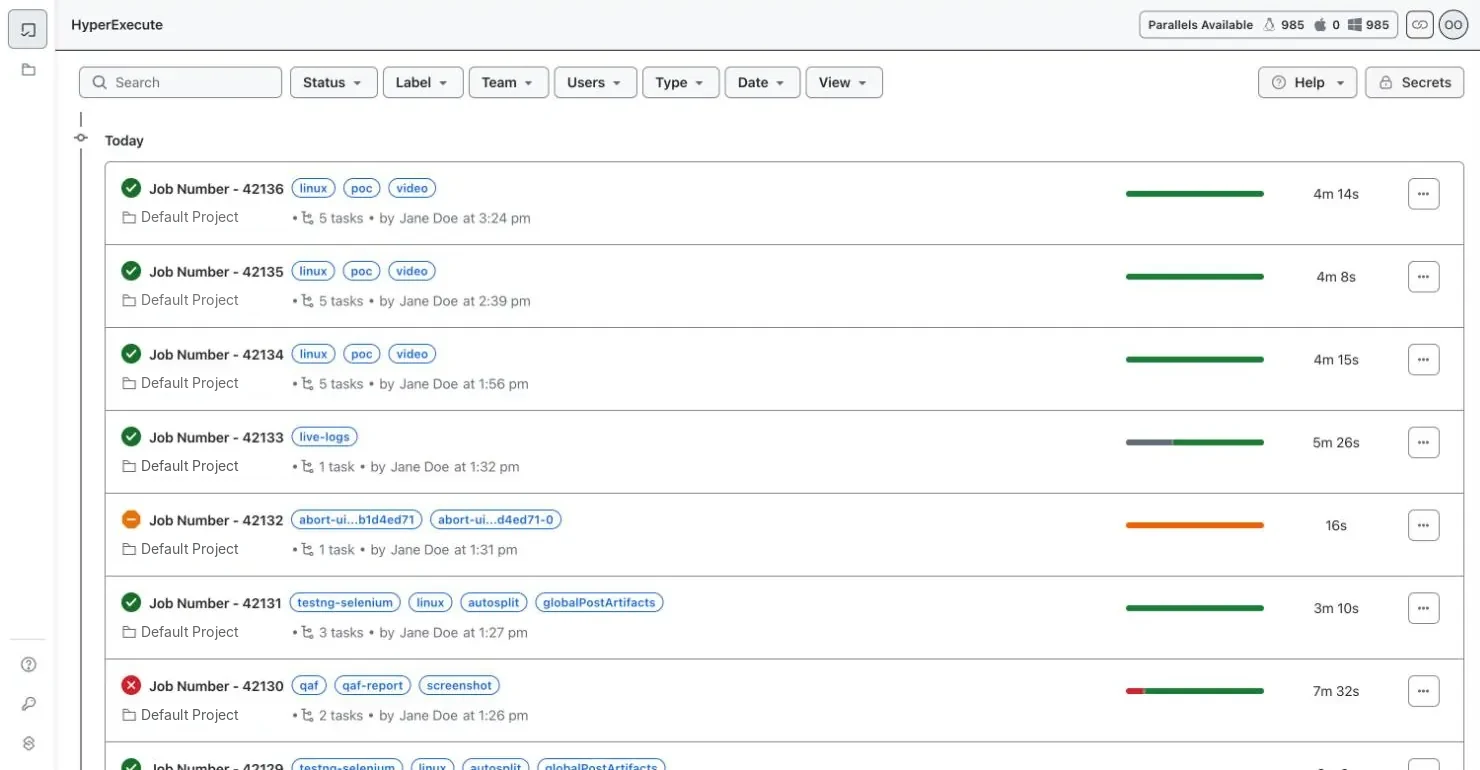
These controls appear on every page:
- Parallels Available (top right) shows how many Linux, macOS and Windows sessions your organization can run at once. On-prem deployments run Linux and Windows, so macOS shows
0. - Help opens Quick Start, Docs, Github Samples, Generate YAML and Hyperexecute CLI. You use Hyperexecute CLI in step 3 and Generate YAML in step 4.
Copy your username and access key
- In the left sidebar, click Credentials.
- Click the copy icon next to Username, then next to Access Key.
- To regenerate or manage keys, click Manage Credentials.
Always copy your keys from your own on-prem dashboard.
Step 2: Create a Project
Many organizations onboard Projects through their own process, so your Project may already exist. Open HyperExecute > Projects and look for it first. If it is there, skip to Add Project secrets or step 3. If you are not sure, ask your admin how Projects are onboarded in your organization.
A Project holds one test suite: its Git connection, workflows, secrets and jobs. Create one before you run anything, so every job lands in the right place.
-
Open HyperExecute > Projects and click New Project.
-
In Type of Project, select Custom Project. The other types (Tosca, Tosca with Dex, TTA for SAP, JMeter and Gatling) have their own setup guides, linked from HyperExecute Projects.
-
Fill in the form:
- The URL of the Git repository that holds your tests, and a Project name. Both are required. Your jobs appear under the Project name.
- Branch Name: the default branch. It defaults to
main. - YAML Path: where the YAML lives in the repository. It defaults to
.lambdatest/hyperexecute.yaml. - PAT Token: a Git access token with read access, unless your admin has set up a GitHub App.
- Teams: the teams that should see this Project.
Your deployment may show more fields that your organization has added. Ask your admin what to enter in them.
-
Click Save.
Open the new Project. It has a Workflows tab, a Jobs tab, a Help menu and a Secrets button.
Add Project secrets
Store passwords and tokens your tests need as Project secrets, so no one puts them in the YAML.
- In the Project, click Secrets.
- Add each key and value your tests need.
The steps and how to use secrets in the YAML are on Project-level secrets.
Step 3: Install and configure the CLI
-
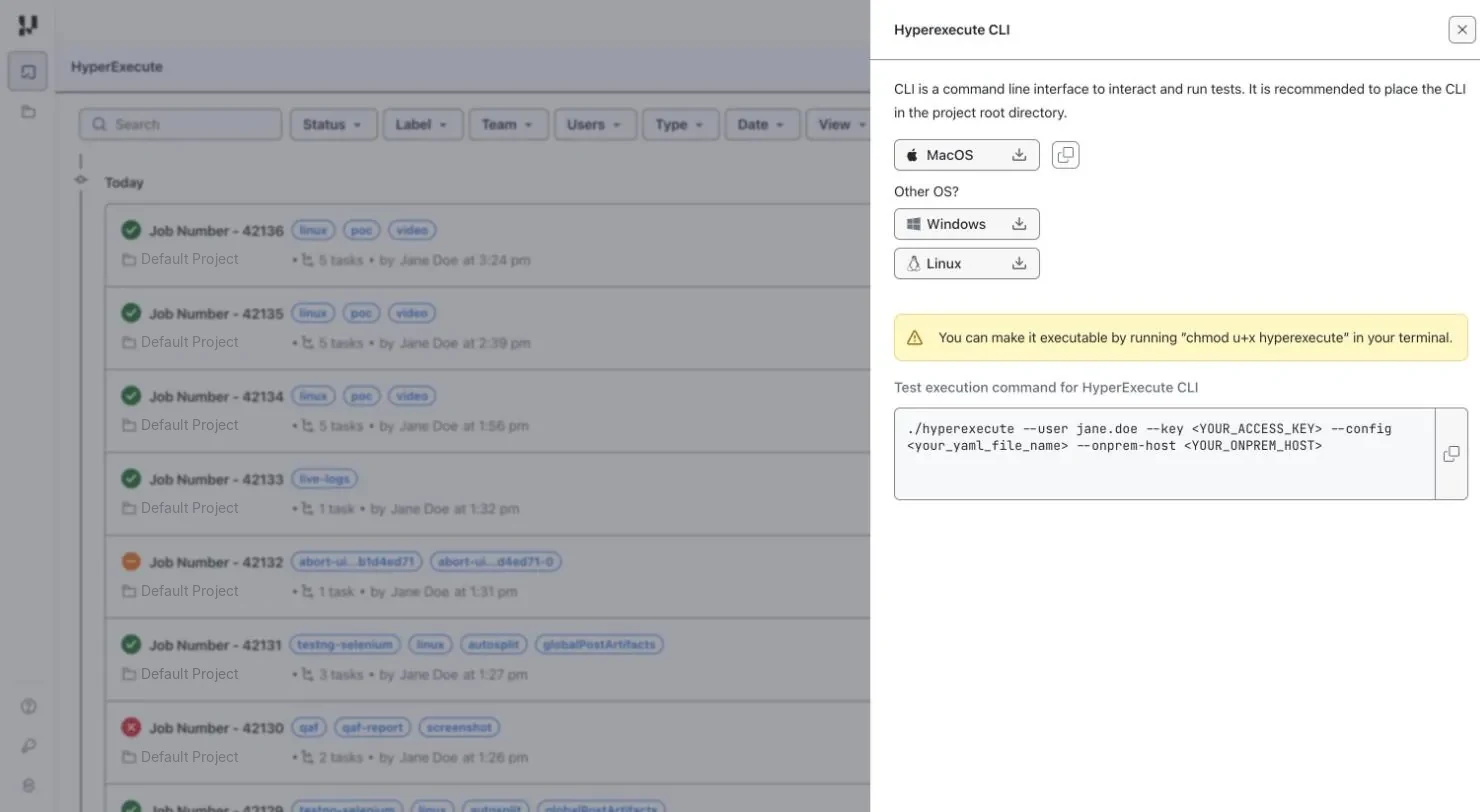
Open Help > Hyperexecute CLI on any HyperExecute page.
-
Download the binary for your OS: MacOS, Windows or Linux. The CLI can run on a Mac even though tests on your deployment run on Linux and Windows.
-
Place the binary in your test project's root folder.
-
On Linux or macOS, make it executable:
chmod u+x ./hyperexecute -
Check that it runs:
./hyperexecute --version -
If you are behind a corporate proxy, add
--auto-proxyto your commands so the CLI uses thehttp_proxyandhttps_proxyvalues already set on your machine.
Step 4: Prepare your YAML
The YAML file tells HyperExecute what to run and how to split it. It is the same format on SaaS and on-prem.
- Start from the guide for your framework in Frameworks you can run. It has a sample YAML you can adapt.
- New to the format? Use Help > Generate YAML, or read Generate your YAML and the Deep Dive into YAML.
- Keep the file at the YAML Path you set on the Project (
.lambdatest/hyperexecute.yamlby default). Workflows look for it there. - YAML version 0.2 has a
frameworkblock for Maven projects (TestNG, JUnit 4, JUnit 5). Rerun failed tests needs version 0.1, so pick the version that fits how you work. - Add your Project so jobs from the CLI are grouped with workflow jobs. See Link jobs to Projects using YAML.
- Reference secrets instead of writing passwords in the file. See Project-level secrets.
- Ask your admin whether caching is set up on your deployment for Maven, Gradle or npm dependencies.
On-prem specifics:
- Use
linuxorwininrunson. macOS is not available on-prem. - If you do not set an environment, the job uses your organization's default environment.
- Your admin can limit which environment variables jobs may use. If you set one that is not allowed, the CLI shows a warning. See
env. - Set
testDiscovery.mode: remotein every YAML. On-prem supports remote discovery only, somode: localdoes not work, whether you start the job from the CLI or from a Workflow. See testDiscovery. - Org-wide Global Policies, set by your Org Admins, can add steps to your job or reject it. You cannot change them from your YAML. Check the Applied Policies panel on the job page to see what changed, and ask your Org Admin if a policy blocks your job.
Validate the file before you submit it:
./hyperexecute --config .lambdatest/hyperexecute.yaml --validate
Step 5: Trigger a job from the CLI
The Hyperexecute CLI panel from step 3 shows a Test execution command for your deployment. Copy it, replace any placeholder such as <YOUR_ACCESS_KEY> or <your_yaml_file_name> with your own value, and run it from your project root:
./hyperexecute --user <YOUR_USERNAME> --key <YOUR_ACCESS_KEY> --config .lambdatest/hyperexecute.yaml --onprem-host <YOUR_ONPREM_HOST>
--onprem-host takes the host name of your deployment on its own, for example hyperexecute.example.com, with no https:// and no path. Use the value your admin gives you, or the one in the panel's command.
The job appears on the Jobs page while it runs, and in your Project's Jobs tab if your YAML names the Project.
Flags most on-prem teams use:
| Flag | Use it to |
|---|---|
--config | Point to a YAML file that is not in the current folder. |
--validate | Check the YAML without starting a job. |
--labels | Tag the job, for example with the team or release name, so you can filter jobs by label later. |
--vars | Pass values into the YAML at runtime. |
--job-secret-file | Pass secrets from a file instead of the command line. |
--auto-proxy | Use the proxy settings already on your machine. |
--download-artifacts, --download-report | Pull results back to the machine that started the job. |
--no-track | Start the job and return without waiting for it to finish. |
The full list is on HyperExecute CLI flags.
Running from a CI pipeline
The CLI works the same way inside Jenkins, Azure DevOps, GitLab and other CI tools. Store the username and access key as CI secrets, then call the same command as a pipeline step.
- Set
CI=trueto turn on quiet mode and keep pipeline logs short. - Use the CLI exit code to pass or fail the pipeline stage. See Handling error codes in CI.
- Tool-specific setup is on Integration with CI/CD tools.
Step 6: Configure and run a Workflow
A Workflow runs a Project's tests on a schedule, or on demand from the dashboard, without a CI pipeline. Use it for nightly regression, checks before business hours, and suites that chain into each other.
Before you create one:
- The Project's Git URL and access are set (step 2).
- The YAML is in the branch you pick, or you paste a custom YAML during setup.
- Workflows use the remote mode of test discovery.
Create it:
-
Open the Project and click Create Workflow (or Setup Workflow in an empty Project).
-
Step 1 of 3: enter the Workflow name and Branch. Under Type, keep In Repo Yaml and check the File Location, or choose Custom Yaml and paste the file. Click Next.
-
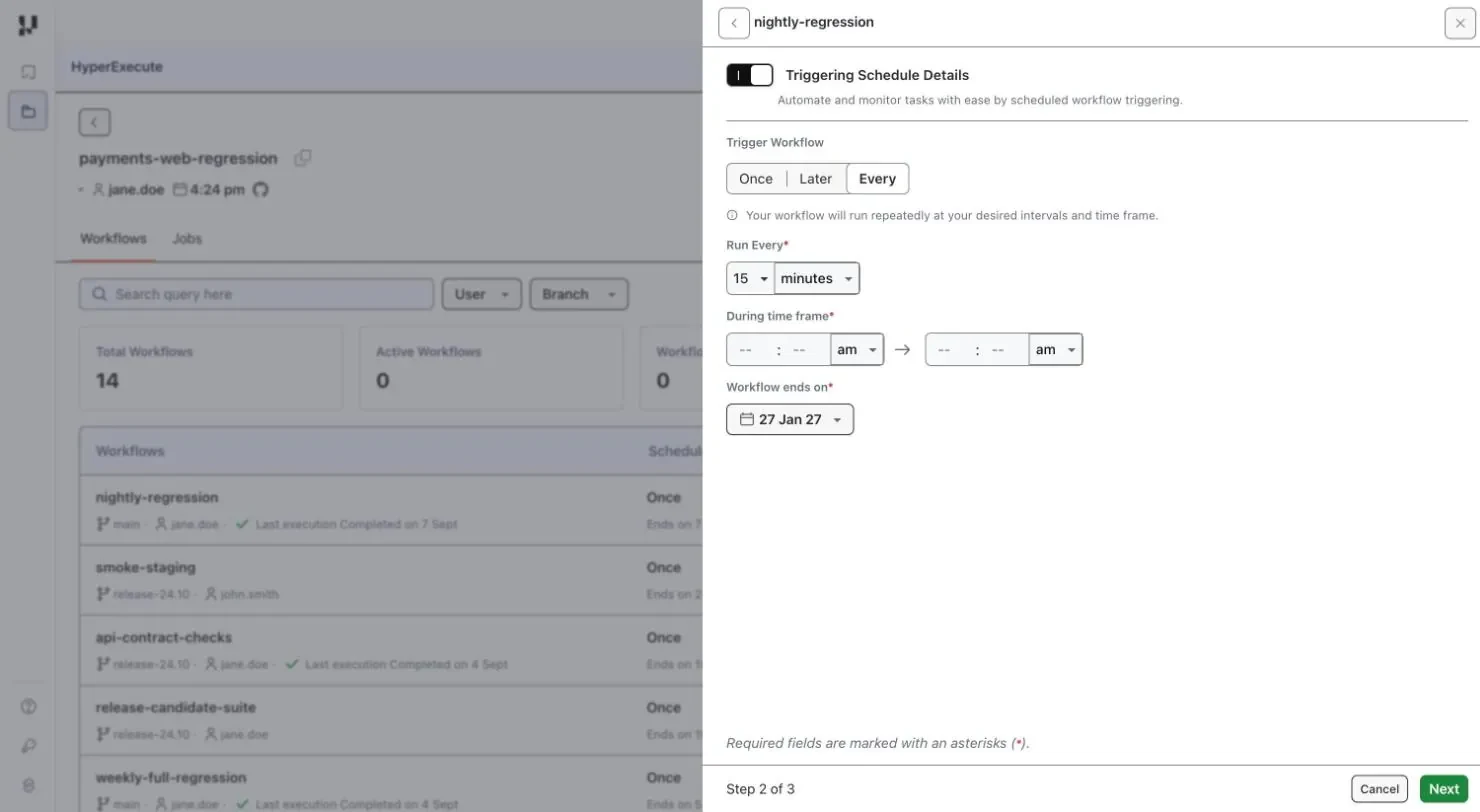
Step 2 of 3: leave Triggering Schedule Details on and pick Once, Later or Every. For Every, pick a Run Every option:
- Minutes, Hours or Days, with a During time frame start and end time.
- Days of week, with a Start at time and the days under When to Run.
Turn the toggle off to run the workflow only by hand. Set Workflow ends on either way, then click Next.
-
Step 3 of 3 (optional): turn on Link Workflow to trigger another workflow when this one ends Completed, and pick its project and workflow. Turn on Workflow Variables to add values you can change at runtime.
-
Click Finish. Click Play on the workflow row to run it straight away.
Full feature reference: Workflows, Test Chains.
Step 7: Manage workflow states
The Status column shows each workflow's state.
| State | What it means |
|---|---|
| Active | Triggers jobs on its schedule. |
| Paused | Kept as it is, but triggers no new jobs. |
| Expired | The end date has passed, so it no longer runs. Set automatically. |
The Project's Workflows tab sums them up at the top: Total Workflows, Active Workflows, Workflows Running Successfully, Workflows with Issues and Expired Workflows. Each row shows the branch, owner, last run, schedule, end date, status and the Last 5 Jobs.
Pause a workflow
Pause a workflow when the target environment is down for maintenance, during a code freeze, or while you investigate repeated failures.
- Open the Project and stay on the Workflows tab.
- In the Status column, click Active on the workflow row.
- Select Pause Workflow.
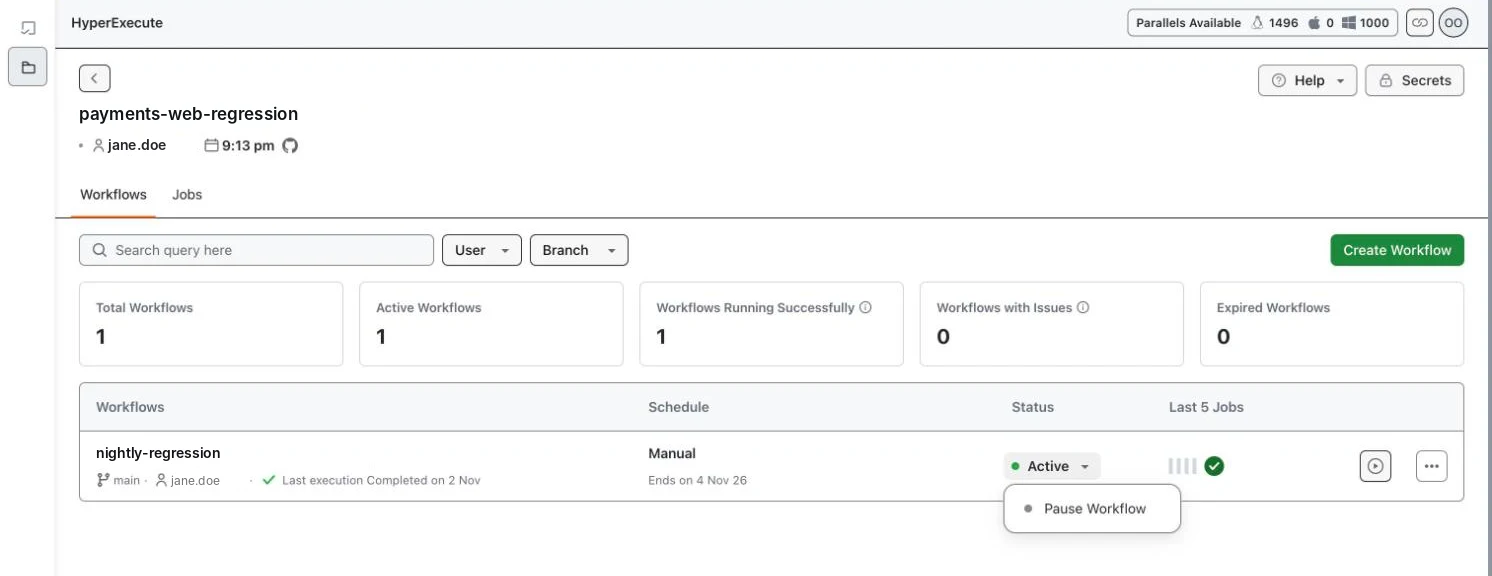
A paused workflow triggers no new jobs. To resume it, use the same Status menu on the workflow row.
Expired workflows
An Expired workflow has passed its Workflow ends on date. To run that schedule again, use Edit Workflow or Clone Workflow from the ... menu on the workflow row. The same menu has Delete Workflow.
Step 8: Review results and rerun failures
Open a job from the Jobs page or the Project's Jobs tab. The job page shows the status, duration, owner and labels at the top, with YAML, Artifacts and Report buttons. The left panel lists each execution task and the global post task. On the right, switch between Pre Steps, Scenarios and Post Steps to read the logs for that task. The Scenarios tab lists each scenario with its own status, duration and log, so you can open just the one that failed.
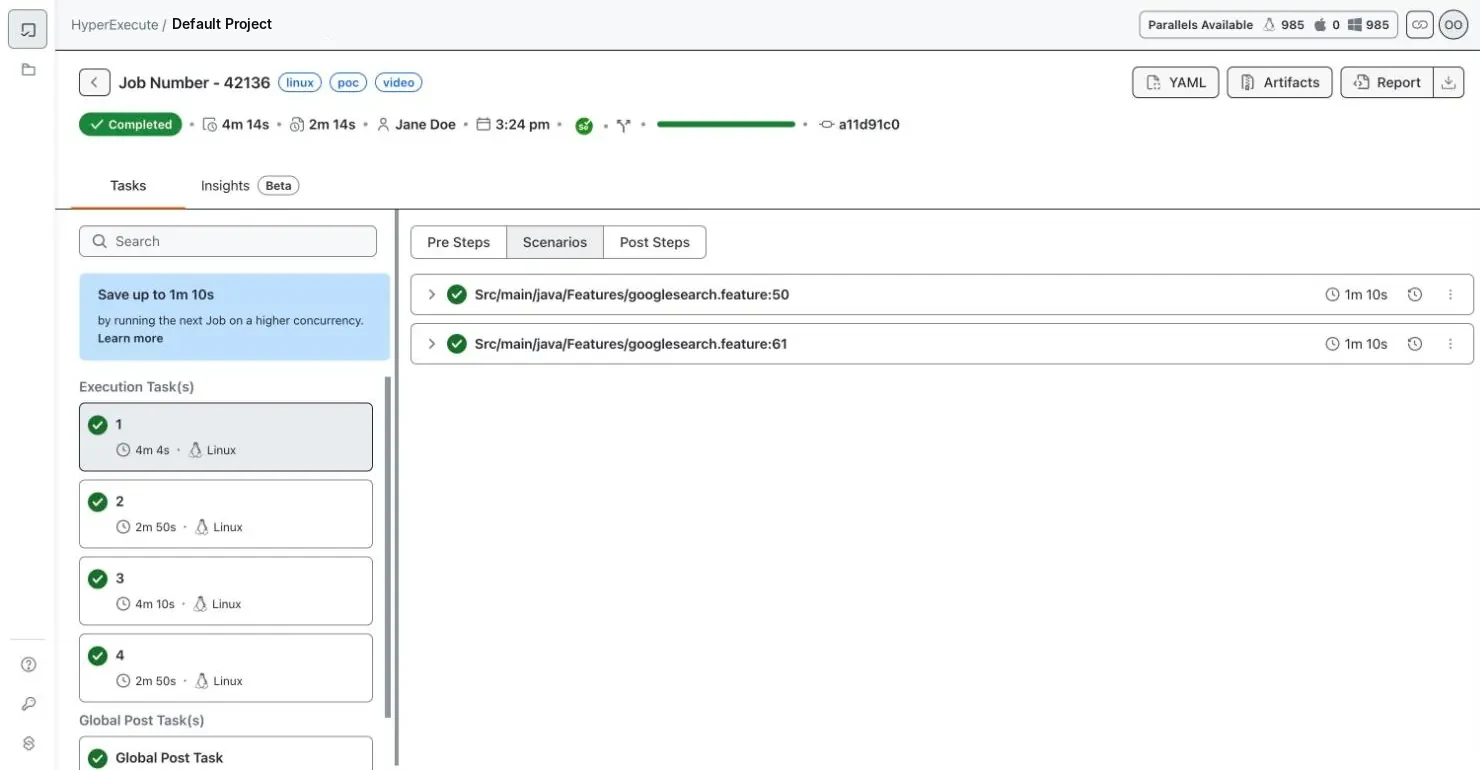
- Job page: live logs, task status and the Applied Policies panel. Start with How to debug a failed job.
- Reports: framework reports for each job. See Job Reports.
- Artifacts: files your tests produce. See Job Artifacts.
- Rerun failed tests: rerun only the failed scenarios, or all of them, from the job page. The job needs code from Git and YAML version 0.1. See Rerun failed jobs.
- Run again after a fix: you can also start the job again from the CLI (step 5), or click Play on the workflow row.
- Notifications: if your deployment sends email, send reports by email, including different recipients for passed, failed and aborted jobs.
- Org view: Org Admins can click View Summary on the Projects page to open the Organisation Summary.
Environments and queues
Admins define the environments and can map Linux frameworks to different queues for each environment.
- Jobs that do not name an environment use the org default.
Common scenarios
Nightly regression
Create a workflow with an Every schedule on weekdays at a quiet hour. Set the end date to the end of the release cycle. If your deployment sends email, add email notifications for failed runs.
Smoke first, then regression
Create two workflows. Schedule the smoke workflow, and link the regression workflow to it so regression starts when the smoke workflow ends with status Completed. See Test Chains.
Same suite against several environments
Create one workflow with a Workflow Variable such as TARGET_ENV that has several values. See Workflow Variables for which value scheduled and manual runs use.
Maintenance window
Before the window starts, pause the affected workflows (Status > Pause Workflow). Resume them once the environment is back.
Run from your CI pipeline on every merge
Use the CLI command from step 5 as a pipeline stage. Use CI for commit-driven runs and workflows for scheduled runs.
Troubleshooting
| What you see | Likely cause | What to do |
|---|---|---|
ERR::HTTP::RESP with 401 and Invalid user/key credentials | Wrong key, or a key copied from a different dashboard | Copy the username and key from the on-prem dashboard. See ERR::HTTP::RESP. |
ERR:HTTP:HOST | CLI cannot reach a host it needs, often because --onprem-host is wrong or a proxy blocks it | The message shows the URL the CLI tried to reach. Check --onprem-host, then add --auto-proxy. Run --scan to see which host fails, and send that host to your network team. See ERR:HTTP:HOST. |
ERR::NO::USER or ERR::NO::KEY | Username or key not passed | Pass --user and --key, or set them as environment variables. See Error codes. |
| YAML rejected before the job starts | A Global Policy with error severity, or invalid YAML | Read the message, which names the policy and the fix. Run --validate. See YAML validation messages. |
| Workflow did not start at the scheduled time | Workflow is Paused or Expired, or the run failed to create a job | Check the Status column. Open the workflow and check Past Occurrences for errors such as a wrong branch or YAML path. |
| Tests pass on your machine but fail on HyperExecute | Missing dependency or different environment | Check pre-steps output. See Pre steps errors and Scenario steps errors. |
Job ends with lambda_error | Symbolic links or very large files in the upload | See Symbolic link error and use a .hyperexecuteignore file. |
| The CLI warns about an environment variable | Your admin has limited which environment variables jobs may use | Remove the variable from your YAML, or ask your admin to allow it. |
| No rerun option on a failed job | The job did not come from Git, or it used YAML version 0.2 | Check the rerun prerequisites. Otherwise run the job again from the CLI. |
| Certificate or TLS error from the CLI | The machine or CI agent does not trust the certificate presented by your deployment or proxy | Send the full error to your network or security team. They set up trust for internal certificates on your machines. |
| A setting from your YAML is ignored or the job is changed | A Global Policy set by your Org Admins | Open the Applied Policies panel on the job page, then ask your Org Admin. |
Dependencies checklist
| Dependency | Needed for | Owner |
|---|---|---|
| On-prem dashboard URL and host | Everything | Your admin |
| User account, role and access key | CLI and dashboard | Org Admin |
| Network path from your machine or CI agent to the deployment | CLI | Network team |
| Proxy settings | CLI behind a corporate proxy | Network or security team |
| Git connection for your Git provider (for example a GitHub App) | Projects and Workflows | Your admin |
| Environment and queue setup | Running jobs | Your admin |
| YAML in the repository | Jobs and Workflows | Test team |
| Secrets created in HyperExecute | Jobs that need credentials | Test team or Org Admin |
Frameworks you can run
Each guide below shows a sample project, its YAML and its discovery and runner commands for that framework. On-prem, run them on Linux or Windows, use testDiscovery with mode: remote, and add --onprem-host to the CLI command. Ask your admin which frameworks your deployment supports.
| Language | Framework guides |
|---|---|
| Java | TestNG, JUnit, Cucumber, REST Assured, Karate |
| JavaScript and TypeScript | WebdriverIO, Playwright, Cypress, Nightwatch, Jest, Mocha, CodeceptJS, Protractor |
| Python | PyTest, PyUnit, Behave, Robot Framework |
| C# and .NET | NUnit, SpecFlow, Reqnroll |
| Ruby | Ruby, Capybara |
For the full list, see Languages and frameworks supported on HyperExecute. Mobile frameworks are not listed here. Ask your admin whether your deployment supports them.
Feature reference
These pages describe each feature on SaaS. Before you rely on a feature this guide does not cover, check with your admin that your deployment supports it. Use this list to jump to the detail.

 Chat with Us