Ignore or Select Annotated Regions
Web applications often have dynamic elements that can cause unnecessary noise in your visual testing. Take a social media platform, for instance. The number of unread notifications displayed might change with each test run. While these variations are expected, you don't necessarily want them to trigger alerts as potential regressions.
The SmartUI Annotation tool allows you to interact directly with your screenshots through detailed annotations. You can draw over screenshots, define regions with boxes, and choose to ignore or select these regions for current and future comparisons. With advanced features like Ignore Colors, Floating Regions, Layout Regions, Select Ignore, and Element Based Anchoring for multi-page PDFs, you can handle even the most complex dynamic content scenarios.
By utilizing ignored/selected regions, you can keep your test results focused on the truly important changes, streamlining your workflow and saving you time from chasing irrelevant discrepancies.
Quick Start
Accessing the Annotation Tool
- Navigate to your SmartUI project dashboard
- Open a screenshot comparison that shows differences
- Click on the Actions button (annotation icon) in the comparison view

Basic Workflow
- Click the annotation icon to open the annotation tool
- Click "Add Region" and draw a box around the area you want to annotate
- Select the annotation type (Ignore Region, Select Region, Floating Region, Ignore Colors, or Layout Region)
- Click "Save" to apply the annotation
- Choose application scope: Apply to current screenshot only or all browser variants
Tip: Start with Ignore Region for simple dynamic content like timestamps or notification counters. It's the most straightforward annotation type.
Annotation Methods
All annotation methods are accessible from the same Actions button (annotation icon). Click on the annotation icon to open the annotation tool, then select your desired annotation type from the available options.
- Ignore Region
- Select Region
- Floating Region
- Ignore Colors
- Layout Region
What is Ignore Region?
Ignore Region excludes specific areas from visual comparison. Ideal for dynamic content that changes frequently but isn't critical to your visual tests, such as timestamps, notification badges, or advertisements.
When to Use
- Ignoring notification counters that change frequently
- Excluding advertisement banners
- Ignoring timestamps or date displays
- Hiding dynamic user-generated content
- Excluding non-critical UI elements that vary between builds
How to Use
Step 1: Click on the Actions button (annotation icon) to open the annotation tool.
Step 2: Click on the Add Region button and draw a box around the area you want to ignore.
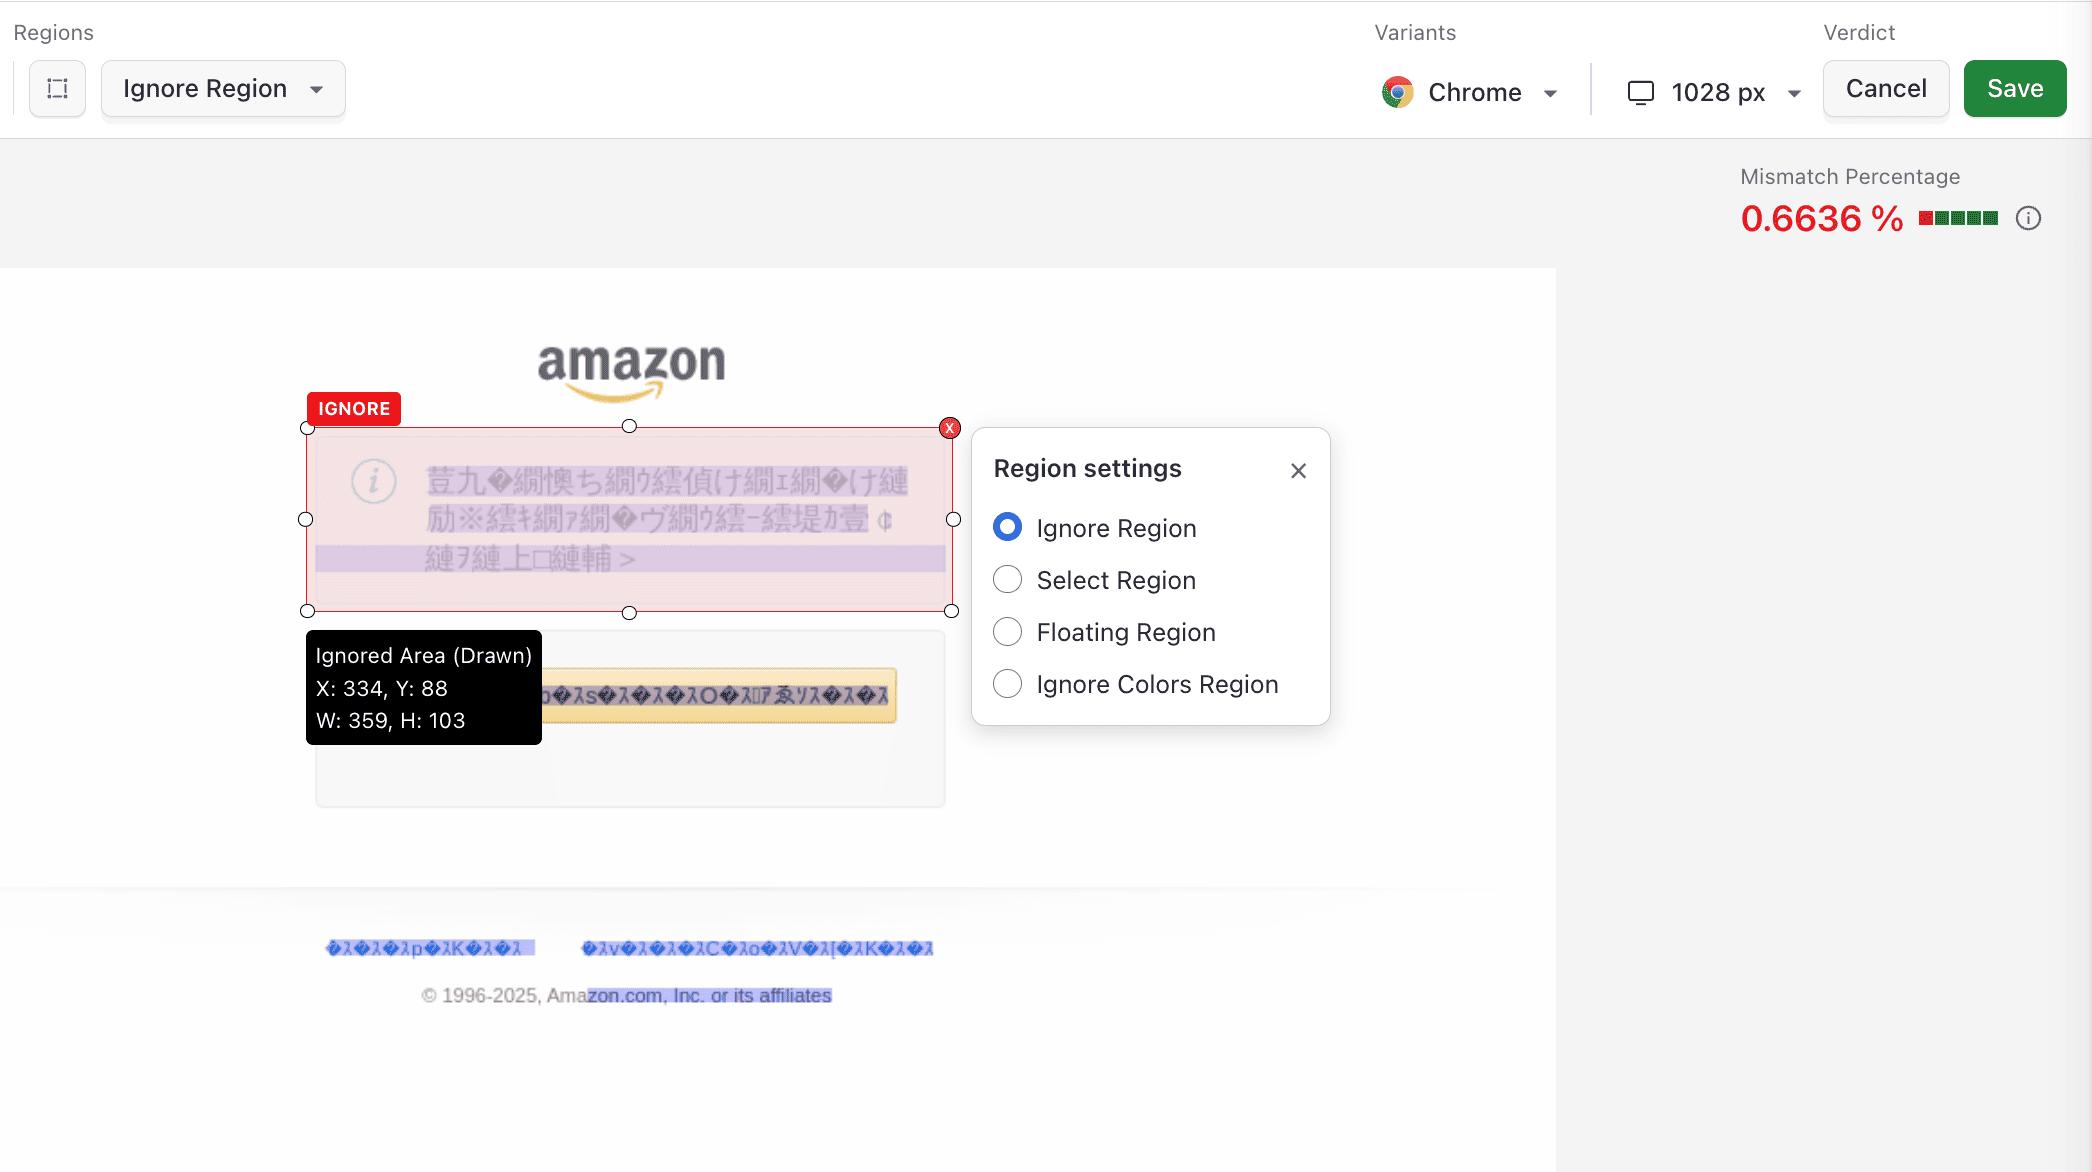
Step 3: Select Ignore Region from the annotation type dropdown and click Save.
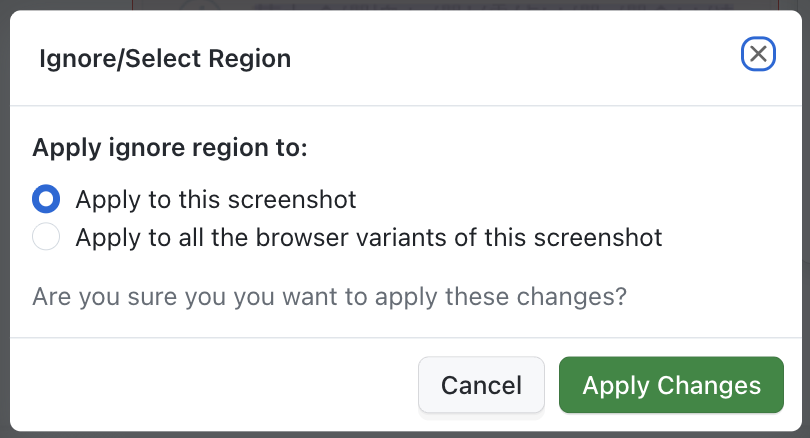
Step 4: Choose whether to apply to the current screenshot only or all browser variants.
What Happens: The configured area will be ignored in every consecutive build for the same screenshot test case.
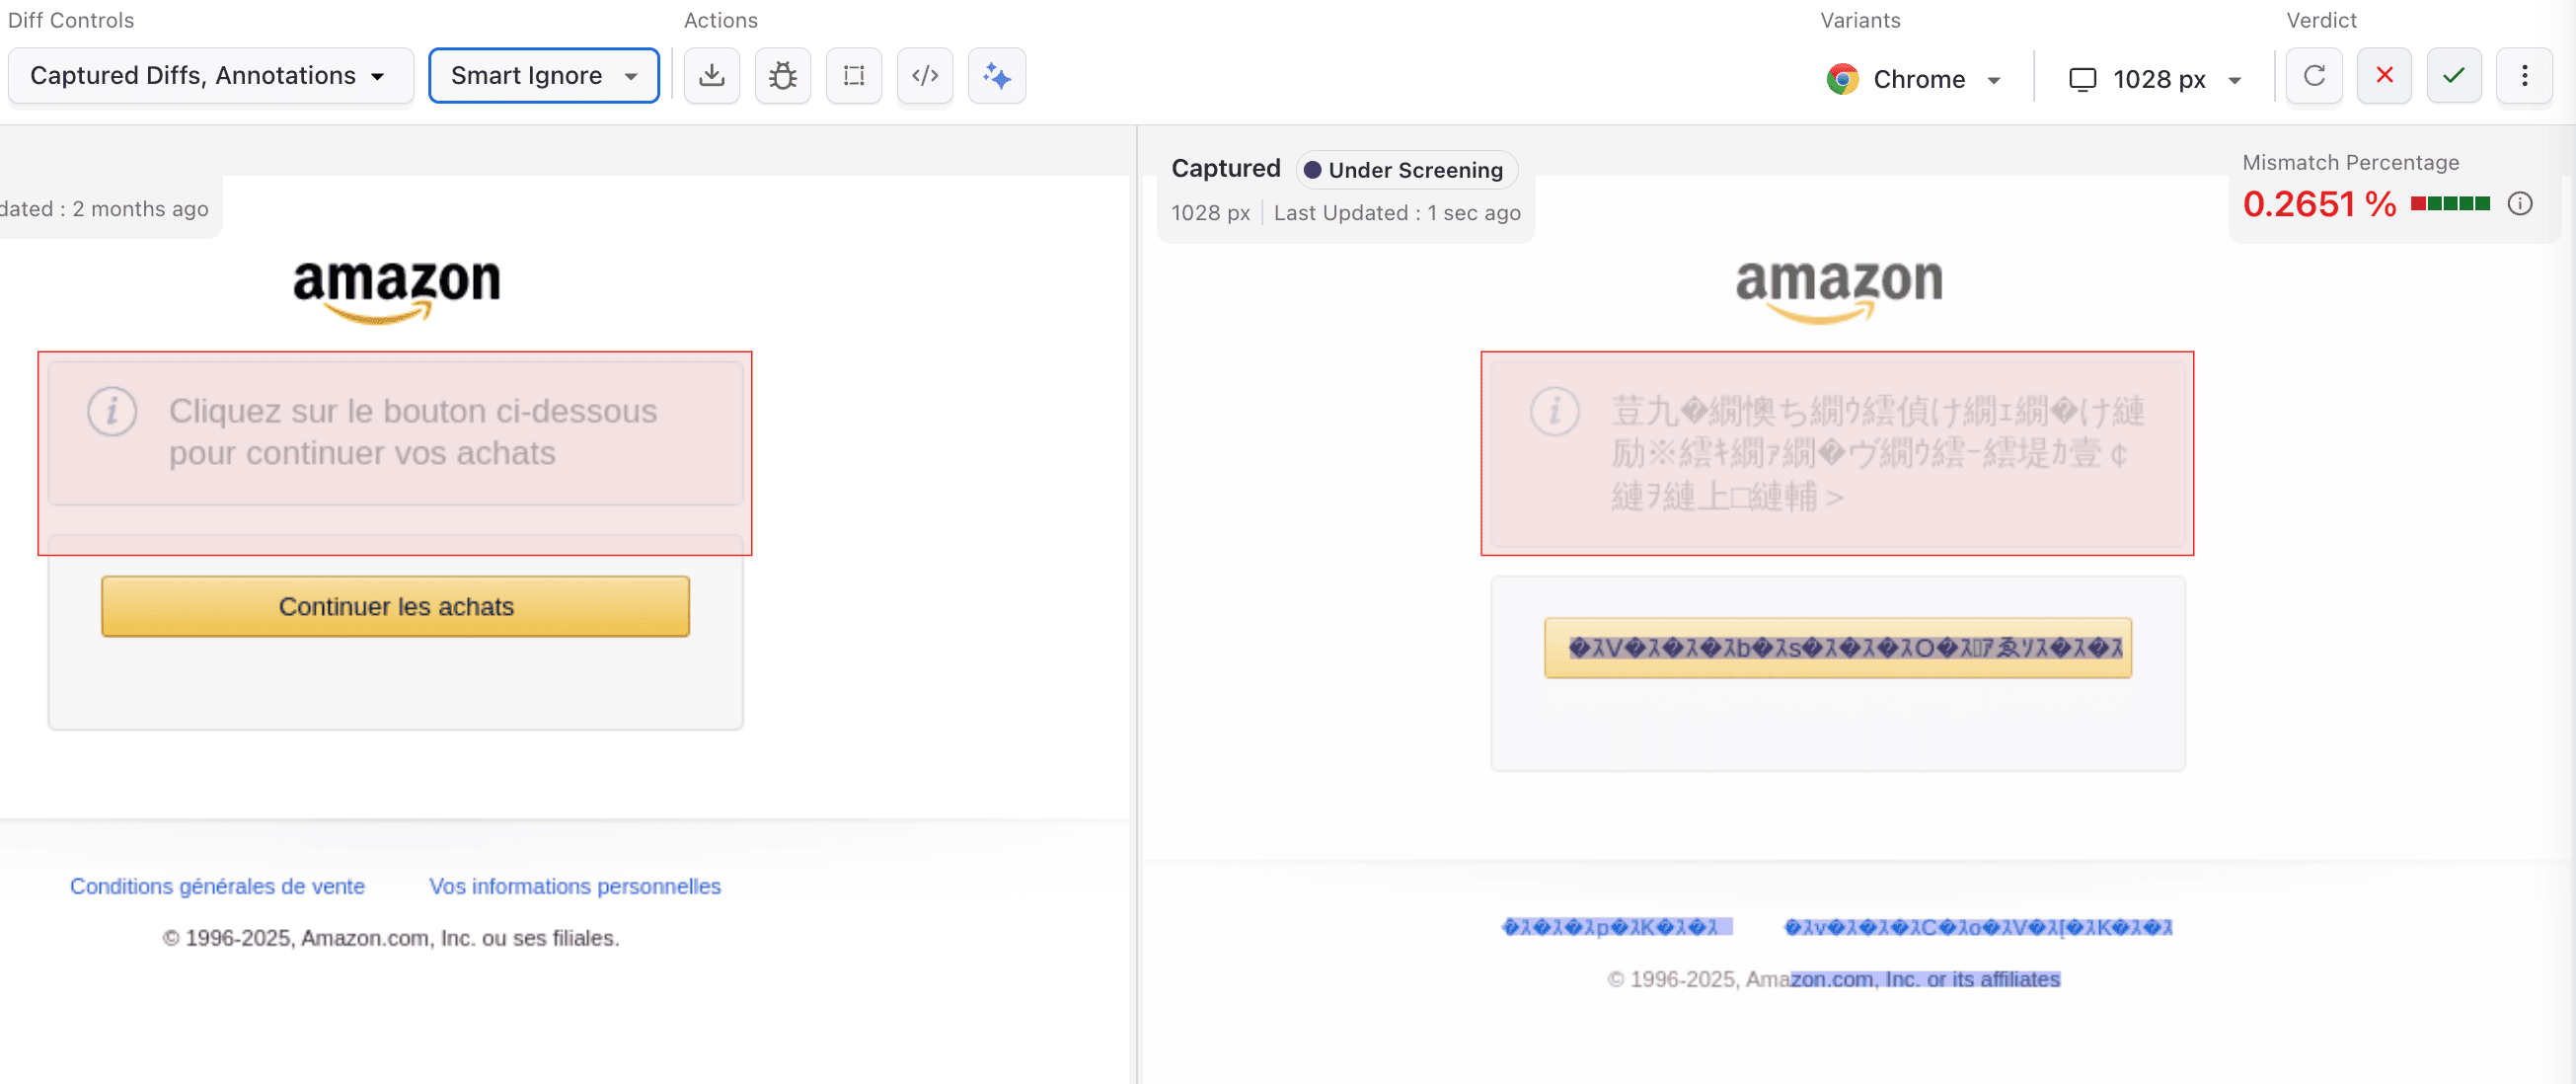
Example
Ignoring a "Last updated" timestamp in a dashboard that changes with each page load.
What is Select Region?
Select Region focuses visual comparison on specific areas of your screenshot. Only the selected regions will be compared, while everything else is automatically ignored. This is useful when you want to test only critical UI components.
When to Use
- Testing only the main content area
- Focusing on specific form fields
- Comparing only critical UI components
- Isolating header or footer sections
- Testing specific widgets or components in isolation
How to Use
Step 1: Click on the Actions button (annotation icon) to open the annotation tool.
Step 2: Click on the Add Region button and draw a box around the area you want to select for comparison.
Step 3: Select Select Region from the annotation type dropdown and click Save.
Step 4: Choose whether to apply to the current screenshot only or all browser variants.
What Happens: Only the selected regions will be compared in future builds, while all other areas are automatically ignored.
Note: You can define multiple select regions. All selected regions will be compared, and everything outside these regions will be ignored.
Example
Testing only the checkout form while ignoring the rest of the page, including header, footer, and sidebar elements.
What is Floating Region?
Floating Region handles elements that move or shift position within a defined boundary. This feature uses two regions:
- Blue Region: Defines the boundary where the element might move to (the floating area)
- Yellow Region: Defines which element to test within the floating region
Perfect for handling dynamic elements that may appear in different positions but should be tested for content consistency.
When to Use
- Testing notification badges that may appear in different positions
- Handling tooltips or popovers that can move
- Testing floating action buttons
- Comparing elements that shift based on content length
- Handling dropdown menus or modals that may appear in different locations
How to Use
Step 1: Click on the Actions button (annotation icon) to open the annotation tool.
Step 2: First, draw a Blue Region (Floating Area) that defines the boundary where the element might move to. Make it large enough to encompass all possible positions.
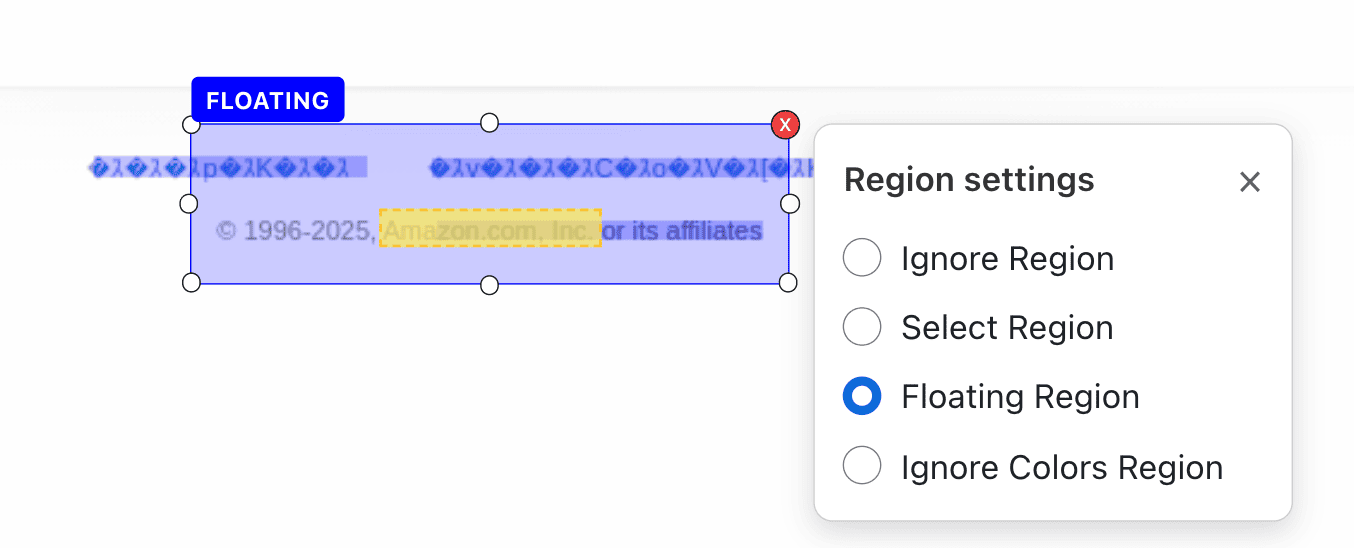
Step 3: Then, within the blue region, draw a Yellow Region (Element to Test) that defines the specific element you want to test.
Step 4: Select Floating Region from the annotation type dropdown and click Save.
Step 5: Choose whether to apply to the current screenshot only or all browser variants.
What Happens: SmartUI will compare the yellow region element, allowing it to move anywhere within the blue floating area without triggering false positives.

Tip: Make the blue region large enough to encompass all possible positions of the element, and keep the yellow region focused on the specific element you want to test.
Example
Testing a notification badge that may appear in different positions based on content length or screen size.
What is Ignore Colors?
Ignore Colors ignores color differences in specific regions while still comparing the structure and layout. Particularly useful when colors may vary due to themes, user preferences, or A/B testing, but the structure should remain consistent.
When to Use
- Ignoring color changes in themed applications
- Handling A/B testing color variations
- Ignoring user-customizable color schemes
- Testing structure while ignoring color differences in specific regions
- Comparing layouts across different theme configurations
How to Use
Step 1: Click on the Actions button (annotation icon) to open the annotation tool.
Step 2: Click on the Add Region button and draw a box around the area where you want to ignore color differences.
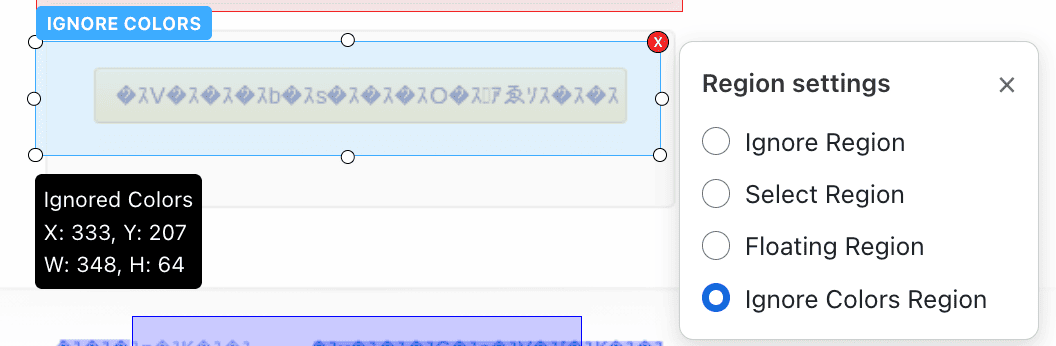
Step 3: Select Ignore Colors from the annotation type dropdown and click Save.
Step 4: Choose whether to apply to the current screenshot only or all browser variants.
What Happens: The region will be compared for structure and layout, but color differences will be ignored, reducing false positives from color variations.

Note: Ignore Colors is particularly effective when combined with other annotation types for comprehensive visual testing.
Example
Ignoring color differences in a themed navigation bar while testing its structure and layout across different theme configurations.
What is Layout Region?
Layout Region compares a single area for structure only. Inside the region SmartUI reports elements that were added, removed, or moved, while text, values, and colors inside those elements are not compared. Everything outside the region keeps the build's normal comparison mode.
This sits between Ignore Region, which drops the area from validation completely, and Layout Comparison, which applies structure-only matching to the whole capture.
When to Use
- Validating that a section with live data still has its rows, cards, or columns intact
- Regulated PDF documents where timestamps and generated IDs change every run but the structure must stay fixed
- Localized pages where translated text varies in length and the surrounding structure has to hold
- Any area you are ignoring today only because the content is noisy, when you still want to know if it breaks
How to Use
Step 1: Click on the Actions button (annotation icon) to open the annotation tool.
Step 2: Click on the Add Region button and draw a box around the section whose structure you want to validate.
Step 3: Select Layout Region from the annotation type dropdown and click Save.
Step 4: Choose whether to apply to the current screenshot only or all browser variants.
What Happens: Inside the region only structural differences are highlighted, and content churn is suppressed. Outside the region the comparison is unchanged.
Note: The Layout Region option is available for web captures and PDF comparisons. It is not offered for real device tests, app SDK tests, Storybook projects, Figma projects, or single image uploads through the API.
Important: On web comparisons this works only when the DOM was recorded at capture time. SmartUI CLI and SDK captures record it automatically. Captures taken inside an automation session need DOM recording enabled for your organization, and builds made from an uploaded image never carry a DOM. When it is missing the region quietly behaves like an Ignore Region. See DOM Recording Requirement. PDF comparisons are not affected.
Example
Validating that an order summary table still has all of its rows and columns, while the order numbers and timestamps inside it change on every run.
See Layout Regions for how the matching works and what it does not catch.
Advanced: Select Ignore
Select Ignore is an advanced feature that combines selection and ignoring. You first select a region to focus on, then within that selected region, you can ignore specific sub-regions. This is perfect for scenarios where you want to test most of a component but ignore certain dynamic elements within it.
When to Use
- Testing a product card but ignoring the price (which may change)
- Comparing a user profile section but ignoring the avatar (which may be different)
- Testing a dashboard widget but ignoring specific metrics that change frequently
- Focusing on a form while ignoring dynamic validation messages
- Testing a navigation menu but ignoring the active state indicator
How to Use
Step 1: Click on the Actions button (annotation icon) to open the annotation tool.
Step 2: First, draw a Select Region box around the main area you want to test.
Step 3: Then, within that selected region, draw an Ignore Region box around the sub-area you want to ignore.
Step 4: Select Select Ignore from the annotation type dropdown and click Save.
Step 5: Choose whether to apply to the current screenshot only or all browser variants.
What Happens: The outer selected region will be compared, but the inner ignored sub-region will be excluded from comparison, giving you precise control over what gets tested.
Tip: Use Select Ignore when you need granular control over comparison areas within a larger component. Ensure the ignore region is completely within the select region.
Example
Testing a product card but ignoring the price and rating that may change, while still comparing the product image, title, and description.
Baseline Regions New
A baseline is the reference image that every later build is compared against. Normally you draw regions on a comparison build, so the region belongs to that build's comparison. Baseline Regions let you draw an ignore or select region directly on the #1 Baseline Build, so the region is owned by the baseline itself and is honored for comparisons from the baseline forward.
This is useful when you already know an area is dynamic at the moment you establish the baseline. Instead of waiting for a comparison build and re-applying the region there, you can annotate the baseline once and have it apply to every build that uses that image as its baseline.
When to Use
- Marking a known dynamic area (a timestamp, a session banner, a live counter) as ignored right when the baseline is created
- Keeping the baseline and what is actually compared in sync, without waiting for the next comparison build
- Establishing a select region on the baseline so every downstream build compares only the area you care about
How to Use
Step 1: Open the #1 Baseline Build for your screenshot in the SmartUI dashboard.
Step 2: Click on the Actions button (annotation icon) to open the annotation tool.
Step 3: Click on the Add Region button and draw a box around the area you want to ignore or select, then choose the annotation type (for example, Ignore Region or Select Region).
Step 4: Mark the region as a baseline region in the apply dialog and click Save.
What Happens: The region is stored against the baseline screenshot and is applied in every consecutive build that is compared against that baseline. Regions that are not marked as baseline regions continue to behave exactly as before and apply only from the build on which you drew them.
Note: Baseline Regions and the per-region Apply to all variants scope are independent. A baseline region controls the builds a region applies to (from the baseline forward), while the variant scope controls the browser and viewport combinations a region is copied to.
Tip: Use a baseline region for content you already know is dynamic before the first comparison ever runs. For areas you discover later while reviewing a comparison, a normal region on that build is the simpler choice.
Element Based Anchoring for PDF Regions New
When you draw a region on a PDF and apply it to every page, the region normally keeps the coordinates you drew it at. PDFs reflow, so the same heading, label or footer usually sits at a slightly different position on each page, and a region pinned to page 1's coordinates will not line up with it on the other pages.
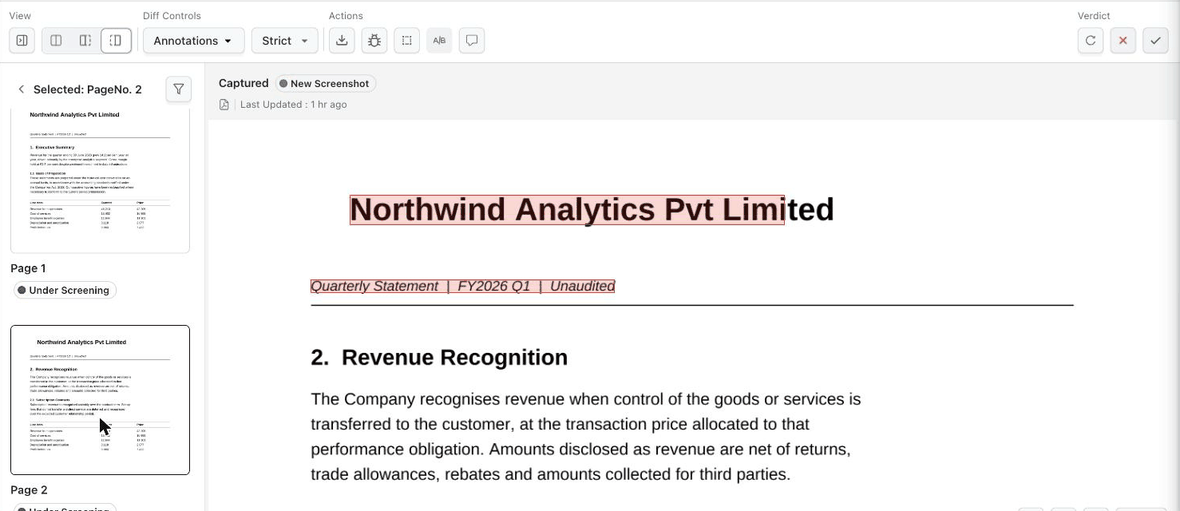
Element based anchoring changes what the region is attached to. Instead of remembering where you drew the box, SmartUI remembers what was inside it, captures the text under the box as an anchor, and then locates that same content on every other page of the PDF. The region is placed wherever the anchor is actually found on that page.
Matching is done on the text content itself, so the font family, size, weight and style of the anchored content do not affect whether it is found.
The Problem It Solves
Teams running visual tests on generated documents such as statements, invoices, policy packs and regulatory filings all hit the same wall. The document is reviewed page by page, and the parts of it that are genuinely dynamic (a generation timestamp, an account holder's name, a running header) sit in a slightly different place on every page because the content above them reflows.
Without anchoring, there are only two ways to handle that, and both cost you something:
| Approach | What it costs |
|---|---|
| Draw the region once and apply it to all pages | The box lands on the coordinates from the page you drew it on, so on other pages it sits beside the content instead of on it |
| Redraw the region manually on every page | Minutes per document, repeated every time the template changes, and it does not survive a new document with a different page count |
For a 40-page statement, that is 40 manual regions to place and re-place. Teams either spend the time, or they stop annotating and accept the noise.
Product Impact
- Annotation effort drops from per-page to per-document. One region, drawn once, covers every page of the PDF. The saving scales with page count, so it is largest on exactly the long documents that were most painful before.
- Fewer false positives to triage. A region that actually sits on the dynamic content suppresses the noise it was meant to suppress, so reviewers spend their time on real changes rather than dismissing the same reflow difference on every page.
- Fewer missed regressions. When a mispositioned region covers the wrong part of the page, it can hide a genuine change while leaving the intended one exposed. Anchoring to content keeps the region on the thing you chose.
- Annotations survive template changes. Because the region is tied to content rather than coordinates, a layout change that moves the anchored element does not require the region to be redrawn.
- Consistent results across renditions. Since matching ignores font family, size, weight and style, the same annotation behaves the same way across documents rendered with different typography.
When to Use
- Anchoring a company name, report title or letterhead in a statement whose header shifts from page to page
- Keeping an ignore region on a running footer or document strap line across a long PDF
- Annotating a repeated label in an invoice, policy document or financial statement where the vertical position drifts as content reflows
- Any multi-page PDF where you would otherwise redraw the same region page by page
How to Use
Step 1: Open a PDF comparison in an Omni project and click on the Actions button (annotation icon) to open the annotation tool.
Note: Element based anchoring, and page level region propagation generally, are available on PDF comparisons in Omni projects. In a standard PDF project the region settings panel offers the region types only, and a region applies to the page it was drawn on.
Step 2: Draw a box around the content you want to anchor to, and pick the region type you want (for example, Ignore Region or Floating Region).
Step 3: Under Apply region to, choose Apply to all the pages of this PDF, then tick the Element based anchoring checkbox.
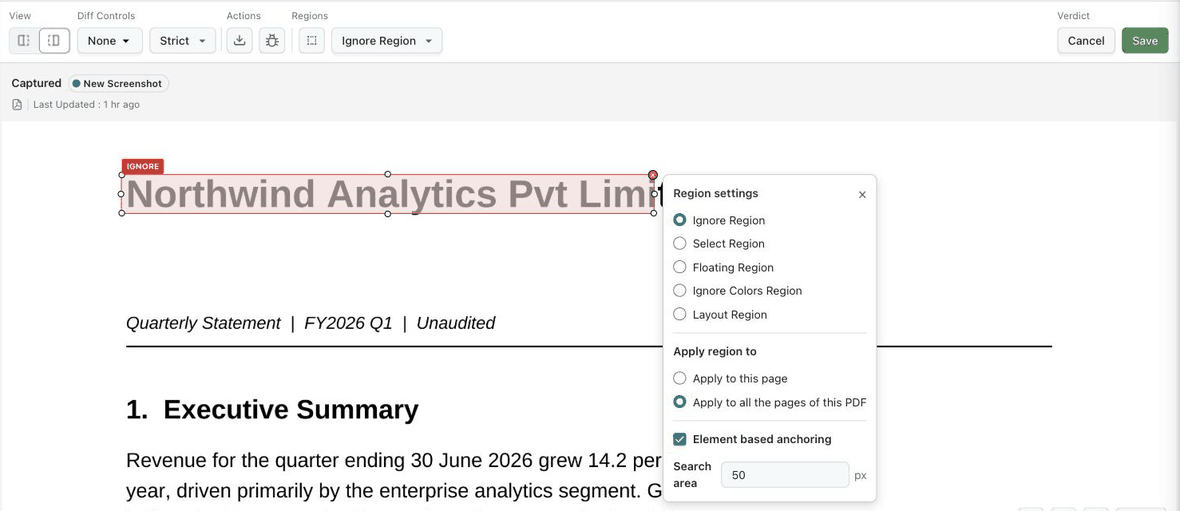
Step 4: Set the Search area value in pixels. This is how far out from the drawn box SmartUI will look for the anchor content on each of the other pages. The default is 50 px, and you can set any value between 0 and 500 px.
Step 5: Click Save, then confirm with Apply Changes. SmartUI resolves the anchor on every page and reports how many pages the region was applied to.
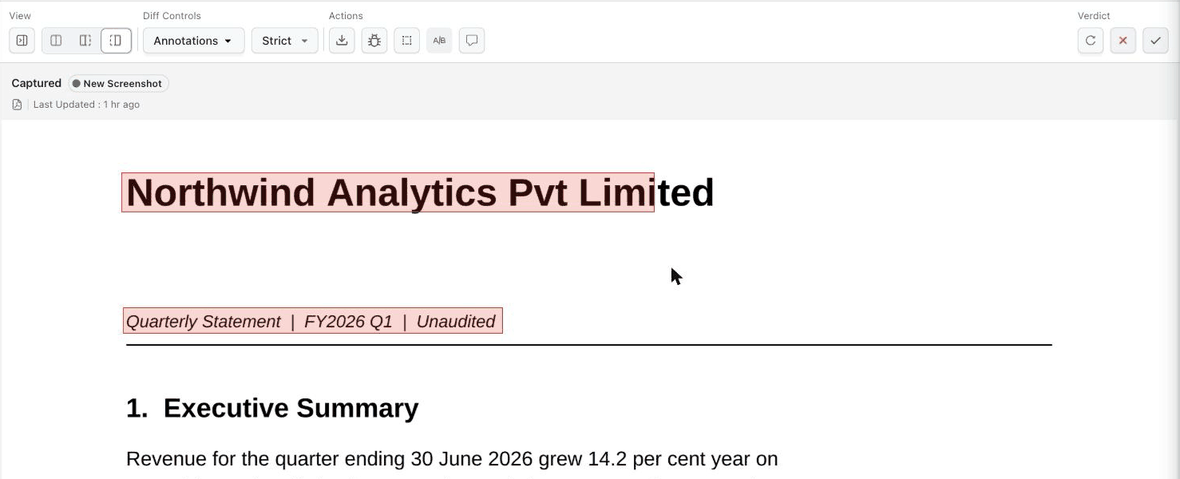
What Happens: On each page of the PDF, SmartUI looks for the anchor content within the search area around the drawn position and places the region where that content is found. Open any other page of the PDF to see the region sitting on the same content, at that page's own position.
Choosing a Search Area
The search area controls how far the anchor content is allowed to have moved and still be matched on a given page.
- Smaller values keep the match close to where you drew the region. Use these when the content only shifts slightly between pages, or when similar text appears elsewhere on the page and you want to be sure the nearest occurrence is the one that is used.
- Larger values let SmartUI find the anchor further from the drawn position. Use these when the content moves further down or across the page as the document reflows.
0turns the search off, so the region stays at the coordinates you drew it at, which is the same behaviour as a region without element based anchoring.
Tip: Start with the default of
50px. If a page's content sits further from the drawn position than that, raise the search area and apply the region again.
Propagating Regions on PDFs and Websites
Regions propagate on both PDF and website comparisons, but the axis they propagate along is different, so the control you use is different too.
| PDF comparisons | Website and app comparisons | |
|---|---|---|
| What a region propagates across | The pages of the PDF | The browser and viewport variants of the screenshot |
| Scope control | Apply to all the pages of this PDF | Apply to all variants |
| Available region types | Ignore, Select, Floating, Ignore Colors, Layout | Ignore, Select, Floating, Ignore Colors |
| Element based anchoring | Available, on every region type | Not applicable |
| Project type required | Omni | Any |
On a PDF, the same document flows across many pages, so the same element lands at a different position on each one. This is what element based anchoring is for: tick the checkbox, set a search area, and the region is placed on the anchored content page by page.
On a website or app screenshot, a region propagates across the browser and viewport variants of that screenshot instead. Draw the region, choose Apply to all variants, and it is copied to every browser and viewport combination for that screenshot. Each region carries its own scope, so applying one region to all variants leaves your other annotations untouched.
Tip: If you are annotating a multi-page PDF, reach for Apply to all the pages of this PDF with Element based anchoring. If you are annotating a website across Chrome, Firefox and Safari or across desktop and mobile viewports, reach for Apply to all variants.
Note: In an Omni project, where PDF, website, app, Figma, Storybook and image sources all co-exist in one project, both propagation controls are available in the same place. The one you see for a given comparison follows the source of the screenshot you are annotating: PDF artifacts offer Apply to all the pages of this PDF together with Element based anchoring, and website and app artifacts offer Apply to all variants.
Example
A six-page quarterly statement where the company name in the header sits at a slightly different position on every page. Draw an ignore region around the company name on page 1, choose Apply to all the pages of this PDF, tick Element based anchoring, and the region lands on the company name on each page rather than on the blank space where page 1's header used to be.
Managing Annotations
Once you've created annotations, you can view, edit, and delete them as needed.
Viewing Annotations
Step 1: Toggle the Annotations switch to view/analyze your ignored/selected areas.
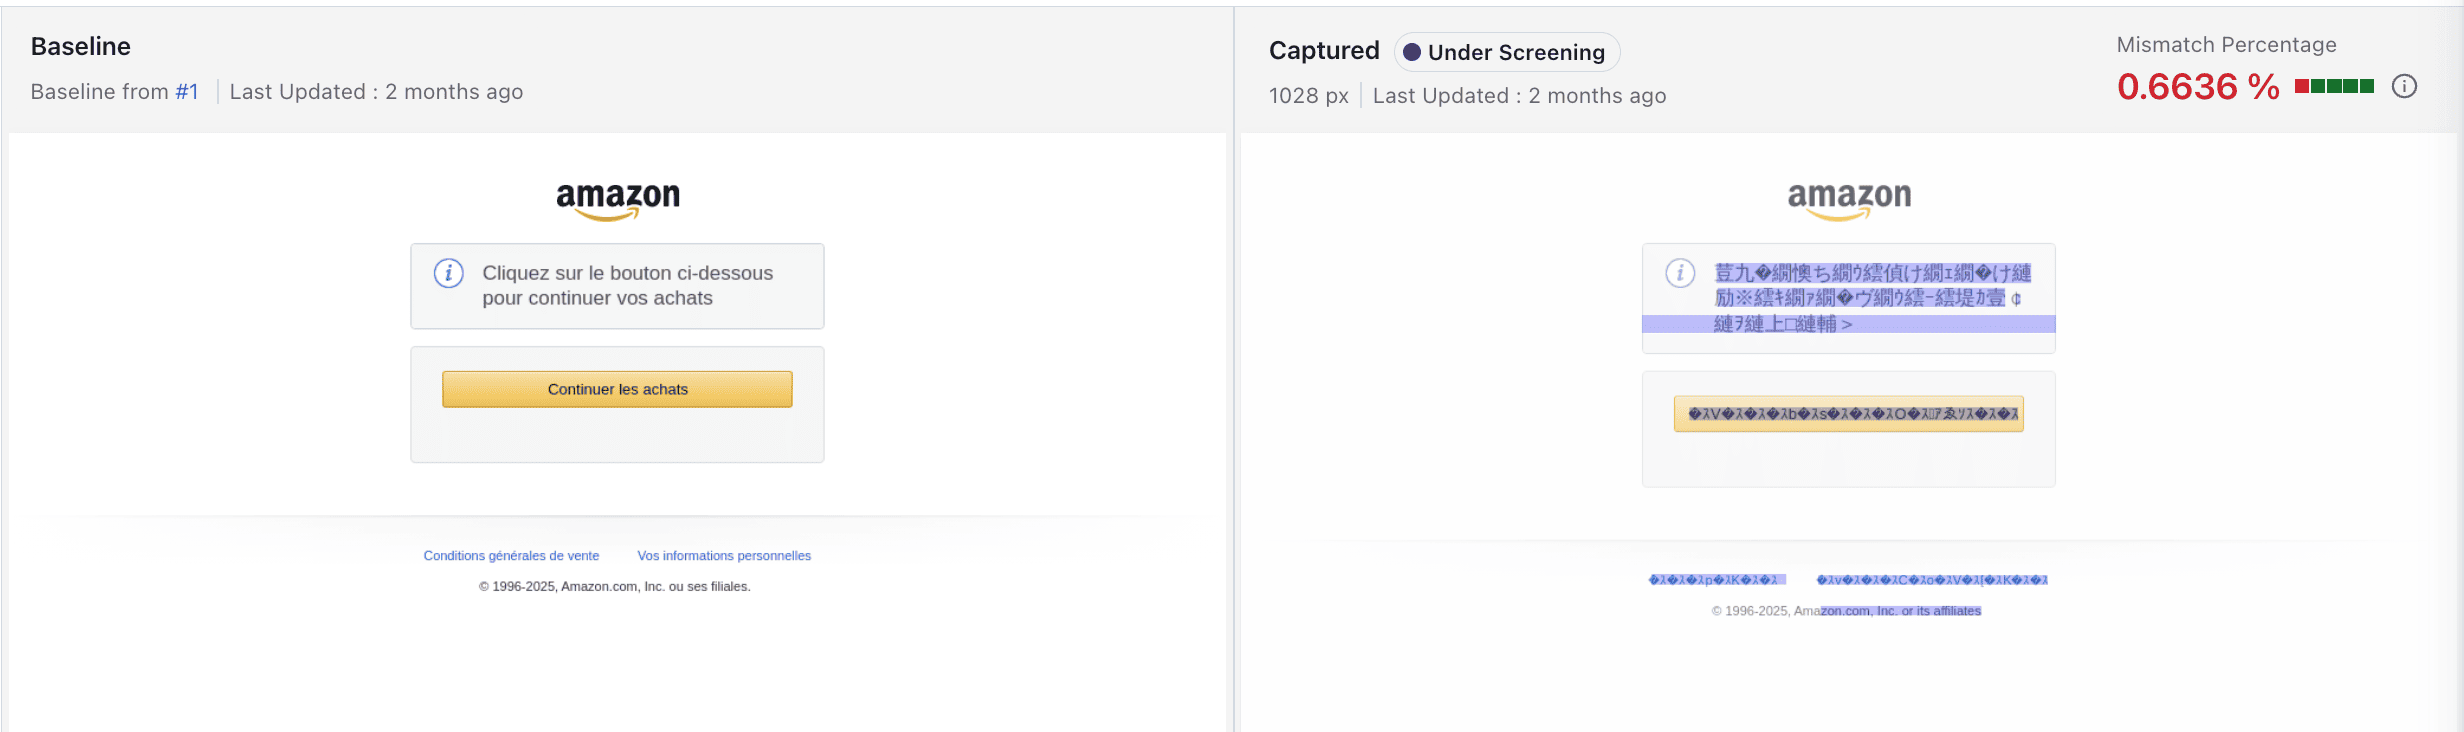
Step 2: When the toggle is on, you'll see all your annotation boxes with color coding (see Annotation Color Coding below).
Step 3: Hover over any annotation box to see a tooltip with detailed information, including:
- Box dimensions (width × height)
- Annotation type (Ignore, Select, Floating, etc.)
- Coordinates
Editing Annotations
You can always edit or delete pre-configured areas or add new ones according to your requirements.
To Edit an Annotation:
Step 1: Click on the Actions button (annotation icon).
Step 2: Click on the annotation box you want to edit.
Step 3: Resize or reposition the box as needed.
Step 4: Click Save to apply changes.
Deleting Annotations
Step 1: Click on the Actions button (annotation icon).
Step 2: Click on the annotation box you want to delete, or click Delete All to remove all annotations.
Step 3: Click on the Save button to confirm deletion.
Note: Deleting annotations will trigger a re-run of the comparison, and the previously ignored/selected areas will be included in future comparisons.
Applying Annotations
After drawing a region, you'll see a modal dialog that controls where that specific region is applied:
Options:
-
Apply to Current Screenshot Only: The region will only affect the current screenshot variant (for example, Chrome on desktop).
-
Apply to All Browser Variants: The region will be applied to every browser and viewport combination for this screenshot (for example, Chrome, Firefox, and Safari on desktop).
Each region has its own scope, so Apply to all variants is a per-region action. Every region you draw is tracked with a stable identity of its own, which means the scope you pick applies to that one region and to no others.
Note: Apply to all variants propagates only the region you currently have selected or have just drawn. Any other annotations that already exist on the screenshot are left untouched and are not copied to the other variants unless you select them and apply them too. This keeps regions you never intended to share from spreading across the variant matrix.
To propagate more than one region, select each region and choose Apply to all variants for it in turn.
Best Practice: While you can apply a region to all browser variants, it's recommended to manually verify that the area is configured correctly for each browser. Certain browsers may render elements differently, which can cause inconsistencies in your regions.
Annotation Color Coding
When viewing annotations, different colors indicate their type:
- Red boxes: Ignore regions
- Grey boxes: Select regions
- Blue boxes: Floating area boundaries
- Yellow boxes: Elements within floating regions
- Light blue boxes: Ignore colors regions
- Green boxes: Layout regions
Keyboard Shortcuts
Speed up your annotation workflow with these keyboard shortcuts:
Shift + A:Resize annotation box leftShift + S:Resize annotation box downShift + D:Resize annotation box rightShift + W:Resize annotation box upShift + T:Define a region encompassing the entire screenshotDelete or Backspace:Remove the currently selected annotation
Tip: Use keyboard shortcuts for precise control when resizing annotation boxes, especially for small or complex regions.
Best Practices
Follow these best practices to get the most out of the annotation tool:
Choosing the Right Annotation Type
- Start with Ignore Region for simple dynamic content (timestamps, counters, ads)
- Use Select Region when you only care about specific UI components
- Use Floating Region for elements that move within a boundary
- Use Ignore Colors when structure matters more than color variations
- Use Layout Region when the content in a section is expected to change but its structure must stay intact
- Use Select Ignore for granular control within larger components
General Guidelines
- Verify across browsers: Test annotations on different browsers to ensure consistency
- Document your decisions: Note why you ignored/selected certain regions for future reference
- Review periodically: Regularly review annotations to ensure they're still relevant
- Start simple: Begin with basic Ignore Region before moving to advanced features
- Test thoroughly: Verify annotations work correctly before applying to all browser variants
Workflow Tips
- Create annotations after reviewing initial comparison results
- Use the annotation toggle to hide/show annotations for a cleaner view
- Leverage keyboard shortcuts for faster annotation creation
- Apply to current screenshot first, then verify before applying to all variants
- Combine multiple annotation types for comprehensive coverage
Troubleshooting
- Annotations Not Applying
- Floating Region Not Working
- Ignore Colors Still Showing Differences
- Annotations Disappearing
- Layout Region Not Flagging Changes
Annotations Not Applying
Issue: Annotations are not being applied to future builds.
Solutions:
- Ensure you clicked Save after creating annotations
- Verify you selected the correct annotation type
- Check that you applied annotations to the correct screenshot variant
- Refresh the page and verify annotations are visible
Floating Region Not Working
Issue: Floating region is still showing false positives.
Solutions:
- Ensure the blue region (floating area) is large enough to encompass all possible positions
- Verify the yellow region (element to test) is correctly positioned within the blue region
- Check that the element structure hasn't changed significantly
- Try adjusting the size of both regions
Ignore Colors Still Showing Differences
Issue: Color differences are still being detected in ignore colors regions.
Solutions:
- Verify you selected "Ignore Colors" as the annotation type
- Ensure the region covers the entire area where colors may vary
- Check that structural differences aren't being mistaken for color differences
- Review the comparison settings in project configuration
Annotations Disappearing
Issue: Annotations are not visible or have disappeared.
Solutions:
- Toggle the Annotations switch to ensure it's enabled
- Refresh the page
- Check if annotations were deleted accidentally
- Verify you're viewing the correct screenshot variant
Layout Region Not Flagging Changes
Issue: Content changed inside a layout region and nothing was reported.
Solutions:
- This is expected for content only changes. A layout region reports elements that were added, removed, or moved, not text or value changes
- On a web comparison, confirm the DOM was recorded for the build. Without it the region can only behave like an ignore region. See DOM Recording Requirement
- Verify the region covers the elements you expect. An element belongs to the region when its center falls inside the box
- Reduce very large regions. A region drawn over an element heavy page falls back to plain ignore behavior
- See Layout Regions for the full behavior and limitations
For more comprehensive troubleshooting, refer to the SmartUI Troubleshooting Guide.
Additional Resources
- Layout Regions - Compare a single area for structure only
- SmartUI Project Settings - Configure comparison settings
- Handling Dynamic Data - Code-based solutions for dynamic content
- Smart Ignore - Automatic layout shift handling
- Troubleshooting Guide - Comprehensive issue resolution


 Chat with Us