Test Run - Creation and Management
This guide outlines the steps required to create, configure, and manage test runs within TestMu AI's Test Manager. It provides developers and testers with a clear understanding of the process, enabling efficient test execution and organization.
1. Creating a Test Run
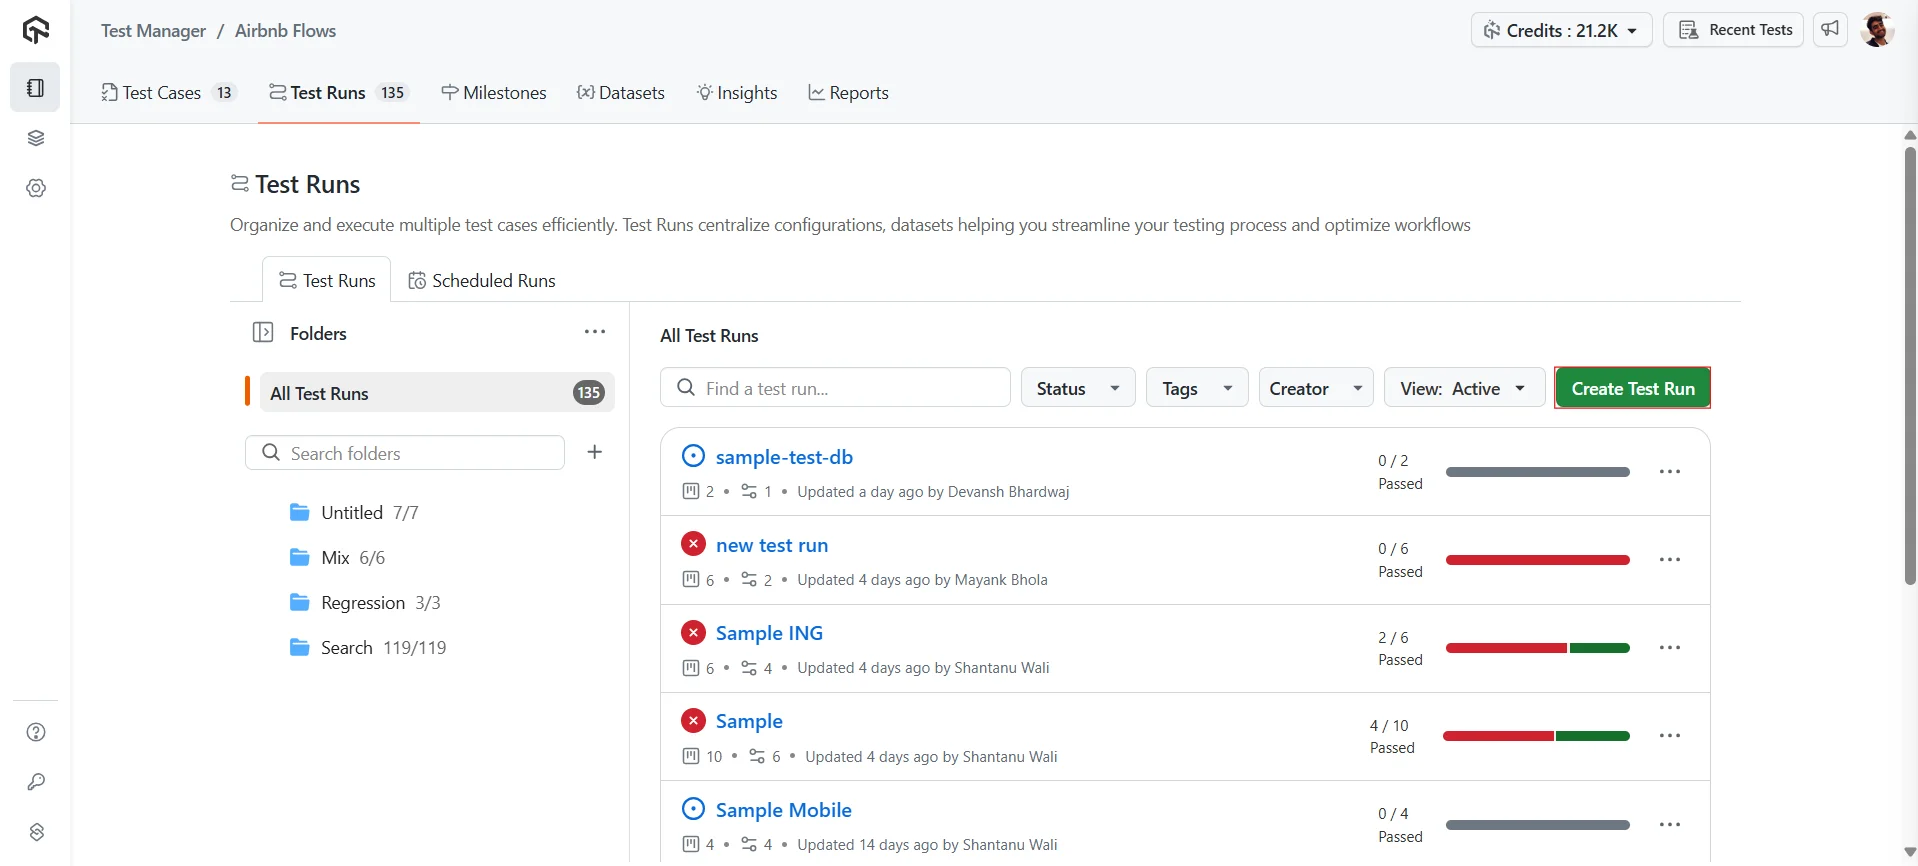
Initiate a New Test Run
- Navigate to the Test Manager and click on Create Test Run.
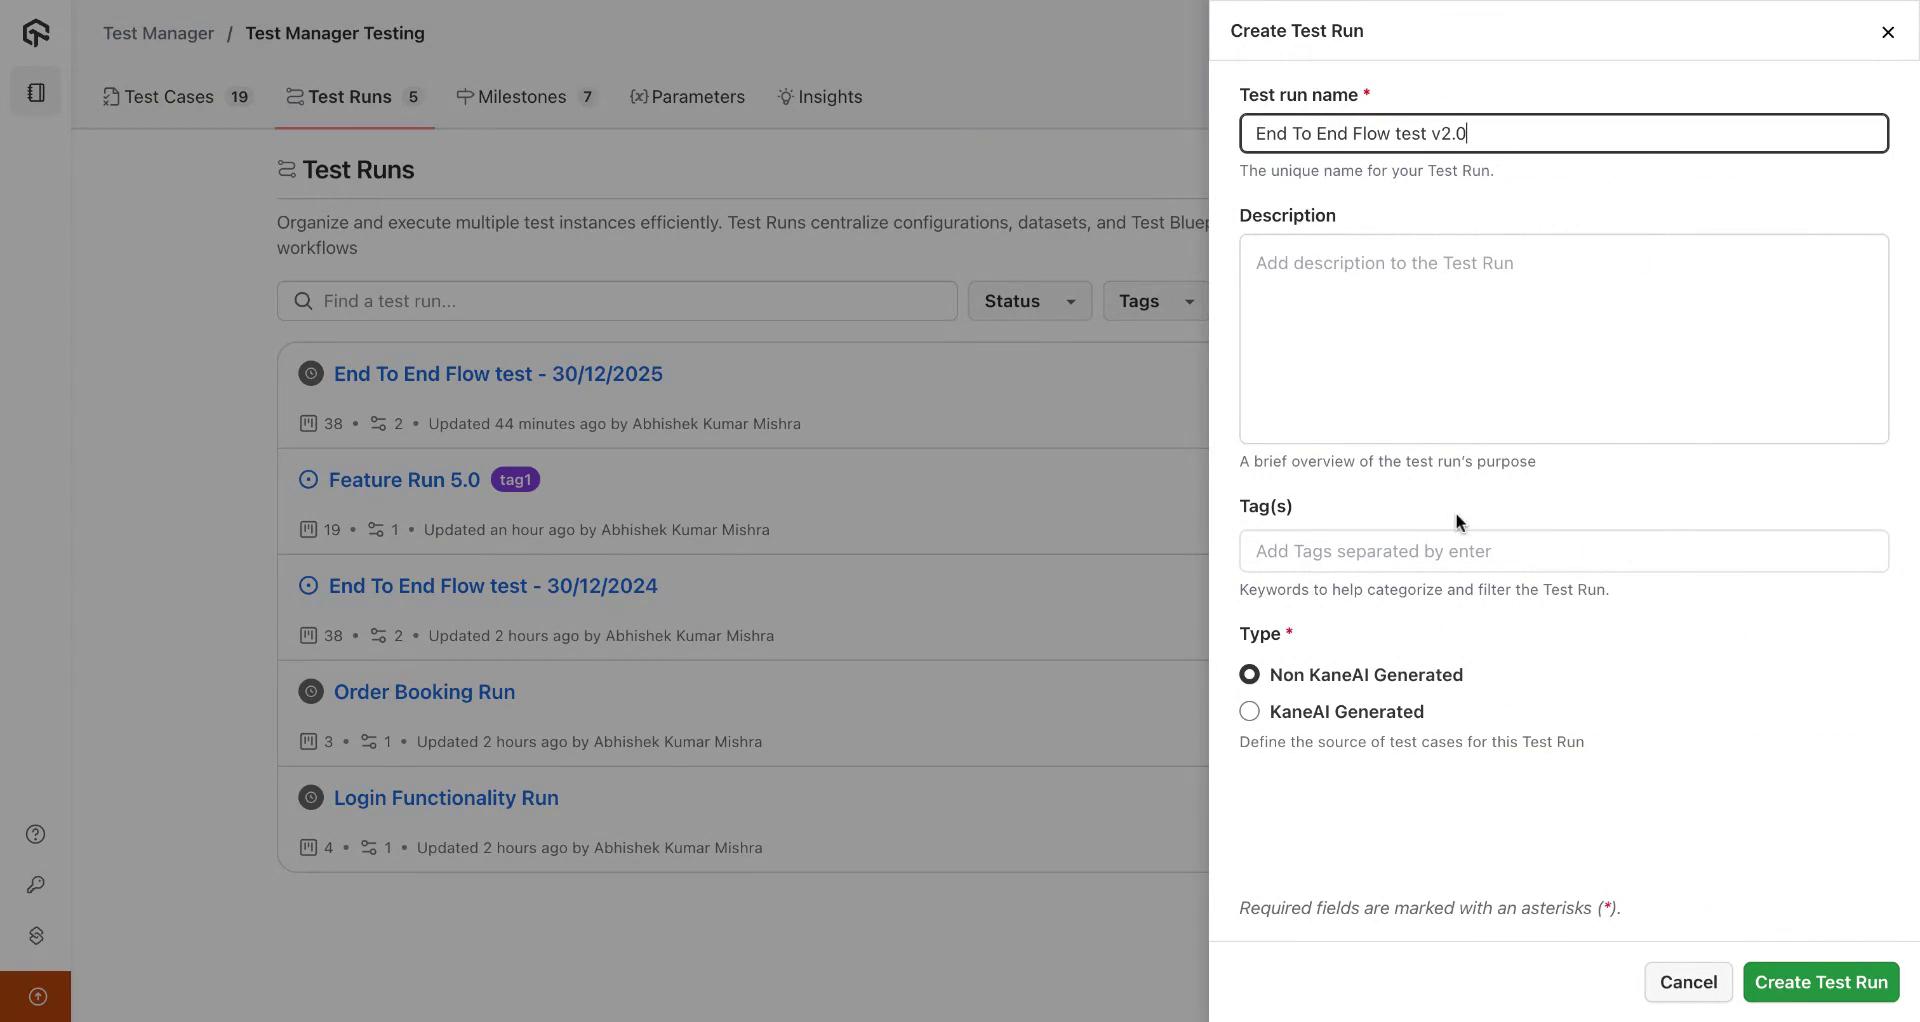
- Enter a Test Run Name and an optional Description to define the purpose of the test run.
Use descriptive names to easily identify test runs later.
Add Tags
- Assign relevant Tags to categorize the test run.
- Click Create Test Run to proceed.
2. Adding and Configuring Test Cases
Access the Test Cases Tab
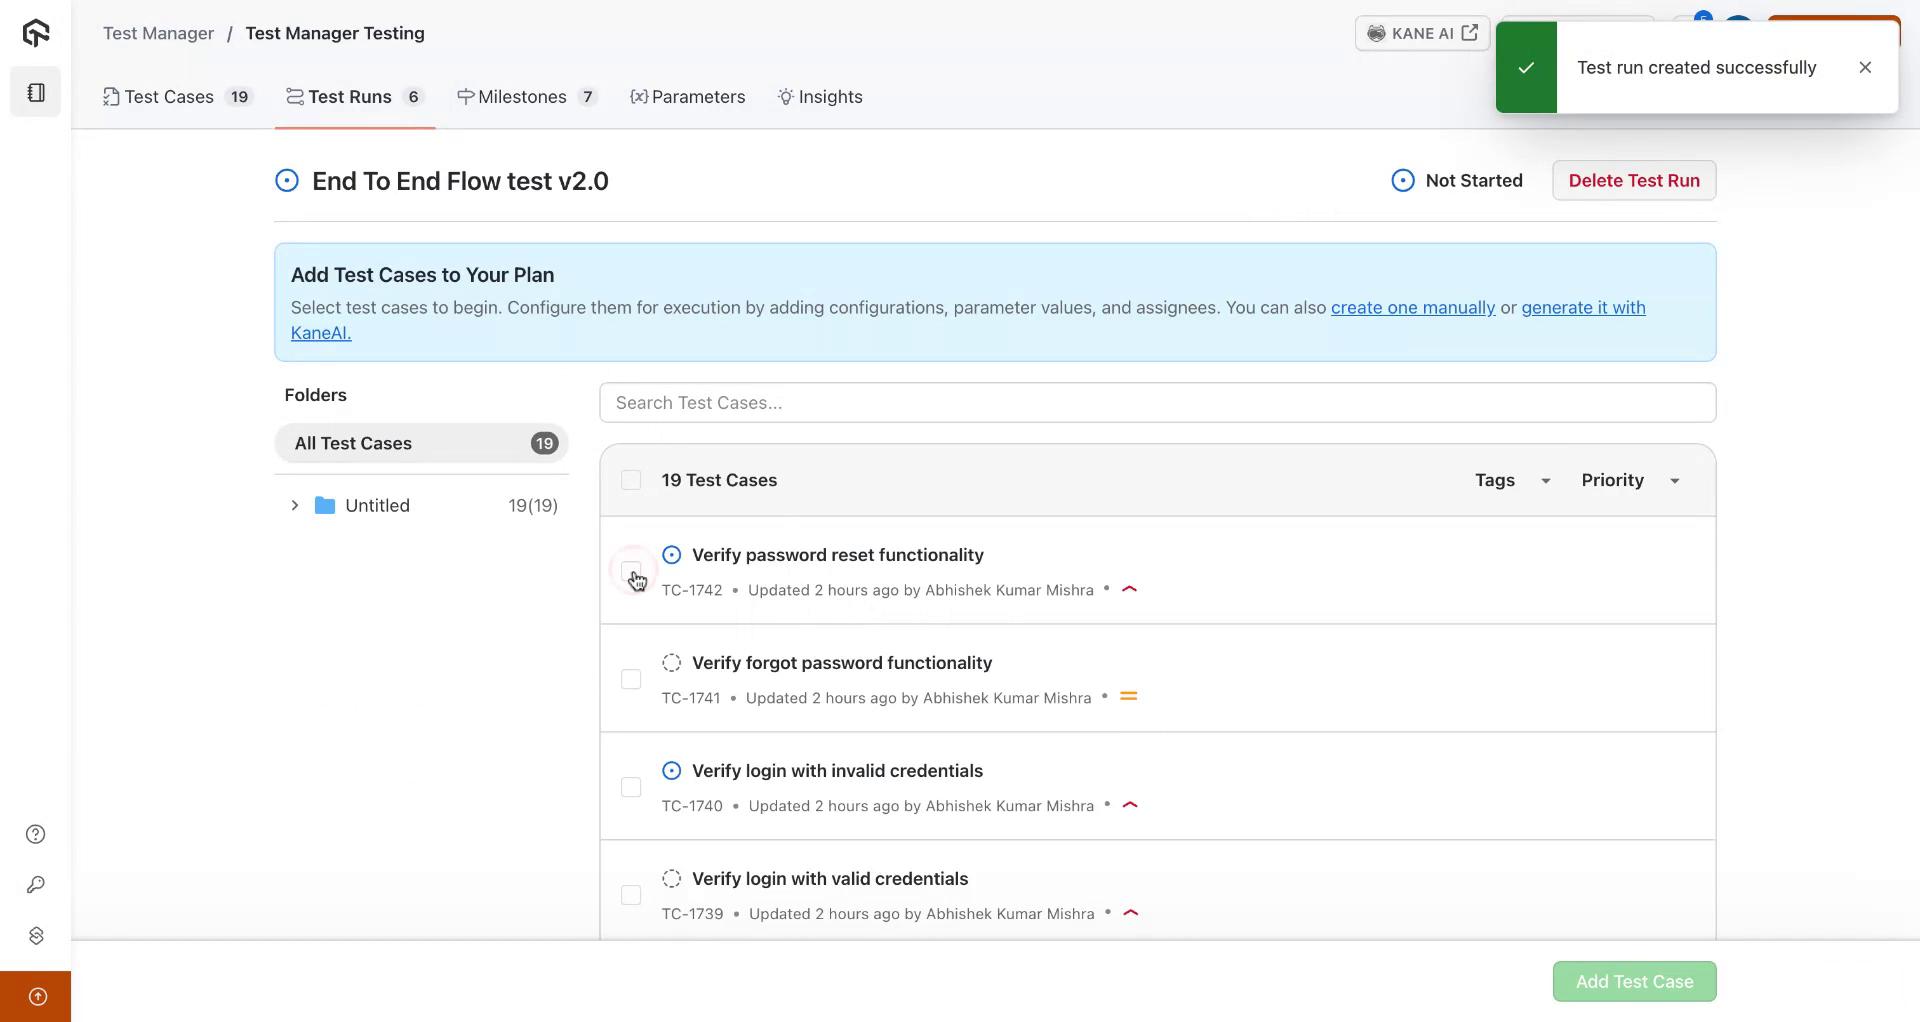
- Upon successful creation, you will be redirected to the Test Cases tab.
- Here, you can add multiple test cases to the test run.
Assign Test Cases
- Select the desired test cases from the list.
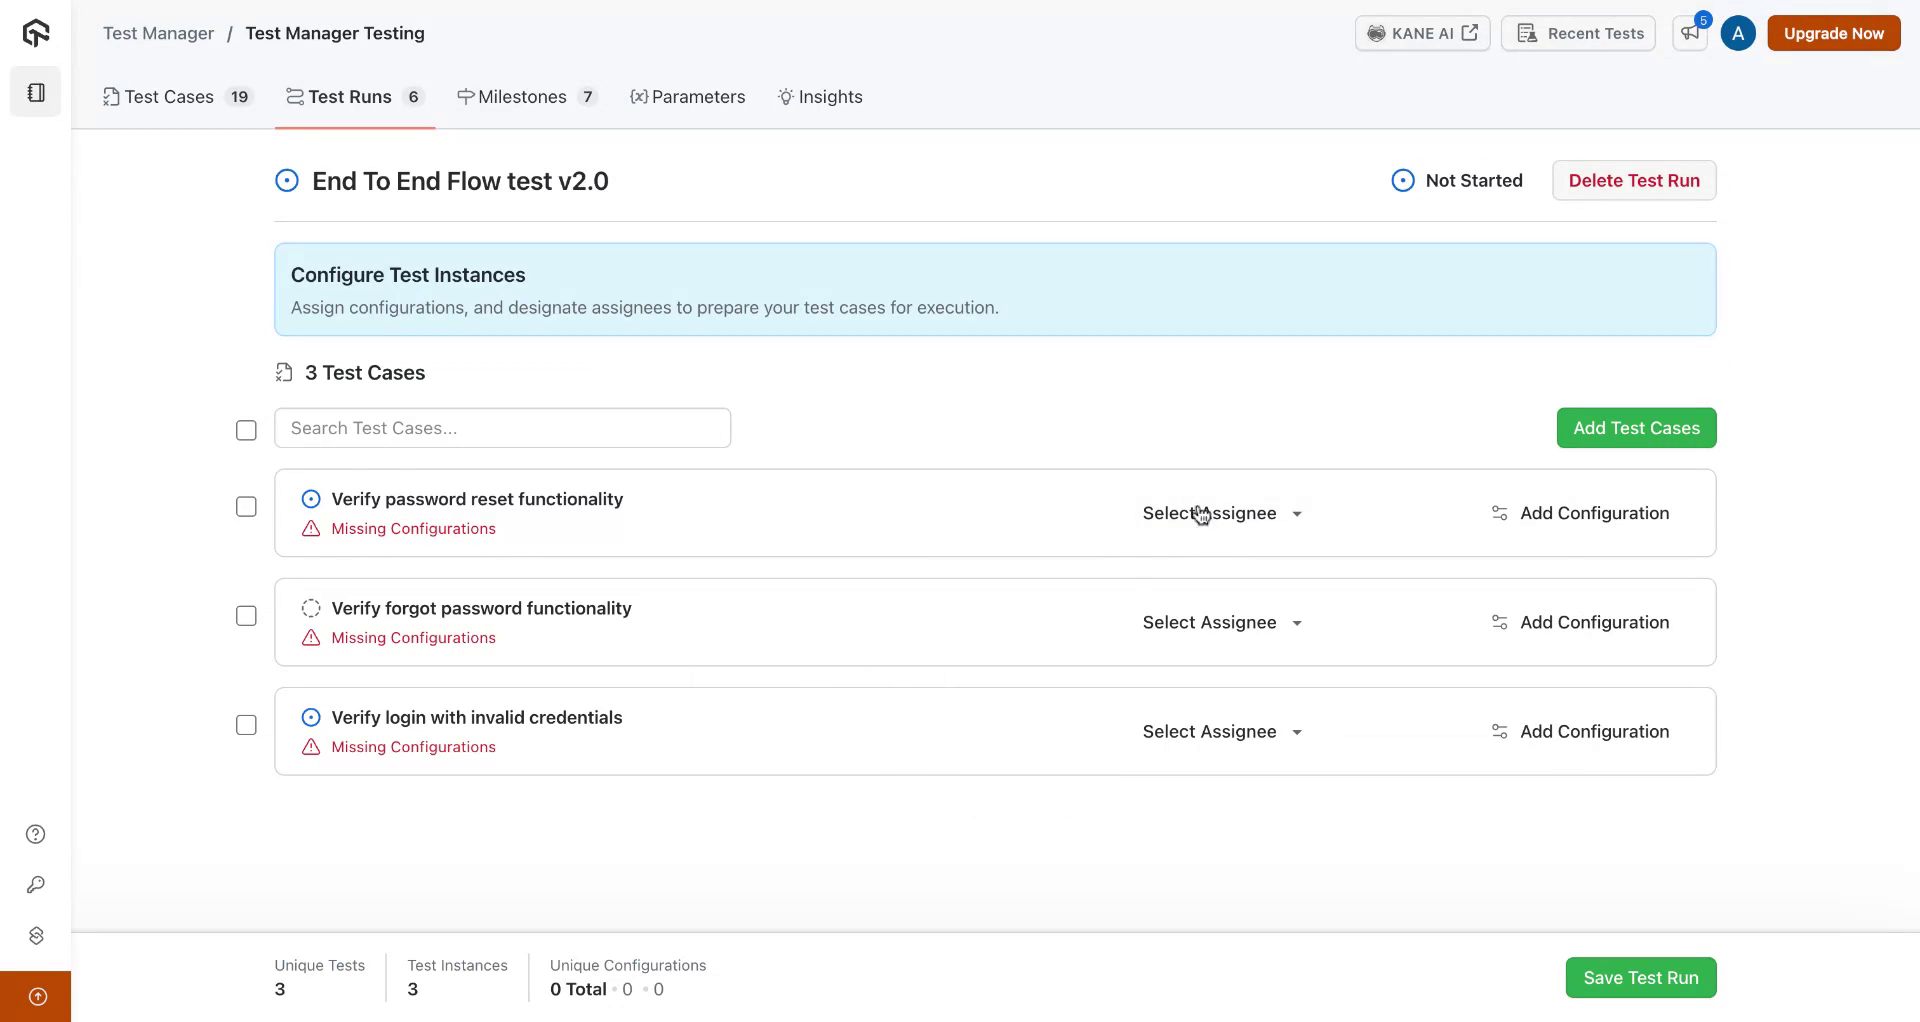
- Assign Assignees to each test case.
- Add test case configurations individually or in bulk.
Note: Configurations allow you to define environment settings, such as browser and device combinations.
Test cases shared into your project from other projects can be added to a test run too. Select them from Shared Incoming. See Share Test Cases Across Projects.
Add Configurations
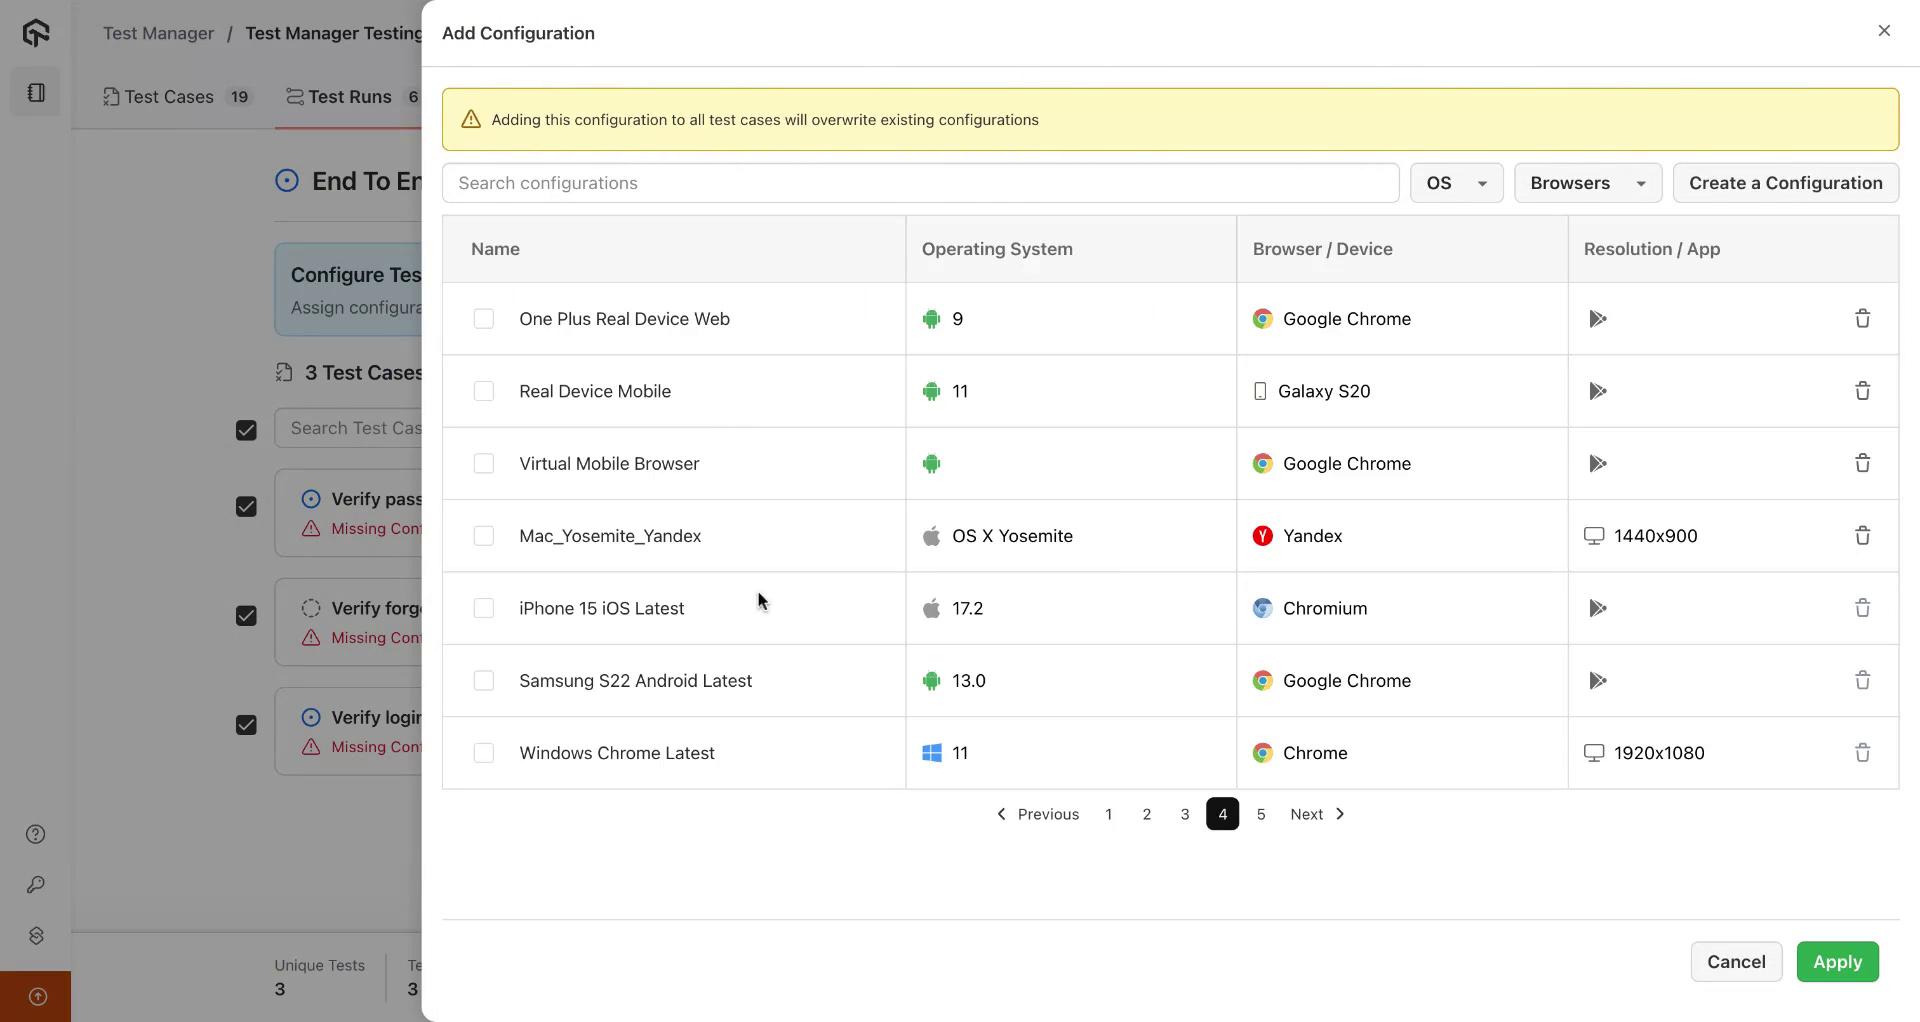
- Choose multiple configurations from the dropdown or create new configurations as needed.
- Apply configurations to the selected test cases.
3. Saving and Managing Test Runs
Finalize the Test Run
- Click Save Test Run to finalize the setup.
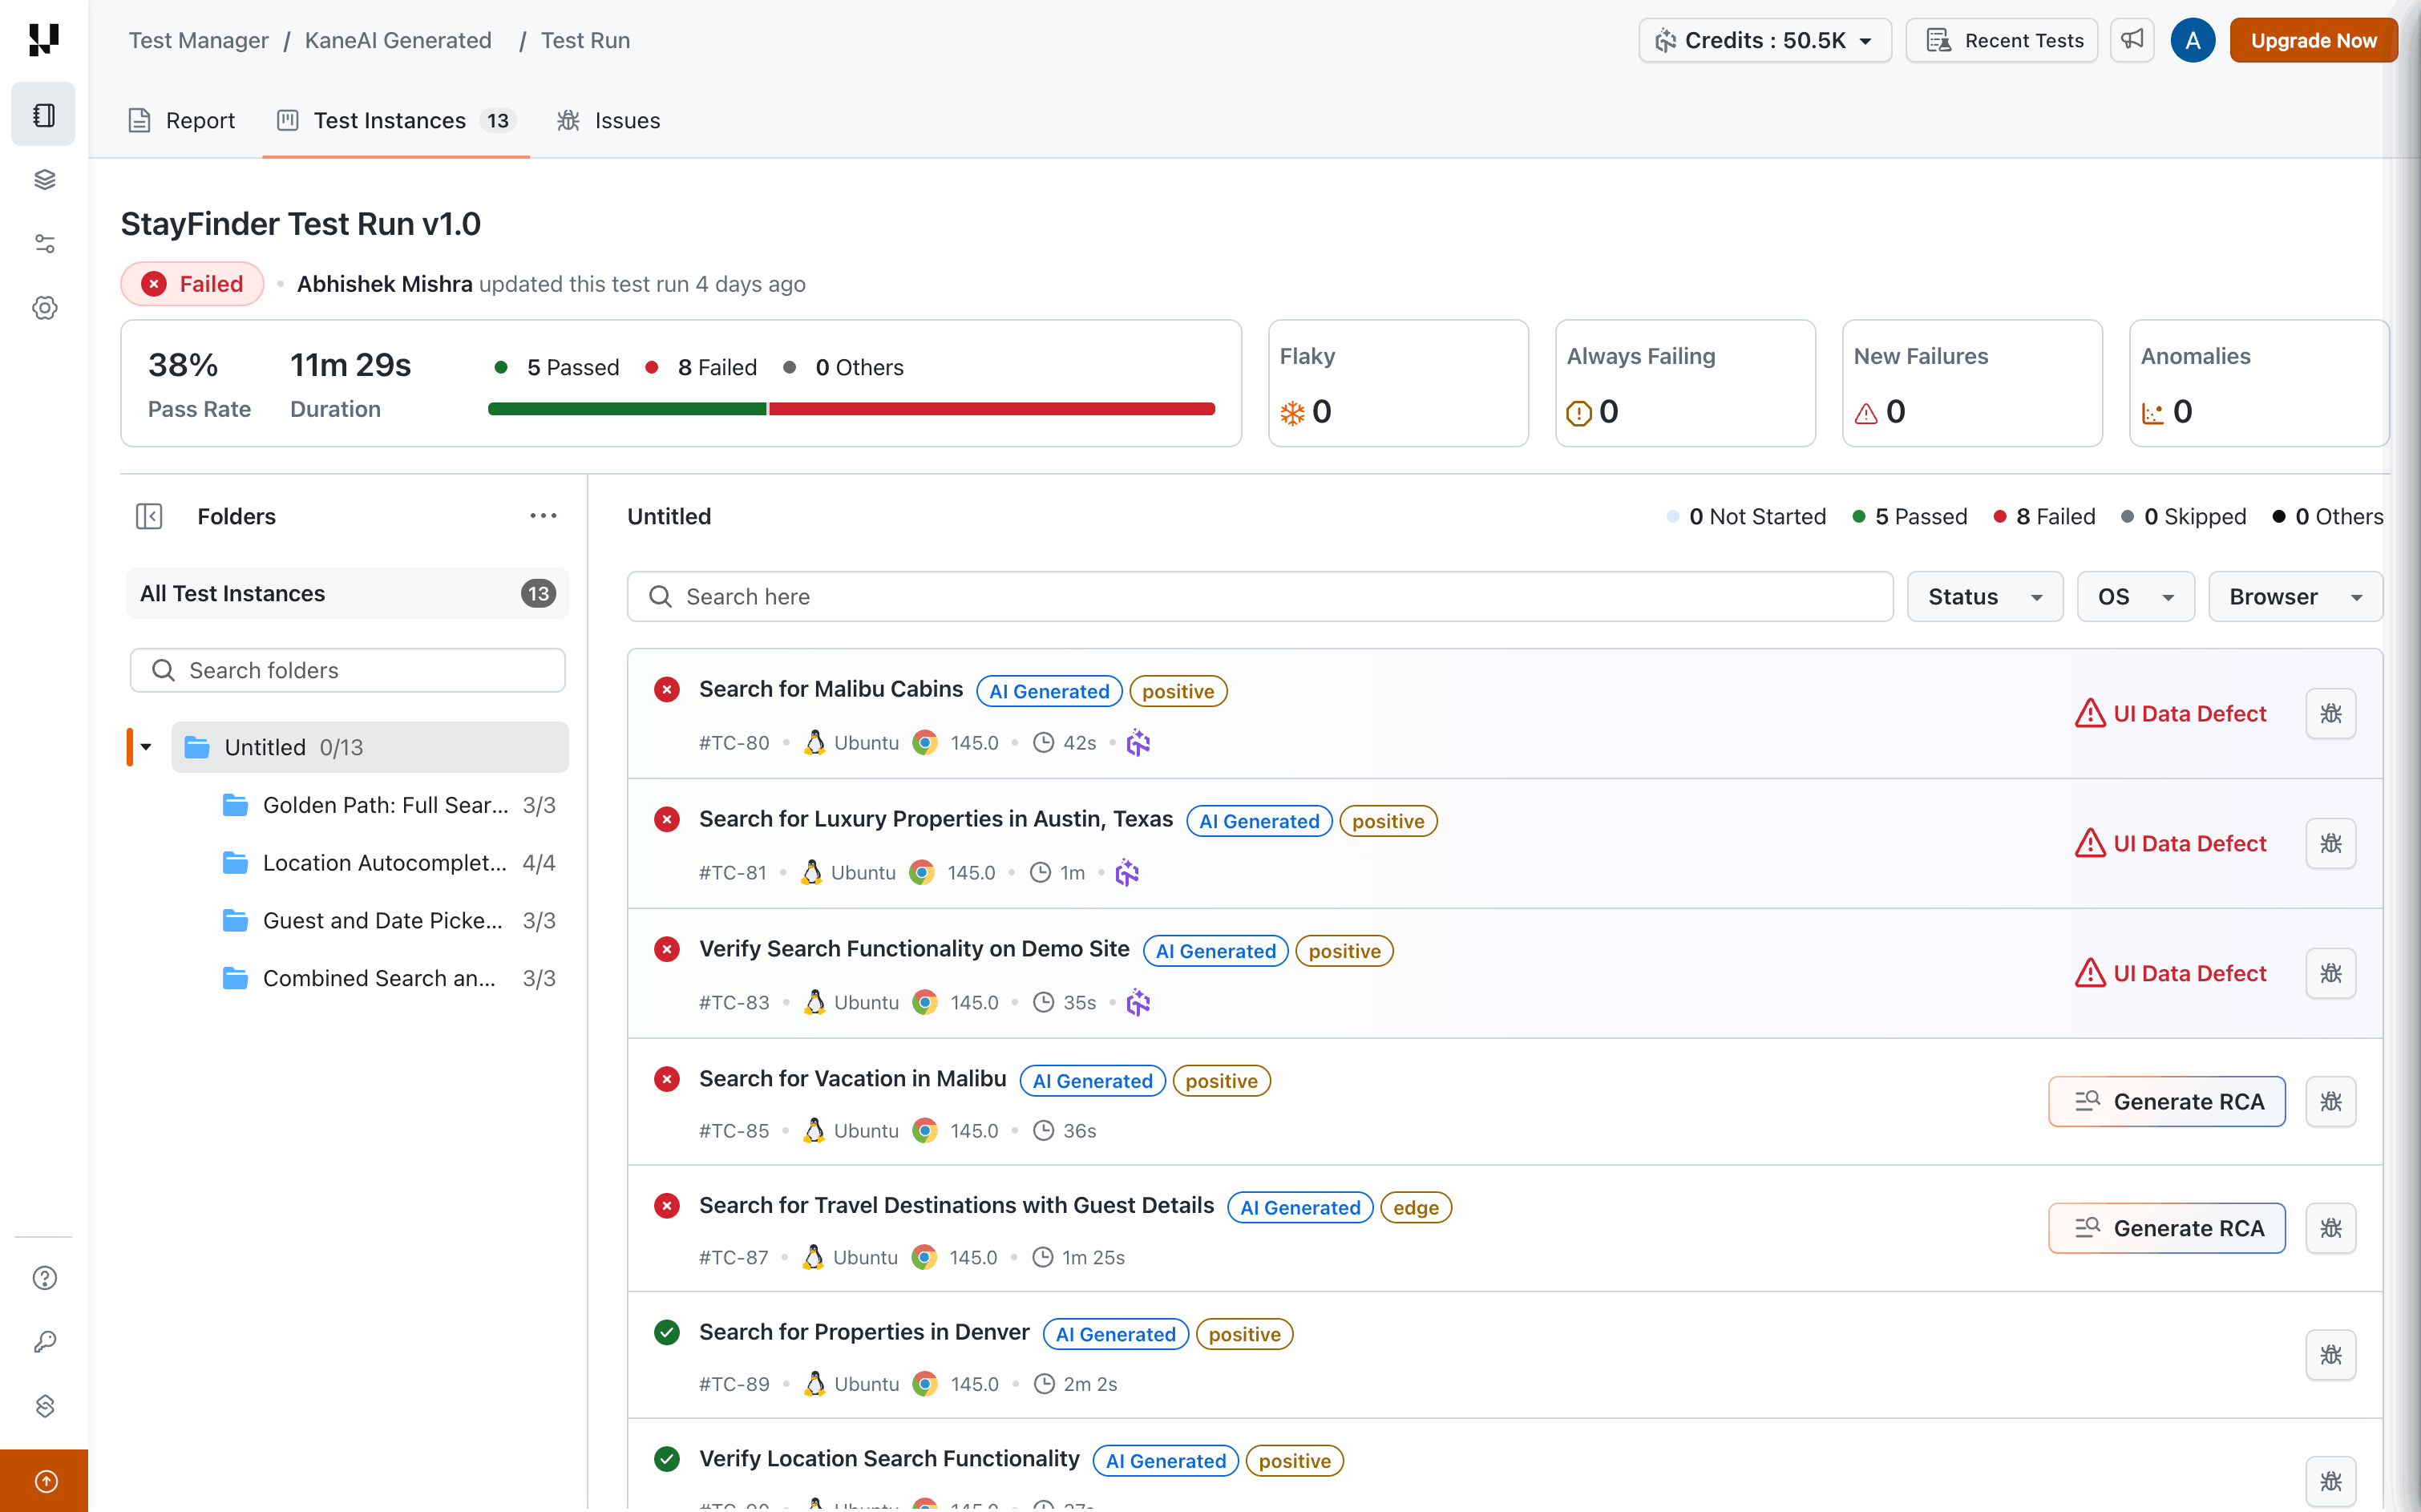
- View the created test run and its associated test instances in the dashboard.
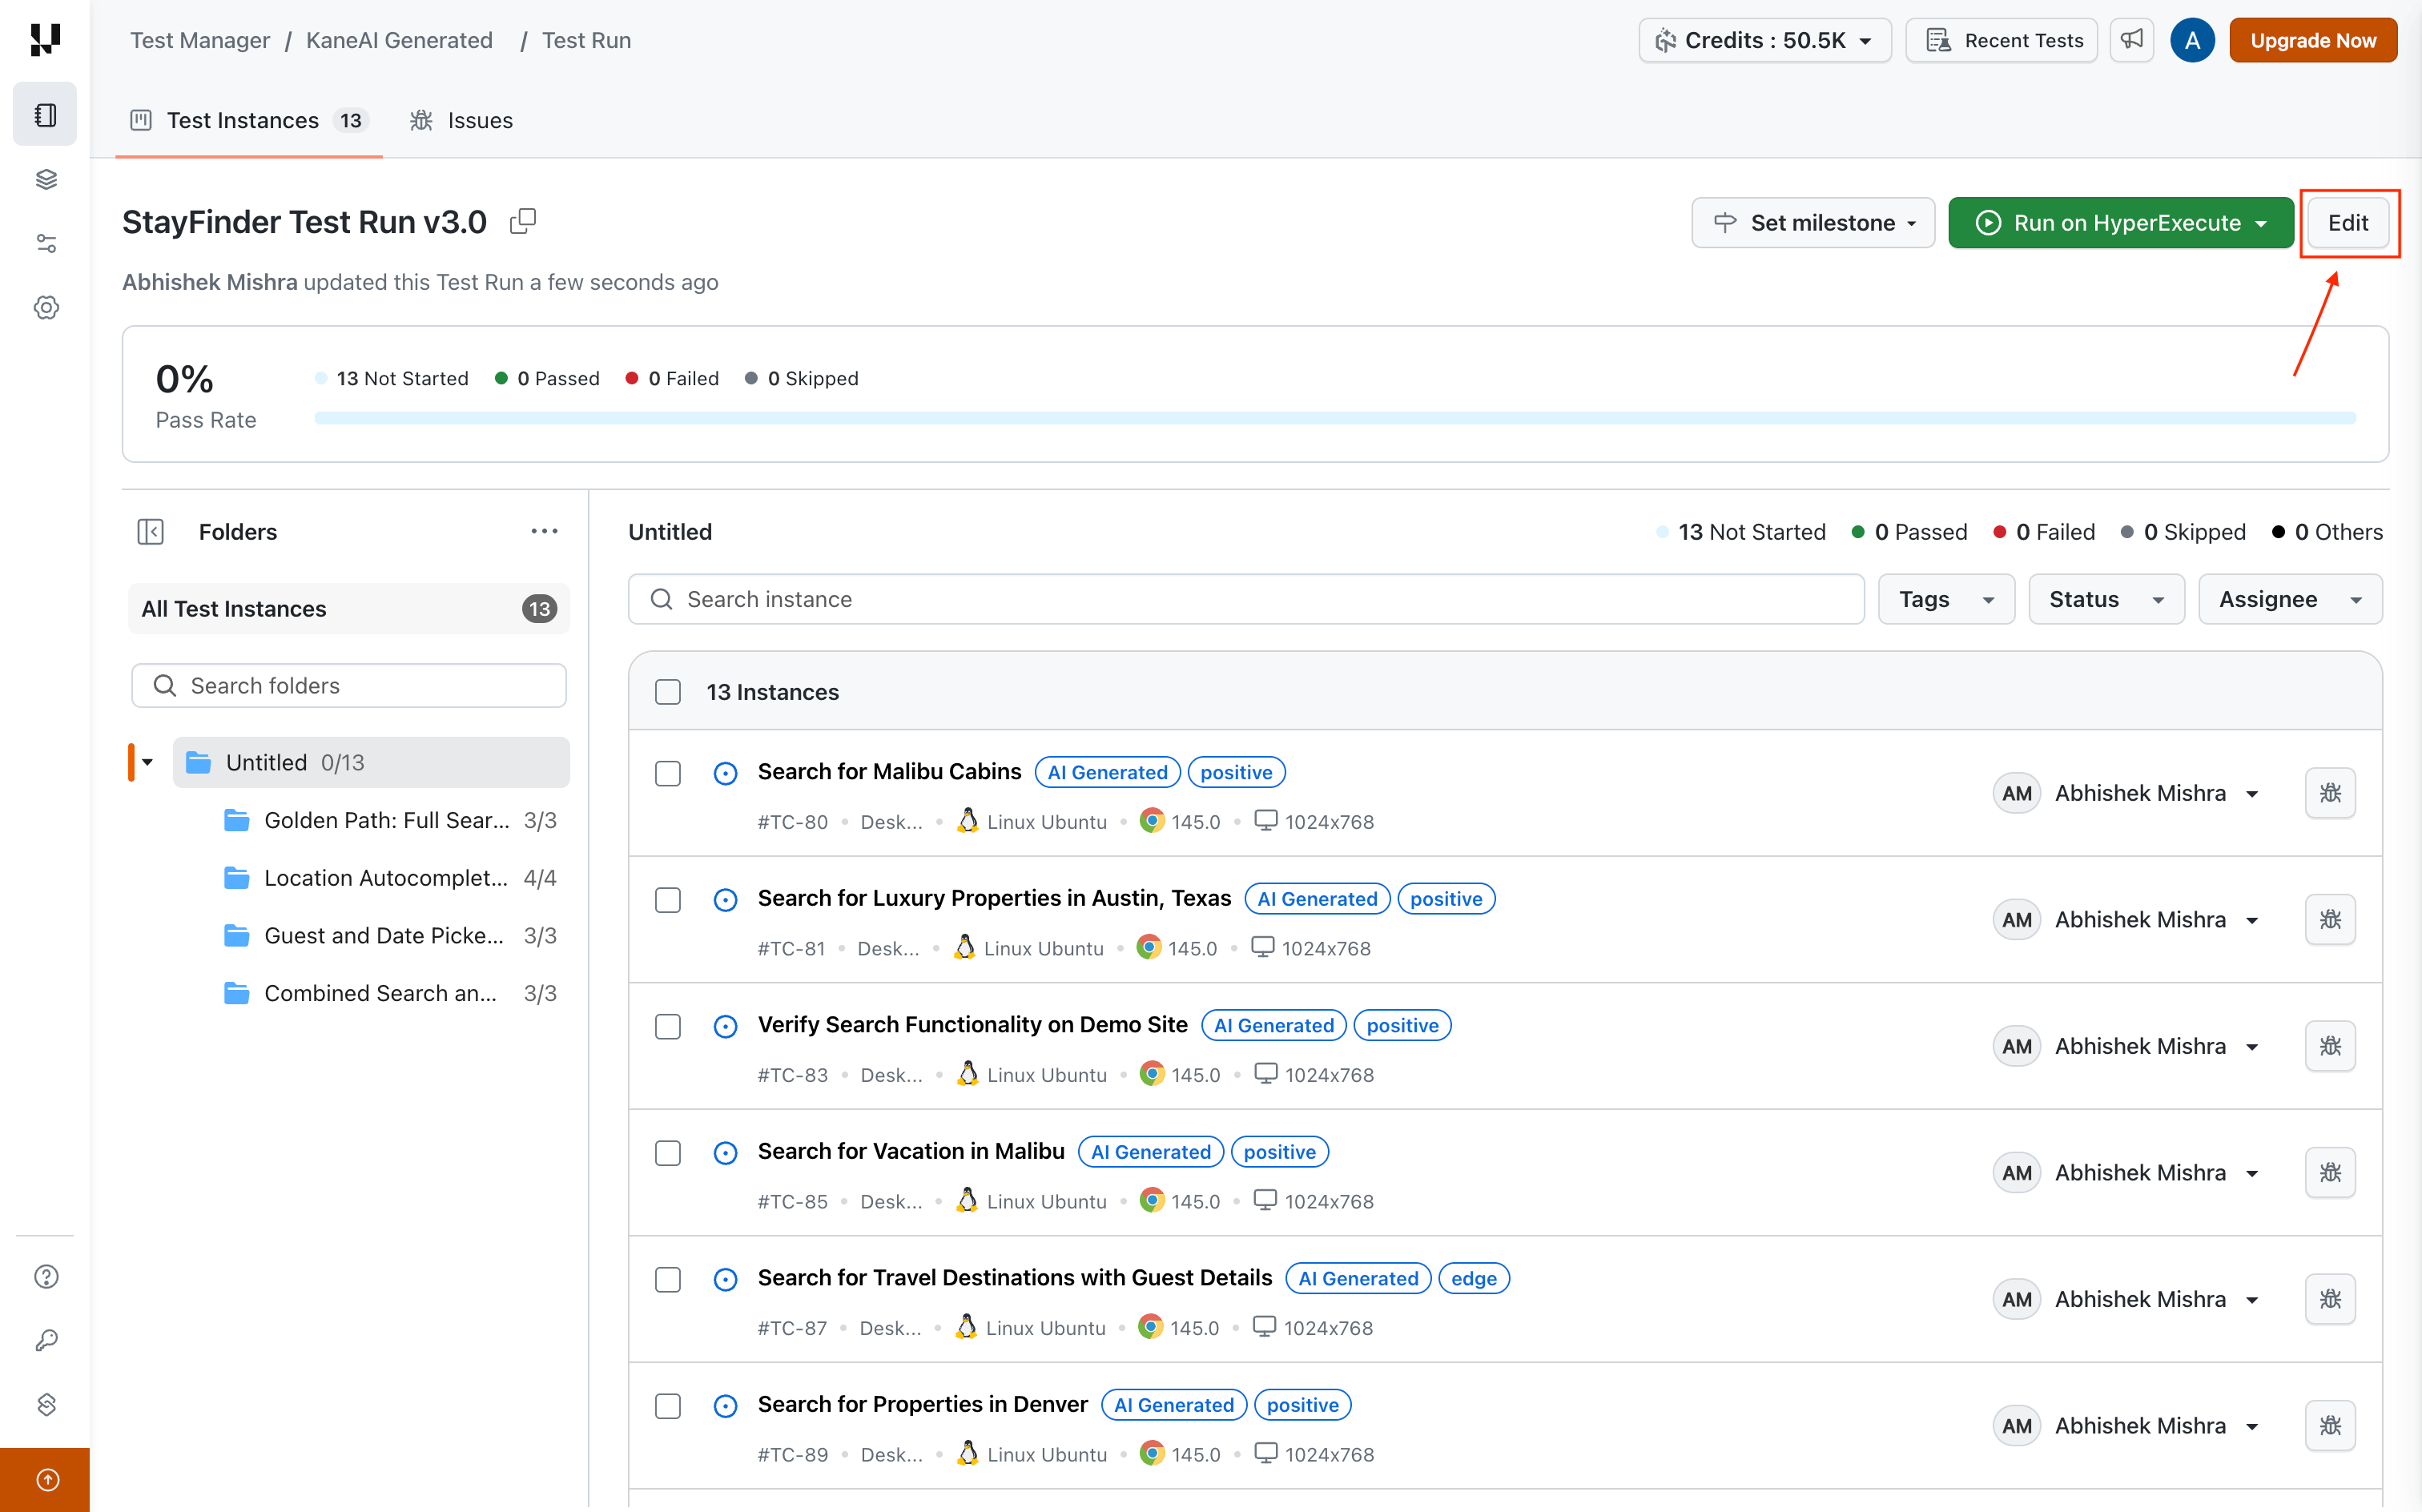
Test instances are organized using a Folders sidebar on the left, reflecting the folder structure of the test cases added to the test run. Only folders whose test cases are included in the test run are displayed, and each folder shows the count of test instances it contains (e.g., 3/3, 4/4).
- Select a folder to filter and view only its test instances. The status summary (Passed, Failed, Not Started, Skipped) is displayed in the top-right corner of the listing for the selected folder.
- Collapse or expand folders for easier navigation.
- Click the three-dot menu on the Folders header to toggle Include Child Folders. When enabled (default), selecting a parent folder also displays test instances from its child folders.
Bulk Update Options
- To update multiple test instances:
- Select multiple test instances.
- Use the Select Assignee and Select Status options to apply changes in bulk.
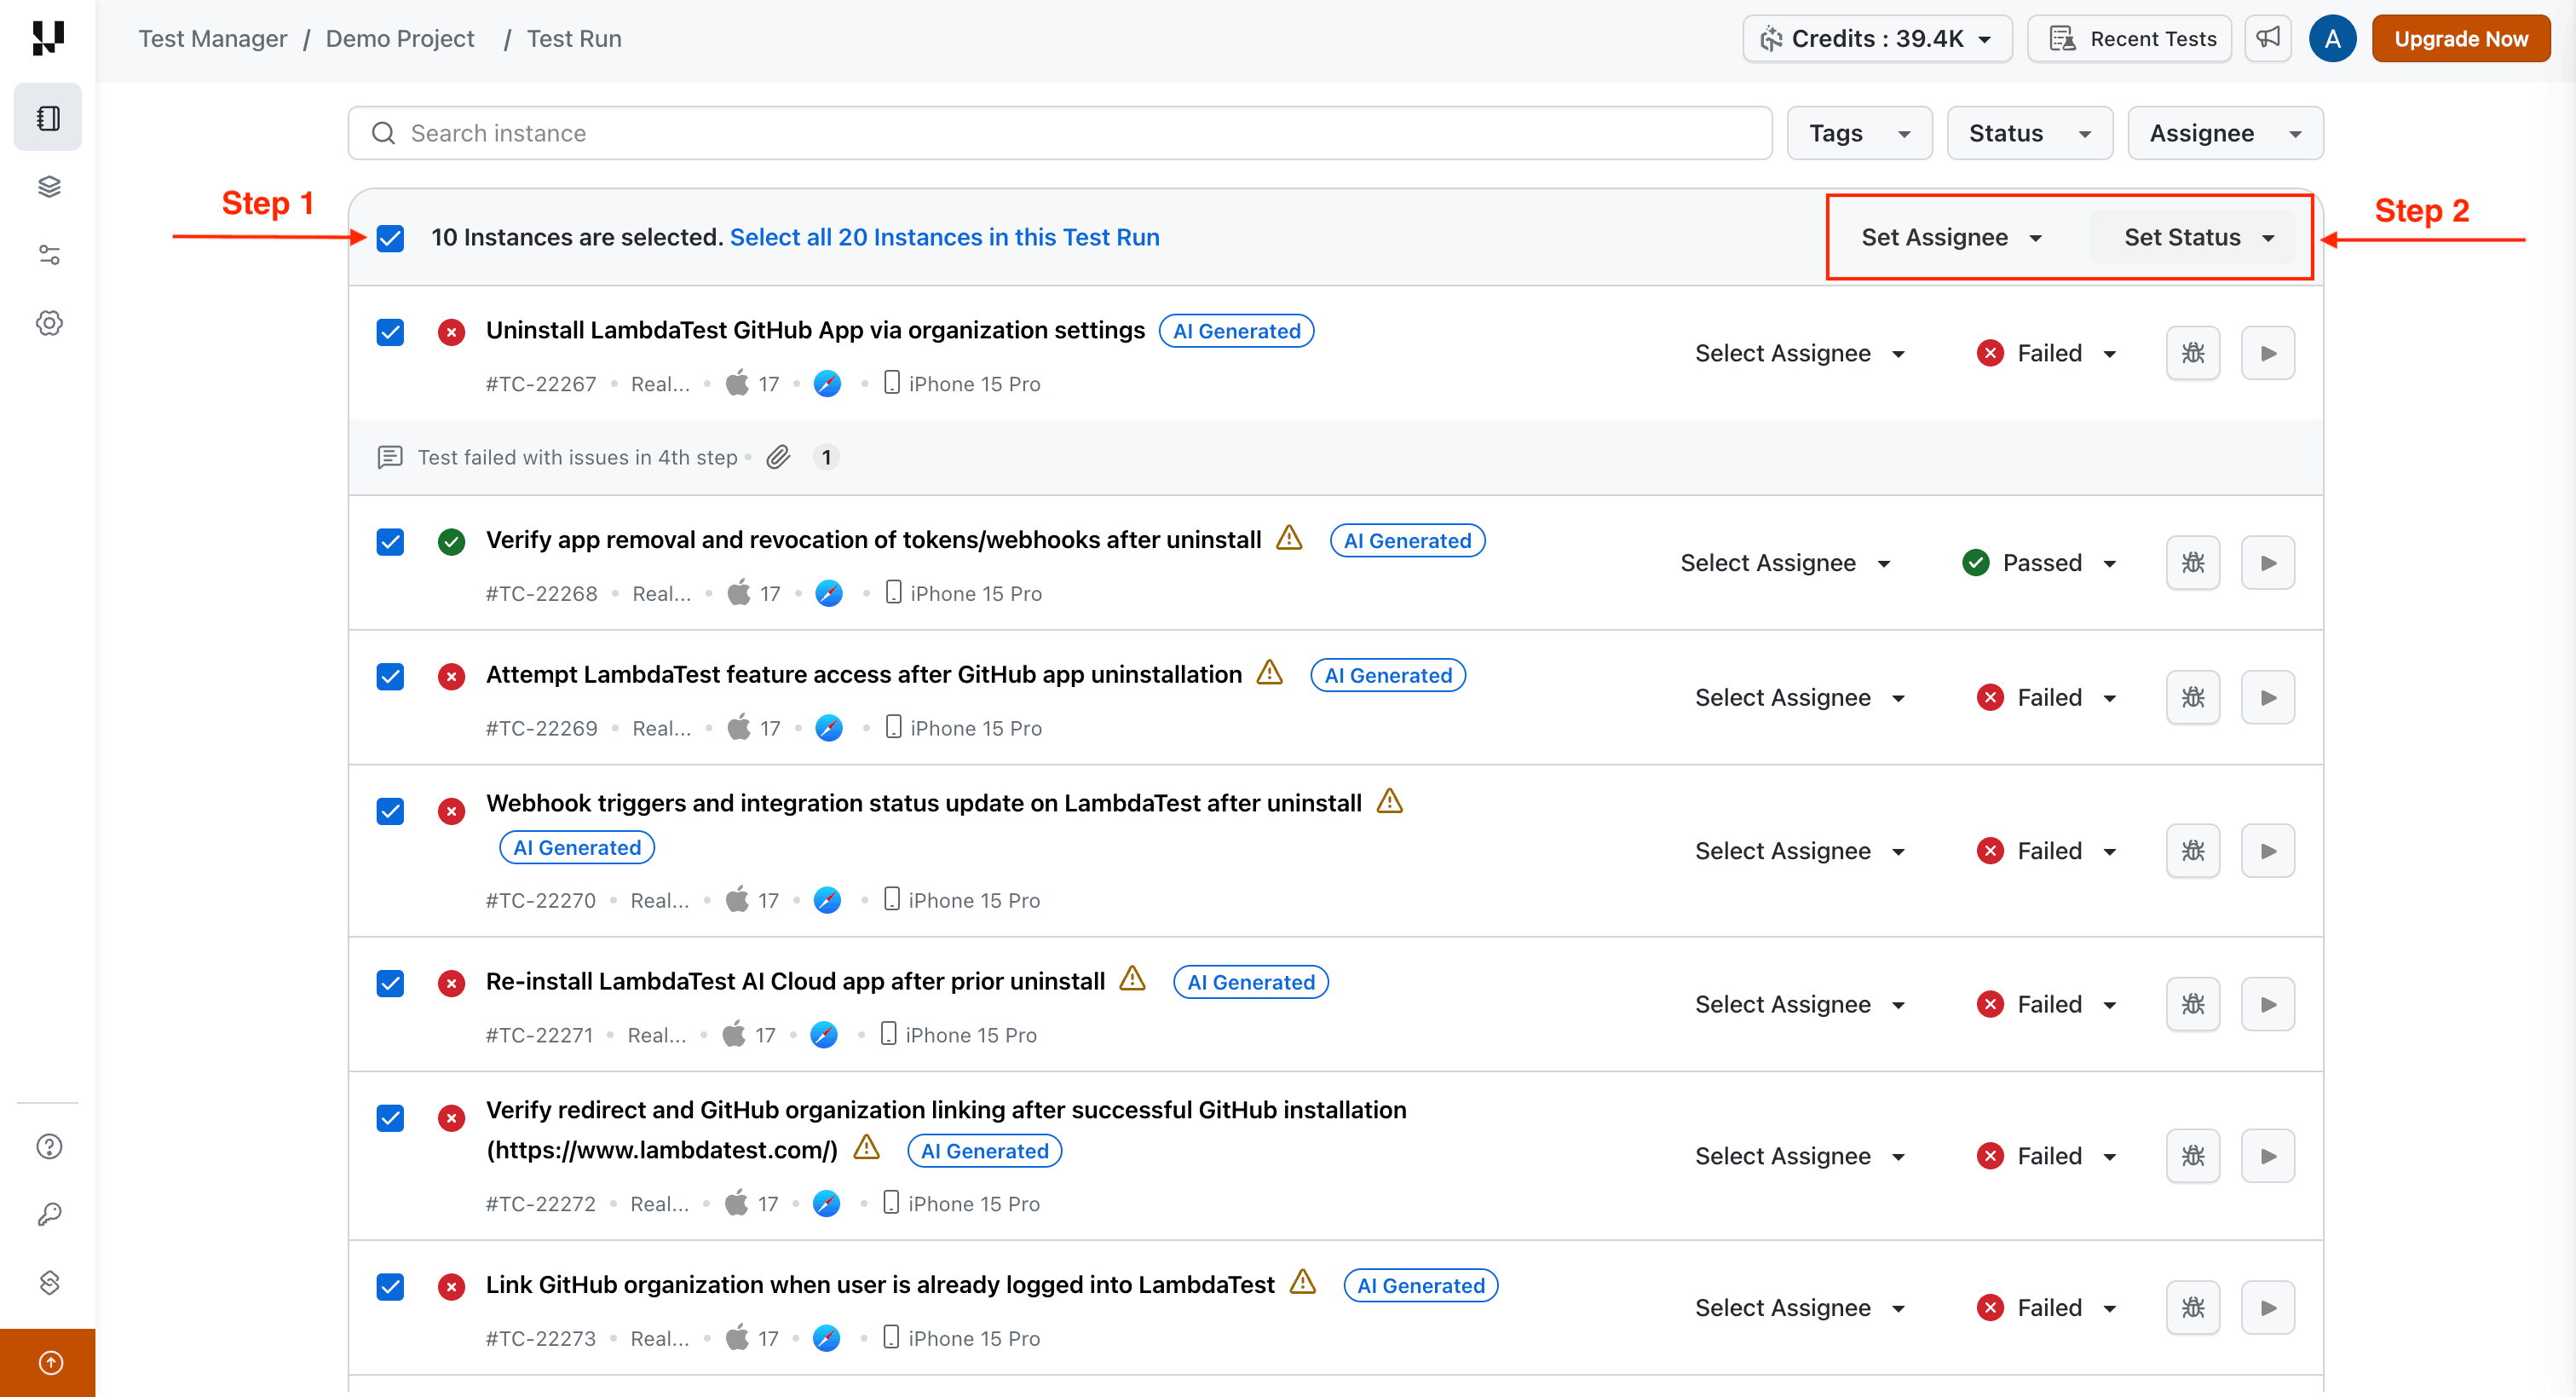
Setting statuses here counts as setting them by hand, so those test instances are no longer marked as derived until their steps change again. See Setting the Test Instance Status Yourself.
Update Test Step Status
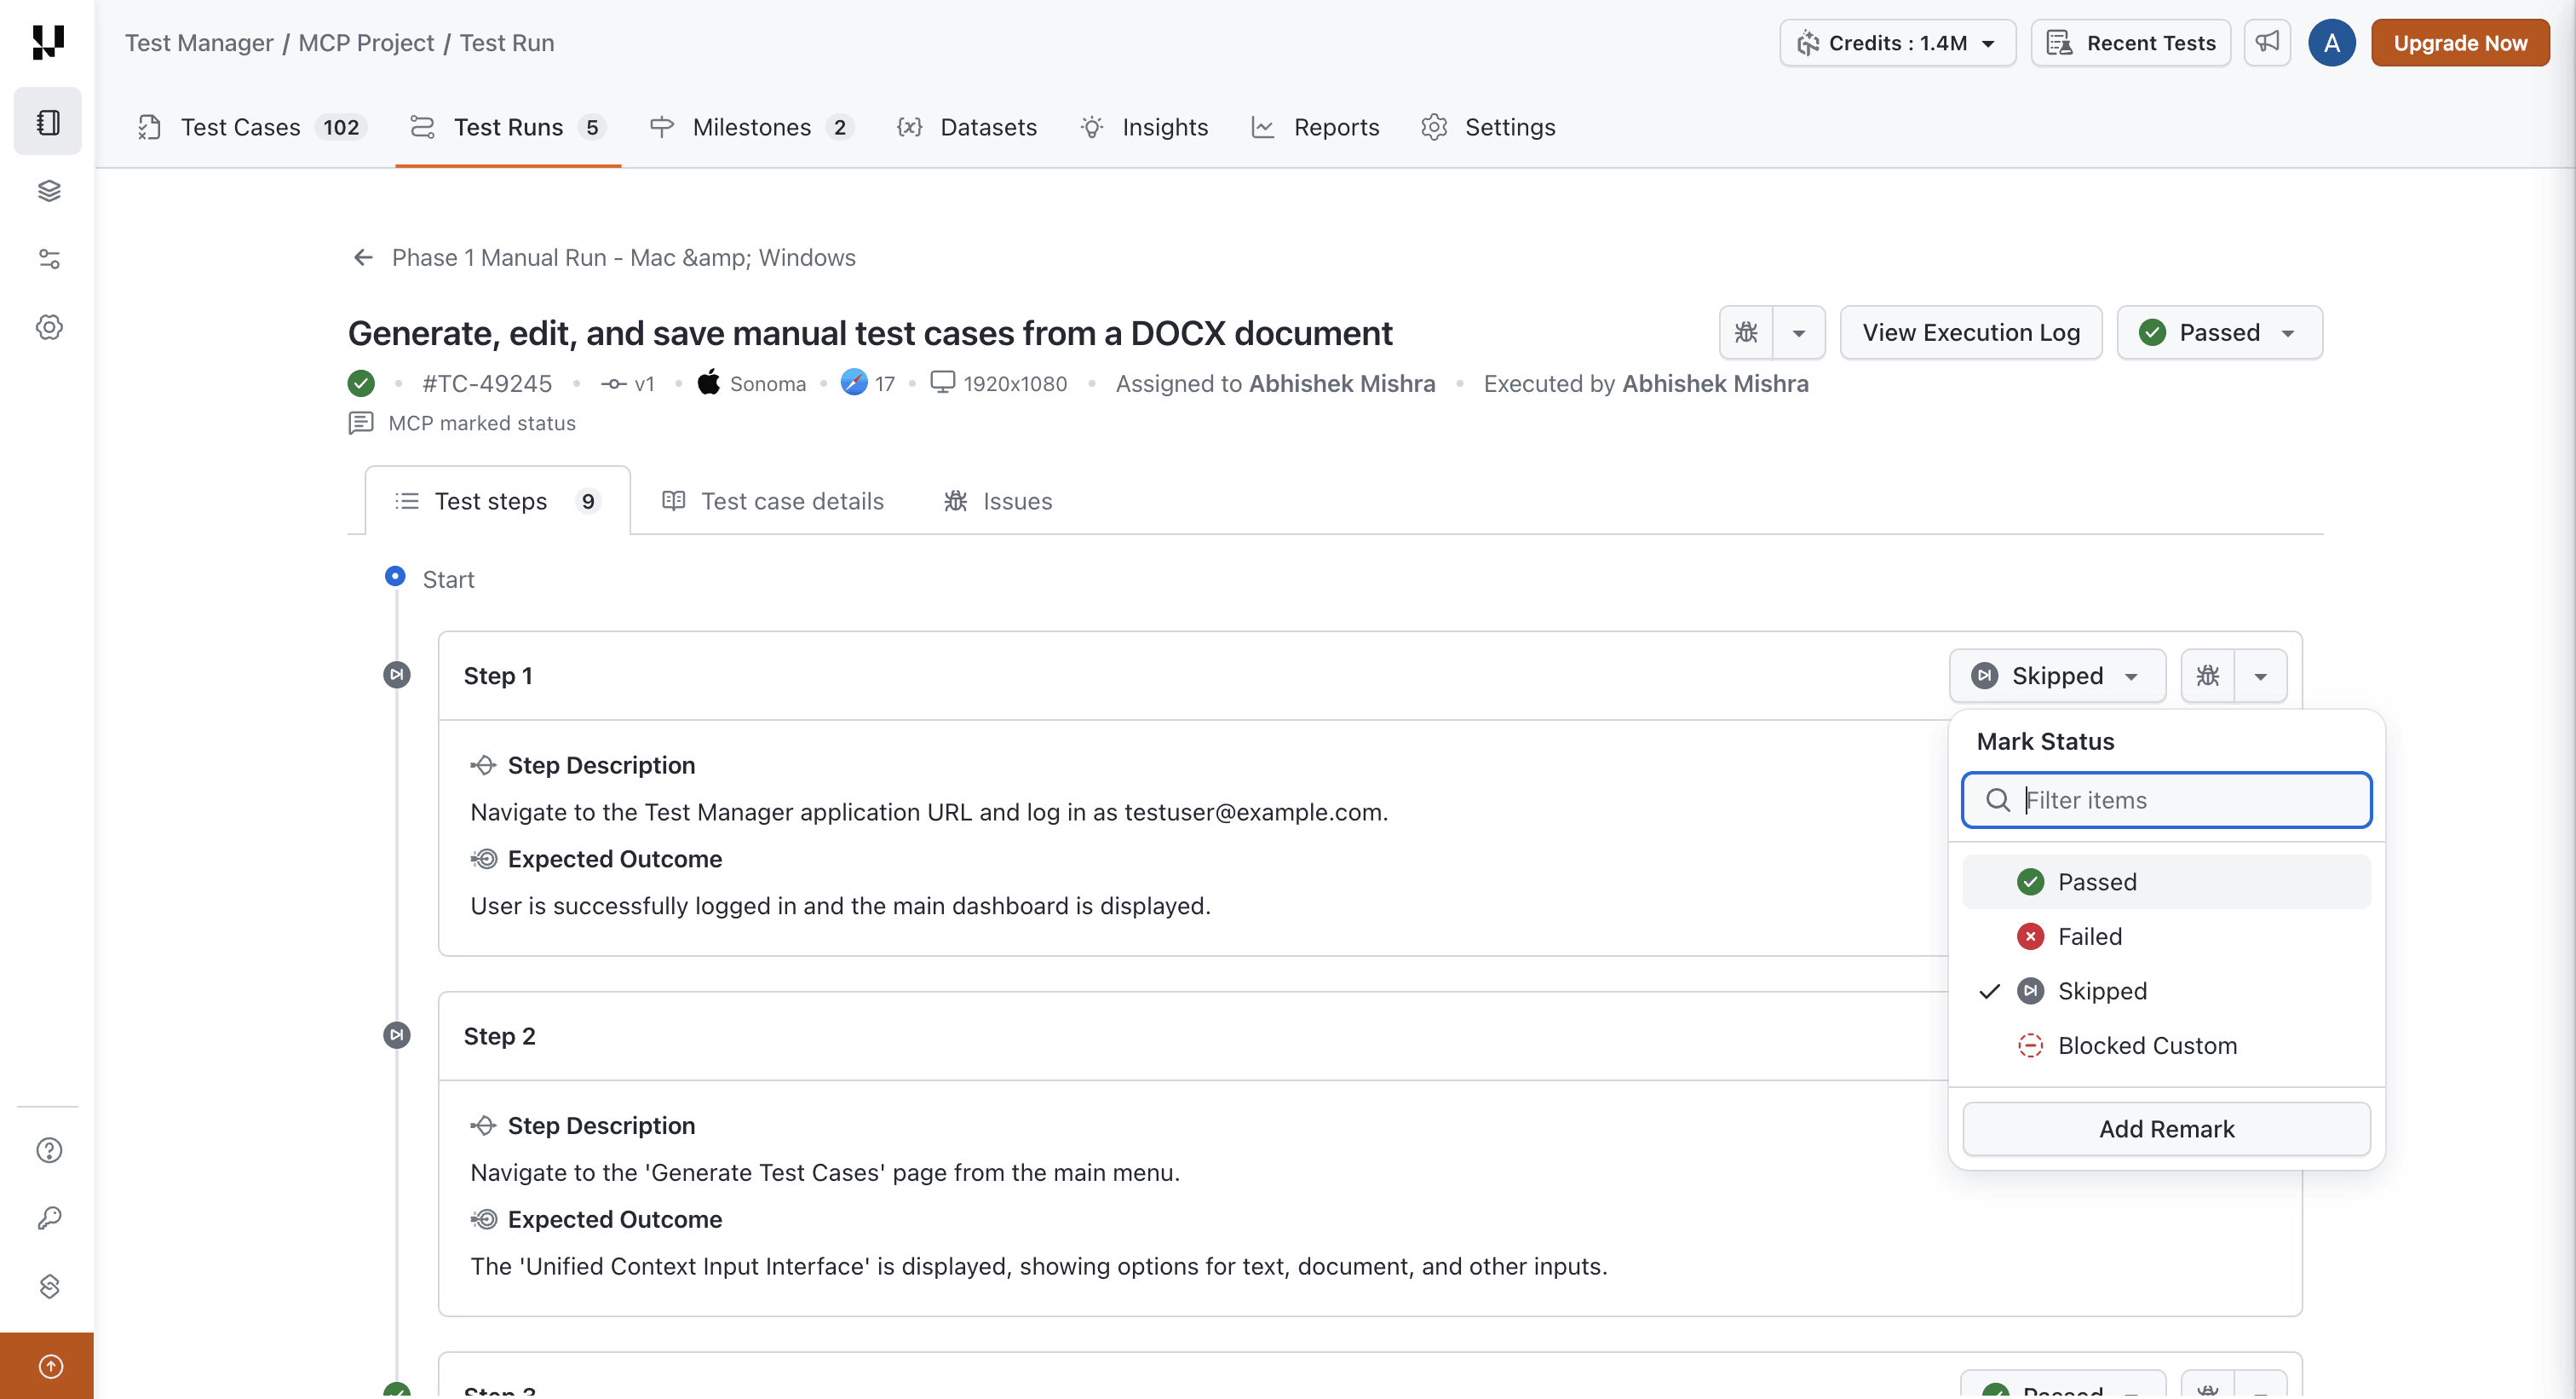
- Within any test instance, individually update the status of each test step.
- Add remarks or actual outcomes for manual test steps.
- Move a step back to Not Started if it has to be executed again.
On a manual test instance, marking a step also updates the status of the test instance itself. See How the Test Instance Status Is Derived.
How the Test Instance Status Is Derived
On a manual test instance, changing the status of a step recalculates the status of the instance from all of its steps, not only the one you changed. You record the verdict once, on the step, and the instance follows.
The instance status is written only when the recalculated value differs from the one already stored, so nothing else about the instance changes.
The rules below are checked in order, and the first one that matches decides the status.
| Order | If | The test instance becomes |
|---|---|---|
| 1 | Any step is Failed | Failed |
| 2 | Any step has not been executed yet — Not Started, or not marked at all | Not Started |
| 3 | Every step is executed and at least one is on a custom status | That custom status, from the lowest-numbered step holding one |
| 4 | Every step is executed and at least one is Passed | Passed |
| 5 | Every step is executed and none of the above applies | Skipped |
Examples
Blocked and Deferred below are examples of custom statuses your project may have added to the Test Run Status field.
| Step statuses, in order | Test instance status | Why |
|---|---|---|
| Passed, Passed, Passed | Passed | Every step was executed and passed. |
| Passed, Failed, Passed | Failed | One failed step is enough, wherever it is. |
| Failed, Failed, Skipped | Failed | More than one failure makes no difference. |
| Blocked, Failed, Passed | Failed | A failure outranks a custom status. |
| Passed, Not Started, Not Started | Not Started | Steps are still unexecuted. |
| Passed, Blocked, Not Started | Not Started | An unexecuted step outranks the custom status. |
| Not Started, Not Started, Not Started | Not Started | Nothing has been executed yet. |
| Not marked, Passed, Skipped | Not Started | A step with no status counts as unexecuted. |
| Passed, Blocked, Skipped | Blocked | Every step is executed, so the custom status decides. |
| Blocked, Passed, Skipped | Blocked | A custom status is never resolved into Passed. |
| Blocked, Deferred, Passed | Blocked | With two custom statuses, the lowest-numbered step wins. |
| Skipped, Skipped, Blocked | Blocked | A custom status outranks Skipped. |
| Passed, Skipped, Passed | Passed | A skipped step does not block a pass. |
| Skipped, Skipped, Skipped | Skipped | Everything was executed, and nothing passed or failed. |
Custom Statuses in a Derived Status
Custom statuses are the extra values your project adds to the Test Run Status system field. See System and Custom Fields.
- A custom status is an end state. It is never resolved into Passed by a later rule, and the execution end time is stamped on the instance when it is derived.
- Renaming a custom status applies the new name on the instance and on its steps, and the instance stays marked as derived.
- Deleting a custom status, or unlinking a project from it, resets every instance holding it to Not Started and leaves the steps that carried it unmarked.
Setting the Test Instance Status Yourself
- You can still set the test instance status by hand at any time, and it is kept exactly as you set it.
- A status you set by hand is no longer marked as derived. The next real step status change derives over it.
- Re-selecting the status a step already has is not a change, so it triggers no recalculation and leaves a hand-set instance status alone.
- Setting statuses in bulk from the test instance list counts as setting them by hand. See Bulk Update Options.
- Updating several steps in one bulk action produces a single recalculation, not one per step.
- Moving a step back to Not Started pulls the instance out of an end state such as Passed, Failed or a custom status, and clears its execution end time.
Where Derivation Does Not Apply
- Automation and KaneAI test instances, whose status is reported by the runner.
- Test instances in an archived test run.
- Test instances that have no steps. Their status stays manually settable.
- Test instances already on Timed Out, Aborted, Lambda Error or Muted. These are never overwritten.
A derived status change is recorded on the test instance audit log against the person who changed the step, naming the step that drove it. See Test Instance Audit Logs. Syncing an instance to a newer test case version resets it and stops it being marked as derived, until its next step status change. See Sync Test Instances.
A derived status rolls up to the test run in the same way a hand-set one does, so the test run status and its status counts stay in step with what was executed.
Turn Status Derivation On or Off
Deriving the test instance status from step results is enabled by default for every organization and applies to all of its projects.
This behaviour is configured at the Organization level within the Org Product Preferences section of Organization settings, under Test Manager > Manual Test Status, here. Use the Set test instance status from step results toggle, then save your changes.
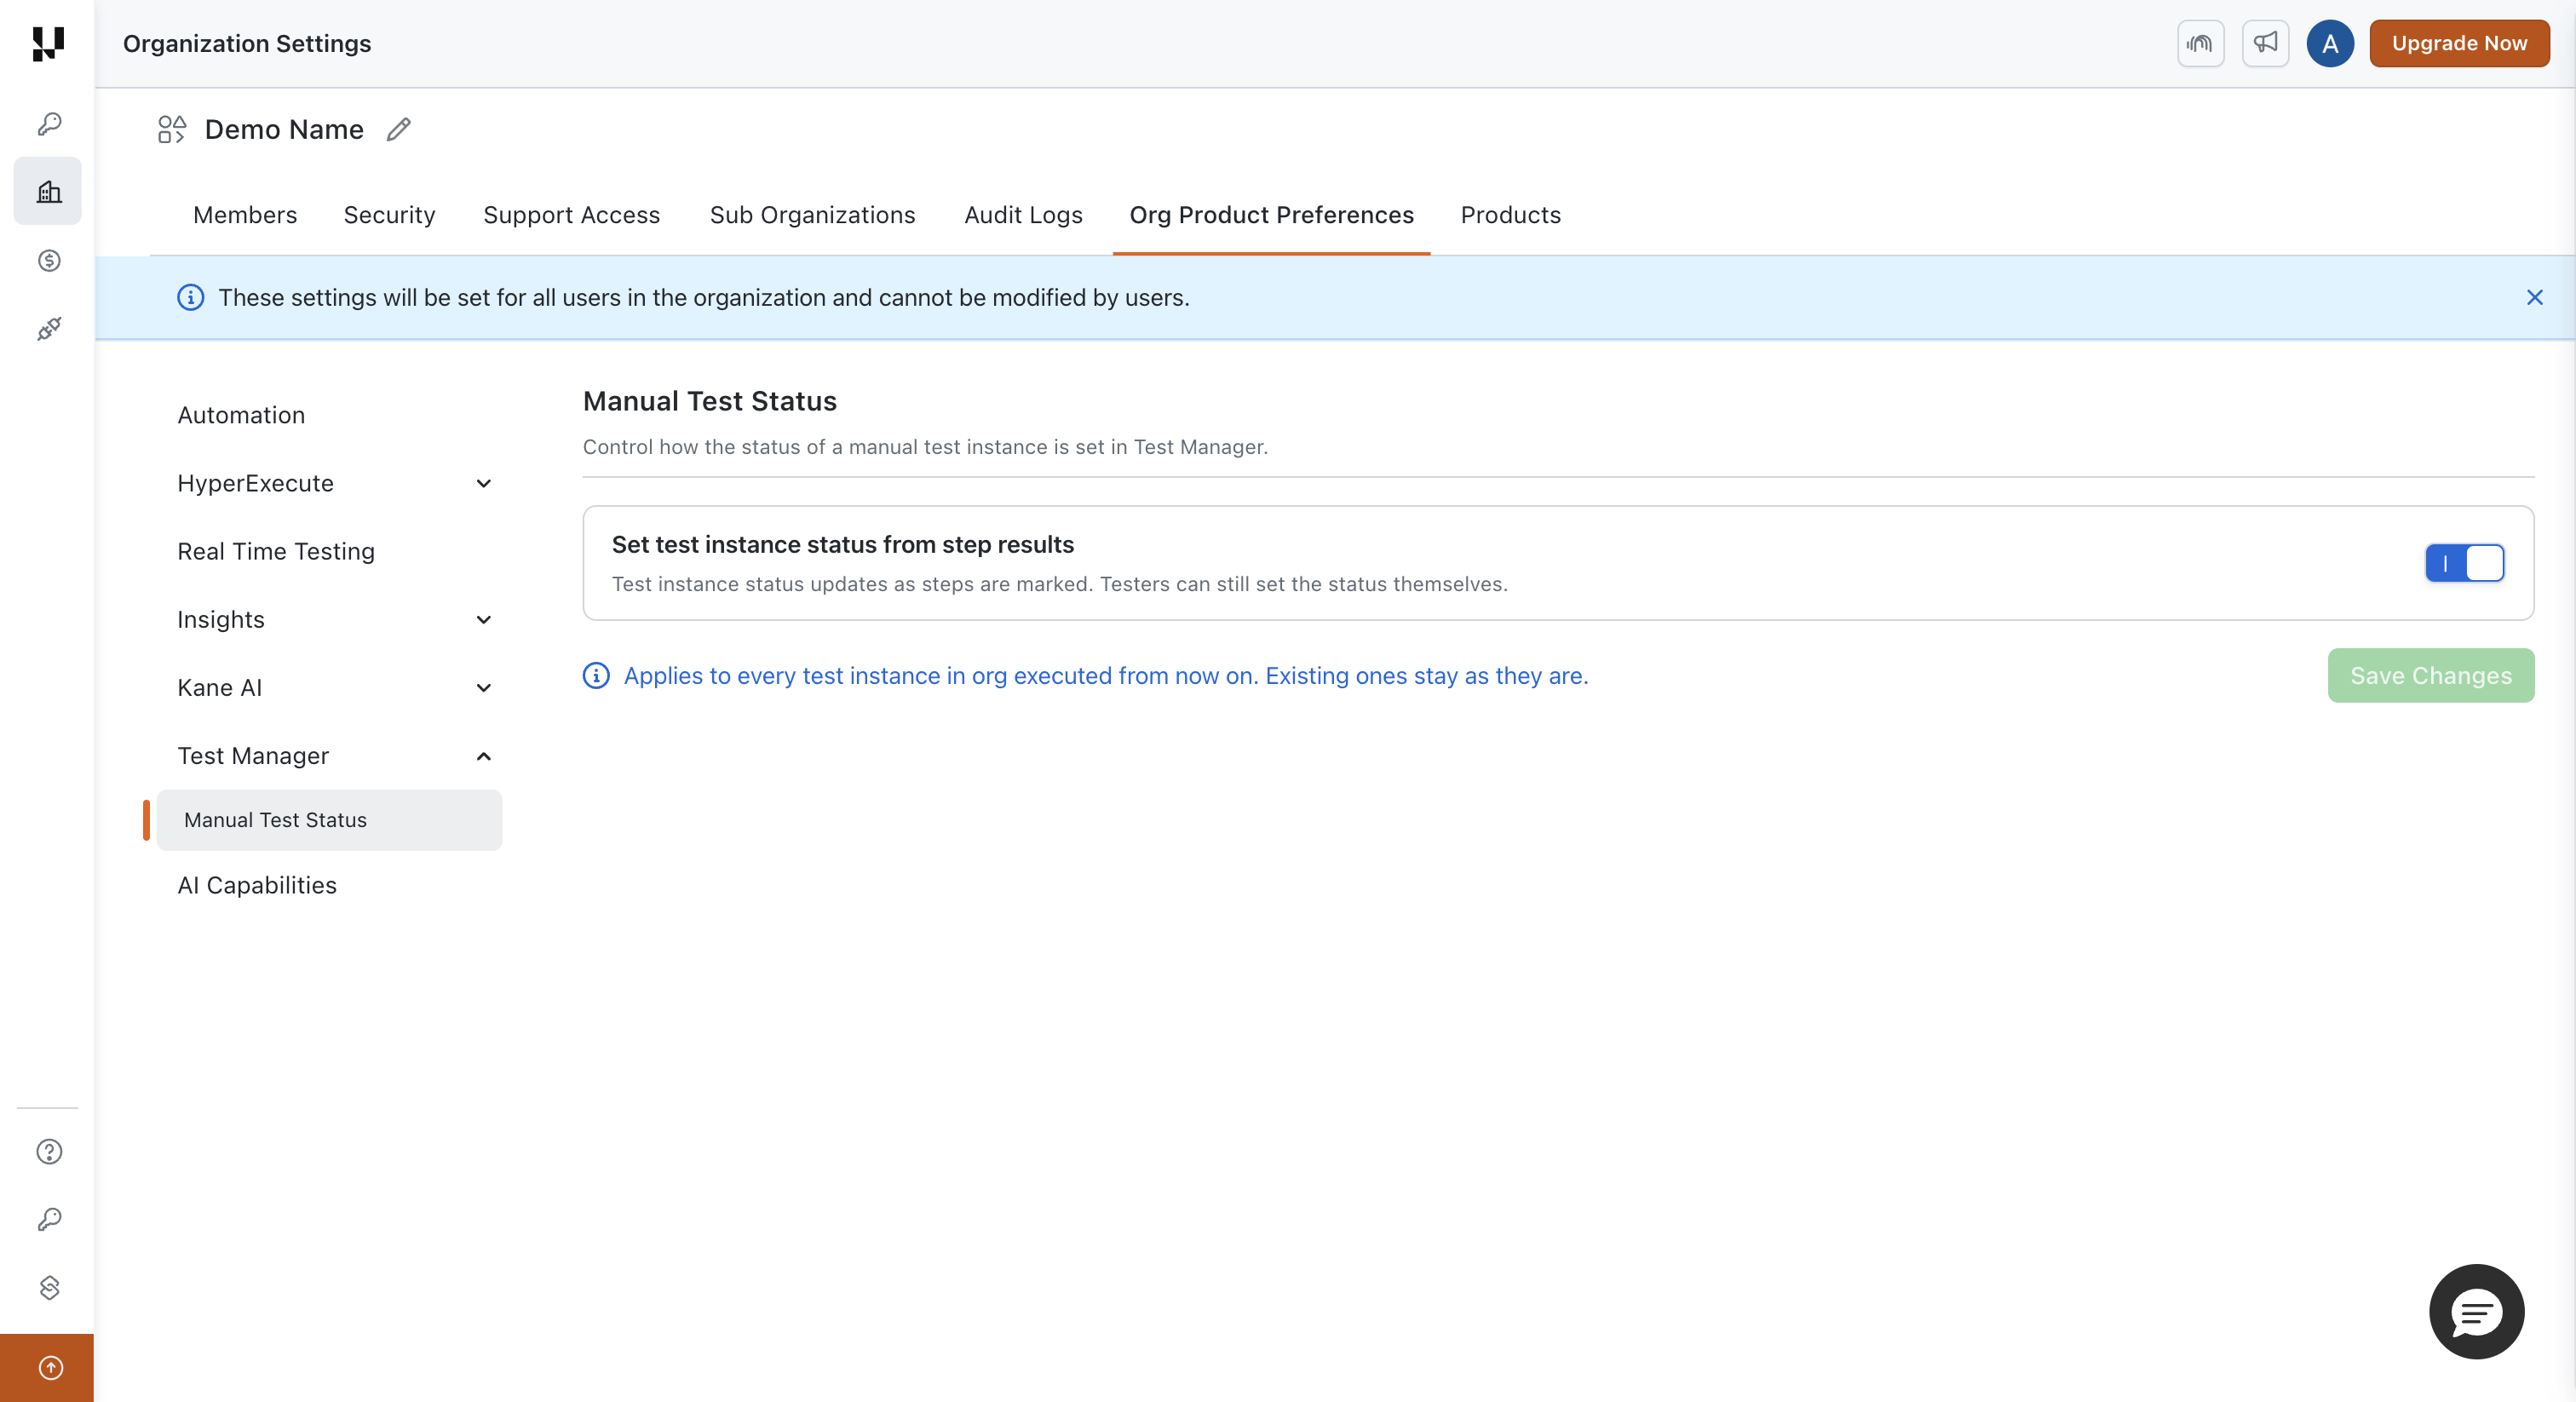
- Turn it off and no test instance status is derived any more. Statuses that were already derived are left as they are.
- Turn it on and it applies from each instance's next step status change. Nothing is recalculated or rewritten for executions that already happened.
Only Admins of the Organization can change this setting.
Read the Test Case Details During Execution
A manual test instance opens on three tabs: Test steps, Test case details, and Issues.
The Test case details tab shows the content of the test case you are executing, so you do not have to leave the run to read it:
- Description, Pre-conditions, and Attachments, which you can preview or download.
- Status, Type, Priority, Automation Status, Tags, and any Custom Fields.
Fields that have no value are left out. The tab is read only: you cannot edit the test case or add attachments from here. To change any of it, open the test case from its ID in the instance header and edit it on the Test Case Details page.
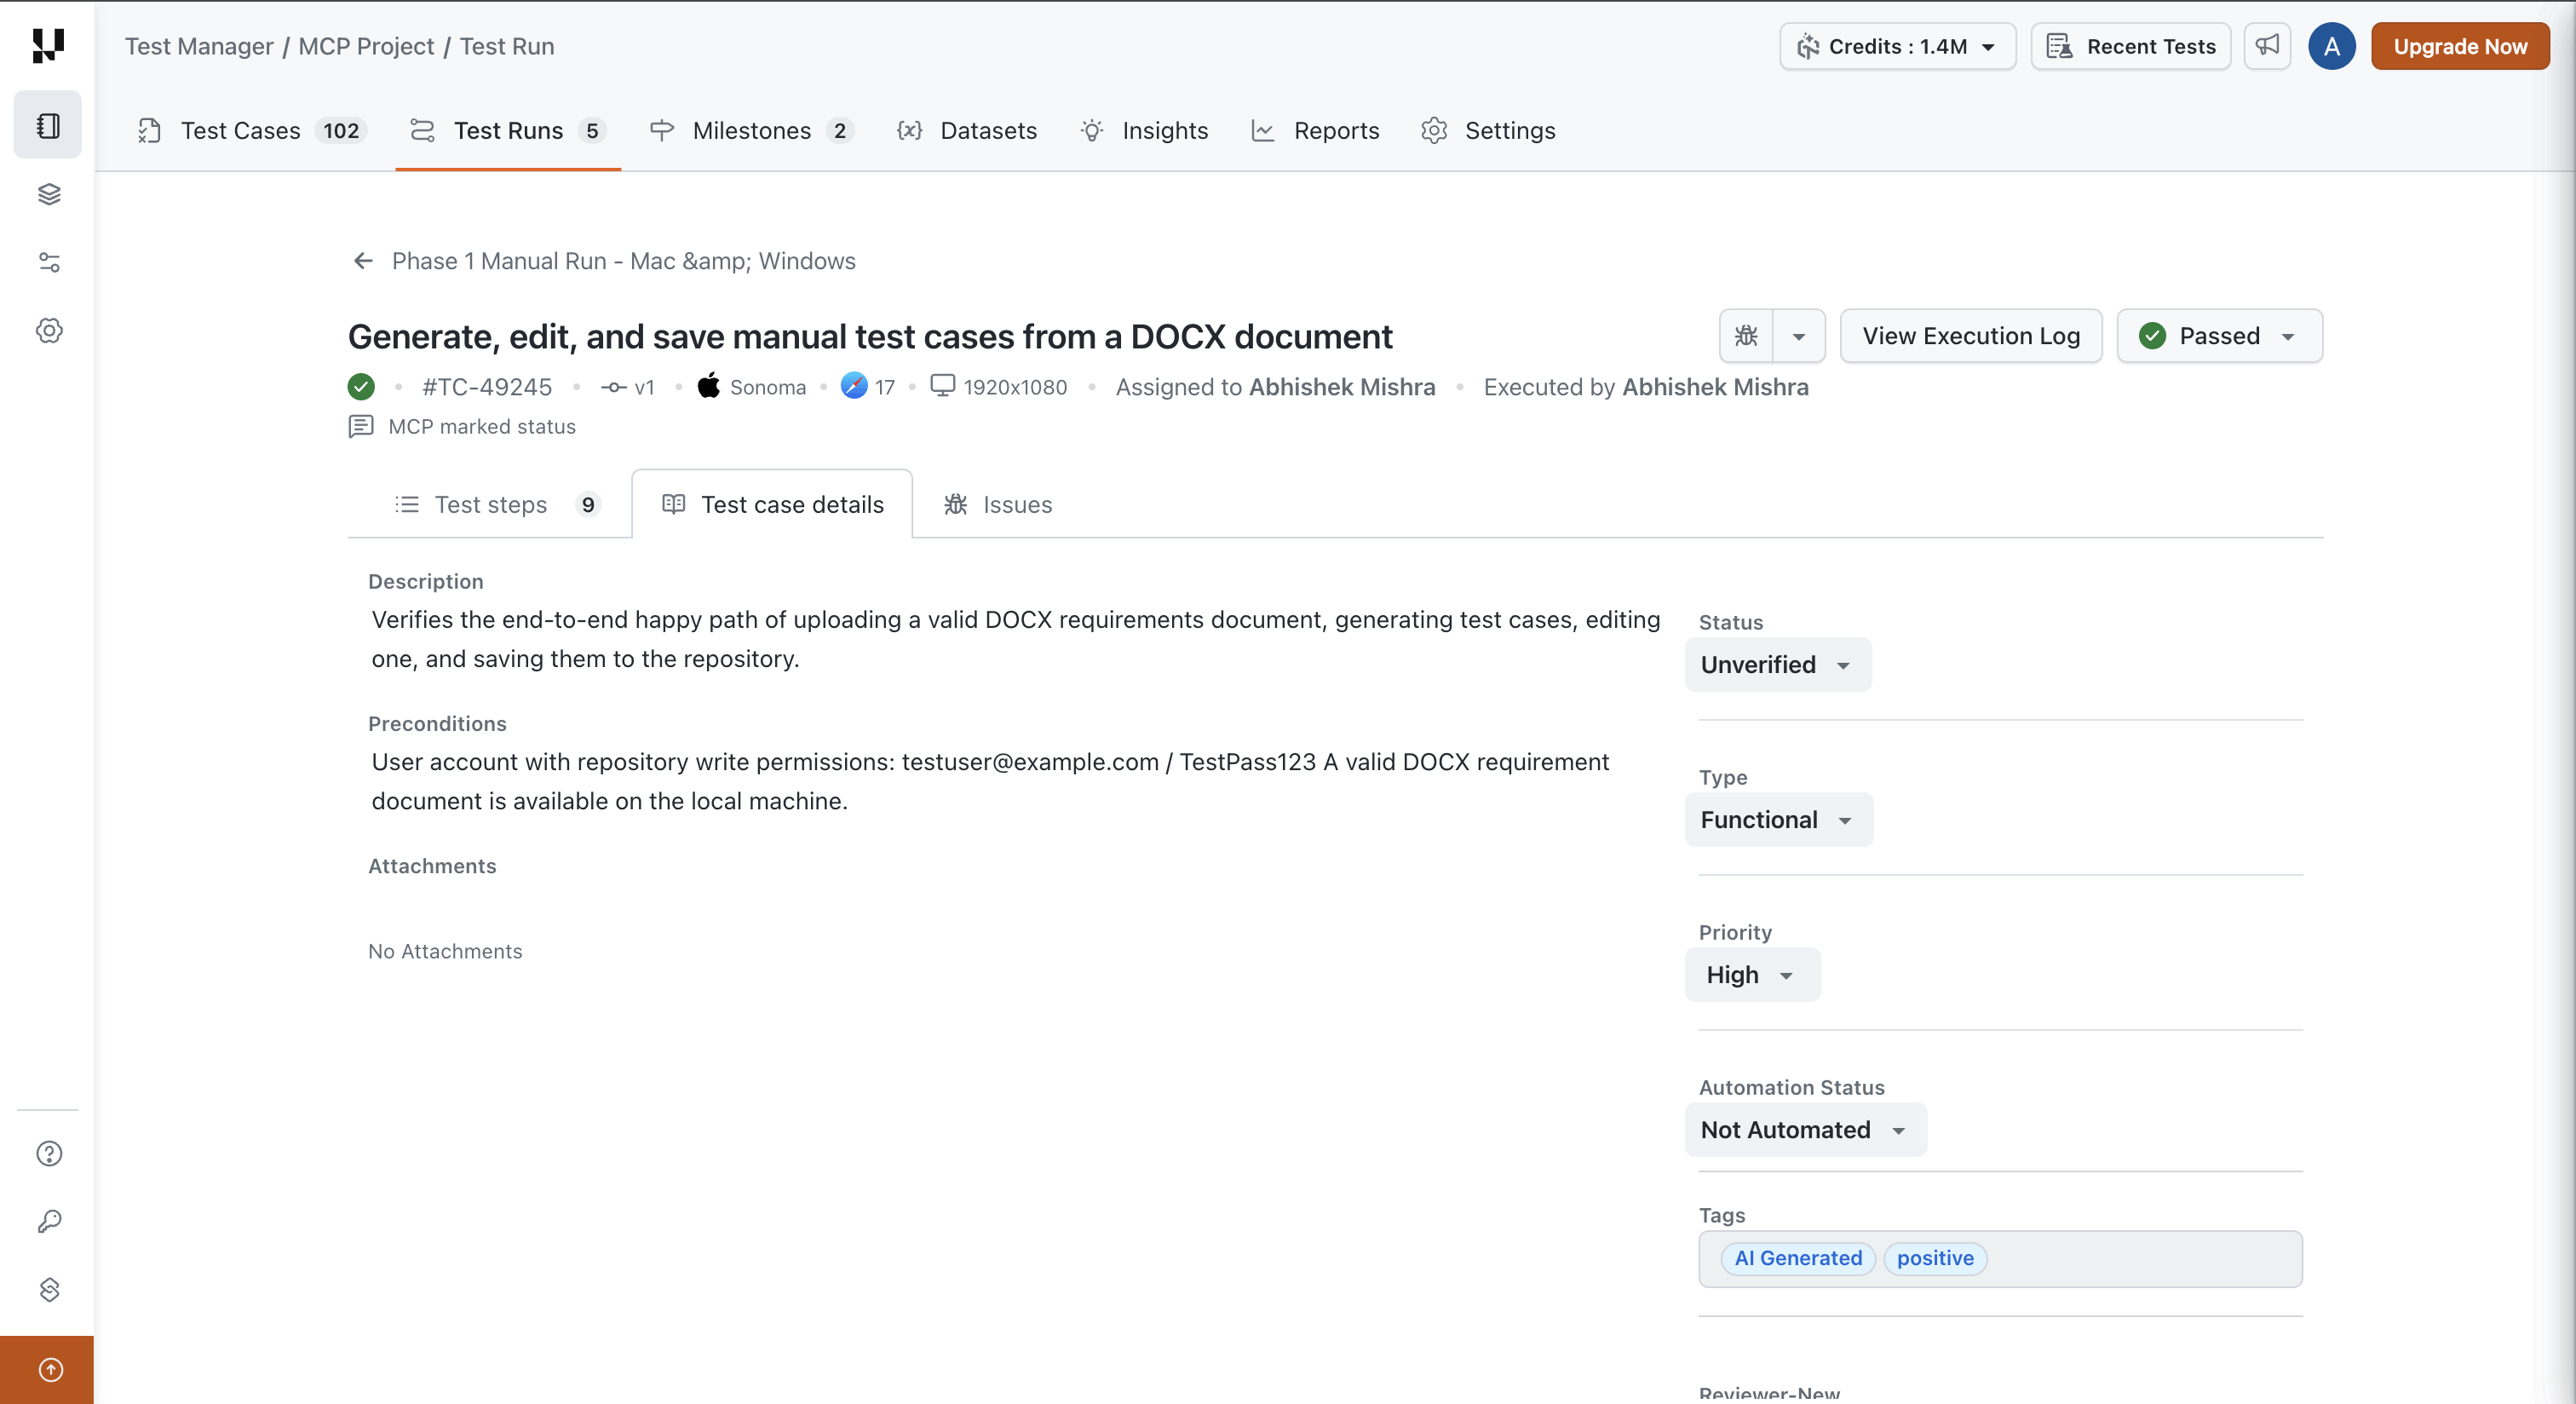
The tab shows the test case as of the version this instance is linked to, the version badge next to the test case ID, which is not always the latest version of the test case. When you update the instance to a newer version, the tab reflects the new version along with the steps. See Sync Test Instances.
The Test case details tab is available on manual test instances.
4. Filtering Test Instances
A filter bar above the test instance list lets you narrow down a test run by:
- Test instance attributes: Status, Assignee, Platform, OS, Browser, Resolution, Device.
- Test case attributes: Tags, Priority, Test Case Status.
- Test Case Custom Fields: available under More Filters.
Filters work on both Manual and Automation test runs, apply at the All Test Instances view as well as at any folder, and persist as you switch between folders. The active filter state is also reflected in the page URL, so you can bookmark or share a filtered view.
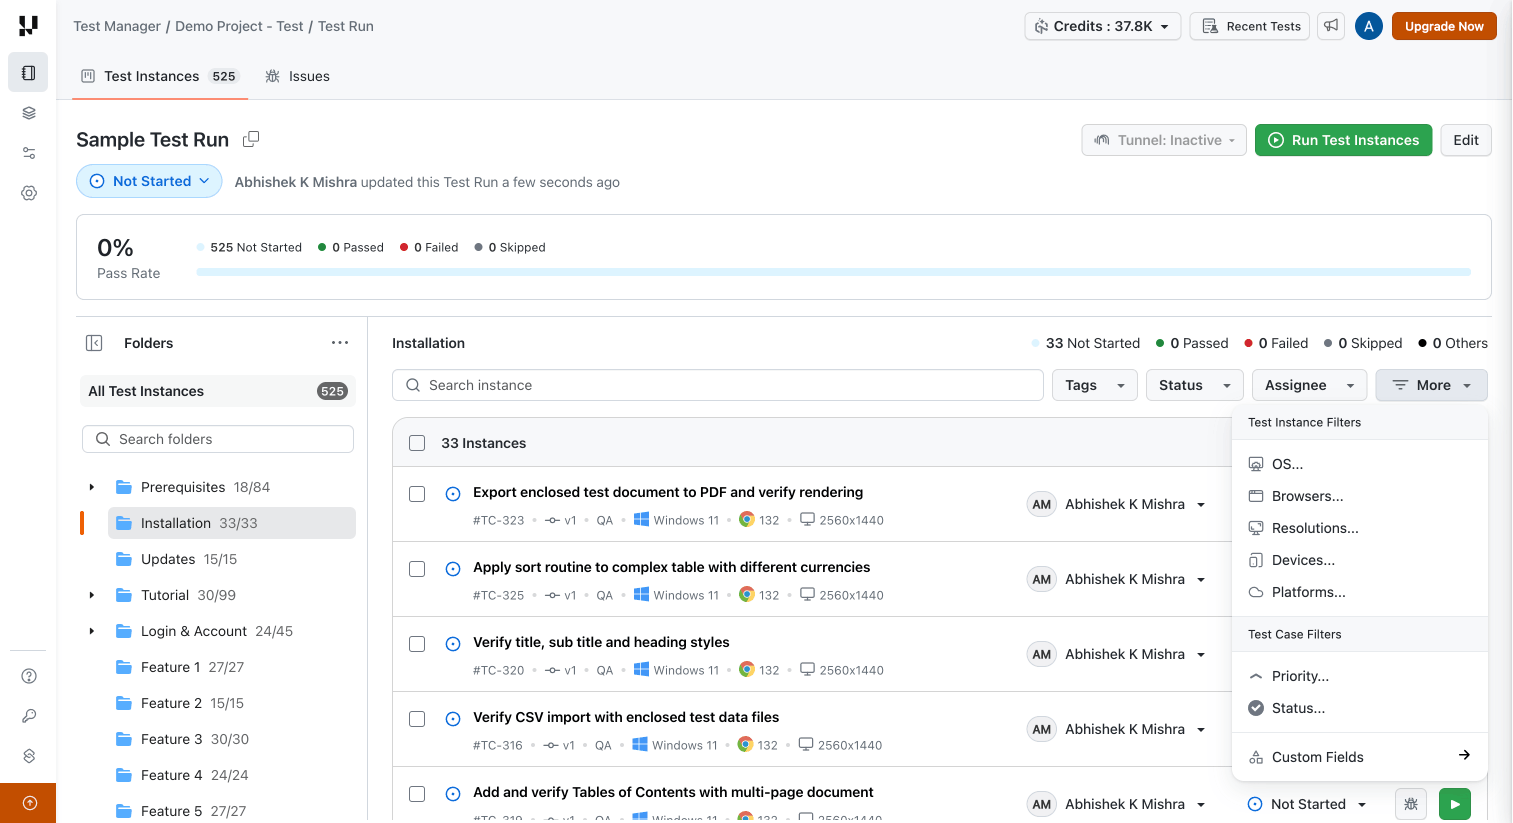
Custom Fields can be filtered only for types: Single Select Dropdown, Multi Select Dropdown, User, Boolean, and Date.
5. Enhancing Test Runs with Test Evidences
Adding Remarks and Attachments
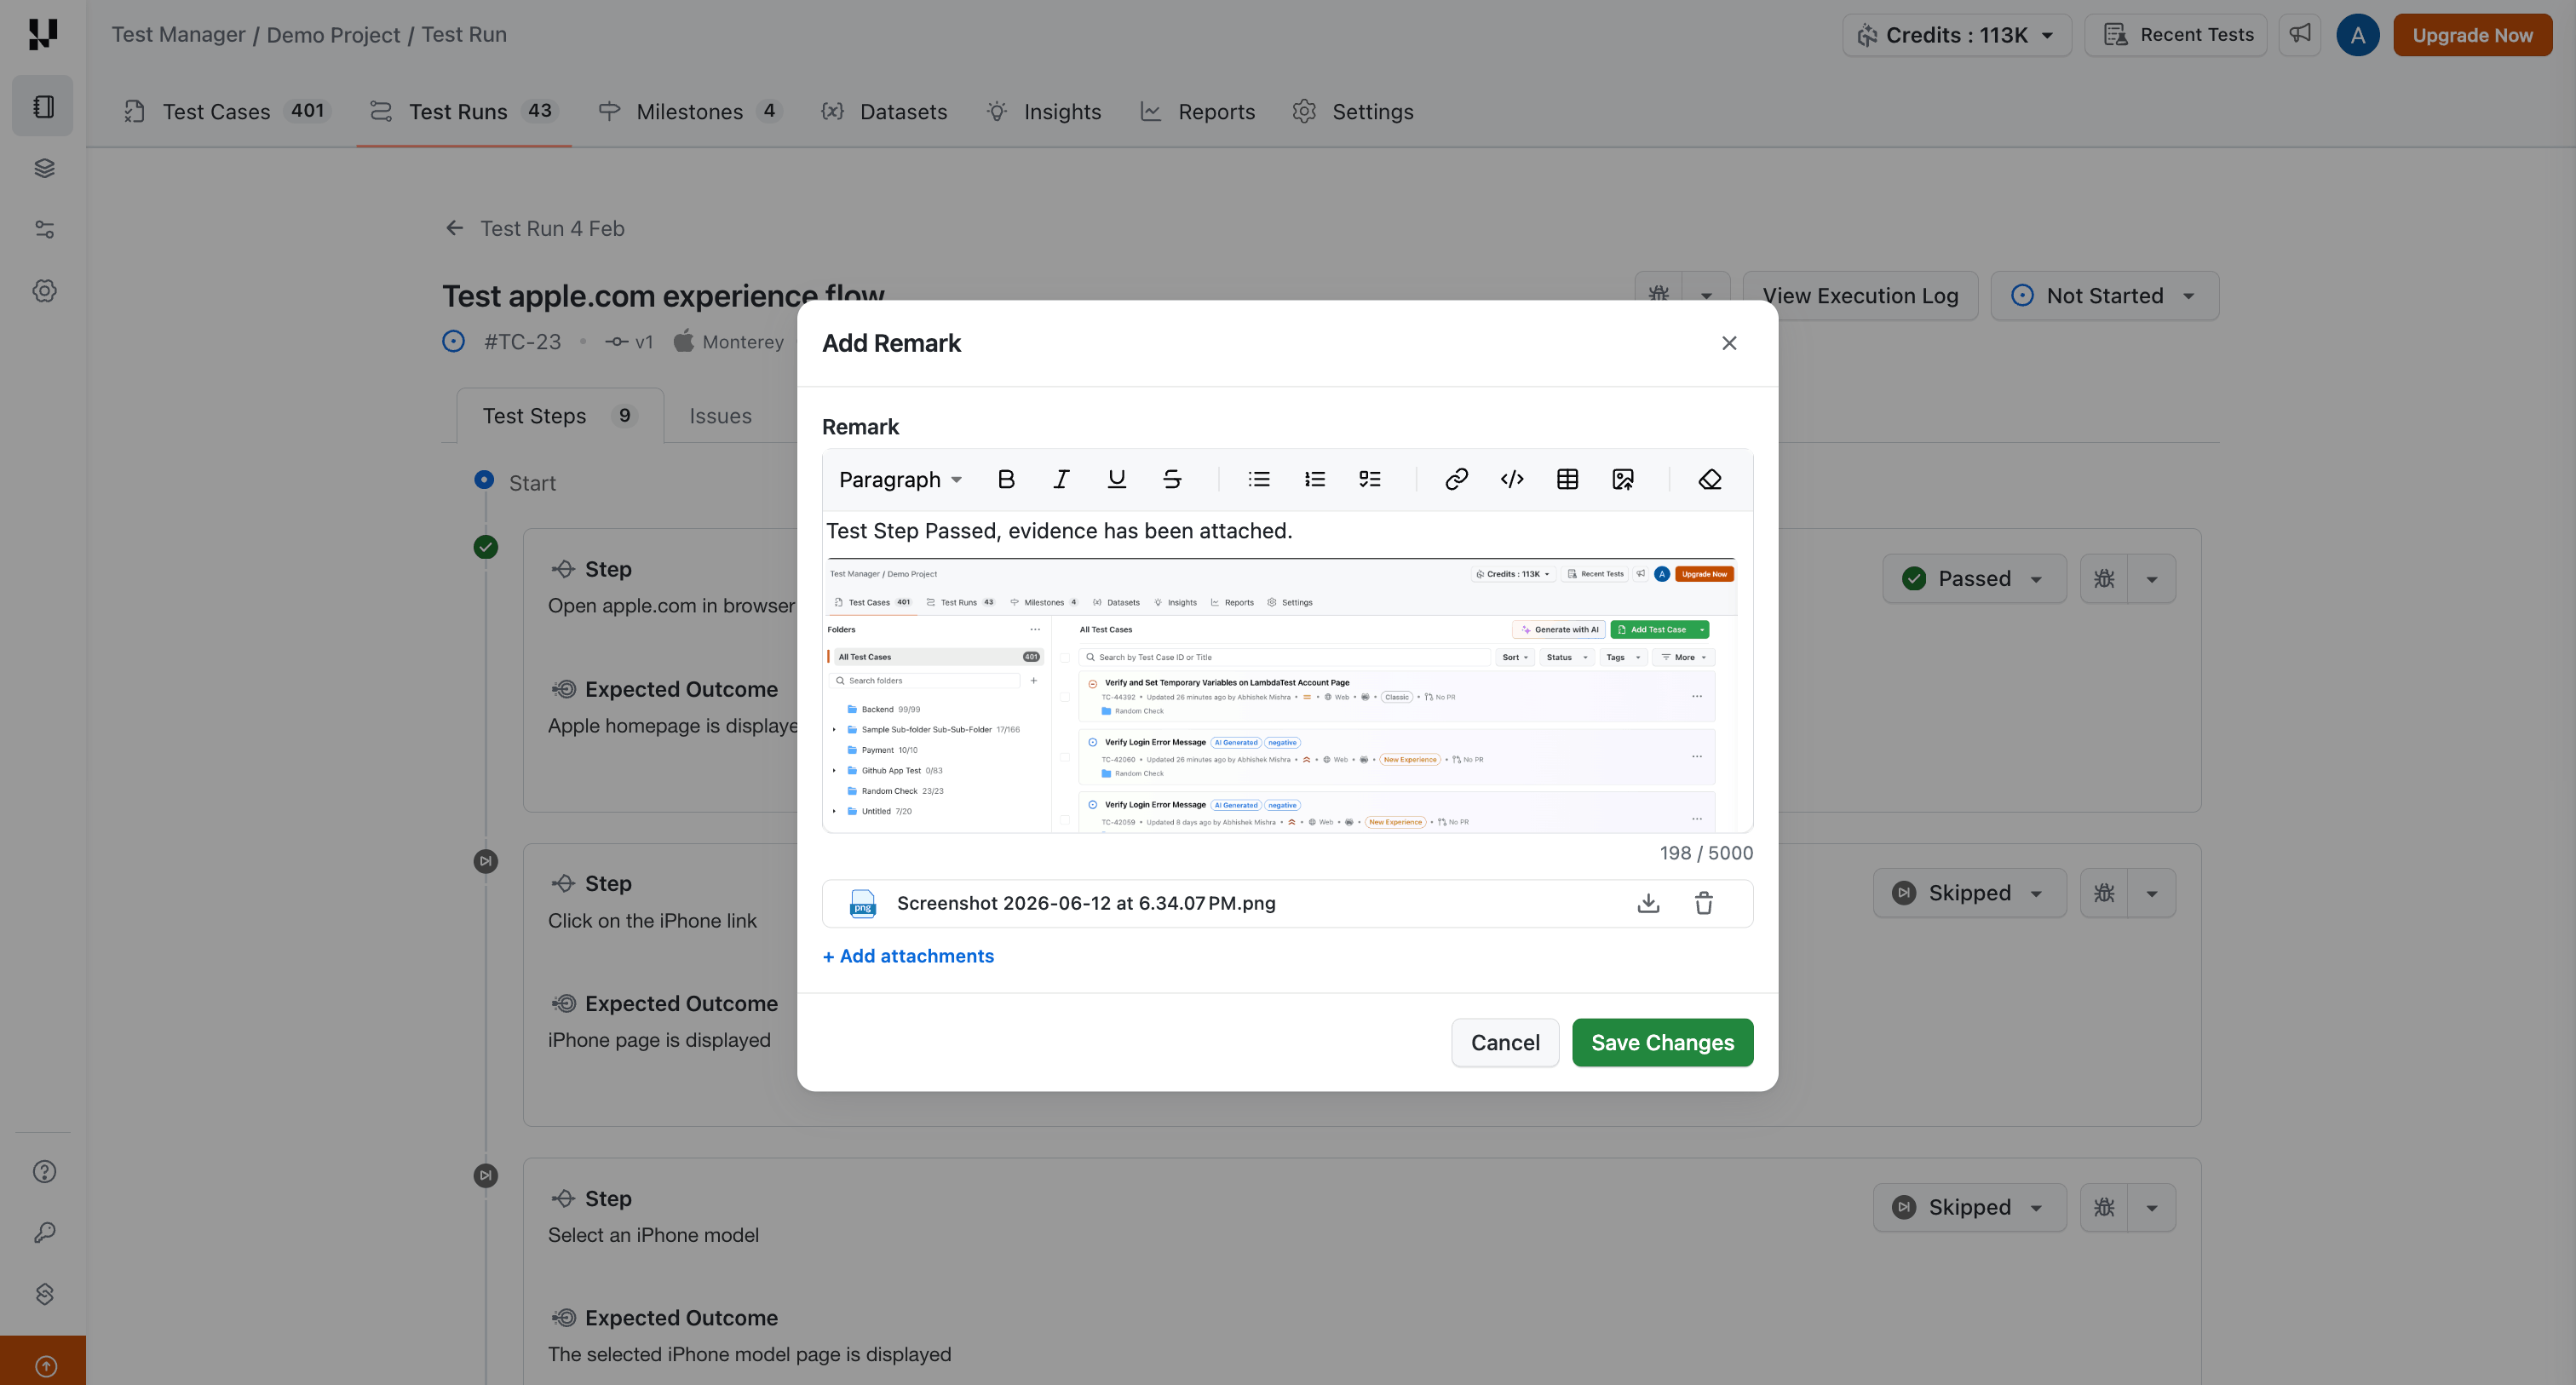
- Add Remarks or actual outcomes to enhance test instance execution details.
- You can add remarks and attachments at both the individual test step level and the overall test instance level.
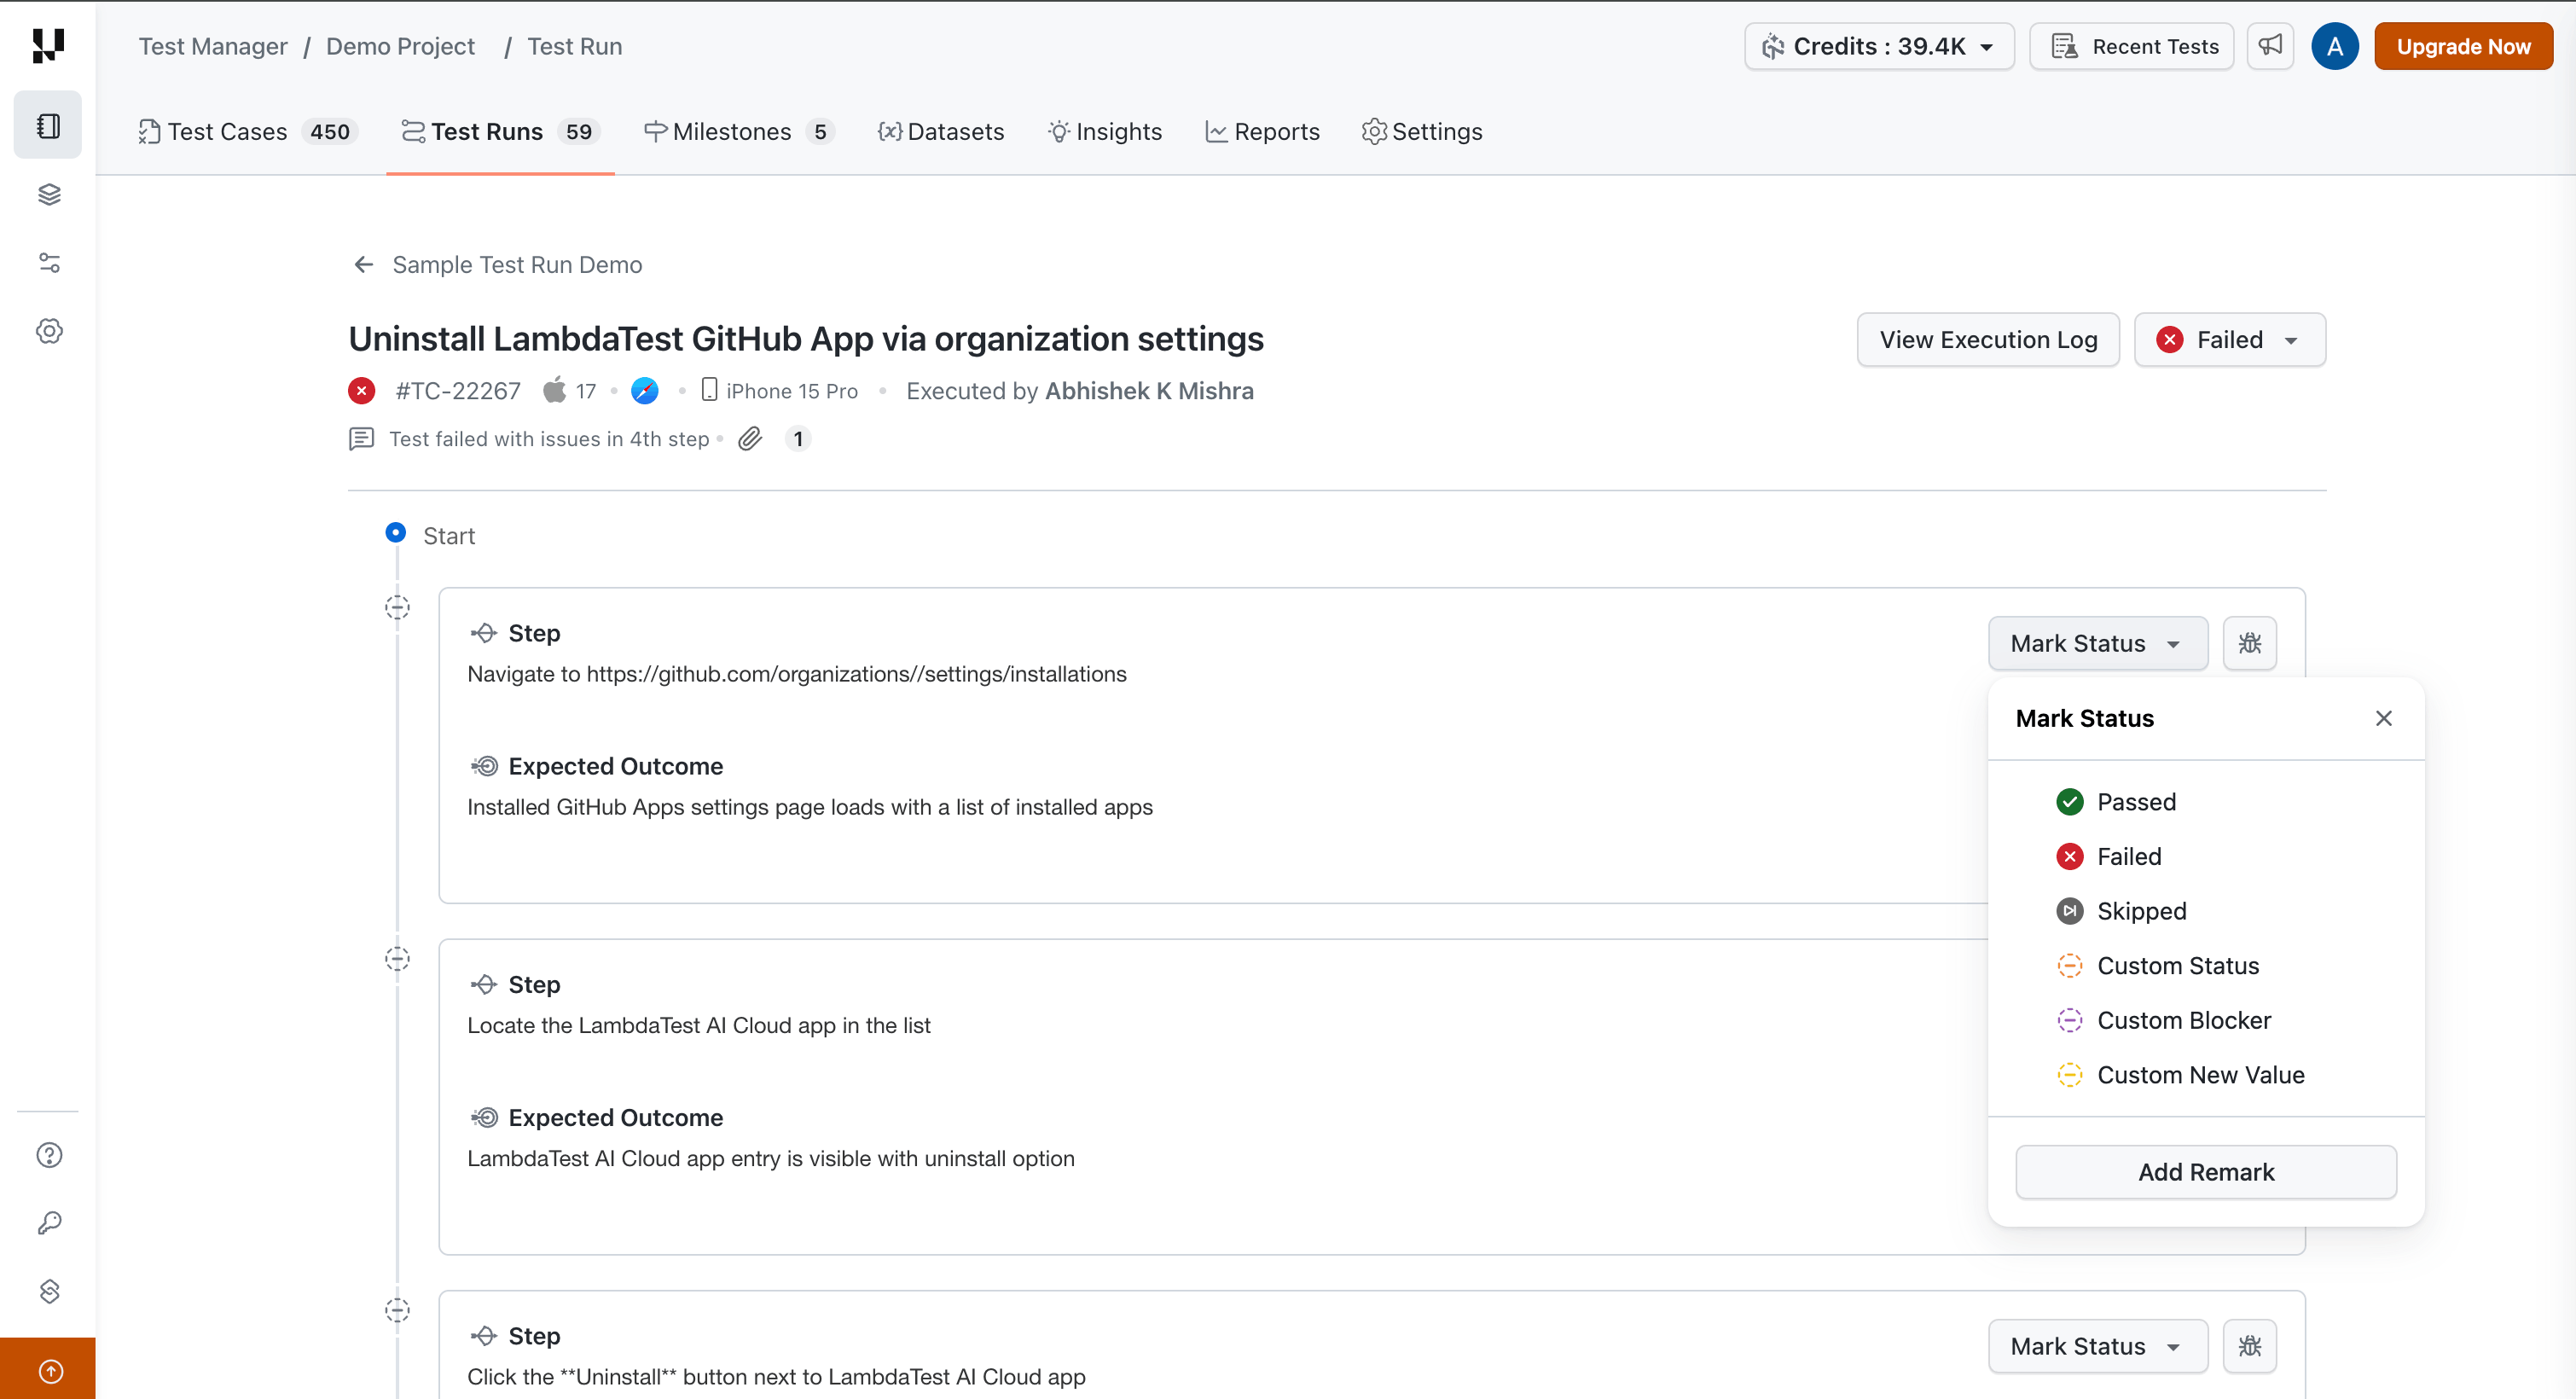
The Remark field supports rich text formatting, including:
- Inline image embedding: paste images directly into the field.
- Text styling such as bold, italic, bullet lists, and other standard rich text options.
Remarks have a maximum limit of 5000 characters.
- Attach supporting files or screenshots to the remarks for better context.
6. Execute Test Runs on TestMu AI Cloud
Execute your manual test instances directly on TestMu AI Cloud, no local setup or environment configuration required. This allows your team to run manual tests on real browsers and devices hosted on the cloud, making it one of the most efficient ways to validate your test cases.
To execute a test run:
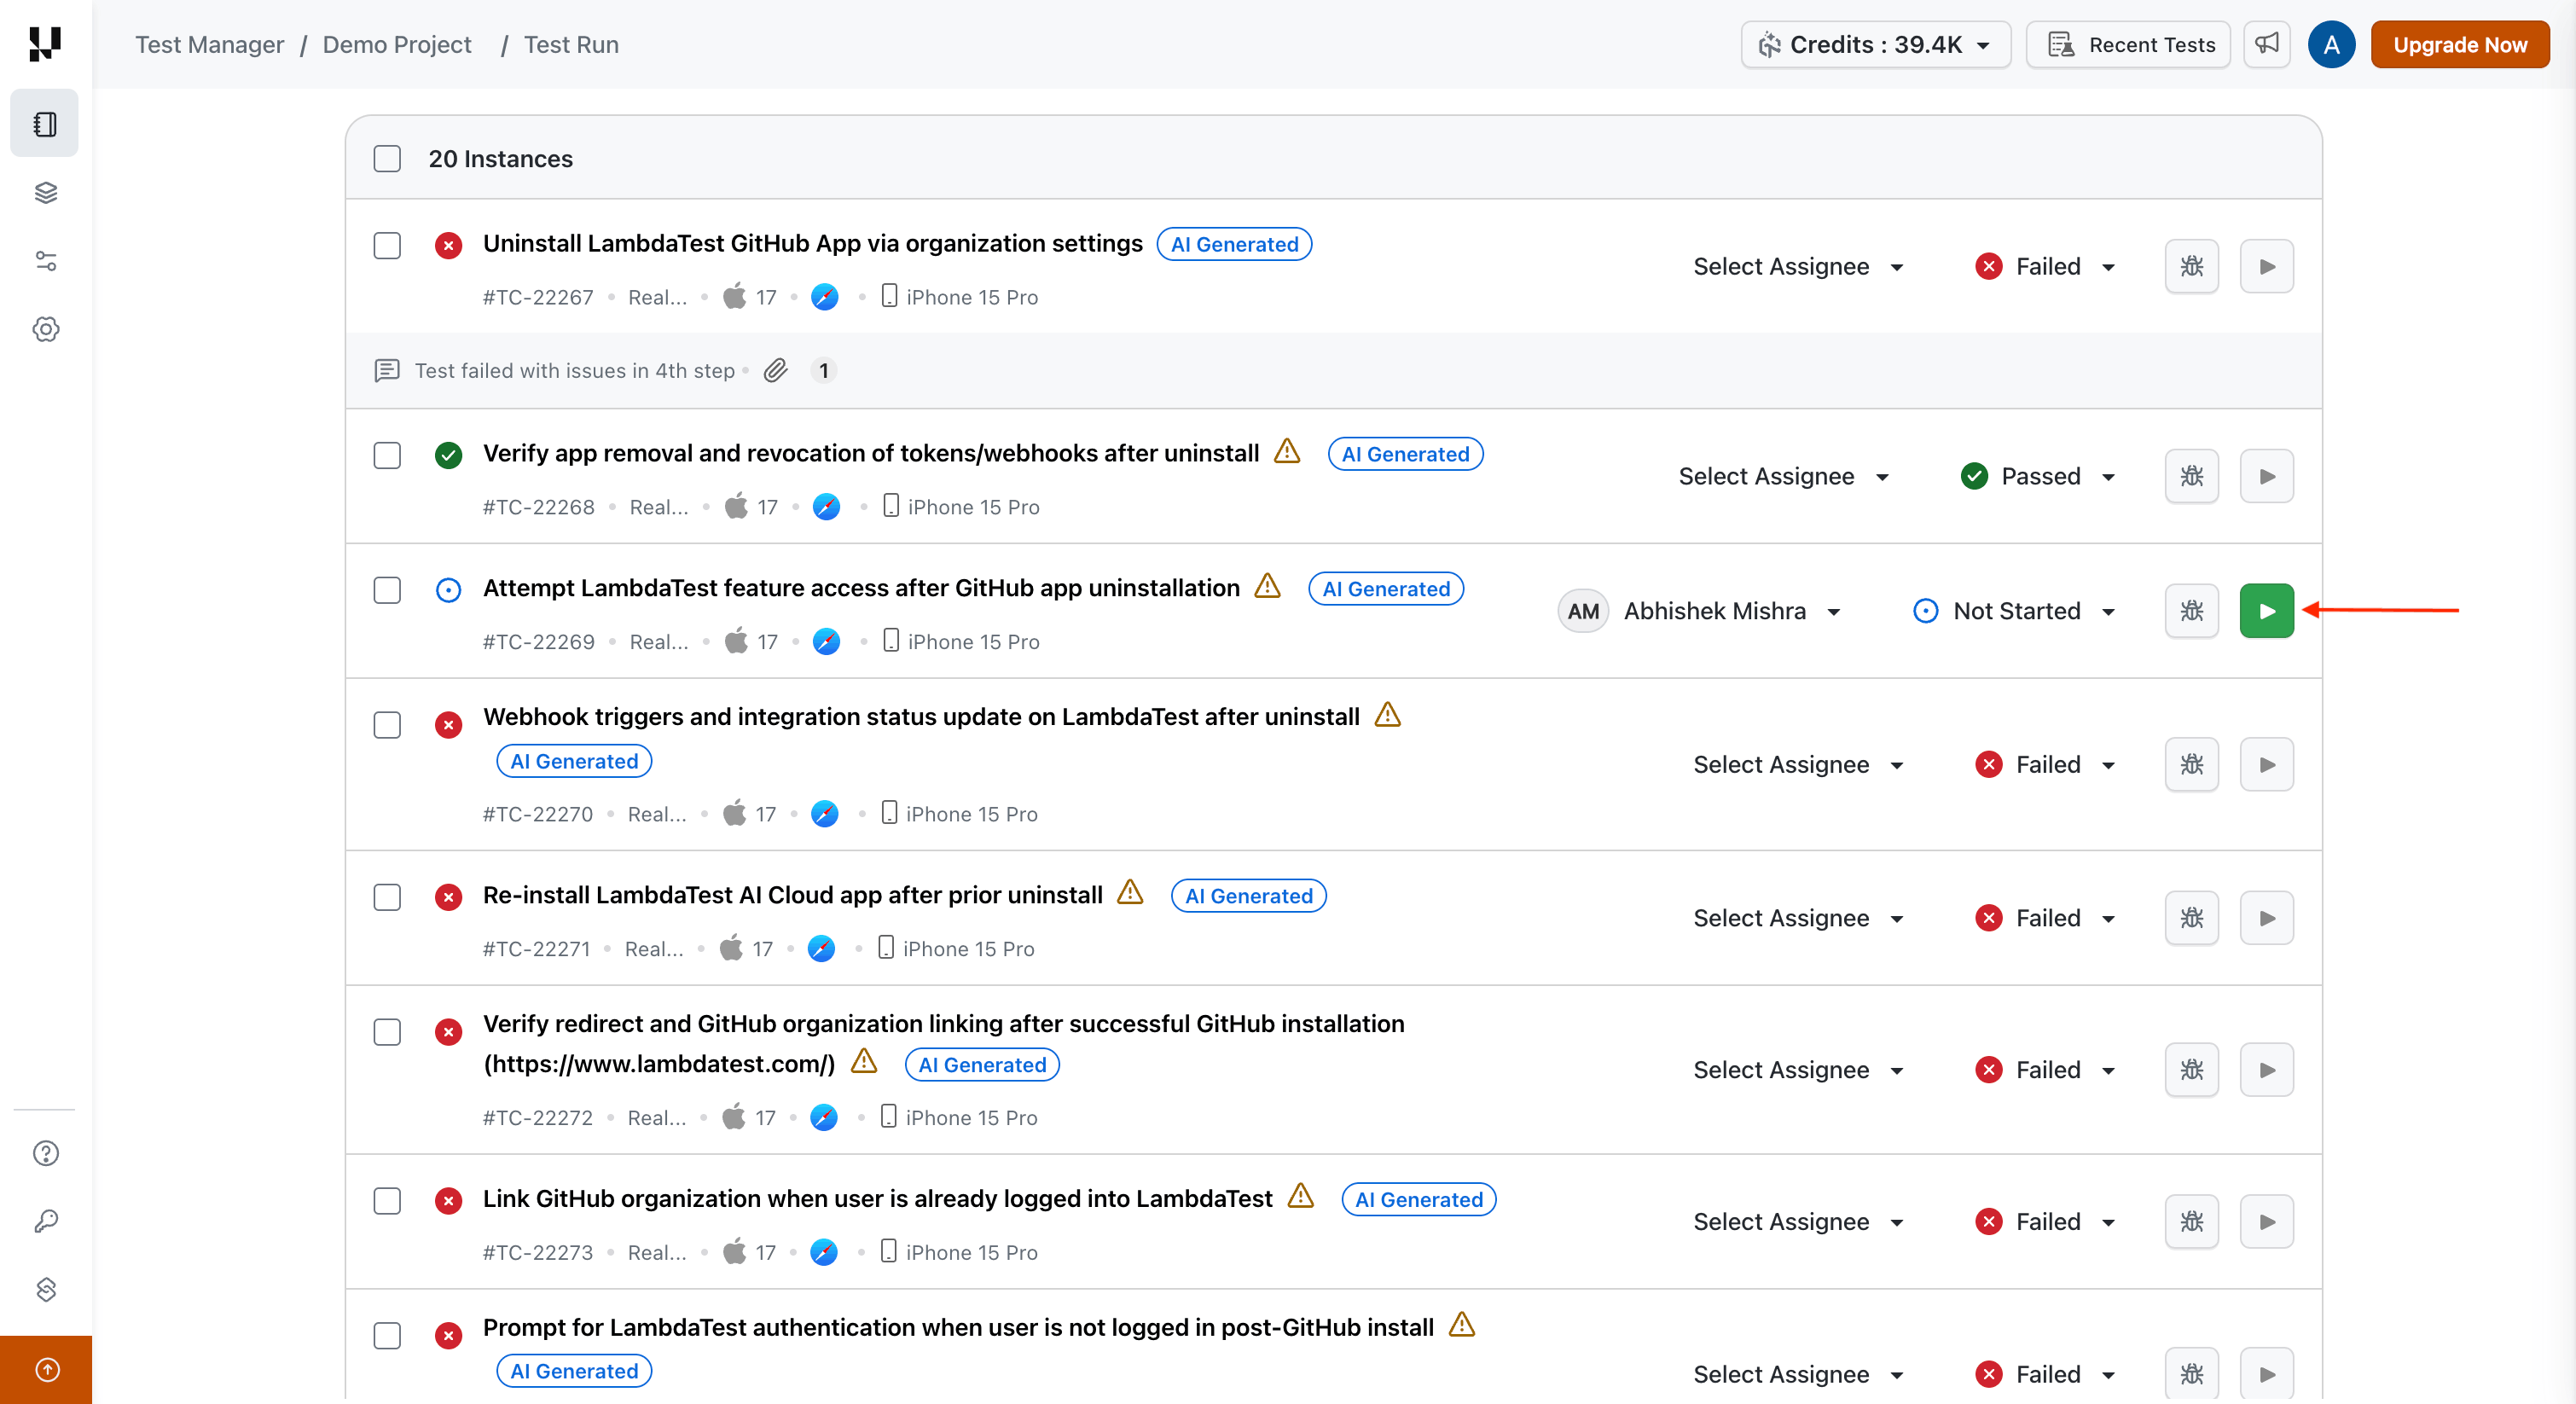
- Click the Play icon on any test instance to launch execution on TestMu AI Cloud.
- During execution, update the status of individual test cases and test steps in real time as you verify each one.
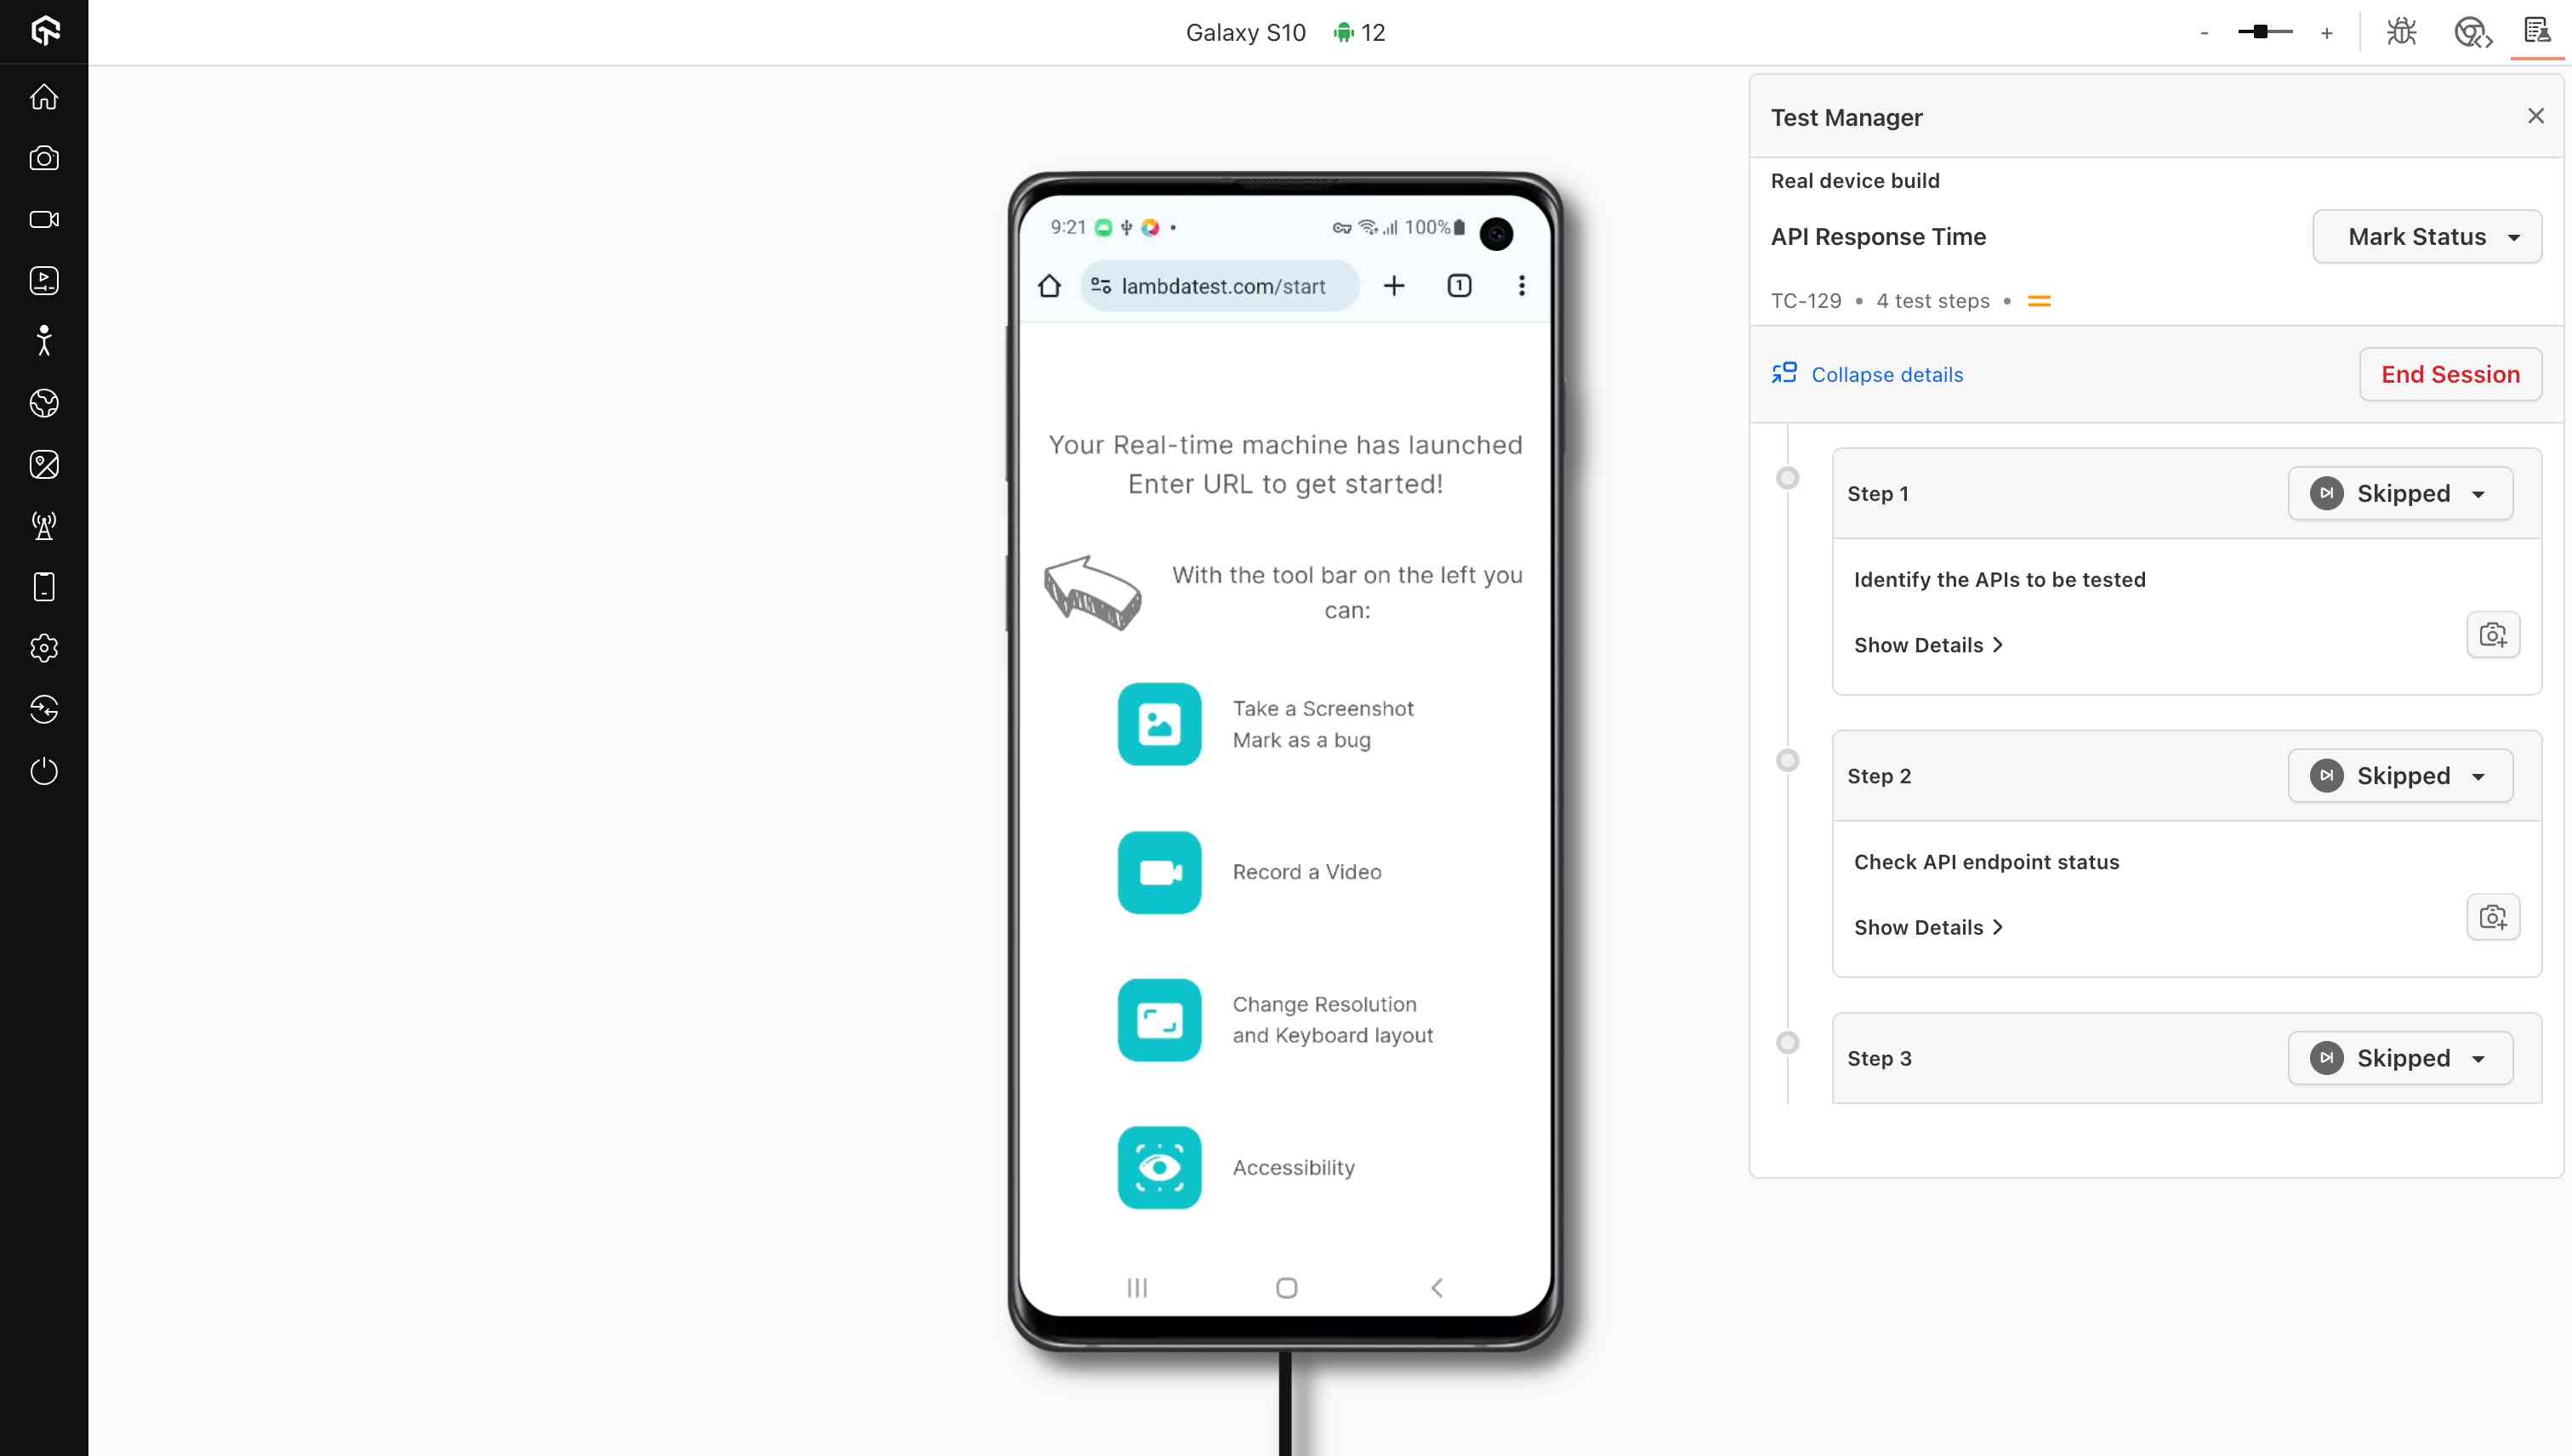
Running test instances on TestMu AI Cloud gives you access to a wide range of real browsers, devices, and OS combinations, without maintaining local infrastructure. It ensures consistent, reliable test execution across environments.
Bugs raised or linked while executing an instance are surfaced under that Test Case instance. To link Jira or Azure DevOps tickets at the instance and step level, see Track Bugs and Issues in Test Runs.
7. Test Run Options
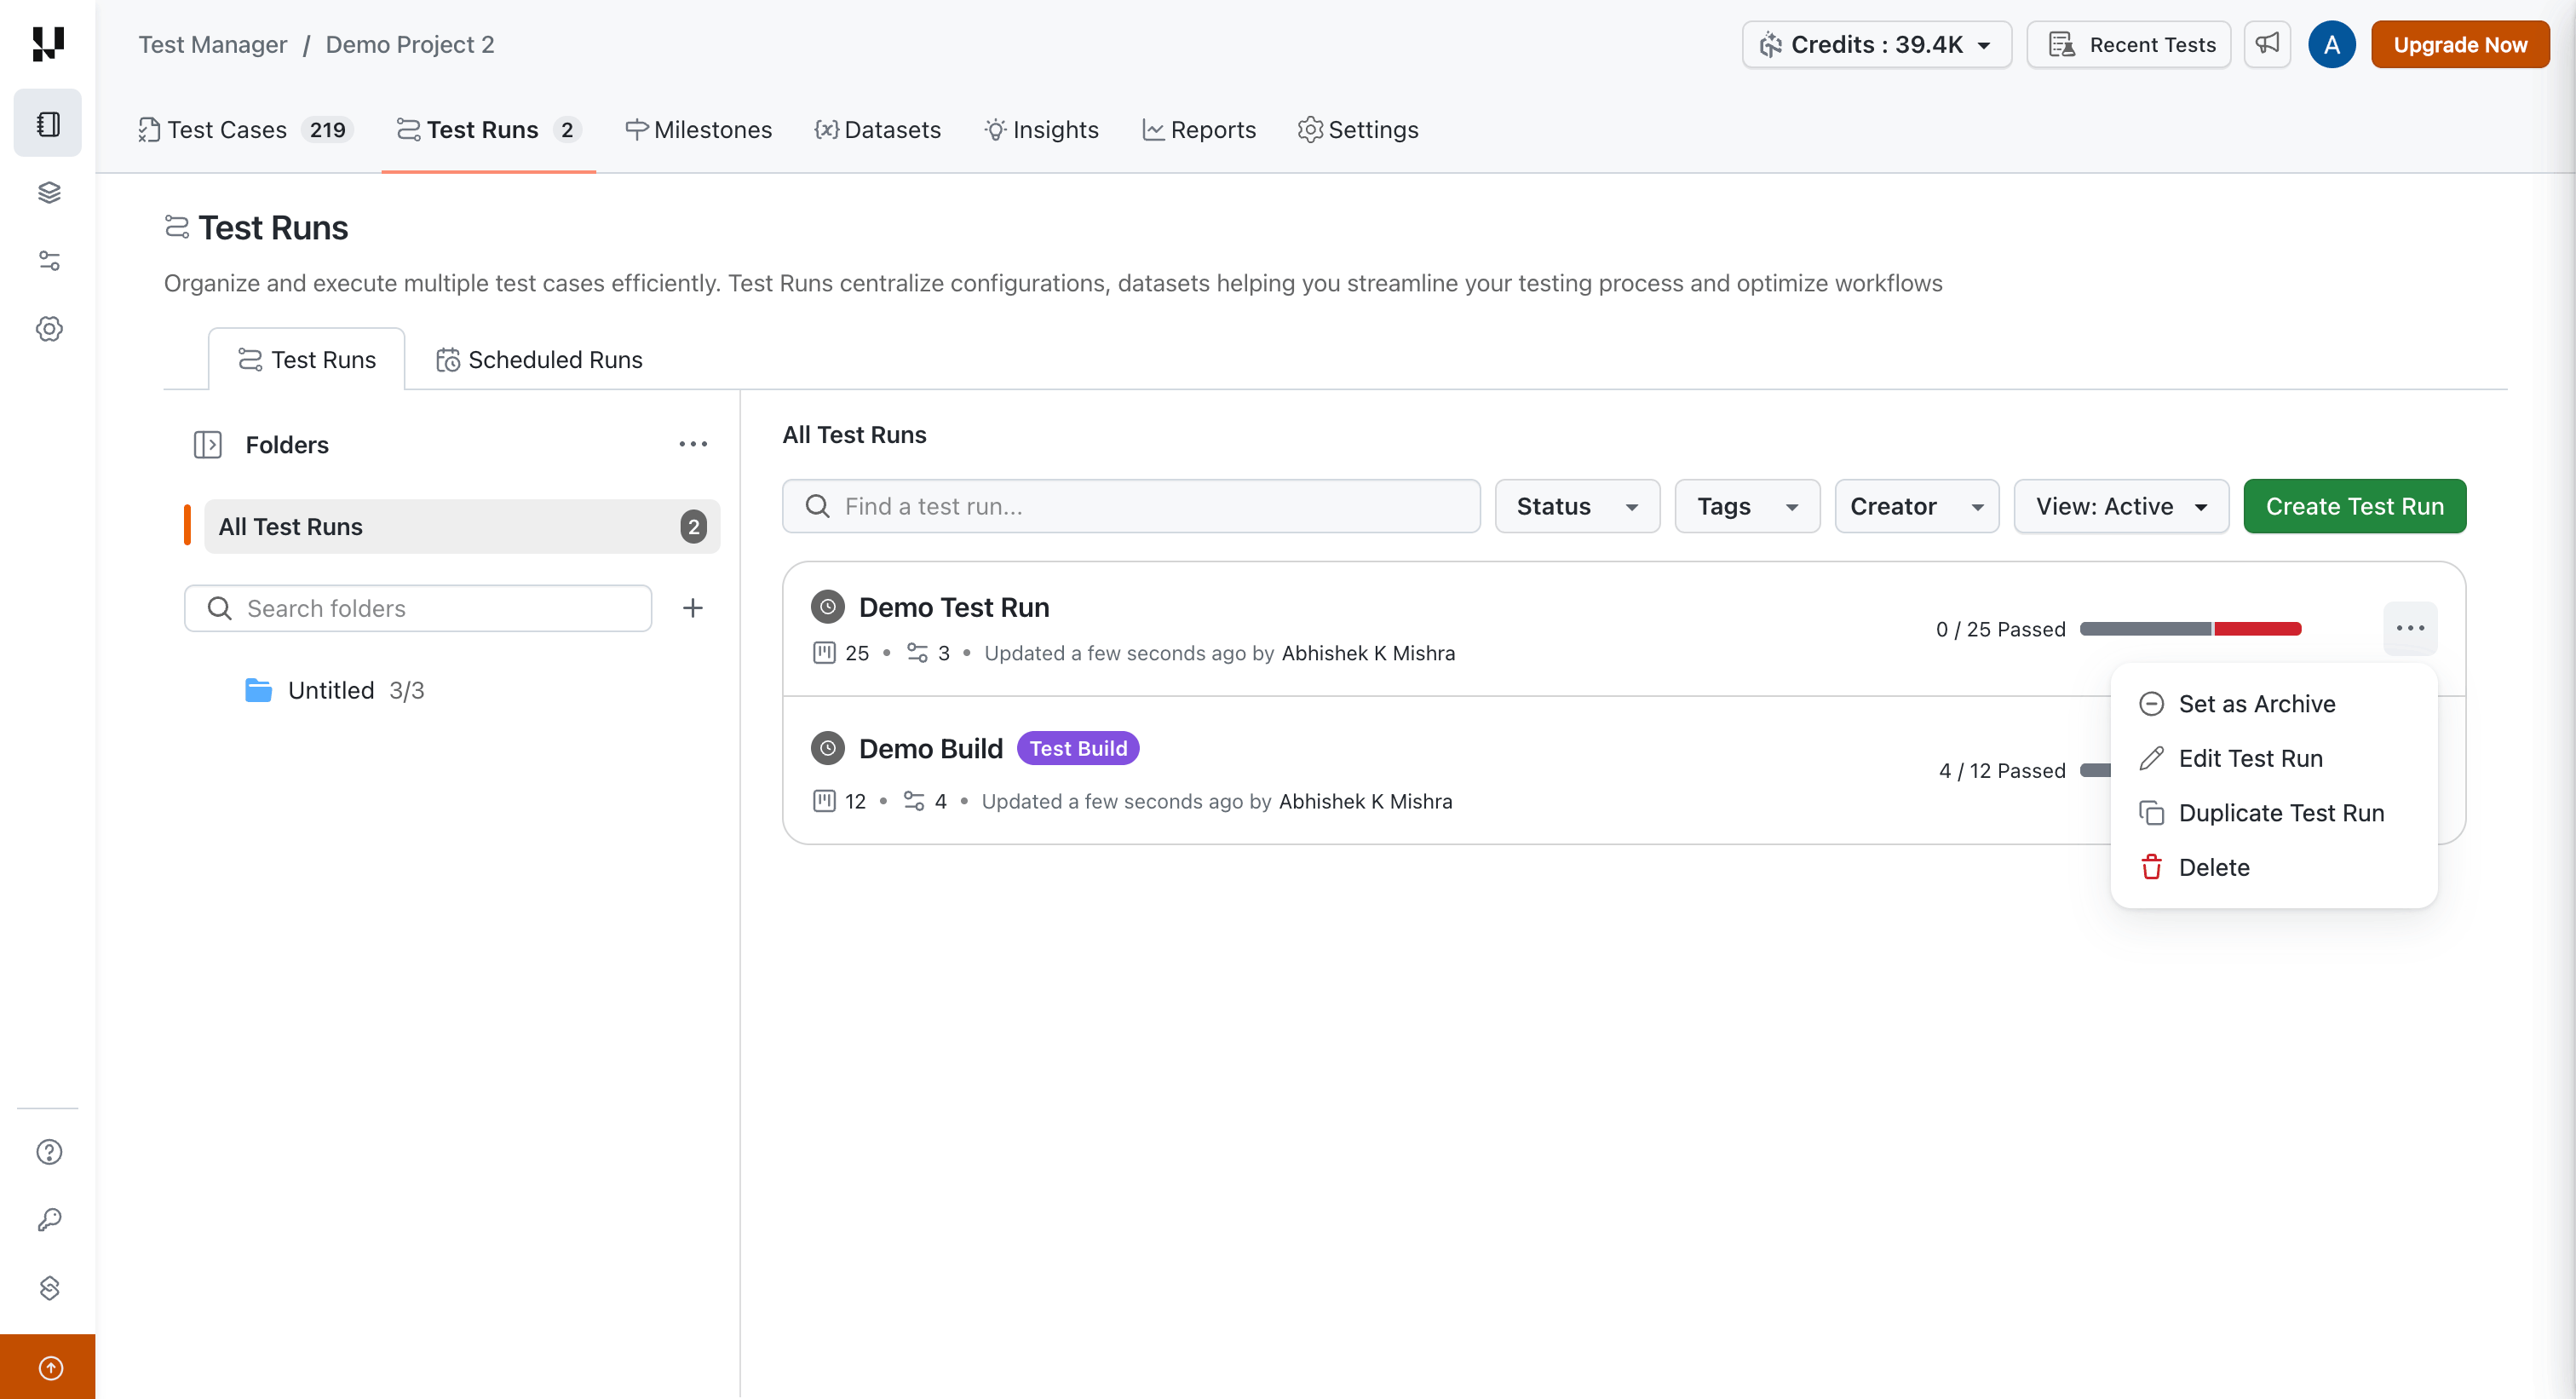
You can manage your test runs using the options available in the three-dot menu on each test run. The following actions are available:
| Action | Description |
|---|---|
| Edit | Modify the test run by adding or removing test cases. KaneAI test runs can only be edited if they have not been executed. |
| Duplicate | Create a copy of the test run for re-execution or variation testing. |
| Archive | Move completed test runs to the archive to keep your workspace clean and organized. Test instances in an archived test run do not have their status derived from step results. |
| Delete | Permanently remove a test run that is no longer needed. |
Archiving a test run is not the same as archiving a test case. An archived test case stays in any run it was already part of and keeps its executions as history, but it is not offered when you create a new test run and is not carried across when you duplicate one. See Archive and Restore Test Cases.
Select several test runs in the list to move them to another folder, copy them into fresh runs for the next cycle, or delete them in one action. You can also drag selected runs onto a folder to move or copy them. A moved run keeps its ID and execution history, and a copied run starts with every test instance at Not Started. See Bulk Move, Copy, and Delete Test Runs.


 Chat with Us