AI Root Cause Analysis (AI RCA) - Test Intelligence
AI Root Cause Analysis (AI RCA) in TestMu AI Analytics uses advanced AI-powered LLM technology to automatically analyze failed tests and identify their root causes. Instead of manually sifting through logs and error messages, AI RCA provides:
- Intelligent root cause identification - distinguishes between primary causes and cascading symptoms
- Actionable fixes - specific recommendations to resolve issues
- Error timelines - chronological sequence of events leading to failures
- Trend analysis - identifies recurring patterns across test executions
Prerequisites for AI RCA
- Active TestMu AI Account: You should have an active TestMu AI account with appropriate permissions.
- Subscription Plan: This feature is available for users with HyperExecute or App/Web Automation subscription plans.
- Available Credits: Tests will only be processed through RCA when sufficient credits are available. For more information on credit management, see our Credits Management documentation.
- Test Failures: AI RCA requires at least one test failure to generate analysis. The system learns from your test execution patterns.
- Access to Insights: You should have access to the TestMu AI Insights platform under Insights tab.
RCA Generation Methods
TestMu AI offers two methods to generate Root Cause Analysis:
-
Automatic RCA: RCA is generated automatically for failed tests based on your configuration settings. Set it up once in Organization Settings, and RCA runs continuously for matching test failures.
-
Manual RCA: Generate RCA on-demand for any failed test by clicking the Generate RCA button. Useful for investigating specific failures without setting up targeting rules.
- Use Automatic RCA for continuous monitoring of critical test suites where you want immediate analysis of every failure.
- Use Manual RCA for ad-hoc debugging when you need to investigate a specific test failure without setting up automated rules.
| Feature | Automatic RCA | Manual RCA |
|---|---|---|
| Trigger | Runs automatically when configured tests fail | Click "Generate RCA" button |
| Targeting Rules | Follows Analysis Scope and Intelligent Targeting settings | Any failed test on-demand |
| Custom RCA Categories | ✓ Applied | ✓ Applied |
| Special Instructions | ✓ Applied | ✓ Applied |
| Best For | Continuous monitoring | Ad-hoc debugging |
Custom RCA Categories and Special Instructions configured in Organization Settings apply to both Automatic and Manual RCA generation. This ensures consistent categorization and analysis context across all RCA results.
Generate RCA Manually
You can manually generate RCA for any failed test from the Test Manager or HyperExecute dashboards.
From Test Manager (TMS)
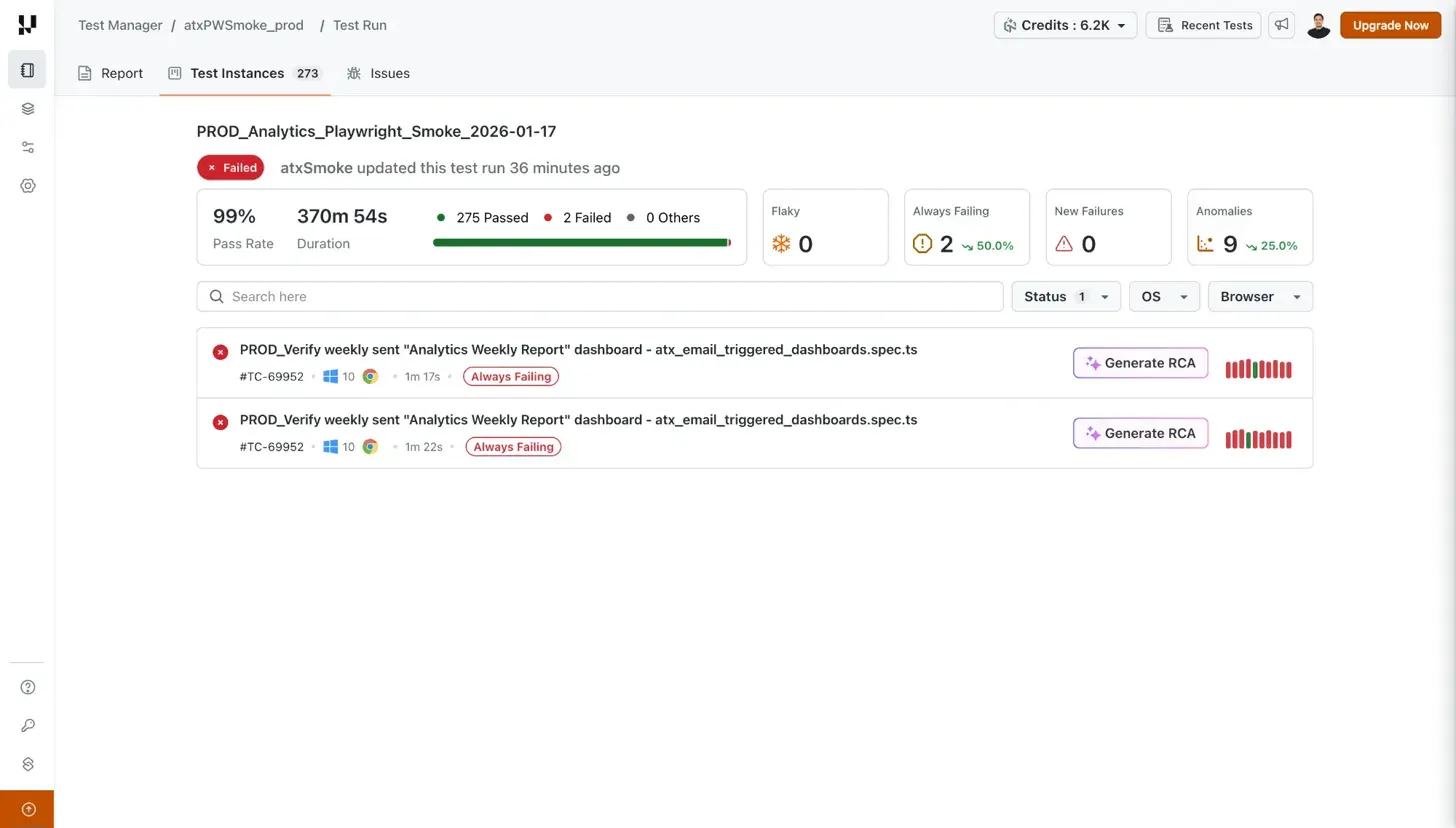
- Navigate to Test Manager → open a Test Run
- Go to the Test Instances tab
- Locate the failed test and click the Generate RCA button
- View the RCA output with root cause, severity, and recommended fixes
From HyperExecute
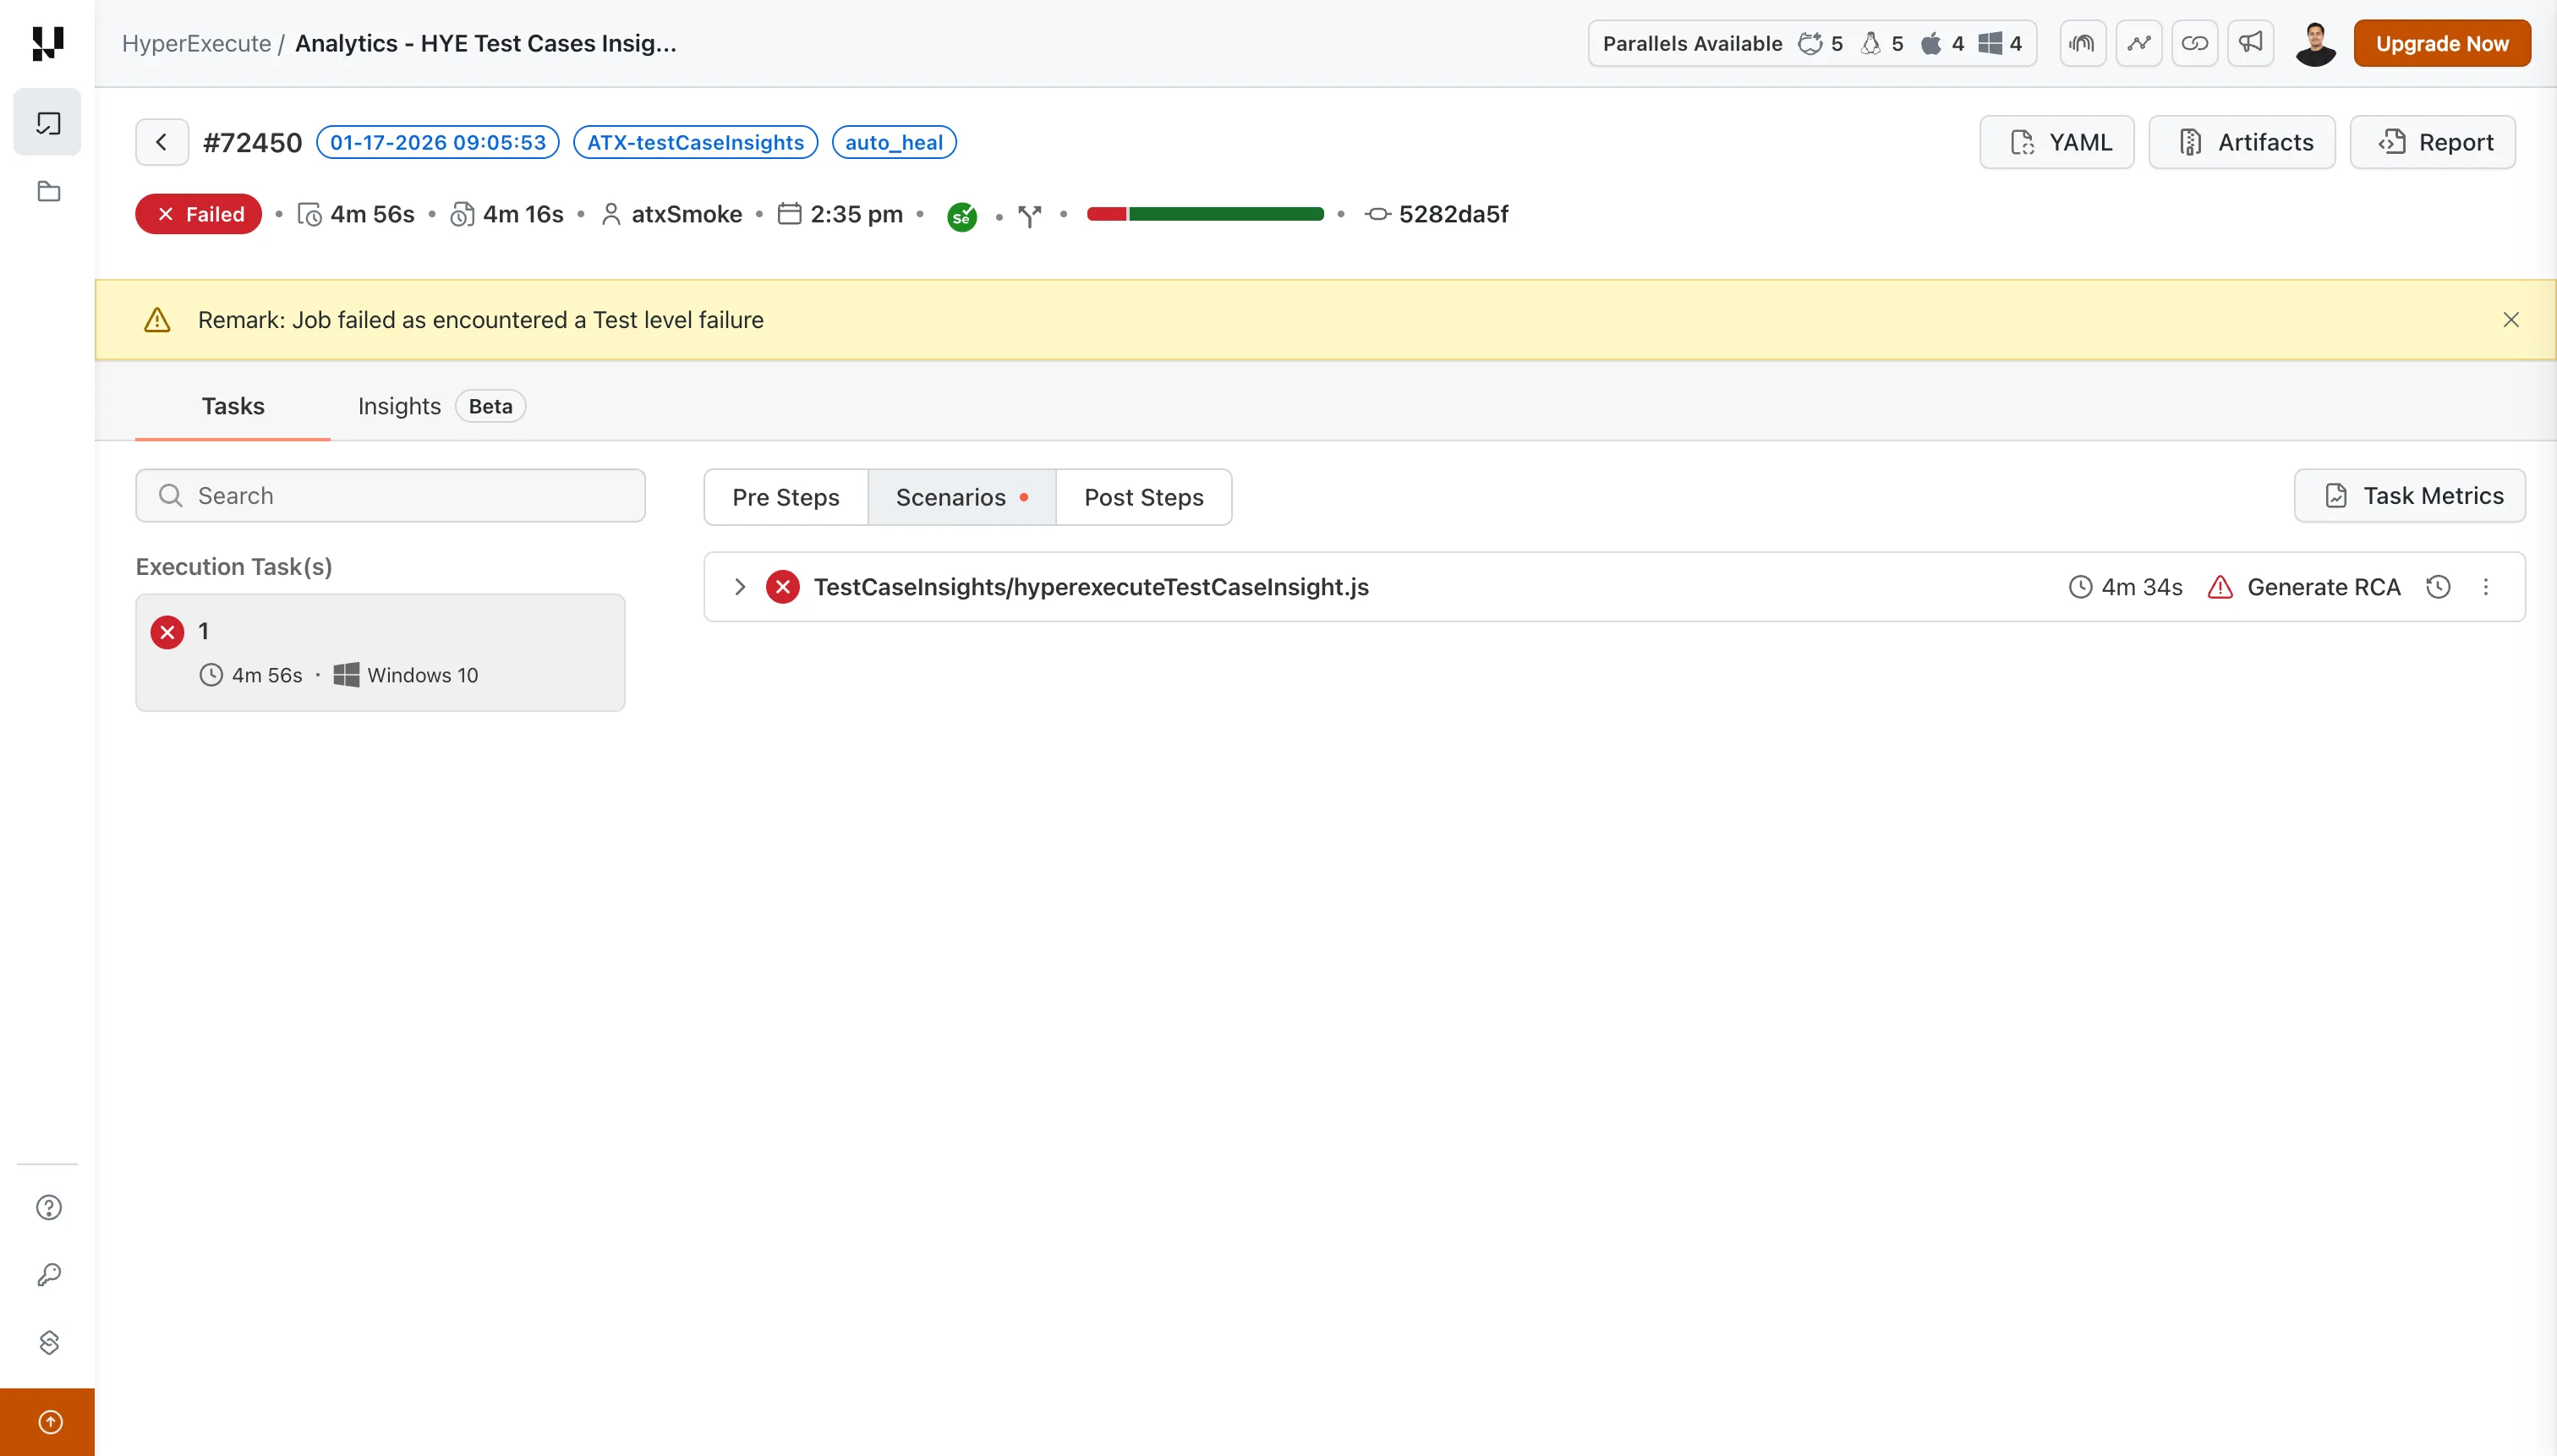
- Navigate to HyperExecute → open the failed Job
- Select the Tasks tab and expand the failed scenario
- Click the Generate RCA button next to the failed test
- View the generated RCA with actionable insights
From Insights Dashboard
The Insights dashboard provides aggregated RCA analytics and trend analysis across all your test executions.
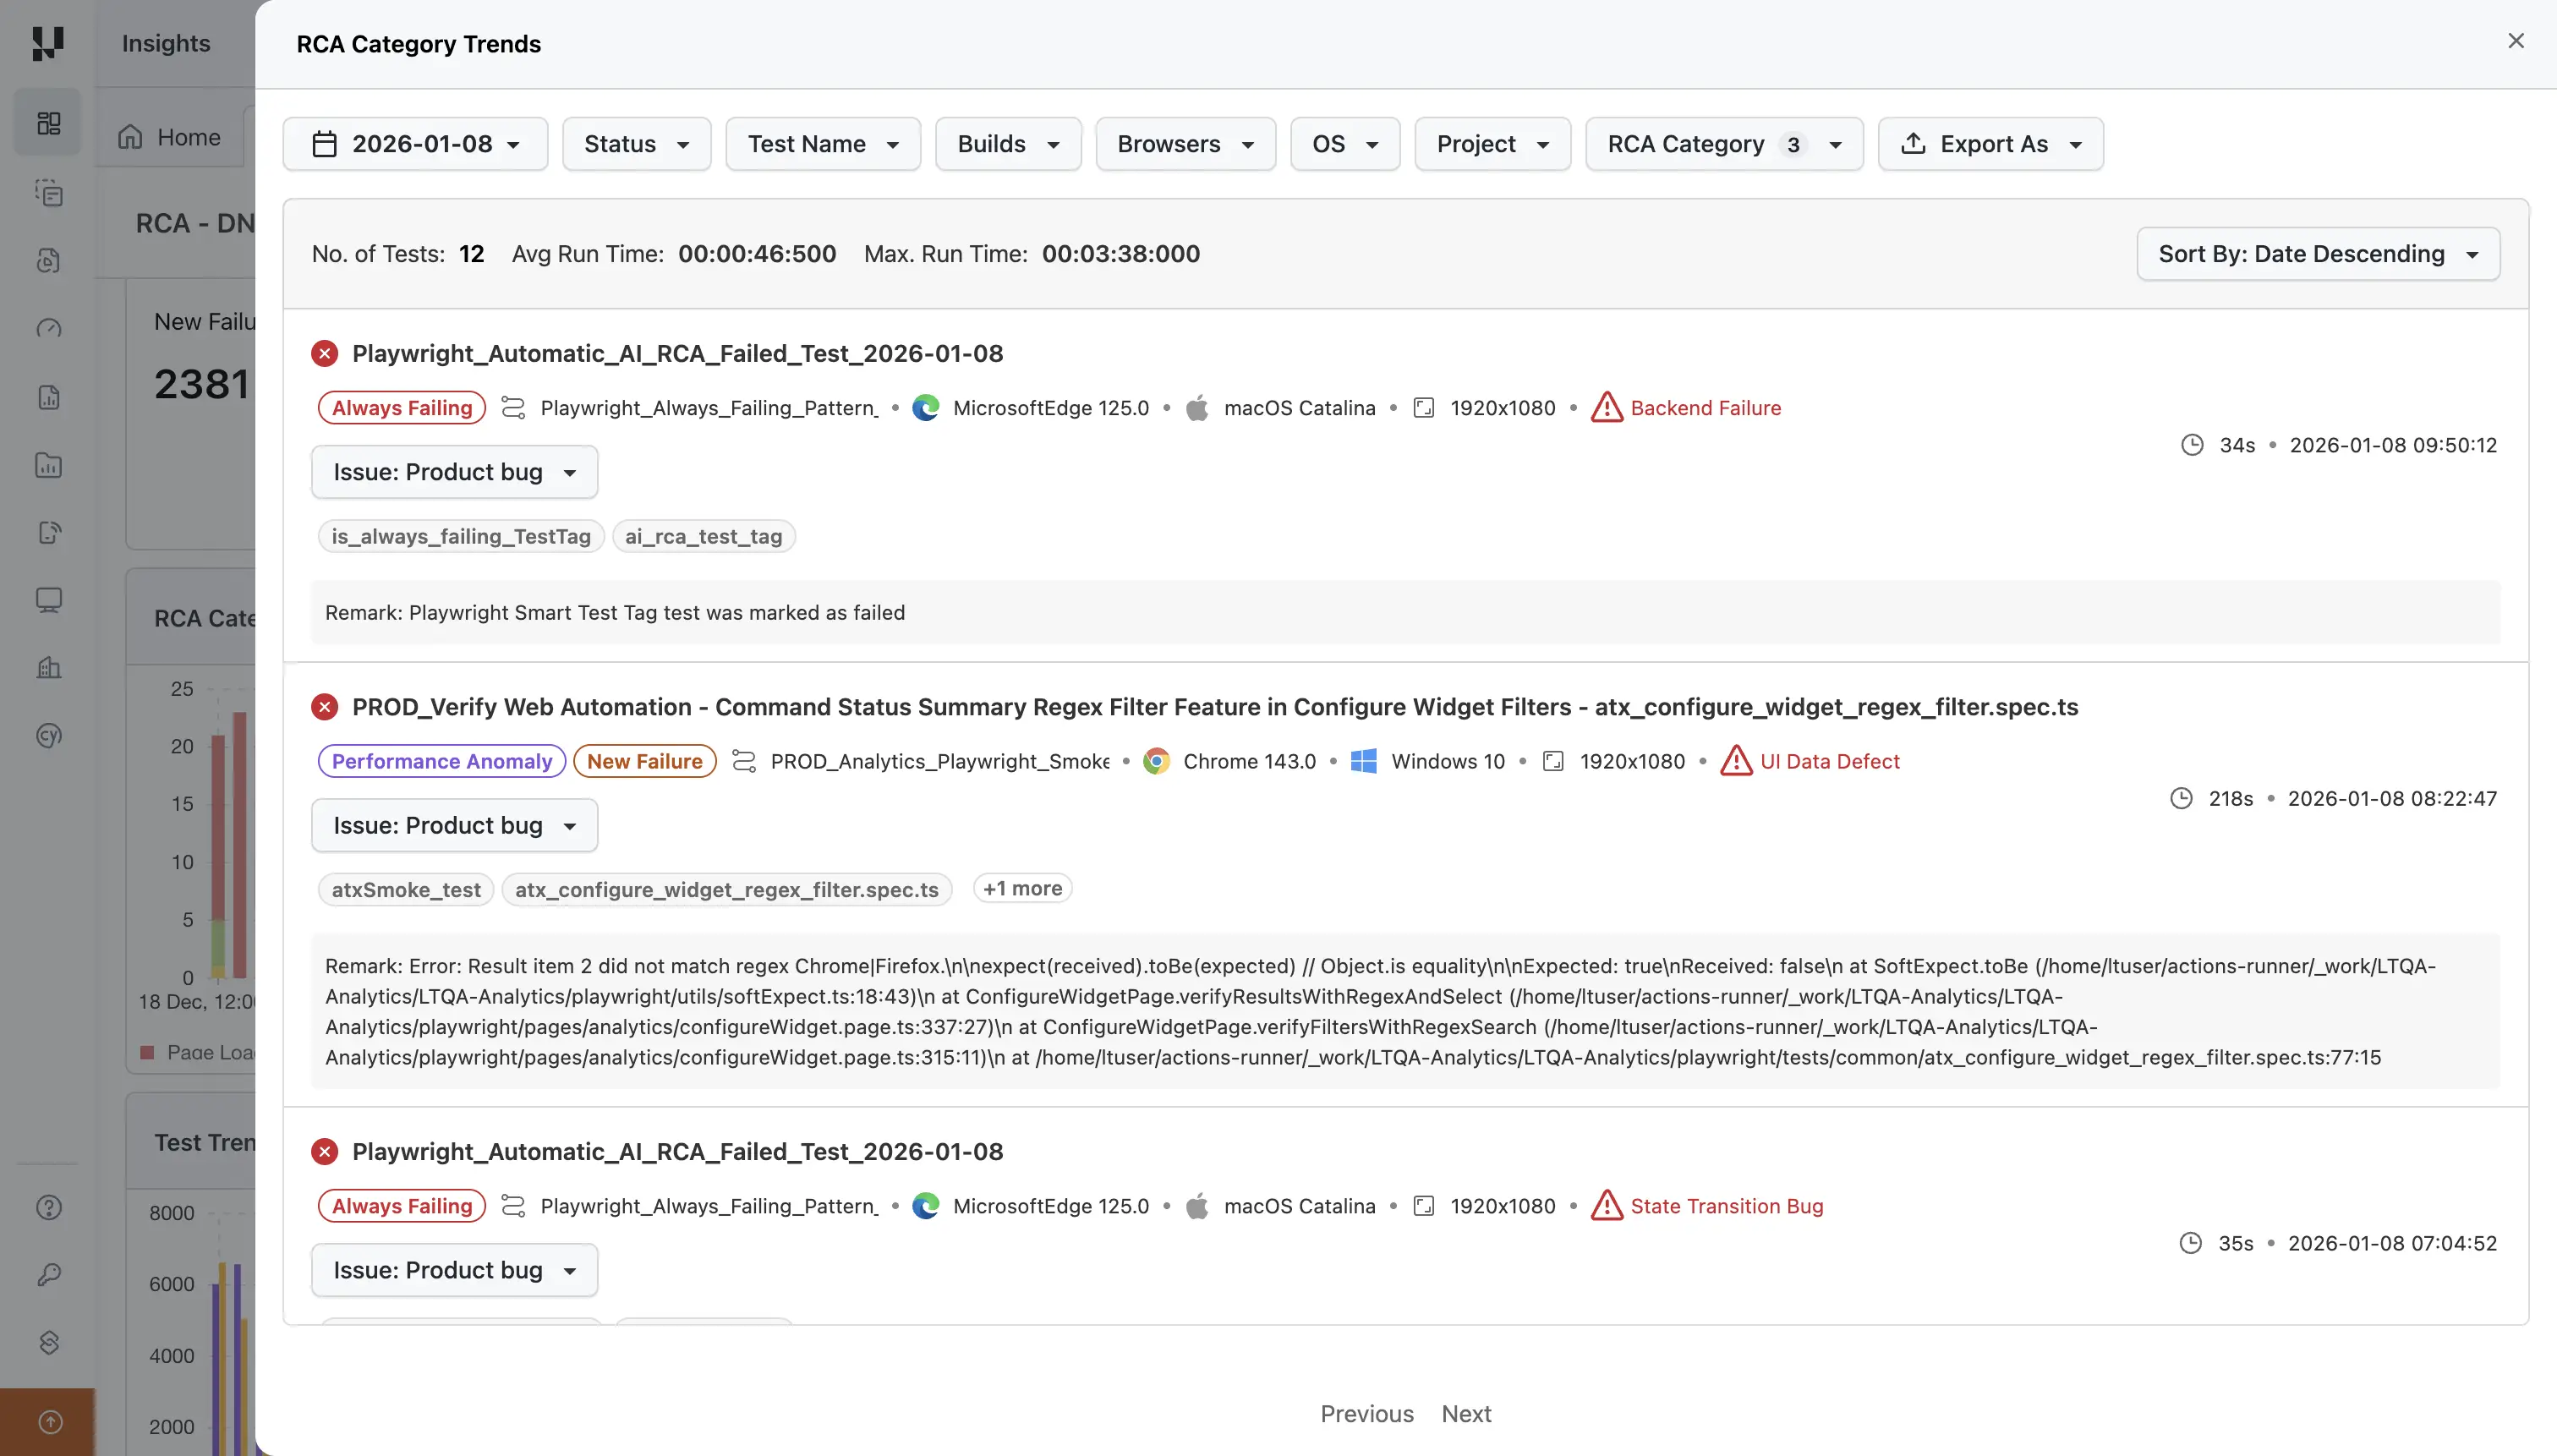
- Navigate to Insights from the TestMu AI dashboard
- Access the RCA Category Trends widget to view aggregated data
- Click on specific categories to drill down into detailed analysis
- Track historical trends to monitor improvement over time
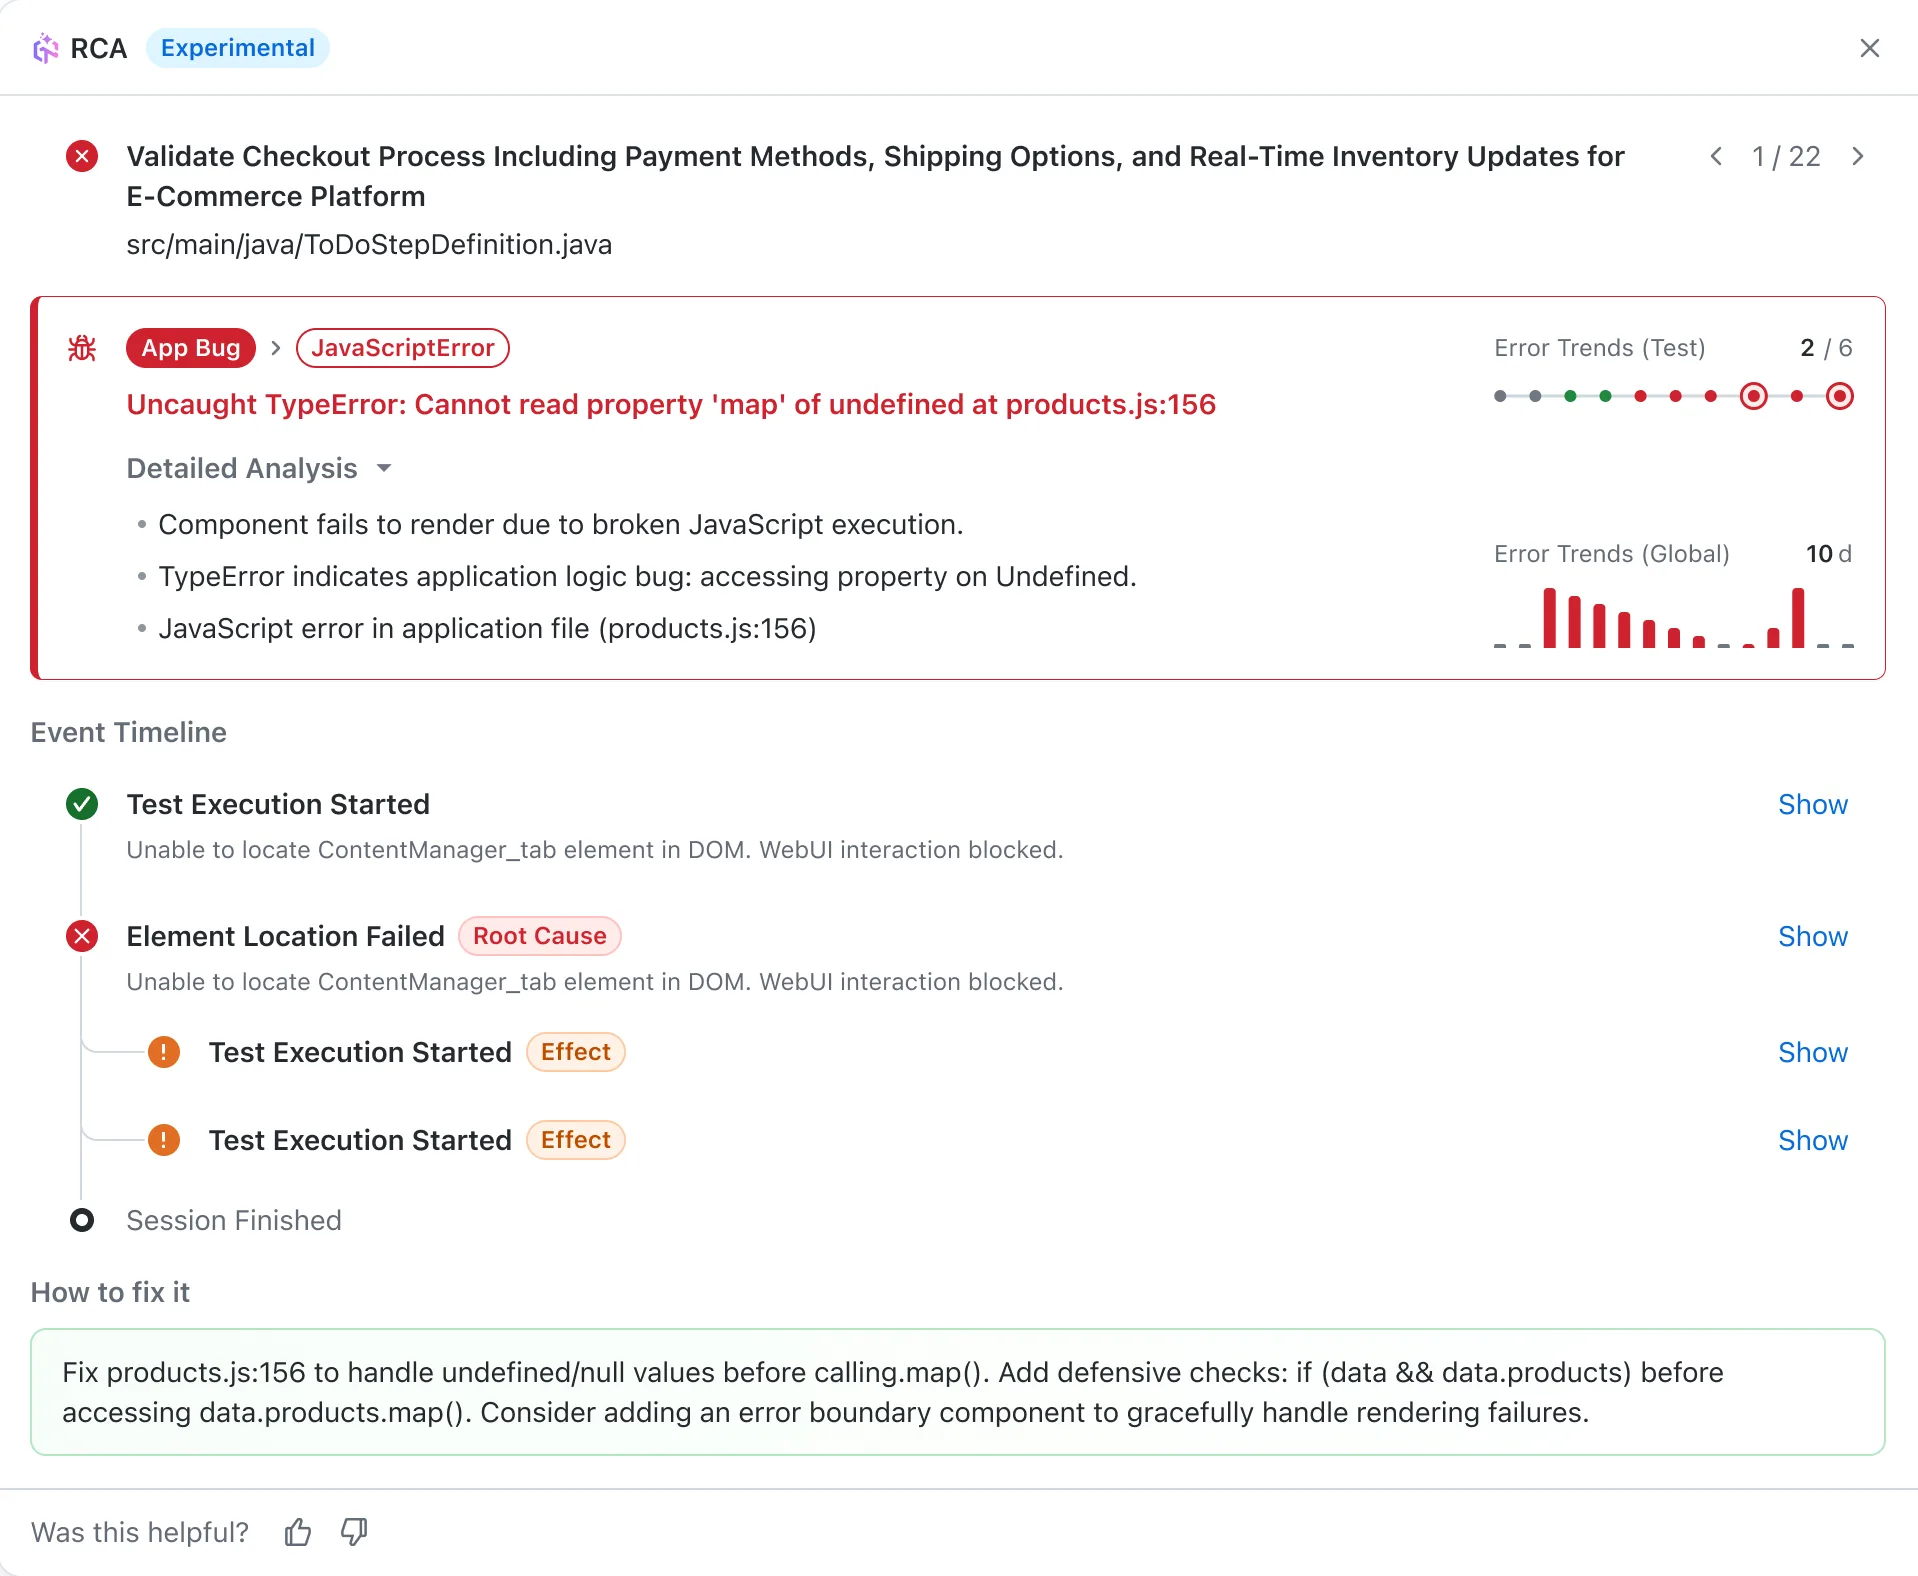
Understanding RCA Output
When you generate or view an RCA, a detailed analysis panel opens with the following components:
Error Classification
At the top of the RCA panel, you'll see:
- Failure Category: The type of failure (e.g.,
App Bug,Product Bug) - Root Cause Type: The specific error category (e.g.,
JavaScriptError,Backend Contract Violation) - Error Summary: A one-line description of the error with file location
- Error Trends (Test): Shows how often this specific test has failed recently
- Error Trends (Global): Shows the error pattern across all tests over time
Detailed Analysis
Expand this section to see AI-generated insights explaining:
- Why the component or test failed
- What the error indicates about the underlying issue
- The specific file and line number where the error occurred
Event Timeline
The Event Timeline shows the chronological sequence of events during test execution:
- ✓ Passed steps: Steps that completed successfully (e.g., "Test Execution Started")
- ✗ Failed steps: Steps where issues occurred, tagged as:
- Root Cause: The primary reason for failure
- Effect: Secondary failures caused by the root cause
Click Show/Hide on any event to expand details including:
- Code: View the relevant source code
- Stacktrace: See the full error stack trace
- Assets: Access screenshots, logs, or other artifacts
How to Fix It
At the bottom of the RCA panel, you'll find numbered, actionable steps to resolve the issue. These recommendations include:
- Specific actions to take in your application or test
- Configuration changes to consider
- Debugging steps to verify the fix
Provide Feedback
Help improve RCA accuracy using the feedback options at the bottom:
- Thumbs up/down: Rate if the analysis was helpful
- Suggest Improvements: Click to open a feedback form where you can:
- Adjust the failure category and root cause classification
- Provide a custom root cause if the AI classification was incorrect
- Add additional context or feedback
Configure Automatic RCA
Set up Automatic RCA to continuously analyze test failures based on your targeting rules.
Step 1: Access Organization Settings
- Navigate to Organization Settings in your TestMu AI dashboard
- In the left sidebar, expand the Insights section under Org Product Preferences
- Select Automatic AI RCA from the available options
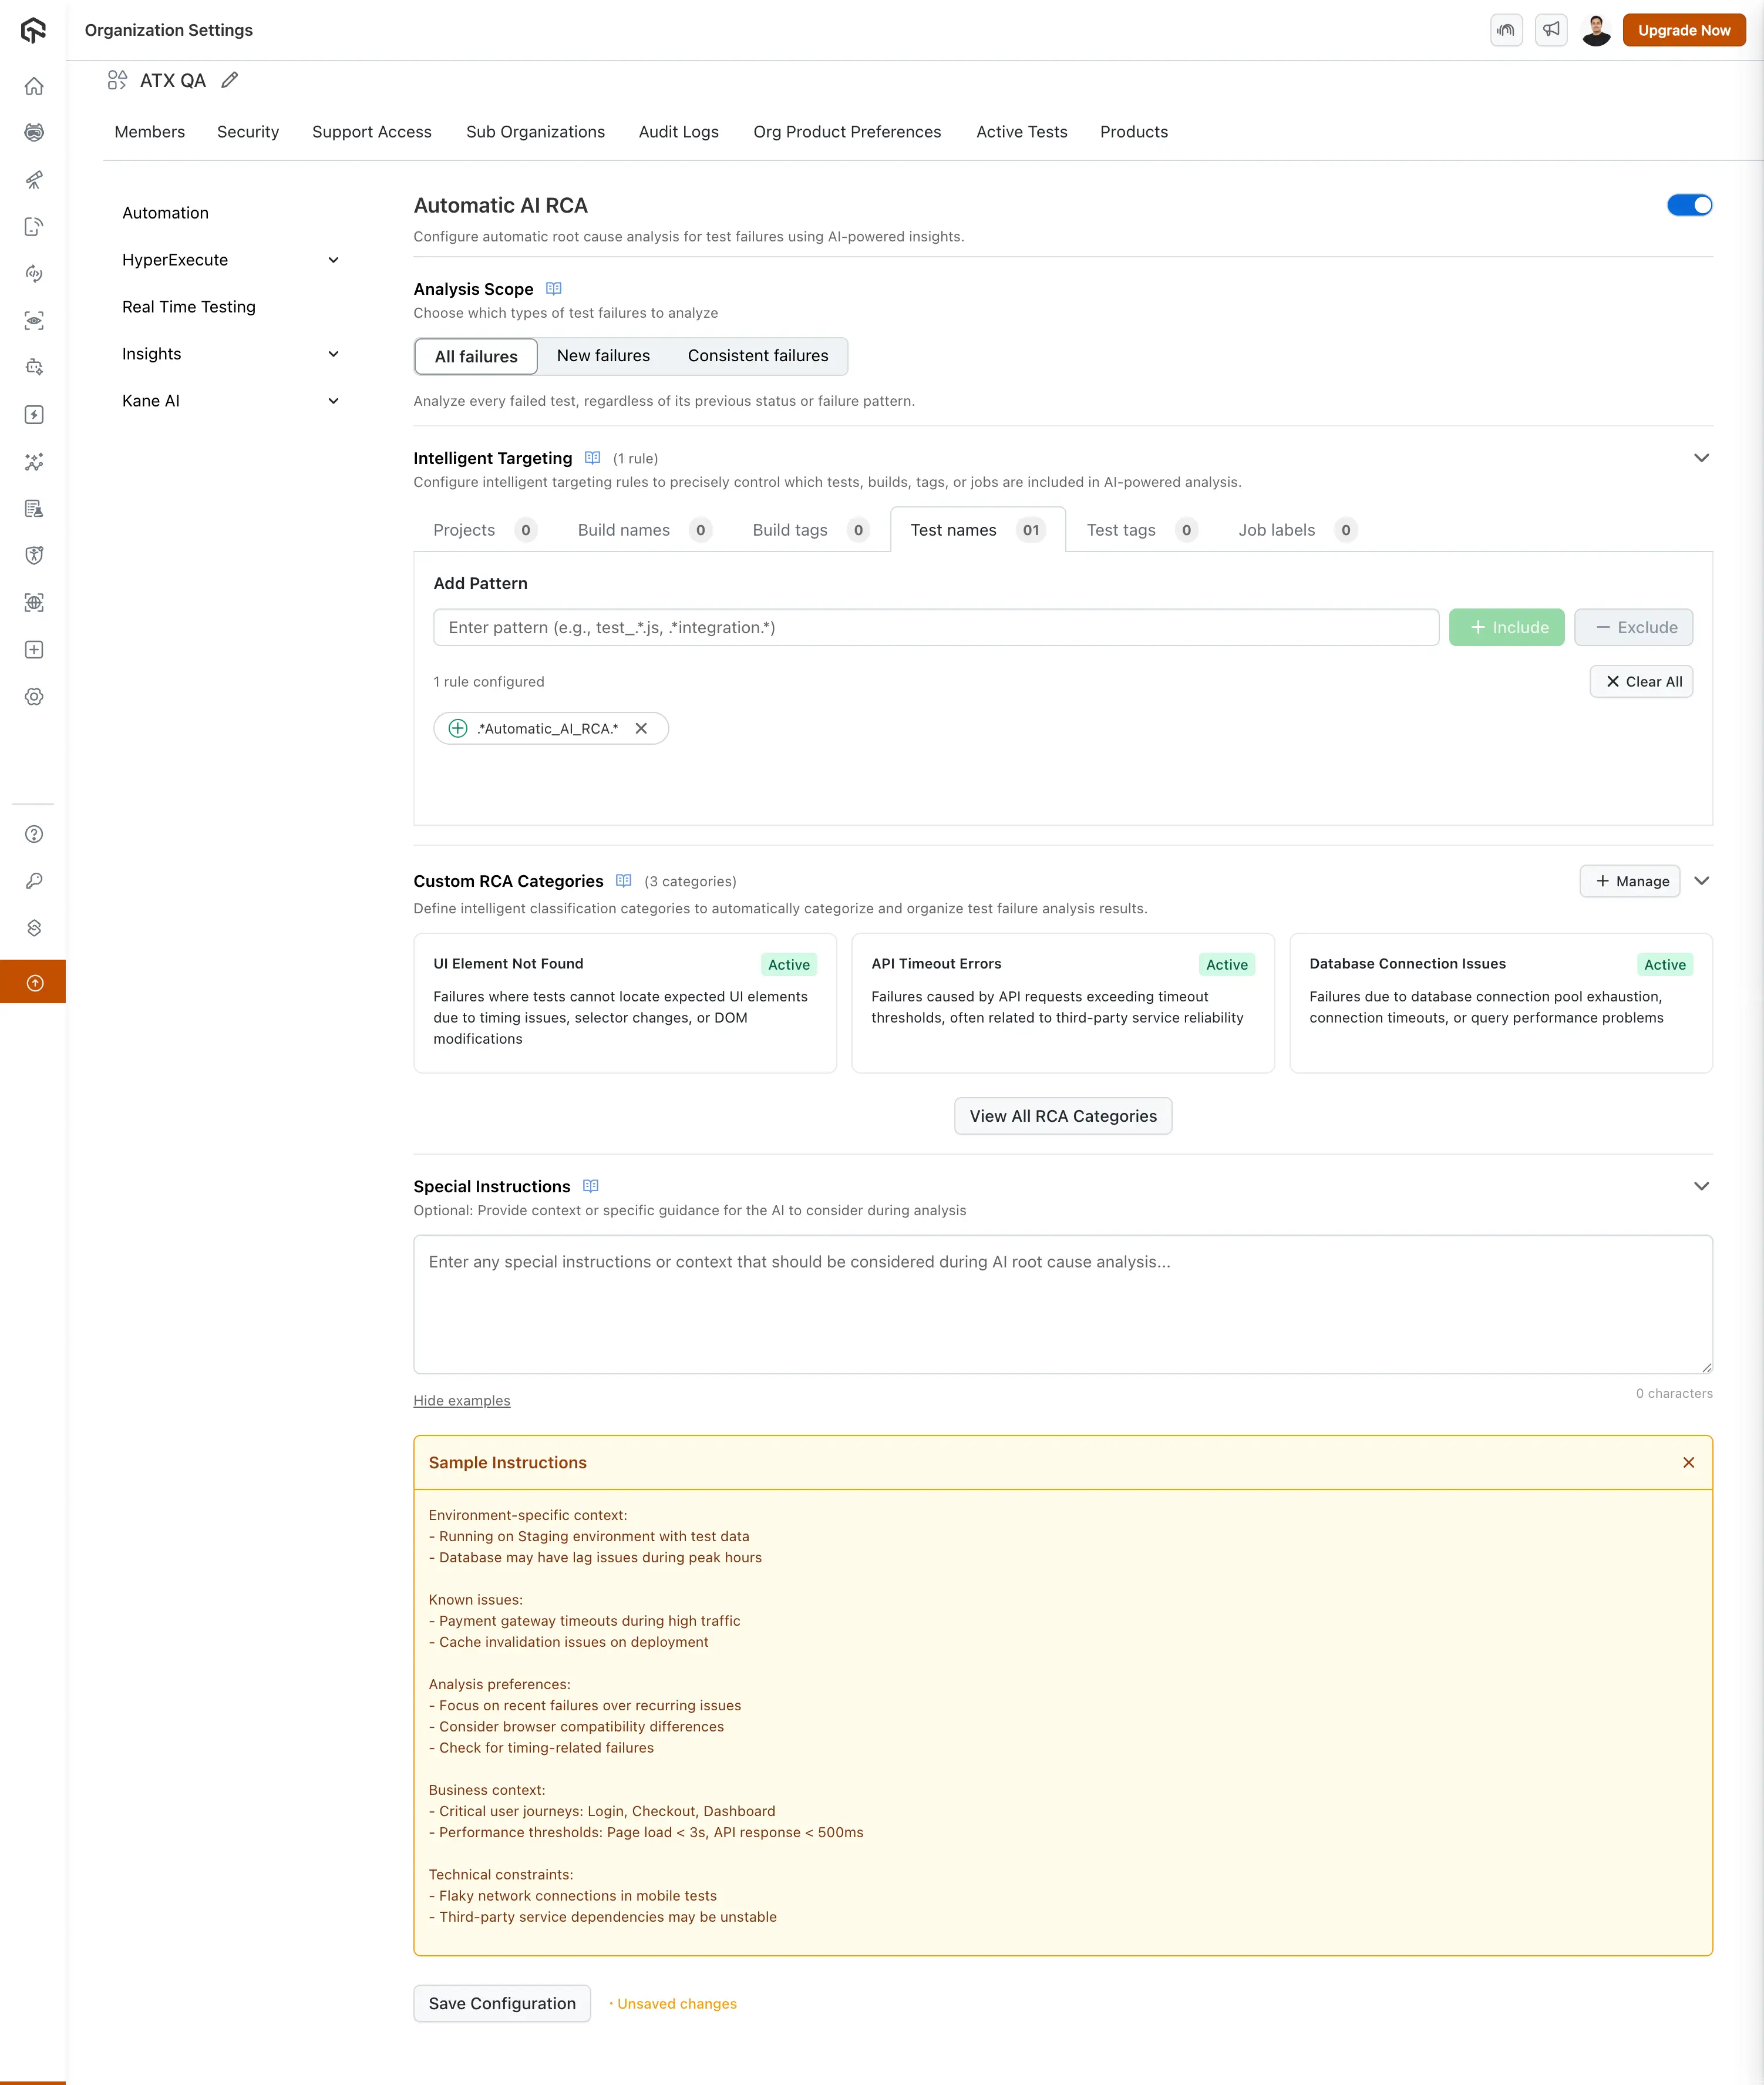
Step 2: Enable AI RCA
Toggle the Feature: Use the blue toggle switch to enable "Automatic AI RCA"
Step 3: Configure Analysis Scope
In the Analysis Scope section, choose which types of test failures to analyze:
- All failures: Analyze every failed test, regardless of previous status
- New failures: Analyze only tests that have failed recently after having passed at least 10 consecutive times previously.
- Consistent Failures: Analyze only tests that have failed in all of their previous 5 runs to identify persistent issues.
Step 4: Configure Intelligent Targeting
Configure intelligent targeting rules to precisely control which tests, builds, tags, projects, or jobs are included in AI-powered analysis:
- Add Targeting Rules: Enter regex patterns in the input field
- Click Include (+) or Exclude (-): Choose whether to include or exclude matching tests
- Configure Multiple Criteria: Set targeting rules for:
- Test Names: Target specific test suites or test patterns
- Build Names: Include or exclude builds with specific names (e.g., hourly, nightly)
- Test Tags: Include or exclude tests with specific tags (e.g., playwright_test, atxHyperexecute_test)
- Build Tags: Include or exclude builds with specific tags (e.g., hourly, nightly)
- Project Names: Include or exclude tests from specific projects using regex patterns
- Job Labels: Include tests with specific job labels or tags
Rule Logic and Application
The intelligent targeting system applies rules using the following logic:
Rule Evaluation Process:
- Include Rules (AND Logic): All Include rules within the same category must match for a test to be considered
- Exclude Rules (OR Logic): Any Exclude rule that matches will immediately exclude the test from analysis
- Cross-Category Logic: Include rules across different categories (Test Names, Build Tags, Project Names, etc.) must ALL match
- Exclusion Precedence: Exclude rules take priority over Include rules - if any exclude rule matches, the test is excluded regardless of include matches
Best Practices for Rule Configuration:
- Start Broad: Begin with general include rules, then add specific exclusions
- Use Specific Patterns: Avoid overly broad regex patterns that might include unintended tests
- Test Your Rules: Verify rule behavior with sample test names and tags before applying
- Regular Review: Periodically review and update rules based on changing test patterns
Example Configuration for Production Test Analysis
Test Name:
- Include:
.*prod.*- Only analyze tests with name containing "prod" - Exclude:
.*non-critical.*- Skip tests with name containing "non-critical"
Build Tags:
- Include:
^hourly- Only analyze builds with tag starting with "hourly"
Test Tags:
- Include:
playwright_test|atxHyperexecute_test- Focus on specific test frameworks - Exclude:
.*smoke.*- Skip smoke tests
Project Names:
- Include:
^ecommerce|^payment- Only analyze tests from projects starting with "ecommerce" or "payment" - Exclude:
.*staging.*- Skip tests from staging projects
Result: AI-powered analysis will run only on production tests (excluding non-critical ones) from hourly builds, focusing on Playwright or HyperExecute test tags, while excluding smoke tests. The analysis will target ecommerce and payment projects, excluding staging projects. This configuration helps narrow down analysis to the most critical test scenarios.
Step 5: Manage Custom RCA Categories (Optional)
Custom RCA Categories allow you to define intelligent classification categories that automatically categorize and organize test failure analysis results. This helps you group similar failures together, track trends, and prioritize fixes more effectively.
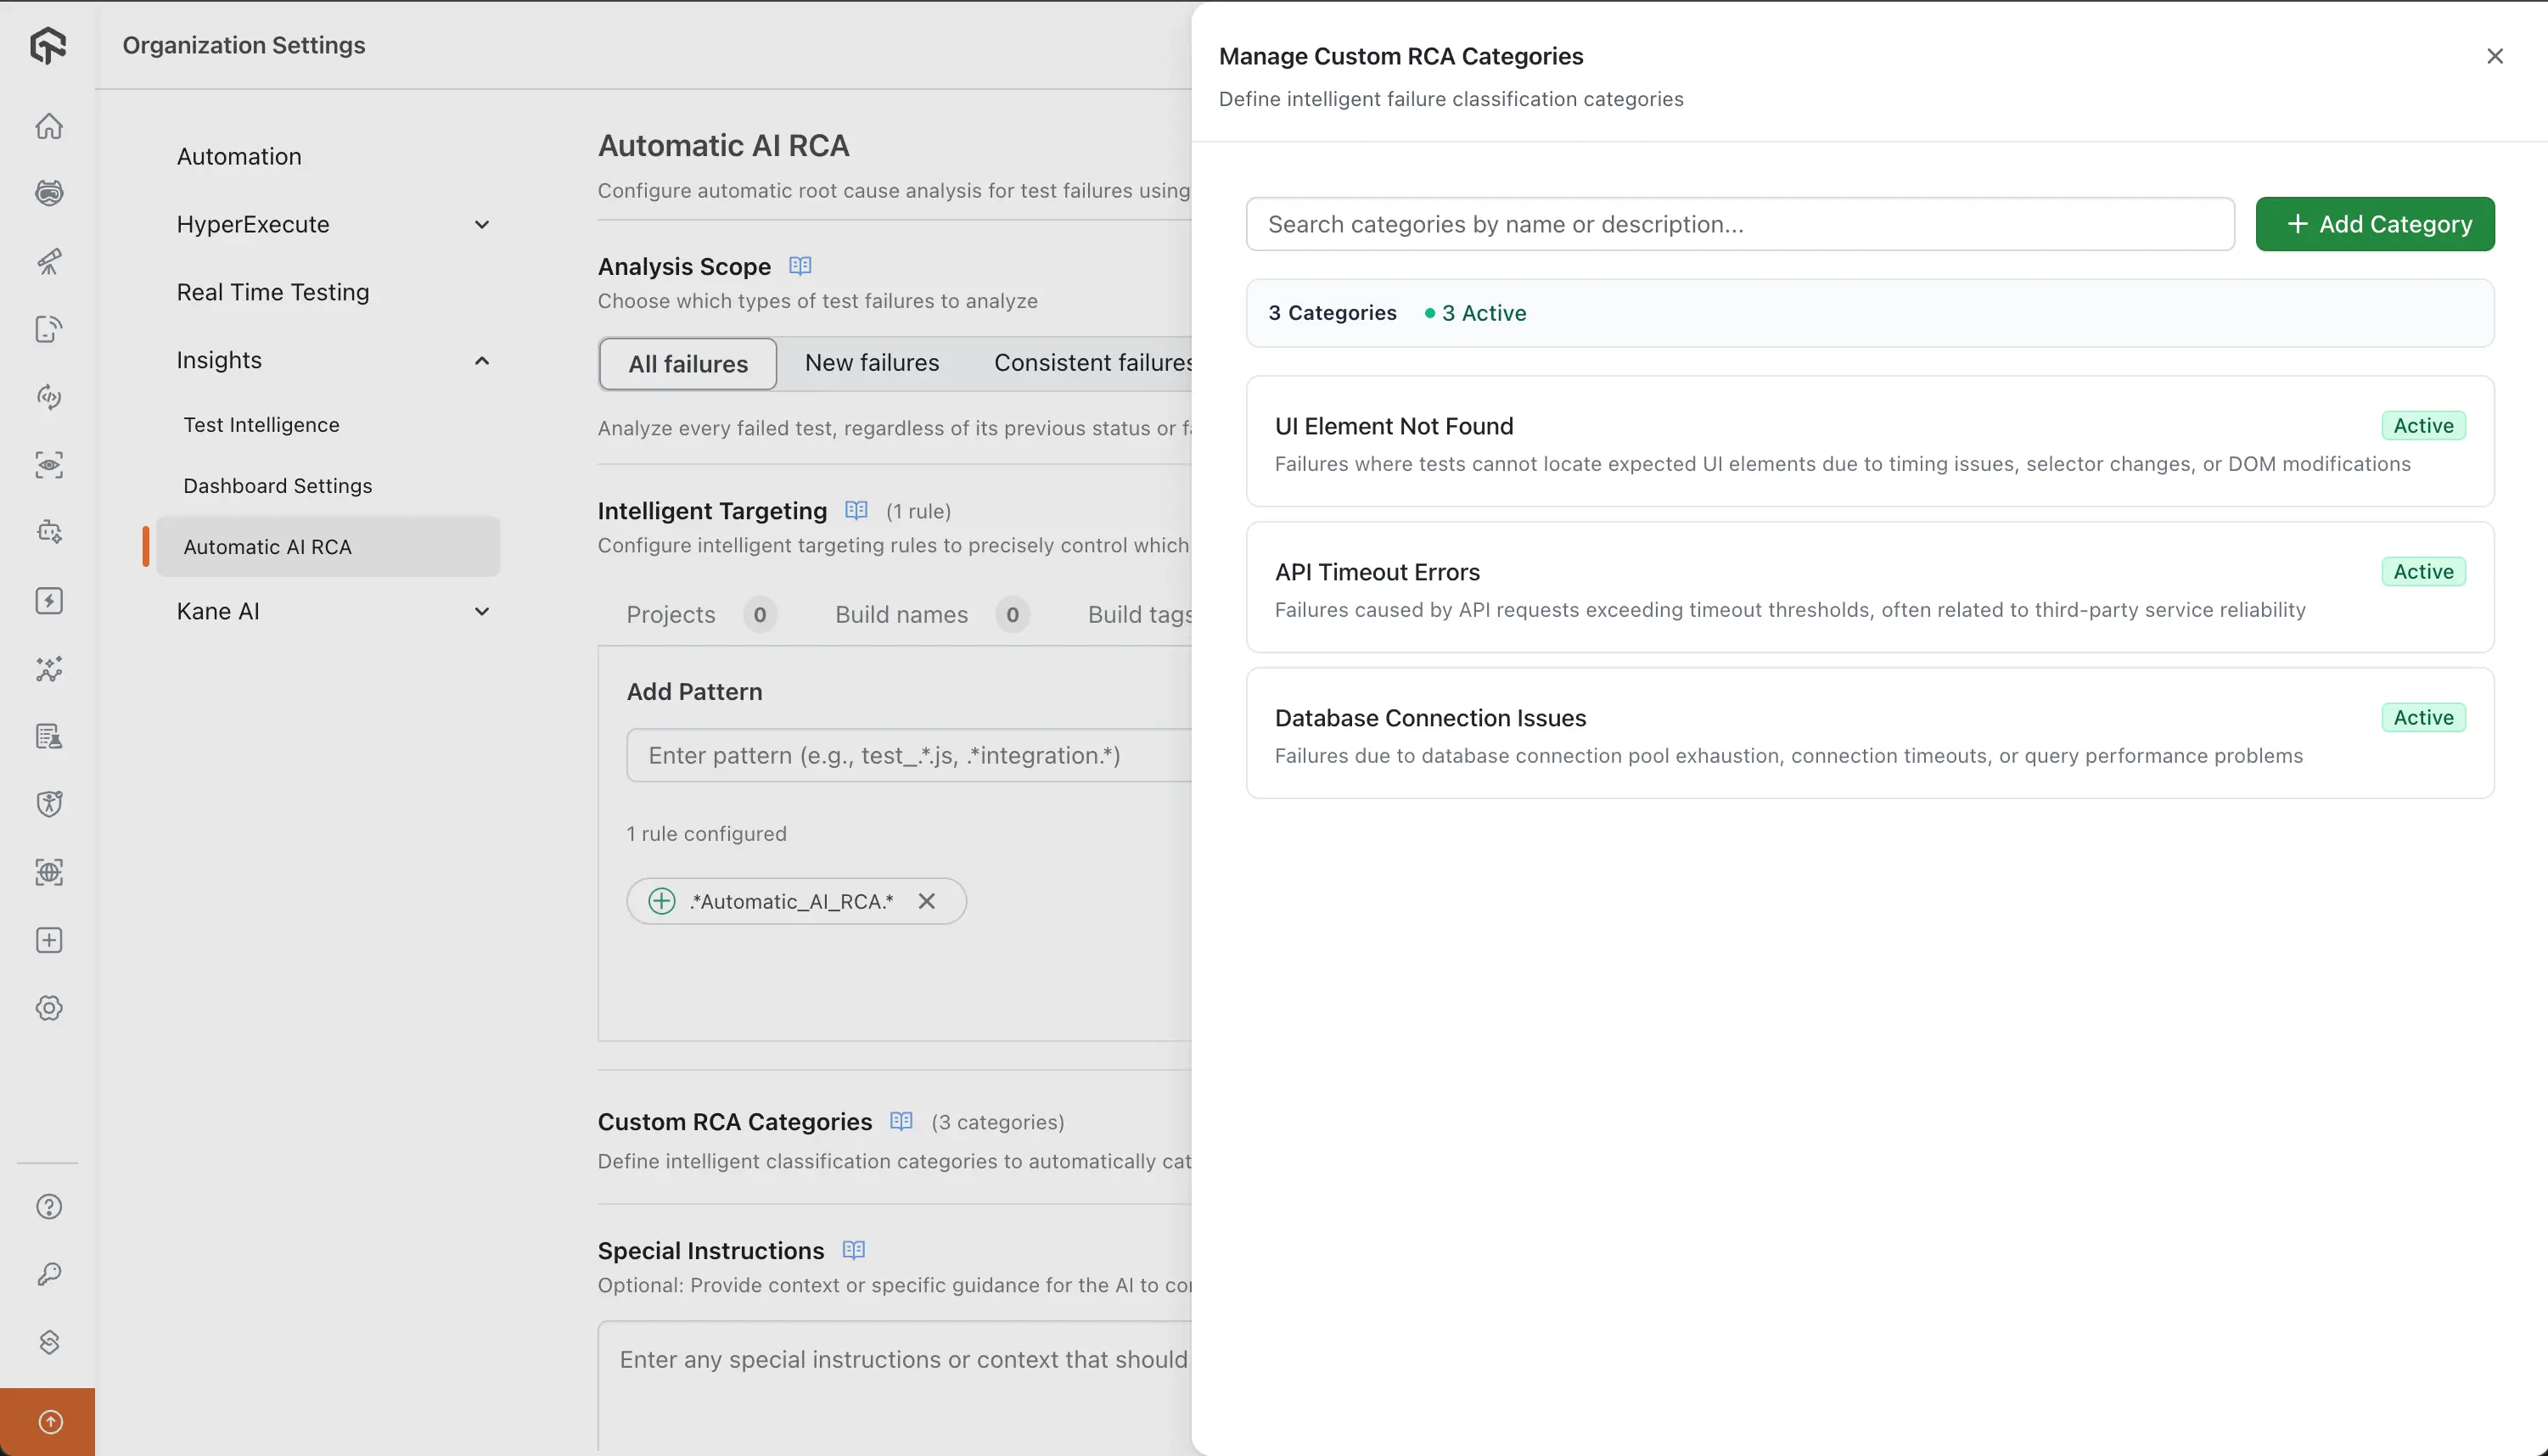
Managing Categories
- In the Automatic AI RCA configuration page, locate the Custom RCA Categories section
- Click the Manage button to open the category management drawer
- Create: Click Add Category, enter a name and description, select Active or Inactive status, then click Create RCA Category
- Edit: Click the edit icon on any category card to modify its details
- Delete: Click the delete icon and confirm to remove a category
- Search: Use the search box to filter categories by name or description
Category Status:
- Active: Used by AI for automatic classification and appears in RCA results
- Inactive: Saved but not used for classification; can be reactivated later
Best Practices:
- Be Specific: Create distinct categories (e.g., "Database Connection Timeouts" vs "Database Issues")
- Use Clear Names: Choose names your team understands immediately
- Start Small: Begin with 5-10 active categories for your most common failure types
- Review Regularly: Periodically refine categories based on your failure patterns
Example Custom RCA Categories:
| Category Name | Description |
|---|---|
| UI Element Not Found | Failures where tests cannot locate expected UI elements due to timing issues, selector changes, or DOM modifications |
| API Timeout Errors | Failures caused by API requests exceeding timeout thresholds, often related to third-party service reliability |
| Database Connection Issues | Failures due to database connection pool exhaustion, connection timeouts, or query performance problems |
| Authentication Token Expiration | Failures related to expired or invalid authentication tokens, session timeouts, or OAuth refresh issues |
| Network Connectivity Issues | Failures caused by network interruptions, DNS failures, proxy issues, or unstable network connections |
Step 6: Set Special Instructions (Optional)
Provide context or specific guidance for the AI to consider during analysis:
- Click on the Special Instructions section
- Enter any special instructions or context that should be considered during AI root cause analysis
- Use the "Show examples" link for guidance on effective instruction writing
Example Instructions:
Environment-Specific Context:
- Running on Staging environment with test data
- Database may have lag issues during peak hours (9 AM - 5 PM EST)
- Test environment has limited resources compared to production (2GB RAM vs 8GB)
- Network latency is higher in test environment (average 150ms vs 50ms in production)
Known Issues & Patterns:
- Payment gateway timeouts during high traffic periods (especially between 2-4 PM)
- Cache invalidation issues occur immediately after deployments
- Third-party API rate limits: Salesforce (1000 requests/hour), HubSpot (500 requests/hour)
- Database connection pool is limited to 20 connections - look for pool exhaustion patterns
- OAuth token expiration happens every 24 hours - failures around token refresh time are expected
Analysis Preferences:
- Focus on recent failures over recurring issues when prioritizing
- Consider browser compatibility differences (Chrome vs Firefox behavior variations)
- Check for timing-related failures (elements loading asynchronously)
- Distinguish between environment-specific issues vs application bugs
- Prioritize failures affecting core user journeys: Login, Checkout, Dashboard, Profile Management
Business Context:
- Critical user journeys: Login, Checkout, Dashboard, Profile Management
- Performance thresholds: Page load < 3s, API response < 500ms
- Peak usage hours: 10 AM - 2 PM and 6 PM - 9 PM EST
- High-value features: Payment processing, Order management, Customer support portal
Technical Constraints:
- Flaky network connections in mobile tests (use retry logic)
- Third-party service dependencies may be unstable (payment gateway, email service)
- Custom error handling: All errors logged to Sentry, user-friendly messages displayed
- Test data cleanup runs nightly - some data may be stale during day
Ignore These Common False Positives:
- Browser console warnings that don't affect functionality
- Network requests to analytics services (Google Analytics, Hotjar, Mixpanel)
- Minor UI layout shifts that don't break functionality (< 5px)
- Expected 404s for optional resources (favicon, tracking pixels)
- Third-party script loading delays that don't impact core functionality
Step 7: Save Configuration
- Click Save Configuration to apply your settings
- The settings will be applied to all users in your organization and cannot be modified by individual users or need admin level privileges.
Best Practices
- Focus on Root Cause events in the Event Timeline rather than Effect events when debugging
- Check Error Trends to see if this is a recurring issue or a new failure
- Use the Code and Stacktrace tabs to pinpoint the exact location of the error
- Follow the "How to Fix It" steps systematically for faster resolution
- Provide feedback using thumbs up/down to help improve RCA accuracy over time
- Monitor trends in Insights to identify patterns and prioritize fixes
Troubleshooting Common Issues
RCA Not Generating
- Check prerequisites: Ensure you have the required subscription plan
- Verify credits availability: AI RCA processing requires credits to be available in your account. Check your Credits Management page to ensure sufficient credits
- Verify test failures: AI RCA requires actual test failures to analyze
- Review configuration: Confirm AI RCA is enabled in organization settings
- Check permissions: Ensure you have access to Analytics and Test Intelligence features
Inaccurate RCA Results
- Refine special instructions: Provide more specific context about your application
- Update intelligent targeting: Exclude irrelevant tests that might confuse the analysis
- Review error categorization: Ensure test failures are properly categorized
- Refine custom RCA categories: Update category descriptions to better match your failure patterns
- Provide feedback: Use any available feedback mechanisms to improve accuracy
Missing RCA Data
- Check time range: Ensure you're looking at the correct time period
- Verify test execution: Confirm tests actually failed during the specified period
- Review dashboard filters: Check if any filters are excluding relevant data
- Contact support: Reach out if RCA data appears to be missing
Support
For any queries or issues related to AI Root Cause Analysis, please reach out to our 24/7 customer support. We're here to help you maximize the value of this powerful debugging tool!
Related Documentation:
