Running Selenium Framework Tests on HyperExecute
HyperExecute runs your Selenium test suites at scale across every major language binding and test framework. Pick your language below, clone the matching sample repository, and trigger the job with the HyperExecute CLI. The setup steps are the same for every framework, only the sample repository and its YAML change.
HyperExecute is an AI Native Test Orchestration Cloud Platform that runs your end-to-end tests quickly and efficiently, with Just-in-Time (JIT) infrastructure, smart orchestration, and detailed real time logs.
Supported languages and frameworks:
- Java: TestNG, JUnit, Cucumber
- Python: PyTest, PyUnit, Behave, Robot
- C#: NUnit, SpecFlow, Reqnroll
- Ruby: Ruby, Capybara
- JavaScript: WebdriverIO, Nightwatch, Protractor
Prerequisites
To run Selenium tests on HyperExecute from your local system, you need:
- Your TestMu AI Username and Access Key.
- The HyperExecute YAML file, which is included in each sample repository below.
- The HyperExecute CLI to trigger the job.
Set Up the HyperExecute CLI and Credentials
Download the HyperExecute CLI binary and keep it in the root directory of your test suite:
Export your TestMu AI credentials as environment variables so the CLI can authenticate:
- Linux / macOS
- Windows
export LT_USERNAME="undefined"
export LT_ACCESS_KEY="undefined"
set LT_USERNAME="undefined"
set LT_ACCESS_KEY="undefined"
On macOS, if you get a permission denied warning while executing the CLI, run chmod u+x ./hyperexecute to grant permission. If a security popup appears, allow it from System Preferences > Security & Privacy > General.
Run a Selenium Test in Your Framework
Pick your language, then your framework. Clone the matching sample repository (each includes a ready-to-run HyperExecute YAML) and trigger the job with the HyperExecute CLI using the credentials and CLI you set up above.
Java
- TestNG
- JUnit
- Cucumber
Running TestNG Framework Tests on HyperExecute
TestNG is a widely-used testing framework for Java applications, designed to simplify and enhance the testing process for developers. It provides a flexible and powerful platform for running test suites, enabling effective unit testing, integration testing, and end-to-end testing of Java applications.
HyperExecute is an AI Native Test Orchestration Cloud Platform that empowers you to run end-to-end tests quickly and efficiently. It provides Just-in-Time (JIT) testing infrastructure with fast execution speeds, smart orchestration, and detailed logs.
Execute your TestNG framework tests on HyperExecute using YAML 0.2 via two different methods:
- Using Local System - You can use your own local machine to execute tests.
- Using Gitpod Platform - Execute tests using GitPod. (Requires a Gitpod account)
1. Testing Using Local System
Follow the step-by-step guide to execute your test on HyperExecute.
Step 1: Configure Your Test Suite
You can use your own project to configure and test it. For demo purposes, we are using the sample repository.
Download or Clone the code sample for the TestNG from the TestMu AI GitHub repository to run the tests on the HyperExecute.
 View on GitHub
If you are using your own project, make sure you update the Hub endpoint in your tests file.
By setting up the Hub endpoint, you establish the communication channel between your tests and the browser nodes, enabling effective test distribution and execution.
Update your TestNG test configuration to point to the TestMu AI hub and set capabilities as needed:
DesiredCapabilities capabilities = new DesiredCapabilities();
capabilities.setCapability("browserName", "chrome");
capabilities.setCapability("version", "70.0");
capabilities.setCapability("platform", "win10"); # If this cap isn't specified, it will just get the any available one
capabilities.setCapability("build", "TestMu AI SampleApp");
capabilities.setCapability("name", "TestMu AI JavaSample");
You can also use dev and beta browser versions. To generate capabilities for your test requirements, you can use our inbuilt 🔗 Capabilities Generator.
Step 2: Configure YAML in your Test Suite
Configure your YAML file as per your use cases using key value pairs.
In this sample YAML file, we have mentioned:
- version of the YAML file
- Timeouts for executing your project
- Mode of execution is Autosplit. You can also opt for Matrix or Hybrid mode.
- Pre and Post commands
- Reports and Artefacts that will be generated after the completion of tests
- and other necessary YAML Parameters
loading...
Step 3: Execute your Test Suite
NOTE : In case of MacOS, if you get a permission denied warning while executing CLI, simply run
chmod u+x ./hyperexecuteto allow permission. In case you get a security popup, allow it from your System Preferences -> Security & Privacy -> General tab.
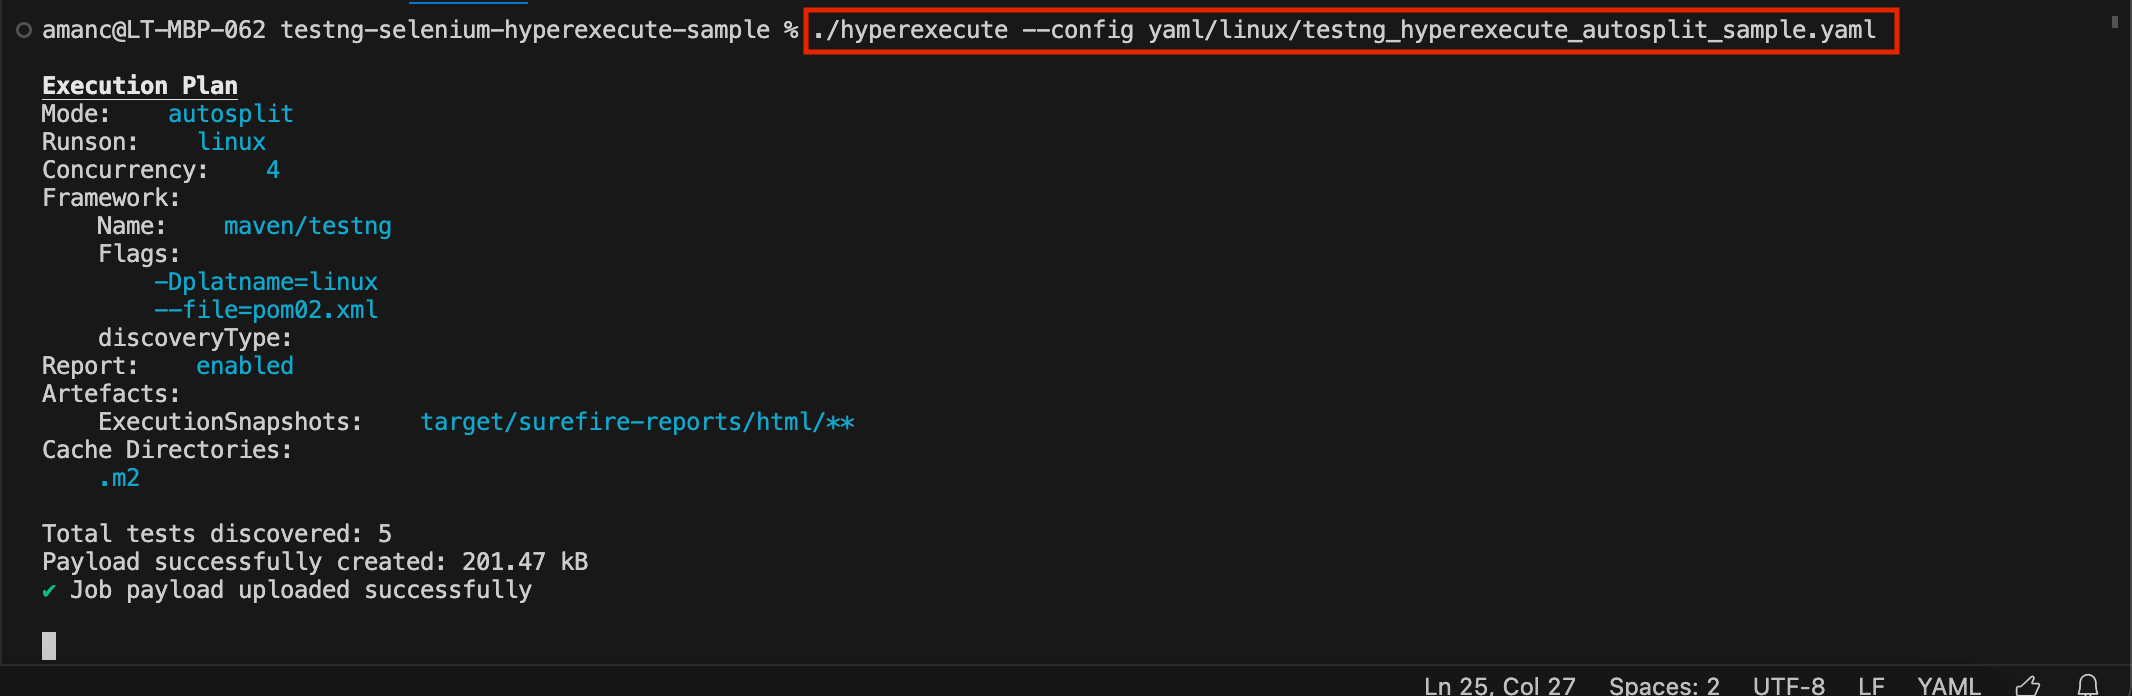
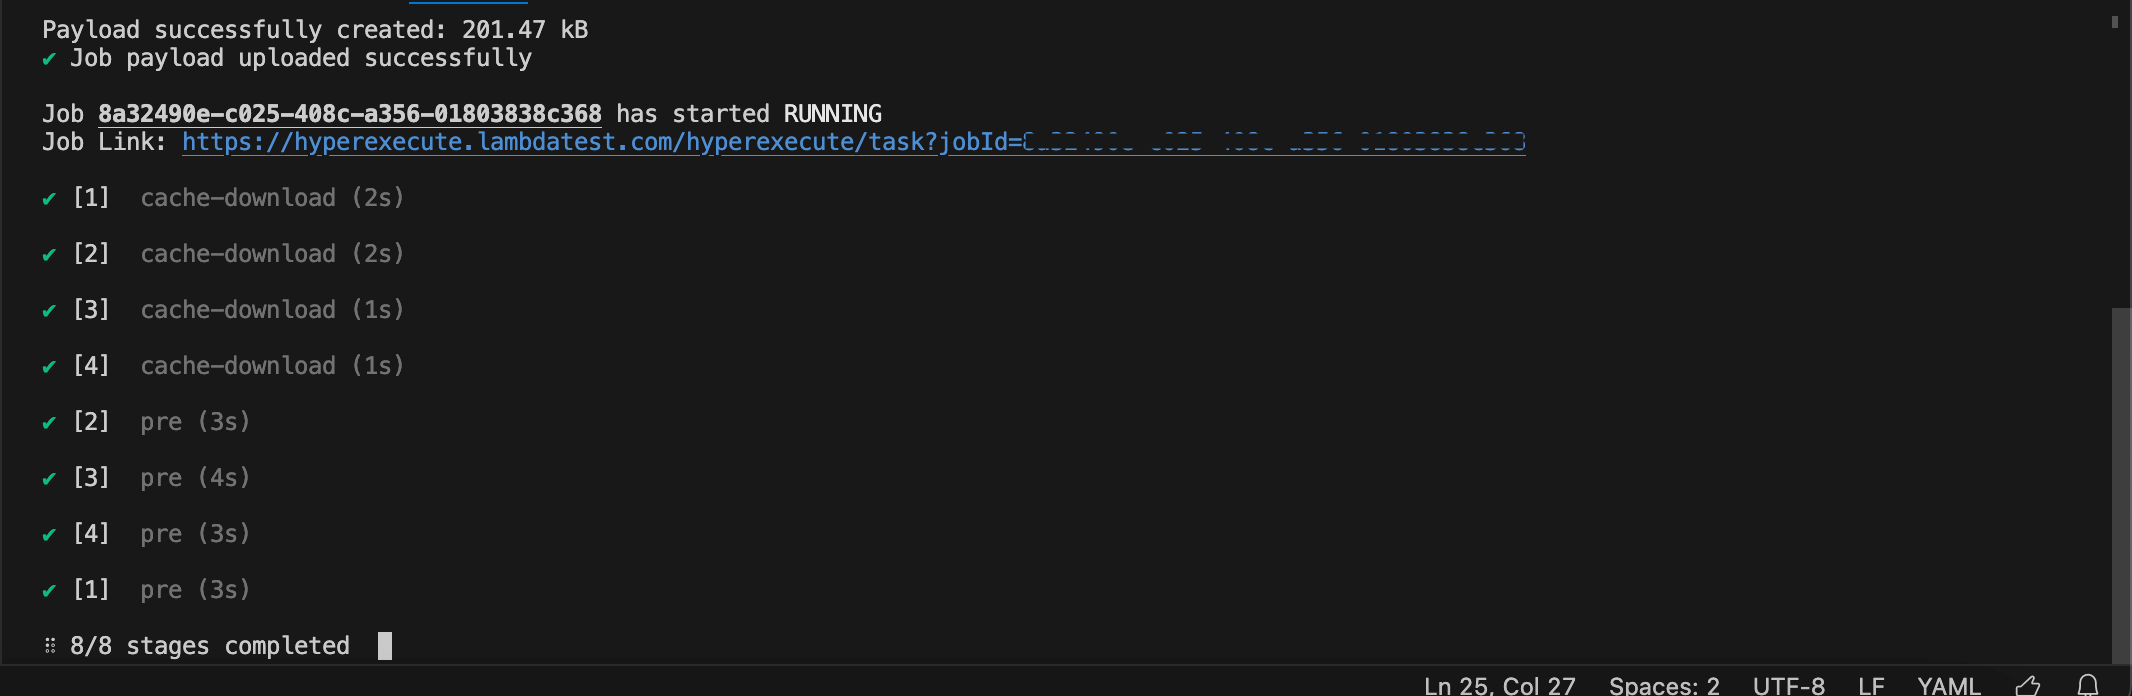
Run the below command in your terminal at the root folder of the project:
./hyperexecute --config RELATIVE_PATH_OF_YOUR_YAML_FILE
OR use this command if you have not exported your username and access key.
./hyperexecute --user undefined --key undefined --config RELATIVE_PATH_OF_YOUR_YAML_FILE
Step 4: Monitor the Test Execution
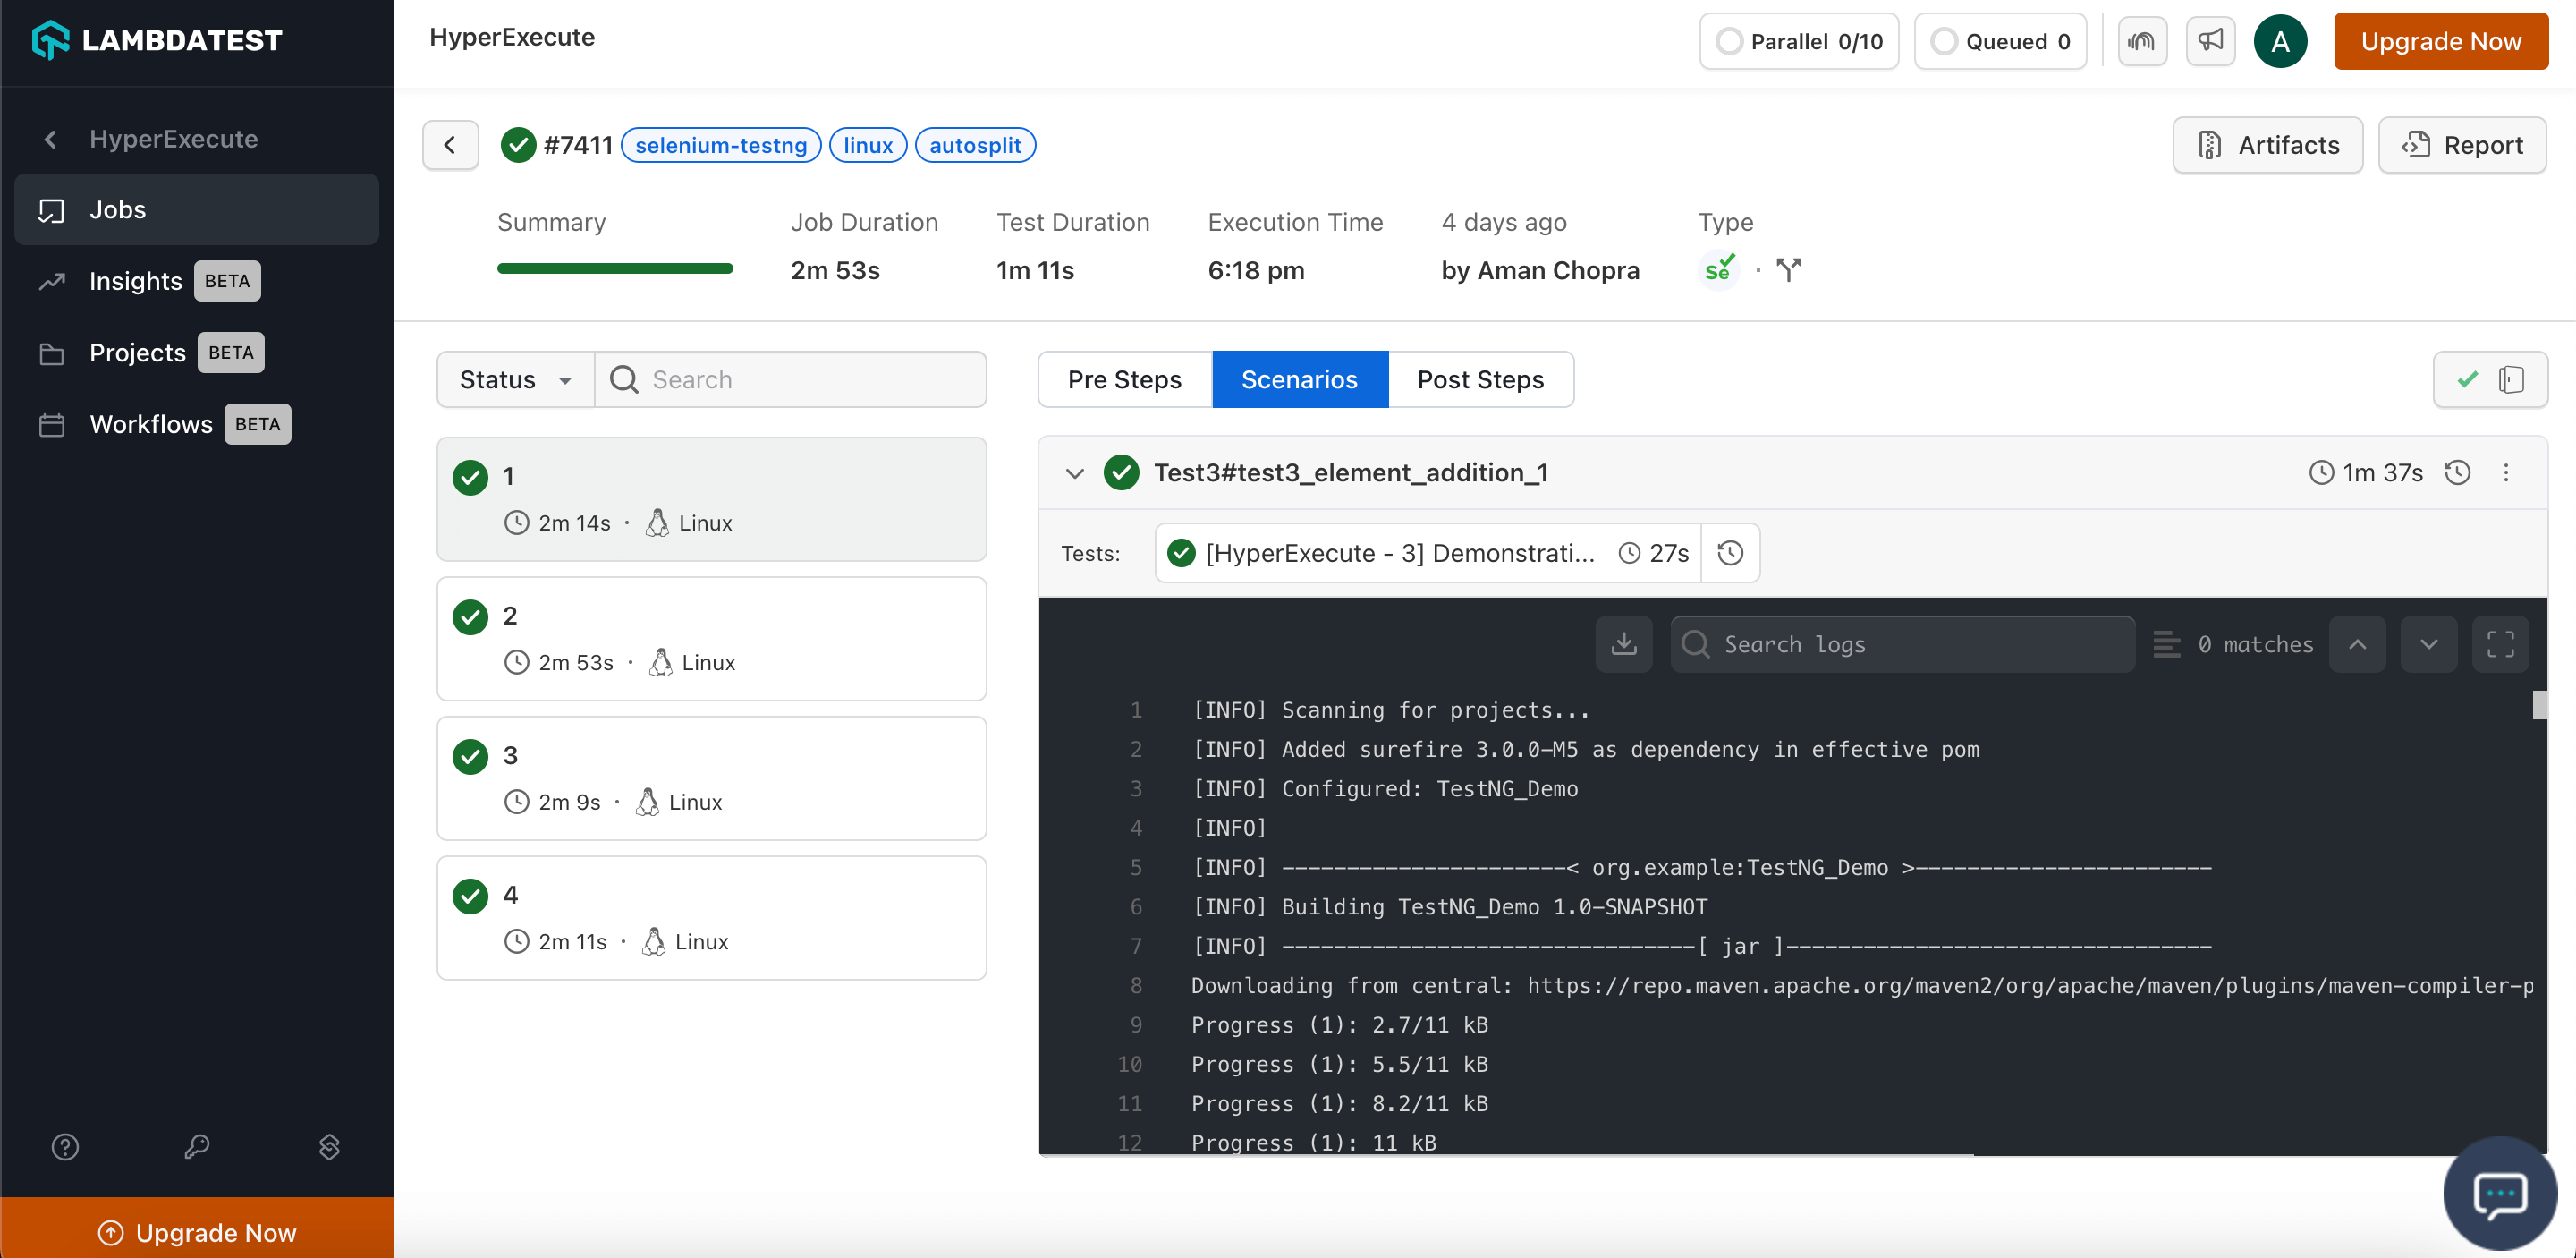
Visit the HyperExecute Dashboard and check your Job status.
Step 5: Download Artifacts and Reports
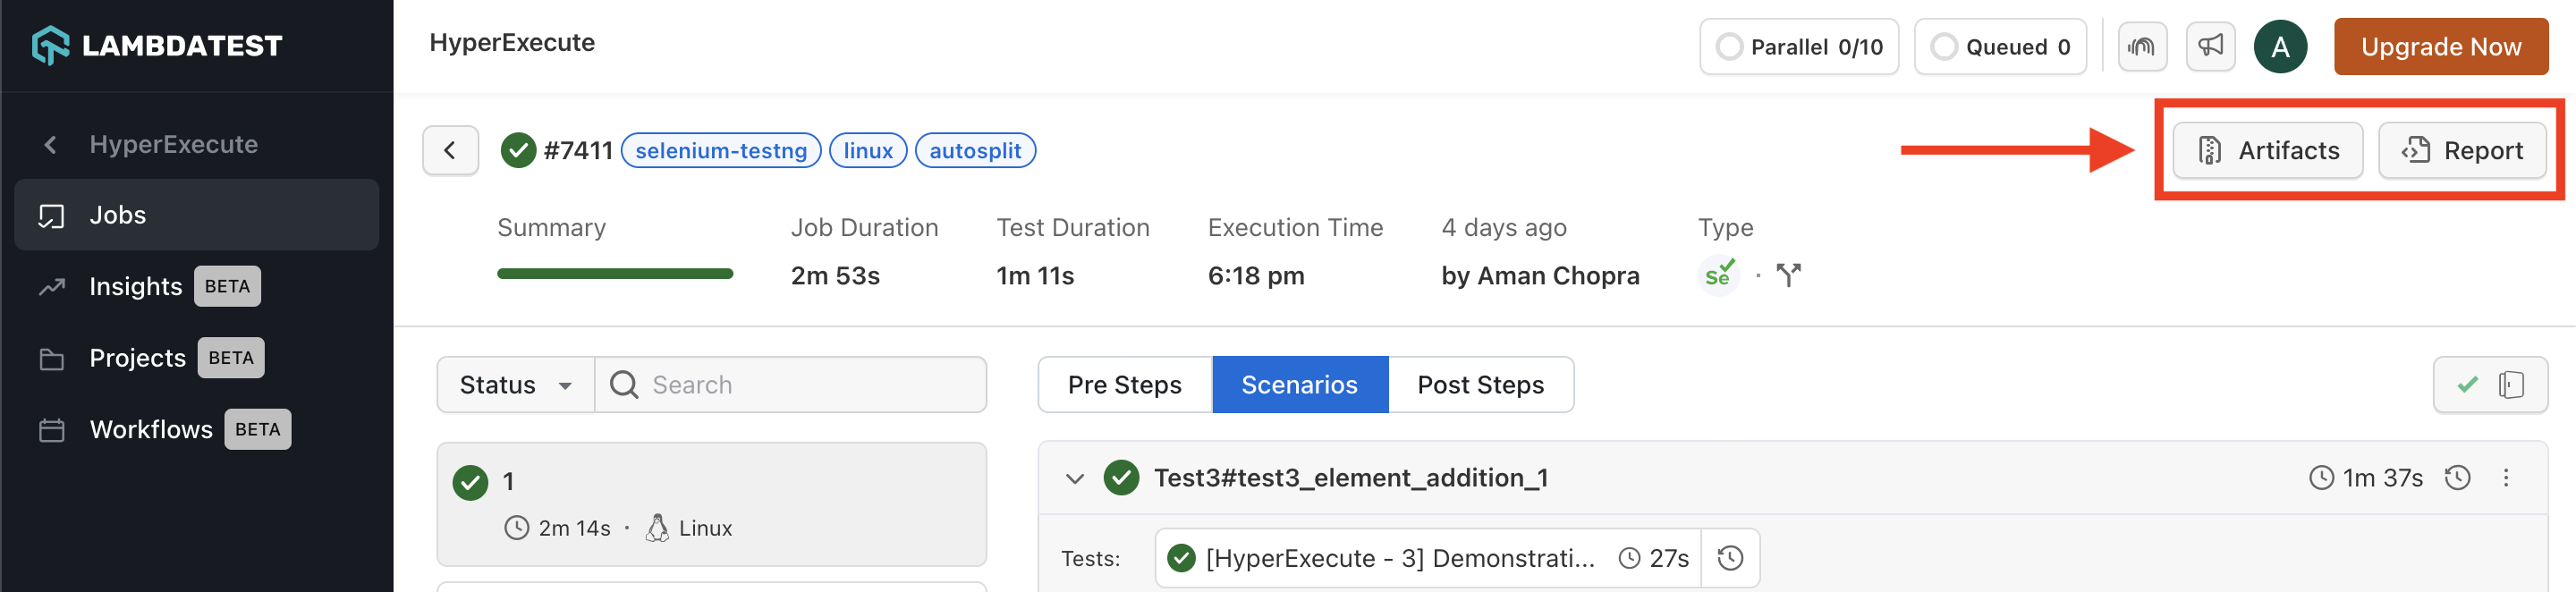
HyperExecute also facilitates the provision to download the Artifacts and Reports on your local machine. Click on the corresponding button to download your generated artifacts and reports.
2. Testing Using Gitpod
You can also use the Gitpod platform to execute our sample repository. It will fetch all the sample codebases and trigger the CLI to execute the tests.
Follow the below steps to run Test using Gitpod:
Step 1: Click 'Open in Gitpod' button. You will be redirected to Login/Signup page. This button is configured to redirect you to the Gitpod platform where you will be able to execute our sample repository.

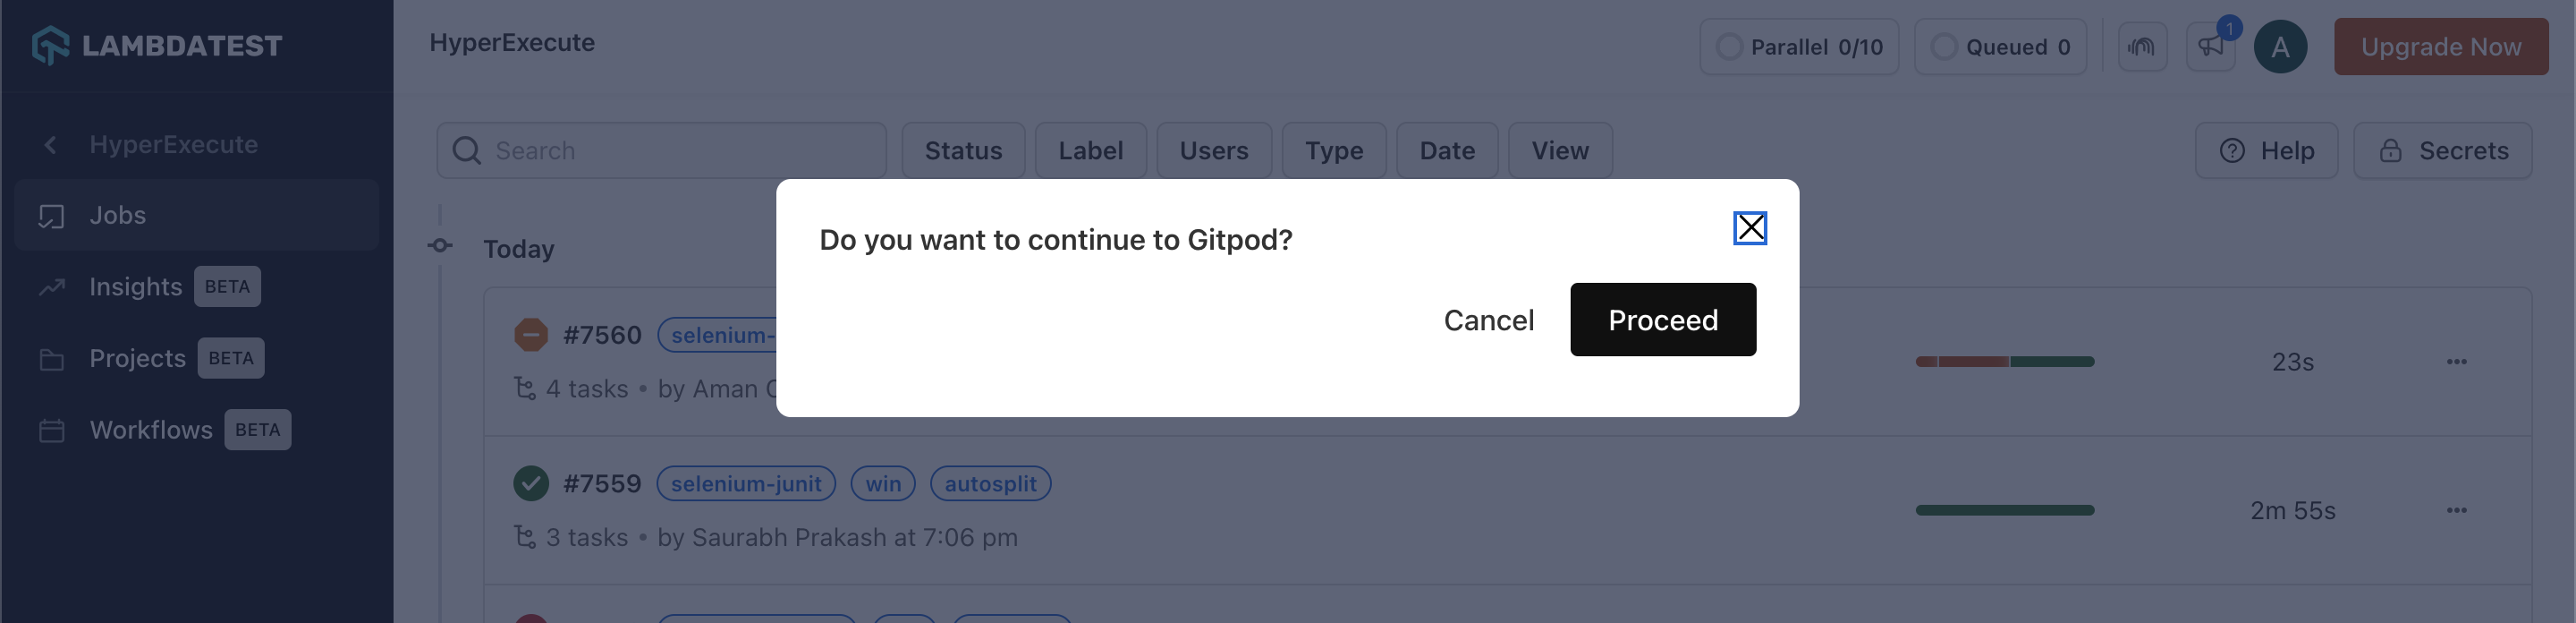
Step 2: Login with TestMu AI credentials. Once logged in, a pop-up confirmation will appear, asking you to 'Proceed' to the Gitpod editor in a new tab. The current tab will display the HyperExecute Dashboard.
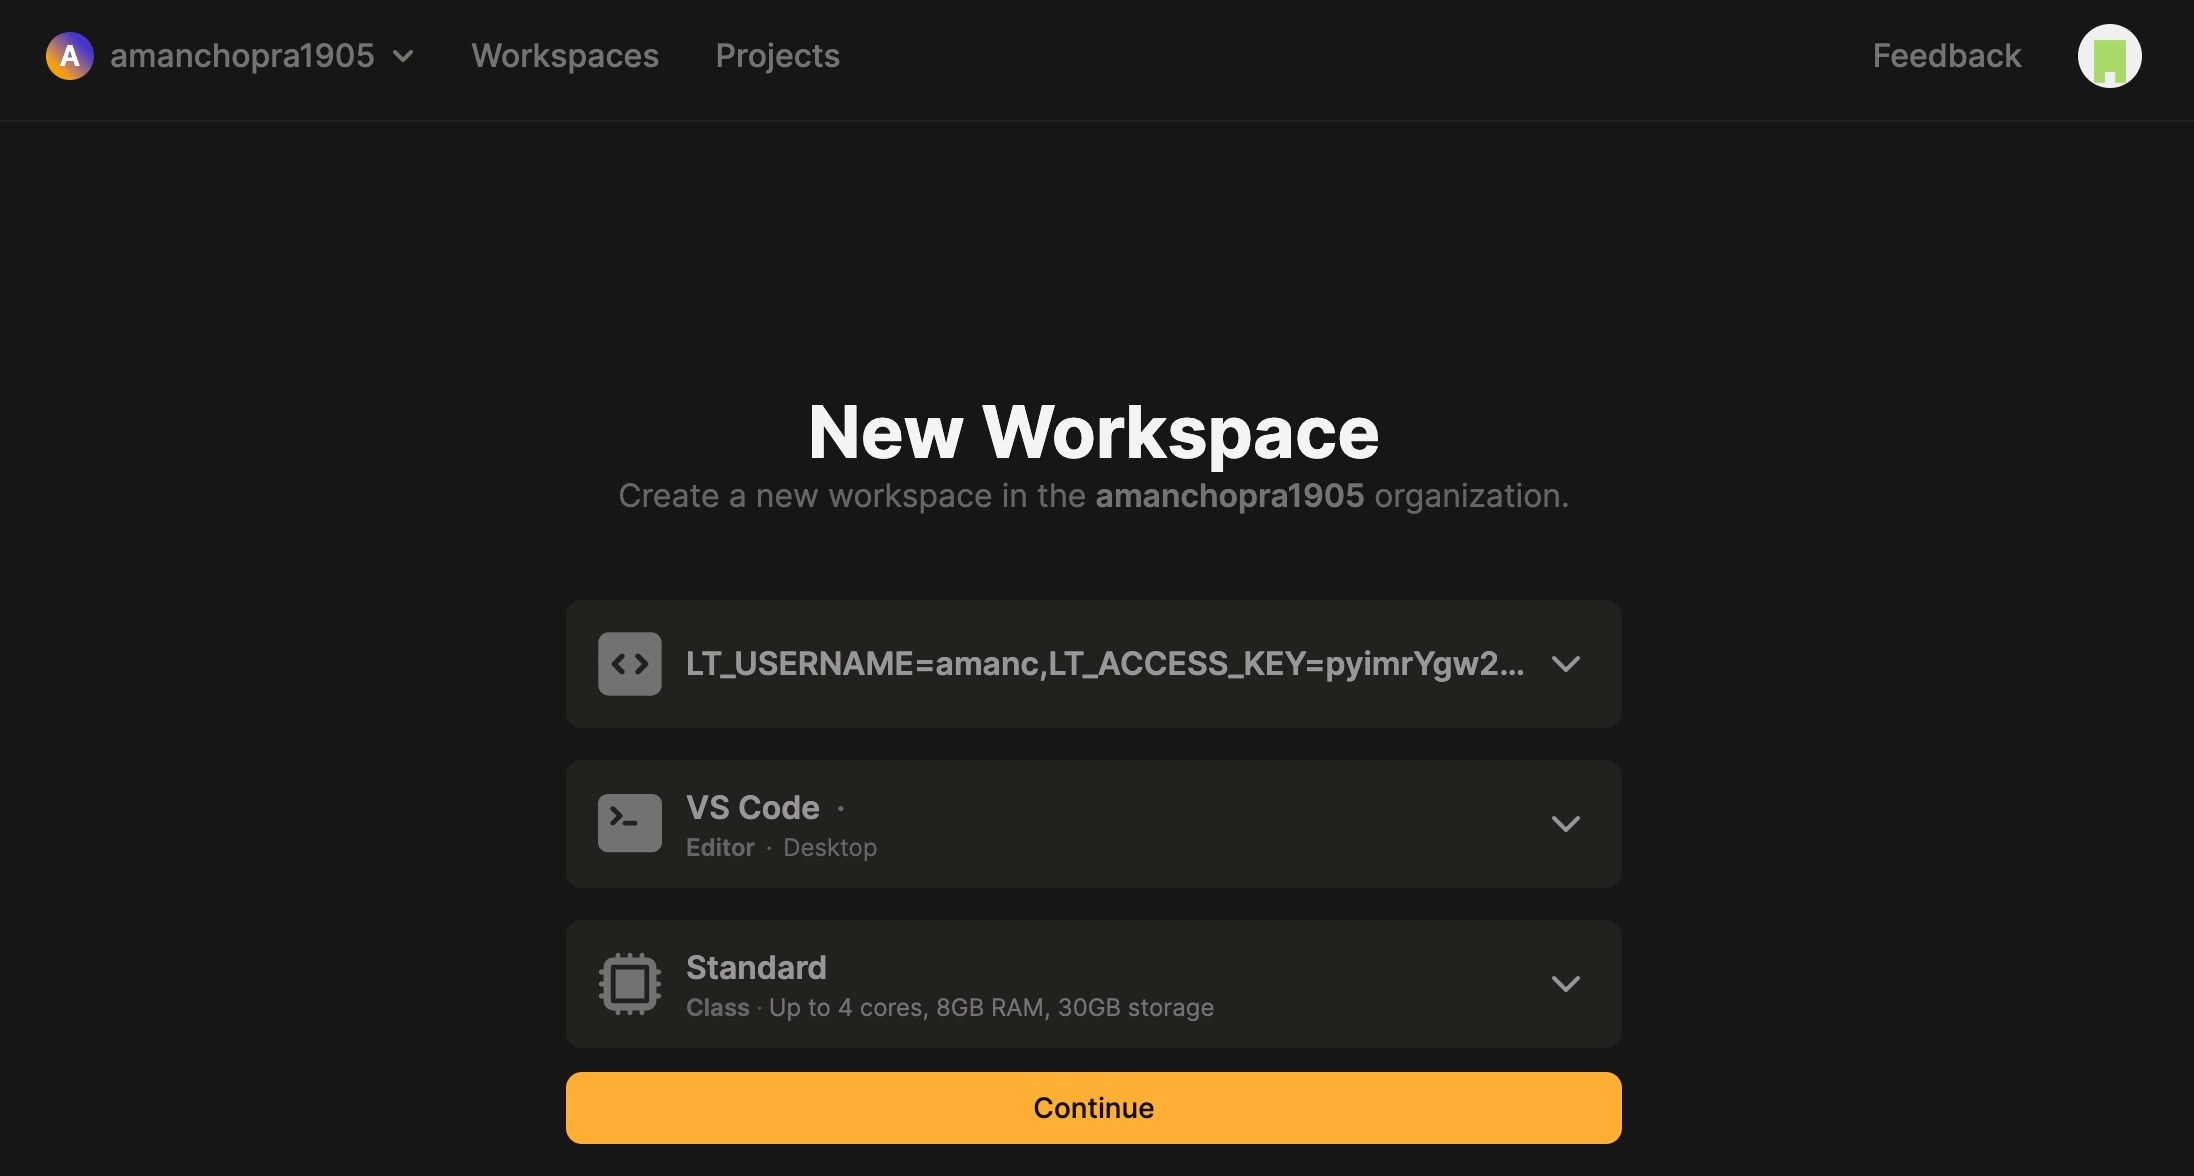
Step 3: Choose your preferred editor (we recommend VS Code Editor)
Step 4: As you are running a sample project, Fetching of the Test Scripts, HyperExecute YAML, HyperExecute CLI and Triggering your tests using the Execution Command will be automated.
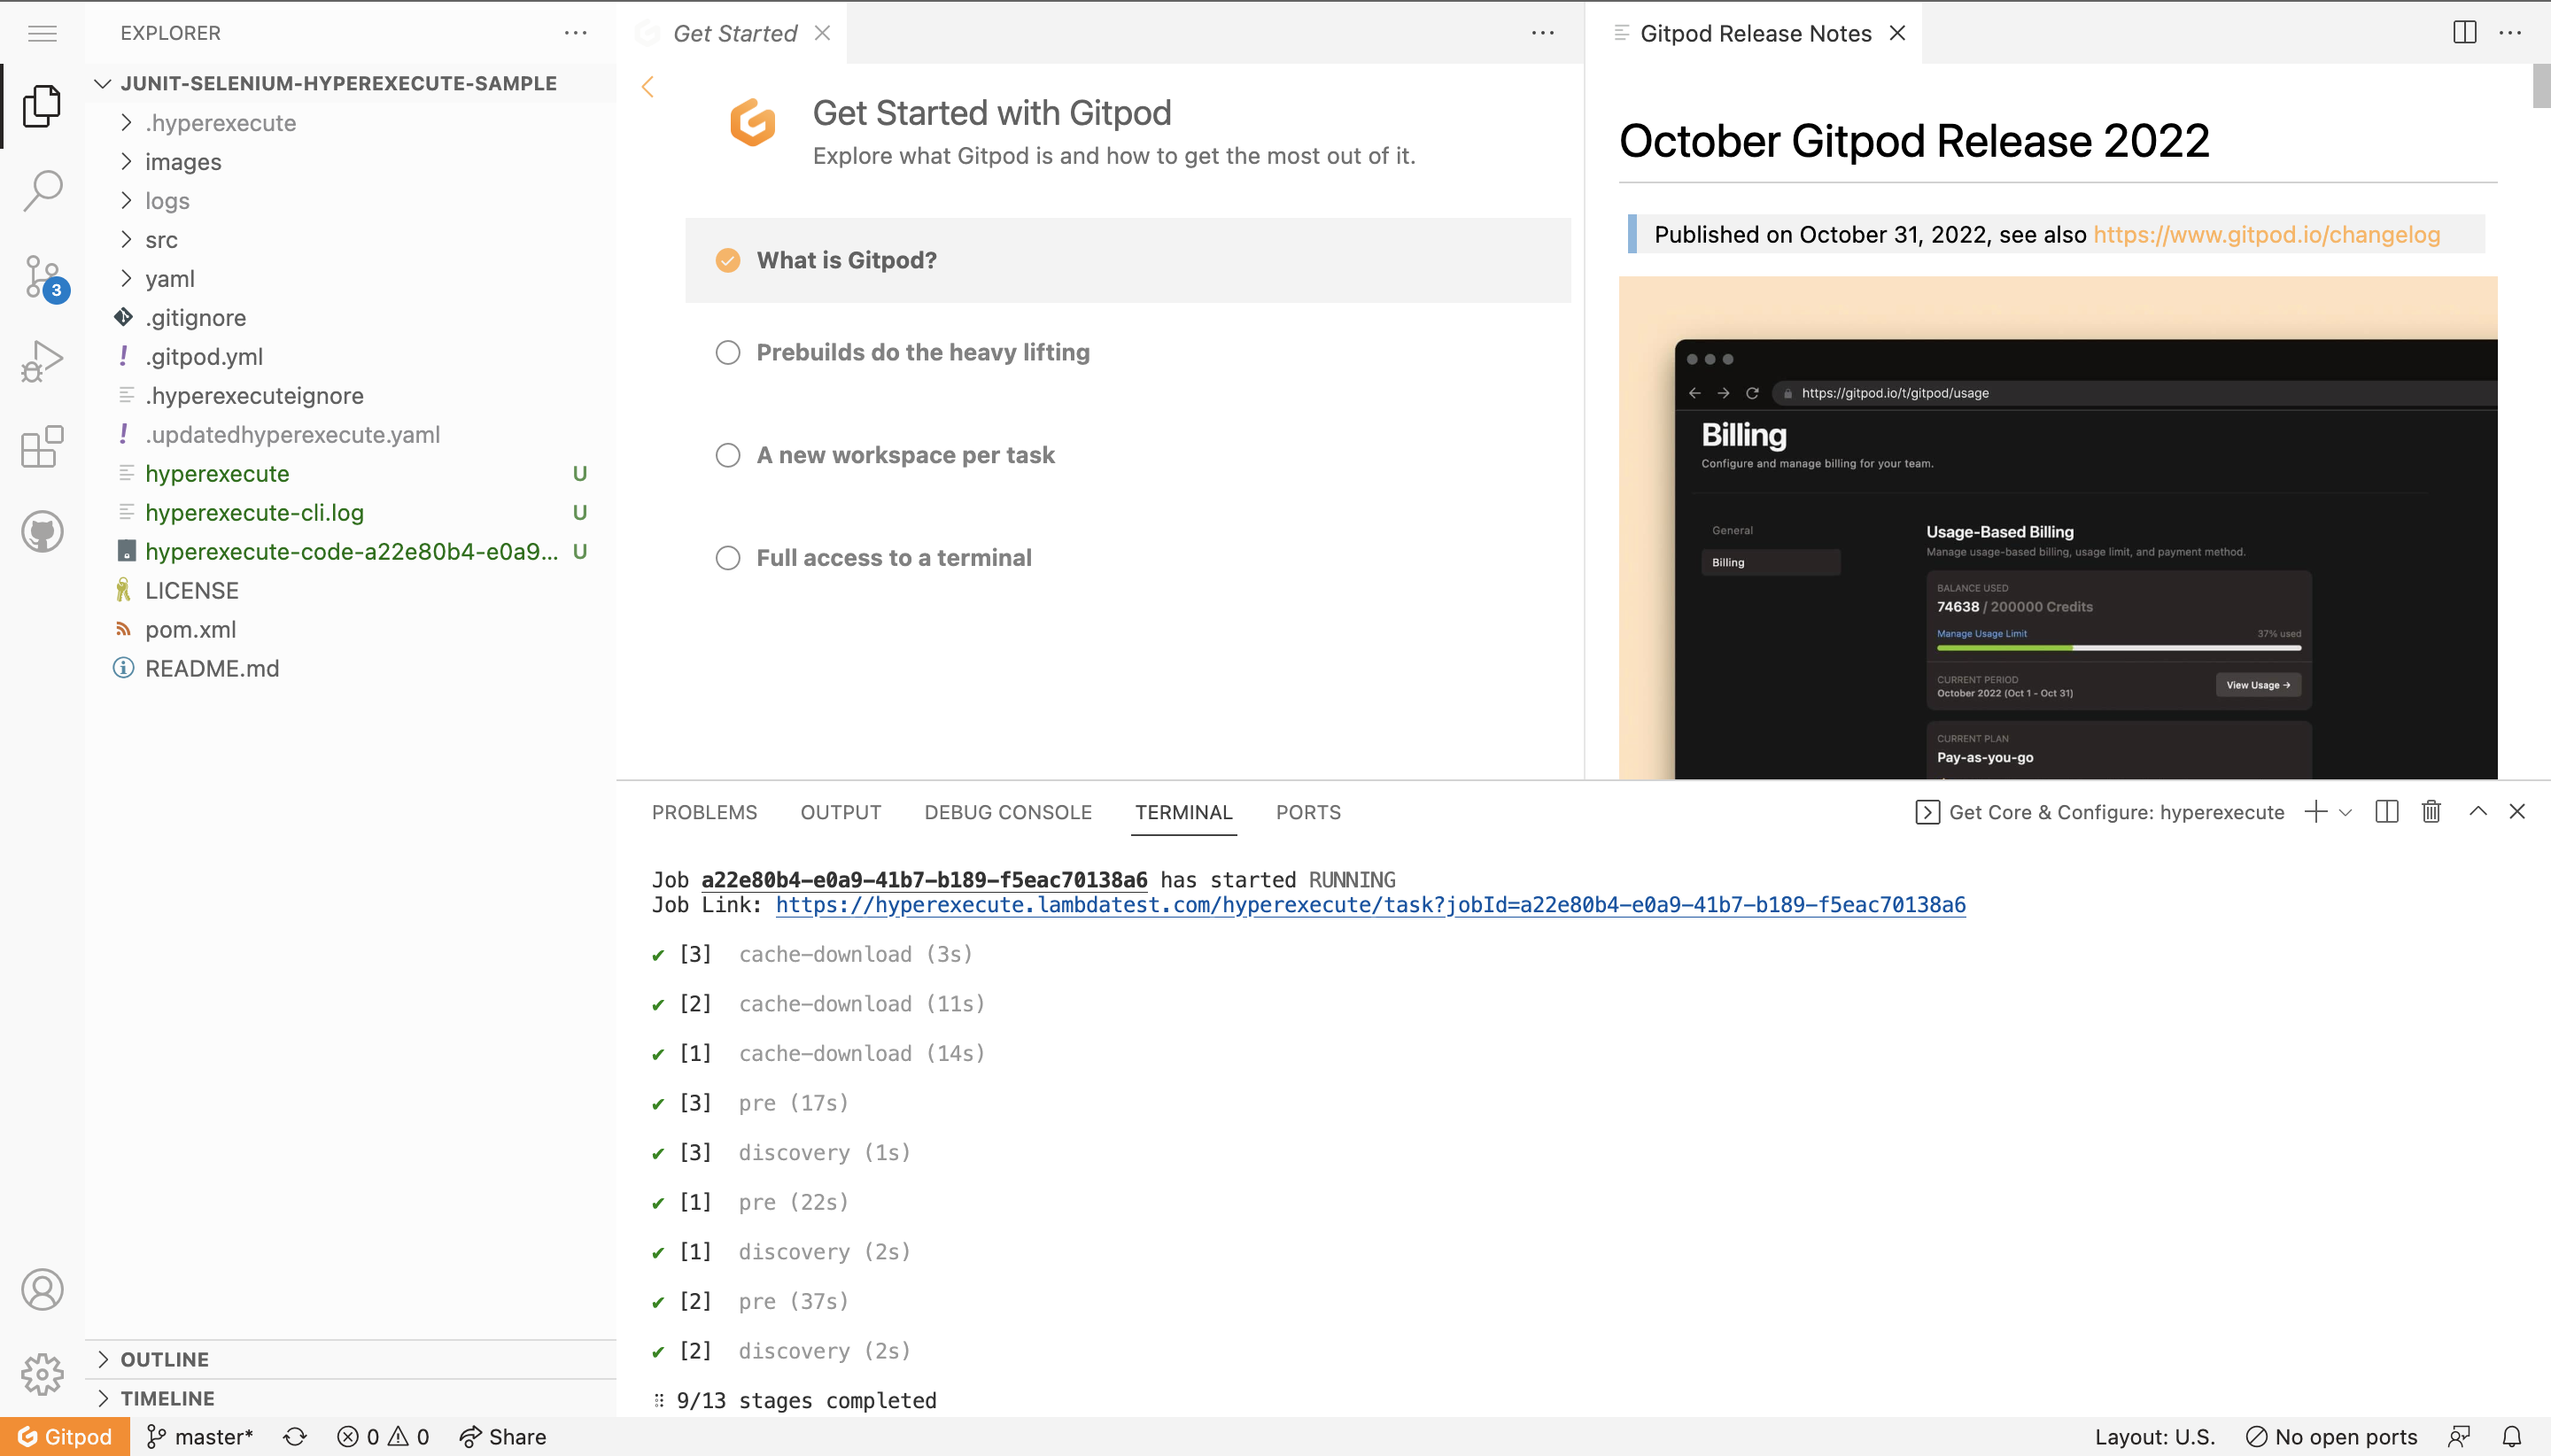
Step 5: Once you see the Job Link in the logs, you can visit the HyperExecute dashboard to see the tests getting executed.
You can also implement Secret Keys in your YAML file.
Navigation in Automation Dashboard
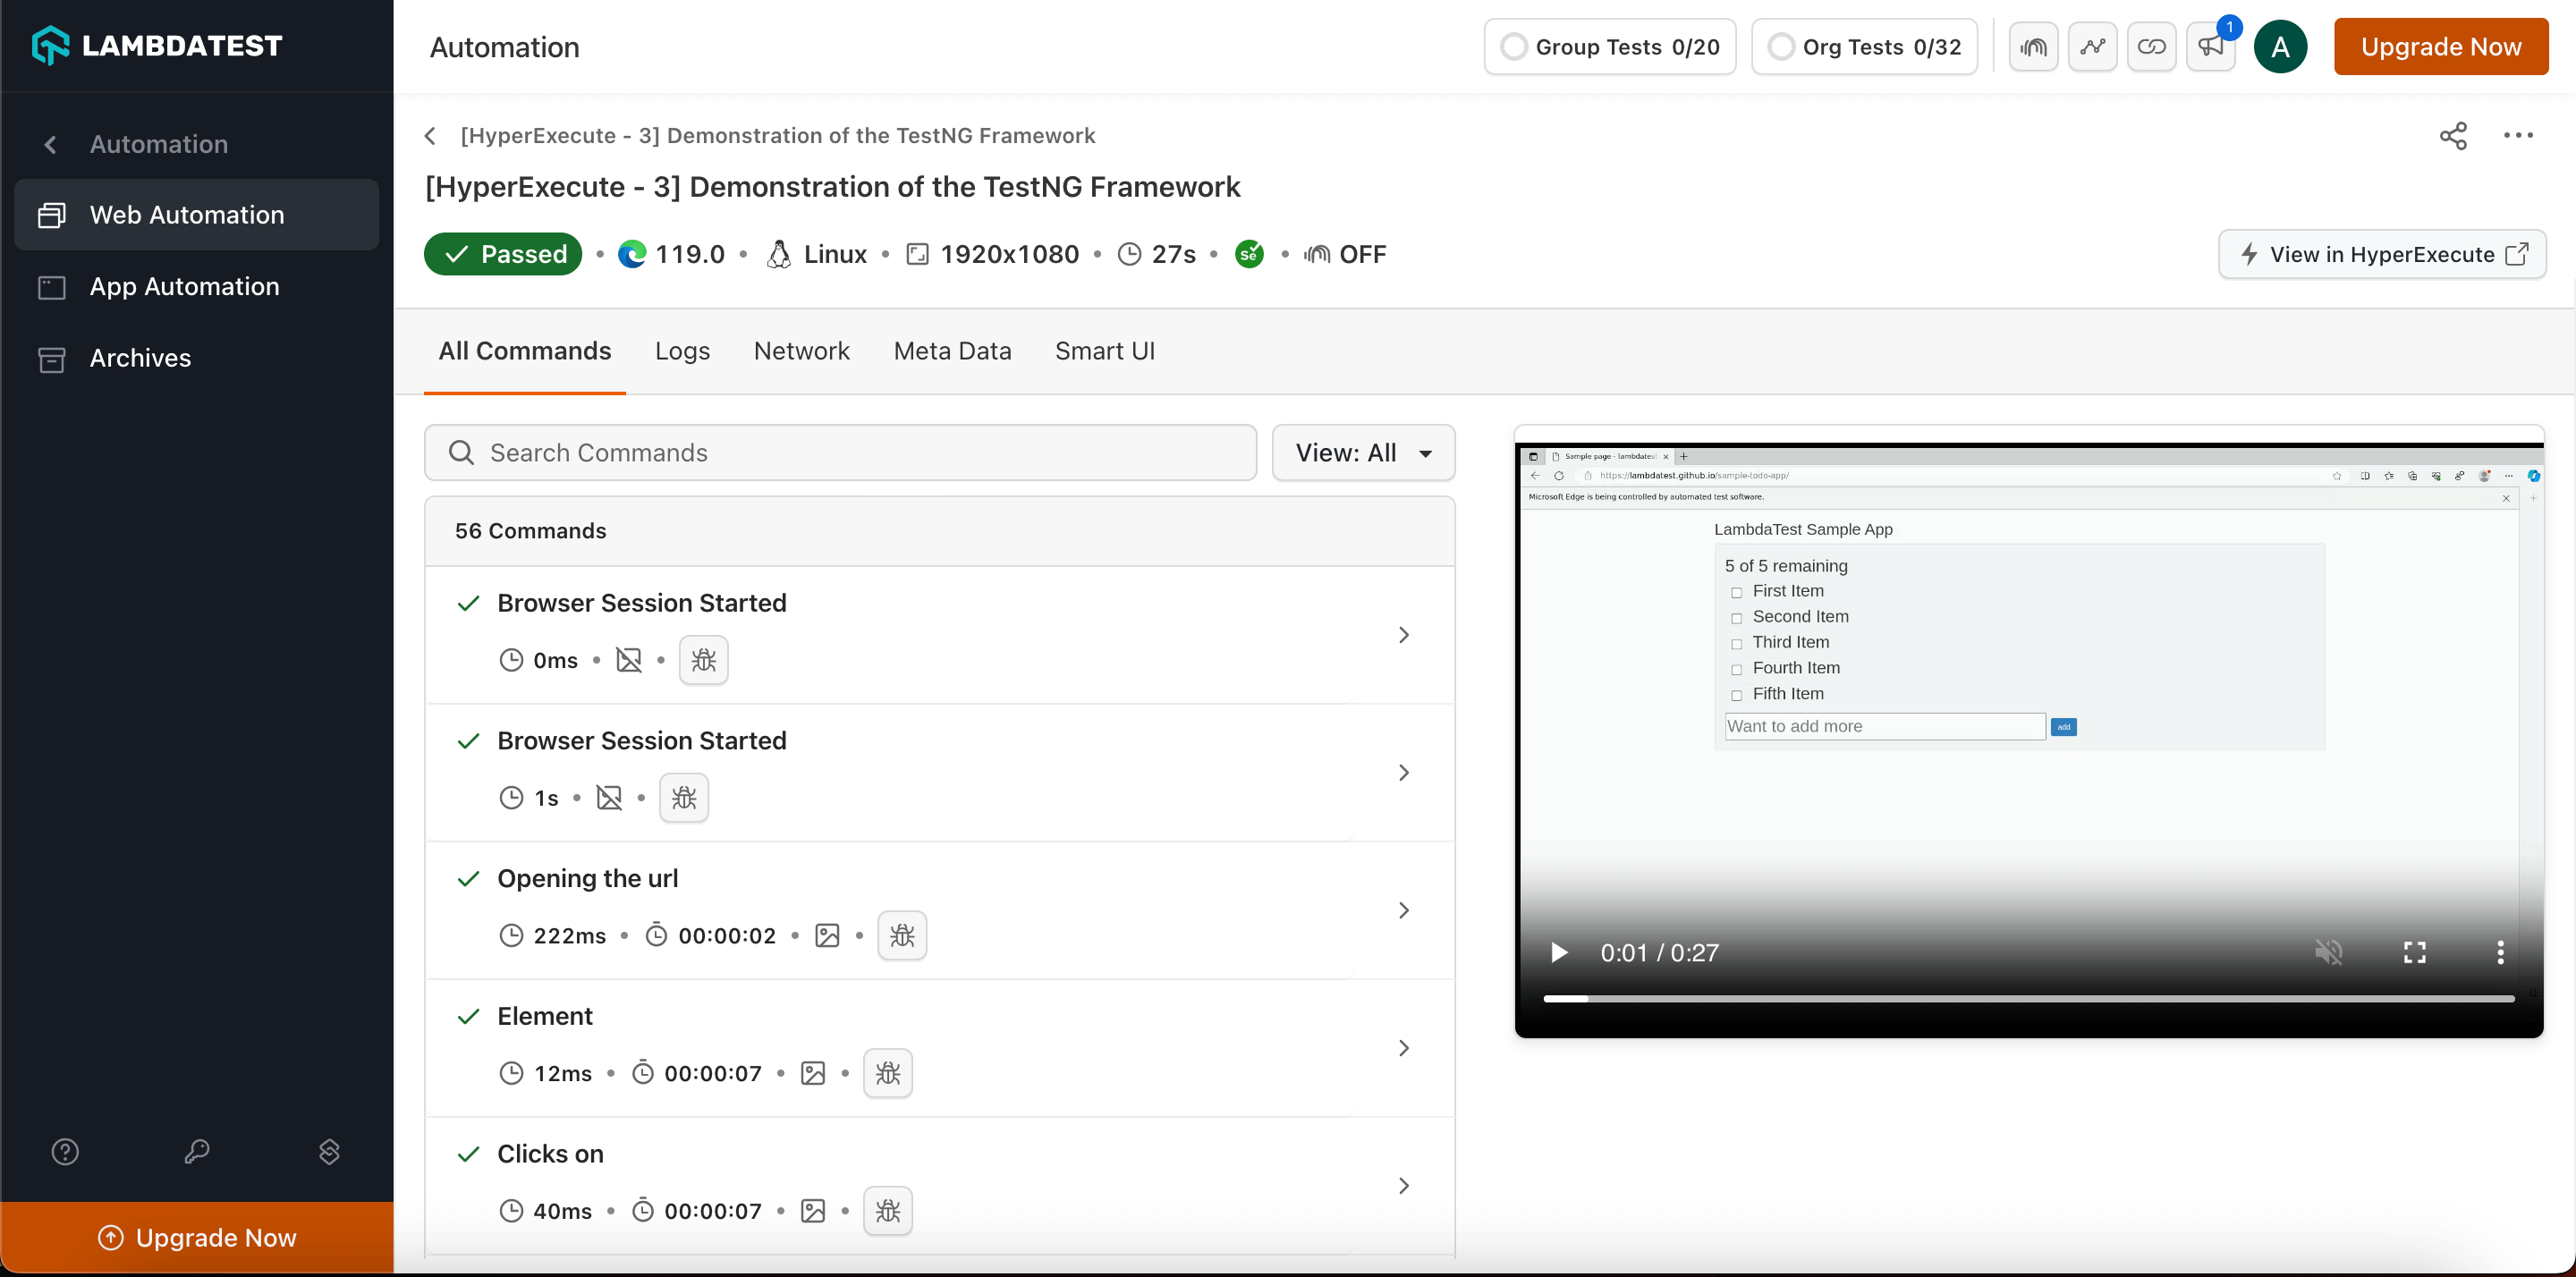
Every test run on the HyperExecute has a unique jobId associated with it. Each jobId can in turn constitute single (or multiple) groupId(s). You can visit HyperExecute Automation Dashboard for checking the status of the test execution.
You can seamlessly navigate between JobId's and taskId's. You need to click on the testID to navigate from the HyperExecute logs to the Automation Dashboard.
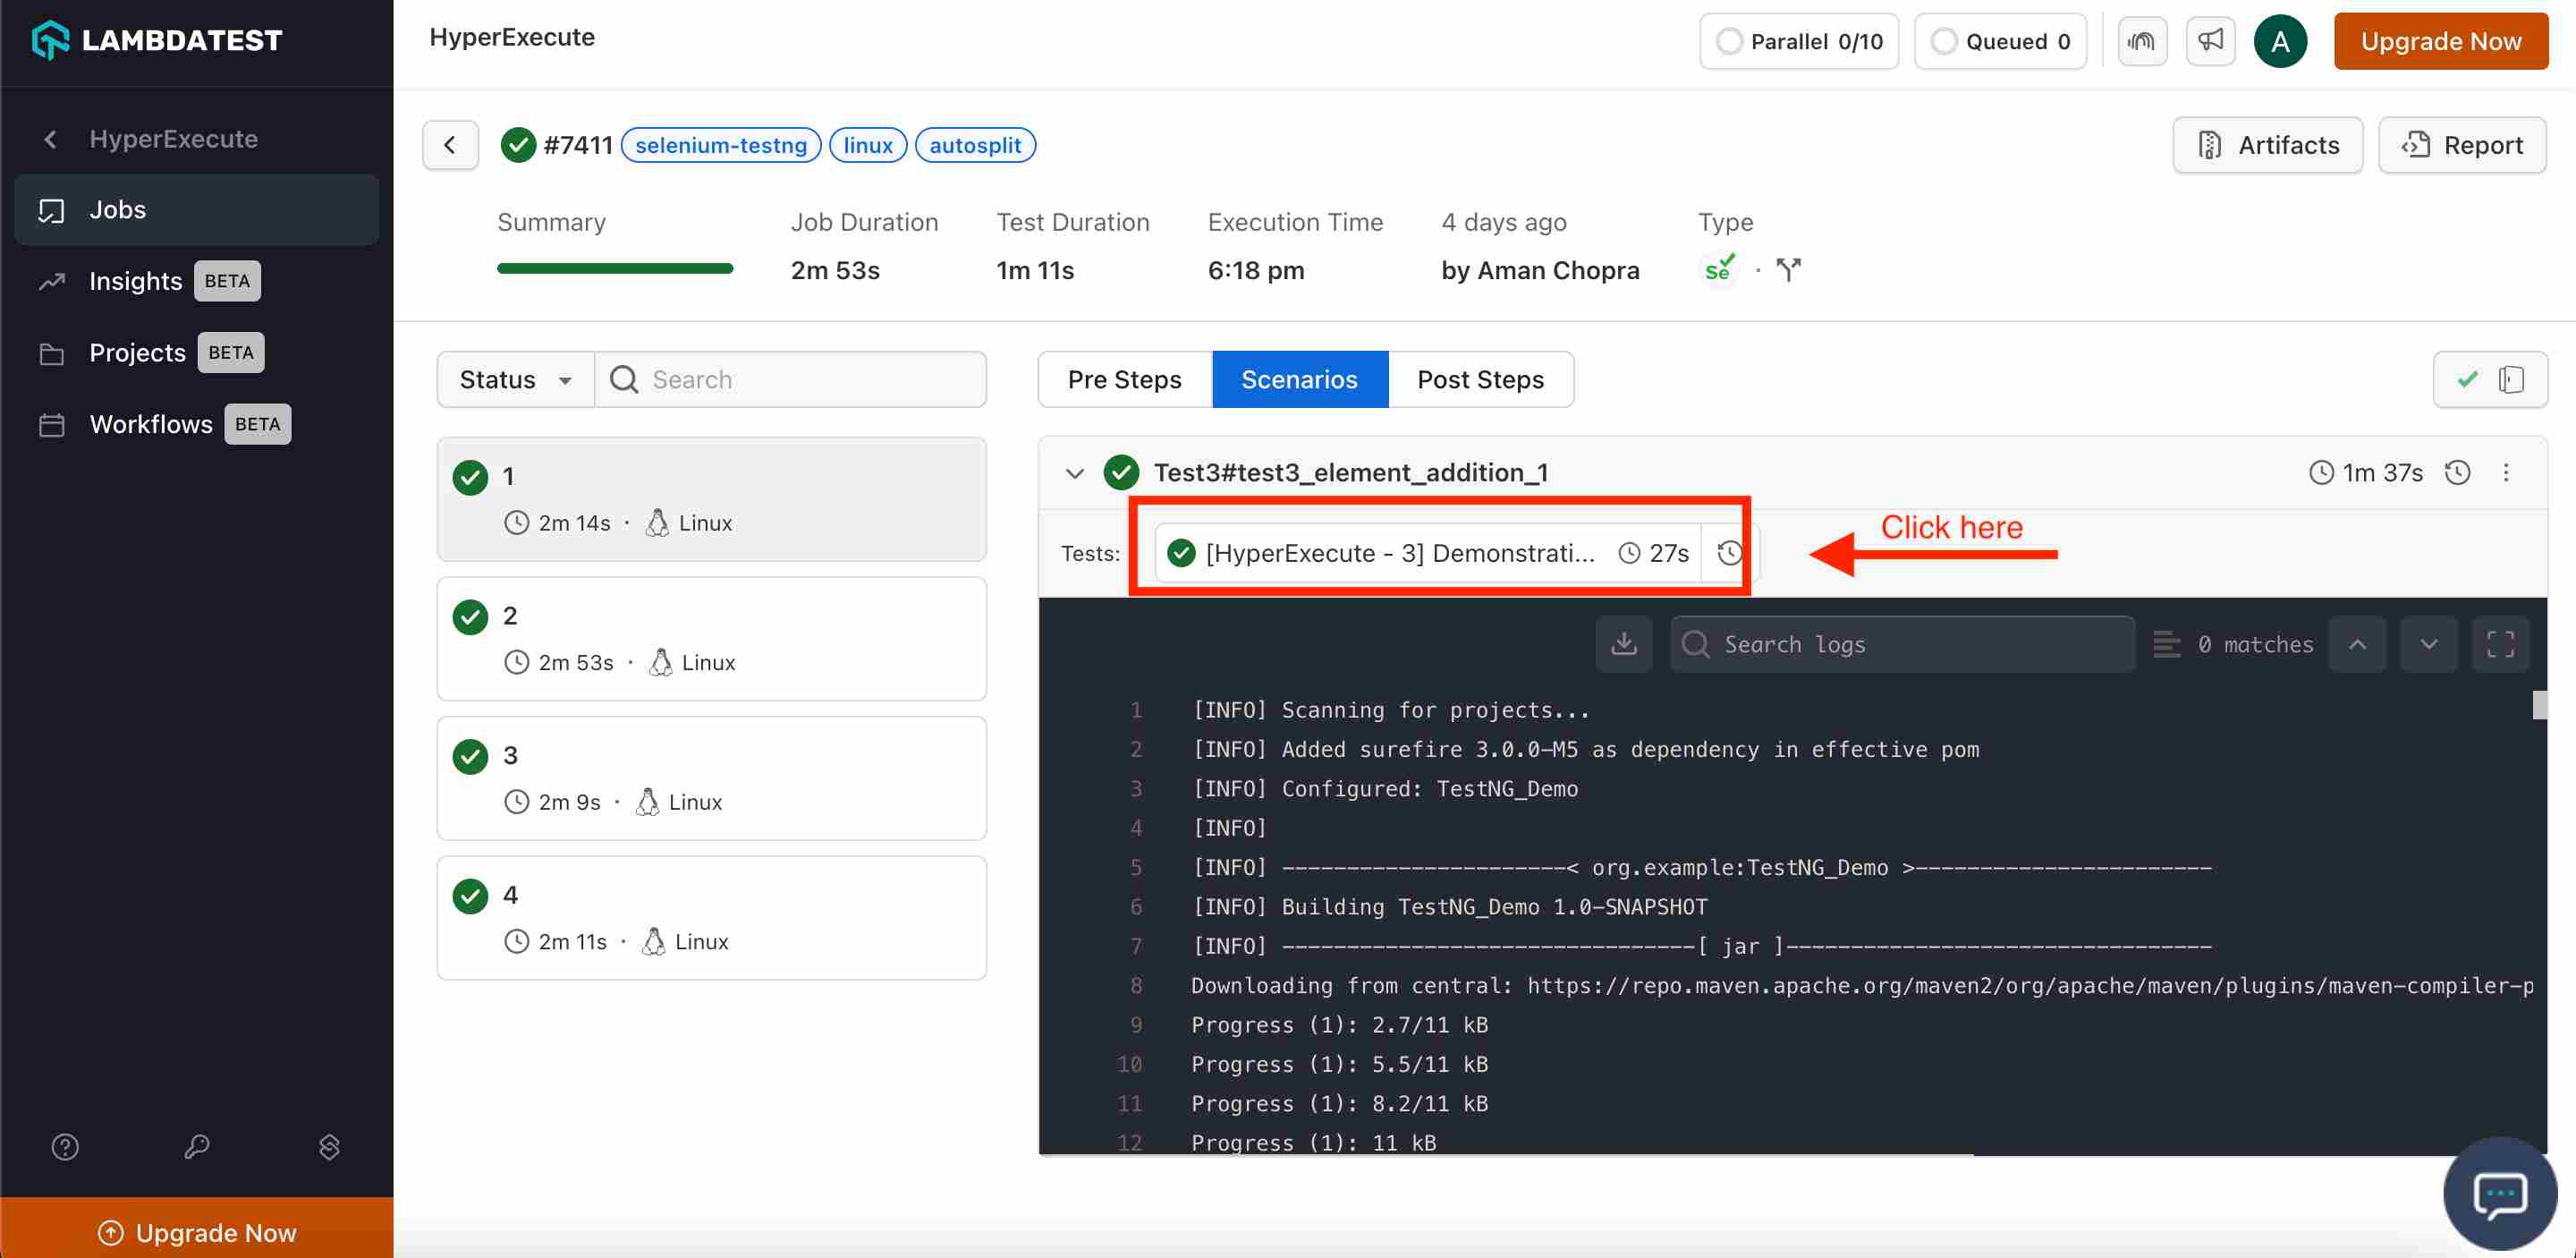
The snapshot below shows the videos, logs and other meta data for that specific test_ID
Running JUnit Framework Tests on HyperExecute
JUnit is a widely-used testing framework for Java that is extensively employed in Selenium test automation. It provides annotations and assertions to structure and validate test cases, making it an integral part of the Selenium testing ecosystem.
HyperExecute is an AI Native Test Orchestration Cloud Platform that empowers you to run end-to-end tests quickly and efficiently. It provides Just-in-Time (JIT) testing infrastructure with fast execution speeds, smart orchestration, and detailed logs.
Execute your JUnit framework tests on HyperExecute via two different methods:
- Using Local System - You can use your own local machine to execute tests.
- Using Gitpod Platform - Execute tests using GitPod. (Requires a Gitpod account)
1. Testing Using Local System
Follow the step-by-step guide to execute your test on HyperExecute.
Step 1: Configure Your Test Suite
You can use your own project to configure and test it. For demo purposes, we are using the sample repository.
Download or Clone the code sample for the JUnit from the TestMu AI GitHub repository to run the tests on the HyperExecute.
View on GitHubIf you are using your own project, make sure you update the Hub endpoint in your tests file.
By setting up the Hub endpoint, you establish the communication channel between your tests and the browser nodes, enabling effective test distribution and execution.
Configure the desired capabilities based on your test requirements. For example:
DesiredCapabilities capabilities = new DesiredCapabilities();
capabilities.setCapability("browserName", "chrome");
capabilities.setCapability("version", "70.0");
capabilities.setCapability("platform", "win10"); # If this cap isn't specified, it will just get the any available one
capabilities.setCapability("build", "LambdaTestSampleApp");
capabilities.setCapability("name", "LambdaTestJavaSample");
capabilities.setCapability("network", true); # To enable network logs
capabilities.setCapability("visual", true); # To enable step by step screenshot
capabilities.setCapability("video", true); # To enable video recording
capabilities.setCapability("console", true); # To capture console logs
You can also use dev and beta browser versions. To generate capabilities for your test requirements, you can use our inbuilt 🔗 Capabilities Generator.
Step 2: Configure YAML in your Test Suite
Configure your YAML file as per your use cases using key value pairs.
In this sample YAML file, we have mentioned:
- version of the YAML file
- Timeouts for executing your project
- Mode of execution is Autosplit. You can also opt for Matrix or Hybrid mode.
- Pre and Post commands
- Reports and Artefacts that will be generated after the completion of tests
- and other necessary YAML Parameters
---
version: 0.1
globalTimeout: 150
testSuiteTimeout: 150
testSuiteStep: 150

runson: linux

autosplit: true
retryOnFailure: true

maxRetries: 1
concurrency: 3

env:
  # PAT: ${{ .secrets.testKey }}
  CACHE_DIR: m2_cache_dir
  TARGET_OS: linux

cacheKey: '{{ checksum "pom.xml" }}'
cacheDirectories:
  - ${CACHE_DIR}

shell: bash

pre:
  # Download and install packages in the CACHE_DIR.
  # Skip execution of the tests in the pre step
  - mvn -Dmaven.repo.local=${CACHE_DIR} -Dmaven.test.skip=true clean install

post:
  - cat yaml/linux/junit_hyperexecute_autosplit_sample.yaml

mergeArtifacts: true

uploadArtefacts:
 - name: Final-Report
   path:
    - target/site/**
 - name: Surefire-Report
   path:
    - target/surefire-reports/**

report: true
partialReports:
  location: target/surefire-reports/html
  type: html
  frameworkName: extent

testDiscovery:
  type: raw
  mode: remote
  command: grep 'public class' src/test/java/hyperexecute/*.java | awk '{print$3}'

testRunnerCommand: mvn -Dplatname=linux -Dmaven.repo.local=m2_cache_dir -Dtest=$test test site surefire-report:report

jobLabel: [selenium-junit, linux, autosplit]
Step 3: Execute your Test Suite
NOTE : In case of MacOS, if you get a permission denied warning while executing CLI, simply run
chmod u+x ./hyperexecuteto allow permission. In case you get a security popup, allow it from your System Preferences -> Security & Privacy -> General tab.
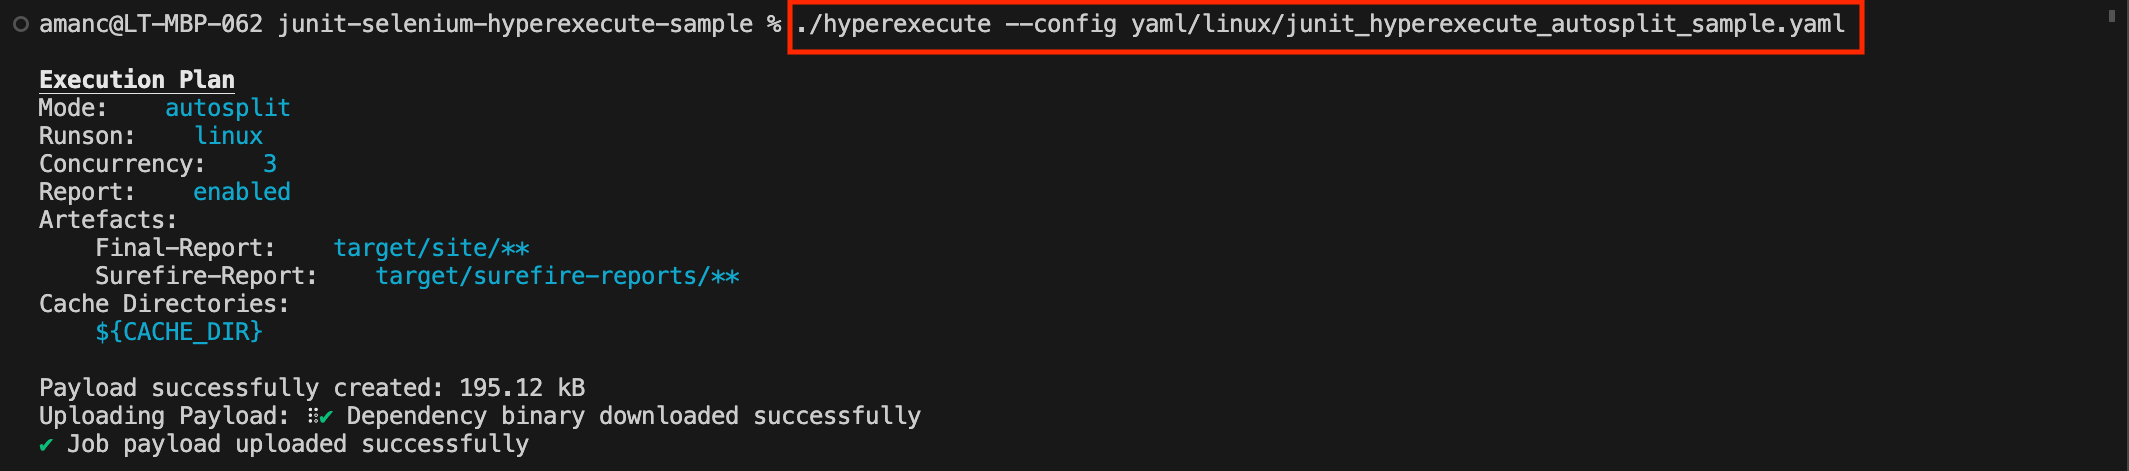
Run the below command in your terminal at the root folder of the project:
./hyperexecute --config RELATIVE_PATH_OF_YOUR_YAML_FILE
OR use this command if you have not exported your username and access key.
./hyperexecute --user undefined --key undefined --config RELATIVE_PATH_OF_YOUR_YAML_FILE
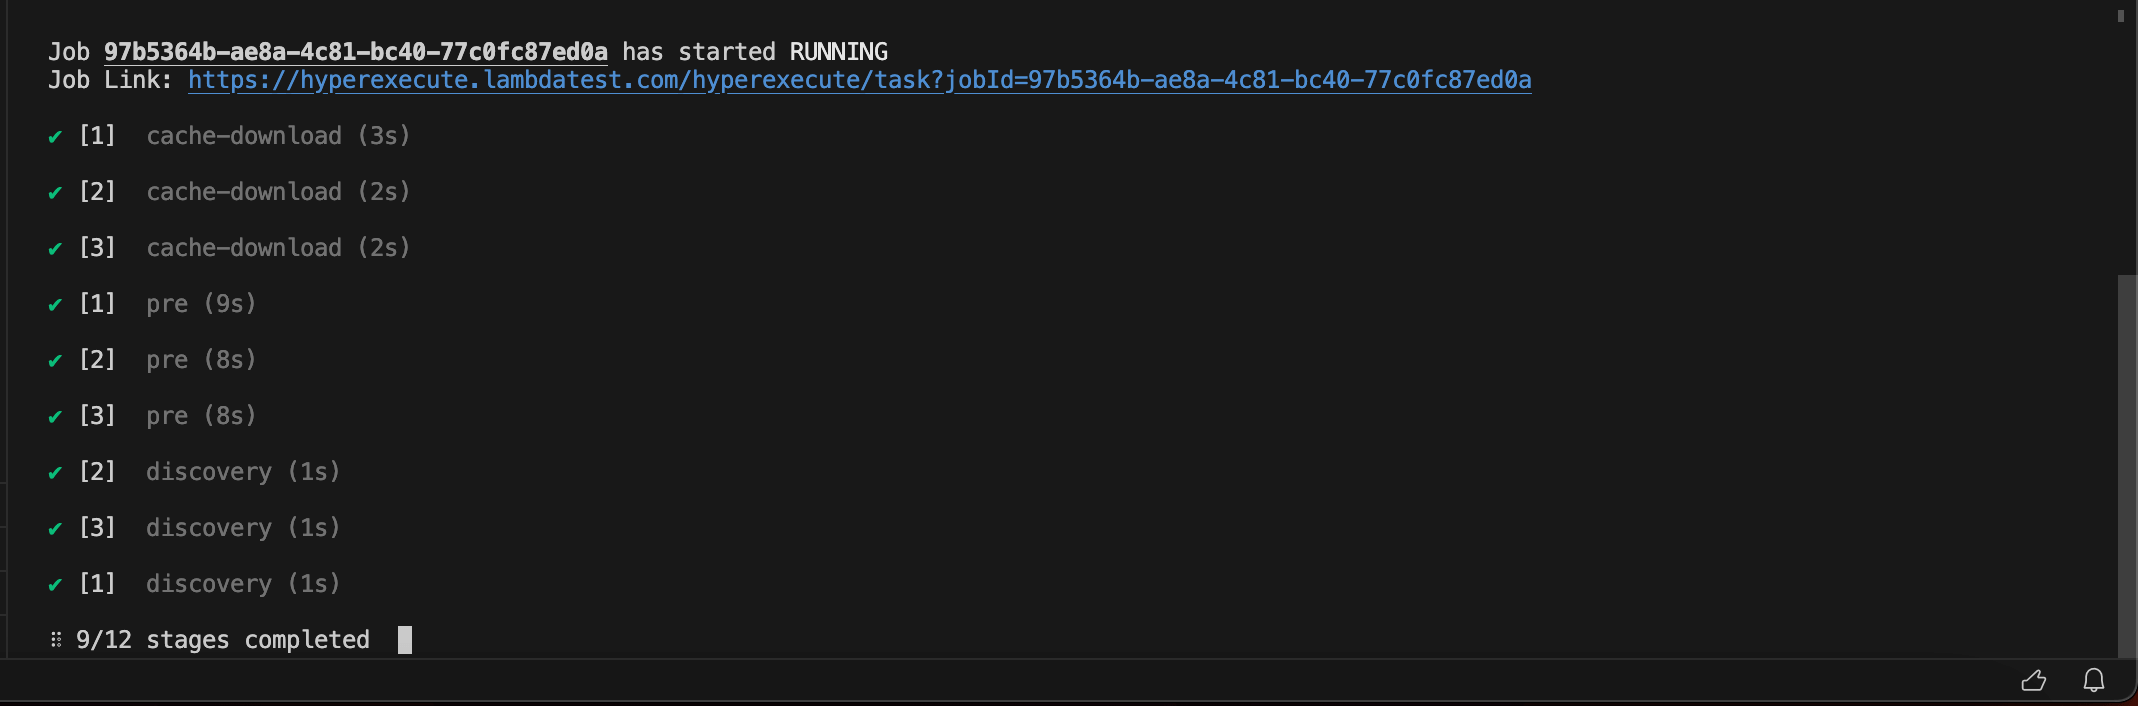
Step 4: Monitor the Test Execution
Visit the HyperExecute Dashboard and check your Job status.
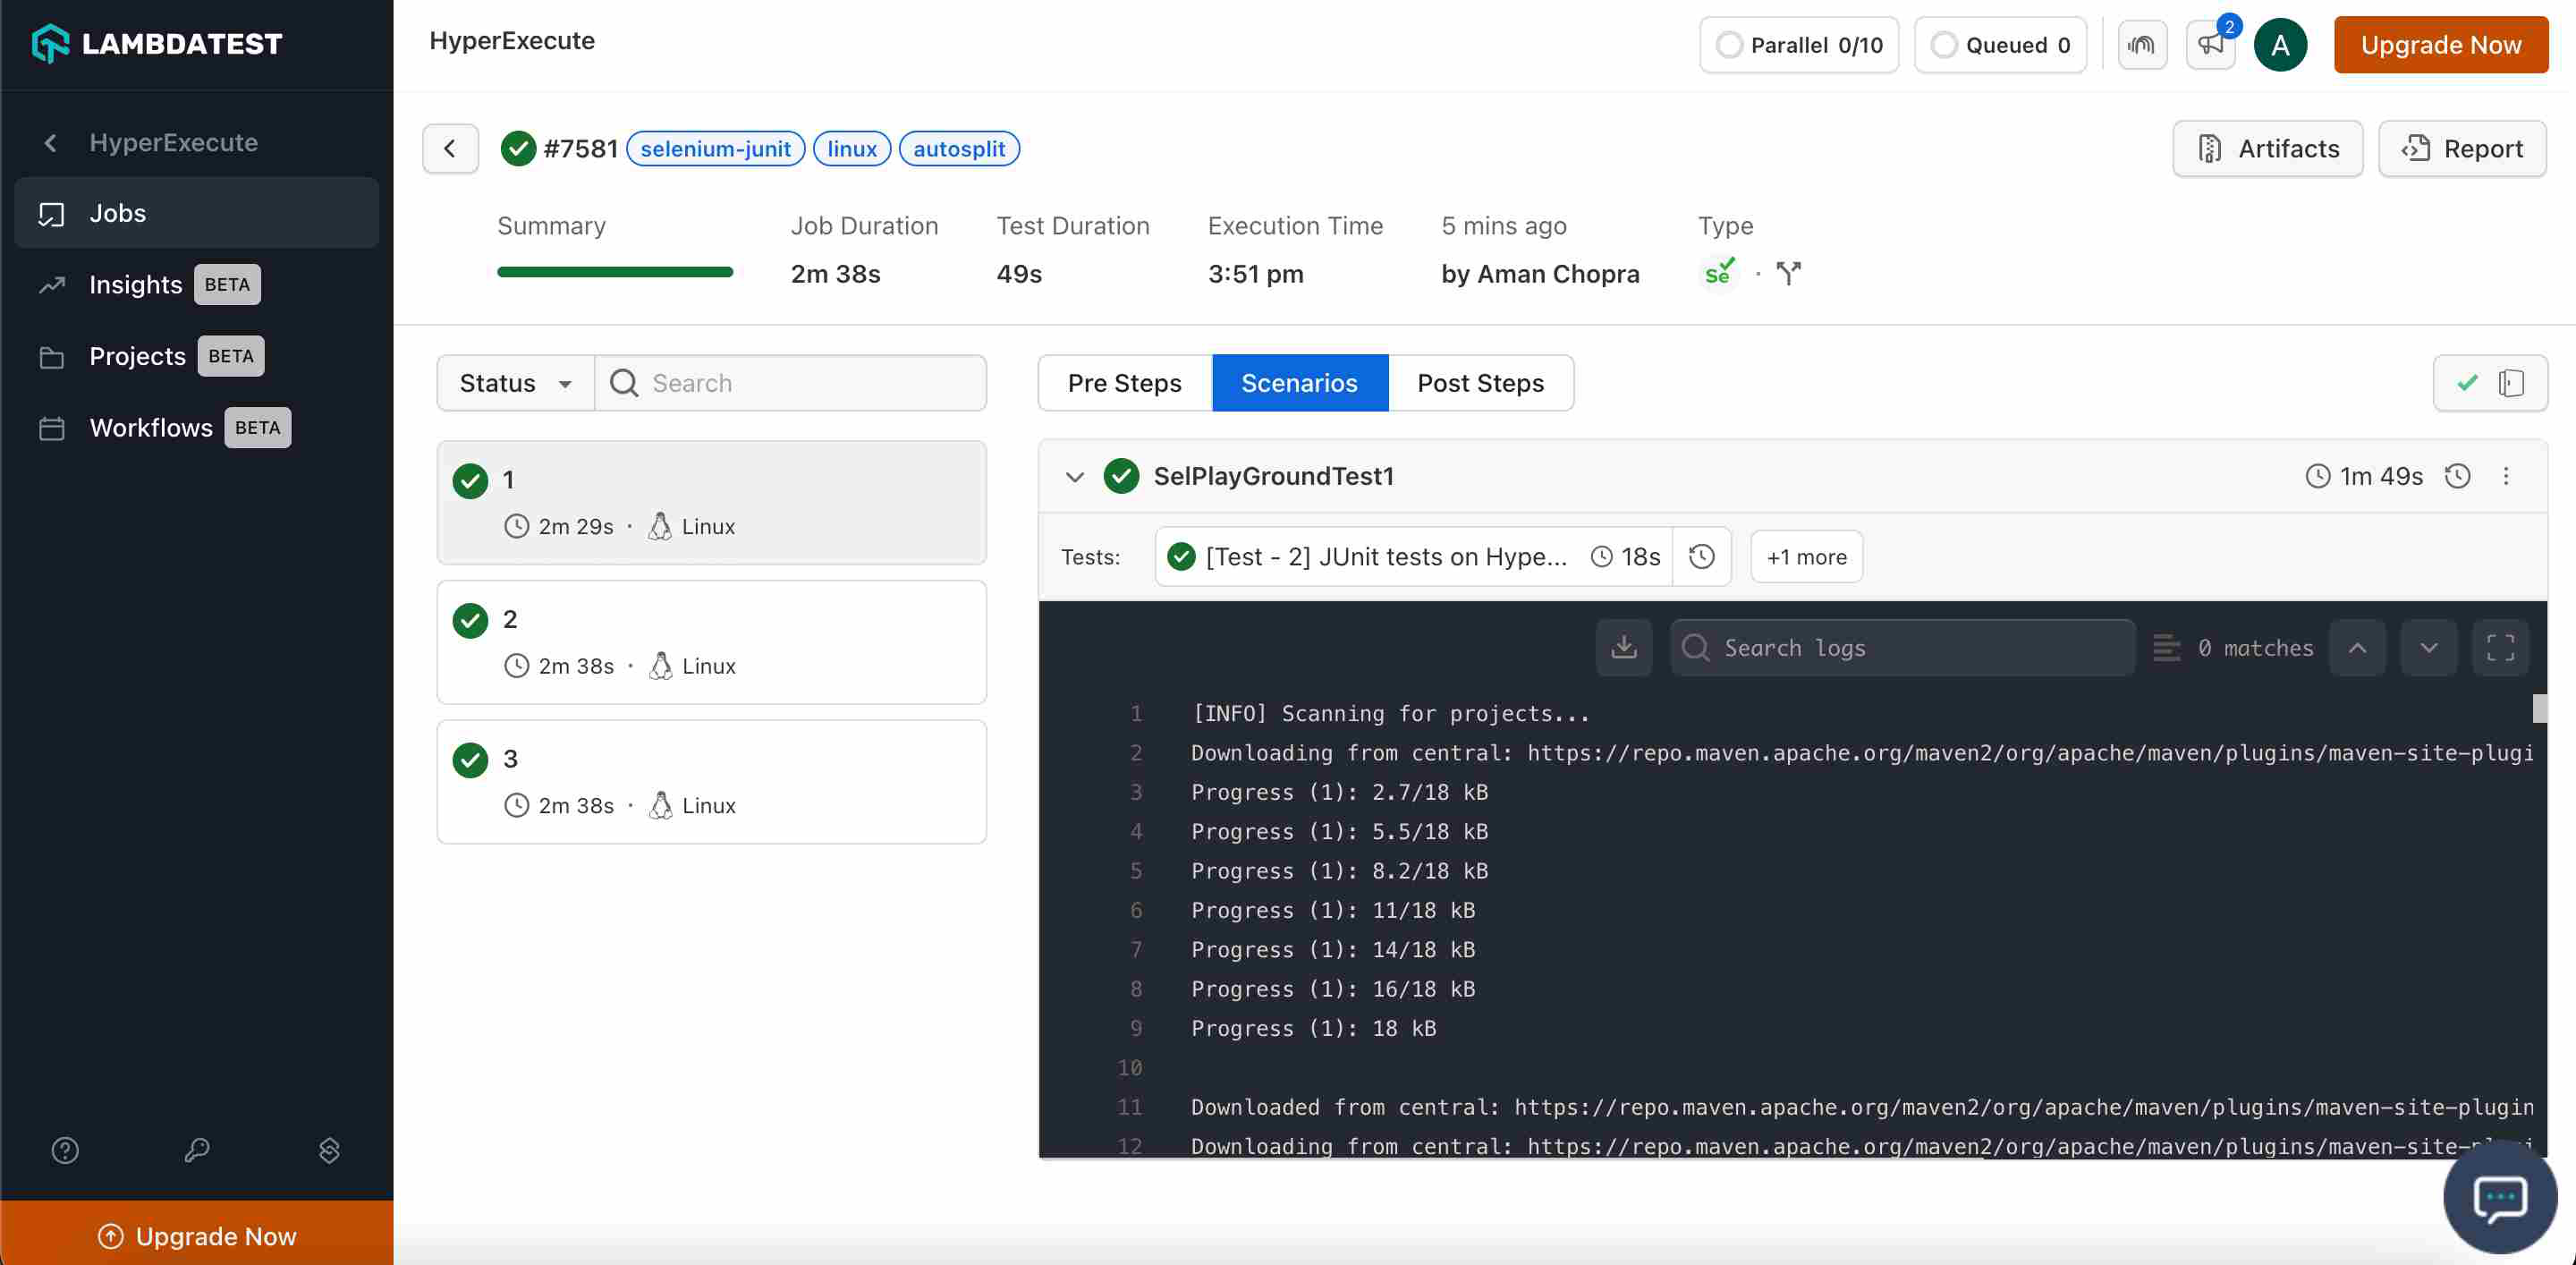
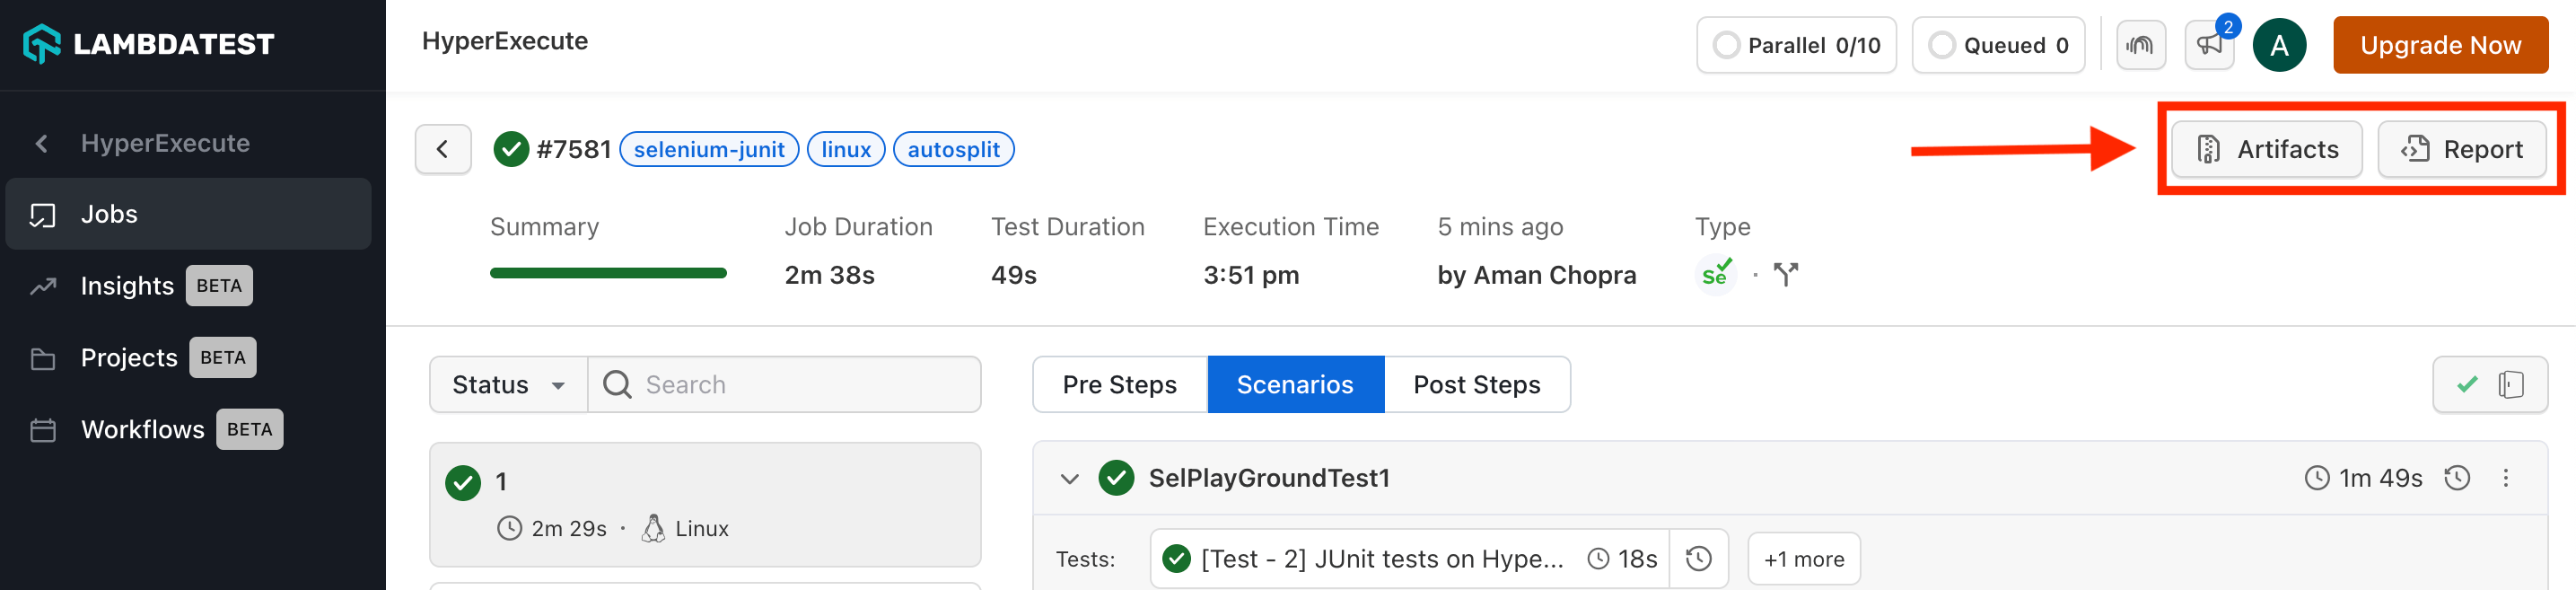
Step 5: Download Artifacts and Reports
HyperExecute also facilitates the provision to download the Artifacts and Reports on your local machine. Click on the corresponding button to download your generated artifacts and reports.
2. Testing Using Gitpod
You can also use the Gitpod platform to execute our sample repository. It will fetch all the sample codebases and trigger the CLI to execute the tests.
Follow the below steps to run Test using Gitpod:
Step 1: Click 'Open in Gitpod' button. You will be redirected to Login/Signup page. This button is configured to redirect you to the Gitpod platform where you will be able to execute our sample repository.
Step 2: Login with TestMu AI credentials. Once logged in, a pop-up confirmation will appear, asking you to 'Proceed' to the Gitpod editor in a new tab. The current tab will display the HyperExecute Dashboard.
Step 3: Choose your preferred editor (we recommend VS Code Editor)
Step 4: As you are running a sample project, Fetching of the Test Scripts, HyperExecute YAML, HyperExecute CLI and Triggering your tests using the Execution Command will be automated.
Step 5: Once you see the Job Link in the logs, you can visit the HyperExecute dashboard to see the tests getting executed.
You can also implement Secret Keys in your YAML file.
Navigation in Automation Dashboard
Every test run on the HyperExecute has a unique jobId associated with it. Each jobId can in turn constitute single (or multiple) groupId(s). You can visit HyperExecute Automation Dashboard for checking the status of the test execution.
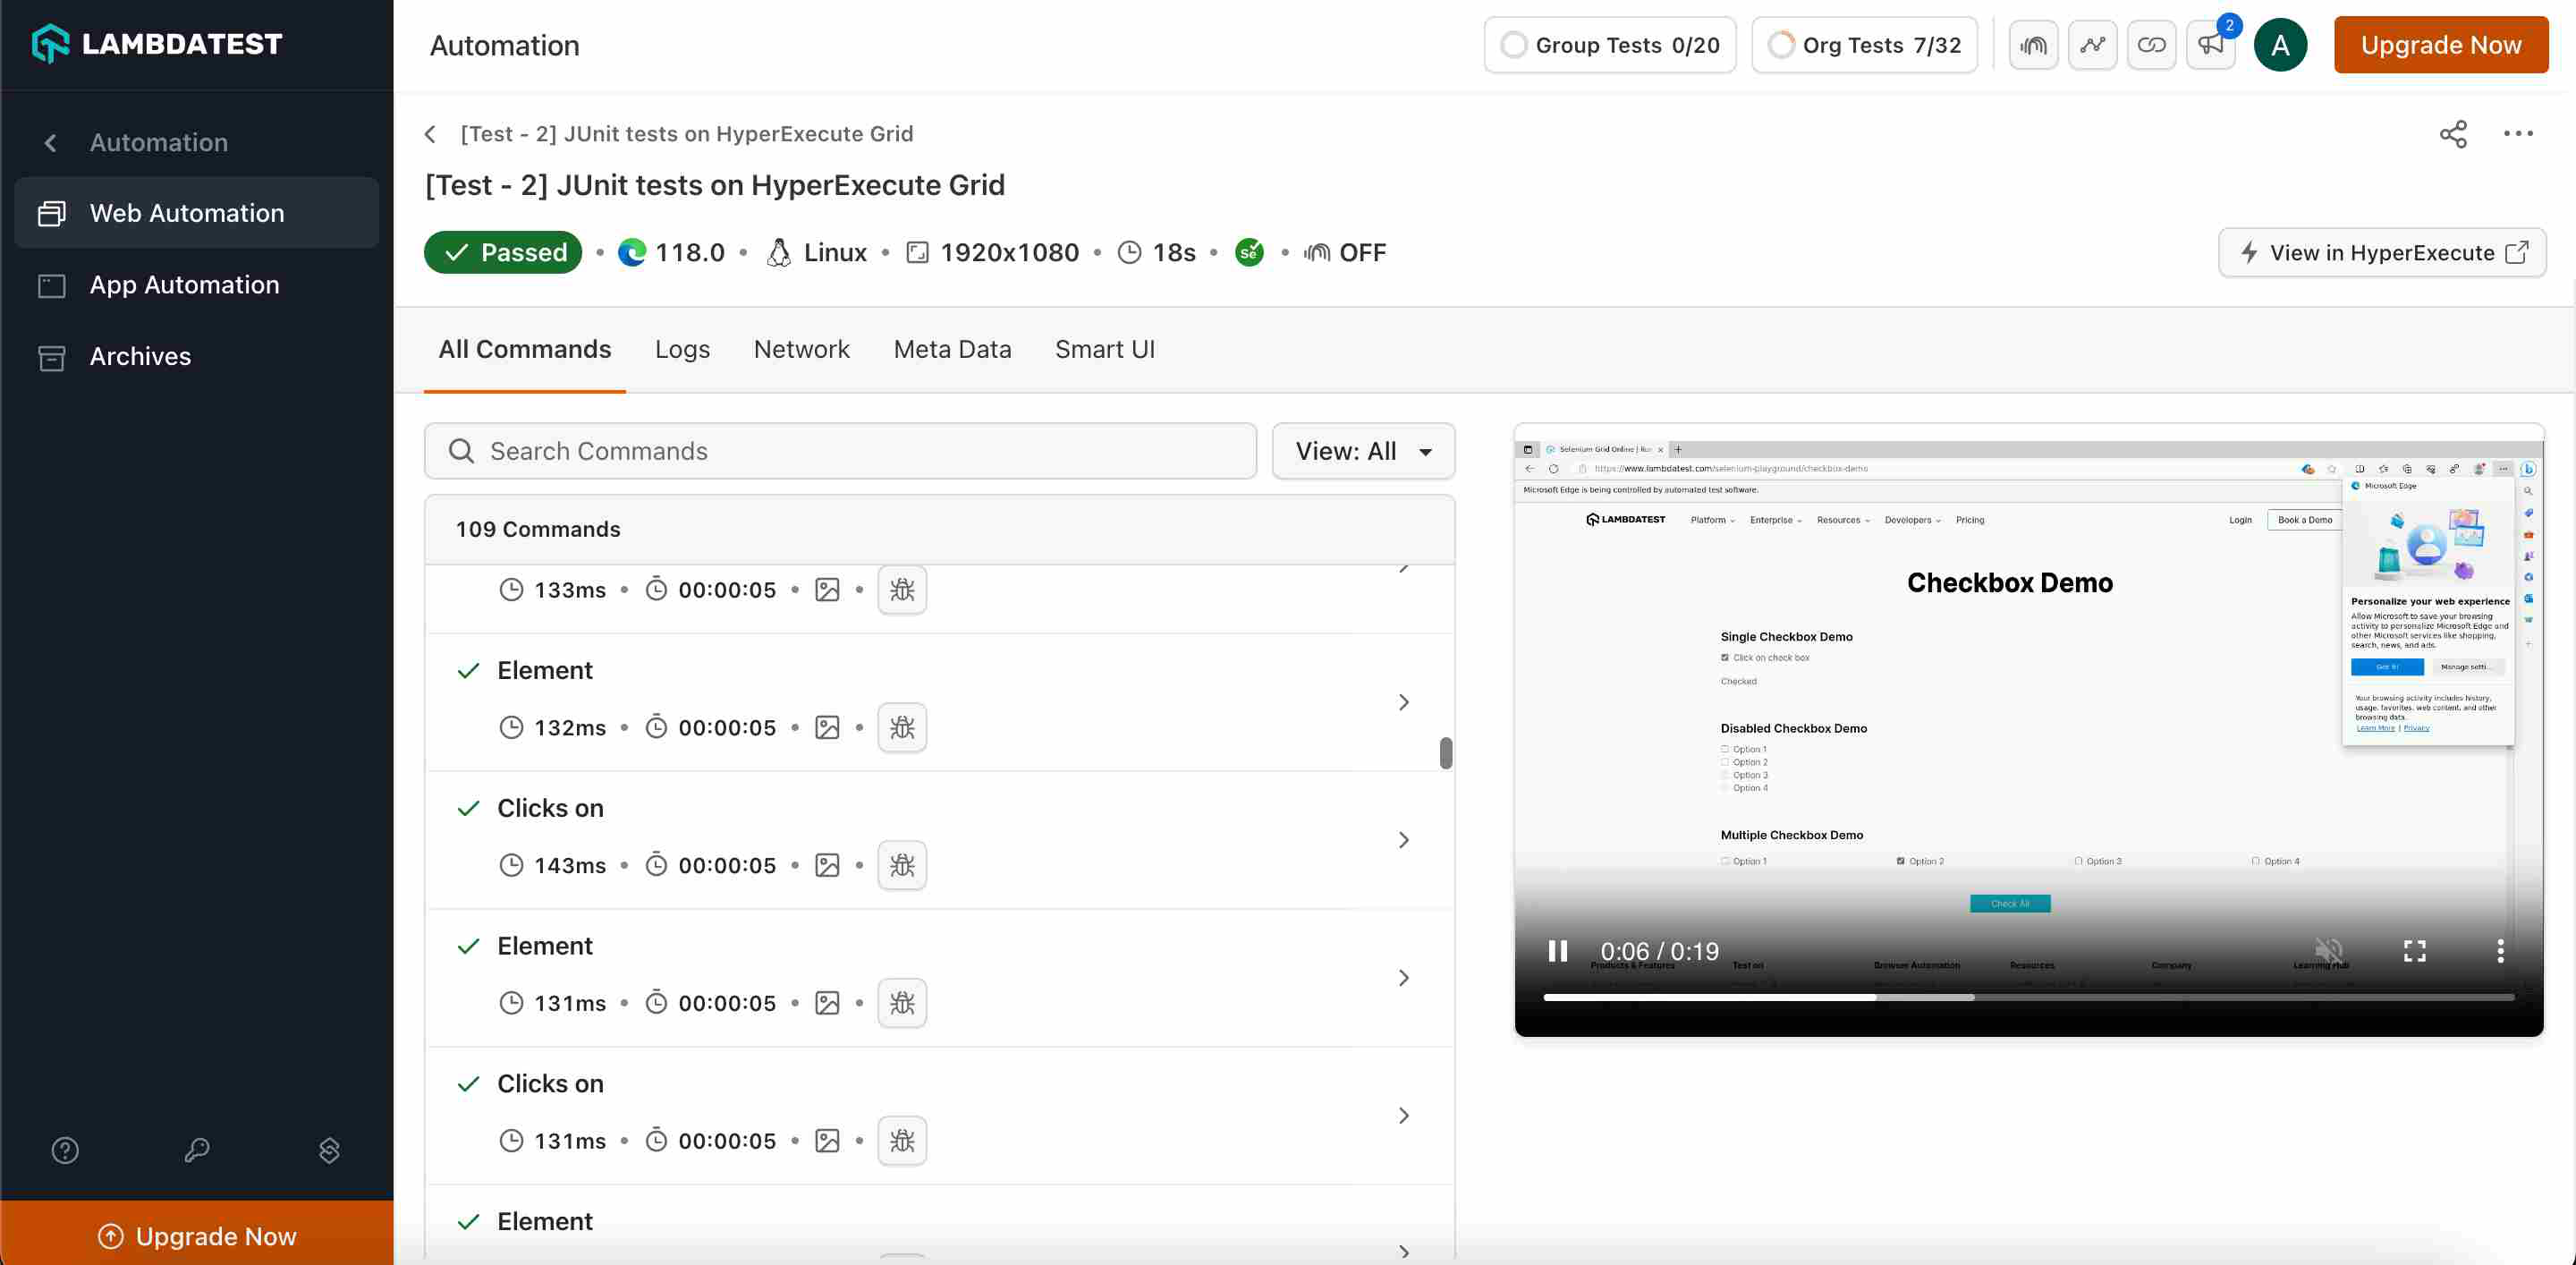
You can seamlessly navigate between JobId's and taskId's. You need to click on the testID to navigate from the HyperExecute logs to the Automation Dashboard.
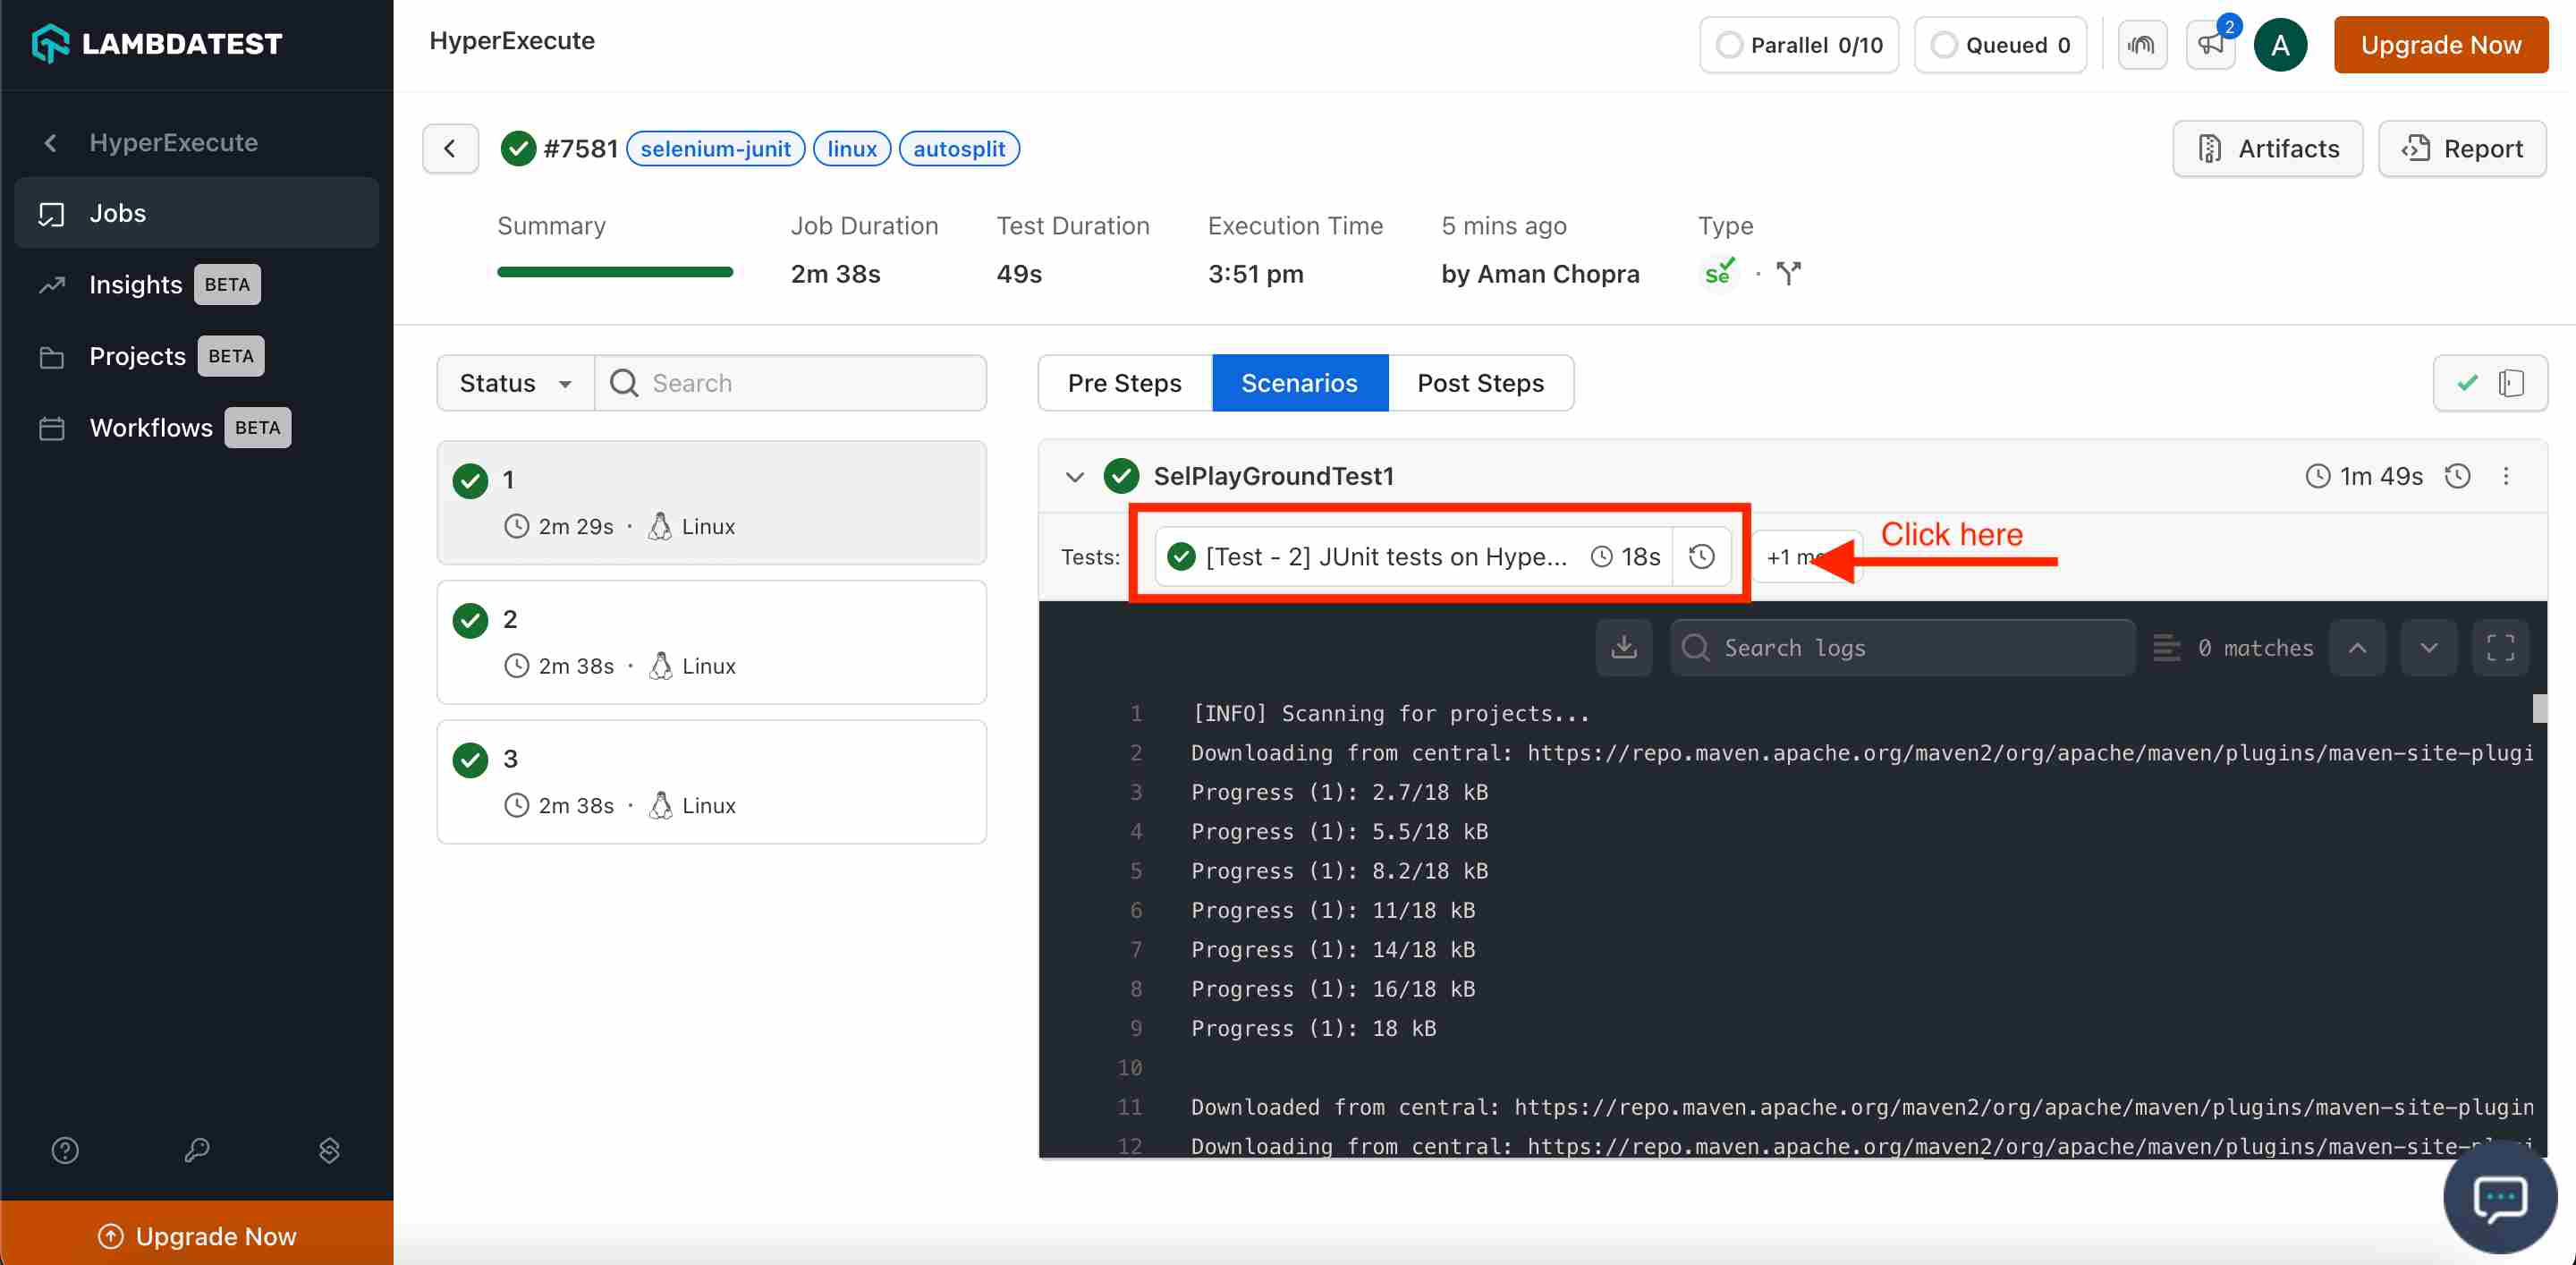
The snapshot below shows the videos, logs and other meta data for that specific test_ID
Running Cucumber Framework Tests on HyperExecute
Cucumber is a widely-used testing framework for Java applications, designed to simplify and enhance the testing process for developers. It provides a flexible and powerful platform for running test suites, enabling effective unit testing, integration testing, and end-to-end testing of Java applications.
HyperExecute is an AI Native Test Orchestration Cloud Platform that empowers you to run end-to-end tests quickly and efficiently. It provides Just-in-Time (JIT) testing infrastructure with fast execution speeds, smart orchestration, and detailed logs.
Execute your Cucumber framework tests on HyperExecute via two different methods:
- Using Local System - You can use your own local machine to execute tests.
- Using Gitpod Platform - Execute tests using GitPod. (Requires a Gitpod account)
1. Testing Using Local System
Follow the step-by-step guide to execute your test on HyperExecute.
Step 1: Configure Your Test Suite
You can use your own project to configure and test it. For demo purposes, we are using the sample repository.
Download or Clone the code sample for the Cucumber from the TestMu AI GitHub repository to run the tests on the HyperExecute.
View on GitHubIf you are using your own project, make sure you update the Hub endpoint in your tests file.
By setting up the Hub endpoint, you establish the communication channel between your tests and the browser nodes, enabling effective test distribution and execution.
Configure the desired capabilities based on your test requirements. For example:
DesiredCapabilities capability = new DesiredCapabilities();
capability.setCapability(CapabilityType.BROWSER_NAME, browser);
capability.setCapability(CapabilityType.VERSION,version);
capability.setCapability(CapabilityType.PLATFORM, platform);
capability.setCapability("build", "Your Build Name");
You can generate capabilities for your test requirements with the help of our inbuilt 🔗 Capabilities Generator.
Step 2: Configure YAML in your Test Suite
Configure your YAML file as per your use cases using key value pairs.
In this sample YAML file, we have mentioned:
- version of the YAML file
- Timeouts for executing your project
- Mode of execution is Autosplit. You can also opt for Matrix or Hybrid mode.
- Pre and Post commands
- Reports and Artefacts that will be generated after the completion of tests
- and other necessary YAML Parameters
---
version: 0.1
globalTimeout: 90
testSuiteTimeout: 90
testSuiteStep: 90

runson: linux

autosplit: true
retryOnFailure: true

maxRetries: 1
concurrency: 4

env:
  # PAT: ${{ .secrets.testKey }}
  CACHE_DIR: m2_cache_dir

# Dependency caching for Windows
cacheKey: '{{ checksum "pom.xml" }}'
cacheDirectories:
  - ${CACHE_DIR}

shell: bash

pre:
  # Download and install packages in the CACHE_DIR.
  # Skip execution of the tests in the pre step
  - mvn -Dmaven.repo.local=${CACHE_DIR} -Dmaven.test.skip=true clean install

post:
  - cat yaml/linux/cucumber_hyperexecute_autosplit_sample.yaml

mergeArtifacts: true

uploadArtefacts:
  - name: XmlReports
    path:
      - target/surefire-reports/testng-results.xml
  - name: JsonReports
    path:
      - target/cucumber-reports/CucumberTestReport.json

report: true
partialReports:
  location: target/cucumber-reports/
  frameworkName: cucumber
  type: json

testDiscovery:
  type: raw
  mode: remote
  #Parallel execution at feature level
  #command: grep -rni 'Features' -e 'Feature:' | sed 's/.*://'
  command: grep -nri '@' src/main/java/Features --include=\*.feature | sed 's/^.*://'

testRunnerCommand: mvn test -Dplatname=linux -Dmaven.repo.local=m2_cache_dir -Dcucumber.options="--tags $test"

jobLabel: [selenium-cucumber-java, linux, autosplit]
Step 3: Execute your Test Suite
NOTE : In case of MacOS, if you get a permission denied warning while executing CLI, simply run
chmod u+x ./hyperexecuteto allow permission. In case you get a security popup, allow it from your System Preferences -> Security & Privacy -> General tab.
Run the below command in your terminal at the root folder of the project:
./hyperexecute --config RELATIVE_PATH_OF_YOUR_YAML_FILE
OR use this command if you have not exported your username and access key.
./hyperexecute --user undefined --key undefined --config RELATIVE_PATH_OF_YOUR_YAML_FILE
Step 4: Monitor the Test Execution
Visit the HyperExecute Dashboard and check your Job status.
Step 5: Download Artifacts and Reports
HyperExecute also facilitates the provision to download the Artifacts and Reports on your local machine. Click on the corresponding button to download your generated artifacts and reports.
2. Testing Using Gitpod
You can also use the Gitpod platform to execute our sample repository. It will fetch all the sample codebases and trigger the CLI to execute the tests.
Follow the below steps to run Test using Gitpod:
Step 1: Click 'Open in Gitpod' button. You will be redirected to Login/Signup page. This button is configured to redirect you to the Gitpod platform where you will be able to execute our sample repository.
Step 2: Login with TestMu AI credentials. Once logged in, a pop-up confirmation will appear, asking you to 'Proceed' to the Gitpod editor in a new tab. The current tab will display the HyperExecute Dashboard.
Step 3: Choose your preferred editor (we recommend VS Code Editor)
Step 4: As you are running a sample project, Fetching of the Test Scripts, HyperExecute YAML, HyperExecute CLI and Triggering your tests using the Execution Command will be automated.
Step 5: Once you see the Job Link in the logs, you can visit the HyperExecute dashboard to see the tests getting executed.
You can also implement Secret Keys in your YAML file.
Navigation in Automation Dashboard
Every test run on the HyperExecute has a unique jobId associated with it. Each jobId can in turn constitute single (or multiple) groupId(s). You can visit HyperExecute Automation Dashboard for checking the status of the test execution.
You can seamlessly navigate between JobId's and taskId's. You need to click on the testID to navigate from the HyperExecute logs to the Automation Dashboard.
The snapshot below shows the videos, logs and other meta data for that specific test_ID
Python
- PyTest
- PyUnit
- Behave
- Robot
Running PyTest Framework Tests on HyperExecute
PyTest is a testing framework for Python that is widely used with Selenium for automated testing. Known for its simplicity and powerful features, Pytest allows efficient test organization, parameterization, and fixtures.
HyperExecute is an AI Native Test Orchestration Cloud Platform that empowers you to run end-to-end tests quickly and efficiently. It provides Just-in-Time (JIT) testing infrastructure with fast execution speeds, smart orchestration, and detailed logs.
Run your PyTest framework tests on HyperExecute via two methods:
- Using Local System - You can use your own local machine to execute tests.
- Using Gitpod Platform - Execute tests using GitPod. (Requires a Gitpod account)
1. Testing Using Local System
Follow the step-by-step guide to execute your test on HyperExecute.
Step 1: Configure Your Test Suite
You can use your own project to configure and test it. For demo purposes, we are using the sample repository.
Download or Clone the code sample for the JUnit from the TestMu AI GitHub repository to run the tests on the HyperExecute.
View on GitHubIf you are using your own project, make sure you update the Hub endpoint in your tests file.
By setting up the Hub endpoint, you establish the communication channel between your tests and the browser nodes, enabling effective test distribution and execution.
Configure the desired capabilities based on your test requirements. For example:
capabilities = {
"build": "Sample PY Build",
"platformName": "Windows 11",
"browserName": "Chrome",
"browserVersion": "latest",
}
You can also use dev and beta browser versions. To generate capabilities for your test requirements, you can use our inbuilt 🔗 Capabilities Generator.
Step 2: Setup the CLI in your Test Suite
After cloning / downloading the sample repo, you need to setup the CLI and the environment variables as described in the page-level prerequisites.
Step 3: Configure YAML in your Test Suite
Configure your YAML file as per your use cases using key value pairs.
In this sample YAML file, we have mentioned:
- version of the YAML file
- Timeouts for executing your project
- Mode of execution is Autosplit. You can also opt for Matrix or Hybrid mode.
- Pre and Post commands
- Reports and Artefacts that will be generated after the completion of tests
- and other necessary YAML Parameters
---
version: 0.1
globalTimeout: 90
testSuiteTimeout: 90
testSuiteStep: 90

runson: linux

autosplit: true
retryOnFailure: true

maxRetries: 1
concurrency: 2

env:
#  PAT: ${{ .secrets.testKey }}
 TARGET_OS: LINUX

cacheKey: '{{ checksum "requirements.txt" }}'
cacheDirectories:
  - CacheDir
pre:
  - pip install py
  - pip install -r requirements.txt --cache-dir CacheDir
post:
  - cat yaml/linux/pytest_hyperexecute_autosplit_sample.yaml

runtime:
  language: python
  version: "3"

mergeArtifacts: true
uploadArtefacts:
  - name: TestReports
    path:
    - reports/**

report: true
partialReports:
    type: json
    location: reports/
    frameworkName: extent

testDiscovery:
  type: raw
  mode: remote
  command: grep -nri 'class' tests -ir --include=\*.py | sed 's/:.*//'

testRunnerCommand: pytest -s  --verbose --html=reports/report.html $test

jobLabel: [selenium-pytest, linux, autosplit]
Step 4: Execute your Test Suite
NOTE : In case of MacOS, if you get a permission denied warning while executing CLI, simply run
chmod u+x ./hyperexecuteto allow permission. In case you get a security popup, allow it from your System Preferences → Security & Privacy → General tab.
Run the below command in your terminal at the root folder of the project:
./hyperexecute --config RELATIVE_PATH_OF_YOUR_YAML_FILE
OR use this command if you have not exported your username and access key in the step 2.
./hyperexecute --user undefined --key undefined --config RELATIVE_PATH_OF_YOUR_YAML_FILE
Step 5: Monitor the Test Execution
Visit the HyperExecute Dashboard and check your Job status.
Step 6: Download Artifacts and Reports
HyperExecute also facilitates the provision to download the Artifacts and Reports on your local machine. Click on the corresponding button to download your generated artifacts and reports.
2. Testing Using Gitpod
You can also use the Gitpod platform to execute our sample repository. It will fetch all the sample codebases and trigger the CLI to execute the tests.
Follow the below steps to run Test using Gitpod:
Step 1: Click 'Open in Gitpod' button. You will be redirected to Login/Signup page. This button is configured to redirect you to the Gitpod platform where you will be able to execute our sample repository.
Step 2: Login with TestMu AI credentials. Once logged in, a pop-up confirmation will appear, asking you to 'Proceed' to the Gitpod editor in a new tab. The current tab will display the HyperExecute Dashboard.
Step 3: Choose your preferred editor (we recommend VS Code Editor)
Step 4: As you are running a sample project, Fetching of the Test Scripts, HyperExecute YAML, HyperExecute CLI and Triggering your tests using the Execution Command will be automated.
Step 5: Once you see the Job Link in the logs, you can visit the HyperExecute dashboard to see the tests getting executed.
You can also implement Secret Keys in your YAML file.
Navigation in Automation Dashboard
Every test run on the HyperExecute has a unique jobId associated with it. Each jobId can in turn constitute single (or multiple) groupId(s). You can visit HyperExecute Automation Dashboard for checking the status of the test execution.
You can seamlessly navigate between JobId's and taskId's. You need to click on the testID to navigate from the HyperExecute logs to the Automation Dashboard.
The snapshot below shows the videos, logs and other meta data for that specific test_ID
For any query or doubt, please feel free to contact us via 24×7 chat support or you can also drop a mail to support@testmuai.com.
Happy testing!
Running PyUnit Framework Tests on HyperExecute
PyUnit, also known as unittest, is a testing framework in Python that is commonly used with Selenium for automated testing. It provides a structure for organizing and executing test cases, along with features like test fixtures, assertions, and test discovery.
HyperExecute is an AI Native Test Orchestration Cloud Platform that empowers you to run end-to-end tests quickly and efficiently. It provides Just-in-Time (JIT) testing infrastructure with fast execution speeds, smart orchestration, and detailed logs.
Run your PyUnit framework tests on HyperExecute via two methods:
- Using Local System - You can use your own local machine to execute tests.
- Using Gitpod Platform - Execute tests using GitPod. (Requires a Gitpod account)
1. Testing Using Local System
Follow the step-by-step guide to execute your test on HyperExecute.
Step 1: Configure Your Test Suite
You can use your own project to configure and test it. For demo purposes, we are using the sample repository.
Download or Clone the code sample for the JUnit from the TestMu AI GitHub repository to run the tests on the HyperExecute.
View on GitHubIf you are using your own project, make sure you update the Hub endpoint in your tests file.
By setting up the Hub endpoint, you establish the communication channel between your tests and the browser nodes, enabling effective test distribution and execution.
Configure the desired capabilities based on your test requirements. For example:
capabilities = {
"build": "UnitTest-Selenium-Sample",
"name": "UnitTest-Selenium-Test",
"platformName": "Windows 11",
"browserName": "Chrome",
"browserVersion": "latest",
}
You can also use dev and beta browser versions. To generate capabilities for your test requirements, you can use our inbuilt 🔗 Capabilities Generator.
Step 2: Setup the CLI in your Test Suite
After cloning / downloading the sample repo, you need to setup the CLI and the environment variables as described in the page-level prerequisites.
Step 3: Configure YAML in your Test Suite
Configure your YAML file as per your use cases using key value pairs.
In this sample YAML file, we have mentioned:
- version of the YAML file
- Timeouts for executing your project
- Mode of execution is Autosplit. You can also opt for Matrix or Hybrid mode.
- Pre and Post commands
- Reports and Artefacts that will be generated after the completion of tests
- and other necessary YAML Parameters
---
version: 0.1
globalTimeout: 90
testSuiteTimeout: 90
testSuiteStep: 90

runson: linux

autosplit: true
retryOnFailure: true

maxRetries: 1
concurrency: 2

env:
#  PAT: ${{ .secrets.testKey }}
 TARGET_OS: LINUX

cacheKey: '{{ checksum "requirements.txt" }}'
cacheDirectories:
  - CacheDir
pre:
  - pip3 install -r requirements.txt --cache-dir CacheDir
post:
  - cat yaml/linux/pyunit_hyperexecute_autosplit_sample.yaml

mergeArtifacts: true

uploadArtefacts:
  - name: TestReport
    path:
     - example_*/**

report: true
partialReports:
    type: json
    location: /
    frameworkName: extent

testDiscovery:
  type: raw
  mode: remote
  command: grep -nri 'HyperTestPyUnit' tests -ir --include=\*.py | sed 's/:.*//'

testRunnerCommand: python3 $test

jobLabel: [selenium-pyunit, linux, autosplit]
Step 4: Execute your Test Suite
NOTE : In case of MacOS, if you get a permission denied warning while executing CLI, simply run
chmod u+x ./hyperexecuteto allow permission. In case you get a security popup, allow it from your System Preferences → Security & Privacy → General tab.
Run the below command in your terminal at the root folder of the project:
./hyperexecute --config RELATIVE_PATH_OF_YOUR_YAML_FILE
OR use this command if you have not exported your username and access key in the step 2.
./hyperexecute --user undefined --key undefined --config RELATIVE_PATH_OF_YOUR_YAML_FILE
Step 5: Monitor the Test Execution
Visit the HyperExecute Dashboard and check your Job status.
Step 6: Download Artifacts and Reports
HyperExecute also facilitates the provision to download the Artifacts and Reports on your local machine. Click on the corresponding button to download your generated artifacts and reports.
2. Testing Using Gitpod
You can also use the Gitpod platform to execute our sample repository. It will fetch all the sample codebases and trigger the CLI to execute the tests.
Follow the below steps to run Test using Gitpod:
Step 1: Click 'Open in Gitpod' button. You will be redirected to Login/Signup page. This button is configured to redirect you to the Gitpod platform where you will be able to execute our sample repository.
Step 2: Login with TestMu AI credentials. Once logged in, a pop-up confirmation will appear, asking you to 'Proceed' to the Gitpod editor in a new tab. The current tab will display the HyperExecute Dashboard.
Step 3: Choose your preferred editor (we recommend VS Code Editor)
Step 4: As you are running a sample project, Fetching of the Test Scripts, HyperExecute YAML, HyperExecute CLI and Triggering your tests using the Execution Command will be automated.
Step 5: Once you see the Job Link in the logs, you can visit the HyperExecute dashboard to see the tests getting executed.
You can also implement Secret Keys in your YAML file.
Navigation in Automation Dashboard
Every test run on the HyperExecute has a unique jobId associated with it. Each jobId can in turn constitute single (or multiple) groupId(s). You can visit HyperExecute Automation Dashboard for checking the status of the test execution.
You can seamlessly navigate between JobId's and taskId's. You need to click on the testID to navigate from the HyperExecute logs to the Automation Dashboard.
The snapshot below shows the videos, logs and other meta data for that specific test_ID
For any query or doubt, please feel free to contact us via 24×7 chat support or you can also drop a mail to support@testmuai.com.
Happy testing!
Running Behave Framework Tests on HyperExecute
Behave is a behavior-driven development (BDD) framework for Python that is commonly used with Selenium for automated testing. It allows teams to write test scenarios in a natural language format using Gherkin syntax.
HyperExecute is an AI Native Test Orchestration Cloud Platform that empowers you to run end-to-end tests quickly and efficiently. It provides Just-in-Time (JIT) testing infrastructure with fast execution speeds, smart orchestration, and detailed logs.
Run your Behave framework tests on HyperExecute via two methods:
- Using Local System - You can use your own local machine to execute tests.
- Using Gitpod Platform - Execute tests using GitPod. (Requires a Gitpod account)
1. Testing Using Local System
Follow the step-by-step guide to execute your test on HyperExecute.
Step 1: Configure Your Test Suite
You can use your own project to configure and test it. For demo purposes, we are using the sample repository.
Download or Clone the code sample for the JUnit from the TestMu AI GitHub repository to run the tests on the HyperExecute.
View on GitHubIf you are using your own project, make sure you update the Hub endpoint in your tests file.
By setting up the Hub endpoint, you establish the communication channel between your tests and the browser nodes, enabling effective test distribution and execution.
Configure the desired capabilities based on your test requirements. For example:
[
  {
    "platform": "Windows 10",
    "browserName": "chrome",
    "version": "latest",
    "build": "Behave Selenium Sample",
    "name": "Behave Sample Test"
  }
]
You can also use dev and beta browser versions. To generate capabilities for your test requirements, you can use our inbuilt 🔗 Capabilities Generator.
Step 2: Setup the CLI in your Test Suite
After cloning / downloading the sample repo, you need to setup the CLI and the environment variables as described in the page-level prerequisites.
Step 3: Configure YAML in your Test Suite
Configure your YAML file as per your use cases using key value pairs.
In this sample YAML file, we have mentioned:
- version of the YAML file
- Timeouts for executing your project
- Mode of execution is Autosplit. You can also opt for Matrix or Hybrid mode.
- Pre and Post commands
- Reports and Artefacts that will be generated after the completion of tests
- and other necessary YAML Parameters
---
version: 0.1
globalTimeout: 90
testSuiteTimeout: 90
testSuiteStep: 90

runson: linux

autosplit: true
retryOnFailure: true

maxRetries: 1
concurrency: 2

env:
#  PAT: ${{ .secrets.testKey }}
 TARGET_OS: LINUX

cacheKey: '{{ checksum "requirements.txt" }}'
cacheDirectories:
  - pip_cache
pre:
  - pip3 install -r requirements.txt --cache-dir pip_cache
post:
  - cat yaml/linux/behave_hyperexecute_autosplit_sample.yaml
upload:
  - reports/test_report.json

mergeArtifacts: true

uploadArtefacts:
  - name: TestReports
    path:
    - reports/**

report: true
partialReports:
    type: json
    location: /
    frameworkName: extent

# Details about HTML Formatter at https://pypi.org/project/behave-html-formatter/
testDiscovery:
  type: raw
  mode: remote
  command: grep -nri 'Feature' features -ir --include=\*.feature | sed 's/:.*//'

# Reports are generated in the pretty JSON format
testRunnerCommand: behave -f json.pretty -o reports/test_report.json $test

jobLabel: [selenium-behave, linux, autosplit]
Step 4: Execute your Test Suite
NOTE : In case of MacOS, if you get a permission denied warning while executing CLI, simply run
chmod u+x ./hyperexecuteto allow permission. In case you get a security popup, allow it from your System Preferences → Security & Privacy → General tab.
Run the below command in your terminal at the root folder of the project:
./hyperexecute --config RELATIVE_PATH_OF_YOUR_YAML_FILE
OR use this command if you have not exported your username and access key in the step 2.
./hyperexecute --user undefined --key undefined --config RELATIVE_PATH_OF_YOUR_YAML_FILE
Step 5: Monitor the Test Execution
Visit the HyperExecute Dashboard and check your Job status.
Step 6: Download Artifacts and Reports
HyperExecute also facilitates the provision to download the Artifacts and Reports on your local machine. Click on the corresponding button to download your generated artifacts and reports.
2. Testing Using Gitpod
You can also use the Gitpod platform to execute our sample repository. It will fetch all the sample codebases and trigger the CLI to execute the tests.
Follow the below steps to run Test using Gitpod:
Step 1: Click 'Open in Gitpod' button. You will be redirected to Login/Signup page. This button is configured to redirect you to the Gitpod platform where you will be able to execute our sample repository.
Step 2: Login with TestMu AI credentials. Once logged in, a pop-up confirmation will appear, asking you to 'Proceed' to the Gitpod editor in a new tab. The current tab will display the HyperExecute Dashboard.
Step 3: Choose your preferred editor (we recommend VS Code Editor)
Step 4: As you are running a sample project, Fetching of the Test Scripts, HyperExecute YAML, HyperExecute CLI and Triggering your tests using the Execution Command will be automated.
Step 5: Once you see the Job Link in the logs, you can visit the HyperExecute dashboard to see the tests getting executed.
You can also implement Secret Keys in your YAML file.
Navigation in Automation Dashboard
Every test run on the HyperExecute has a unique jobId associated with it. Each jobId can in turn constitute single (or multiple) groupId(s). You can visit HyperExecute Automation Dashboard for checking the status of the test execution.
You can seamlessly navigate between JobId's and taskId's. You need to click on the testID to navigate from the HyperExecute logs to the Automation Dashboard.
The snapshot below shows the videos, logs and other meta data for that specific test_ID
For any query or doubt, please feel free to contact us via 24×7 chat support or you can also drop a mail to support@testmuai.com.
Running Robot Framework Tests on HyperExecute
Robot Framework is a powerful open-source automation framework for Selenium that supports keyword-driven and behavior-driven development. With an easy-to-read syntax and a rich set of libraries, it simplifies the creation and execution of Selenium test scripts.
HyperExecute is an AI Native Test Orchestration Cloud Platform that empowers you to run end-to-end tests quickly and efficiently. It provides Just-in-Time (JIT) testing infrastructure with fast execution speeds, smart orchestration, and detailed logs.
Run your Robot framework tests on HyperExecute via two methods:
- Using Local System - You can use your own local machine to execute tests.
- Using Gitpod Platform - Execute tests using GitPod. (Requires a Gitpod account)
Testing a mainframe terminal with Robot Framework? See Mainframe Testing with HyperExecute for a suite that installs the s3270/x3270 emulators, runs mock hosts as background services, and records the x3270 GUI.
1. Testing Using Local System
Follow the step-by-step guide to execute your test on HyperExecute.
Step 1: Configure Your Test Suite
You can use your own project to configure and test it. For demo purposes, we are using the sample repository.
Download or Clone the code sample for the JUnit from the TestMu AI GitHub repository to run the tests on the HyperExecute.
View on GitHubIf you are using your own project, make sure you update the Hub endpoint in your tests file.
By setting up the Hub endpoint, you establish the communication channel between your tests and the browser nodes, enabling effective test distribution and execution.
You can also use dev and beta browser versions. To generate capabilities for your test requirements, you can use our inbuilt 🔗 Capabilities Generator.
Step 2: Setup the CLI in your Test Suite
After cloning / downloading the sample repo, you need to setup the CLI and the environment variables as described in the page-level prerequisites.
Step 3: Configure YAML in your Test Suite
Configure your YAML file as per your use cases using key value pairs.
In this sample YAML file, we have mentioned:
- version of the YAML file
- Timeouts for executing your project
- Mode of execution is Autosplit. You can also opt for Matrix or Hybrid mode.
- Pre and Post commands
- Reports and Artefacts that will be generated after the completion of tests
- and other necessary YAML Parameters
---
version: 0.1
globalTimeout: 90
testSuiteTimeout: 90
testSuiteStep: 90

runson: linux

autosplit: true
retryOnFailure: true

maxRetries: 1
concurrency: 2

env:
#  PAT: ${{ .secrets.testKey }}
 TARGET_OS: LINUX

# Dependency caching for Windows
cacheKey: '{{ checksum "requirements.txt" }}'
cacheDirectories:
  - pip_cache
  - poetry_cache
pre:
  # Robot Framework and Robot Selenium Library need to be installed globally
  # Rest of the packages can be installed in venv
  - pip3 install -r requirements.txt --cache-dir pip_cache
  - poetry config virtualenvs.path poetry_cache
  - poetry install
post:
  - cat yaml/linux/robot_hyperexecute_autosplit_sample.yaml

mergeArtifacts: true

uploadArtefacts:
 - name: HTML_Reports
   path:
    - /*.html
 - name: XML_Reports
   path:
    - /*.xml

report: true
partialReports:
    type: json
    location: /
    frameworkName: extent

testDiscovery:
  type: raw
  mode: remote
  command: grep 'test_linux' Makefile | sed 's/\(.*\):/\1 /'

testRunnerCommand: make $test

jobLabel: [selenium-robot, linux, autosplit]
Step 4: Execute your Test Suite
NOTE : In case of MacOS, if you get a permission denied warning while executing CLI, simply run
chmod u+x ./hyperexecuteto allow permission. In case you get a security popup, allow it from your System Preferences → Security & Privacy → General tab.
Run the below command in your terminal at the root folder of the project:
./hyperexecute --config RELATIVE_PATH_OF_YOUR_YAML_FILE
OR use this command if you have not exported your username and access key in the step 2.
./hyperexecute --user undefined --key undefined --config RELATIVE_PATH_OF_YOUR_YAML_FILE
Step 5: Monitor the Test Execution
Visit the HyperExecute Dashboard and check your Job status.
Step 6: Download Artifacts and Reports
HyperExecute also facilitates the provision to download the Artifacts and Reports on your local machine. Click on the corresponding button to download your generated artifacts and reports.
2. Testing Using Gitpod
You can also use the Gitpod platform to execute our sample repository. It will fetch all the sample codebases and trigger the CLI to execute the tests.
Follow the below steps to run Test using Gitpod:
Step 1: Click 'Open in Gitpod' button. You will be redirected to Login/Signup page. This button is configured to redirect you to the Gitpod platform where you will be able to execute our sample repository.
Step 2: Login with TestMu AI credentials. Once logged in, a pop-up confirmation will appear, asking you to 'Proceed' to the Gitpod editor in a new tab. The current tab will display the HyperExecute Dashboard.
Step 3: Choose your preferred editor (we recommend VS Code Editor)
Step 4: As you are running a sample project, Fetching of the Test Scripts, HyperExecute YAML, HyperExecute CLI and Triggering your tests using the Execution Command will be automated.
Step 5: Once you see the Job Link in the logs, you can visit the HyperExecute dashboard to see the tests getting executed.
You can also implement Secret Keys in your YAML file.
Navigation in Automation Dashboard
Every test run on the HyperExecute has a unique jobId associated with it. Each jobId can in turn constitute single (or multiple) groupId(s). You can visit HyperExecute Automation Dashboard for checking the status of the test execution.
You can seamlessly navigate between JobId's and taskId's. You need to click on the testID to navigate from the HyperExecute logs to the Automation Dashboard.
The snapshot below shows the videos, logs and other meta data for that specific test_ID
For any query or doubt, please feel free to contact us via 24×7 chat support or you can also drop a mail to support@testmuai.com.
Happy testing!
C#
- NUnit
- SpecFlow
- Reqnroll
Running NUnit Framework Tests on HyperExecute
NUnit is a testing framework for .NET languages, commonly used with Selenium for automated testing. It provides a structure for organizing and executing tests, supporting features like test fixtures, assertions, and setup/teardown methods.
Run your NUnit framework tests on HyperExecute via two methods:
- Using Local System - You can use your own local machine to execute tests.
- Using Gitpod Platform - Execute tests using GitPod. (Requires a Gitpod account)
1. Testing Using Local System
Follow the step-by-step guide to execute your test on HyperExecute.
Step 1: Configure Your Test Suite
You can use your own project to configure and test it. For demo purposes, we are using the sample repository.
Download or Clone the code sample for the NUnit from the TestMu AI GitHub repository to run the tests on the HyperExecute.
View on GitHubIf you are using your own project, make sure you update the Hub endpoint in your tests file.
By setting up the Hub endpoint, you establish the communication channel between your tests and the browser nodes, enabling effective test distribution and execution.
Configure the desired capabilities based on your test requirements. For example:
DesiredCapabilities capabilities = new DesiredCapabilities();
capabilities.SetCapability(CapabilityType.BrowserName, "Chrome");
capabilities.SetCapability(CapabilityType.Version, "96");
capabilities.SetCapability(CapabilityType.Platform, "Windows 10");
You can also use dev and beta browser versions. To generate capabilities for your test requirements, you can use our inbuilt 🔗 Capabilities Generator.
Step 2: Setup the CLI in your Test Suite
After cloning / downloading the sample repo, you need to setup the CLI and the environment variables as described in the common steps above.
Step 3: Configure YAML in your Test Suite
Configure your YAML file as per your use cases using key value pairs.
In this sample YAML file, we have mentioned:
- version of the YAML file
- Timeouts for executing your project
- Mode of execution is Autosplit. You can also opt for Matrix or Hybrid mode.
- Pre and Post commands
- Reports and Artefacts that will be generated after the completion of tests
- and other necessary YAML Parameters
---
version: 0.1
globalTimeout: 150
testSuiteTimeout: 150
testSuiteStep: 150

runson: linux

autosplit: true
retryOnFailure: true

maxRetries: 1
concurrency: 2

project: NUnitHyperTestDemo/NUnitHyperTestDemo.csproj
solution: NUnitHyperTestDemo.sln

env:
  NUGET_PACKAGES: '/home/ltuser/.nuget/packages/'
  NUGET_HTTP_CACHE_PATH: '/home/ltuser/.local/share/NuGet/v3-cache'
  NUGET_PLUGINS_CACHE_PATH: '/home/ltuser/.local/share/NuGet/plugins-cache'

pre:
 - dotnet restore
 - dotnet list $project package > packages.txt
 - dotnet build -c Release

post:
  - cat yaml/linux/nunit_hyperexecute_autosplit_sample.yaml

mergeArtifacts: true

uploadArtefacts:
  - name: ExecutionSnapshots
    path:
     - NUnitHyperTestDemo/Reports/**

report: true
partialReports:
    type: json
    location: NUnitHyperTestDemo/
    frameworkName: extent

testDiscovery:
  type: raw
  mode: remote
  command: grep 'Category' NUnitHyperTestDemo -ir --include=\*.cs --exclude=DriverFactory.cs --exclude=HyperTestDemo.AssemblyInfo.cs | awk '{print$2}' | grep -o '".*"'

testRunnerCommand: dotnet test $solution --filter TestCategory=$test

jobLabel: [selenium-Nunit, linux, autosplit]
Step 4: Execute your Test Suite
NOTE : In case of MacOS, if you get a permission denied warning while executing CLI, simply run
chmod u+x ./hyperexecuteto allow permission. In case you get a security popup, allow it from your System Preferences → Security & Privacy → General tab.
Run the below command in your terminal at the root folder of the project:
./hyperexecute --config RELATIVE_PATH_OF_YOUR_YAML_FILE
OR use this command if you have not exported your username and access key in the previous step.
./hyperexecute --user undefined --key undefined --config RELATIVE_PATH_OF_YOUR_YAML_FILE
Step 5: Monitor the Test Execution
Visit the HyperExecute Dashboard and check your Job status.
Step 6: Download Artifacts and Reports
HyperExecute also facilitates the provision to download the Artifacts and Reports on your local machine. Click on the corresponding button to download your generated artifacts and reports.
2. Testing Using Gitpod
You can also use the Gitpod platform to execute our sample repository. It will fetch all the sample codebases and trigger the CLI to execute the tests.
Follow the below steps to run Test using Gitpod:
Step 1: Click 'Open in Gitpod' button. You will be redirected to Login/Signup page. This button is configured to redirect you to the Gitpod platform where you will be able to execute our sample repository.
Step 2: Login with TestMu AI credentials. Once logged in, a pop-up confirmation will appear, asking you to 'Proceed' to the Gitpod editor in a new tab. The current tab will display the HyperExecute Dashboard.
Step 3: Choose your preferred editor (we recommend VS Code Editor)
Step 4: As you are running a sample project, Fetching of the Test Scripts, HyperExecute YAML, HyperExecute CLI and Triggering your tests using the Execution Command will be automated.
Step 5: Once you see the Job Link in the logs, you can visit the HyperExecute dashboard to see the tests getting executed.
You can also implement Secret Keys in your YAML file.
Navigation in Automation Dashboard
Every test run on the HyperExecute has a unique jobId associated with it. Each jobId can in turn constitute single (or multiple) groupId(s). You can visit HyperExecute Automation Dashboard for checking the status of the test execution.
You can seamlessly navigate between JobId's and taskId's. You need to click on the testID to navigate from the HyperExecute logs to the Automation Dashboard.
The snapshot below shows the videos, logs and other meta data for that specific test_ID
Running SpecFlow Framework Tests on HyperExecute
SpecFlow is a behavior-driven development (BDD) framework for .NET languages, often used with Selenium for automated testing. It enables collaboration between technical and non-technical team members by expressing tests in natural language.
Run your Specflow framework tests on HyperExecute via two methods:
- Using Local System - You can use your own local machine to execute tests.
- Using Gitpod Platform - Execute tests using GitPod. (Requires a Gitpod account)
1. Testing Using Local System
Follow the step-by-step guide to execute your test on HyperExecute.
Step 1: Configure Your Test Suite
You can use your own project to configure and test it. For demo purposes, we are using the sample repository.
Download or Clone the code sample for the SpecFlow from the TestMu AI GitHub repository to run the tests on the HyperExecute.
View on GitHubIf you are using your own project, make sure you update the Hub endpoint in your tests file.
By setting up the Hub endpoint, you establish the communication channel between your tests and the browser nodes, enabling effective test distribution and execution.
Configure the desired capabilities based on your test requirements. For example:
DesiredCapabilities capabilities = new DesiredCapabilities();
capabilities.SetCapability(CapabilityType.BrowserName, "Chrome");
capabilities.SetCapability(CapabilityType.Version, "96");
capabilities.SetCapability(CapabilityType.Platform, "Windows 10");
You can also use dev and beta browser versions. To generate capabilities for your test requirements, you can use our inbuilt 🔗 Capabilities Generator.
Step 2: Setup the CLI in your Test Suite
After cloning / downloading the sample repo, you need to setup the CLI and the environment variables as described in the common steps above.
Step 3: Configure YAML in your Test Suite
Configure your YAML file as per your use cases using key value pairs.
In this sample YAML file, we have mentioned:
- version of the YAML file
- Timeouts for executing your project
- Mode of execution is Autosplit. You can also opt for Matrix or Hybrid mode.
- Pre and Post commands
- Reports and Artefacts that will be generated after the completion of tests
- and other necessary YAML Parameters
---
version: 0.1
globalTimeout: 90
testSuiteTimeout: 90
testSuiteStep: 90

runson: linux

autosplit: true
retryOnFailure: true

maxRetries: 1
concurrency: 3

env:
  NUGET_PACKAGES: '/home/ltuser/.nuget/packages/'
  NUGET_HTTP_CACHE_PATH: '/home/ltuser/.local/share/NuGet/v3-cache'
  NUGET_PLUGINS_CACHE_PATH: '/home/ltuser/.local/share/NuGet/plugins-cache'

pre:
 - dotnet restore
 - dotnet list OnlySpecTest.csproj package > packages.txt
#  - chmod 777 /tmp/NuGetScratch
#  - nuget locals all -clear
 - dotnet build -c Release

cacheKey: '{{ checksum "packages.txt" }}'

post:
  - cat yaml/linux/specflow_hyperexecute_autosplit_sample.yaml

mergeArtifacts: true

uploadArtefacts:
 - name: Execution_Report
   path:
    - Report/**
 - name: Execution_Screenshots
   path:
    - Screenshots/**/**

report: true
partialReports:
  location: Report/
  type: html
  frameworkName: specflow

# The below testDiscovery command will give the feature name in the respective feature files
testDiscovery:
  type: raw
  mode: remote
  #Parallel execution at feature level
  #command: grep -rni 'Features' -e 'Feature:' | sed 's/.*://'

  command: grep -rni 'Features' -e '@' --include=\*.feature | sed 's/.*@//'

#Parallel execution at feature level
#testRunnerCommand: dotnet test --filter "(Name~$test)"
testRunnerCommand: dotnet test --filter "(Category=$test)"

jobLabel: [selenium-specflow, linux, autosplit]
Step 4: Execute your Test Suite
NOTE : In case of MacOS, if you get a permission denied warning while executing CLI, simply run
chmod u+x ./hyperexecuteto allow permission. In case you get a security popup, allow it from your System Preferences → Security & Privacy → General tab.
Run the below command in your terminal at the root folder of the project:
./hyperexecute --config RELATIVE_PATH_OF_YOUR_YAML_FILE
OR use this command if you have not exported your username and access key in the previous step.
./hyperexecute --user undefined --key undefined --config RELATIVE_PATH_OF_YOUR_YAML_FILE
Step 5: Monitor the Test Execution
Visit the HyperExecute Dashboard and check your Job status.
Step 6: Download Artifacts and Reports
HyperExecute also facilitates the provision to download the Artifacts and Reports on your local machine. Click on the corresponding button to download your generated artifacts and reports.
2. Testing Using Gitpod
You can also use the Gitpod platform to execute our sample repository. It will fetch all the sample codebases and trigger the CLI to execute the tests.
Follow the below steps to run Test using Gitpod:
Step 1: Click 'Open in Gitpod' button. You will be redirected to Login/Signup page. This button is configured to redirect you to the Gitpod platform where you will be able to execute our sample repository.
Step 2: Login with TestMu AI credentials. Once logged in, a pop-up confirmation will appear, asking you to 'Proceed' to the Gitpod editor in a new tab. The current tab will display the HyperExecute Dashboard.
Step 3: Choose your preferred editor (we recommend VS Code Editor)
Step 4: As you are running a sample project, Fetching of the Test Scripts, HyperExecute YAML, HyperExecute CLI and Triggering your tests using the Execution Command will be automated.
Step 5: Once you see the Job Link in the logs, you can visit the HyperExecute dashboard to see the tests getting executed.
You can also implement Secret Keys in your YAML file.
Navigation in Automation Dashboard
Every test run on the HyperExecute has a unique jobId associated with it. Each jobId can in turn constitute single (or multiple) groupId(s). You can visit HyperExecute Automation Dashboard for checking the status of the test execution.
You can seamlessly navigate between JobId's and taskId's. You need to click on the testID to navigate from the HyperExecute logs to the Automation Dashboard.
The snapshot below shows the videos, logs and other meta data for that specific test_ID
Running Reqnroll Framework Tests on HyperExecute
Reqnroll is an open-source behavior-driven development (BDD) framework for .NET, the successor to SpecFlow. It allows you to define test scenarios in plain language using Gherkin syntax, making collaboration between technical and non-technical team members seamless.
Run your Reqnroll framework tests on HyperExecute via two methods:
- Using Local System - You can use your own local machine to execute tests.
- Using Gitpod Platform - Execute tests using GitPod. (Requires a Gitpod account)
Testing Using Local System
Follow the step-by-step guide to execute your test on HyperExecute.
Step 1: Configure Your Test Suite
You can use your own project to configure and test it. For demo purposes, we are using the sample repository.
Download or Clone the code sample for the Reqnroll from the TestMu AI GitHub repository to run the tests on the HyperExecute.
View on GitHubIf you are using your own project, make sure you update the Hub endpoint in your tests file.
By setting up the Hub endpoint, you establish the communication channel between your tests and the browser nodes, enabling effective test distribution and execution.
Configure the desired capabilities based on your test requirements. For example:
DesiredCapabilities capabilities = new DesiredCapabilities();
capabilities.SetCapability(CapabilityType.BrowserName, "Chrome");
capabilities.SetCapability(CapabilityType.Version, "96");
capabilities.SetCapability(CapabilityType.Platform, "Windows 10");
You can also use dev and beta browser versions. To generate capabilities for your test requirements, you can use our inbuilt 🔗 Capabilities Generator.
Step 2: Setup the CLI in your Test Suite
After cloning / downloading the sample repo, you need to setup the CLI and the environment variables as described in the common steps above.
Step 3: Configure YAML in your Test Suite
Configure your YAML file as per your use cases using key value pairs.
In this sample YAML file, we have mentioned:
- version of the YAML file
- Timeouts for executing your project
- Mode of execution is Autosplit. You can also opt for Matrix or Hybrid mode.
- Pre and Post commands
- Reports and Artefacts that will be generated after the completion of tests
- and other necessary YAML Parameters
---
version: 0.1
globalTimeout: 90
testSuiteTimeout: 90
testSuiteStep: 90

runson: linux

autosplit: true
retryOnFailure: true

maxRetries: 1
concurrency: 4

env:
  NUGET_PACKAGES: '/home/ltuser/.nuget/packages/'
  NUGET_HTTP_CACHE_PATH: '/home/ltuser/.local/share/NuGet/v3-cache'
  NUGET_PLUGINS_CACHE_PATH: '/home/ltuser/.local/share/NuGet/plugins-cache'

pre:
 - dotnet restore
 - dotnet list reqnroll.cloud.csproj package > packages.txt
 - dotnet build -c Release

cacheKey: '{{ checksum "packages.txt" }}'

post:
  - cat yaml/linux/reqnroll_hyperexecute_autosplit_sample.yaml

mergeArtifacts: true

uploadArtefacts:
 - name: Execution_Report
   path:
    - Report/**
    - Reports/**
 - name: Execution_Screenshots
   path:
    - Screenshots/**/**
    - Reports/**/Screenshots/**

testDiscovery:
  type: raw
  mode: remote
  command: grep -rni 'Features' -e '@' --include=\*.feature | sed 's/.*@//'

testRunnerCommand: dotnet test --logger "console;verbosity=detailed" --filter "(Category=$test)"

jobLabel: [selenium-reqnroll, linux, autosplit]
Step 4: Execute your Test Suite
NOTE : In case of MacOS, if you get a permission denied warning while executing CLI, simply run
chmod u+x ./hyperexecuteto allow permission. In case you get a security popup, allow it from your System Preferences → Security & Privacy → General tab.
Run the below command in your terminal at the root folder of the project:
./hyperexecute --config RELATIVE_PATH_OF_YOUR_YAML_FILE
OR use this command if you have not exported your username and access key in the previous step.
./hyperexecute --user undefined --key undefined --config RELATIVE_PATH_OF_YOUR_YAML_FILE
Step 5: Monitor the Test Execution
Visit the HyperExecute Dashboard and check your Job status.
Every test run on the HyperExecute has a unique jobId associated with it. Each jobId can in turn constitute single (or multiple) groupId(s). You can visit HyperExecute Automation Dashboard for checking the status of the test execution.
You can seamlessly navigate between JobId's and taskId's. You need to click on the testID to navigate from the HyperExecute logs to the Automation Dashboard.
Step 6: Download Artifacts and Reports
HyperExecute also facilitates the provision to download the Artifacts and Reports on your local machine. Click on the corresponding button to download your generated artifacts and reports.
Ruby
- Ruby
- Capybara
Running Ruby Framework Tests on HyperExecute
RSpec is a behavior-driven development (BDD) framework for Ruby commonly used in conjunction with Selenium for automated testing. It facilitates expressive and readable specifications, making it easier to define and manage Selenium test cases. RSpec supports a variety of assertions and provides powerful reporting tools, enhancing the efficiency and clarity of Selenium test scripts written in Ruby.
HyperExecute is an AI Native Test Orchestration Cloud Platform that empowers you to run end-to-end tests quickly and efficiently. It provides Just-in-Time (JIT) testing infrastructure with fast execution speeds, smart orchestration, and detailed logs.
Run your RSpec framework tests on HyperExecute via two methods:
- Using Local System - You can use your own local machine to execute tests.
- Using Gitpod Platform - Execute tests using GitPod. (Requires a Gitpod account)
1. Testing Using Local System
Follow the step-by-step guide to execute your test on HyperExecute.
Step 1: Configure Your Test Suite
You can use your own project to configure and test it. For demo purposes, we are using the sample repository.
Download or Clone the code sample for the JUnit from the TestMu AI GitHub repository to run the tests on the HyperExecute.
View on GitHubIf you are using your own project, make sure you update the Hub endpoint in your tests file.
By setting up the Hub endpoint, you establish the communication channel between your tests and the browser nodes, enabling effective test distribution and execution.
You can also use dev and beta browser versions. To generate capabilities for your test requirements, you can use our inbuilt 🔗 Capabilities Generator.
Step 2: Setup the CLI in your Test Suite
After cloning / downloading the sample repo, you need to setup the CLI and the environment variables.
Step 3: Configure YAML in your Test Suite
Configure your YAML file as per your use cases using key value pairs.
In this sample YAML file, we have mentioned:
- version of the YAML file
- Timeouts for executing your project
- Mode of execution is Autosplit. You can also opt for Matrix or Hybrid mode.
- Pre and Post commands
- Reports and Artefacts that will be generated after the completion of tests
- and other necessary YAML Parameters
---
version: "0.1"
globalTimeout: 90
testSuiteTimeout: 90
testSuiteStep: 90

runson: linux

autosplit: true
retryOnFailure: true
maxRetries: 1
concurrency: 2

pre:
  - bundle install --deployment

cacheKey: '{{ checksum "Gemfile.lock" }}'
cacheDirectories:
  - /vendor

env:
   CONFIG_NAME: "linux"

testDiscovery:
  type: raw
  mode: remote
  command: grep -nri -E 'it ".*." do' spec/*.rb | awk '{print$1}' | sed 's/\(.*\):/\1 /'

testRunnerCommand: bundle exec rspec "$test" --format html --out rspec_results.html

mergeArtifacts: true
uploadArtefacts:
 - name: report
   path:
     - rspec_results.html

report: true
partialReports:
 location: rspec_results.html
 type: html

jobLabel: [selenium-Rspec, linux, autosplit]
Step 4: Execute your Test Suite
NOTE : In case of MacOS, if you get a permission denied warning while executing CLI, simply run
chmod u+x ./hyperexecuteto allow permission. In case you get a security popup, allow it from your System Preferences → Security & Privacy → General tab.
Run the below command in your terminal at the root folder of the project:
./hyperexecute --config RELATIVE_PATH_OF_YOUR_YAML_FILE
OR use this command if you have not exported your username and access key in the step 2.
./hyperexecute --user undefined --key undefined --config RELATIVE_PATH_OF_YOUR_YAML_FILE
Step 5: Monitor the Test Execution
Visit the HyperExecute Dashboard and check your Job status.
Step 6: Download Artifacts and Reports
HyperExecute also facilitates the provision to download the Artifacts and Reports on your local machine. Click on the corresponding button to download your generated artifacts and reports.
2. Testing Using Gitpod
You can also use the Gitpod platform to execute our sample repository. It will fetch all the sample codebases and trigger the CLI to execute the tests.
Follow the below steps to run Test using Gitpod:
Step 1: Click 'Open in Gitpod' button. You will be redirected to Login/Signup page. This button is configured to redirect you to the Gitpod platform where you will be able to execute our sample repository.
Step 2: Login with TestMu AI credentials. Once logged in, a pop-up confirmation will appear, asking you to 'Proceed' to the Gitpod editor in a new tab. The current tab will display the HyperExecute Dashboard.
Step 3: Choose your preferred editor (we recommend VS Code Editor)
Step 4: As you are running a sample project, Fetching of the Test Scripts, HyperExecute YAML, HyperExecute CLI and Triggering your tests using the Execution Command will be automated.
Step 5: Once you see the Job Link in the logs, you can visit the HyperExecute dashboard to see the tests getting executed.
You can also implement Secret Keys in your YAML file.
Navigation in Automation Dashboard
Every test run on the HyperExecute has a unique jobId associated with it. Each jobId can in turn constitute single (or multiple) groupId(s). You can visit HyperExecute Automation Dashboard for checking the status of the test execution.
You can seamlessly navigate between JobId's and taskId's. You need to click on the testID to navigate from the HyperExecute logs to the Automation Dashboard.
The snapshot below shows the videos, logs and other meta data for that specific test_ID
Running Capybara Framework Tests on HyperExecute
Capybara is a Ruby-based testing framework commonly used with Selenium for end-to-end web application testing. It provides a clean and expressive DSL (Domain-Specific Language) for interacting with web pages and handling common browser interactions.
HyperExecute is an AI Native Test Orchestration Cloud Platform that empowers you to run end-to-end tests quickly and efficiently. It provides Just-in-Time (JIT) testing infrastructure with fast execution speeds, smart orchestration, and detailed logs.
Run your Capybara framework tests on HyperExecute via two methods:
- Using Local System - You can use your own local machine to execute tests.
- Using Gitpod Platform - Execute tests using GitPod. (Requires a Gitpod account)
1. Testing Using Local System
Follow the step-by-step guide to execute your test on HyperExecute.
Step 1: Configure Your Test Suite
You can use your own project to configure and test it. For demo purposes, we are using the sample repository.
Download or Clone the code sample for the JUnit from the TestMu AI GitHub repository to run the tests on the HyperExecute.
View on GitHubIf you are using your own project, make sure you update the Hub endpoint in your tests file.
By setting up the Hub endpoint, you establish the communication channel between your tests and the browser nodes, enabling effective test distribution and execution.
Configure the desired capabilities based on your test requirements. For example:
@caps = {
  "browserName"=>lt_browser,
  "version"=>lt_browser_version,
  "platform"=>lt_os,
  "resolution"=>lt_res,
  "build"=>"capybara-lambdatest",
  "name"=>"single-Test-Jenkins",
  "video"=>true,
  "network"=>true,
  "console"=>true,
  "visual"=>true
}
You can also use dev and beta browser versions. To generate capabilities for your test requirements, you can use our inbuilt 🔗 Capabilities Generator.
Step 2: Setup the CLI in your Test Suite
After cloning / downloading the sample repo, you need to setup the CLI and the environment variables.
Step 3: Configure YAML in your Test Suite
Configure your YAML file as per your use cases using key value pairs.
In this sample YAML file, we have mentioned:
- version of the YAML file
- Timeouts for executing your project
- Mode of execution is Autosplit. You can also opt for Matrix or Hybrid mode.
- Pre and Post commands
- Reports and Artefacts that will be generated after the completion of tests
- and other necessary YAML Parameters
---
version: "0.1"

globalTimeout: 90
testSuiteTimeout: 90
testSuiteStep: 90

runson: linux

autosplit: true

retryOnFailure: true
maxRetries: 5

concurrency: 2

pre:
  - bundle install --deployment

env:
   CONFIG_NAME: "linux"

cacheKey: '{{ checksum "Gemfile.lock" }}'
cacheDirectories:
  - ./vendor/bundle

uploadArtefacts:
 - name: report
   path:
     - cucumber_results.html

report: true
partialReports:
 location: cucumber_results.html
 type: html

testDiscovery:
  type: raw
  mode: remote
  command: snooper --featureFilePaths=features/ --frameWork=java

testRunnerCommand: bundle exec cucumber "$test" --format html --out cucumber_results.html

jobLabel: [selenium-capybara, linux, autosplit]
Step 4: Execute your Test Suite
NOTE : In case of MacOS, if you get a permission denied warning while executing CLI, simply run
chmod u+x ./hyperexecuteto allow permission. In case you get a security popup, allow it from your System Preferences → Security & Privacy → General tab.
Run the below command in your terminal at the root folder of the project:
./hyperexecute --config RELATIVE_PATH_OF_YOUR_YAML_FILE
OR use this command if you have not exported your username and access key in the step 2.
./hyperexecute --user undefined --key undefined --config RELATIVE_PATH_OF_YOUR_YAML_FILE
Step 5: Monitor the Test Execution
Visit the HyperExecute Dashboard and check your Job status.
Step 6: Download Artifacts and Reports
HyperExecute also facilitates the provision to download the Artifacts and Reports on your local machine. Click on the corresponding button to download your generated artifacts and reports.
2. Testing Using Gitpod
You can also use the Gitpod platform to execute our sample repository. It will fetch all the sample codebases and trigger the CLI to execute the tests.
Follow the below steps to run Test using Gitpod:
Step 1: Click 'Open in Gitpod' button. You will be redirected to Login/Signup page. This button is configured to redirect you to the Gitpod platform where you will be able to execute our sample repository.
Step 2: Login with TestMu AI credentials. Once logged in, a pop-up confirmation will appear, asking you to 'Proceed' to the Gitpod editor in a new tab. The current tab will display the HyperExecute Dashboard.
Step 3: Choose your preferred editor (we recommend VS Code Editor)
Step 4: As you are running a sample project, Fetching of the Test Scripts, HyperExecute YAML, HyperExecute CLI and Triggering your tests using the Execution Command will be automated.
Step 5: Once you see the Job Link in the logs, you can visit the HyperExecute dashboard to see the tests getting executed.
You can also implement Secret Keys in your YAML file.
Navigation in Automation Dashboard
Every test run on the HyperExecute has a unique jobId associated with it. Each jobId can in turn constitute single (or multiple) groupId(s). You can visit HyperExecute Automation Dashboard for checking the status of the test execution.
You can seamlessly navigate between JobId's and taskId's. You need to click on the testID to navigate from the HyperExecute logs to the Automation Dashboard.
The snapshot below shows the videos, logs and other meta data for that specific test_ID
JavaScript
- WebdriverIO
- Nightwatch
- Protractor
WebdriverIO is a widely-used testing framework for Java applications, designed to simplify and enhance the testing process for developers. It provides a flexible and powerful platform for running test suites, enabling effective unit testing, integration testing, and end-to-end testing of Java applications
Run your WebdriverIO framework tests on HyperExecute via two methods:
- Using Local System - You can use your own local machine to execute tests.
- Using Gitpod Platform - Execute tests using GitPod. (Requires a Gitpod account)
1. Testing Using Local System
Follow the step-by-step guide to execute your test on HyperExecute.
Step 1: Configure Your Test Suite
You can use your own project to configure and test it. For demo purposes, we are using the sample repository.
Download or Clone the code sample for the JUnit from the TestMu AI GitHub repository to run the tests on the HyperExecute.
View on GitHubIf you are using your own project, make sure you update the Hub endpoint in your tests file.
By setting up the Hub endpoint, you establish the communication channel between your tests and the browser nodes, enabling effective test distribution and execution.
Configure the desired capabilities based on your test requirements. For example:
capabilities: [{
  browserName: 'chrome',
  platform: 'Windows 10',
  version: 'latest',
  name: "single-test",
  build: "wd-lambdatest-sample",
  geoLocation : "US"
}]
You can also use dev and beta browser versions. To generate capabilities for your test requirements, you can use our inbuilt 🔗 Capabilities Generator.
Step 2: Setup the CLI in your Test Suite
After cloning / downloading the sample repo, you need to setup the CLI and the environment variables. Download the HyperExecute CLI and set up your environment variables as described in the sections above.
Step 3: Configure YAML in your Test Suite
Configure your YAML file as per your use cases using key value pairs.
In this sample YAML file, we have mentioned:
- version of the YAML file
- Timeouts for executing your project
- Mode of execution is Autosplit. You can also opt for Matrix or Hybrid mode.
- Pre and Post commands
- Reports and Artefacts that will be generated after the completion of tests
- and other necessary YAML Parameters
---
version: 0.1
globalTimeout: 150
testSuiteTimeout: 150
testSuiteStep: 150

runson: linux

autosplit: true
retryOnFailure: true

maxRetries: 1
concurrency: 2

pre:
  - npm install

cacheKey: '{{ checksum "package-lock.json" }}'
cacheDirectories:
  - node_modules

mergeArtifacts: true

uploadArtefacts:
  [{
    "name": "Reports",
    "path": ["Reports/*"]
  }]

report: true
partialReports:
    type: json
    location: Reports/
    frameworkName: extent

testDiscovery:
  type: automatic
  args:
    featureFilePaths: Features/
    frameWork: java
    specificTags: ["@ToDoOne", "@ToDoTwo", "@ToDoThree"]

testRunnerCommand: npx wdio wdio.conf.js --spec=$test

jobLabel: [selenium-webdriverIO, linux, autosplit]
Step 4: Execute your Test Suite
NOTE : In case of MacOS, if you get a permission denied warning while executing CLI, simply run
chmod u+x ./hyperexecuteto allow permission. In case you get a security popup, allow it from your System Preferences → Security & Privacy → General tab.
Run the below command in your terminal at the root folder of the project:
./hyperexecute --config RELATIVE_PATH_OF_YOUR_YAML_FILE
OR use this command if you have not exported your username and access key in the step 2.
./hyperexecute --user undefined --key undefined --config RELATIVE_PATH_OF_YOUR_YAML_FILE
Step 5: Monitor the Test Execution
Visit the HyperExecute Dashboard and check your Job status.
Step 6: Download Artifacts and Reports
HyperExecute also facilitates the provision to download the Artifacts and Reports on your local machine. Click on the corresponding button to download your generated artifacts and reports.
2. Testing Using Gitpod
You can also use the Gitpod platform to execute our sample repository. It will fetch all the sample codebases and trigger the CLI to execute the tests.
Follow the below steps to run Test using Gitpod:
Step 1: Click 'Open in Gitpod' button. You will be redirected to Login/Signup page. This button is configured to redirect you to the Gitpod platform where you will be able to execute our sample repository.
Step 2: Login with TestMu AI credentials. Once logged in, a pop-up confirmation will appear, asking you to 'Proceed' to the Gitpod editor in a new tab. The current tab will display the HyperExecute Dashboard.
Step 3: Choose your preferred editor (we recommend VS Code Editor)
Step 4: As you are running a sample project, Fetching of the Test Scripts, HyperExecute YAML, HyperExecute CLI and Triggering your tests using the Execution Command will be automated.
Step 5: Once you see the Job Link in the logs, you can visit the HyperExecute dashboard to see the tests getting executed.
You can also implement Secret Keys in your YAML file.
Navigation in Automation Dashboard
Every test run on the HyperExecute has a unique jobId associated with it. Each jobId can in turn constitute single (or multiple) groupId(s). You can visit HyperExecute Automation Dashboard for checking the status of the test execution.
You can seamlessly navigate between JobId's and taskId's. You need to click on the testID to navigate from the HyperExecute logs to the Automation Dashboard.
The snapshot below shows the videos, logs and other meta data for that specific test_ID
Nightwatch.js is an automated testing framework built on top of Selenium and Node.js. It simplifies end-to-end testing, offering a simple syntax and a powerful set of built-in commands. Nightwatch.js supports the Selenium WebDriver protocol and allows efficient browser automation, making it a popular choice for web application testing.
Run your Nightwatch framework tests on HyperExecute via two methods:
- Using Local System - You can use your own local machine to execute tests.
- Using Gitpod Platform - Execute tests using GitPod. (Requires a Gitpod account)
1. Testing Using Local System
Follow the step-by-step guide to execute your test on HyperExecute.
Step 1: Configure Your Test Suite
You can use your own project to configure and test it. For demo purposes, we are using the sample repository.
Download or Clone the code sample for the JUnit from the TestMu AI GitHub repository to run the tests on the HyperExecute.
View on GitHubIf you are using your own project, make sure you update the Hub endpoint in your tests file.
By setting up the Hub endpoint, you establish the communication channel between your tests and the browser nodes, enabling effective test distribution and execution.
Configure the desired capabilities based on your test requirements. For example:
# nightwatch.conf.js

module.exports = (function(settings) {
  console.log(settings["test_settings"]["default"]["username"])
  if (process.env.LT_USERNAME) {
    settings["test_settings"]["default"]["username"] = process.env.LT_USERNAME;
  }
  if (process.env.LT_ACCESS_KEY) {
    settings["test_settings"]["default"]["access_key"] = process.env.LT_ACCESS_KEY;
  }
  if (process.env.SELENIUM_HOST) {
    settings.selenium.host = process.env.SELENIUM_HOST;
  }
  if (process.env.SELENIUM_PORT) {
    settings.selenium.host = process.env.SELENIUM_PORT;
  }
  return settings;
})(require('./nightwatch.json'));
You can generate capabilities for your test requirements with the help of our inbuilt 🔗 Capabilities Generator.
Step 2: Setup the CLI in your Test Suite
After cloning / downloading the sample repo, you need to setup the CLI and the environment variables. Download the HyperExecute CLI and set up your environment variables as described in the sections above.
Step 3: Configure YAML in your Test Suite
Configure your YAML file as per your use cases using key value pairs.
In this sample YAML file, we have mentioned:
- version of the YAML file
- Timeouts for executing your project
- Mode of execution is Autosplit. You can also opt for Matrix or Hybrid mode.
- Pre and Post commands
- Reports and Artefacts that will be generated after the completion of tests
- and other necessary YAML Parameters
---
version: 0.1
globalTimeout: 90
testSuiteTimeout: 90
testSuiteStep: 90

runson: linux
autosplit: true
retryOnFailure: true

maxRetries: 1
concurrency: 3
parallelism: 1

cacheKey: '{{ checksum "package-lock.json" }}'
cacheDirectories:
  - node_modules

pre:
  - npm install

mergeArtifacts: true
uploadArtifacts:
  - name: Reports
    path:
      - reports/

report: true
partialReports:
    type: json
    location: reports/
    frameworkName: extent

testDiscovery:
  type: raw
  mode: remote
  command: grep -B1 'desiredCapabilities' nightwatch.json | sed 's/-//g' | grep -vE 'desiredCapabilities' | grep -vE 'skip_testcases_on_fail' | awk '{print$1}' | sed 's/://g' | sed 's/"//g'

testRunnerCommand: ./node_modules/.bin/nightwatch -e $test

jobLabel: [selenium-Nightwatch, linux, autosplit]
Step 4: Execute your Test Suite
NOTE : In case of MacOS, if you get a permission denied warning while executing CLI, simply run
chmod u+x ./hyperexecuteto allow permission. In case you get a security popup, allow it from your System Preferences → Security & Privacy → General tab.
Run the below command in your terminal at the root folder of the project:
./hyperexecute --config RELATIVE_PATH_OF_YOUR_YAML_FILE
OR use this command if you have not exported your username and access key in the step 2.
./hyperexecute --user undefined --key undefined --config RELATIVE_PATH_OF_YOUR_YAML_FILE
Step 5: Monitor the Test Execution
Visit the HyperExecute Dashboard and check your Job status.
Step 6: Download Artifacts and Reports
HyperExecute also facilitates the provision to download the Artifacts and Reports on your local machine. Click on the corresponding button to download your generated artifacts and reports.
2. Testing Using Gitpod
You can also use the Gitpod platform to execute our sample repository. It will fetch all the sample codebases and trigger the CLI to execute the tests.
Follow the below steps to run Test using Gitpod:
Step 1: Click 'Open in Gitpod' button. You will be redirected to Login/Signup page. This button is configured to redirect you to the Gitpod platform where you will be able to execute our sample repository.
Step 2: Login with TestMu AI credentials. Once logged in, a pop-up confirmation will appear, asking you to 'Proceed' to the Gitpod editor in a new tab. The current tab will display the HyperExecute Dashboard.
Step 3: Choose your preferred editor (we recommend VS Code Editor)
Step 4: As you are running a sample project, Fetching of the Test Scripts, HyperExecute YAML, HyperExecute CLI and Triggering your tests using the Execution Command will be automated.
Step 5: Once you see the Job Link in the logs, you can visit the HyperExecute dashboard to see the tests getting executed.
You can also implement Secret Keys in your YAML file.
Navigation in Automation Dashboard
Every test run on the HyperExecute has a unique jobId associated with it. Each jobId can in turn constitute single (or multiple) groupId(s). You can visit HyperExecute Automation Dashboard for checking the status of the test execution.
You can seamlessly navigate between JobId's and taskId's. You need to click on the testID to navigate from the HyperExecute logs to the Automation Dashboard.
The snapshot below shows the videos, logs and other meta data for that specific test_ID
Protractor is a widely-used testing framework for Java applications, designed to simplify and enhance the testing process for developers. It provides a flexible and powerful platform for running test suites, enabling effective unit testing, integration testing, and end-to-end testing of Java applications
Run your Protractor framework tests on HyperExecute via two methods:
- Using Local System - You can use your own local machine to execute tests.
- Using Gitpod Platform - Execute tests using GitPod. (Requires a Gitpod account)
1. Testing Using Local System
Follow the step-by-step guide to execute your test on HyperExecute.
Step 1: Configure Your Test Suite
You can use your own project to configure and test it. For demo purposes, we are using the sample repository.
Download or Clone the code sample for the JUnit from the TestMu AI GitHub repository to run the tests on the HyperExecute.
View on GitHubIf you are using your own project, make sure you update the Hub endpoint in your tests file.
By setting up the Hub endpoint, you establish the communication channel between your tests and the browser nodes, enabling effective test distribution and execution.
Configure the desired capabilities based on your test requirements. For example:
capabilities = {
  build: 'protractor-LambdaTest-Single',
  browserName: 'chrome',
  version:'latest',
  platform: 'Windows 10',
},
You can also use dev and beta browser versions. To generate capabilities for your test requirements, you can use our inbuilt 🔗 Capabilities Generator.
Step 2: Setup the CLI in your Test Suite
After cloning / downloading the sample repo, you need to setup the CLI and the environment variables. Download the HyperExecute CLI and set up your environment variables as described in the sections above.
Step 3: Configure YAML in your Test Suite
Configure your YAML file as per your use cases using key value pairs.
In this sample YAML file, we have mentioned:
- version of the YAML file
- Timeouts for executing your project
- Mode of execution is Autosplit. You can also opt for Matrix or Hybrid mode.
- Pre and Post commands
- Reports and Artefacts that will be generated after the completion of tests
- and other necessary YAML Parameters
---
version: 0.1
globalTimeout: 90
testSuiteTimeout: 90
testSuiteStep: 90

runson: linux

autosplit: true
retryOnFailure: true

maxRetries: 1
concurrency: 2

cacheKey: '{{ checksum "package-lock.json" }}'
cacheDirectories:
  - node_modules

pre:
  - npm install -g protractor
  - npm install

mergeArtifacts: true

uploadArtefacts:
  - name: Reports
    path:
      - ProtractorTestReport.html
      - xmlresults.xml

report: true
partialReports:
    type: json
    location: /
    frameworkName: extent

testDiscovery:
  type: raw
  mode: remote
  command: grep -nri 'describe' specs -ir --include=*.js | sed 's/:.*//'
testRunnerCommand: protractor conf/single.conf.js --specs=$test --browser=chrome

jobLabel: [selenium-protractor, linux, autosplit]
Step 4: Execute your Test Suite
NOTE : In case of MacOS, if you get a permission denied warning while executing CLI, simply run
chmod u+x ./hyperexecuteto allow permission. In case you get a security popup, allow it from your System Preferences → Security & Privacy → General tab.
Run the below command in your terminal at the root folder of the project:
./hyperexecute --config RELATIVE_PATH_OF_YOUR_YAML_FILE
OR use this command if you have not exported your username and access key in the step 2.
./hyperexecute --user undefined --key undefined --config RELATIVE_PATH_OF_YOUR_YAML_FILE
Step 5: Monitor the Test Execution
Visit the HyperExecute Dashboard and check your Job status.
Step 6: Download Artifacts and Reports
HyperExecute also facilitates the provision to download the Artifacts and Reports on your local machine. Click on the corresponding button to download your generated artifacts and reports.
2. Testing Using Gitpod
You can also use the Gitpod platform to execute our sample repository. It will fetch all the sample codebases and trigger the CLI to execute the tests.
Follow the below steps to run Test using Gitpod:
Step 1: Click 'Open in Gitpod' button. You will be redirected to Login/Signup page. This button is configured to redirect you to the Gitpod platform where you will be able to execute our sample repository.
Step 2: Login with TestMu AI credentials. Once logged in, a pop-up confirmation will appear, asking you to 'Proceed' to the Gitpod editor in a new tab. The current tab will display the HyperExecute Dashboard.
Step 3: Choose your preferred editor (we recommend VS Code Editor)
Step 4: As you are running a sample project, Fetching of the Test Scripts, HyperExecute YAML, HyperExecute CLI and Triggering your tests using the Execution Command will be automated.
Step 5: Once you see the Job Link in the logs, you can visit the HyperExecute dashboard to see the tests getting executed.
You can also implement Secret Keys in your YAML file.
Navigation in Automation Dashboard
Every test run on the HyperExecute has a unique jobId associated with it. Each jobId can in turn constitute single (or multiple) groupId(s). You can visit HyperExecute Automation Dashboard for checking the status of the test execution.
You can seamlessly navigate between JobId's and taskId's. You need to click on the testID to navigate from the HyperExecute logs to the Automation Dashboard.
The snapshot below shows the videos, logs and other meta data for that specific test_ID
Monitor Your Test Execution
Every test run has a unique jobId. Once the CLI prints the job link, open the HyperExecute Dashboard to watch tests execute in real time, review isolated logs and videos per test, and download artifacts and reports.
Next Steps
Continue with these related guides:
 Chat with Us
 Ask the Community