Table Widgets
Table widgets in LambdaTest Insights enable you to display structured test data in a tabular format, making it easy to view detailed information, compare values across multiple dimensions, and analyze data with multiple columns and aggregations.
What is a Table Widget?
A table widget displays data in rows and columns, providing a structured view of your test data. Tables are particularly effective for:
- Displaying detailed data with multiple attributes in a single view
- Comparing values across different dimensions simultaneously
- Showing aggregated metrics alongside categorical data
- Grouping data by multiple fields to create hierarchical views
- Creating summary reports with multiple columns of information
Prerequisites
Before creating a table widget, ensure you have completed the common prerequisites and setup steps for custom widgets.
Step-by-Step Guide to Creating a Table Widget
For prerequisites and common setup steps (Navigate to Insights, Create Dashboard, Choose Product, Select Data Source, Configure Filters), see the Common Steps for Creating Custom Widgets section in the main Custom Widgets documentation.
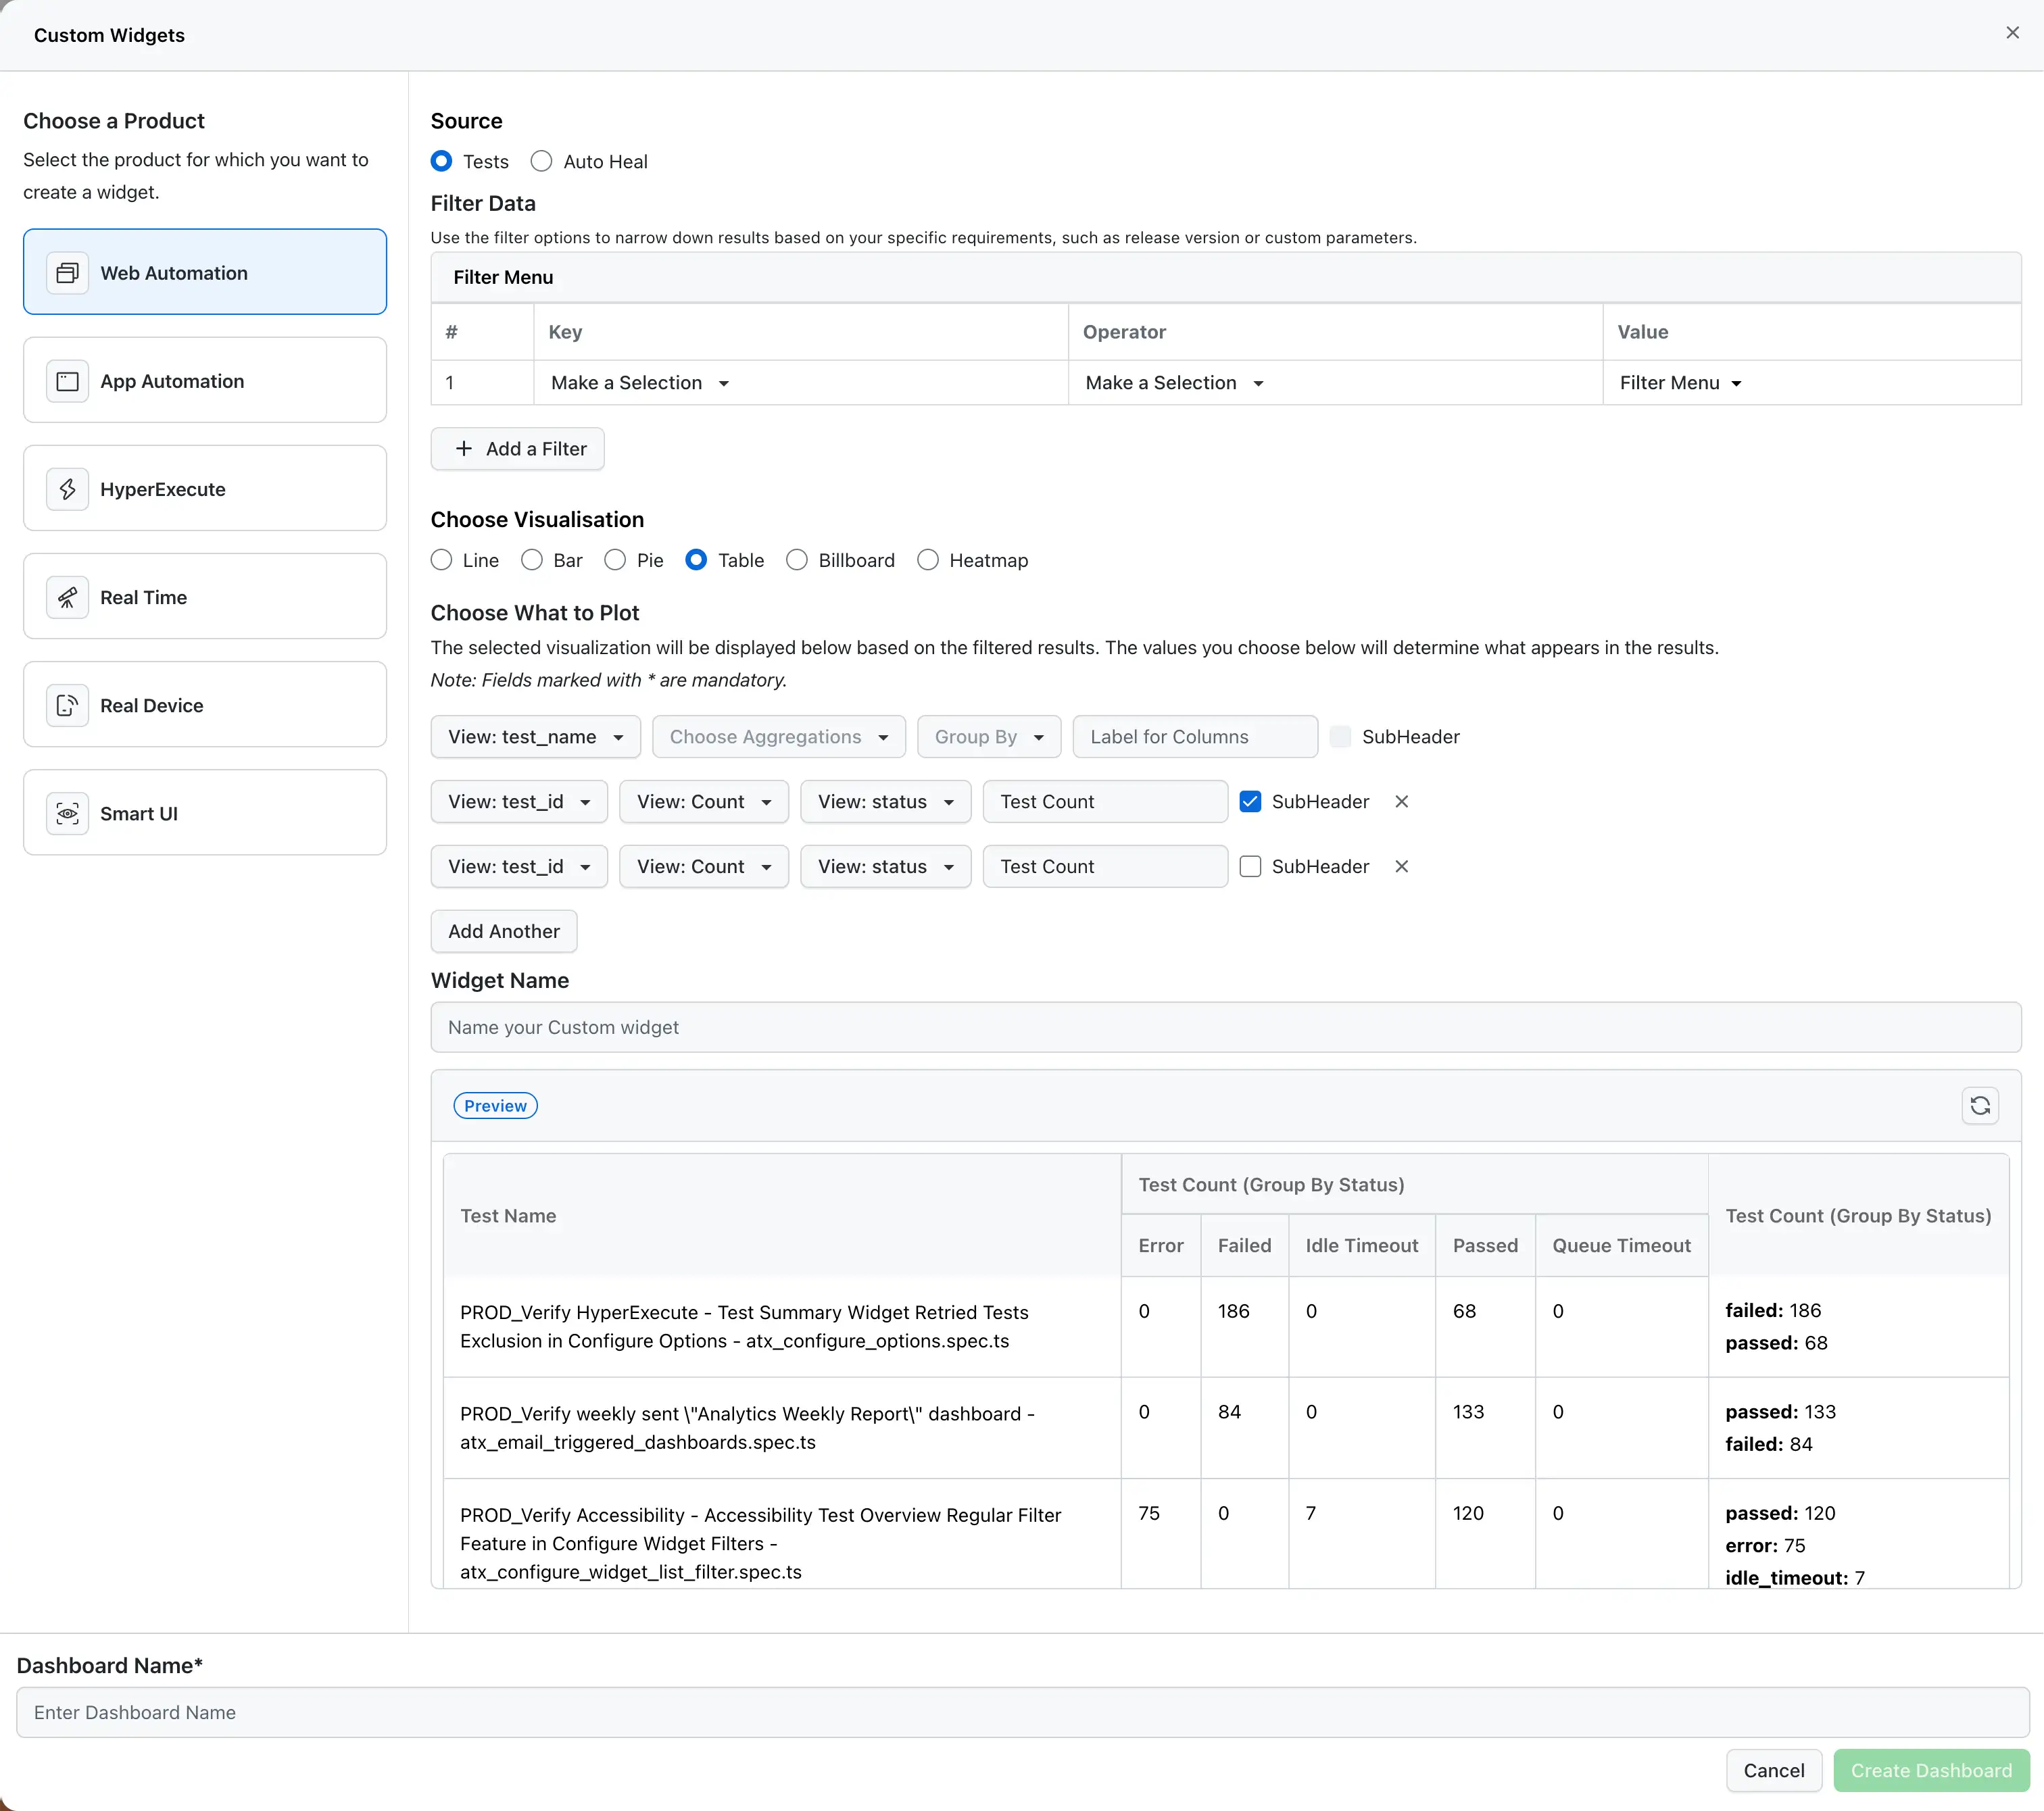
Step 6: Choose Table Visualization
- In the Choose Visualisation section, select Table from the available options (Line, Bar, Pie, Table, Billboard, Heatmap).
Step 7: Configure What to Plot
This is the most critical step for creating meaningful tables. You can add multiple columns to your table:
Adding Columns to Your Table
-
Field Selection* (Mandatory): Select the field you want to display in this column.
- For row identifiers: Use fields like
test_name,project_name,build_name - For metrics: Use fields like
test_id,duration, or other numeric fields - For categories: Use fields like
browser,os,status
- For row identifiers: Use fields like
-
Choose Aggregations (Optional): If you selected a numeric field, choose how to aggregate it:
- Count: Number of records
- Sum: Sum of values
- Average: Average value
- Minimum: Minimum value
- Maximum: Maximum value
- Unique Count: Count of unique values
- Percentiles (50th, 75th, 90th, 95th, 99th): For duration and other numeric fields
-
Group By (Optional): Select a field to group the data in this column. When you use Group By:
- The column will be split into sub-columns for each unique value in the grouping field
- Each sub-column will show the aggregated value for that group
- This is useful for creating breakdowns (e.g., test counts grouped by status will create sub-columns for "Passed", "Failed", "Error", etc.)
-
Label for Columns (Optional): Provide a custom label for the column header to make your table more readable.
-
SubHeader (Optional): Check this box if you want this column to appear as a sub-header in the table structure.
-
Add Another: Click this button to add additional columns to your table.
For a complete list of available keys for each product, see the Available Keys for Custom Widgets section in the main Custom Widgets documentation.
Example Configuration:
- Column 1:
test_name(no aggregation, no group by) - Creates a "Test Name" column showing individual test names - Column 2:
test_idwith Count aggregation, Group Bystatus- Creates a "Test Count" column with sub-columns for each status (Passed, Failed, Error, etc.)
Step 8: Name Your Widget
- Enter a descriptive name in the Widget Name field (e.g., "Test Summary by Status", "Project Test Counts").
- Use clear, descriptive names that indicate what the table shows.
Step 9: Preview Your Table
- Click the Preview button to see how your table will look with the current configuration.
- Review the table structure to ensure it displays the data as expected.
- Use the refresh icon to update the preview if you make changes.
Step 10: Create the Dashboard
- Enter a Dashboard Name in the bottom section.
- Click Create Dashboard to save your table widget.
- Your table will be added to the dashboard and ready for analysis.
How Table Widgets Work
Understanding how tables structure and display data is crucial for effective analysis:
Column Structure
Each column in your table can be configured independently:
- Simple Column: A single field without aggregation or grouping - displays the raw value or field name
- Aggregated Column: A field with an aggregation function - shows the calculated metric (Count, Sum, Average, etc.)
- Grouped Column: A field with Group By - creates sub-columns for each unique value in the grouping field
Row Structure
- Rows represent individual records or groups based on your first column configuration
- The first column typically defines what each row represents (e.g., test names, projects, builds)
- Subsequent columns show metrics or breakdowns for each row
Group By Behavior
When you use Group By in a column:
- The column header shows the aggregation and grouping (e.g., "Test Count (Group By Status)")
- Sub-columns are created for each unique value in the grouping field
- Each sub-column displays the aggregated value for that specific group
- This allows you to see breakdowns within each row
Example: If you group test_id (Count) by status, you'll see:
- Column header: "Test Count (Group By Status)"
- Sub-columns: "Error", "Failed", "Idle Timeout", "Passed", "Queue Timeout"
- Each row shows the count of tests for each status
SubHeader Feature
The SubHeader option allows you to create hierarchical table structures:
- Columns with SubHeader checked appear as section headers
- This helps organize related columns together
- Useful for grouping related metrics or creating multi-level table structures
Generating Meaningful Insights from Tables
Understanding Table Data
- Row Analysis: Each row represents a specific entity (test, project, build, etc.)
- Column Comparison: Compare values across columns to identify patterns
- Grouped Breakdowns: When using Group By, analyze the distribution within each row
- Summary Columns: Some configurations may show summary information in additional columns
Key Insights to Look For
- High-Value Rows: Identify rows with the highest aggregated values (most tests, longest durations, etc.)
- Distribution Patterns: When using Group By, observe how values are distributed across groups
- Anomalies: Rows with unexpected values or distributions that deviate from normal patterns
- Comparisons: Compare values across rows to identify best/worst performers
- Trends: If your first column is time-based, observe how values change across rows
- Coverage: Identify gaps where certain groups have zero or very low values
Interacting with Tables
- Sorting: Click on column headers to sort the table by that column (ascending/descending)
- Scrolling: Tables support horizontal and vertical scrolling for large datasets
- Export: Tables can be exported to CSV or other formats for further analysis
- Filtering: Some table configurations may support in-table filtering
- Drill-down: Click on specific cells or rows to drill down into detailed views
Use Cases for Table Widgets
1. Test Summary by Test Name
Use Case: Create a comprehensive summary table showing test names with their status breakdowns.
Configuration:
- Column 1:
test_name(no aggregation, no group by) - Label: "Test Name" - Column 2:
test_idwith Count aggregation, Group Bystatus- Label: "Test Count" - Source: Tests
Insight: Quickly see which tests have the most activity and how their results are distributed across different statuses. Identify tests with high failure rates or unusual status distributions.
2. Project Test Counts by Browser
Use Case: Compare test execution across different projects, broken down by browser.
Configuration:
- Column 1:
project_name(no aggregation, no group by) - Label: "Project Name" - Column 2:
test_idwith Count aggregation, Group Bybrowser- Label: "Test Count by Browser" - Source: Tests
Insight: Understand browser usage patterns across projects and identify projects that need better browser coverage.
3. Build Performance Summary
Use Case: Analyze build performance with multiple metrics in a single table.
Configuration:
- Column 1:
build_name(no aggregation, no group by) - Label: "Build Name" - Column 2:
test_idwith Count aggregation - Label: "Total Tests" - Column 3:
test_idwith Count aggregation, Group Bystatus- Label: "Test Count by Status" - Column 4:
durationwith Average aggregation - Label: "Average Duration" - Source: Tests
Insight: Get a comprehensive view of build performance including total tests, status breakdown, and execution time.
4. Test Status Distribution by OS
Use Case: See how test statuses vary across different operating systems.
Configuration:
- Column 1:
os(no aggregation, no group by) - Label: "Operating System" - Column 2:
test_idwith Count aggregation, Group Bystatus- Label: "Test Count by Status" - Source: Tests
Insight: Identify OS-specific issues by comparing status distributions across different operating systems.
5. Custom Data Analysis
Use Case: Analyze test patterns based on custom attributes like release version or feature flags.
Configuration:
- Column 1: Custom key (e.g.,
release_version) - Label: "Release Version" - Column 2:
test_idwith Count aggregation, Group Bystatus- Label: "Test Count by Status" - Source: Tests
- Filters: Apply custom data filters
Insight: Track how different releases perform and identify release-specific issues.
6. Duration Analysis by Test Type
Use Case: Compare test execution durations across different test types.
Configuration:
- Column 1:
test_type(no aggregation, no group by) - Label: "Test Type" - Column 2:
durationwith Average aggregation - Label: "Average Duration" - Column 3:
durationwith Maximum aggregation - Label: "Max Duration" - Column 4:
durationwith Minimum aggregation - Label: "Min Duration" - Source: Tests
Insight: Identify which test types take the longest to execute and optimize accordingly.
Available Keys for Table Widgets
For a complete list of available keys that can be used for configuring table columns, aggregations, and grouping, see the Available Keys for Custom Widgets section in the main Custom Widgets documentation.
Choose keys that represent categorical dimensions (like browser, OS, project name) for row identifiers, and numeric or countable fields for aggregations. For grouped columns, use fields with a reasonable number of unique values to avoid creating too many sub-columns.
Best Practices for Table Widgets
1. Choose Meaningful Row Identifiers
- Use the first column to represent what each row stands for (test names, projects, builds, etc.)
- Select fields that create logical groupings and are meaningful for your analysis
- Avoid fields with too many unique values as this can create very long tables
2. Use Aggregations Appropriately
- Use Count aggregation for
test_idor other identifier fields to get test counts - Use Average, Sum, Min, Max for numeric fields like
duration - Use Percentiles for understanding distributions (e.g., 90th percentile duration)
3. Leverage Group By Strategically
- Use Group By to create breakdowns within each row
- Common grouping fields:
status,browser,os,failure_category - Avoid grouping by fields with too many unique values (creates too many sub-columns)
- Group By is most useful when you want to see distributions (e.g., test counts by status)
4. Organize Columns Logically
- Place the most important identifier column first
- Follow with aggregated metrics
- Use SubHeader to group related columns together
- Limit the number of columns to keep tables readable (typically 3-5 columns work well)
5. Use Filters Effectively
- Apply filters to focus on relevant subsets of data
- Combine multiple filters to create highly targeted tables
- Filter by time ranges, projects, or other relevant dimensions
6. Name Columns Clearly
- Use descriptive labels for columns to make tables self-explanatory
- Include aggregation type in labels when using aggregations (e.g., "Average Duration")
- Include grouping information when using Group By (e.g., "Test Count (Group By Status)")
7. Regular Review and Updates
- Review tables regularly to identify new patterns or issues
- Update filters and column configurations as your testing strategy evolves
- Create multiple tables with different configurations to explore various aspects
Troubleshooting
Table Shows No Data
- Check Filters: Ensure filters aren't too restrictive
- Verify Data Source: Confirm you have test data for the selected product
- Check Field Selection: Ensure the selected fields have data in your test executions
- Review Aggregations: Verify that aggregation functions are appropriate for the selected fields
Table is Too Wide or Has Too Many Columns
- Reduce Group By Values: Use filters to limit the number of groups
- Remove Unnecessary Columns: Focus on the most important metrics
- Simplify Grouping: Choose grouping fields with fewer unique values
Group By Creates Too Many Sub-Columns
- Use Filters: Filter to specific values of the grouping field
- Choose Different Grouping: Select a field with fewer unique values
- Combine Groups: Consider using multiple tables for different aspects
Table Doesn't Show Expected Values
- Check Aggregation: Verify the aggregation function is appropriate
- Review Data Range: Ensure you have sufficient data points
- Verify Field Types: Ensure numeric fields are used with numeric aggregations
Next Steps
After creating your table widget:
- Add to Dashboard: Combine tables with other widgets for comprehensive analysis
- Share Dashboard: Share your dashboard with team members for collaborative insights
- Create Variations: Create multiple tables with different configurations to explore various aspects
- Review Regularly: Use insights from tables to identify areas needing attention and track improvements
Support
If you have any questions or need assistance with creating table widgets, please reach out to our 24/7 customer support or visit our Support Center.
