Upload & Download Files and Media on Real Devices
TestMu AI’s Files & Media feature allows you to seamlessly upload files or media from your system to real devices and download files the app or website generated back for verification. This ensures comprehensive validation of workflows such as document generation, media export, and file handling across Android and iOS devices — during both App and Browser testing sessions.
The same upload and download experience is available whether you are testing a native app or a website in a mobile browser, so there is nothing new to relearn when switching between the two.
Supported Devices
| Platform | OS Version |
|---|---|
| Android | 9 and above |
| iOS | 13 and above |
Steps for Uploading & Downloading Files
The Files & Media panel works the same way in both App and Browser sessions. Follow the common steps below — the only differences are the dashboard you start from and where uploaded files land on the device.
-
Open a Real Device Session
Log in to your dashboard and launch a session on an Android or iOS real device:- App testing: App Live Dashboard — upload your app, then select a device.
- Browser testing: Real Device Browser Dashboard — select a device and browser.
-
Use the Files & Media Panel
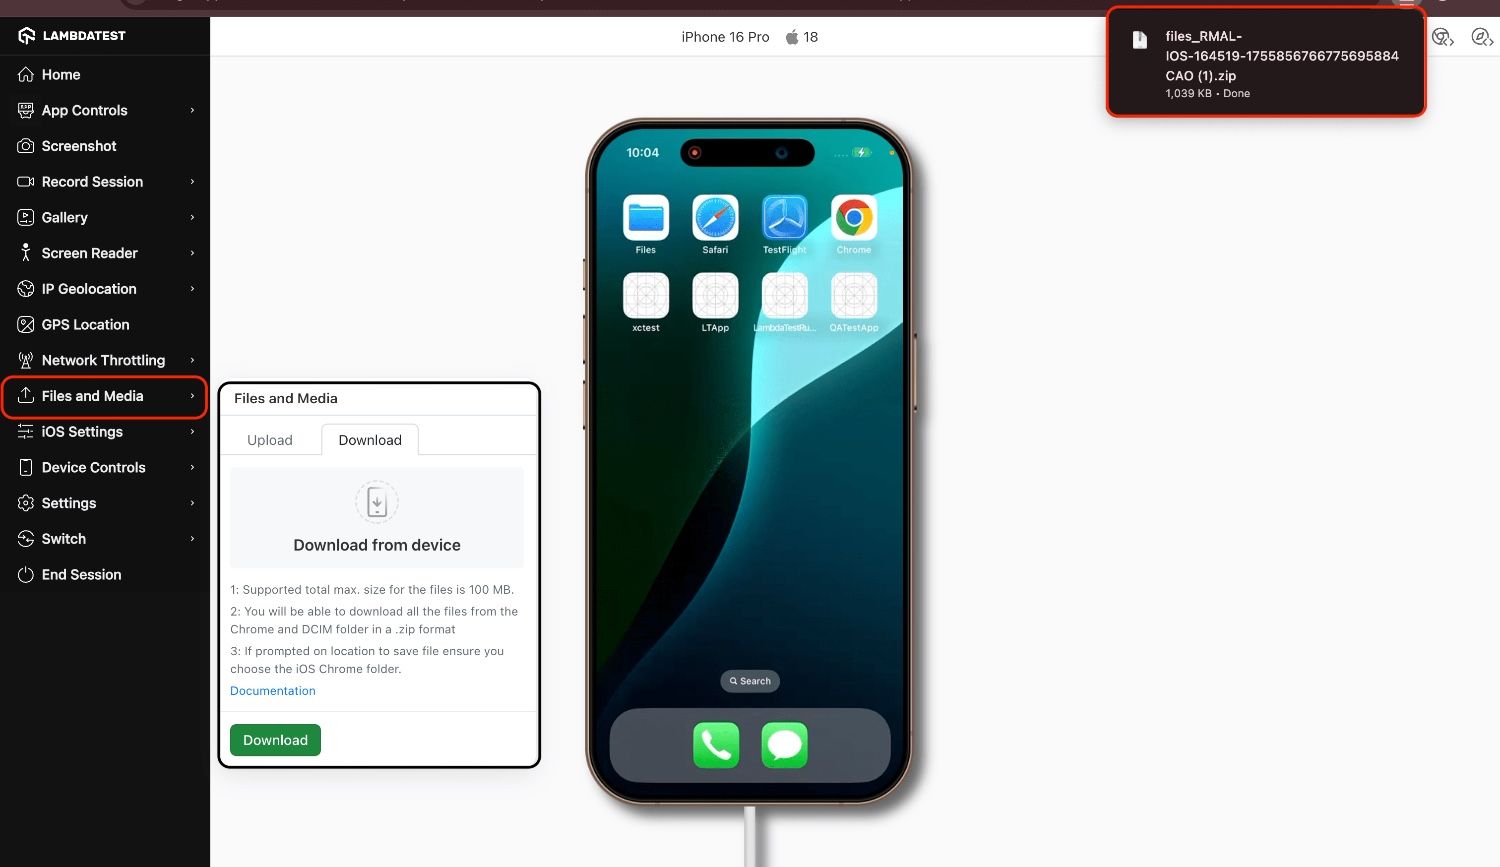
From the right-hand session toolbar, click the Files & Media icon.
Upload
Click Upload to select files or media from your local system. In a browser session, then tap the file input in the website under test and choose the uploaded file from the device.
Once uploaded, files are stored in the device’s default locations. This is the main difference between the two session types:
| Category | Platform | App session location | Browser session location |
|---|---|---|---|
| Media Files | Android | Gallery → /sdcard/Pictures or /sdcard/Movies | Downloads (reachable from the browser file picker) |
| iOS | Camera Roll → /private/var/mobile/Media/DCIM/ | Photo Library (reachable from the native Photo Library picker) | |
| Non-Media Files | Android | Downloads folder | Downloads (reachable from the browser file picker) |
| iOS | Files app → On My iPhone → Your app's directory | Files app → On My iPhone → Chrome (even when testing in Safari) |
- Target App Must Be Installed: In manual testing, your iOS app must be installed on the device before you can upload non-media files.
- Info.plist Configuration: For non-media files, ensure your iOS app’s
Info.plistfile sets bothUIFileSharingEnabledandLSSupportsOpeningDocumentsInPlacetotrue. This makes your app’s directory accessible in the native Files app under On My iPhone → Your App’s Directory.
Download
Switch to the Download tab in the Files & Media panel and select the files you want to export. Click the Download button to save them to your system as a .zip, which you can then extract and verify. In a browser session, this retrieves the files the website saved on the device (Android: Downloads; iOS: the browser’s Downloads).
The maximum combined download size per session is 100 MB.
Differences between App and Browser sessions
Everything else is identical; only these behaviors differ:
- Starting point: App sessions require uploading an app; browser sessions start directly from the Real Device Browser dashboard.
- Upload destination on the device: see the table above.
- iOS documents in browser sessions always appear under Chrome in the Files app — even when testing in Safari. This is by design, as only Chrome on iOS exposes a browsable file container.
- Android
accept="image/*"inputs in browser sessions may open the photo picker; the default file input works across the board.
Automation
Pass the uploadMedia capability — an array of uploaded media IDs (maximum 5) — to make the files available in your session. The capability is identical for app and browser (web) automation. Refer to the documentation for Uploading Files and Media on Real Devices.
Supported File Types
The same formats and size limits apply to both App and Browser sessions:
- Images: JPG, JPEG, PNG, GIF, BMP (Max: 10 MB)
- Videos: MP4 (Max: 50 MB)
- Documents: XLS, XLSX, DOC, DOCX, PDF, CSV, TXT, CRT, CER, GED, GPX, XML, PBIX, ZIP, JSON (Max: 15 MB)
You can upload up to 5 files per session. Files uploaded to or downloaded on the device exist only for the duration of the session and are wiped when the device is recycled.


 Chat with Us