Create and Execute your Test Run for KaneAI Generated Tests on HyperExecute
This documentation outlines the steps to create a test run for KaneAI generated tests using Test Manager. The steps include selecting test cases, setting configurations, and running tests with HyperExecute for efficient execution. Follow the instructions carefully to ensure seamless execution of the process.
Prerequisites
- Access to Test Manager.
- A project with KaneAI-generated test cases.
- Credentials for TestMu AI platform.
Step-by-Step Guide
Step 1: Navigate to the Projects Page
- Log in to Test Manager. Navigate to the Projects page and select the desired project.
- Proceed to the Test Cases section.
Step 2: Create a Test Run
- Go to the Test Run section within the project.
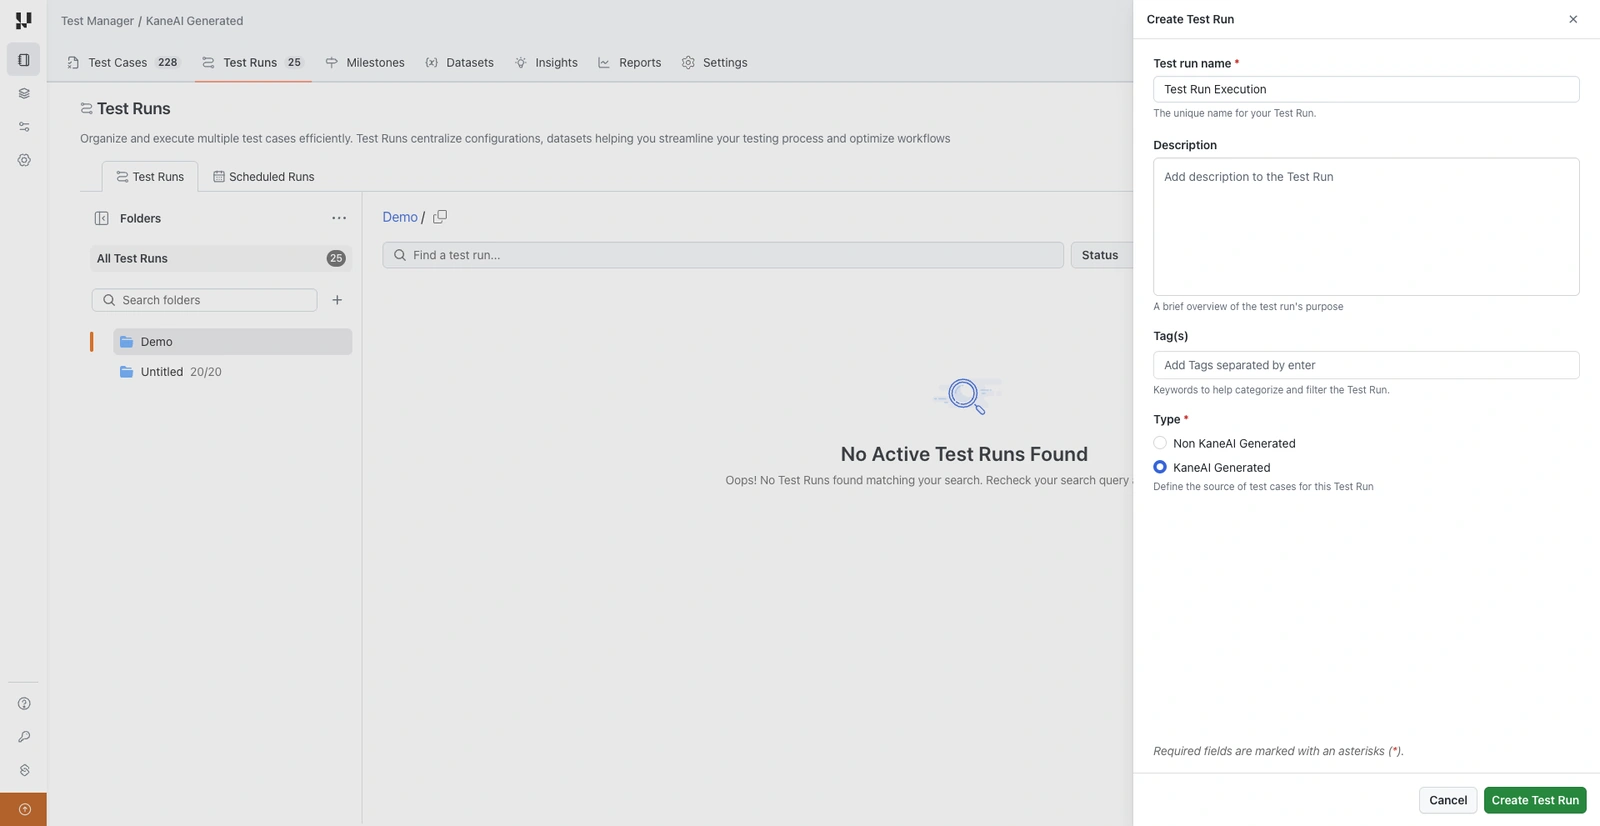
- Click on Create Test Run.
- Provide the following details:
- Name : e.g., Demo Test Run 123.
- Description : A brief overview of the run.
- Tags : Any label to differentiate your test run.
- Type : Choose KaneAI Generated Test Cases.
Step 3: Select and Add Test Cases
- Click Next to view available test cases.
- Select the required test cases for the run.
- Click Add Test Case to include them.
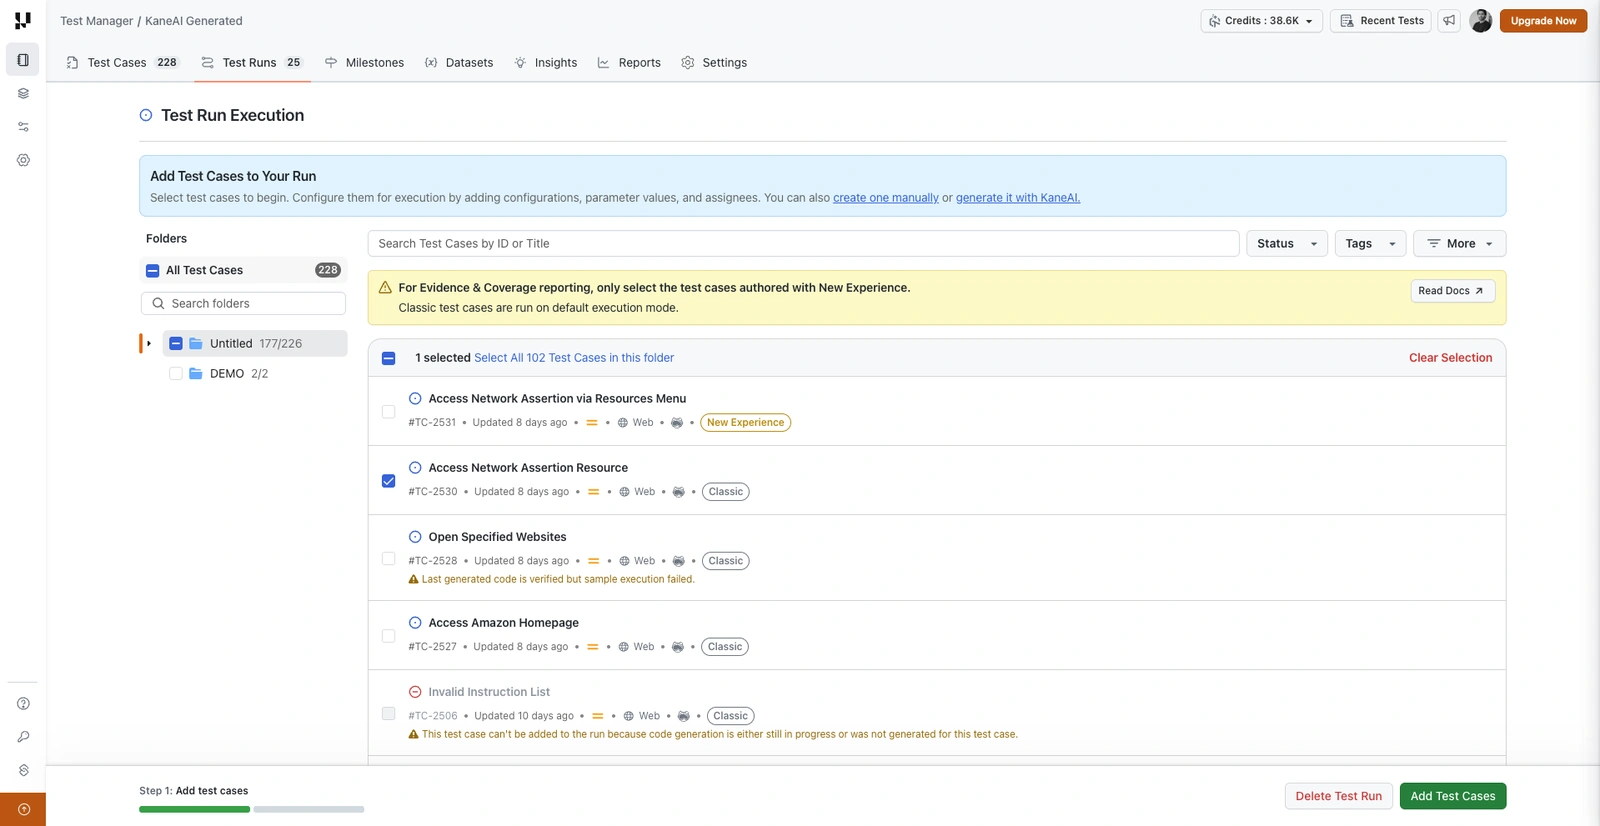
Every test case carries a label showing the experience it was authored with, either New Experience or Classic. The banner above the list explains what that label means for your run. Evidence and Coverage reporting needs every selected test case to be authored with New Experience. Classic test cases run on the default execution mode, so a run that includes even one Classic test case produces the standard report.
All KaneAI test cases with generated code are available for selection here, regardless of whether Sample Run Execution has been triggered or its outcome. Test cases where code generation has not started or is still in progress will not be available.
Step 4: Assign and Configure Test Cases
- On the test run page, review the added test cases.
- Assign team members in bulk.
- Update configurations as required.
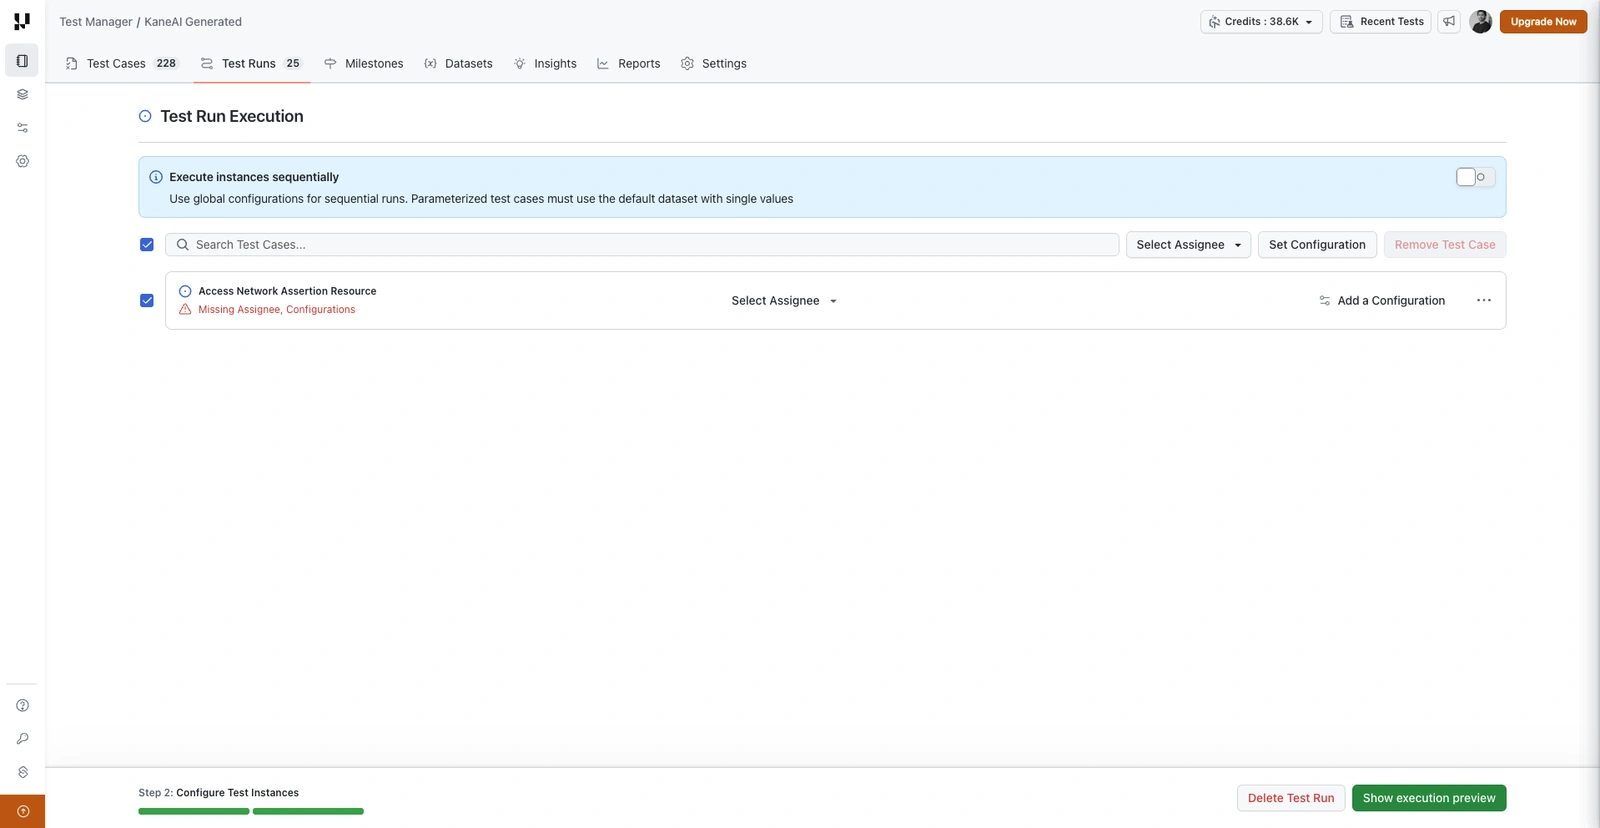
A test case that is still missing an assignee or a configuration is flagged on its row, so you can see what is left to complete before the run can be saved.
Set Configurations
- Choose from available desktop browser and mobile app configurations. If a new configuration is needed, click on Create Configuration button and choose from thousands of configuration options.
Create New Configuration
- Enter configuration name and the following details to create a new Desktop configuration:
- OS : e.g., macOS.
- OS Version : e.g., Monterey.
- Browser : e.g., Chrome.
- Browser Version : e.g., 131.
- Resolution : e.g., 1440x900.
- Enter configuration name and the following details to create a new Real Device configuration:
- OS : e.g., android.
- Manufacturer : e.g., Samsung.
- Device : e.g., Galaxy S24.
- OS Version : e.g., 14.
- App : e.g., Proverbial.
- Click on Create Configuration
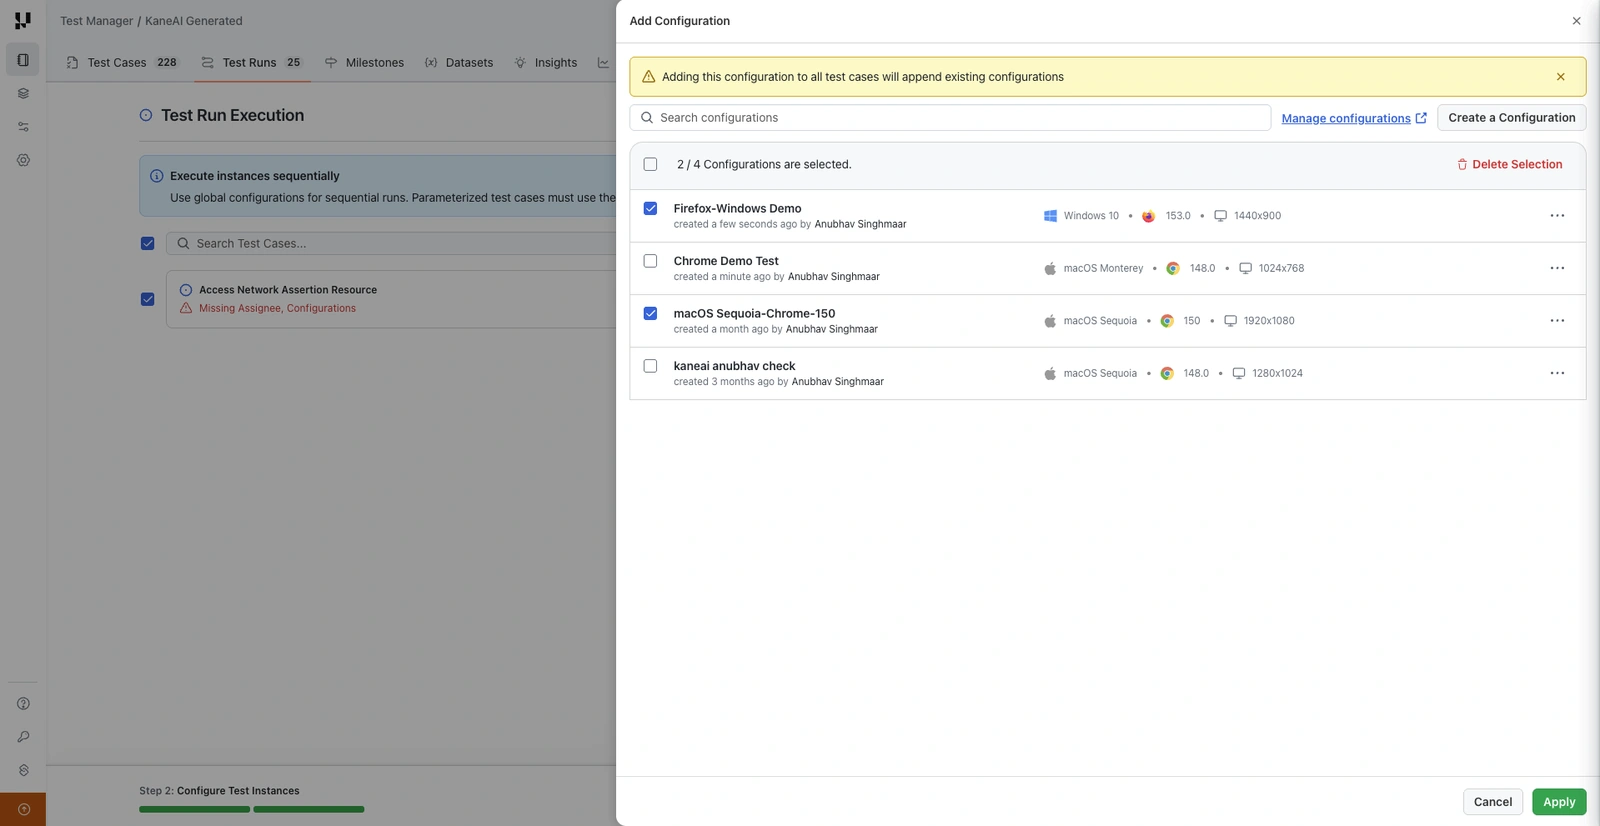
You can also pick from your saved configurations in the Add a Configuration panel and apply them to the selected test cases. Applying a configuration to all test cases appends it to their existing configurations rather than replacing them.
Step 5: Run with HyperExecute
Once every test case has an assignee and at least one configuration, the run is ready to save and execute.
- Review the test instances generated from your test cases and configurations.
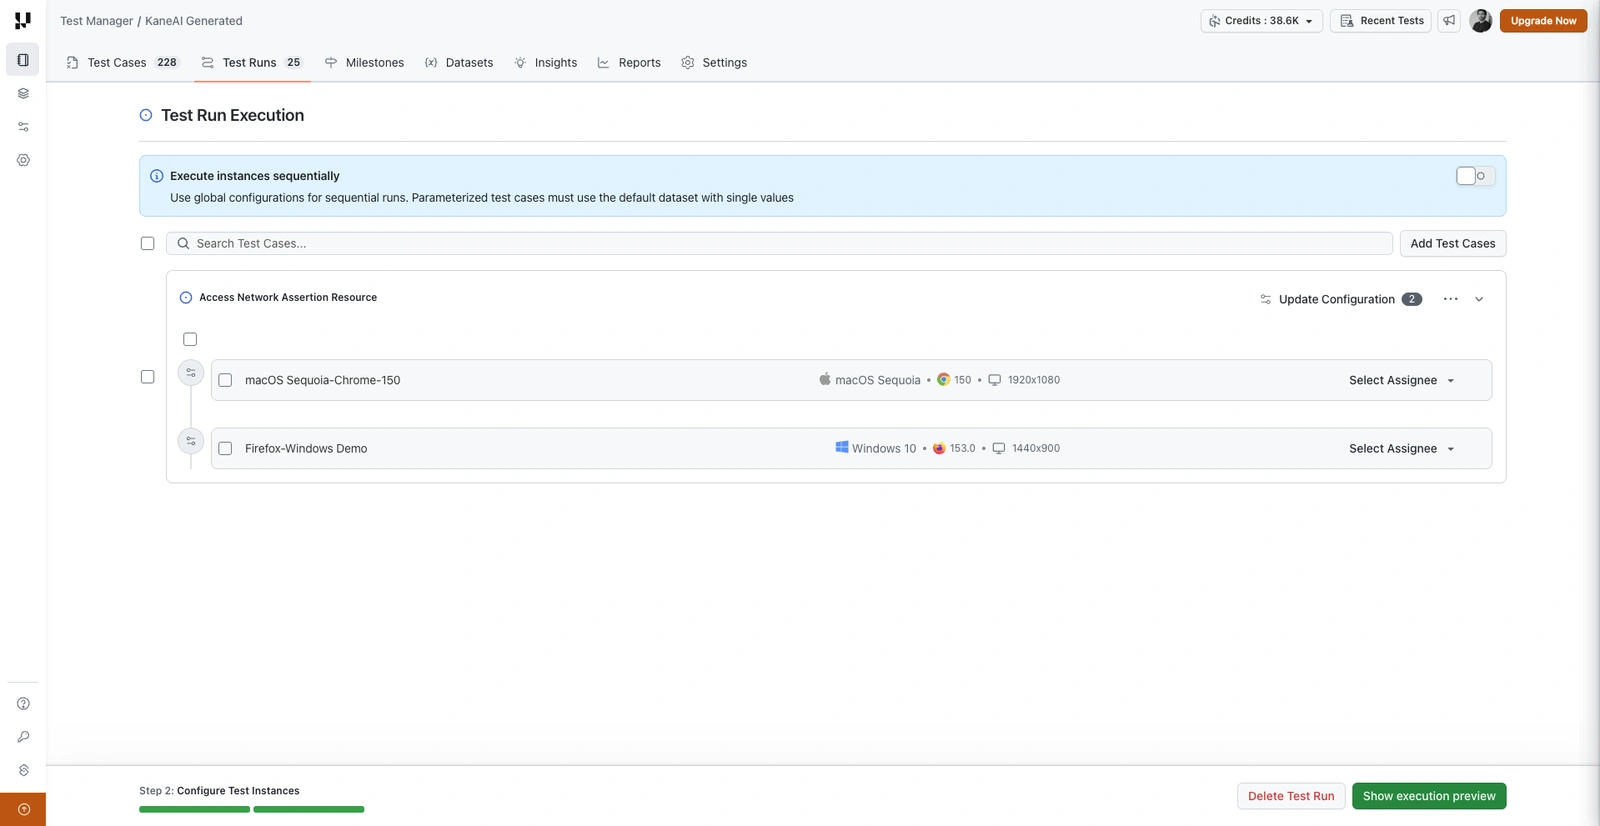
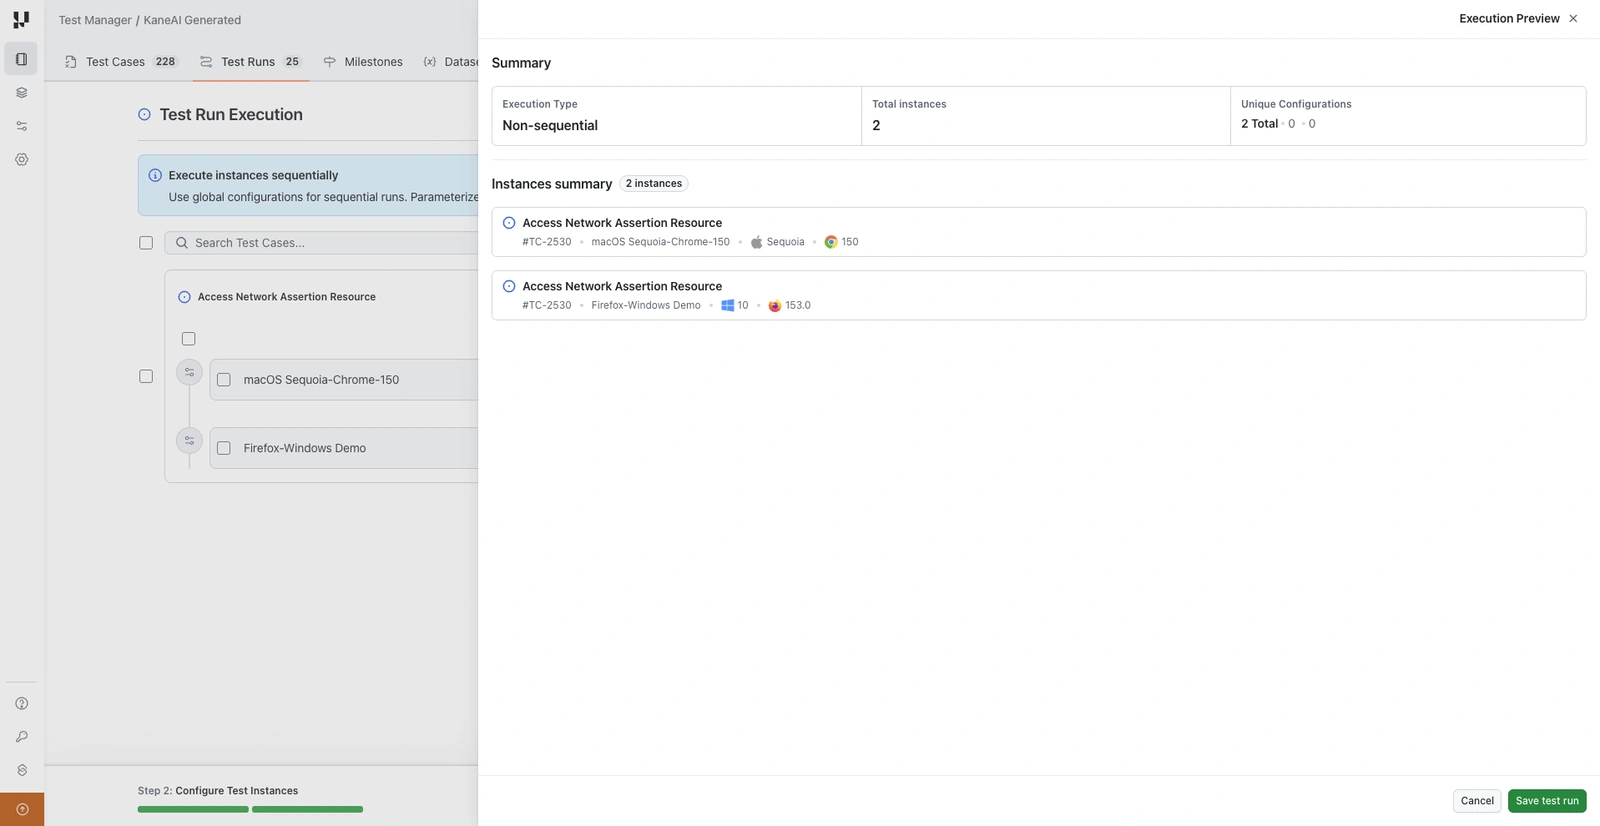
- Click Show execution preview to confirm what will run. The preview shows the execution type, the total number of instances, and the unique configurations involved.
- Click Save test run.
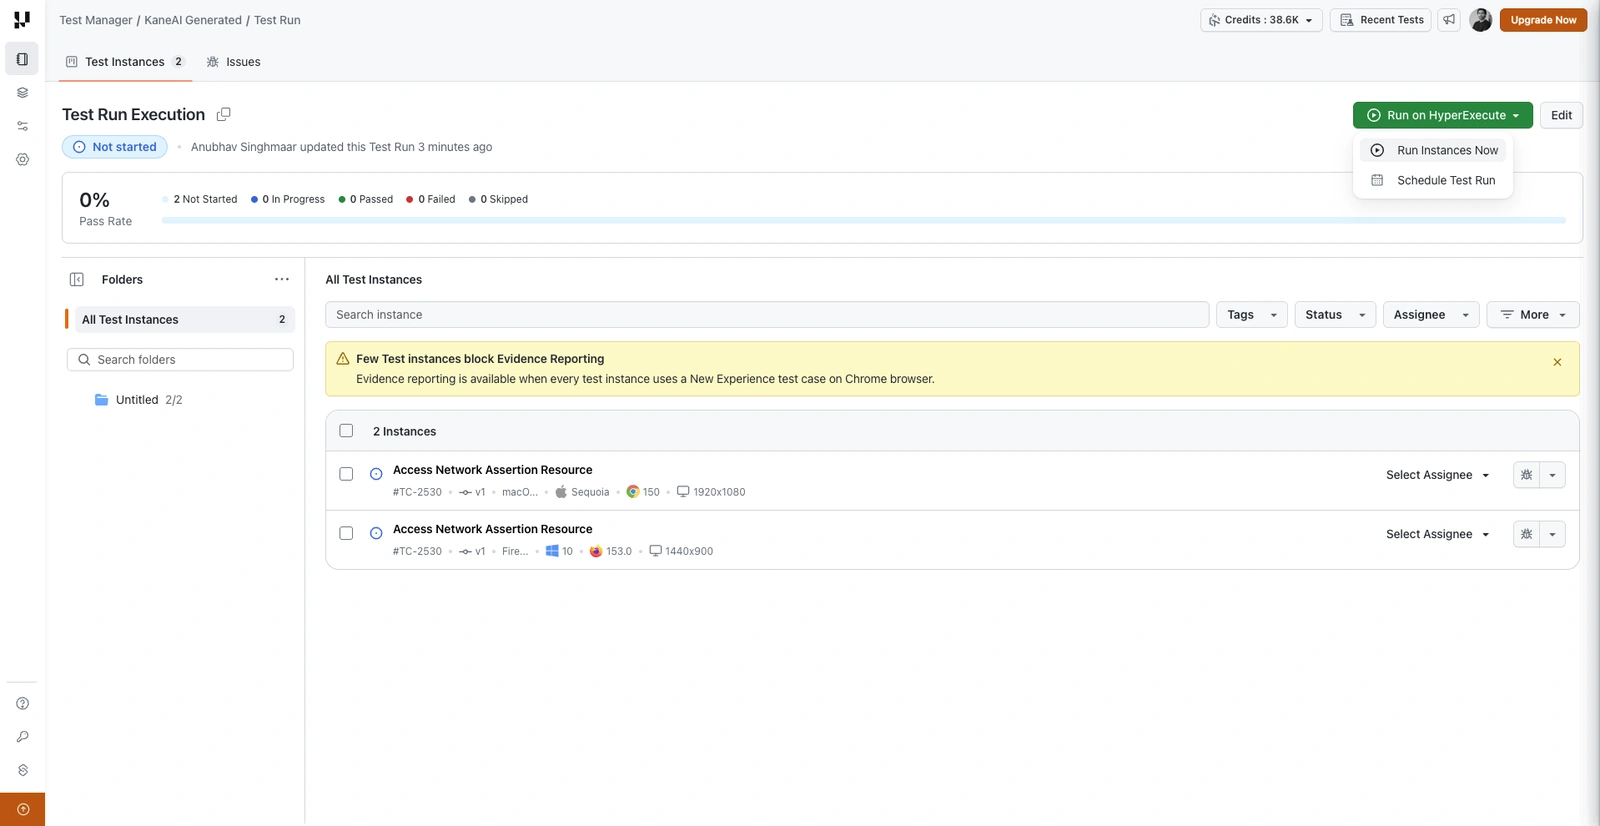
- On the saved run, click Run on HyperExecute and choose Run Instances Now. To run it later instead, choose Schedule Test Run.
- Set the desired concurrency level, e.g., 5, then start the run.
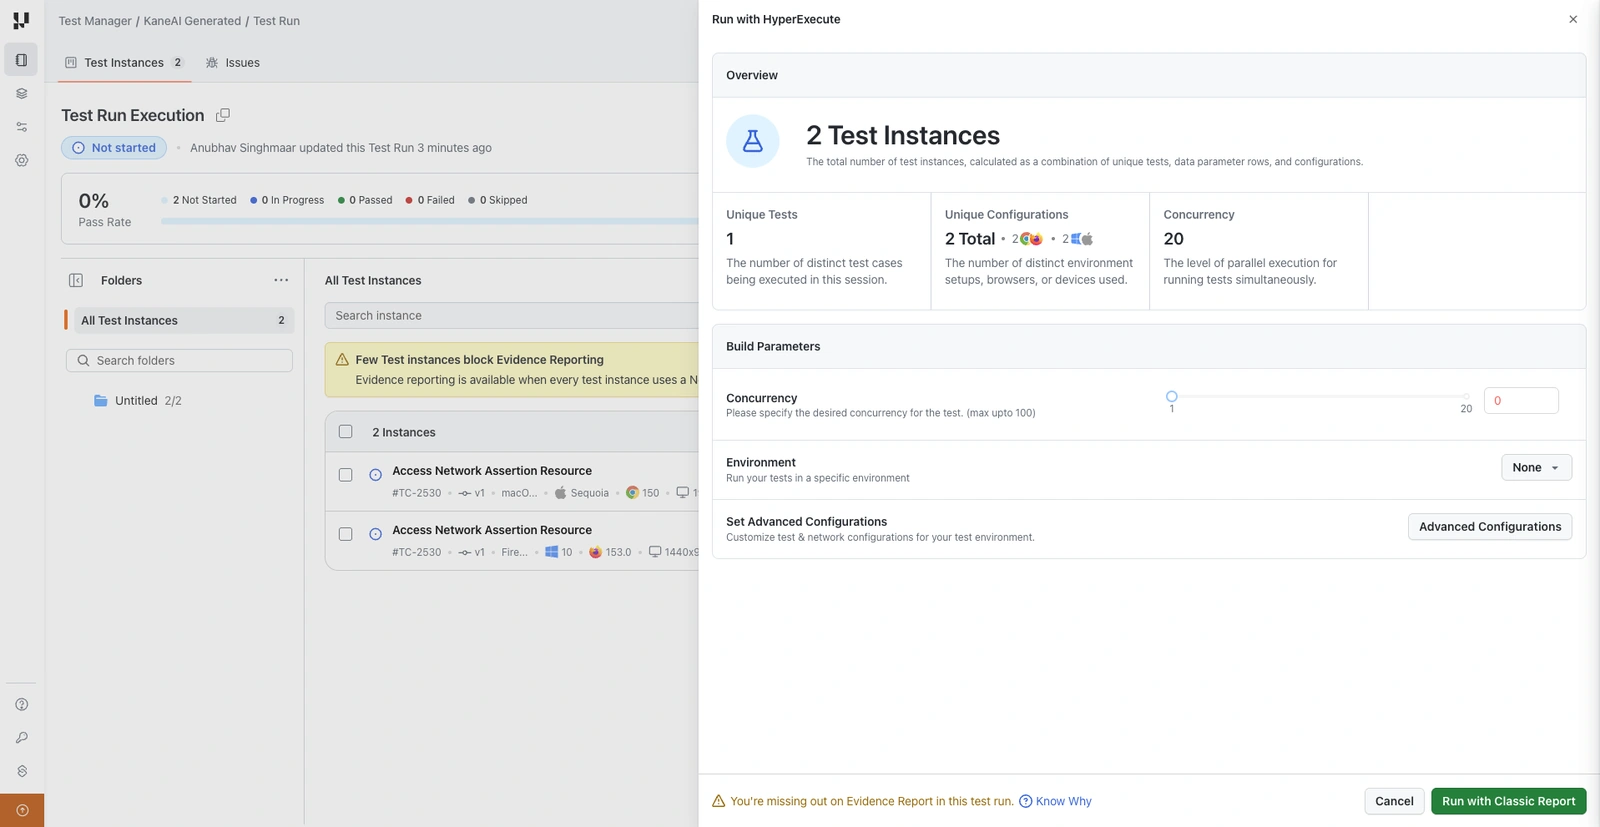
The Run with HyperExecute panel summarises the run before you start it, including the number of unique tests, the unique configurations, and the concurrency. The execute button names the report you are about to generate. For a run that contains a Classic test case, or one that is not on Chrome, the button reads Run with Classic Report and the panel notes that Evidence reporting is not part of this run.
Evidence Reporting
A test run can produce an Evidence Report in place of the standard report. The Evidence Report covers the run in more detail, including coverage details and the business use cases behind the tests.
Evidence Reporting is available only when both of the following are true for the run:
- Every test case in the run is authored with New Experience.
- The run is configured to execute on the Chrome browser.
If either condition is not met, the run executes with the Classic report instead.
Select only New Experience test cases
On the Add Test Cases step, each test case shows the experience it was authored with.
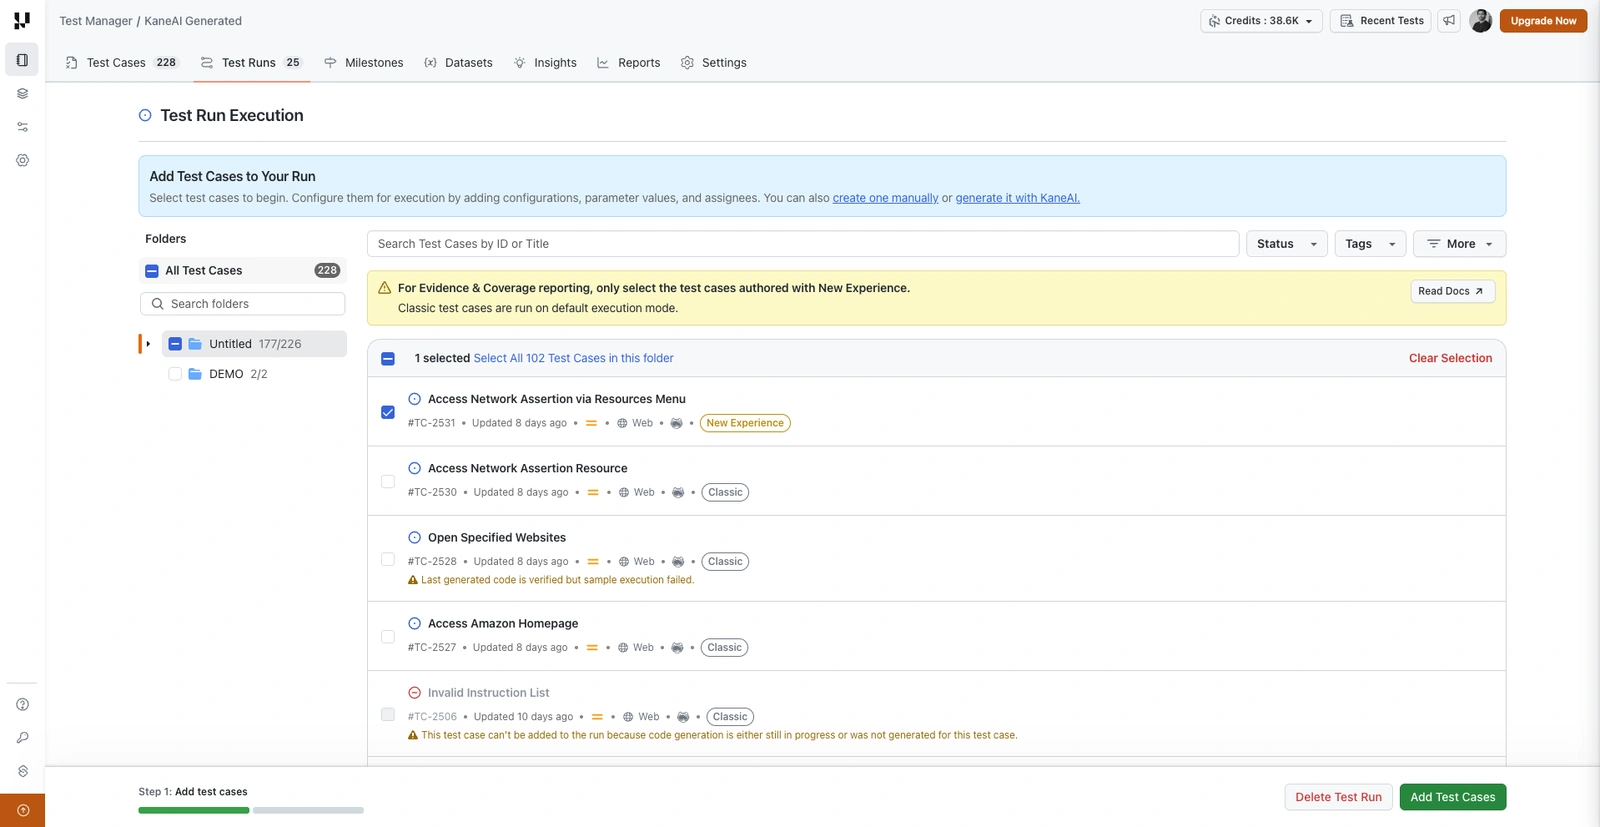
Select the test cases labelled New Experience and click Add Test Cases. Leave out anything labelled Classic, because a single Classic test case makes the whole run ineligible.
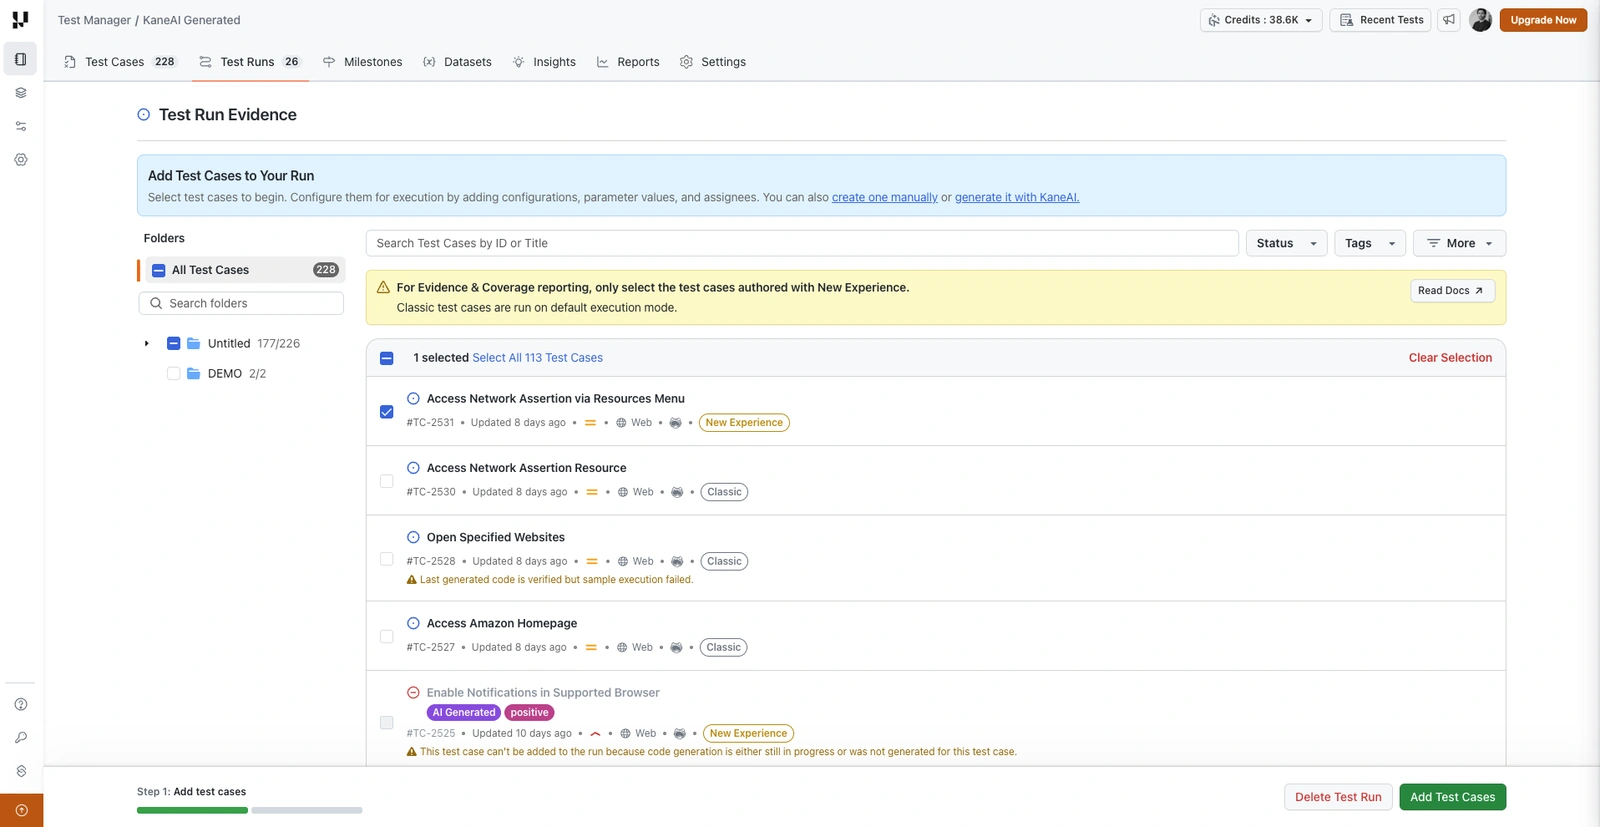
Configure the run to use Chrome
Give every test instance a configuration that uses Chrome, either by picking an existing Chrome configuration in the Add a Configuration panel or by creating one. Any instance on another browser makes the run ineligible.
Run with Evidence Report
When both conditions are met, the saved run shows a note confirming that an Evidence Report is available, and the Run with HyperExecute panel defaults to Evidence Reporting.
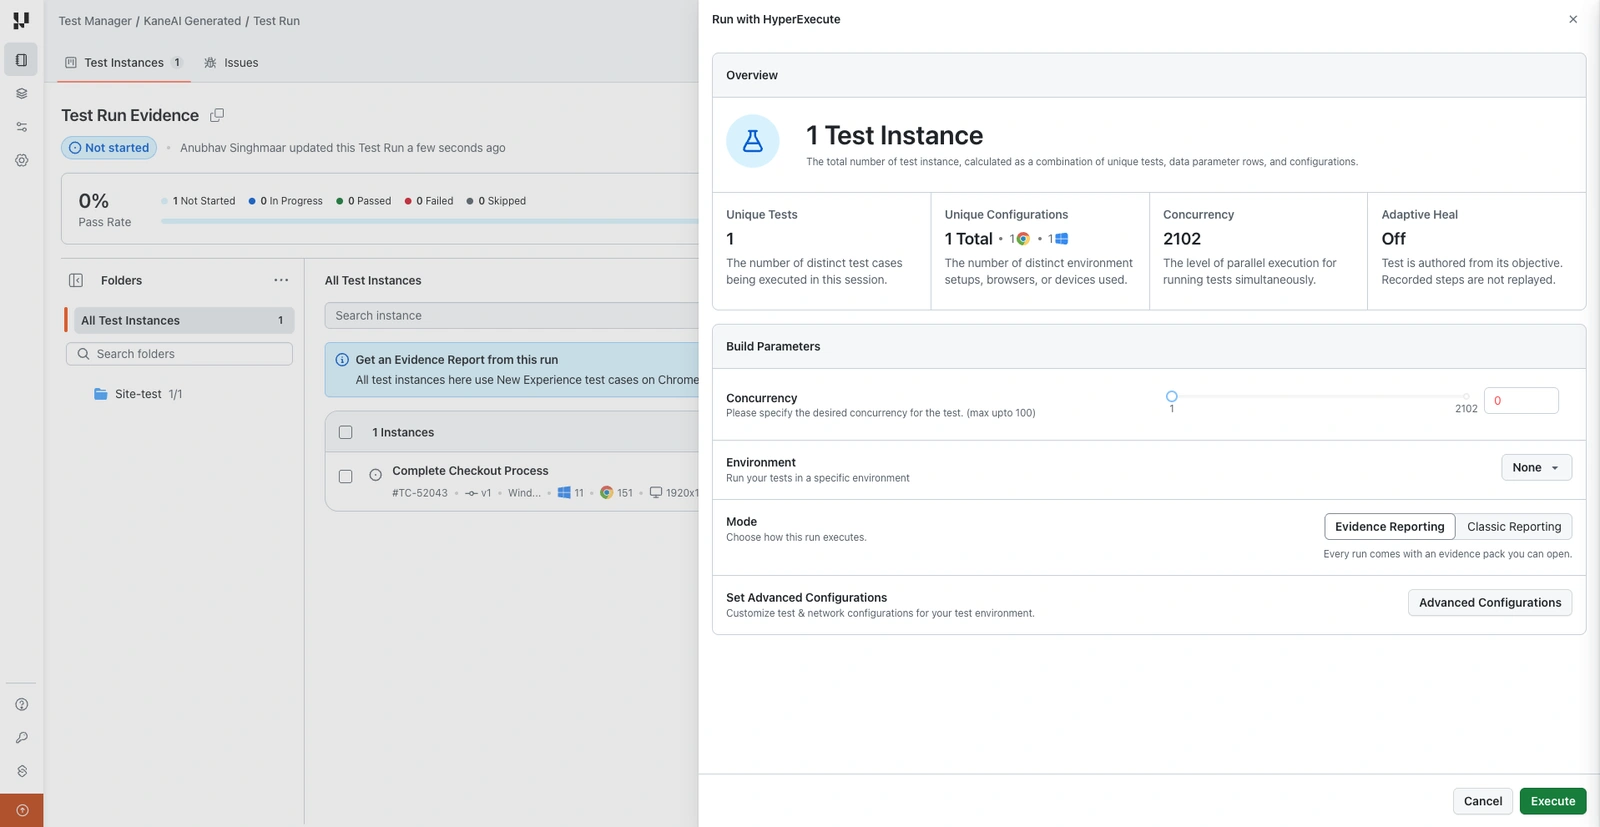
- Under Build Parameters, the Mode setting chooses how the run executes. Evidence Reporting is selected by default and produces the Evidence Report.
- To run the same test run with the standard report instead, select Classic Reporting.
- Click Execute to start the run.
If the run contains a Classic test case, or any instance is on a browser other than Chrome, the saved run flags which instances are blocking Evidence Reporting and the run produces the Classic report. Adjust the test cases or the browser configuration, then reopen the panel.
Advanced Configurations
Before clicking Execute, you can optionally click Advanced Configurations to customize your test execution. The panel groups the settings into Test Configuration, Network Settings, Replace URL, Performance, Visual Regression, Accessibility Testing, and Reports.
The panel below is what a run shows when it uses the Classic report. A run using Evidence Reporting shows a different, shorter panel, described in Test Configurations for Evidence Reporting runs.
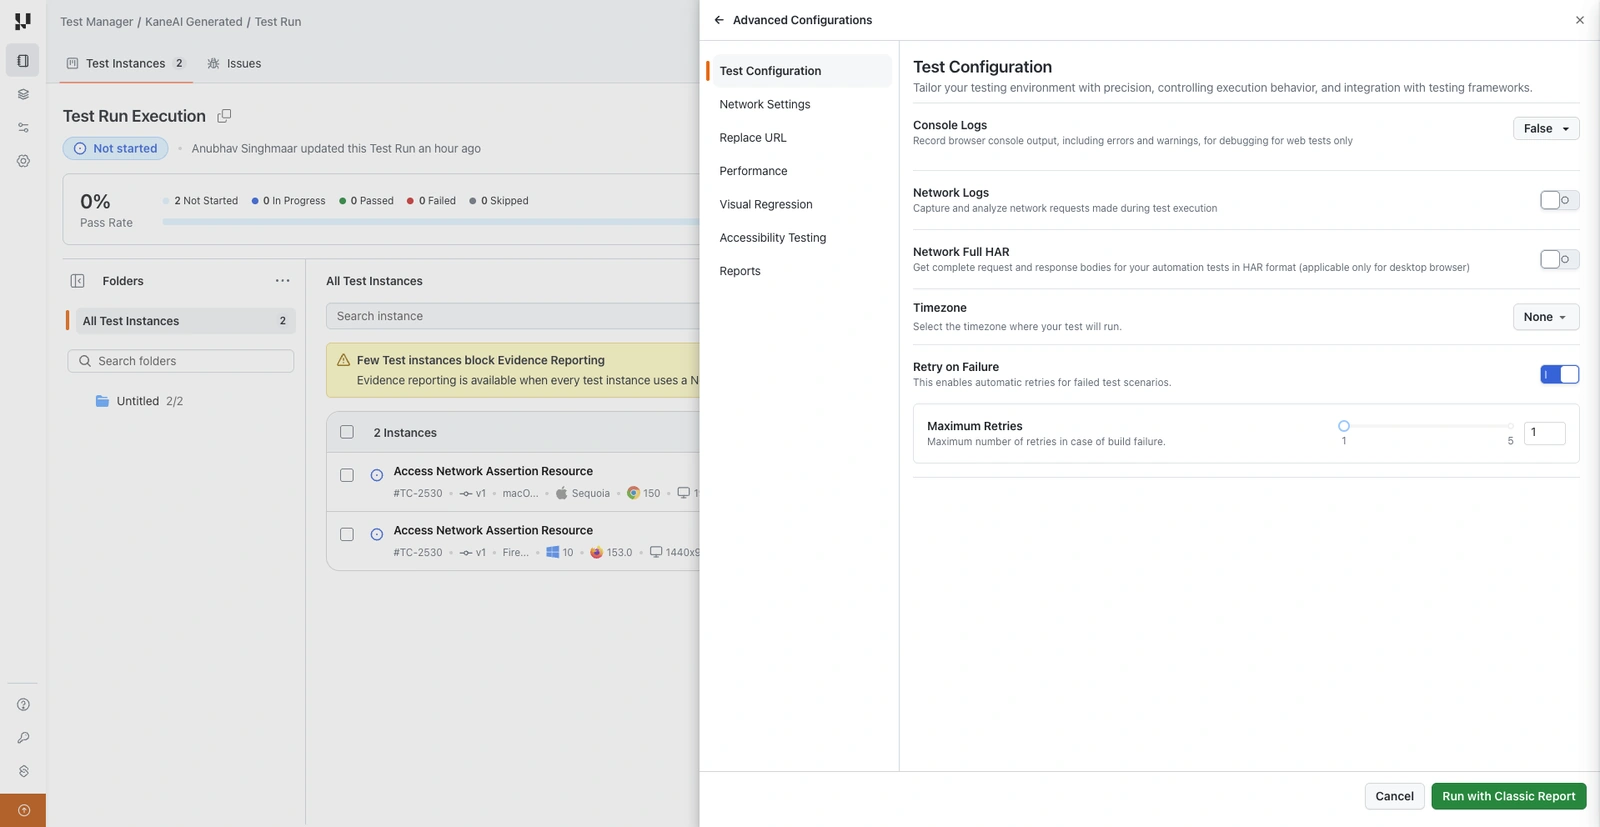
The following settings are available:
| Setting | Description |
|---|---|
| Region | Choose a region for web tests such as eastus or centralindia to select the region from where the VM is allocated. |
| Mobile Region | Choose a region for mobile app tests such as us, ap, or eu to select the region from where the device is allocated. |
| Tunnel | Add the tunnel name if you want to run using TestMu AI Tunnel for private applications. Either tunnel, dedicated proxy, or geolocation can be used in a single execution. See Tunnel Support for details. |
| Dedicated Proxy | Add the region of the dedicated proxy such as us or eu. Either tunnel, dedicated proxy, or geolocation can be used in a single execution. |
| Geolocation | Set the geolocation from which you want to run your tests. See the list of supported geolocations here. Either tunnel, dedicated proxy, or geolocation can be used in a single execution. |
| Console Log | Enable console log capture for web tests. Options: false, error, warn, info, true. |
| Network Logs | Enable capture of network calls during the test. |
| Network Full HAR | Capture complete network requests and responses during web tests. |
| Network Throttle | Enable network throttling for mobile tests by defining download speed, upload speed, and latency. |
| Timezone | Define the timezone for web test runs (e.g., UTC+01:00 format). |
| Retry on Failure | Enable to retry on failure. When enabled, retries are triggered both on testRunnerCommand failure and individual test case failure. Defaults to true. See Retry on Failure for details. |
| Max Retries | Define the maximum number of retries when retry on failure is enabled. Max value 5, default 1. See Max Retries for details. |
| Replace URL | Dynamically replace any pattern URL in test cases with a replacement URL for the entire test run. See Dynamic URL Replacement for details. |
| Performance | Enable Lighthouse performance reports for web tests. Supported on limited OS browser combinations. May slow down execution time. See Lighthouse Performance Metrics for details. |
| App Profiling | Enable app performance metrics tracking for native mobile app tests. See App Performance Analytics for details. |
| Android App ID | Specify an Android app ID (lt://<APP_ID>) to override the existing app in the test instance configuration. |
| iOS App ID | Specify an iOS app ID (lt://<APP_ID>) to override the existing app in the test instance configuration. |
| Visual Regression | Add visual testing configuration: select browsers, viewports, devices, and orientation. See Visual Testing with SmartUI for details. |
| Accessibility | Enable accessibility checks (WCAG 2.1 AA) with best practices and needs review options. Available for web with Chrome and Edge browsers only. May slow down execution time. |
| Report Enabled | Set to true to enable report generation for the test run. Select either HTML or Extent report format. Only one can be active at a time. Reports are accessible from the HyperExecute Job page after execution. See below. |
| Report Email To | An array of email addresses to receive the test run report via email after execution. Maximum 10 email addresses. Only works when report is enabled. |
Test case failure retries are supported only for code exported from May 10, 2026 onwards. For previously exported code, retries are triggered only on test runner command failure. To use this capability, regenerate the code export for your test cases in Test Manager.
Test Configurations for Evidence Reporting runs
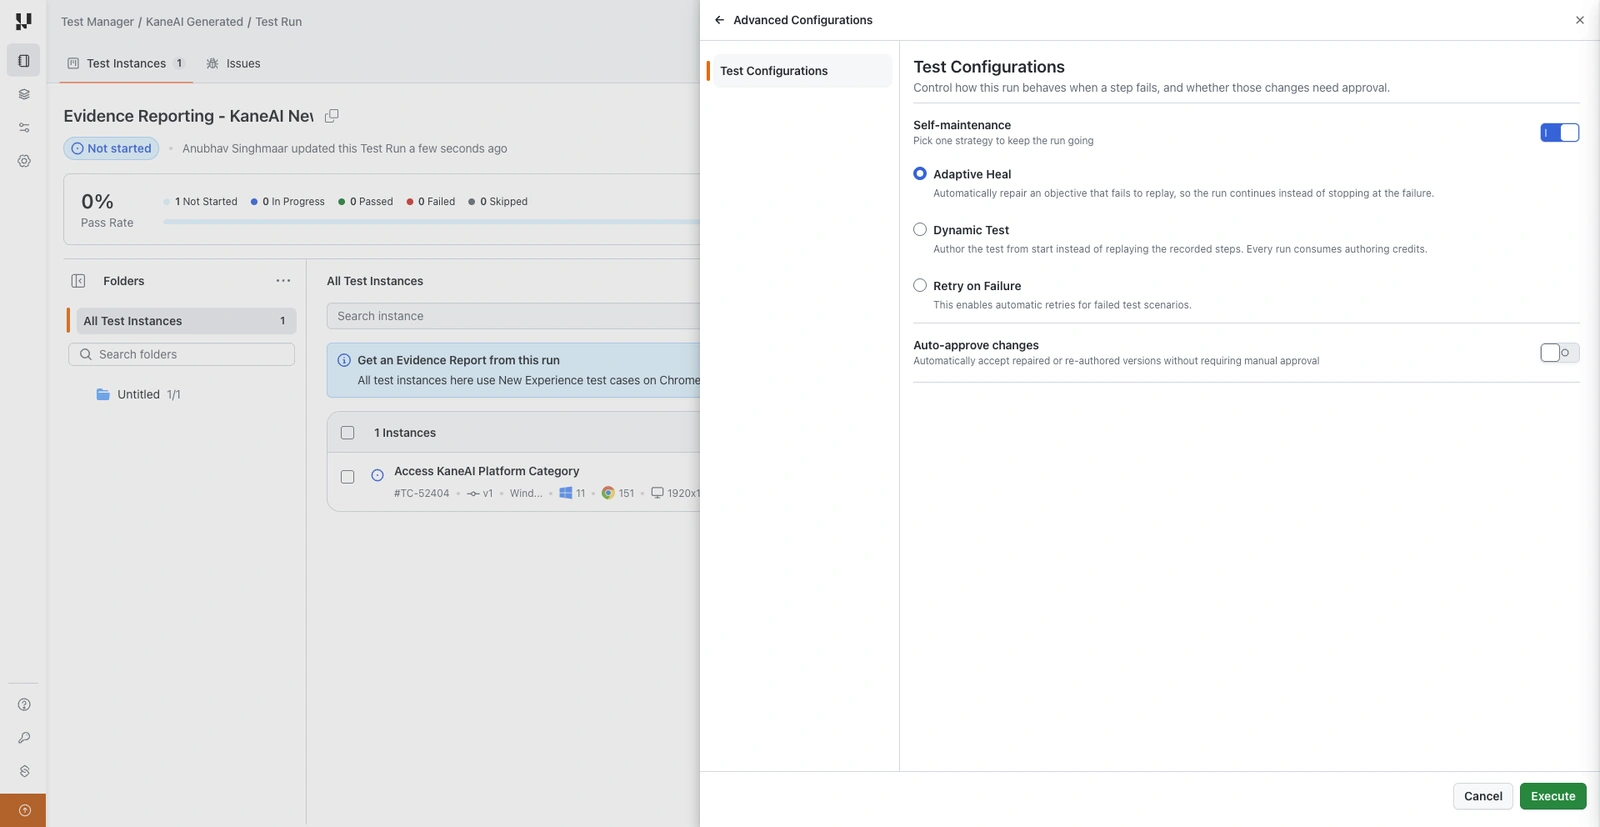
A run using Evidence Reporting shows a different Advanced Configurations panel. Instead of the full set of sections above, it shows Test Configurations only, holding the settings that decide what the run does when a step fails.
| Setting | Description |
|---|---|
| Self-maintenance | Turn on, then pick one strategy to keep the run going: Adaptive Heal, Dynamic Test, or Retry on Failure. Off by default. With it off, nothing is re-authored or retried, Auto-Heal still runs, and only a step Auto-Heal cannot recover ends the run. |
| Adaptive Heal | Re-author the objective that fails to replay, and every objective after it, so the run continues instead of stopping at the failure. The re-authored content is saved as a new version of the test case. |
| Dynamic Test | Author the test from its objective instead of replaying the recorded steps. Every run consumes authoring credits. |
| Retry on Failure | Run the whole test again from the start after it fails. Nothing about the test is changed. |
| Maximum Retries | Appears under Retry on Failure. Sets how many further attempts to make, up to 5. |
| Auto-approve changes | Appears under Adaptive Heal and Dynamic Test. Makes the new version current immediately instead of holding it in Version History for approval. |
Only one of Adaptive Heal, Dynamic Test and Retry on Failure can be active at a time. Selecting one clears the others.
A run made of Classic test cases shows the full panel described above. A run whose test cases are all New Experience on Chrome can choose between the Classic report and Evidence Reporting, and choosing Evidence Reporting shows the Test Configurations panel instead.
See Adaptive Heal and Dynamic Test for what each strategy does, how it is set at the organization and project level, and how re-authored versions are reviewed.
Reports
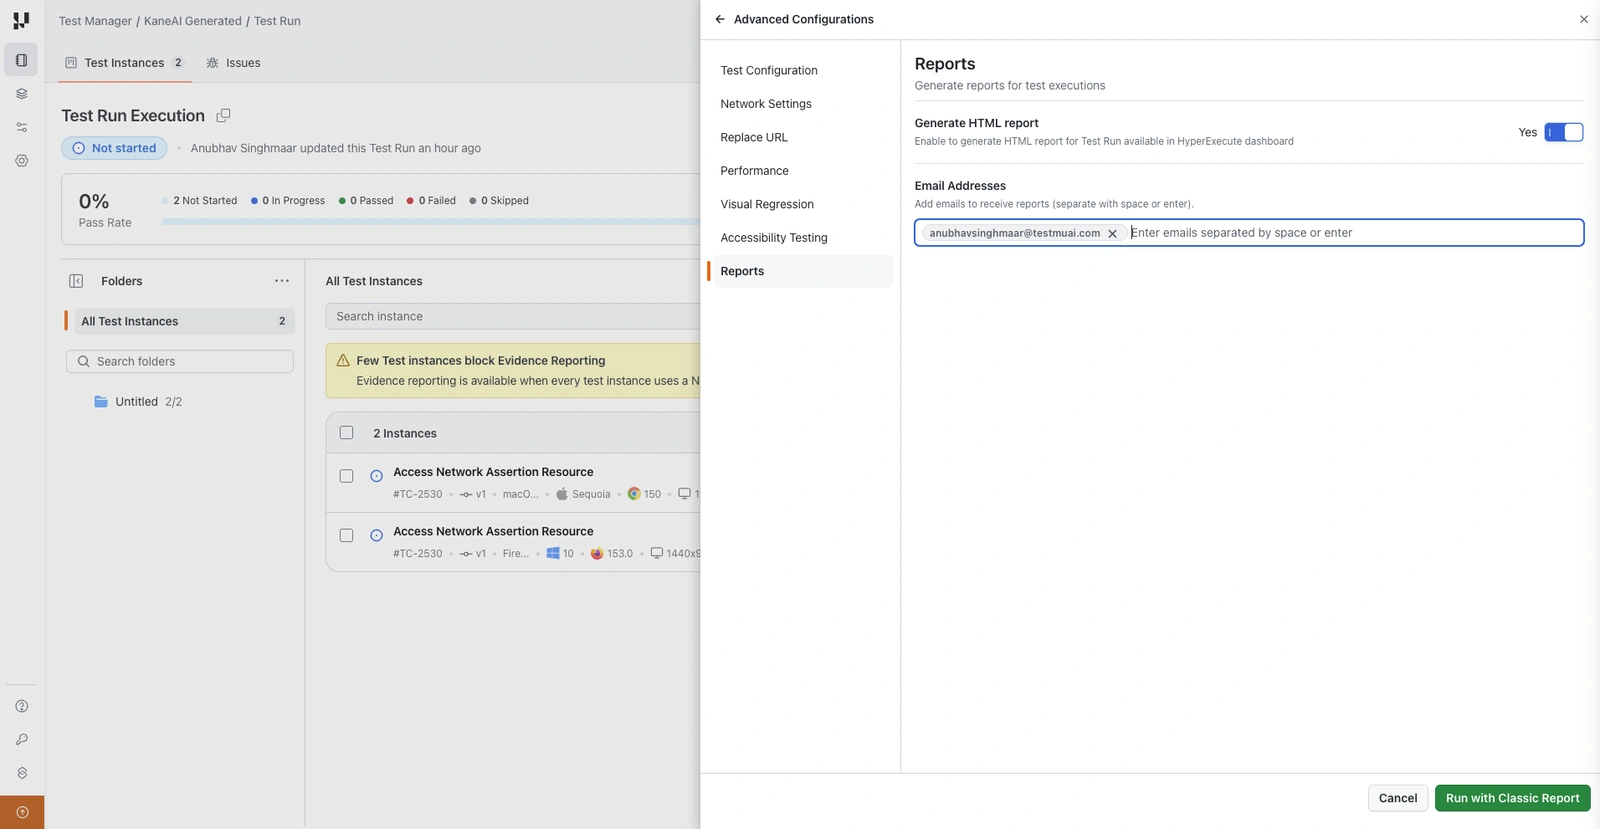
Enable the Reports option in Advanced Configurations to generate reports for your test run. You can enable either an HTML report or an Extent report. Only one can be active at a time. Reports are supported for both web and mobile test executions.
- Generate HTML Report: Toggle to Yes to generate an HTML report for the test run, available in the HyperExecute dashboard after execution.
- Generate Extent Report: Toggle to Yes to generate an Extent report for the test run, available in the HyperExecute dashboard after execution.
- Email Addresses: Add one or more email addresses (separated by space or enter) to receive the report via email after execution. You can add up to 10 email addresses.
Accessing the Report
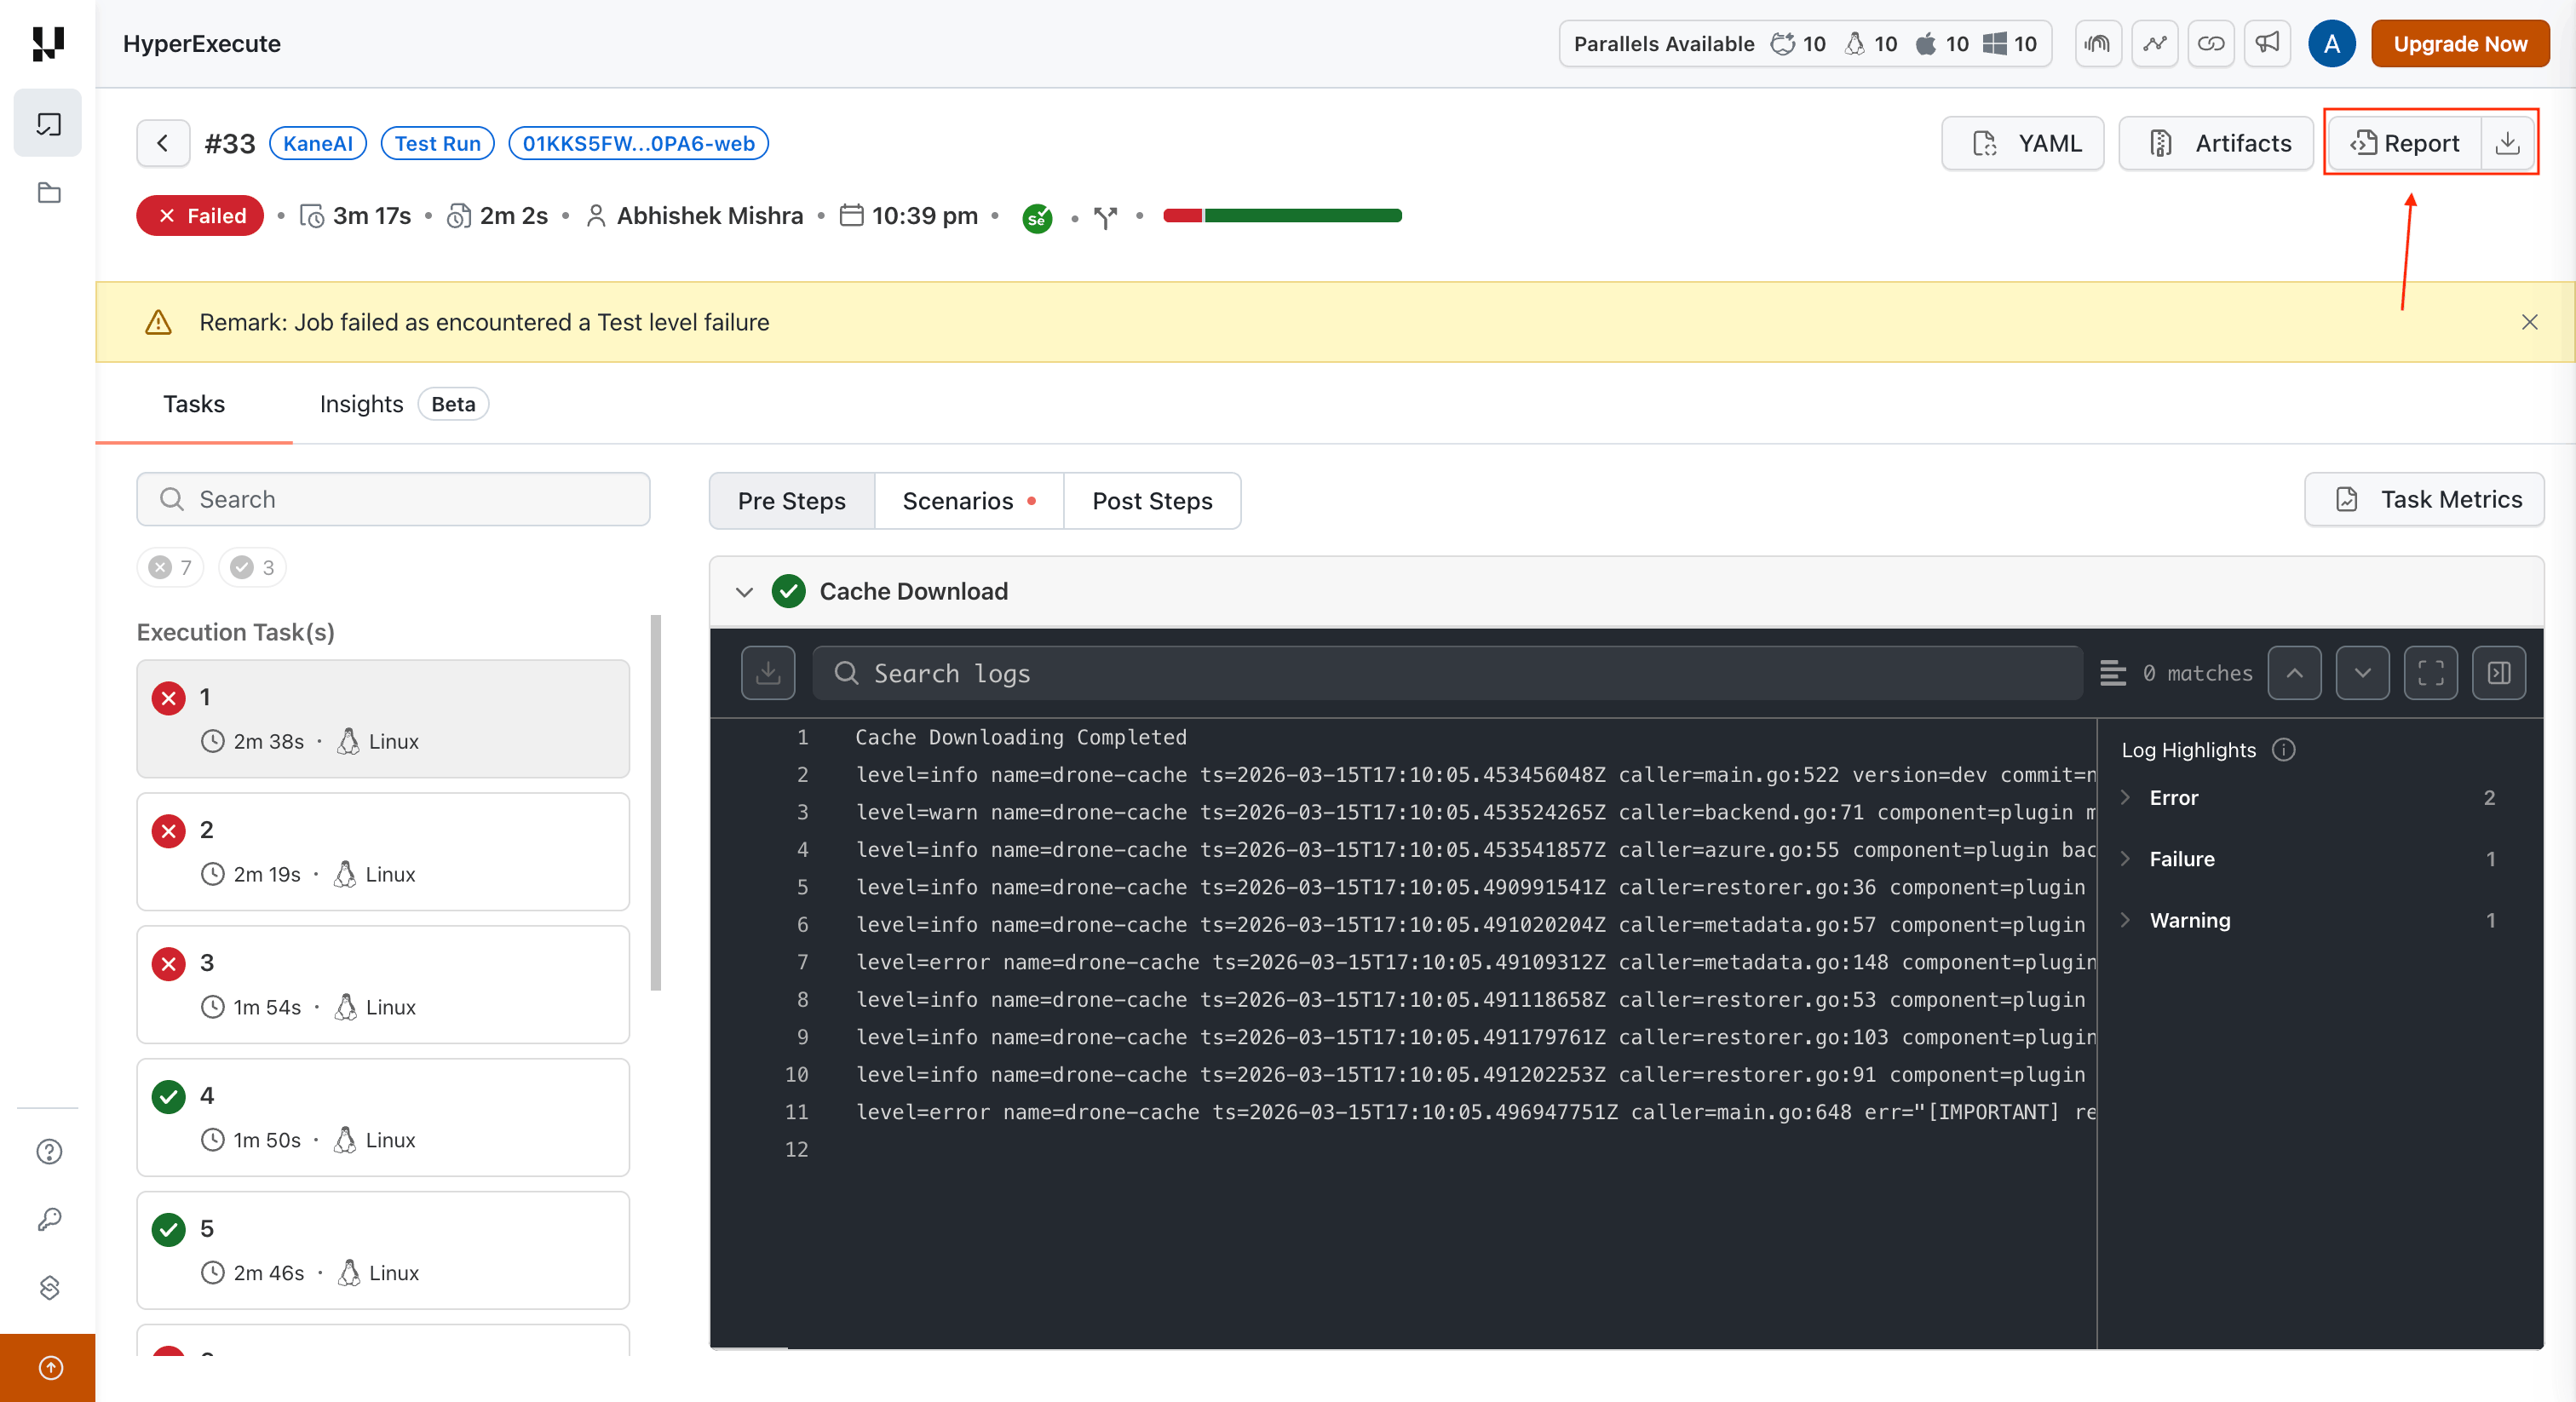
Once your test run execution is complete, you can access the generated HTML report from the HyperExecute Job page. Navigate to the job and click on the Reports section to view or download the report.
HTML Report Overview
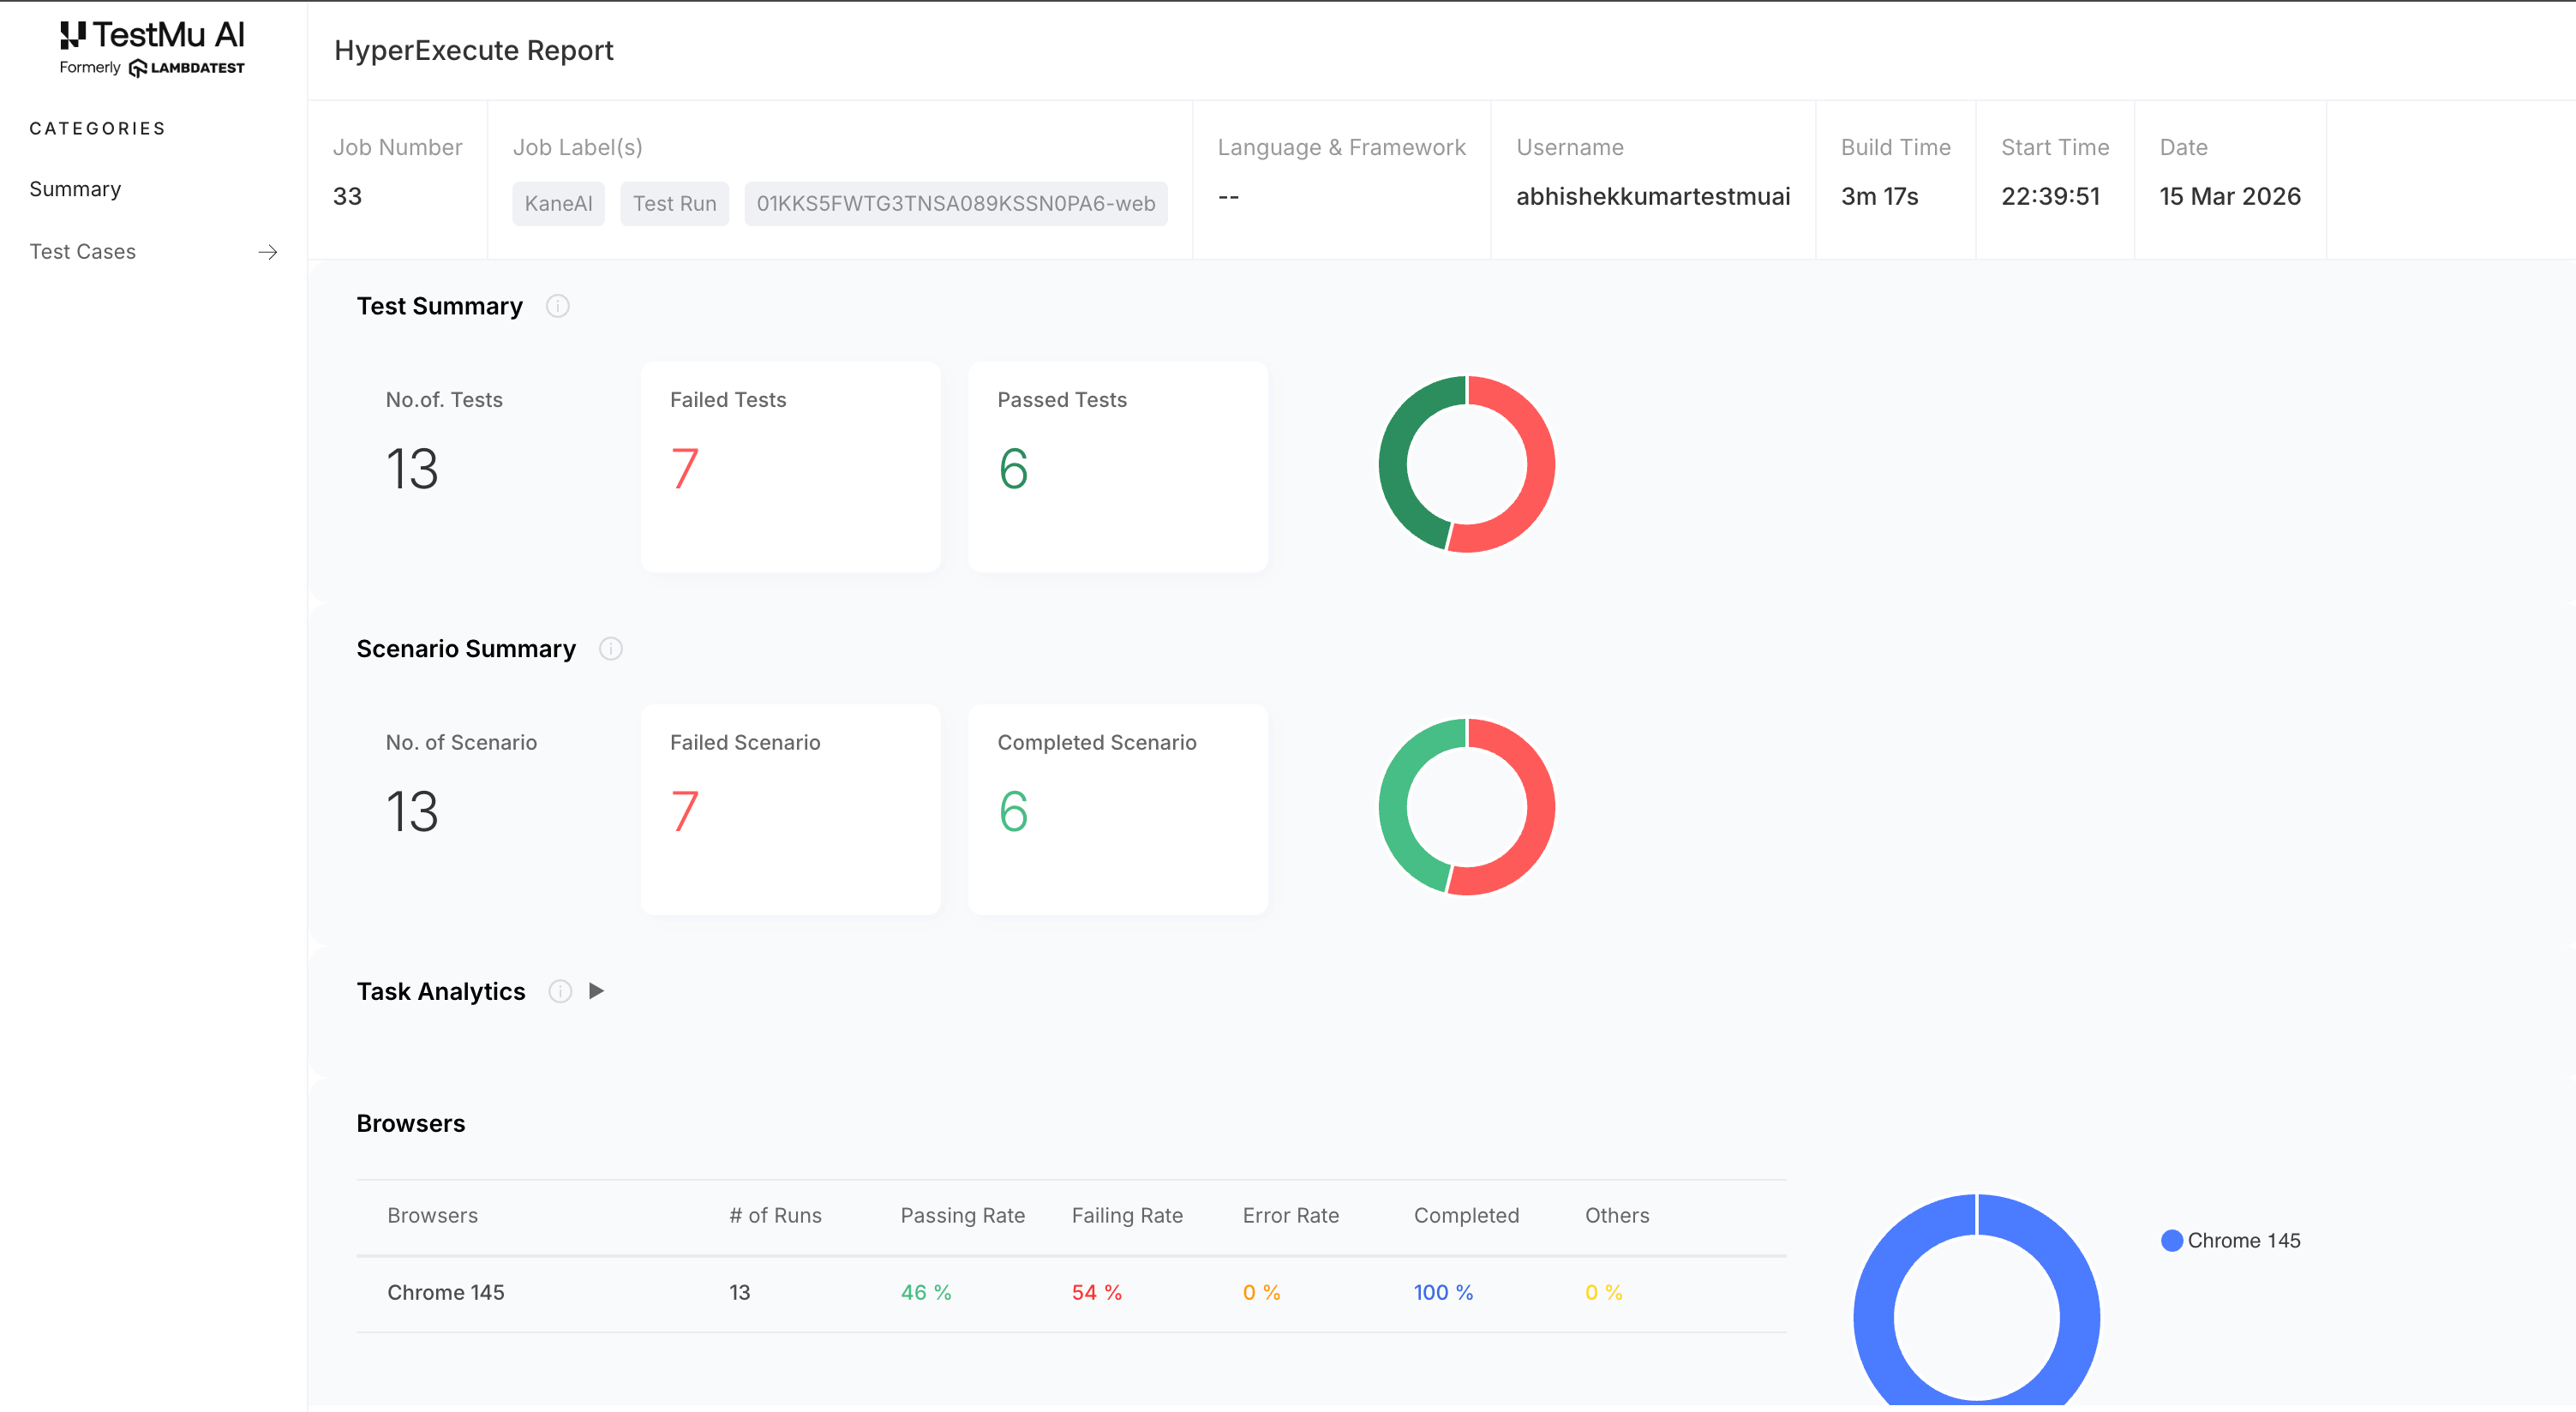
The generated HTML report includes:
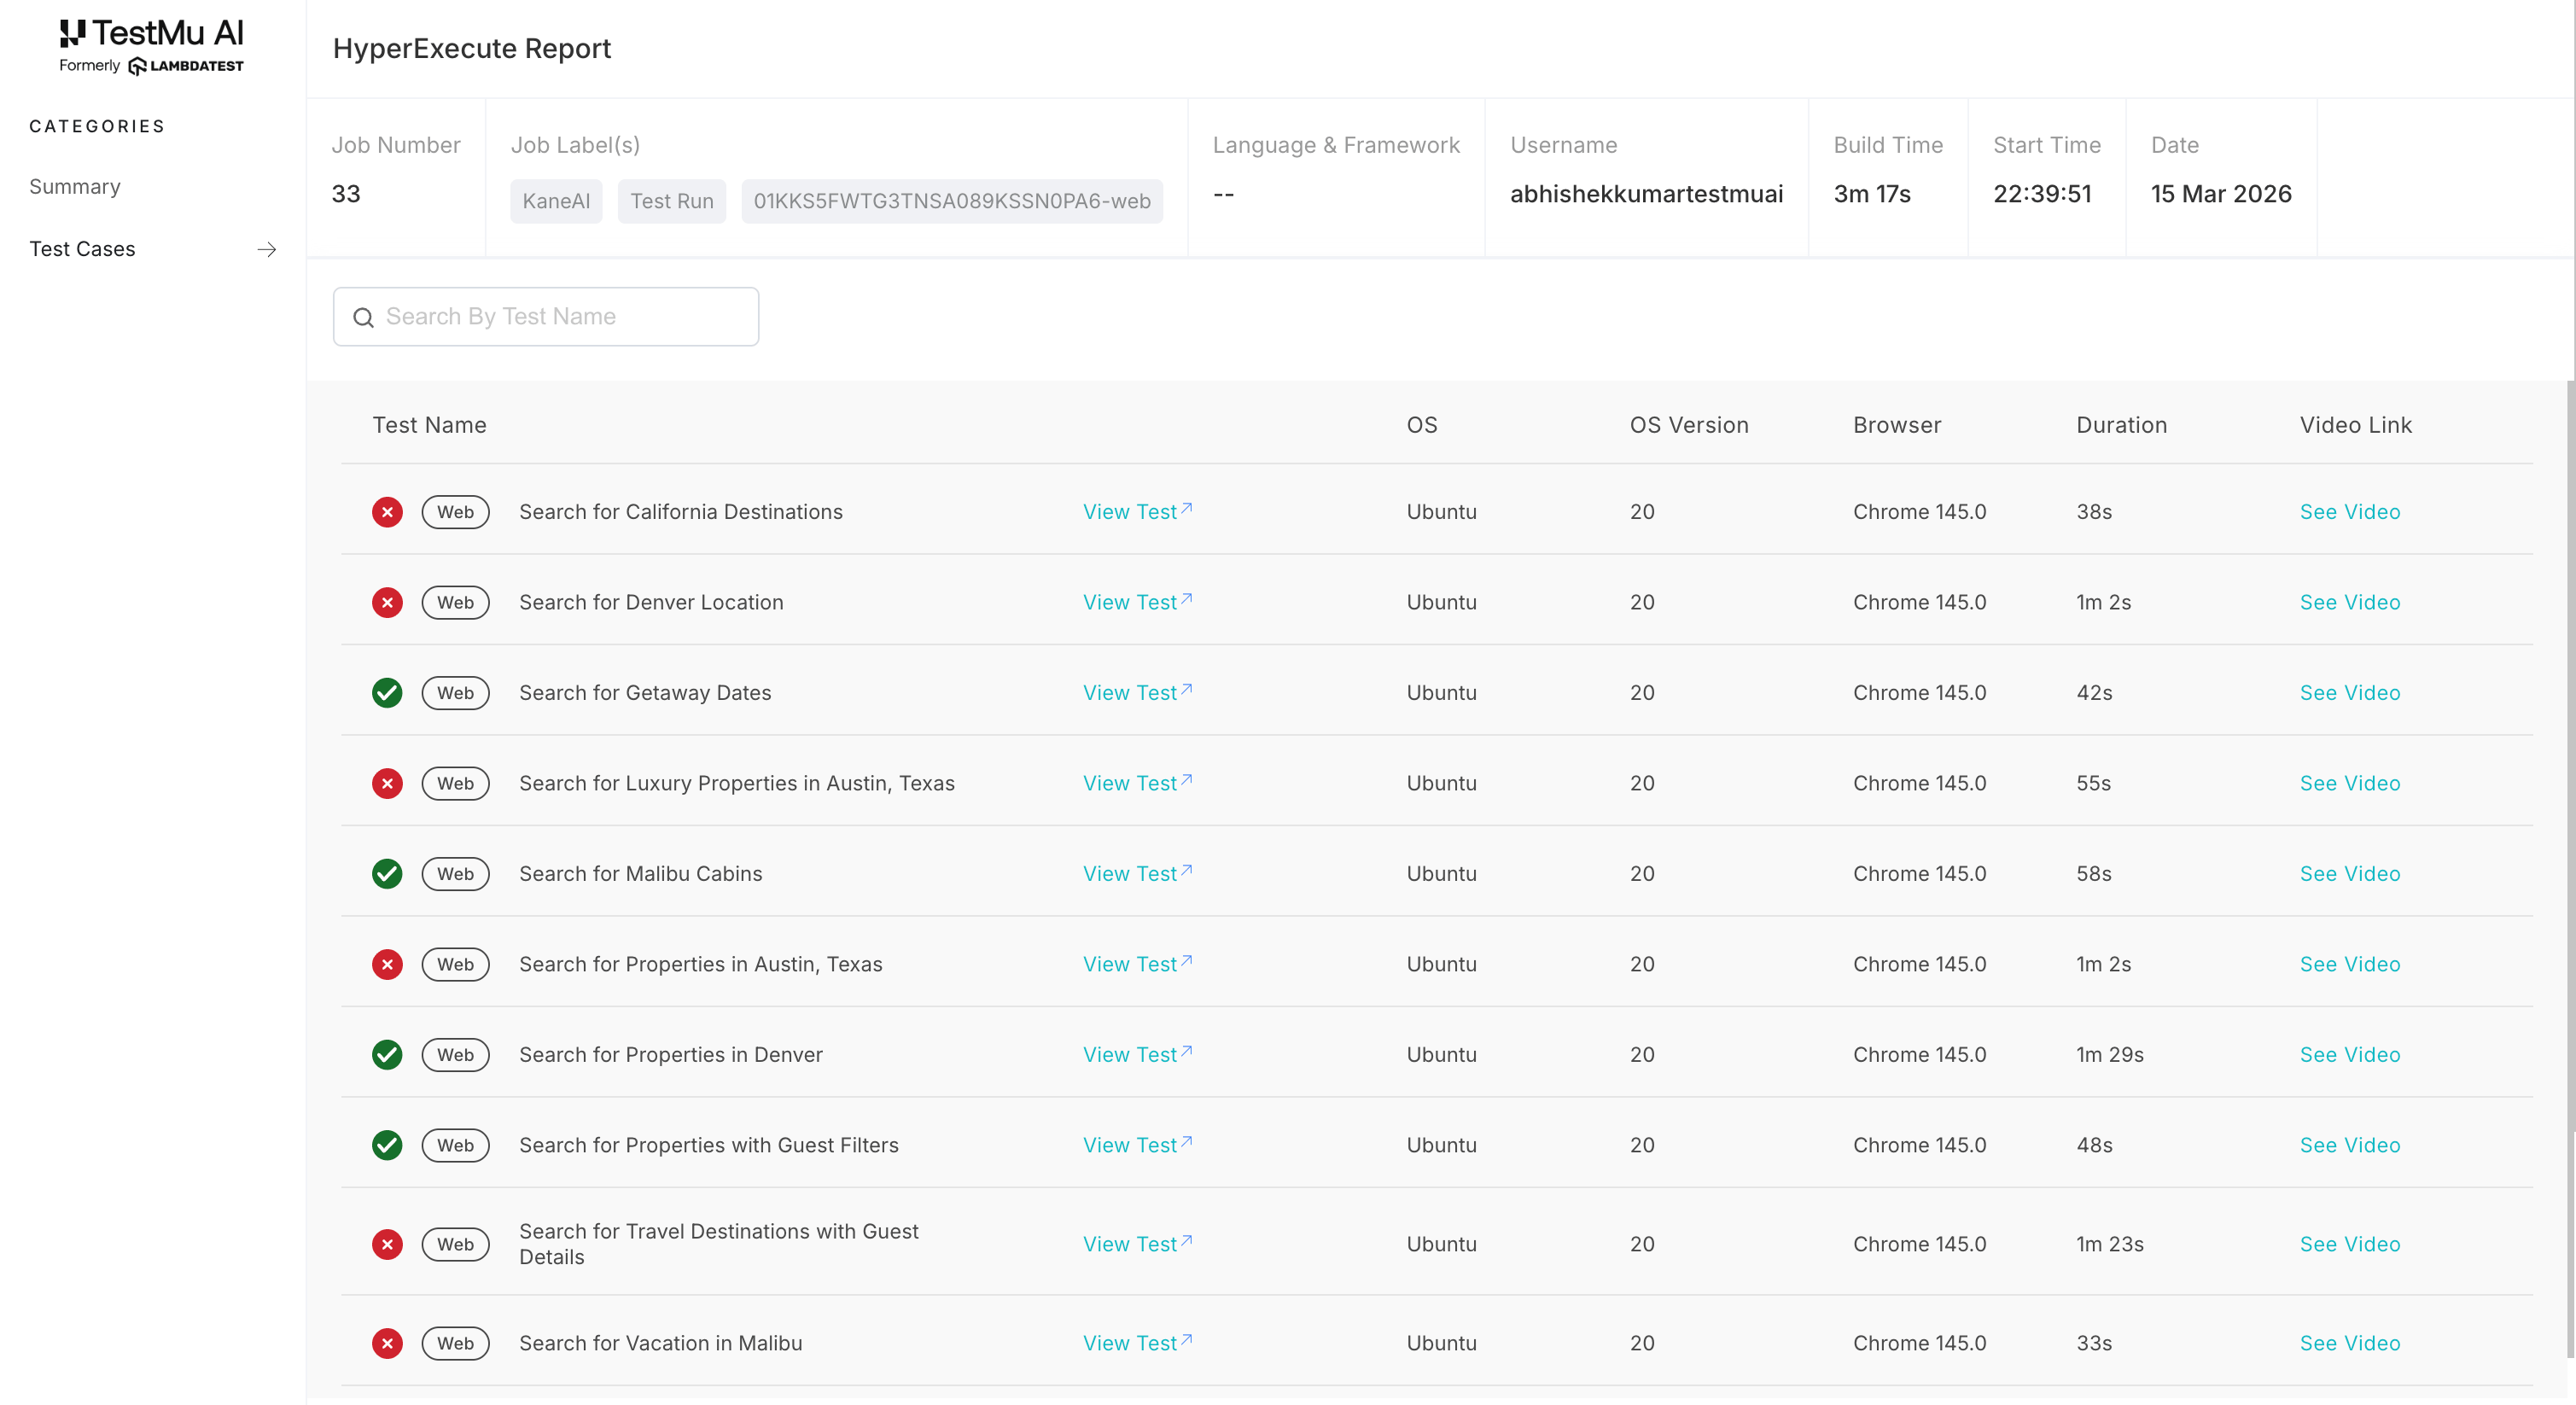
- Summary: Job metadata (job number, labels, username, build time, date), test summary with pass/fail counts and donut charts, scenario summary, task analytics, and browser-level breakdown.
- Test Cases: A detailed list of all test cases with their status (pass/fail), OS, OS version, browser, duration, and links to view the test or watch the video recording.
Extent Report Overview
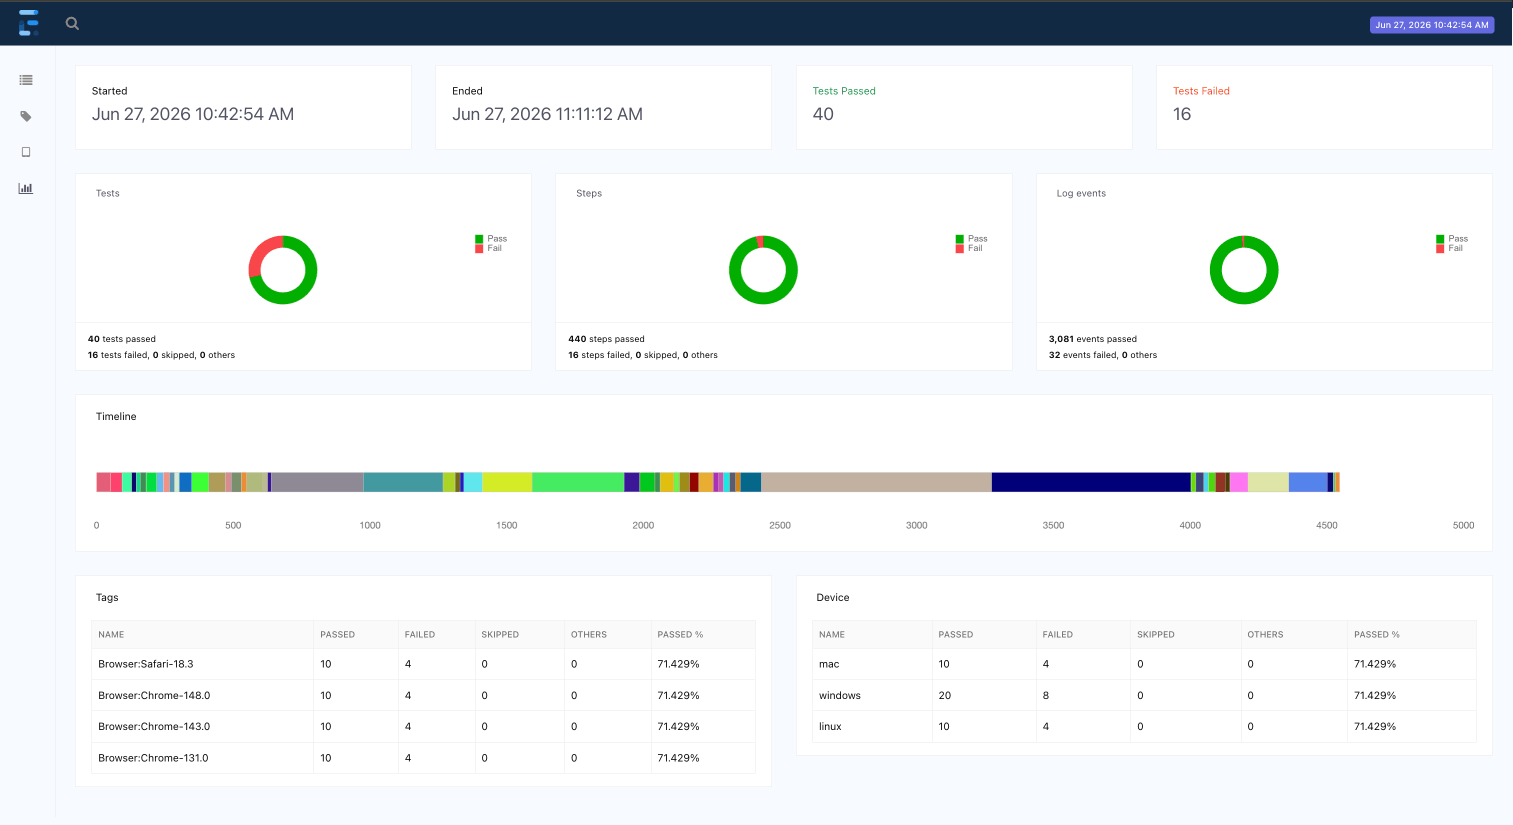
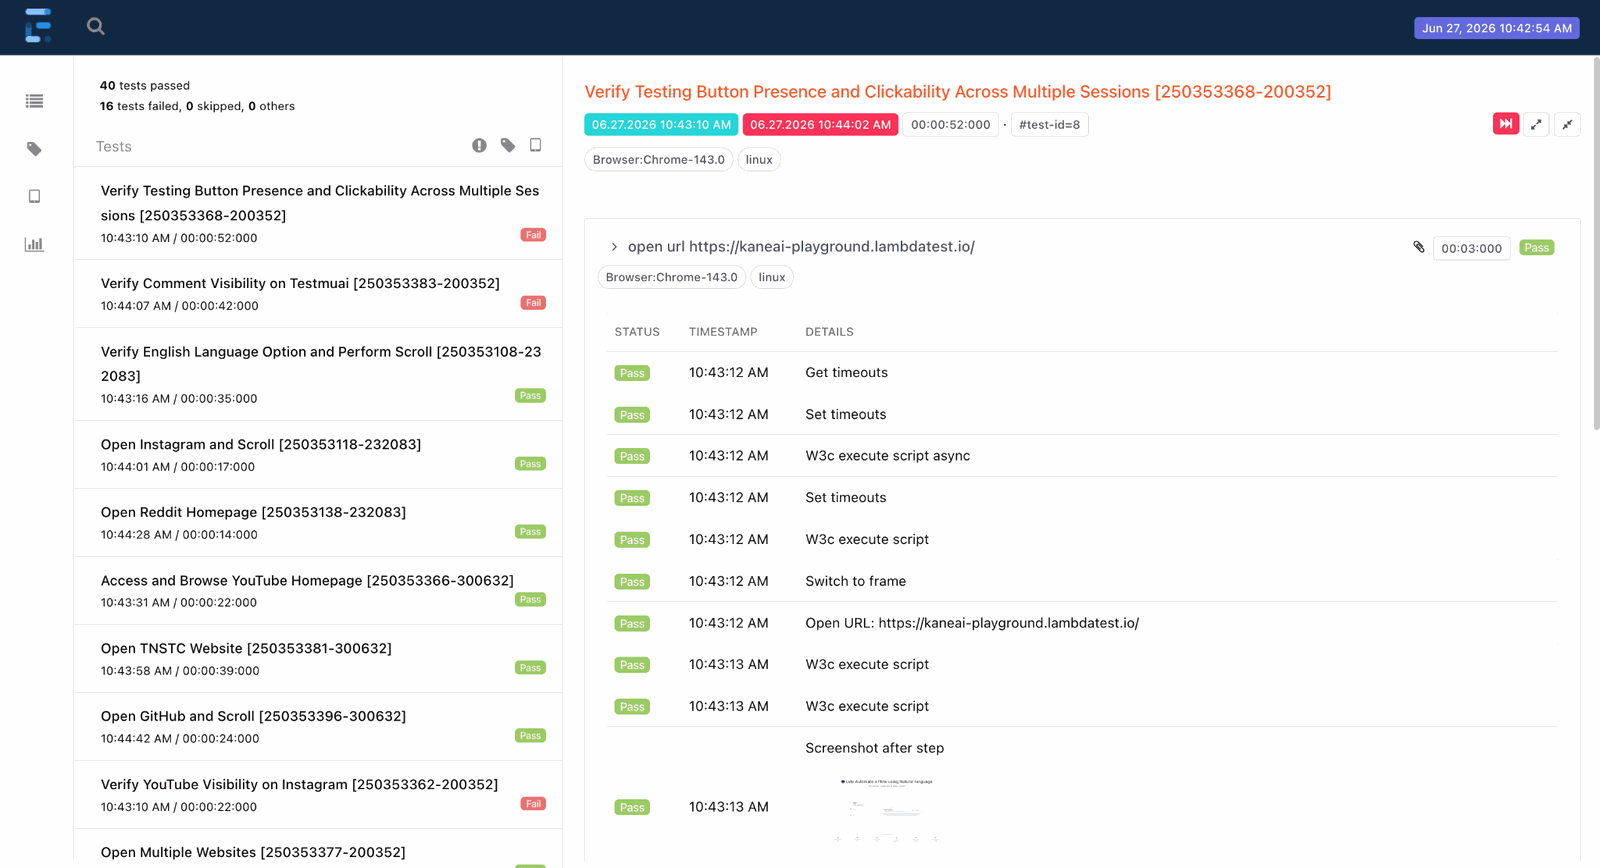
The generated Extent report provides a rich interactive view of test execution results, accessible from the HyperExecute Job page. It includes:
- Dashboard: A visual summary of the test run with pass/fail statistics and trend data.
- Test Details: Step-by-step breakdown of each test case with status and screenshots.
Email Report
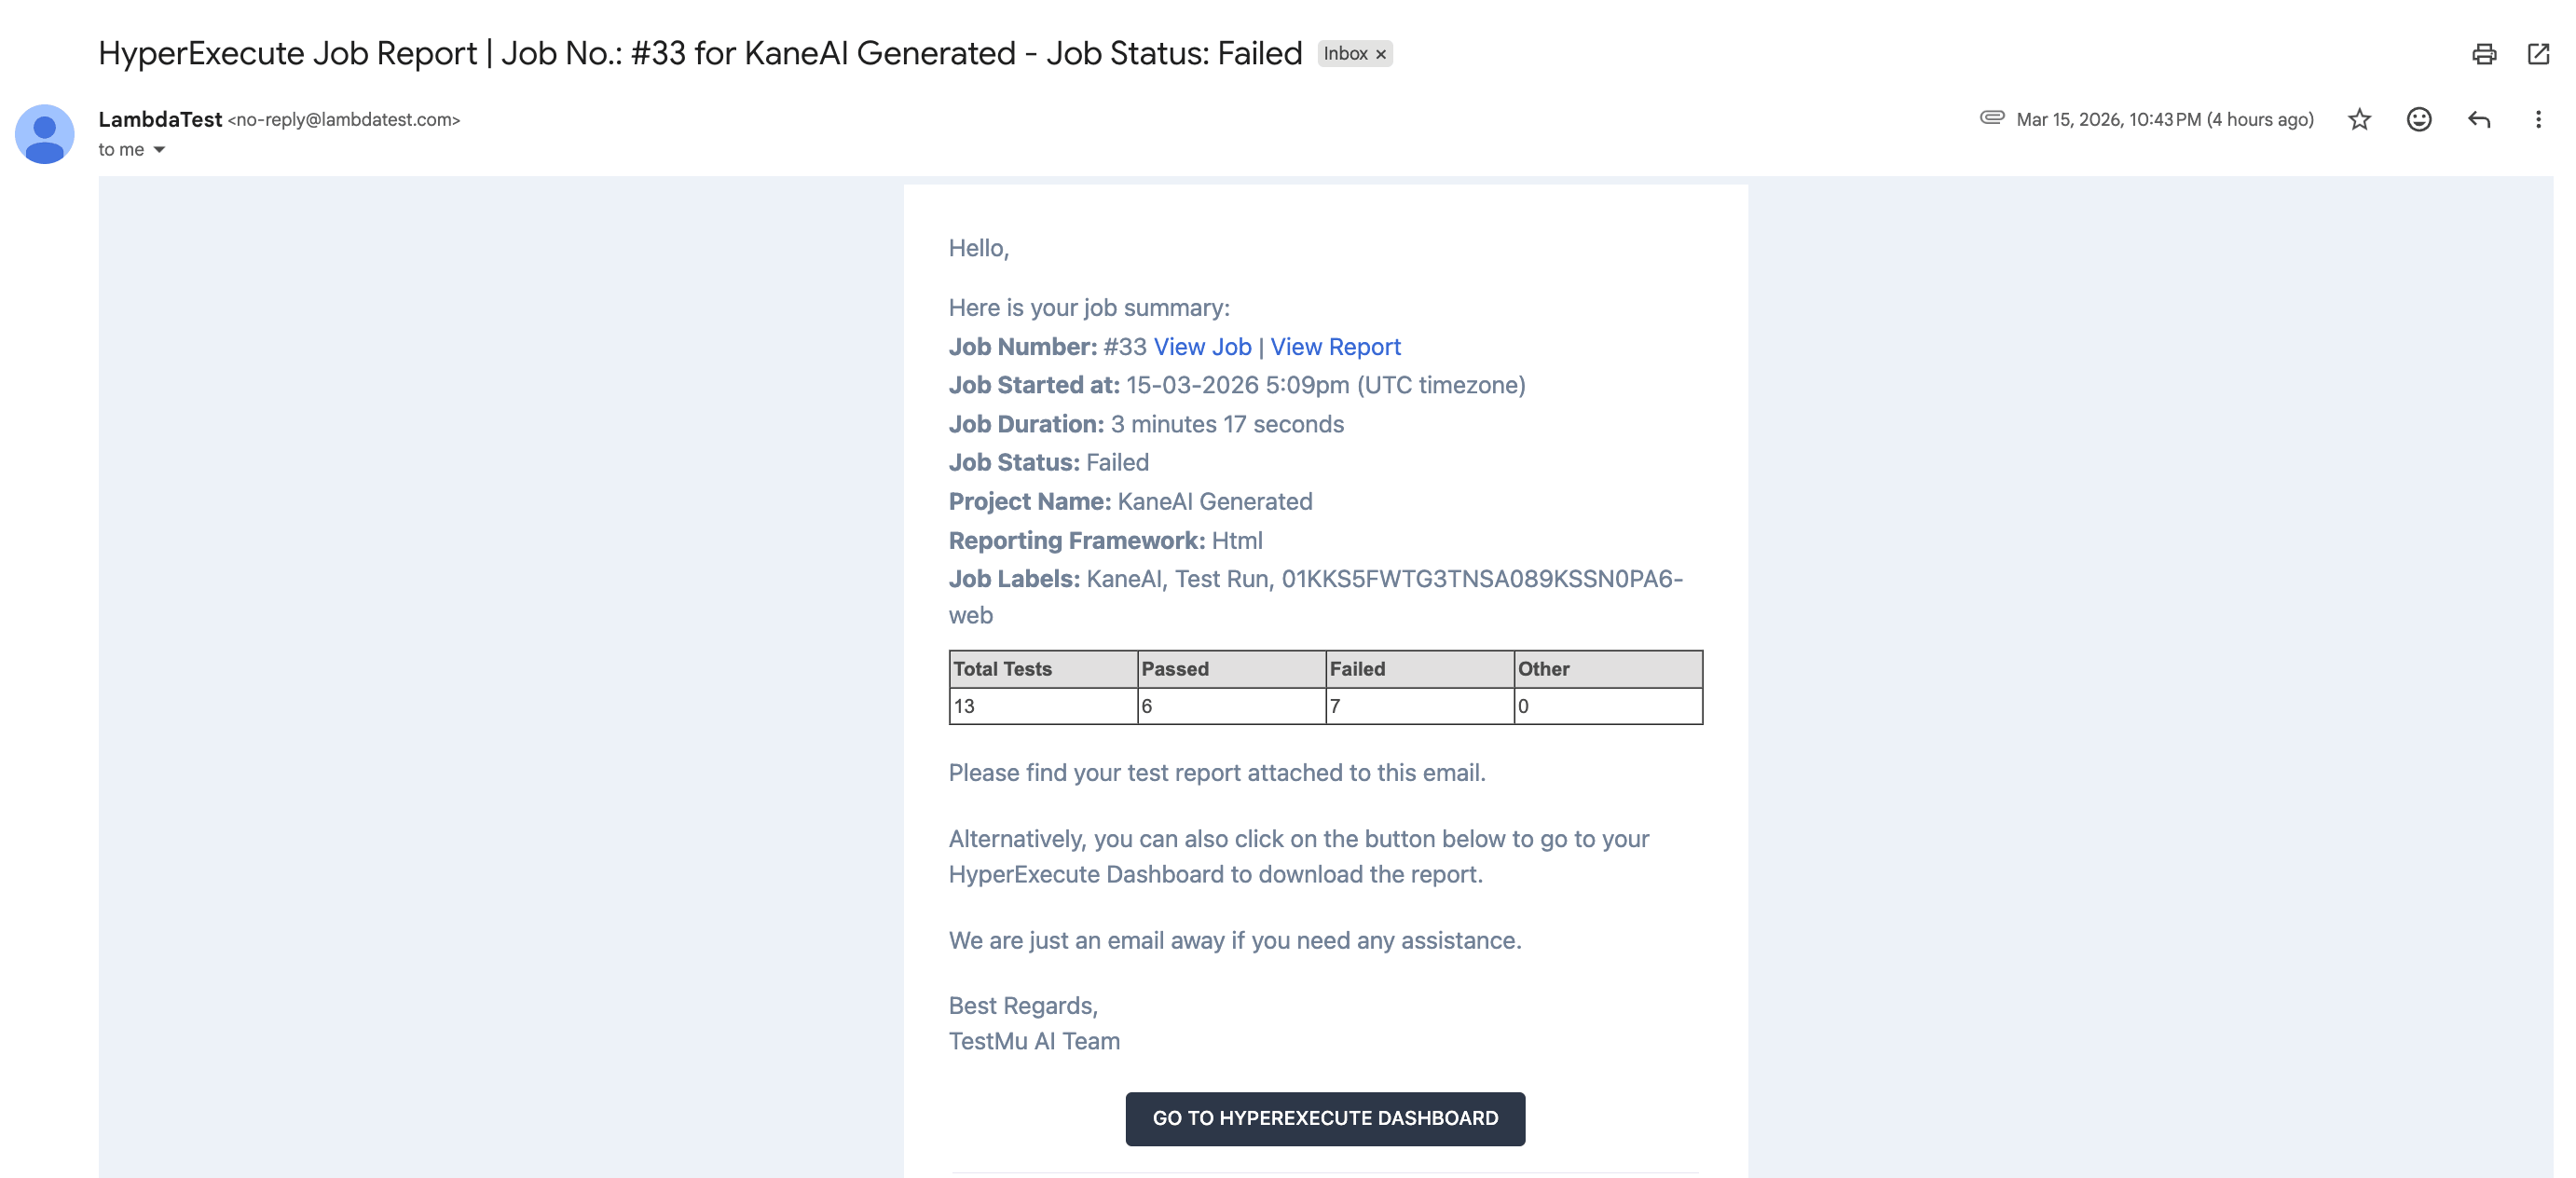
If you added email addresses, recipients receive an email with a summary of the test run results along with the HTML report as an attachment.
Reports are also available when configuring Scheduled Test Runs.
- Click Execute to run the tests.
Monitor Execution on HyperExecute
- Navigate to the HyperExecute page.
- Observe the discovery and rapid execution of test cases.


 Chat with Us