Azure DevOps Integration
Azure DevOps, previously known as VSTS: Visual Studio Team Services – A software developed by Microsoft Corporations to provide an IDE(Integrated Development Environment) for facilitating management & development regarding a software project. Azure DevOps provides a set of specific, cloud-based collaboration tools for developers, testers & software architects. So you can plan smarter and ship even faster with the help of effective collaboration. With their Azure Pipelines you can deploy your development to any Git provider cloud.
The TestMu AI Azure DevOps Integration allows you to create a work item directly in your project from TestMu AI platform. Push a bug, epic, task, story to your respective project anytime, even in the middle of your test session. The fields populated by you when marking as a bug through TestMu AI are displayed as information on the work item in Azure DevOps project for that testing instance.
For teams, we recommend sharing the Azure DevOps connection across your organization — an admin connects once and everyone logs work items through it. See Share your Azure DevOps integration across your organization.
We recently added support for custom fields to our integration. From now on, all required custom fields in your Azure Devops account will be visible in your bug marking form on lambdatest.
Azure DevOps Integration with TestMu AI, like all of our other integrations to 3rd party applications, is available for freemium as well as premium plan.
How To Integrate Azure DevOps With Your TestMu AI Account?
Step 1: Login to your TestMu AI account. You would need to have Admin or User level access to see and install integrations.
Step 2: Select 'Integration' from the left navigation menu bar. This will guide you to a screen where you will find a list of 3rd party applications, available to integrate with your TestMu AI account.
Step 3: Open the Bug Tracker category (or use the search bar), find Azure DevOps, and click Connect.
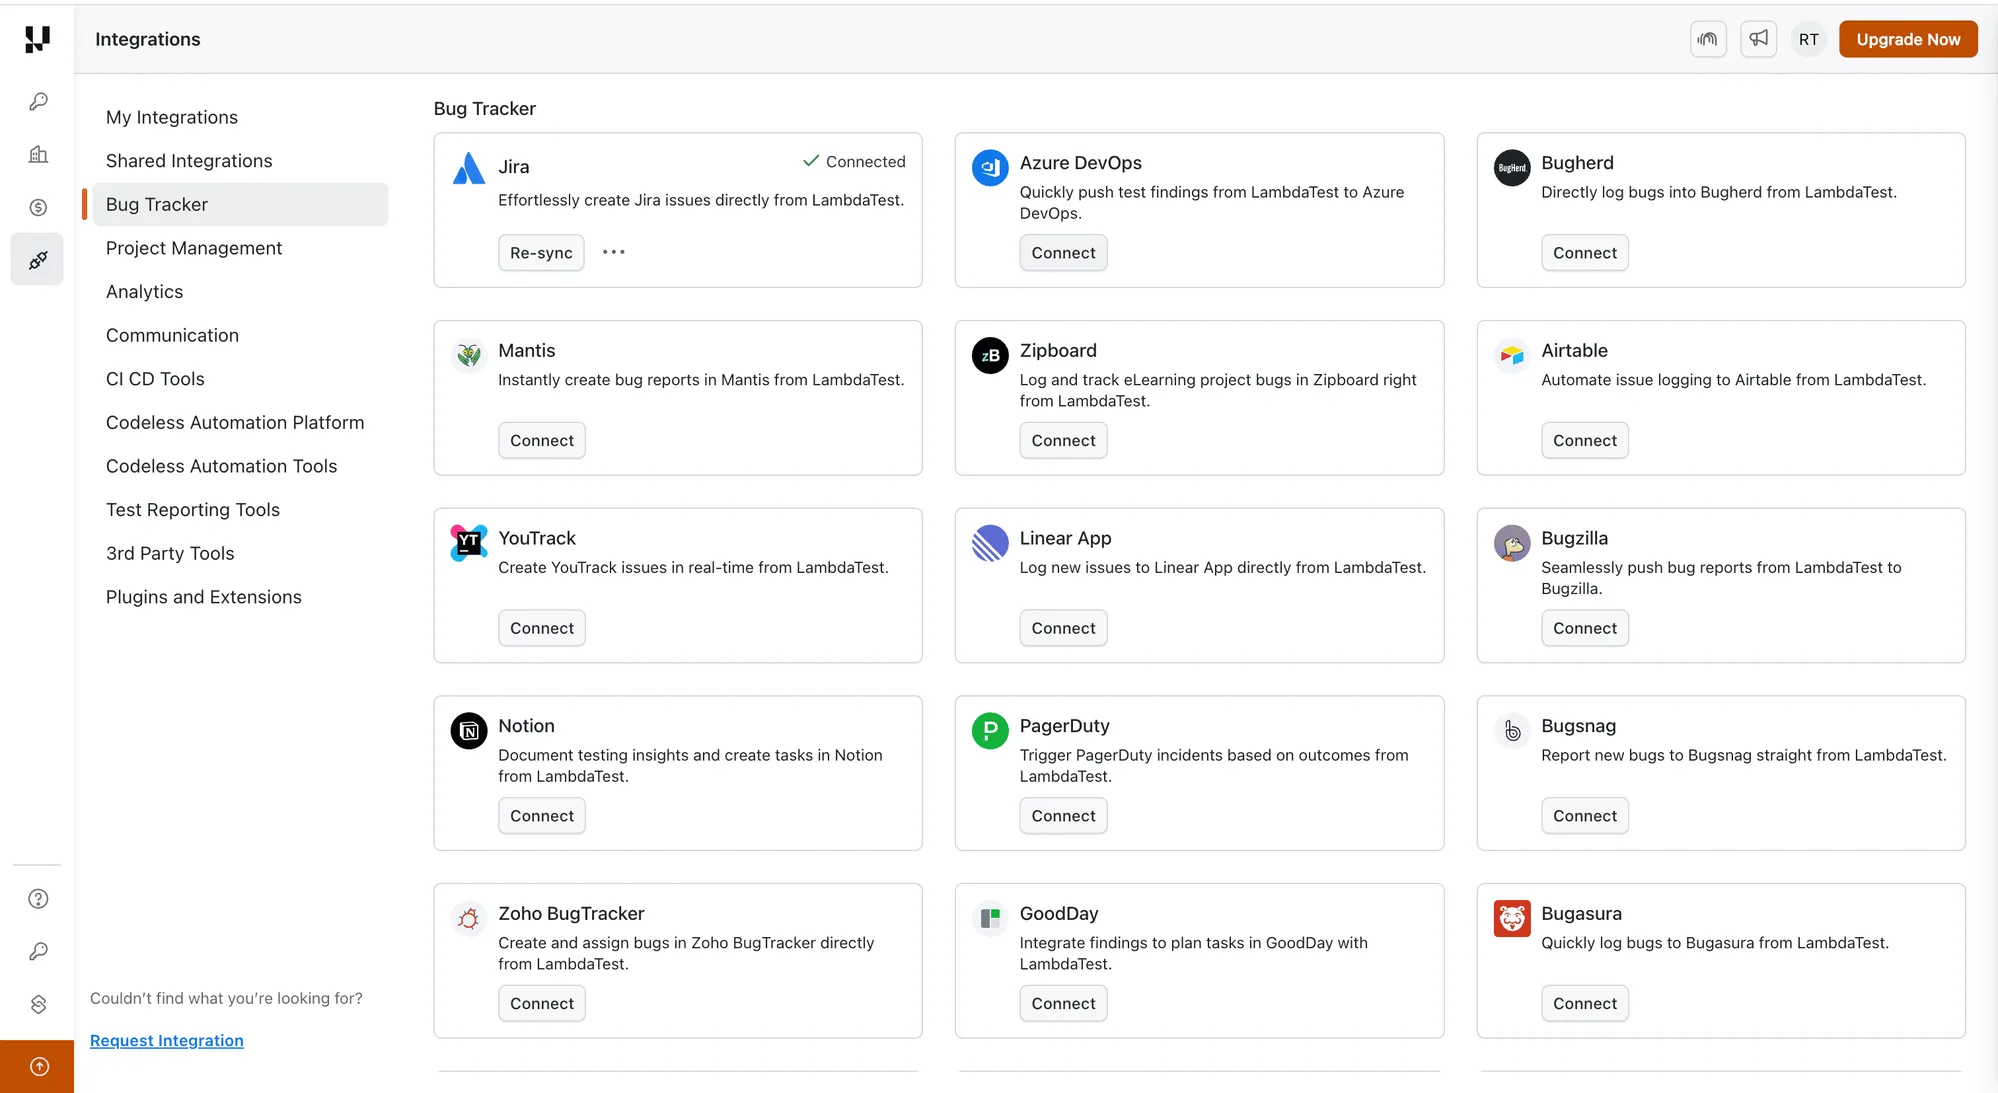
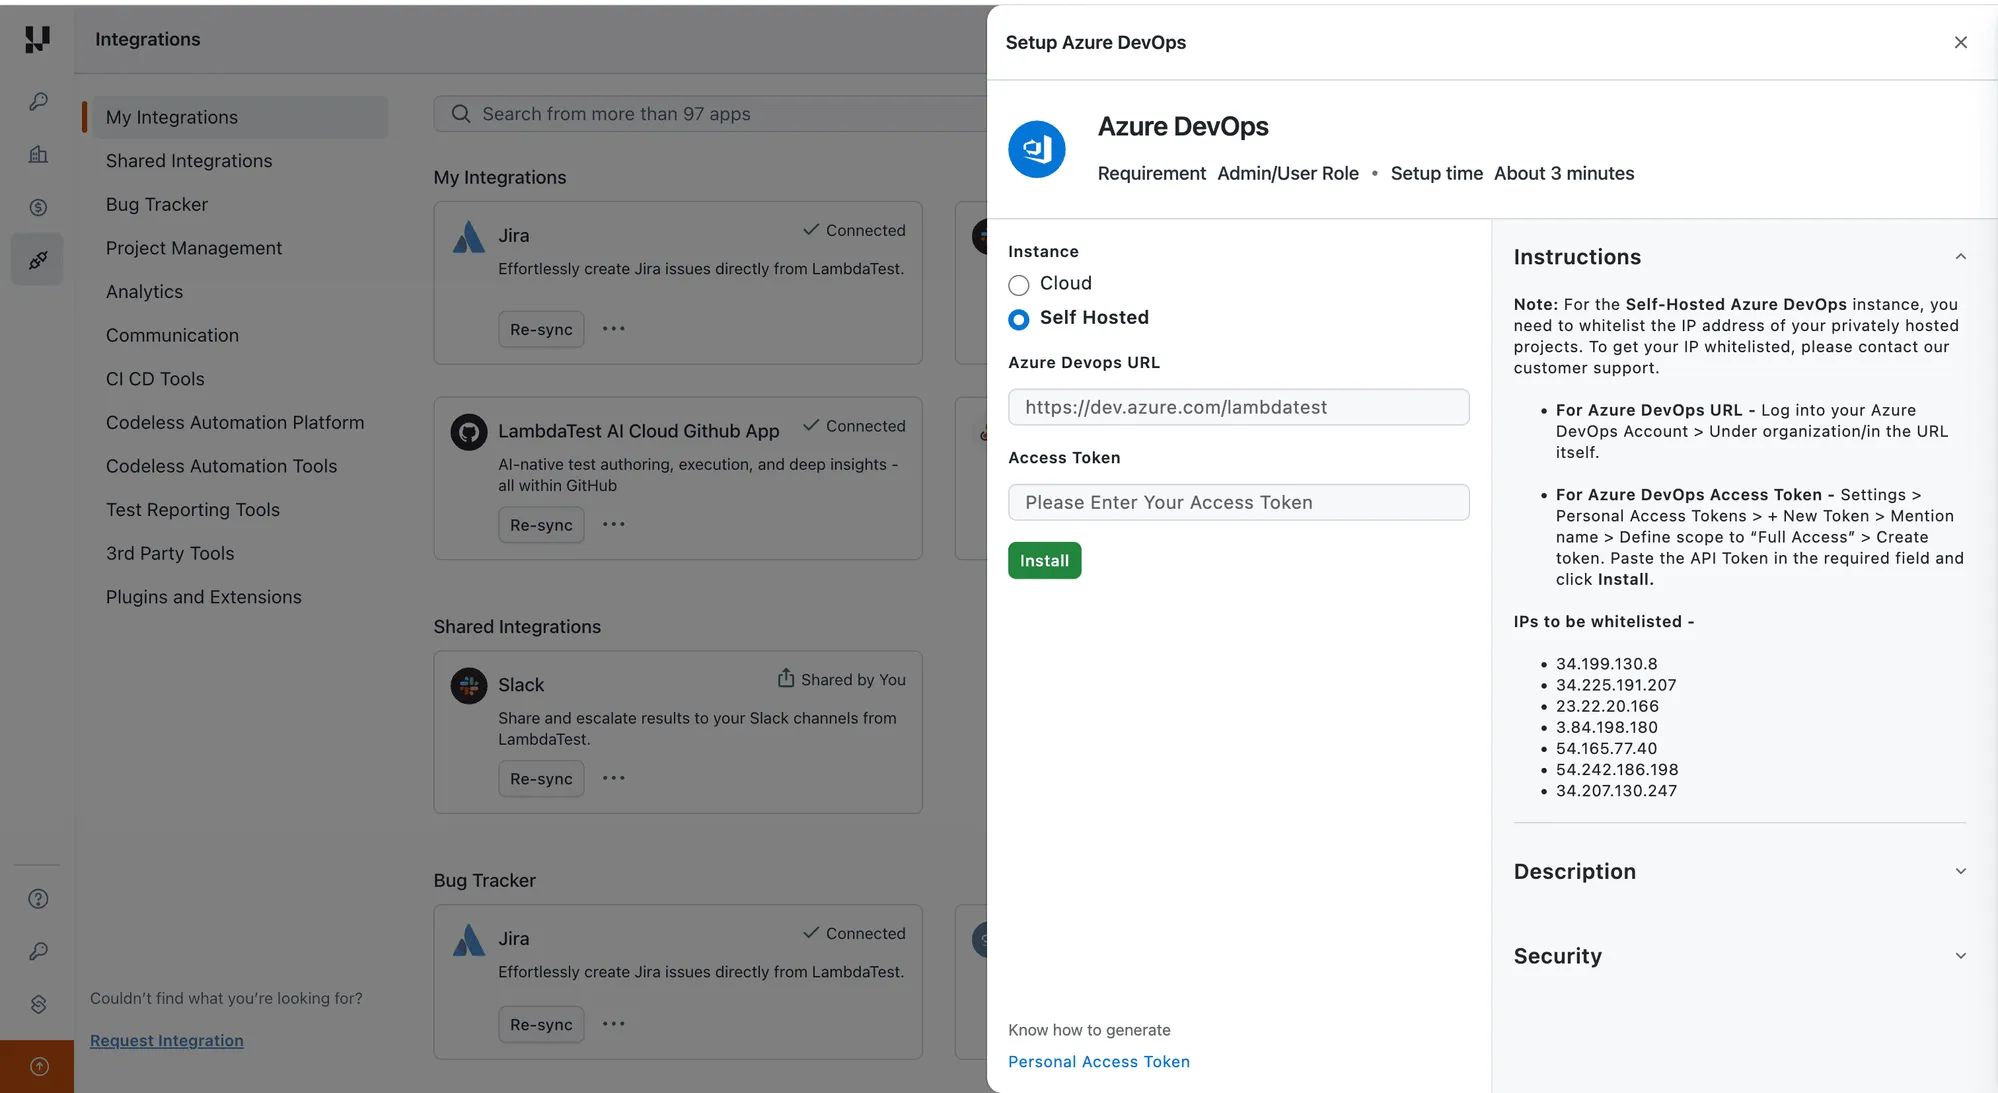
Step 4: In the Setup Azure DevOps panel, choose your Instance:
- Cloud — connect securely with OAuth 2.0 (recommended).
- Self Hosted — connect using a Personal Access Token (PAT).
The integration needs these scopes: Project and Team — Read and Work Items — Read & Write.
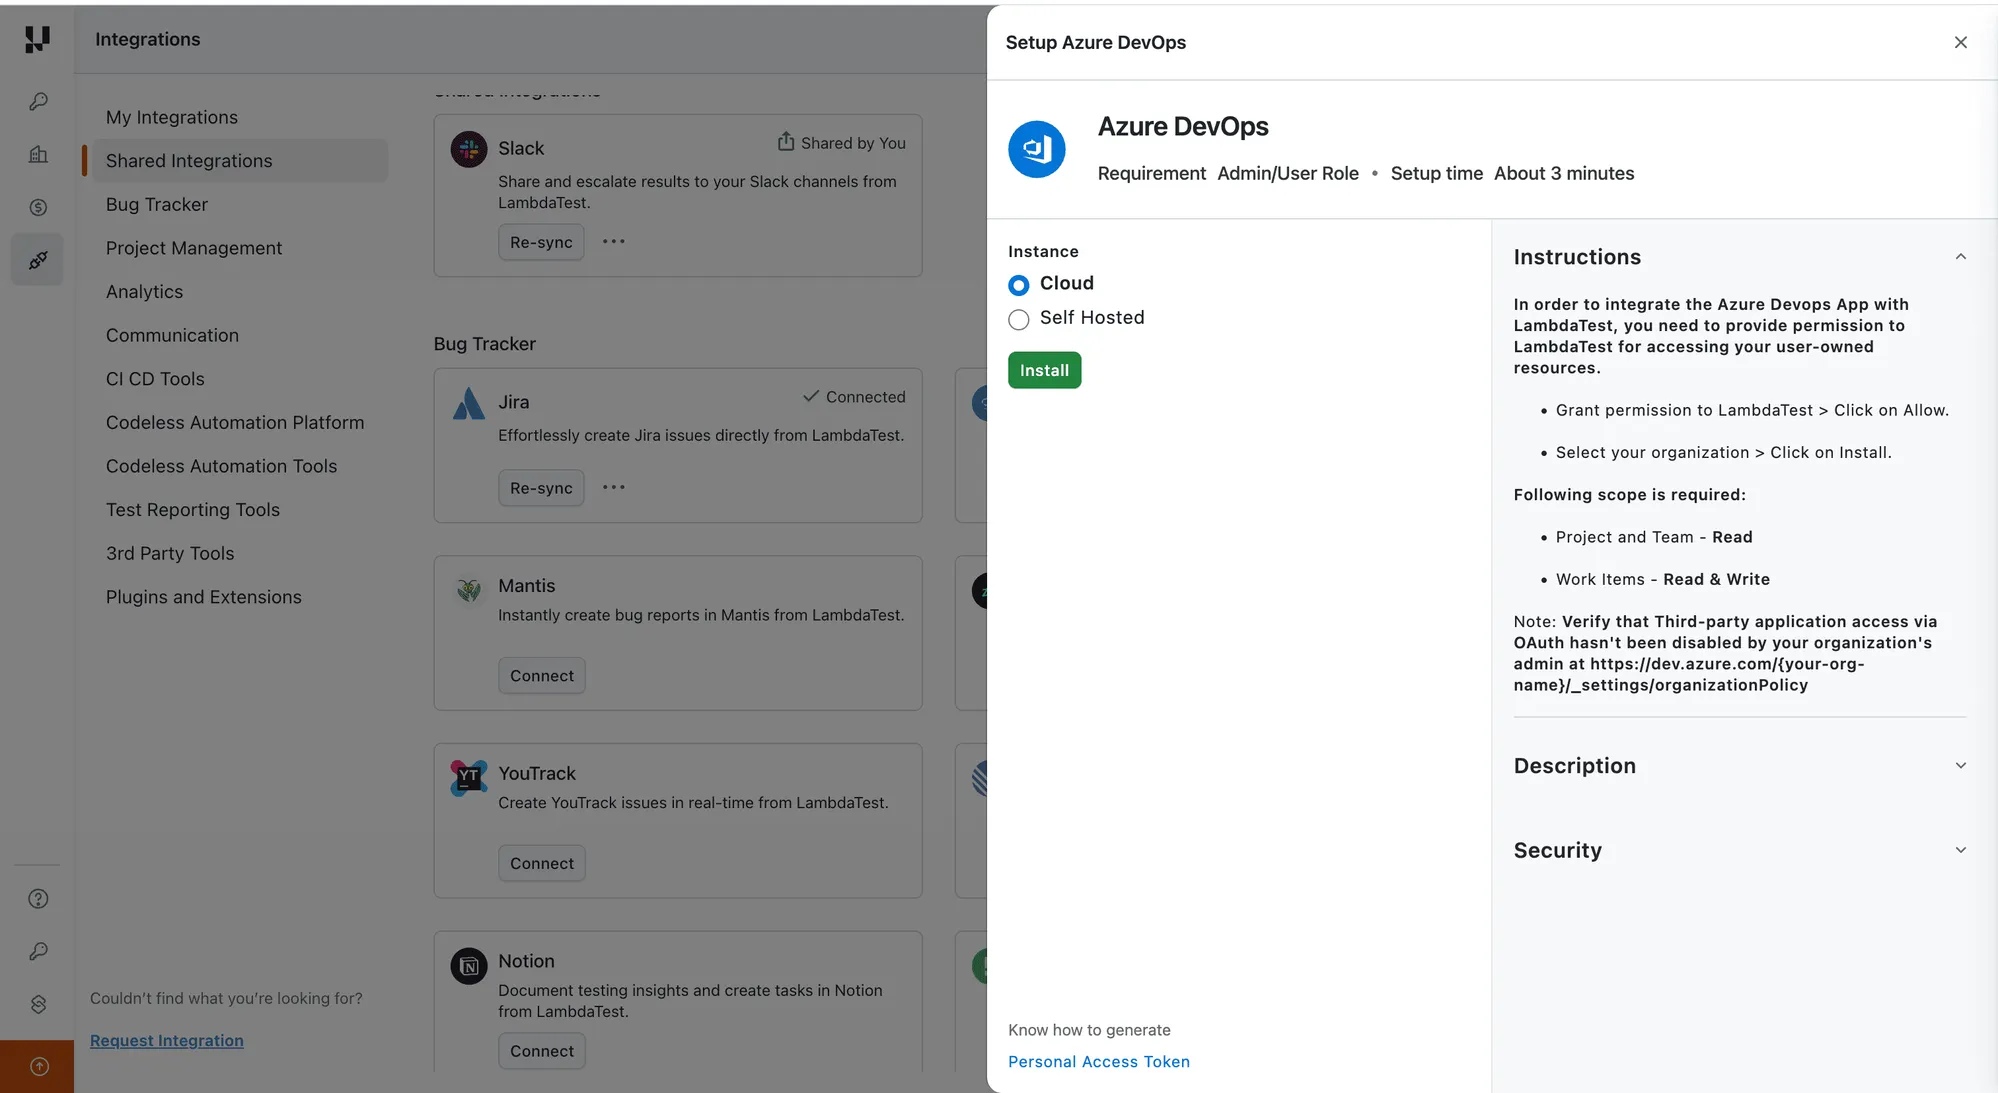
For a Cloud instance, make sure Third-party application access via OAuth hasn't been disabled by your organization's admin (under https://dev.azure.com/{your-org-name}/_settings/organizationPolicy).
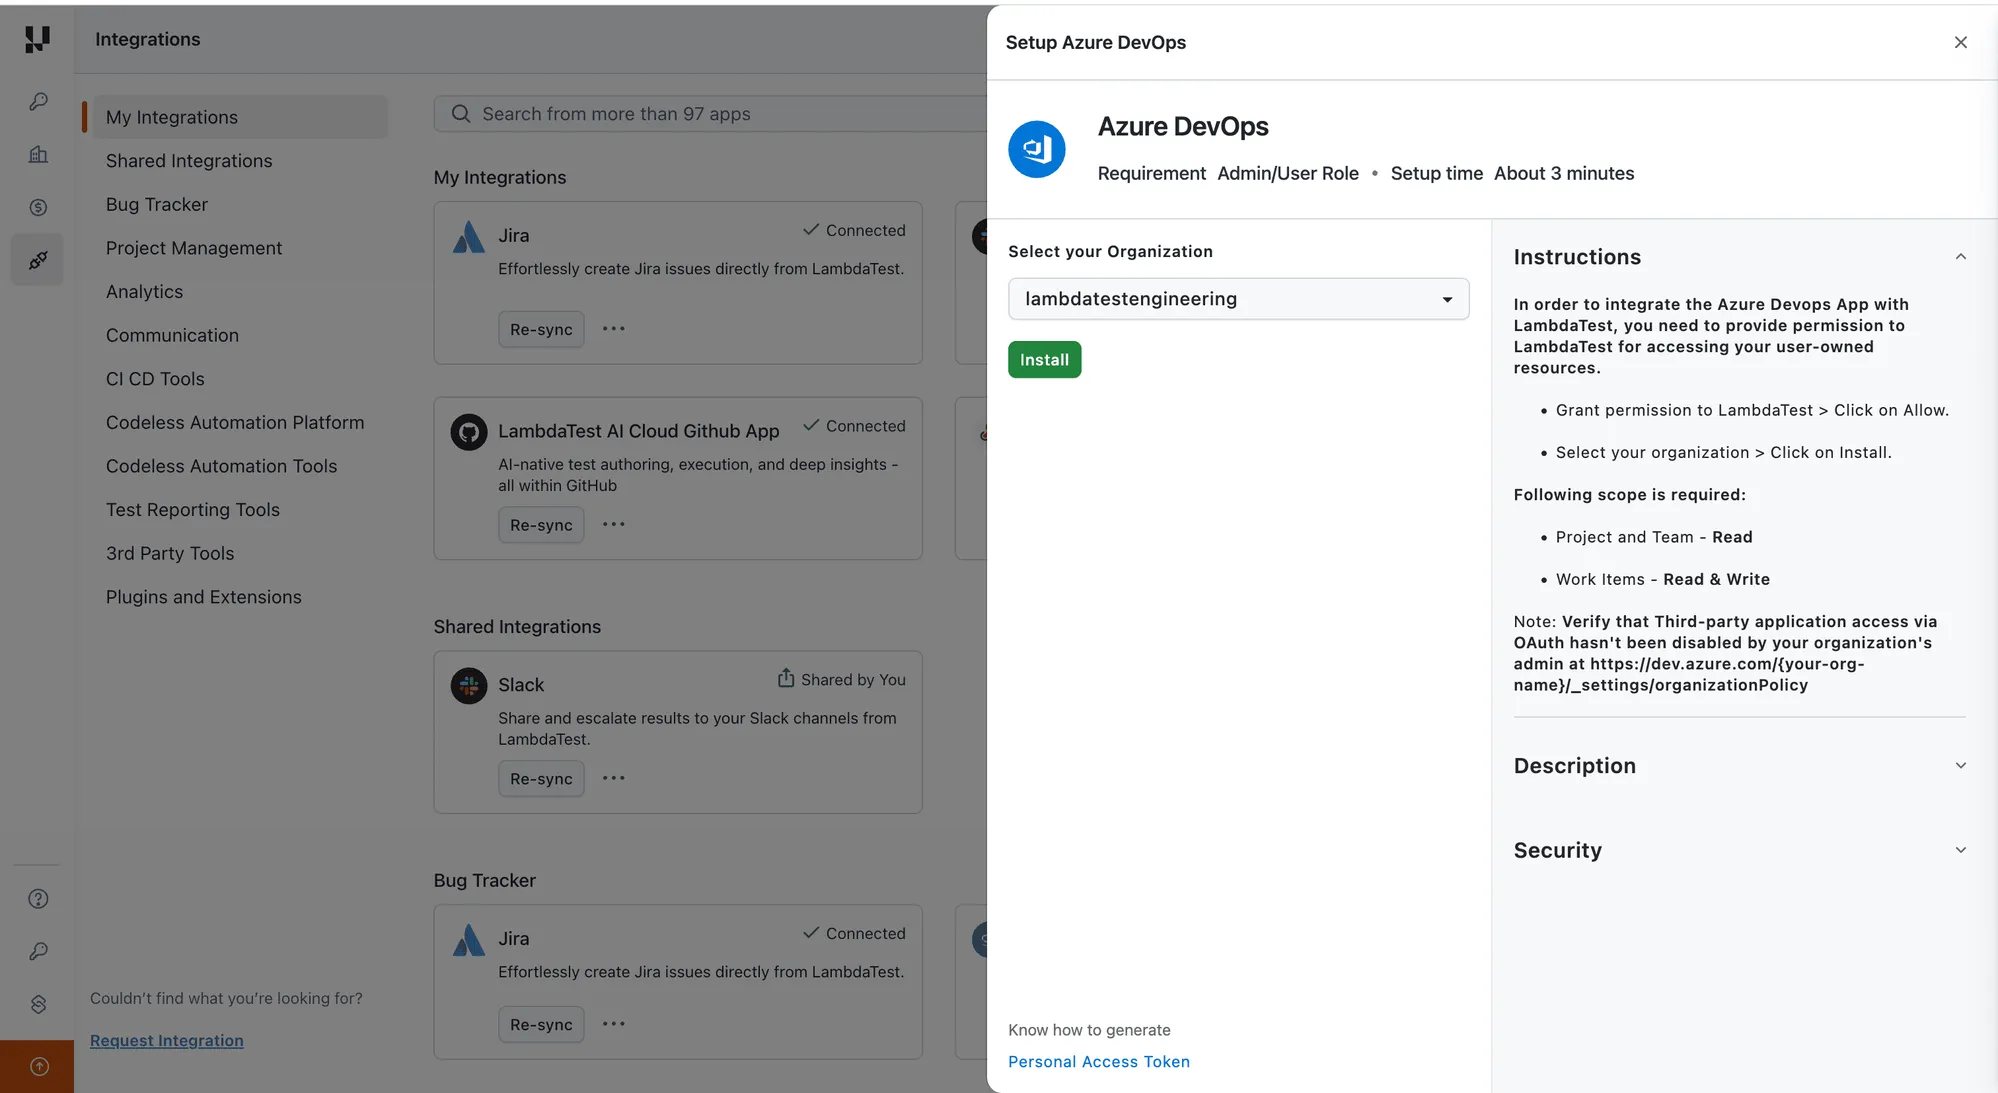
Step 5: For a Cloud instance, click Install and grant permission to TestMu AI when prompted (Allow). Then select your organization from the dropdown and click Install.
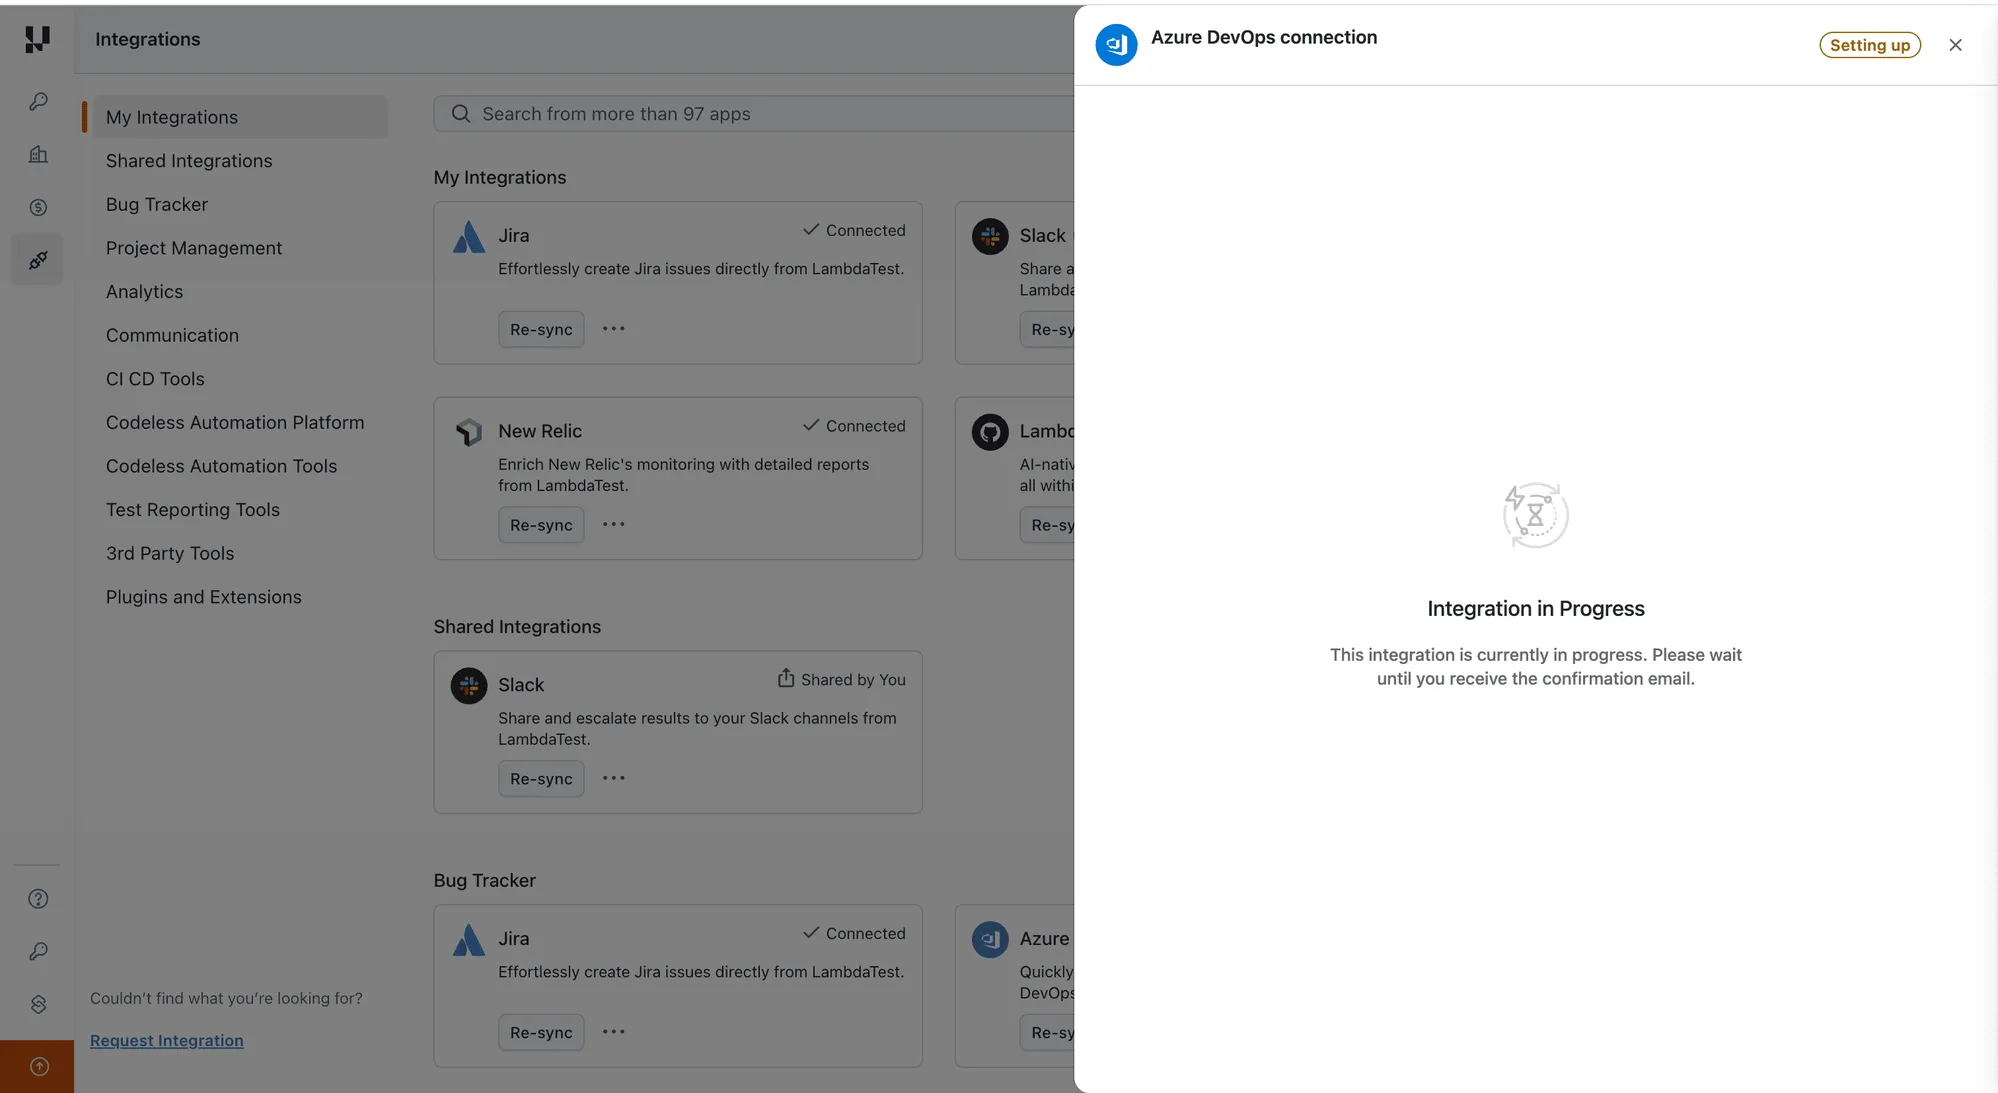
Step 6: The connection begins setting up. You'll see Integration in progress while TestMu AI completes the setup, and you'll get a confirmation once it's ready.
Self-Hosted Azure DevOps (Personal Access Token)
If you chose Self Hosted, you'll connect using your Azure DevOps URL and a Personal Access Token. By doing so you grant TestMu AI access to your user-owned resources on your Azure DevOps account — this is required for authorization between the two applications.
Note: For a Self-Hosted Azure DevOps instance, you need to whitelist the IP addresses shown in the setup panel for your privately hosted projects. If you need help, please contact our customer support.
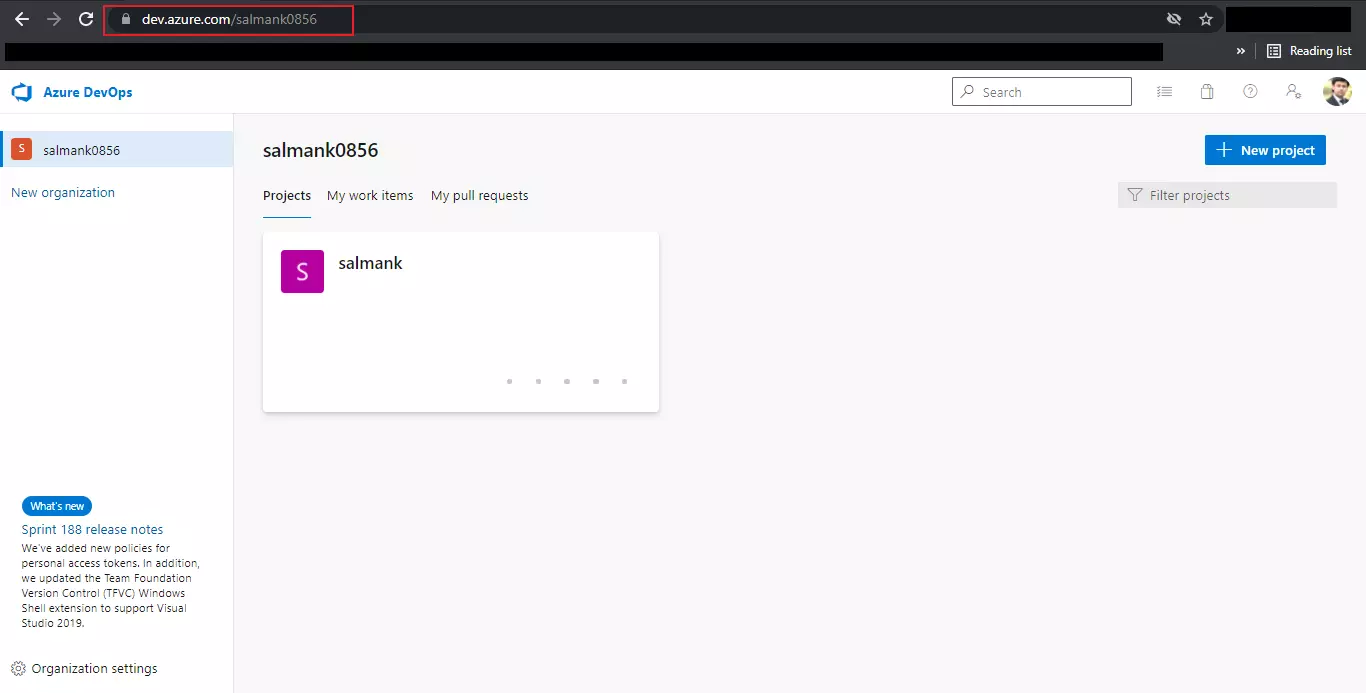
What is my Azure DevOps URL?
Your Azure DevOps URL is the domain name. Log into your Azure DevOps account and you'll find it under your organization.
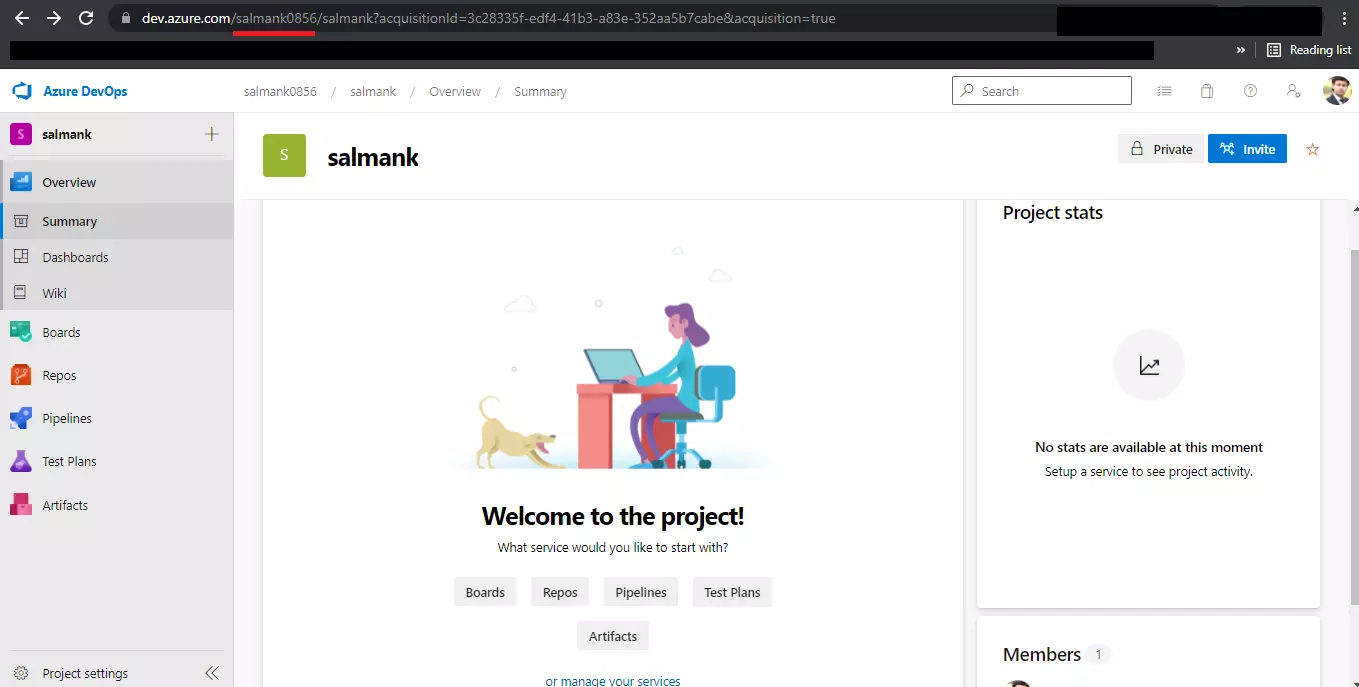
If you are already inside a project in your Azure DevOps account, you'll find it in the URL. For example: https://dev.azure.com/salmank0856
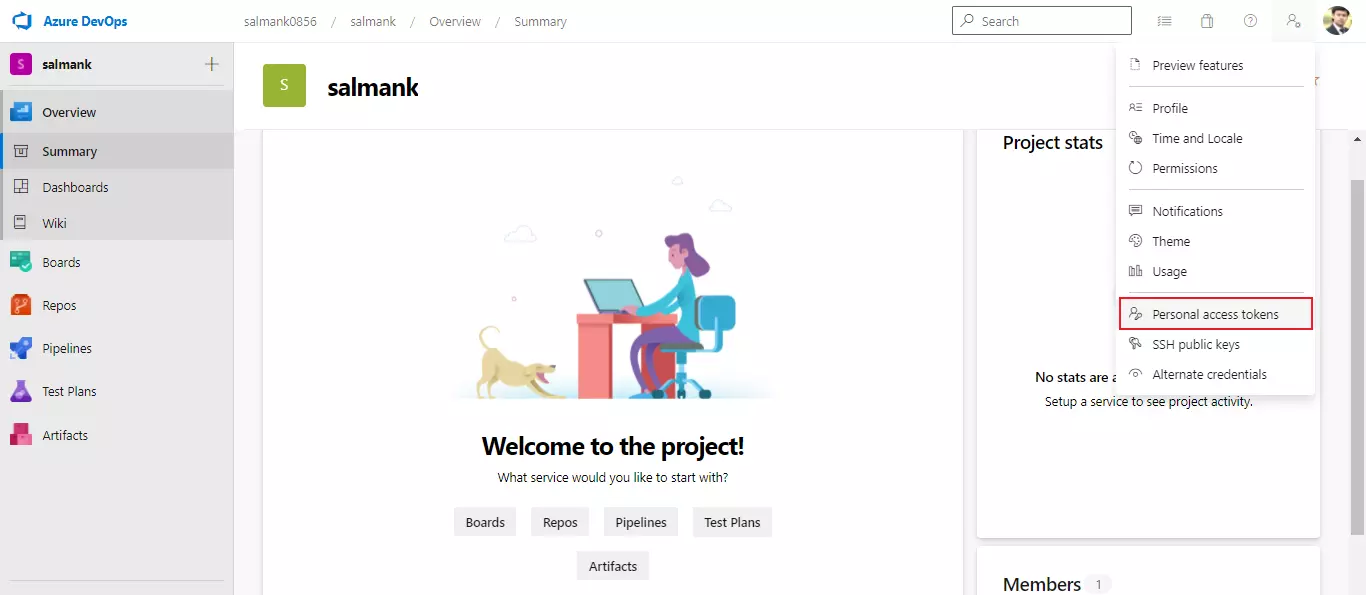
What is my Azure DevOps Access Token?
You can generate your Azure DevOps access token under 'Personal access tokens' — click the settings icon near the top-right corner (next to your user avatar) and click '+ New Token'.
What are access tokens?
Access tokens are strings with an authorization key required to access an API. They are issued to the client server and are usually opaque. They are used for requesting access to protected, user-specific resources. Access tokens are vital from a security point of view & can be generated in different formats, depending upon the security requirements specified on the resource server.
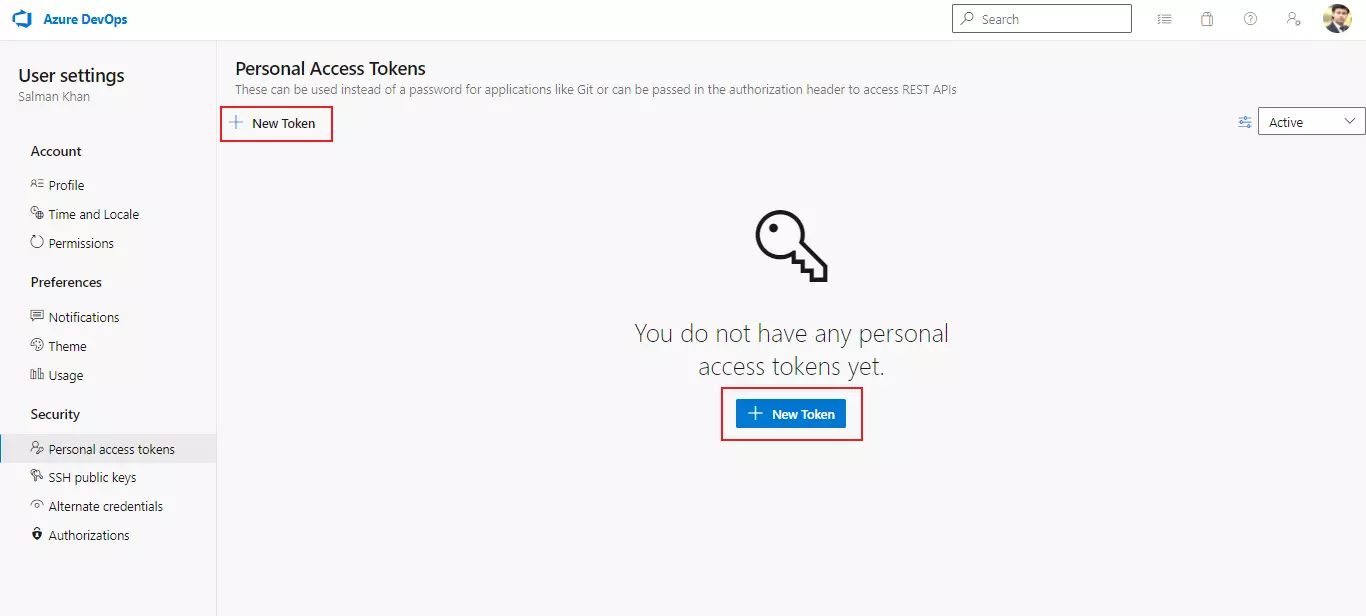
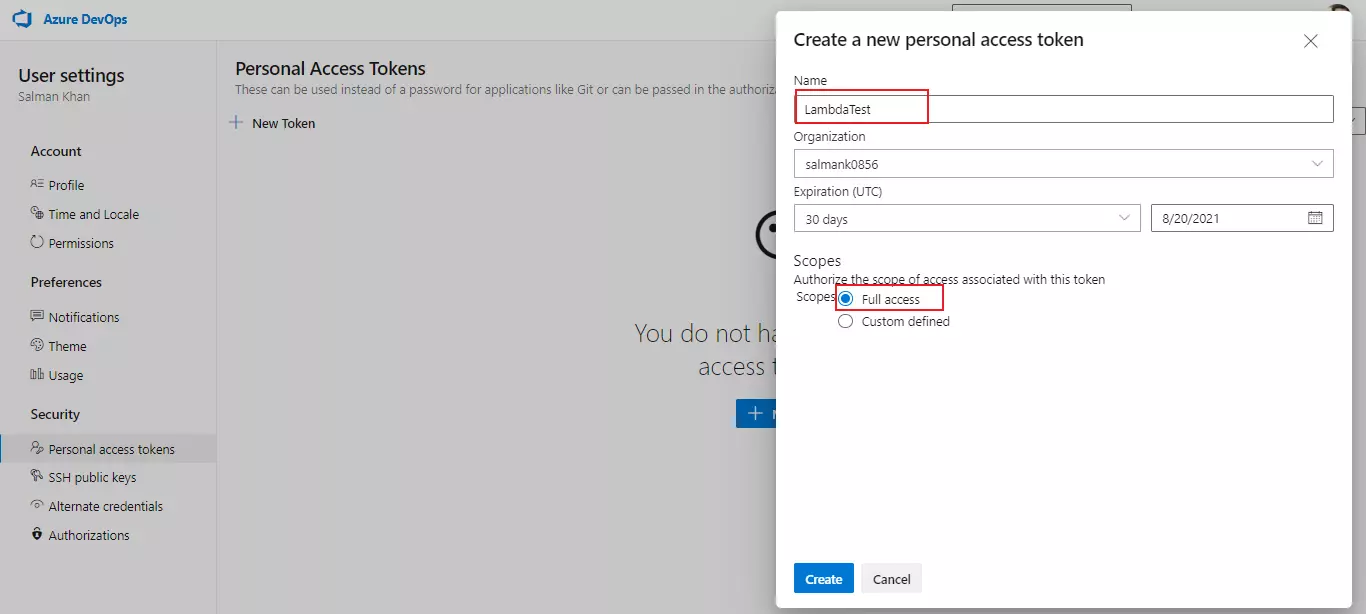
After you click on '+ New Token', give the access token a name and define the scopes for authorizing access — the level of access you grant to any 3rd party API. For TestMu AI integration with Azure DevOps, select 'Full access' & click on 'Create'.
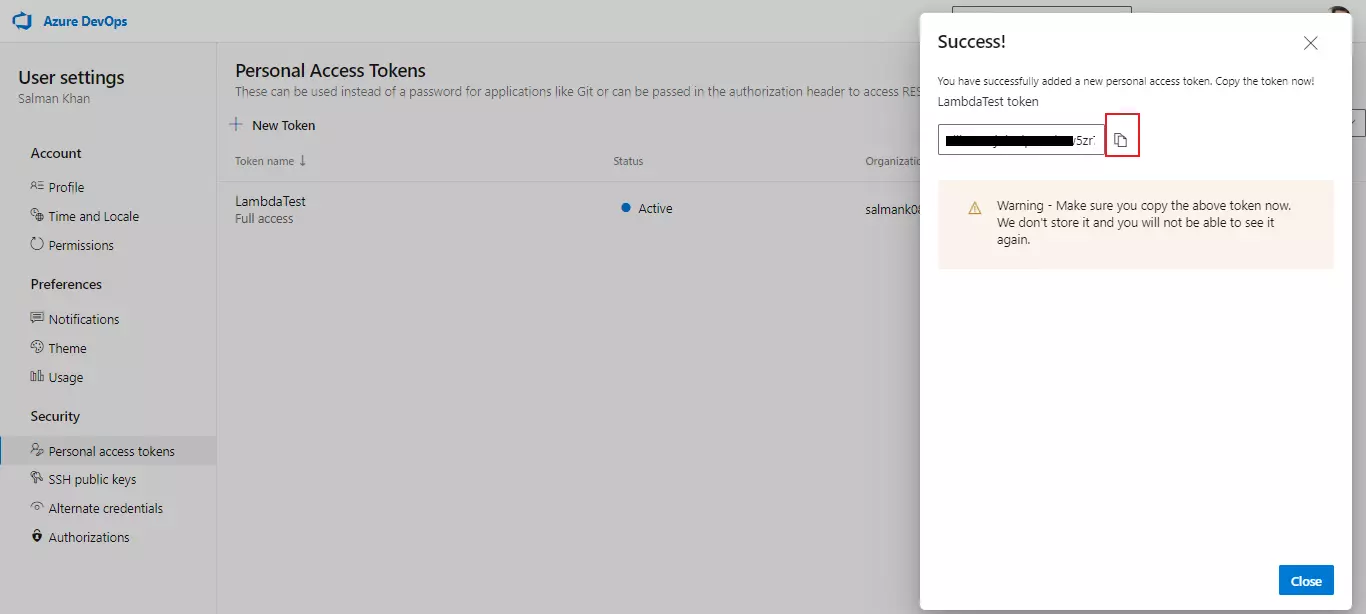
A token is generated — copy it to your clipboard and make sure to store it safely.
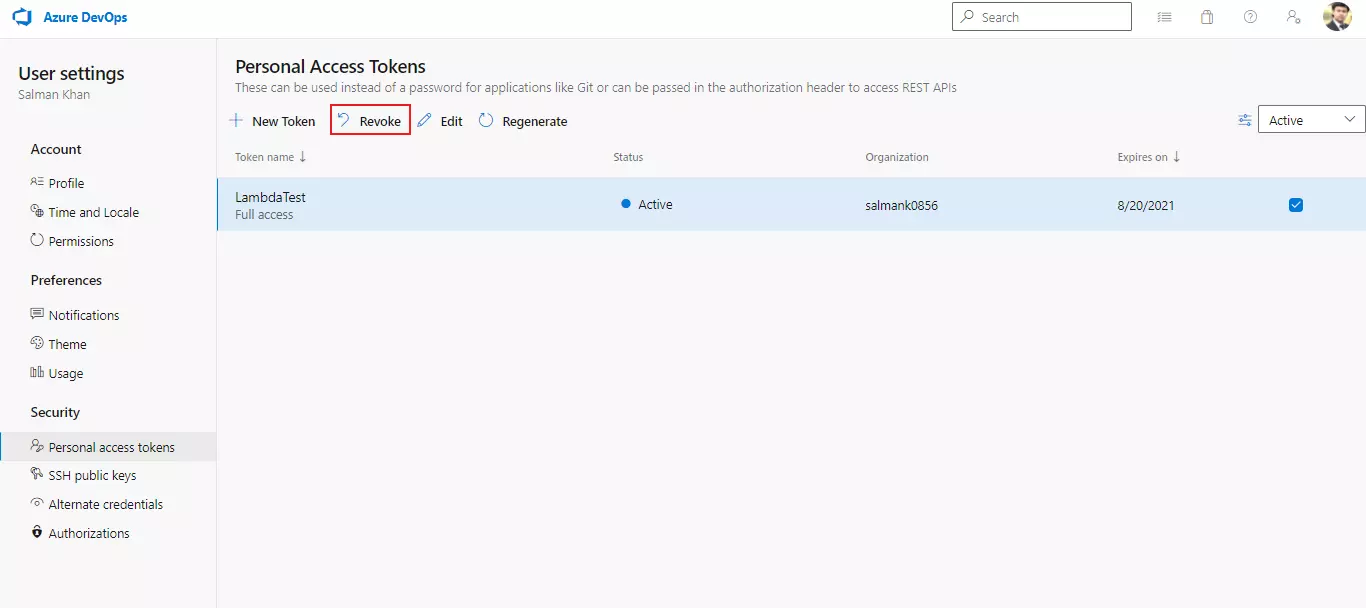
Access tokens are just as important as your passwords and should not be misplaced into the wrong hands. If you lose it in future or it gets shared with someone you don't trust, you can always revoke the token and create a new one. To revoke a token, click on any personal access token and hit 'Revoke'.
Finally, enter your Azure DevOps URL and access token into the setup panel and click Install.
That's it! Go to Integrations again and you will be able to see Azure DevOps under 'My Integrations' section. You can now experience bug logging in a fly from any of your running test session in TestMu AI to your project directly by a single click.
Share Your Azure DevOps Integration Across Your Organization
Instead of every teammate connecting their own Azure DevOps, an admin shares one connection with the entire organization. Members then create work items through it without installing or authenticating Azure DevOps themselves.
One admin-owned connection means consistent projects for everyone, no repeated setup, and a single place to manage access. Members can still install their own connection if they need one.
- Installing and managing an integration requires Admin access.
- Only the admin who installed the connection (the owner) can manage it — share, unshare, re-sync, reconnect, or disconnect.
- A connection can be shared only once. Sharing applies to the whole organization, not to individual members, and there is a single shared connection at a time.
- If a member installs their own Azure DevOps connection on top of a shared one, their personal connection takes priority for them.
Step 1: On the Integrations page, find your connected Azure DevOps card under My Integrations. Click the ellipsis (•••) and select Share.
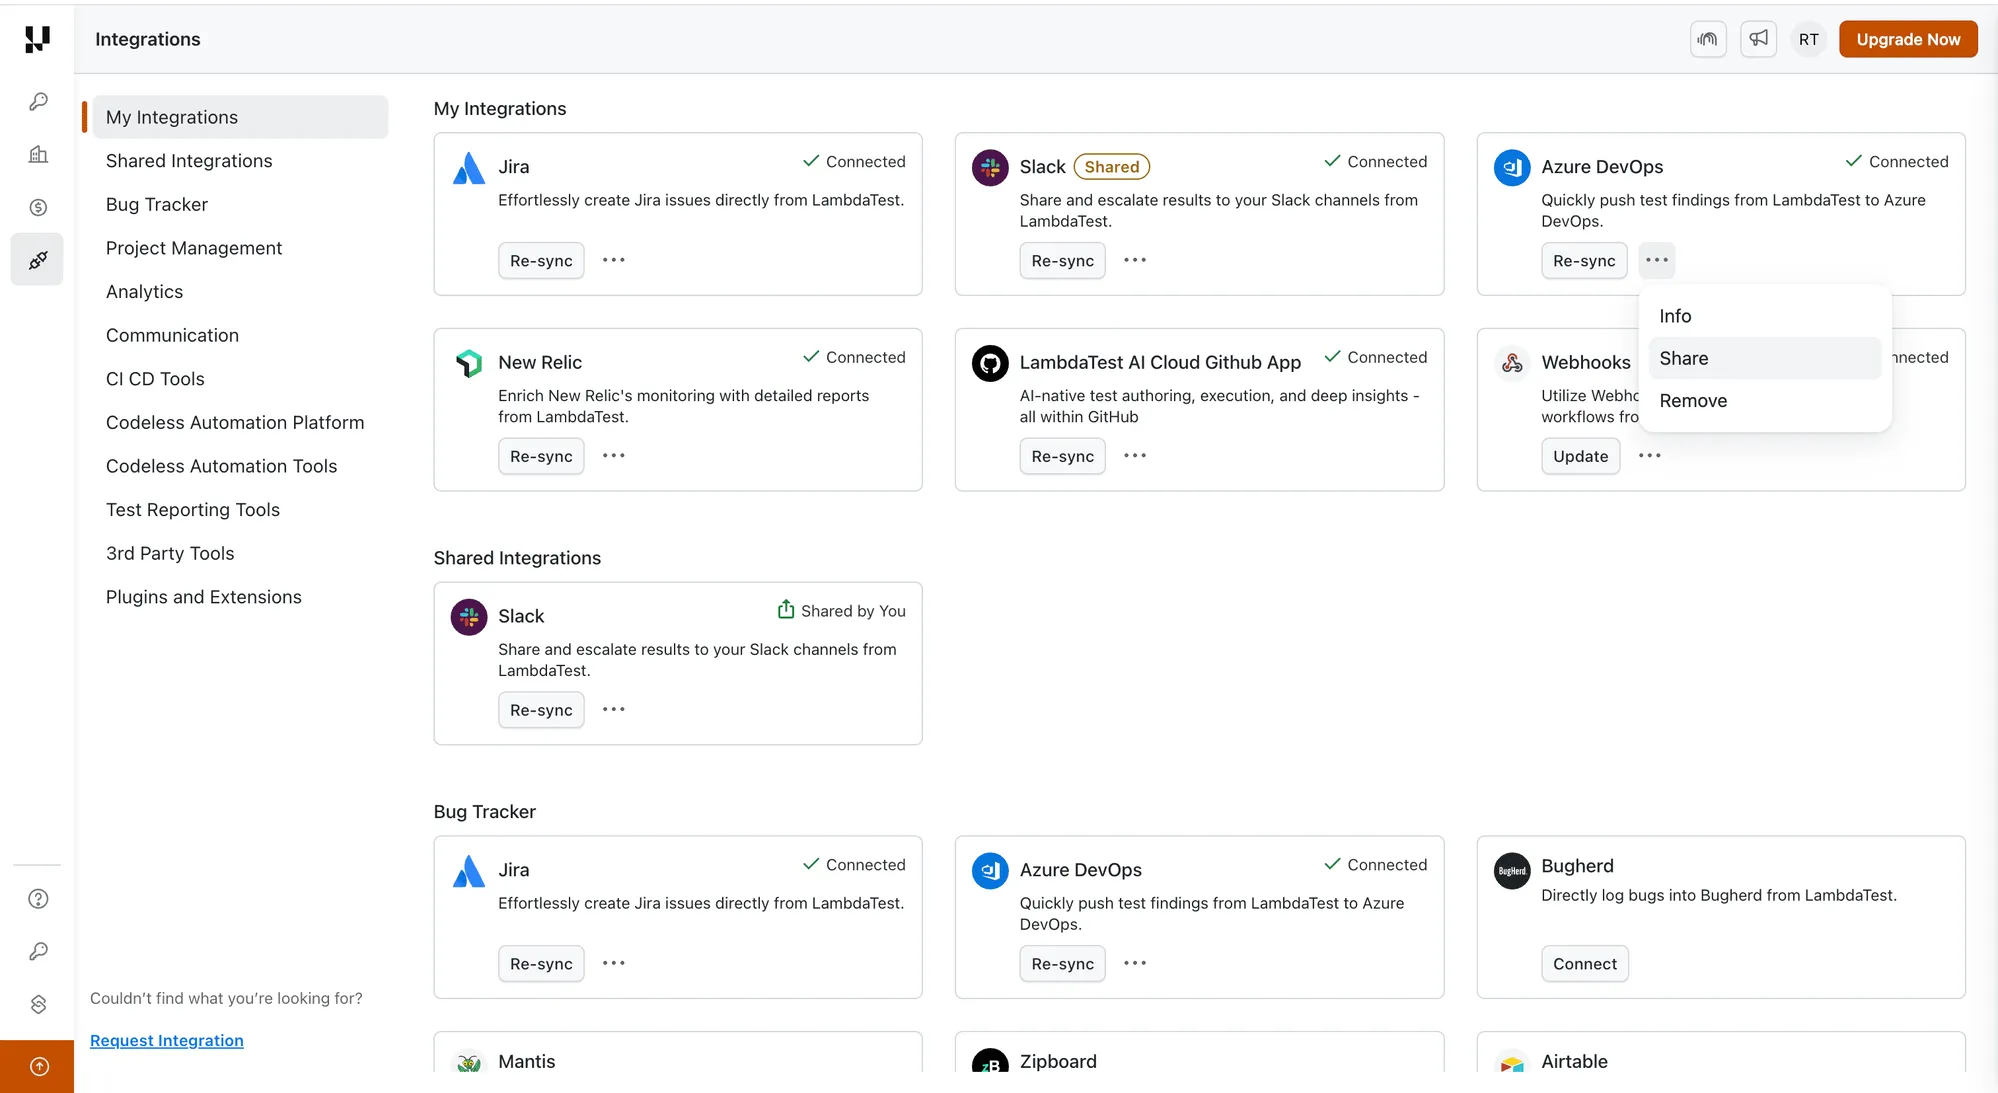
Step 2: You'll see an Azure DevOps plugin shared successfully confirmation. The card now shows a Shared badge and also appears under Shared Integrations marked Shared by You.
What your teammates see: the shared Azure DevOps connection shows up in their Shared Integrations list as Shared by <admin name>, with an Info button to view its details. Members can use the connection but can't manage it — that stays with the admin owner.
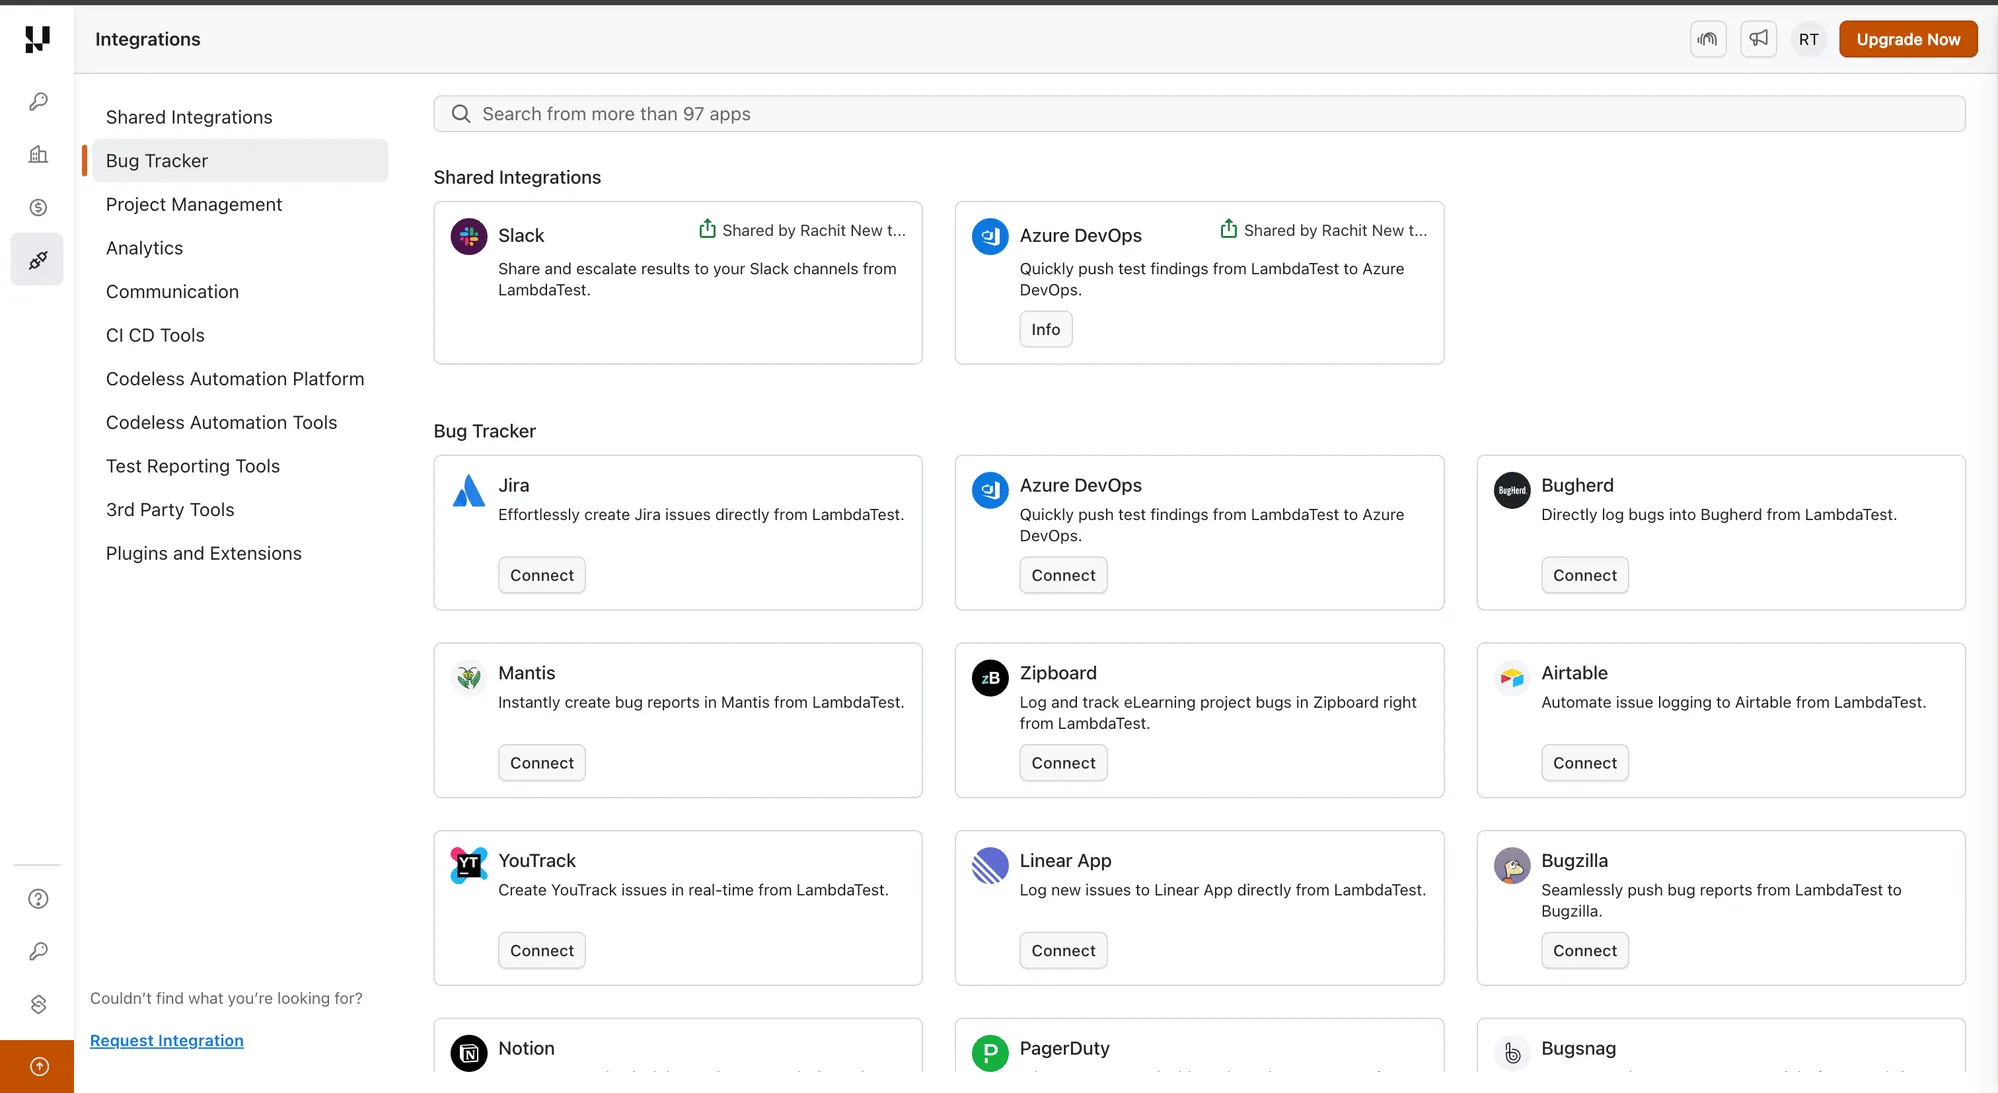
To stop sharing: open the ••• menu on the Azure DevOps card and select Unshare. You'll see an Azure DevOps plugin unshared successfully message, and members will no longer have access to the connection.
View Connection Details (Info)
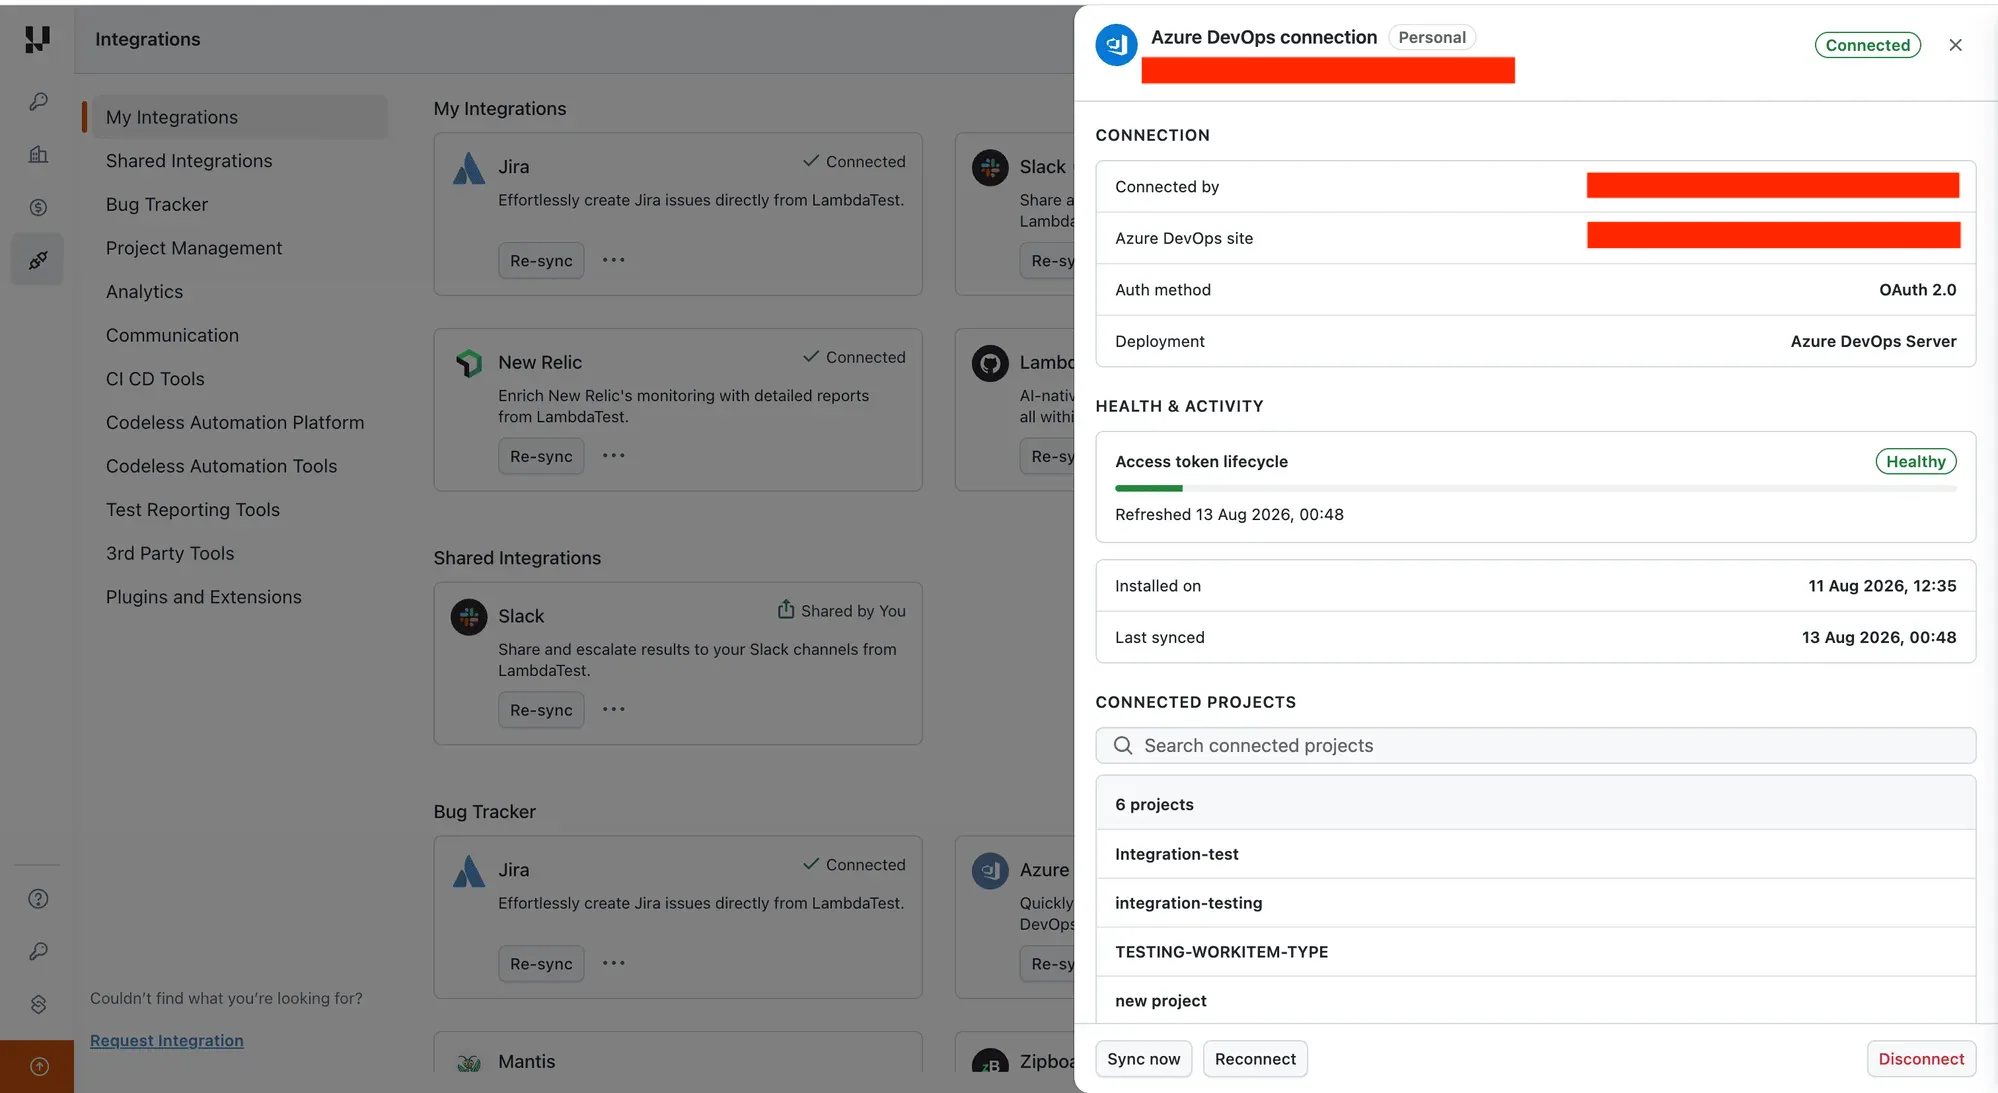
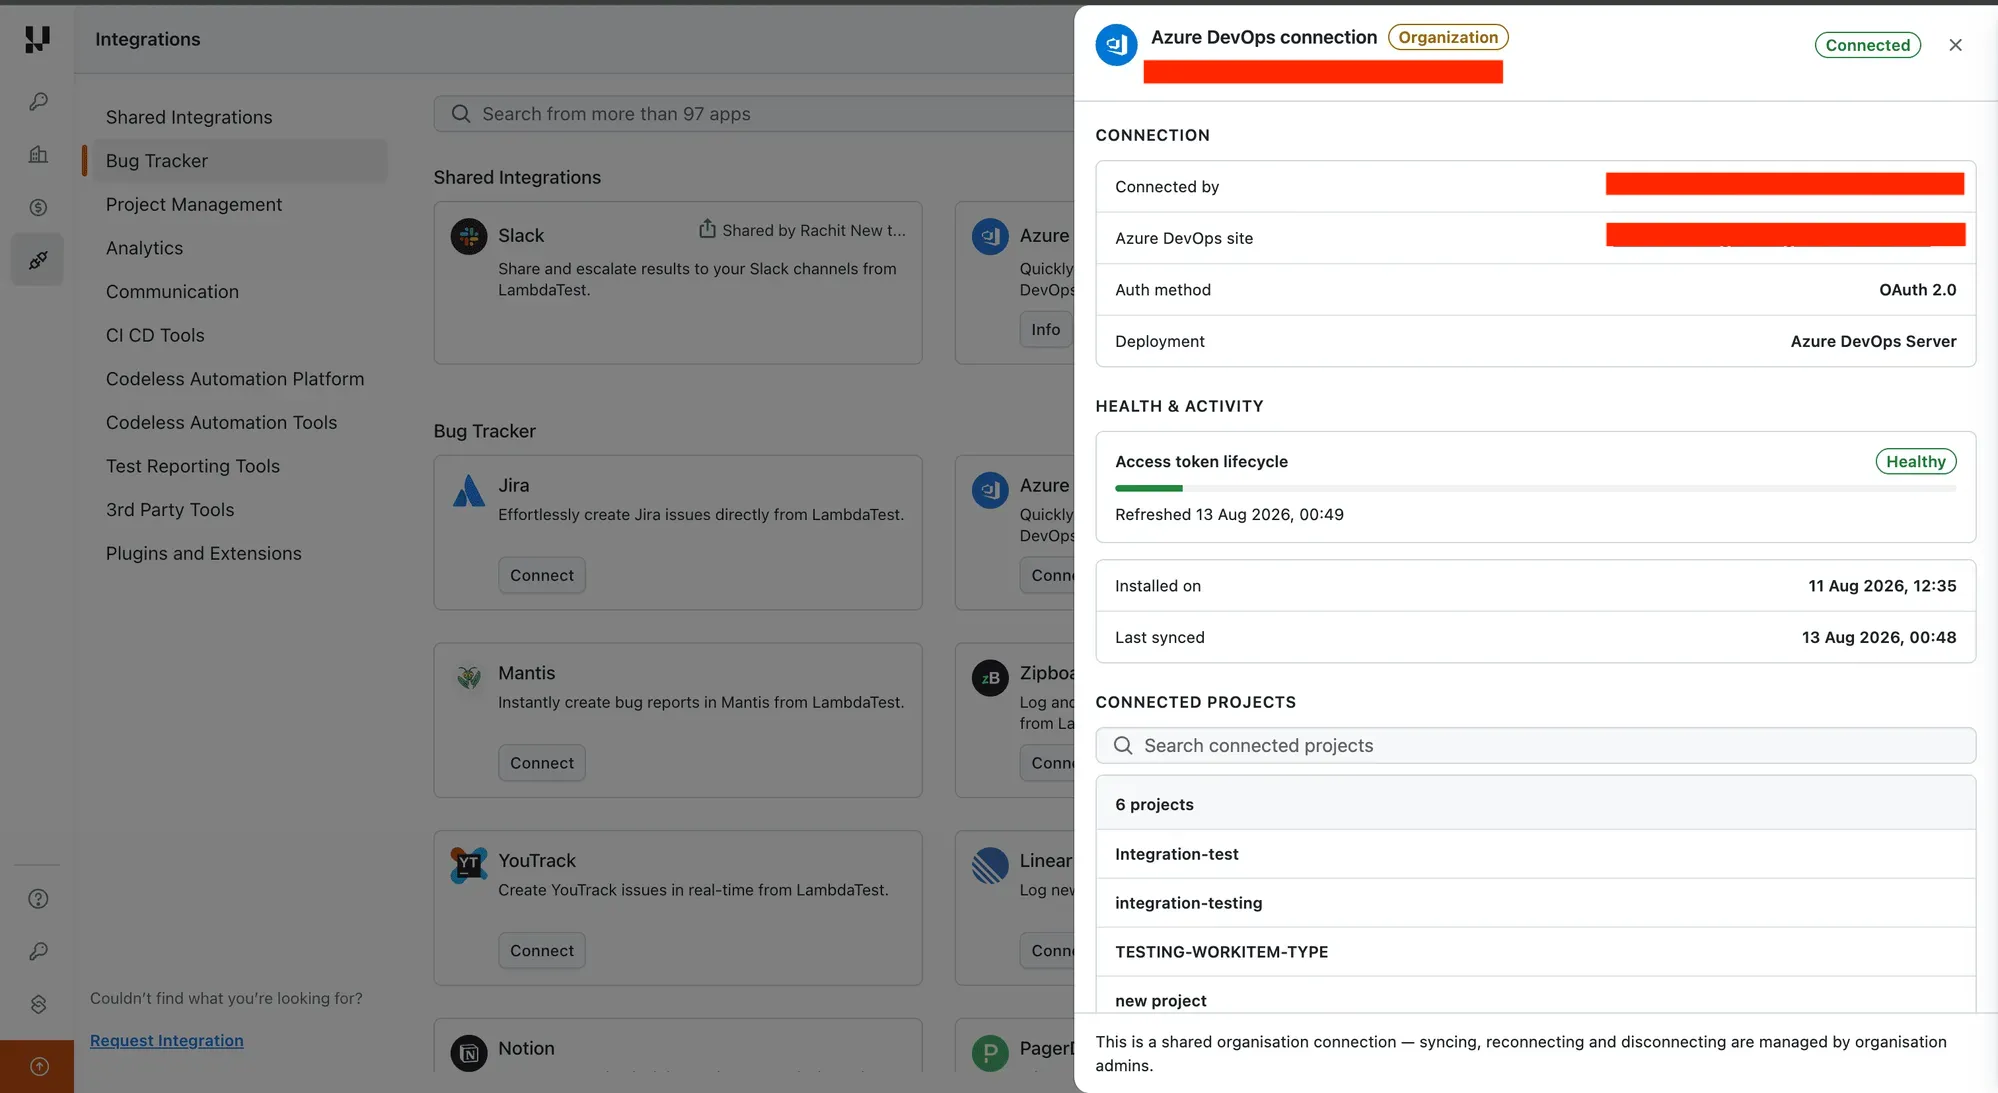
To review a connection's health and setup, open the ••• menu and select Info (members can use the Info button on the shared card). The connection drawer shows:
- Connection — who connected it, the connected Azure DevOps account, organization/site, auth method, and deployment (Azure DevOps Services or Server).
- Health & Activity — access-token lifecycle (with the last refresh time), installed-on date, and last-synced time.
- Connected projects — the Azure DevOps projects available through this connection.
A badge at the top shows whether it's a Personal connection (your own install) or an Organization connection (a shared one).
How To Log Your First Bug Through Azure DevOps Integration?
Step 1: Go for any of the test from the left navigation menu. For demo, we will be taking "Real Time Testing" option.
Step 2: Present a URL of the web-app you need to test in the dialog box. After that, select any configuration for browser and operating system of your choice & hit 'Start'.
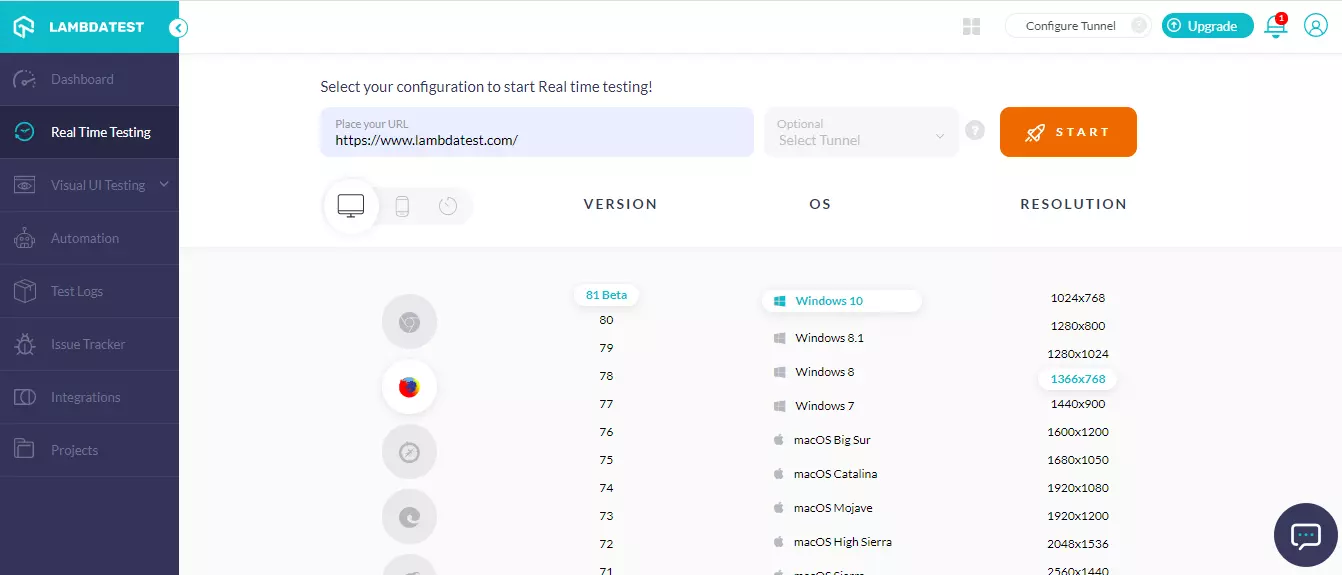
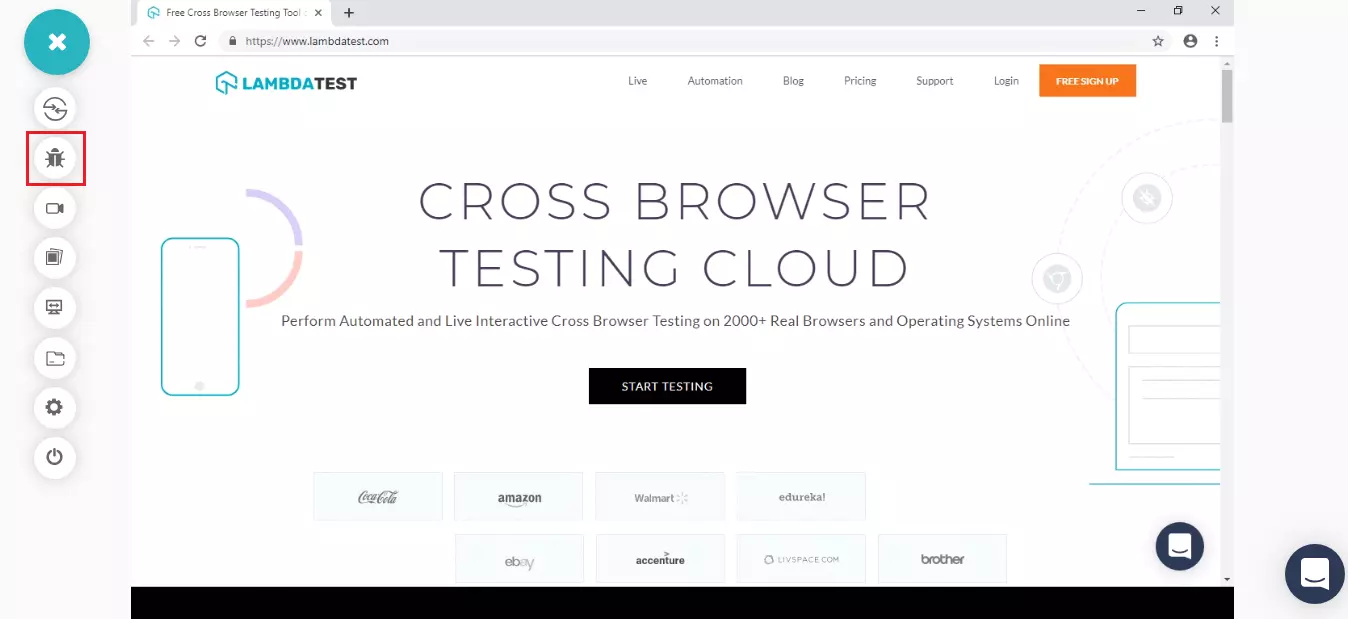
Step 3: After the VM is launched and operable. You can perform testing on your web-app for finding bugs. If a bug gets revealed, then you need to click on the Bug icon from the left panel for capturing a screenshot of the same. We have highlighted that option with red in the below image.
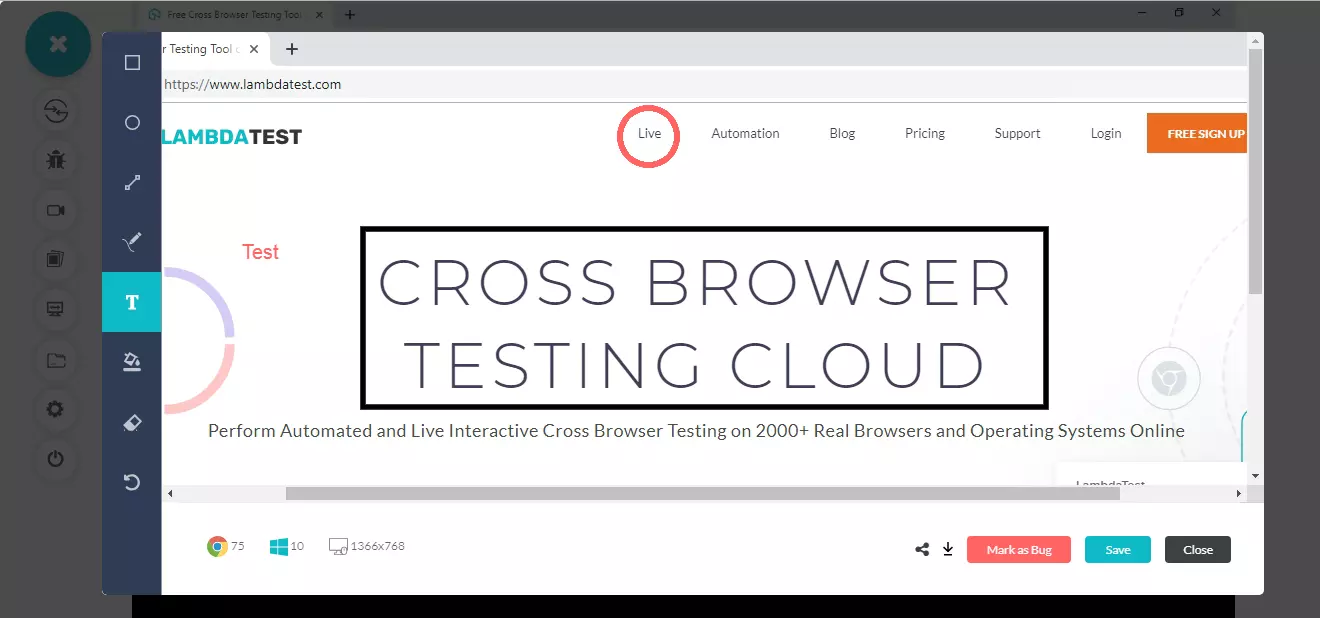
Step 4: After a screenshot is captured, you can annotate any issue or a task with an in-built image editor. Once you are done highlighting the bug, click on the button that says "Mark as Bug".
Step 5: Once you click on "Mark as Bug" button a form would open up. Fill the fields as per your requirement.
- You can choose out of your 'Projects', for logging your UI observation.
- You can select the appropriate 'Team' to which you would like to share the UI observation.
- You can assign it to a colleague by populating the 'Member' field.
- You can specify the number of Iteration.
- You can choose a the type of observation by selecting a 'Work Type'.
- You can provide a 'Title' when pushing the screenshot.
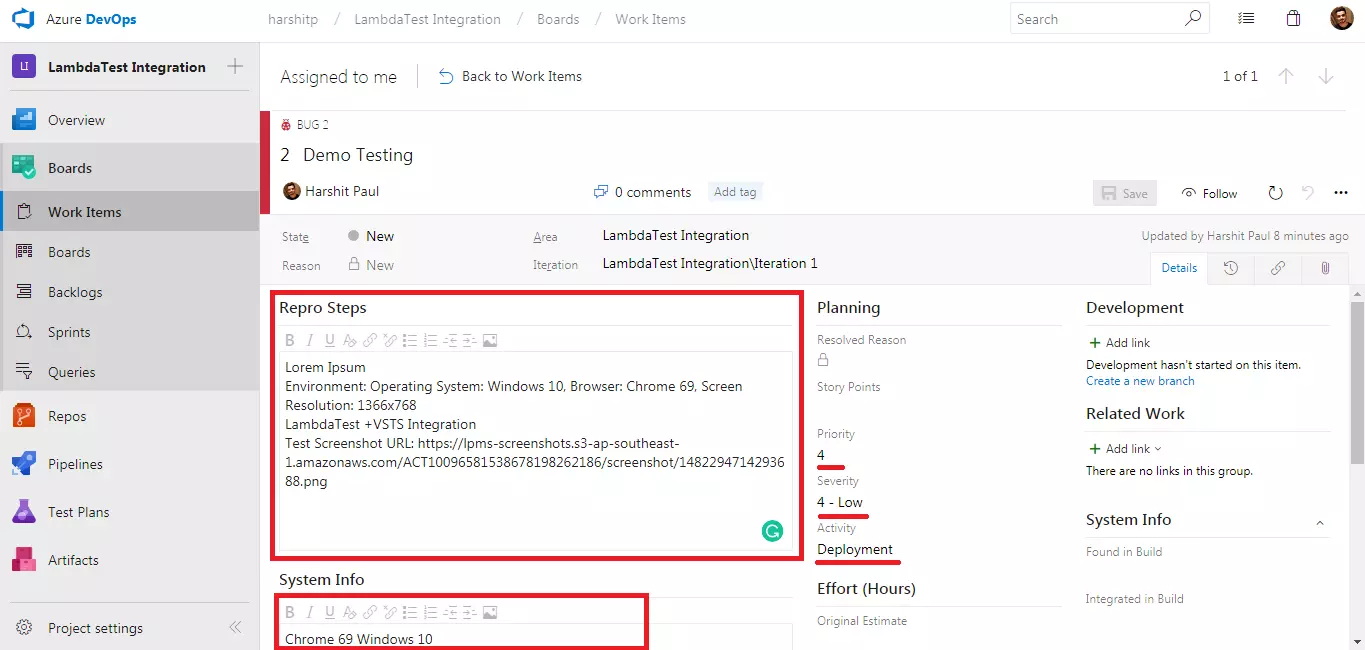
- You can also provide the steps to reproduce in the 'Repro Steps' field.
- Specify the additional information in the 'System info'.
- Select a Priority & 'Severity' of the UI observation.
- Choose the concerned area from the list of 'Activity'
- You also get to post a 'Description' to help relate the cause of the issue or the task.
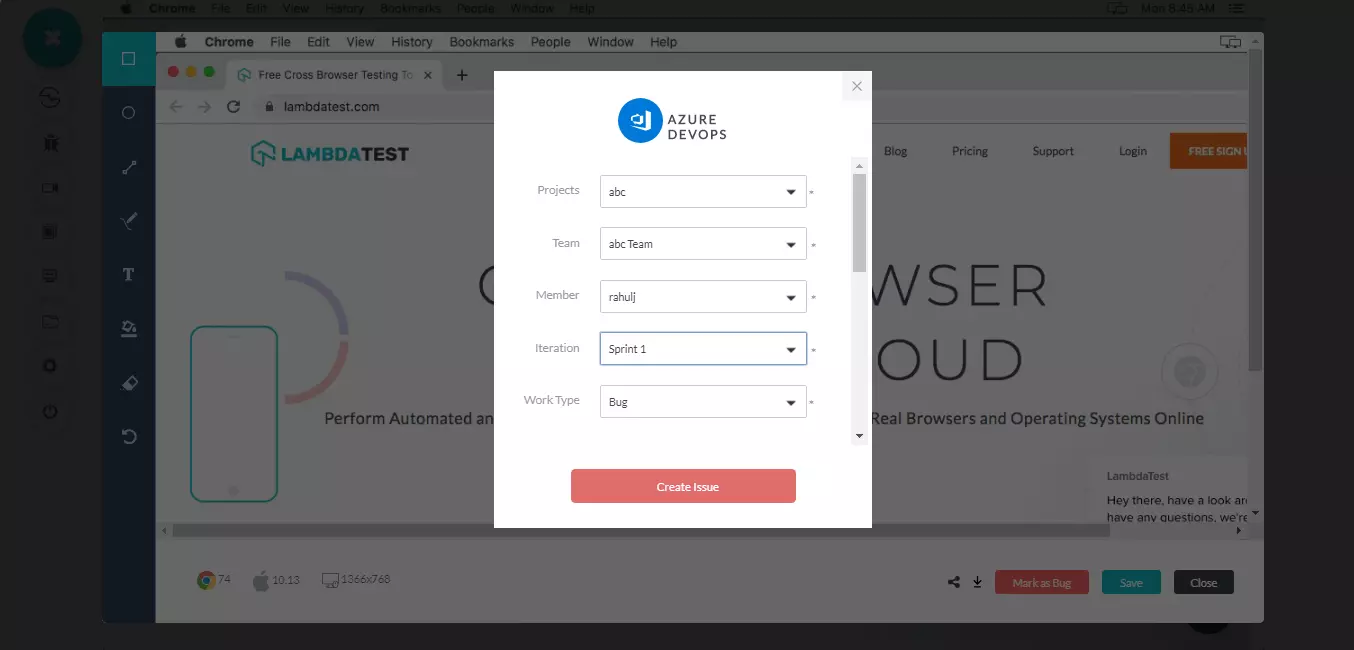
Step 6: Click on "Create Bug" & observe it being successfully marked through a single click effort. Once you hit the button, you will get prompt messages on top of your Virtual Machine indicating the progress of bug logging. You will get a prompt message in few seconds mentioning "Bug successfully marked" indicating that the UI observation has been pushed to your project.

Step 7: Visit your Azure DevOps project. You will be able to notice the logged issue right away by navigating to Boards from the left navigation menu and heading to the Work Items.
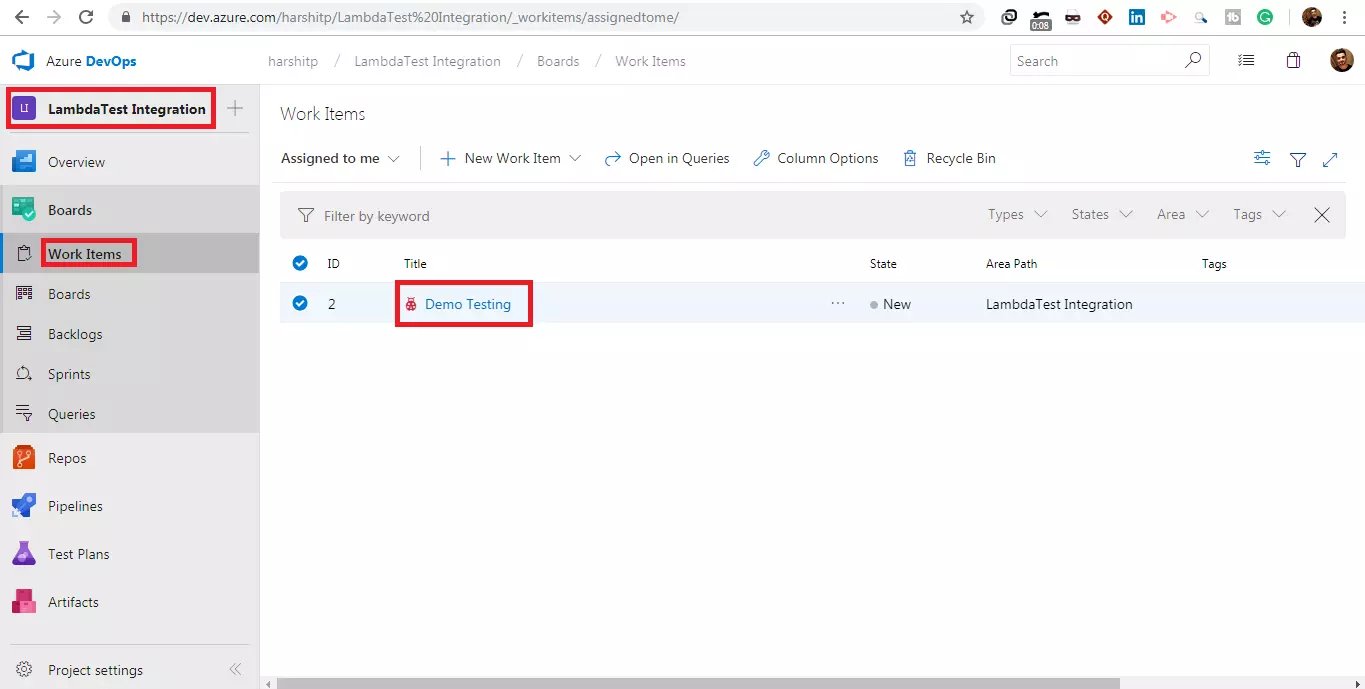
Step 8: Click on the Title to open the details. All the data you provided through TestMu AI would already be presented in it. TestMu AI automatically includes test environment details and related screenshots in your work item on the respective project.
How To Remove Azure DevOps Integration?
You can work with one integration at a time. So if you would want to integrate to a similar 3rd party application, then you would have to remove your current integration. Here is how you can do that.
Step 1: Login to your TestMu AI account.
Step 2: Select 'Settings' from the left navigation menu bar & click on 'Integrations'. This will guide you to a screen where you will find 3rd party applications, available to integrate with your TestMu AI account.
Step 3: Under My Integrations, find the Azure DevOps card. Click the ellipsis (•••) and select Remove.
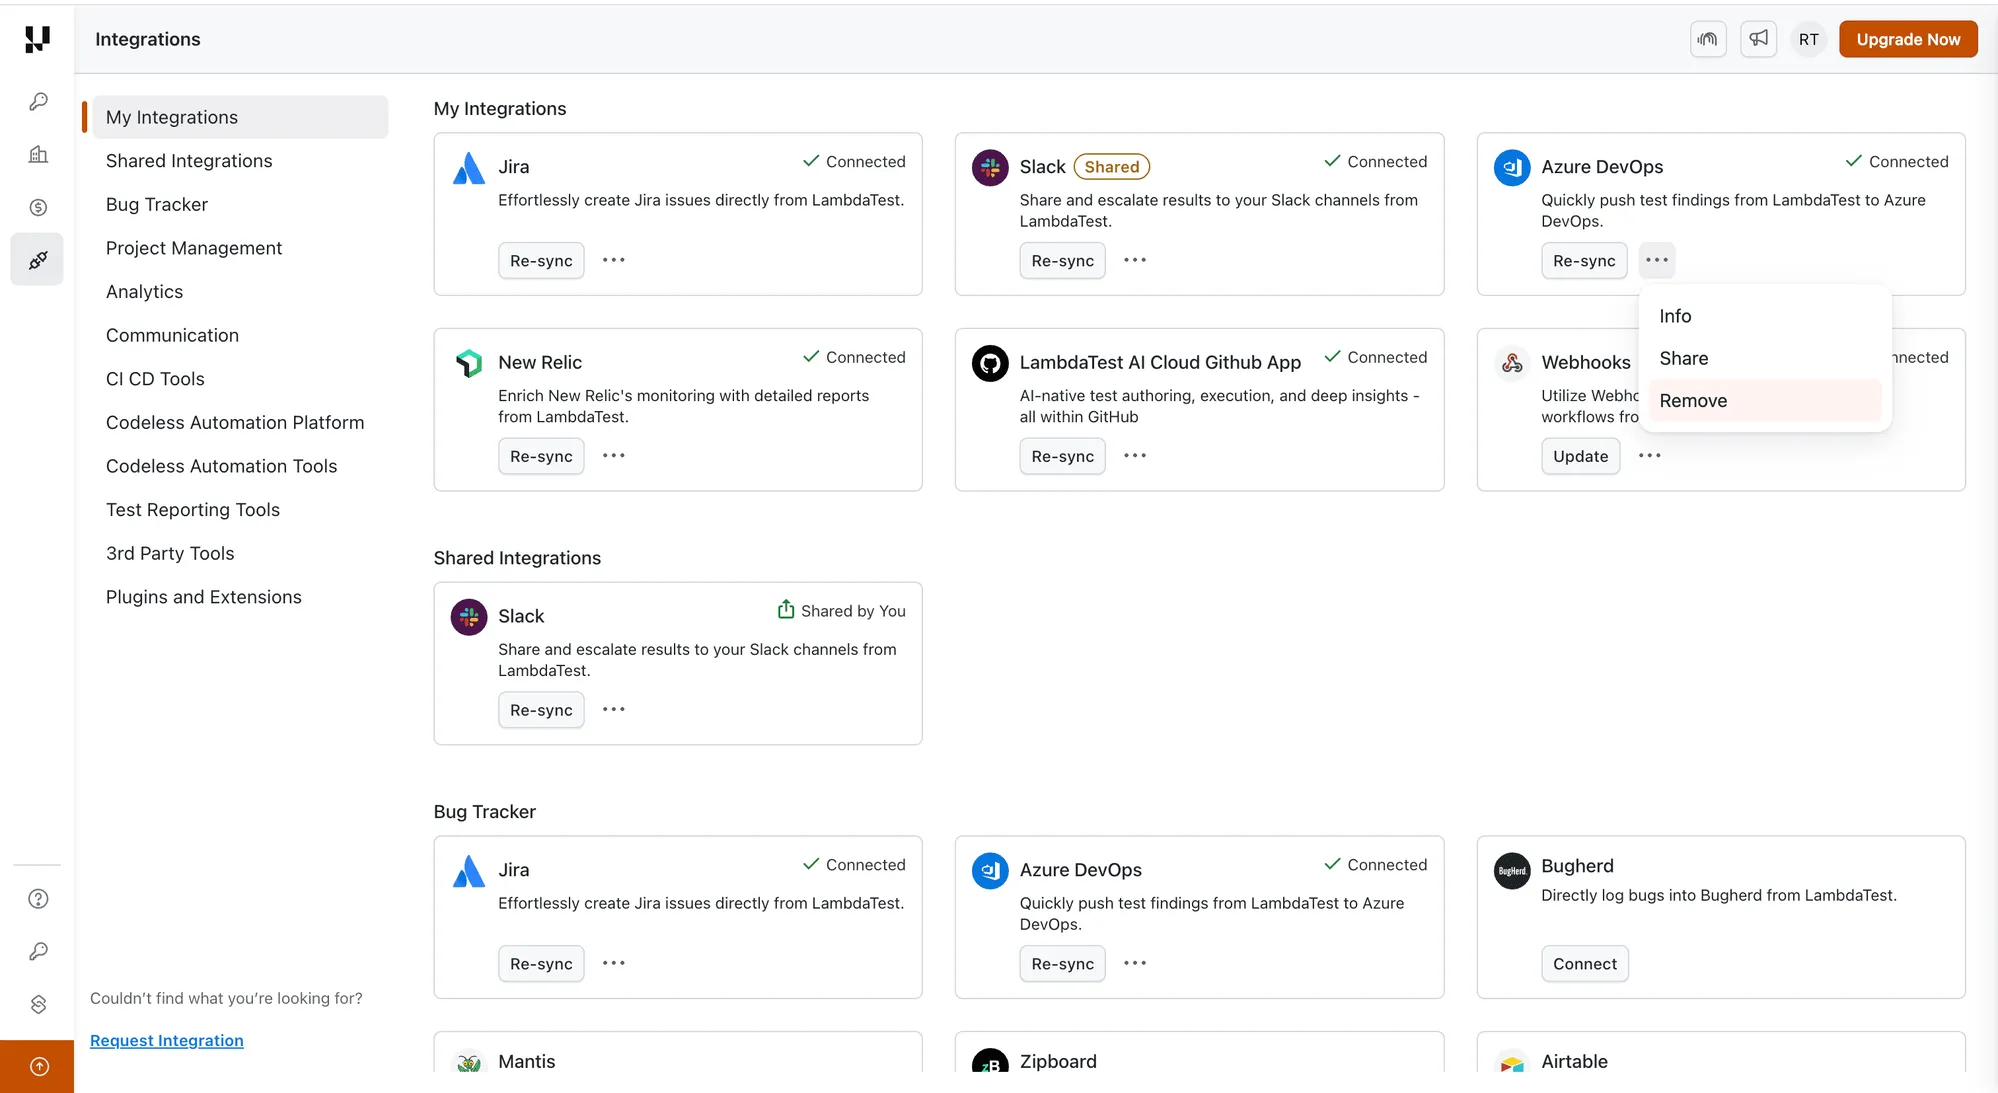
Step 4: You'll see a You have successfully uninstalled Azure DevOps confirmation, and the Azure DevOps card returns to the Connect state.
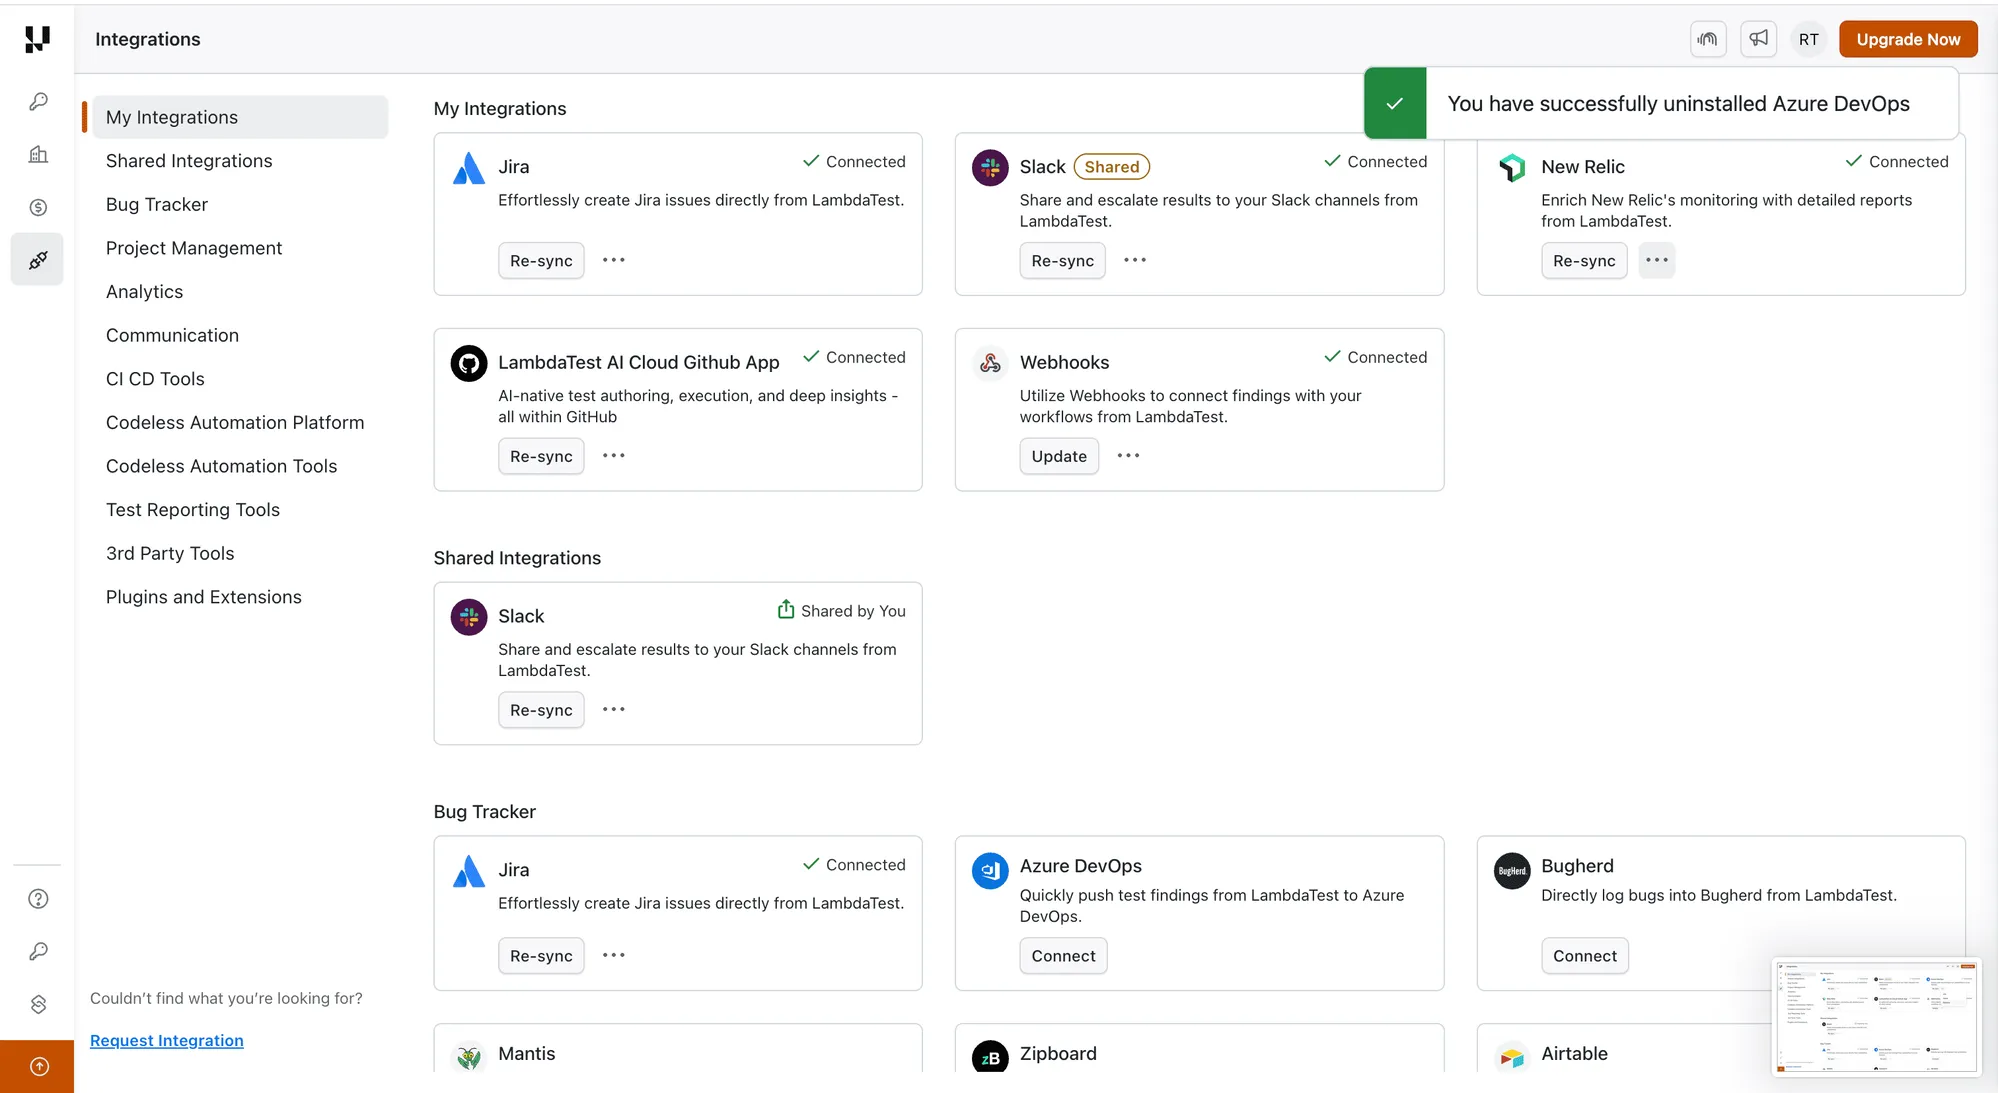
If the connection is currently shared with your organization, Unshare it first. Only the admin who installed the connection can remove it.
That was all you need to know for TestMu AI + Azure DevOps Integration. Increase your productivity with our integrations. If you still have any questions for us, please feel free to let us know. Our experts are always available on chat to help you out with any roadblock regarding our product. Happy testing!


 Chat with Us