AI Test Case Generator
What is the AI Test Case Generator?
The AI Test Case Generator is an intelligent feature within TestMu AI Test Manager and KaneAI that allows users to convert various requirement formats (like text, PDFs, audio, videos, images, Jira tickets and more) into structured, contextual software test cases. It significantly accelerates the test case creation process while improving coverage and quality.
This feature is designed to save time, improve test coverage, and streamline the test design process for both manual and automated testing workflows.
Highlights
Conversation Layer
Refine, correct, expand, and restructure your AI-generated test scenarios and test cases using natural language — no manual editing required. The Conversation Layer brings a chat-driven workflow directly into your generation session, letting you iterate in real time without starting over.
- Natural language control — Describe changes in plain English, and the AI applies them instantly.
- Live streaming updates — Watch scenarios and test cases update in real time as the AI processes your request.
- Precise targeting — Use
@references to target specific scenarios or test cases for modification. - Context-aware — The AI retains your full session context including uploaded files, linked issues, and prior instructions.
- File-based refinement — Upload updated specs or requirements mid-session and ask the AI to fill coverage gaps.
Custom Instructions
Custom instructions allow you to define persistent guidelines that the AI follows during test case generation. These instructions ensure that generated test cases align with your team's testing standards, naming conventions, and quality requirements.
When you provide custom instructions, they are included as additional context alongside your prompt and requirements. The AI uses these instructions to shape the structure, language, coverage, and style of the generated test cases.
Custom instructions are supported at two levels:
| Level | Scope | Use Case |
|---|---|---|
| Project-Level | Applies to all generation sessions within a specific project | Project-specific conventions, domain terminology, or testing focus areas |
| Organization-Level | Applies across all projects in your organization | Company-wide testing standards, compliance requirements, or formatting guidelines |
When both levels are configured, the AI combines organization-level and project-level instructions, with project-level instructions taking precedence in case of conflicts.
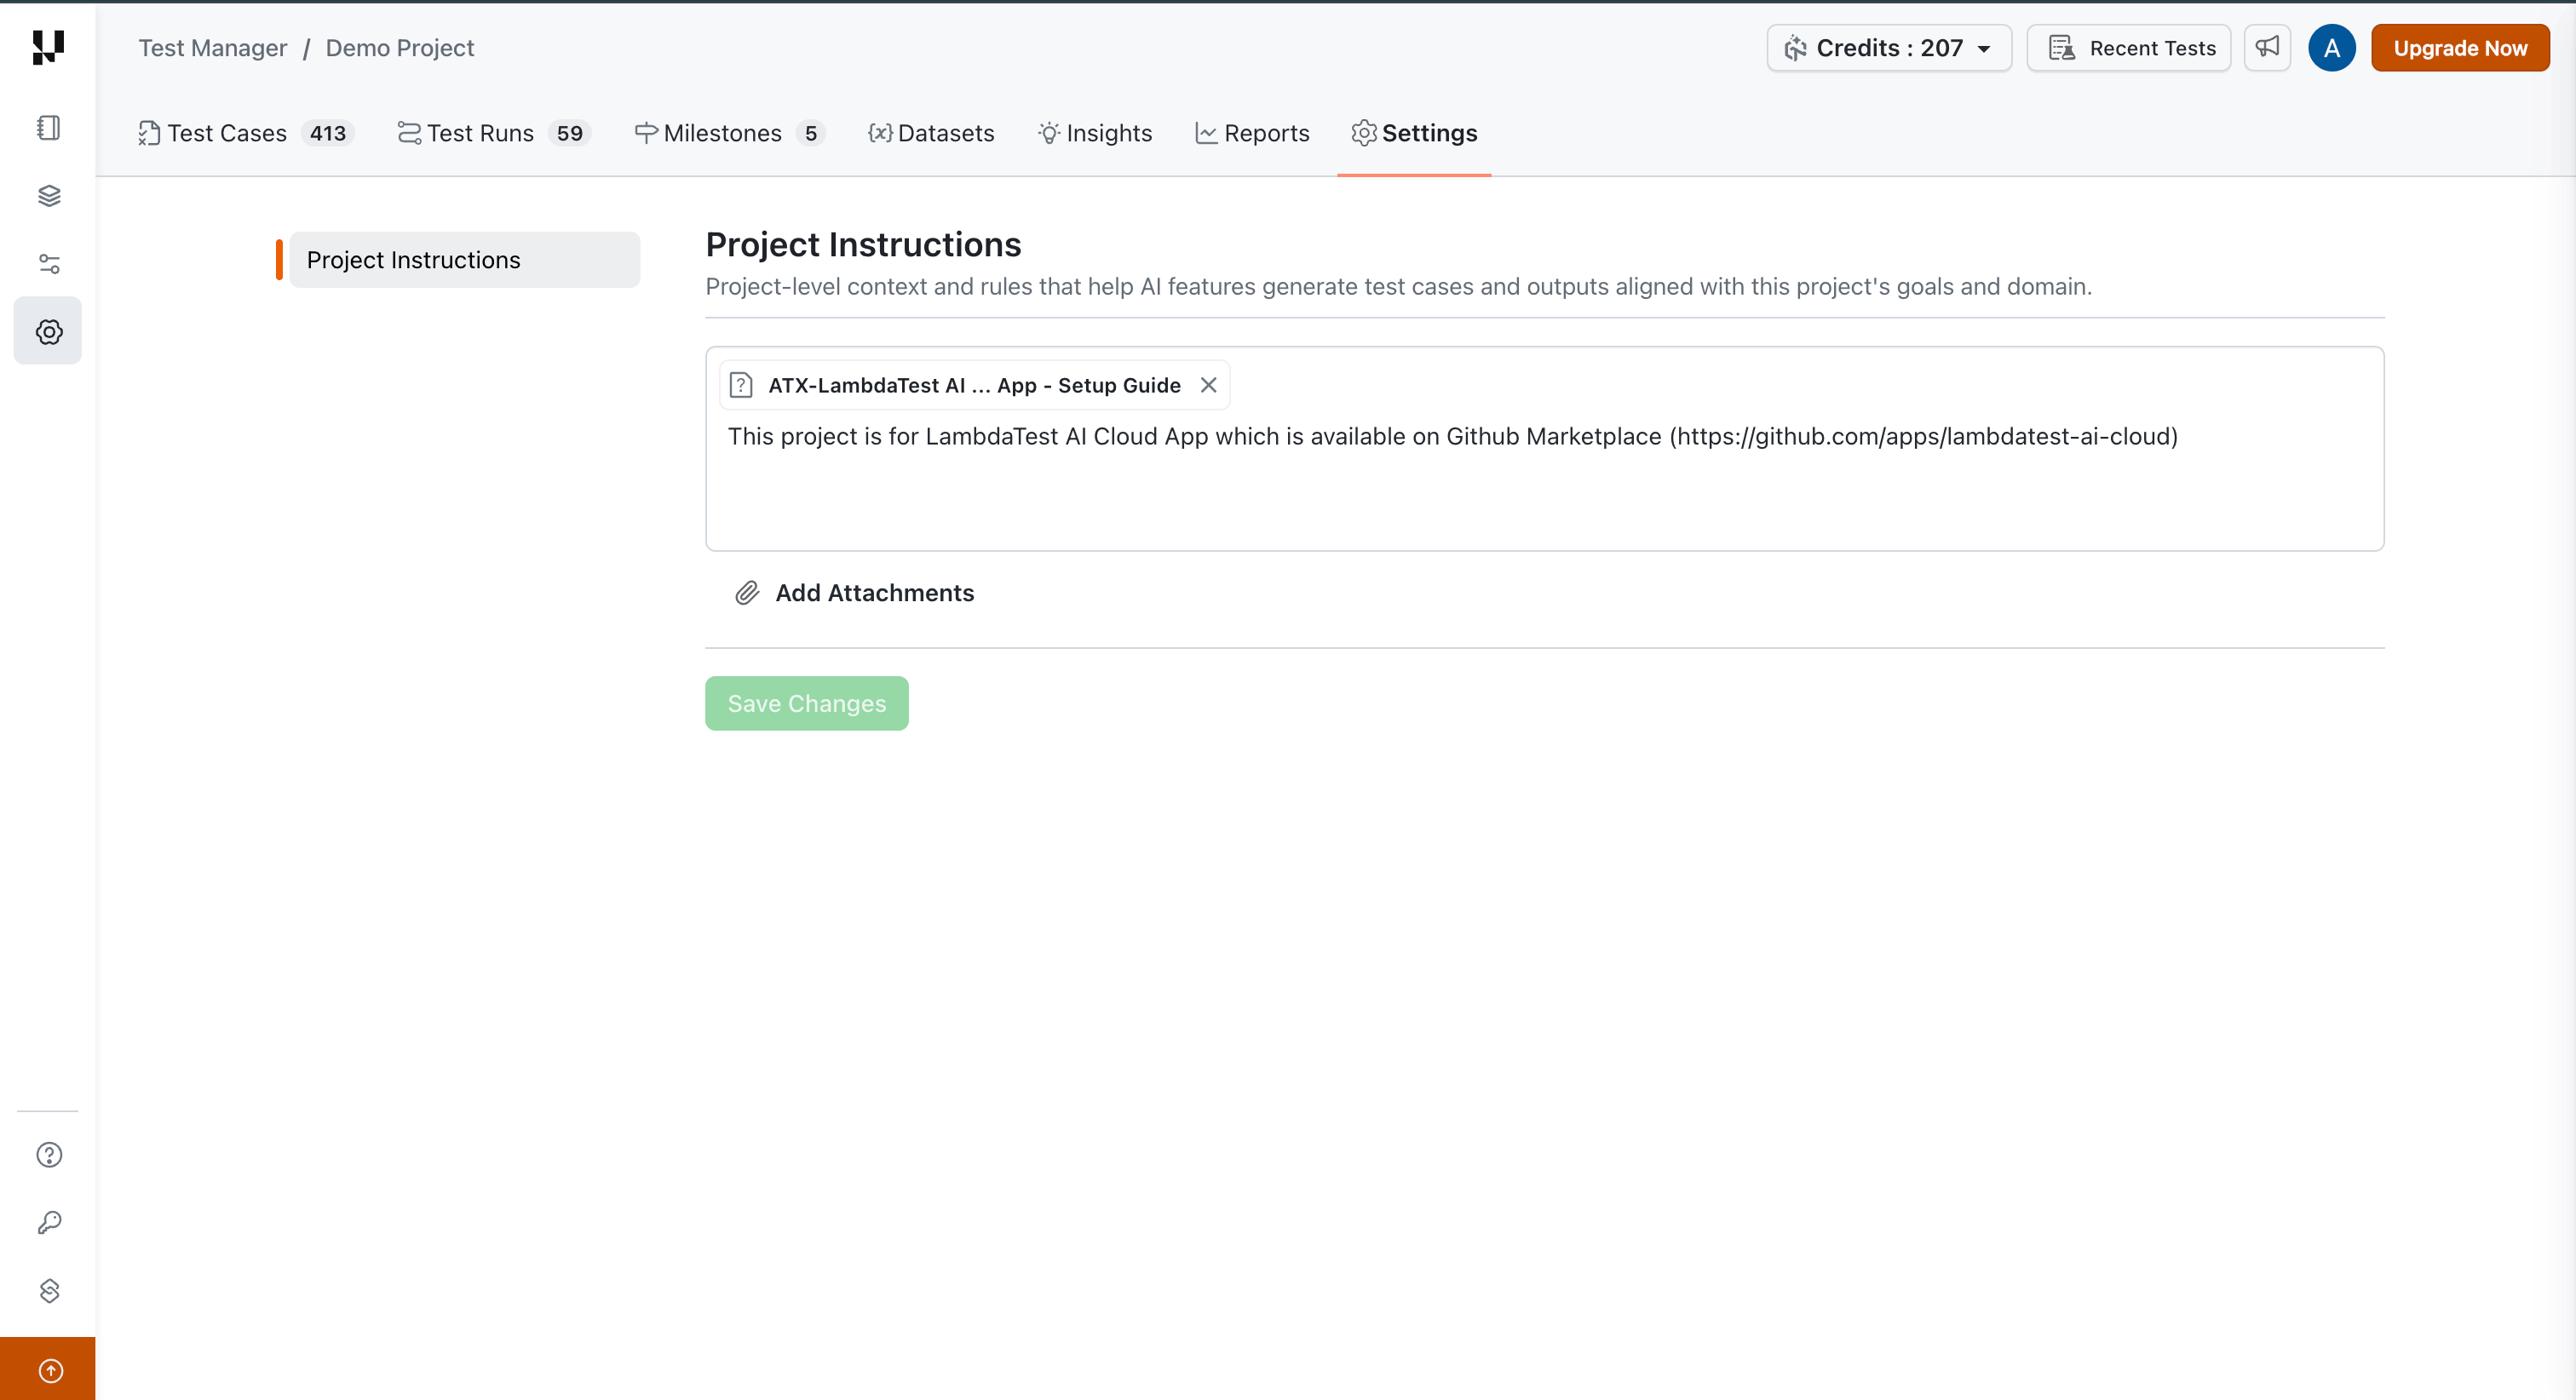
Project-Level Custom Instructions
Project-level instructions are specific to a single project and are applied whenever test cases are generated within that project.
To configure project-level custom instructions:
- Navigate to your project in Test Manager.
- Open the project settings.
- Locate the Project Instructions section.
- Enter your instructions in the text field.
- Save your changes.
Example project-level instructions:
- All test cases must include preconditions for user authentication state.
- Use the naming convention: [Module]_[Feature]_[Scenario]_[Positive/Negative].
- Include API response codes in expected results for all API-related test cases.
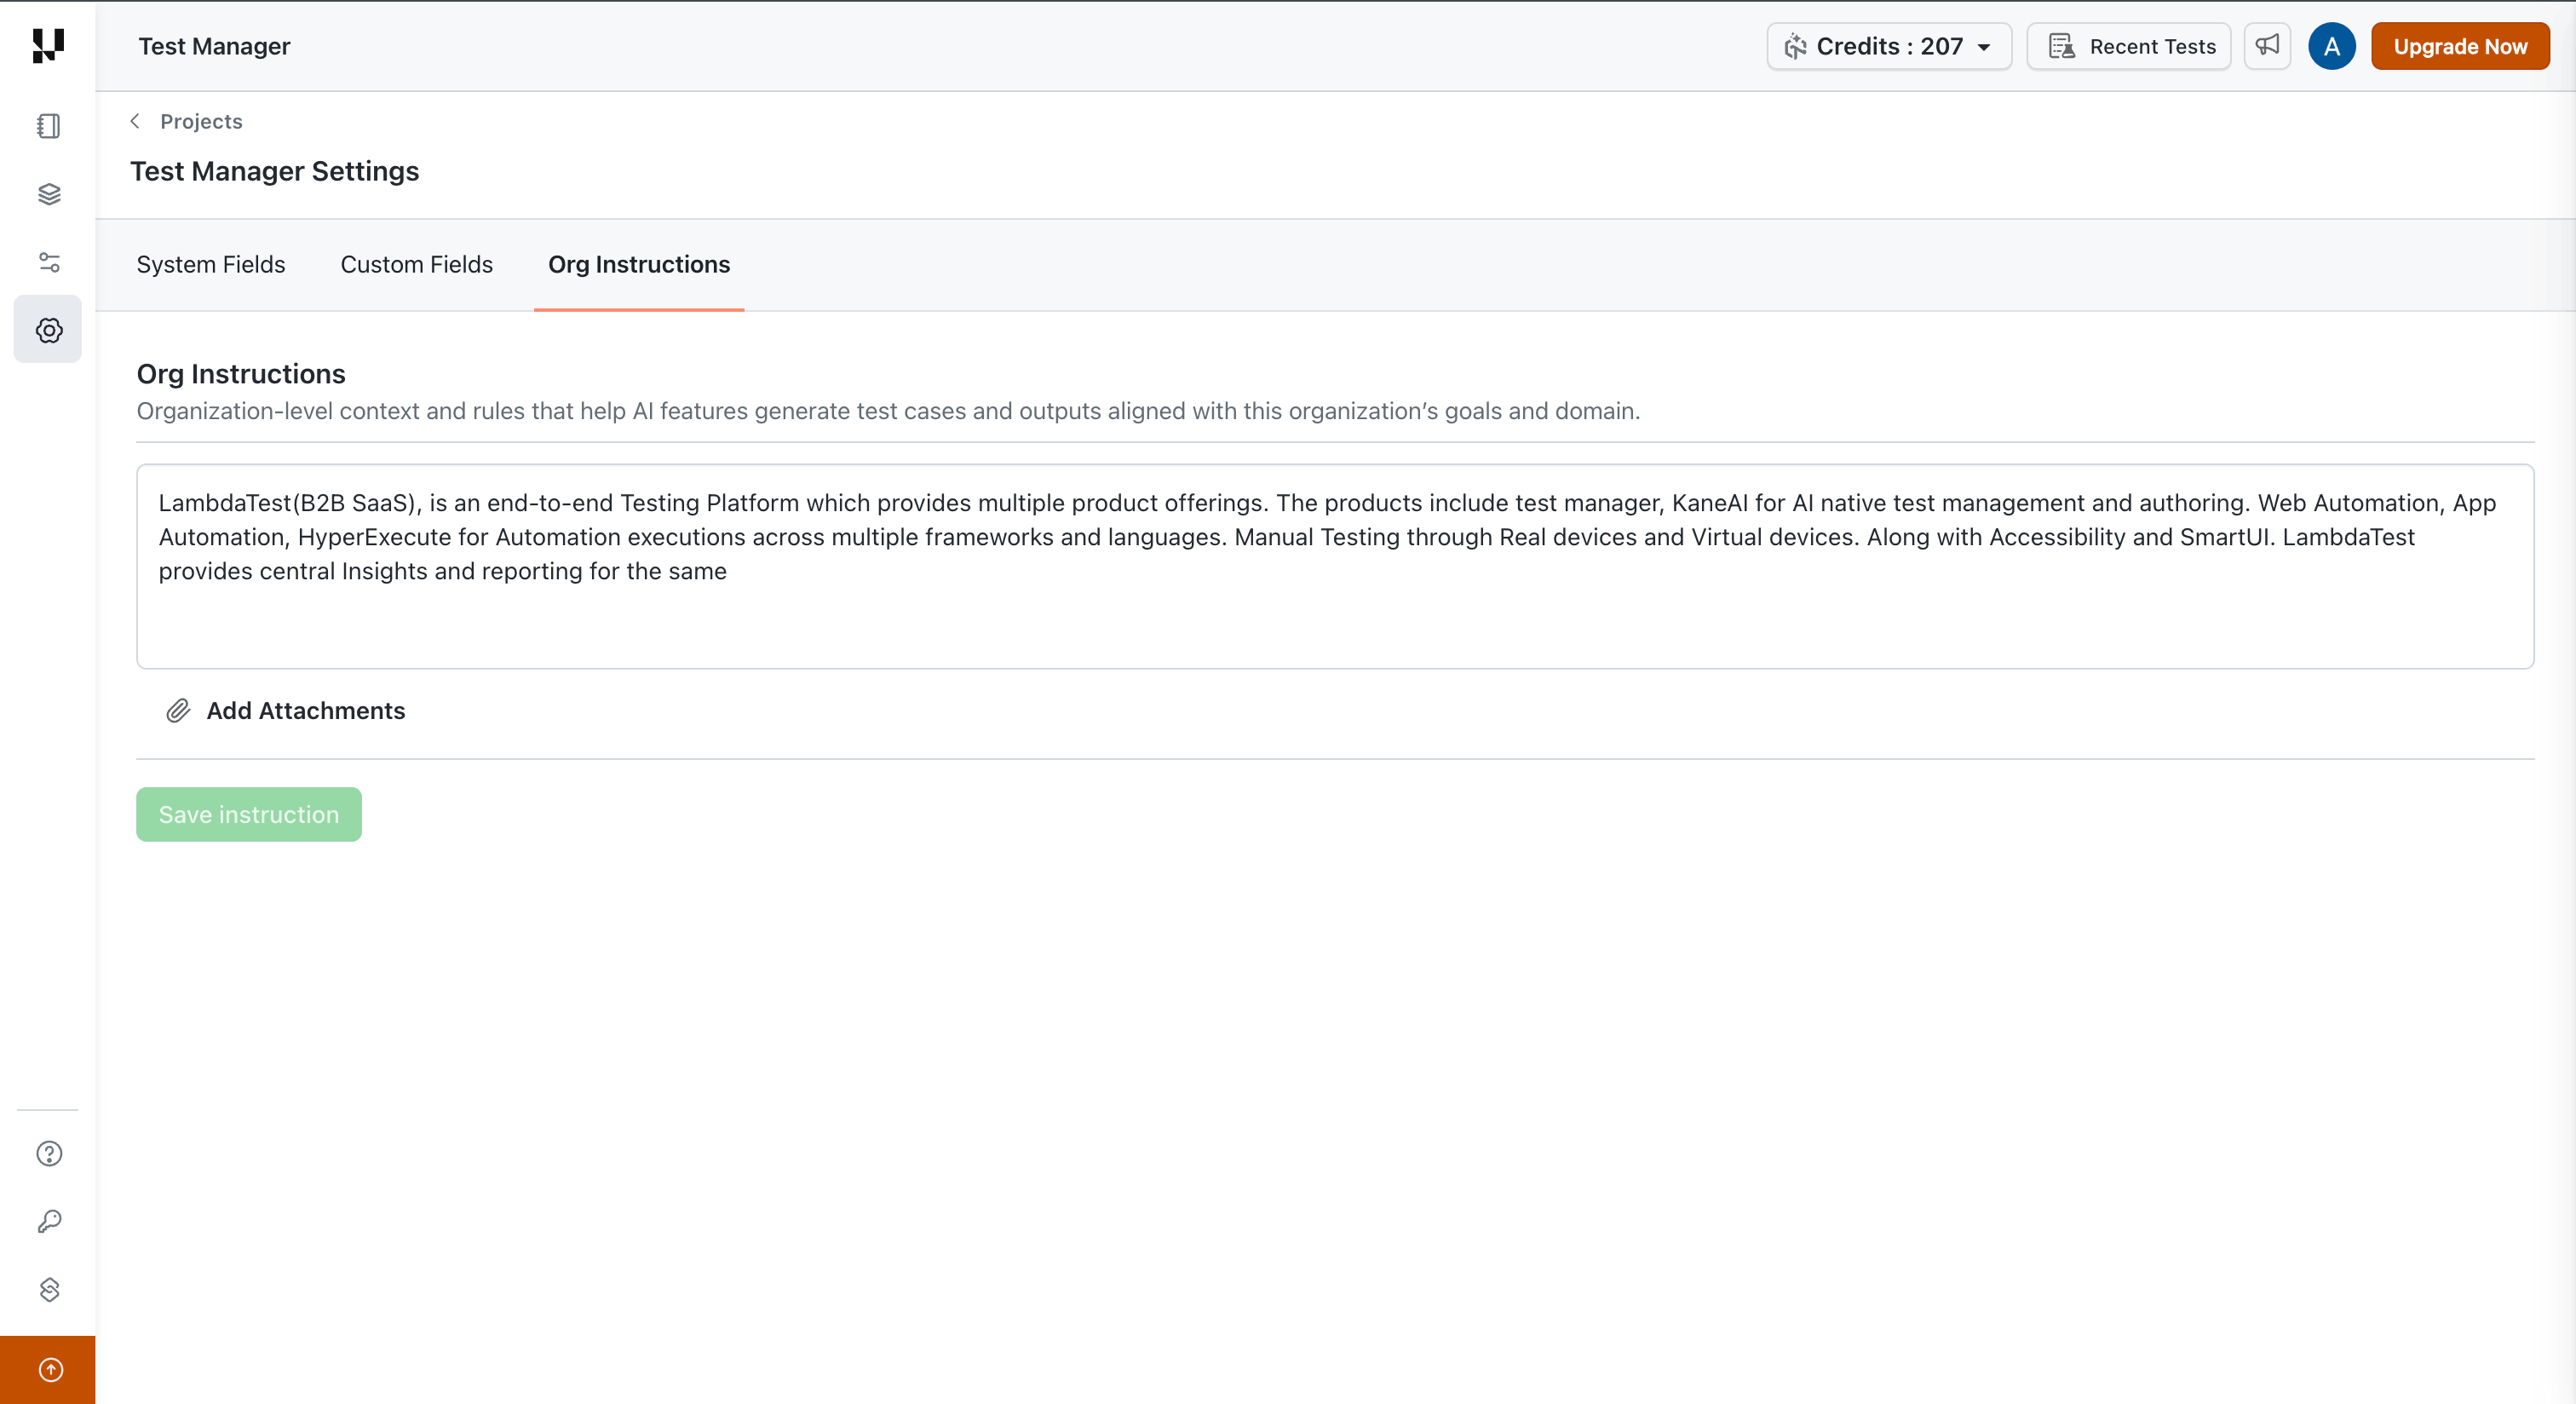
Organization-Level Custom Instructions
Organization-level instructions apply globally across all projects within your organization. They are ideal for enforcing company-wide standards.
To configure organization-level custom instructions:
- Navigate to the Settings in Test Manager sidebar.
- Locate the Org Instructions configuration section.
- Enter your organization-wide instructions.
- Save your changes.
Example organization-level instructions:
- Include accessibility testing considerations where applicable.
- Severity and priority must be assigned to every test case.
- Test data should use anonymized values, never production data.
Smart Context: Memory Layer
The Memory Layer is an intelligent context retrieval system that enhances AI test case generation by leveraging your existing test case repository. It ensures that newly generated test cases are aware of your current test coverage, avoid duplicates, and build upon your existing work.
How It Works
When you initiate a test case generation session, the following process occurs automatically:
- Input Analysis — The AI analyzes your prompt, requirements, and custom instructions.
- Context Retrieval — The system queries a vector database to retrieve the most relevant existing test cases from your test case repository.
- Context-Aware Generation — The retrieved content is embedded into the prompt sent to the AI, enabling it to generate test cases that are aware of your existing coverage, non-duplicative, and complementary to your current test suite.
Benefits
- Duplicate Prevention — The AI recognizes test cases that already exist in your repository and avoids regenerating them.
- Contextual Relevance — New test cases are informed by the language, structure, and patterns used in your existing test suite.
- Incremental Improvement — Each generation session builds upon your accumulated testing knowledge.
The Memory Layer operates automatically in the background, you can choose to enable or disable Memory enhancement feature before triggering a session.
Generate Test Cases: Step-by-Step
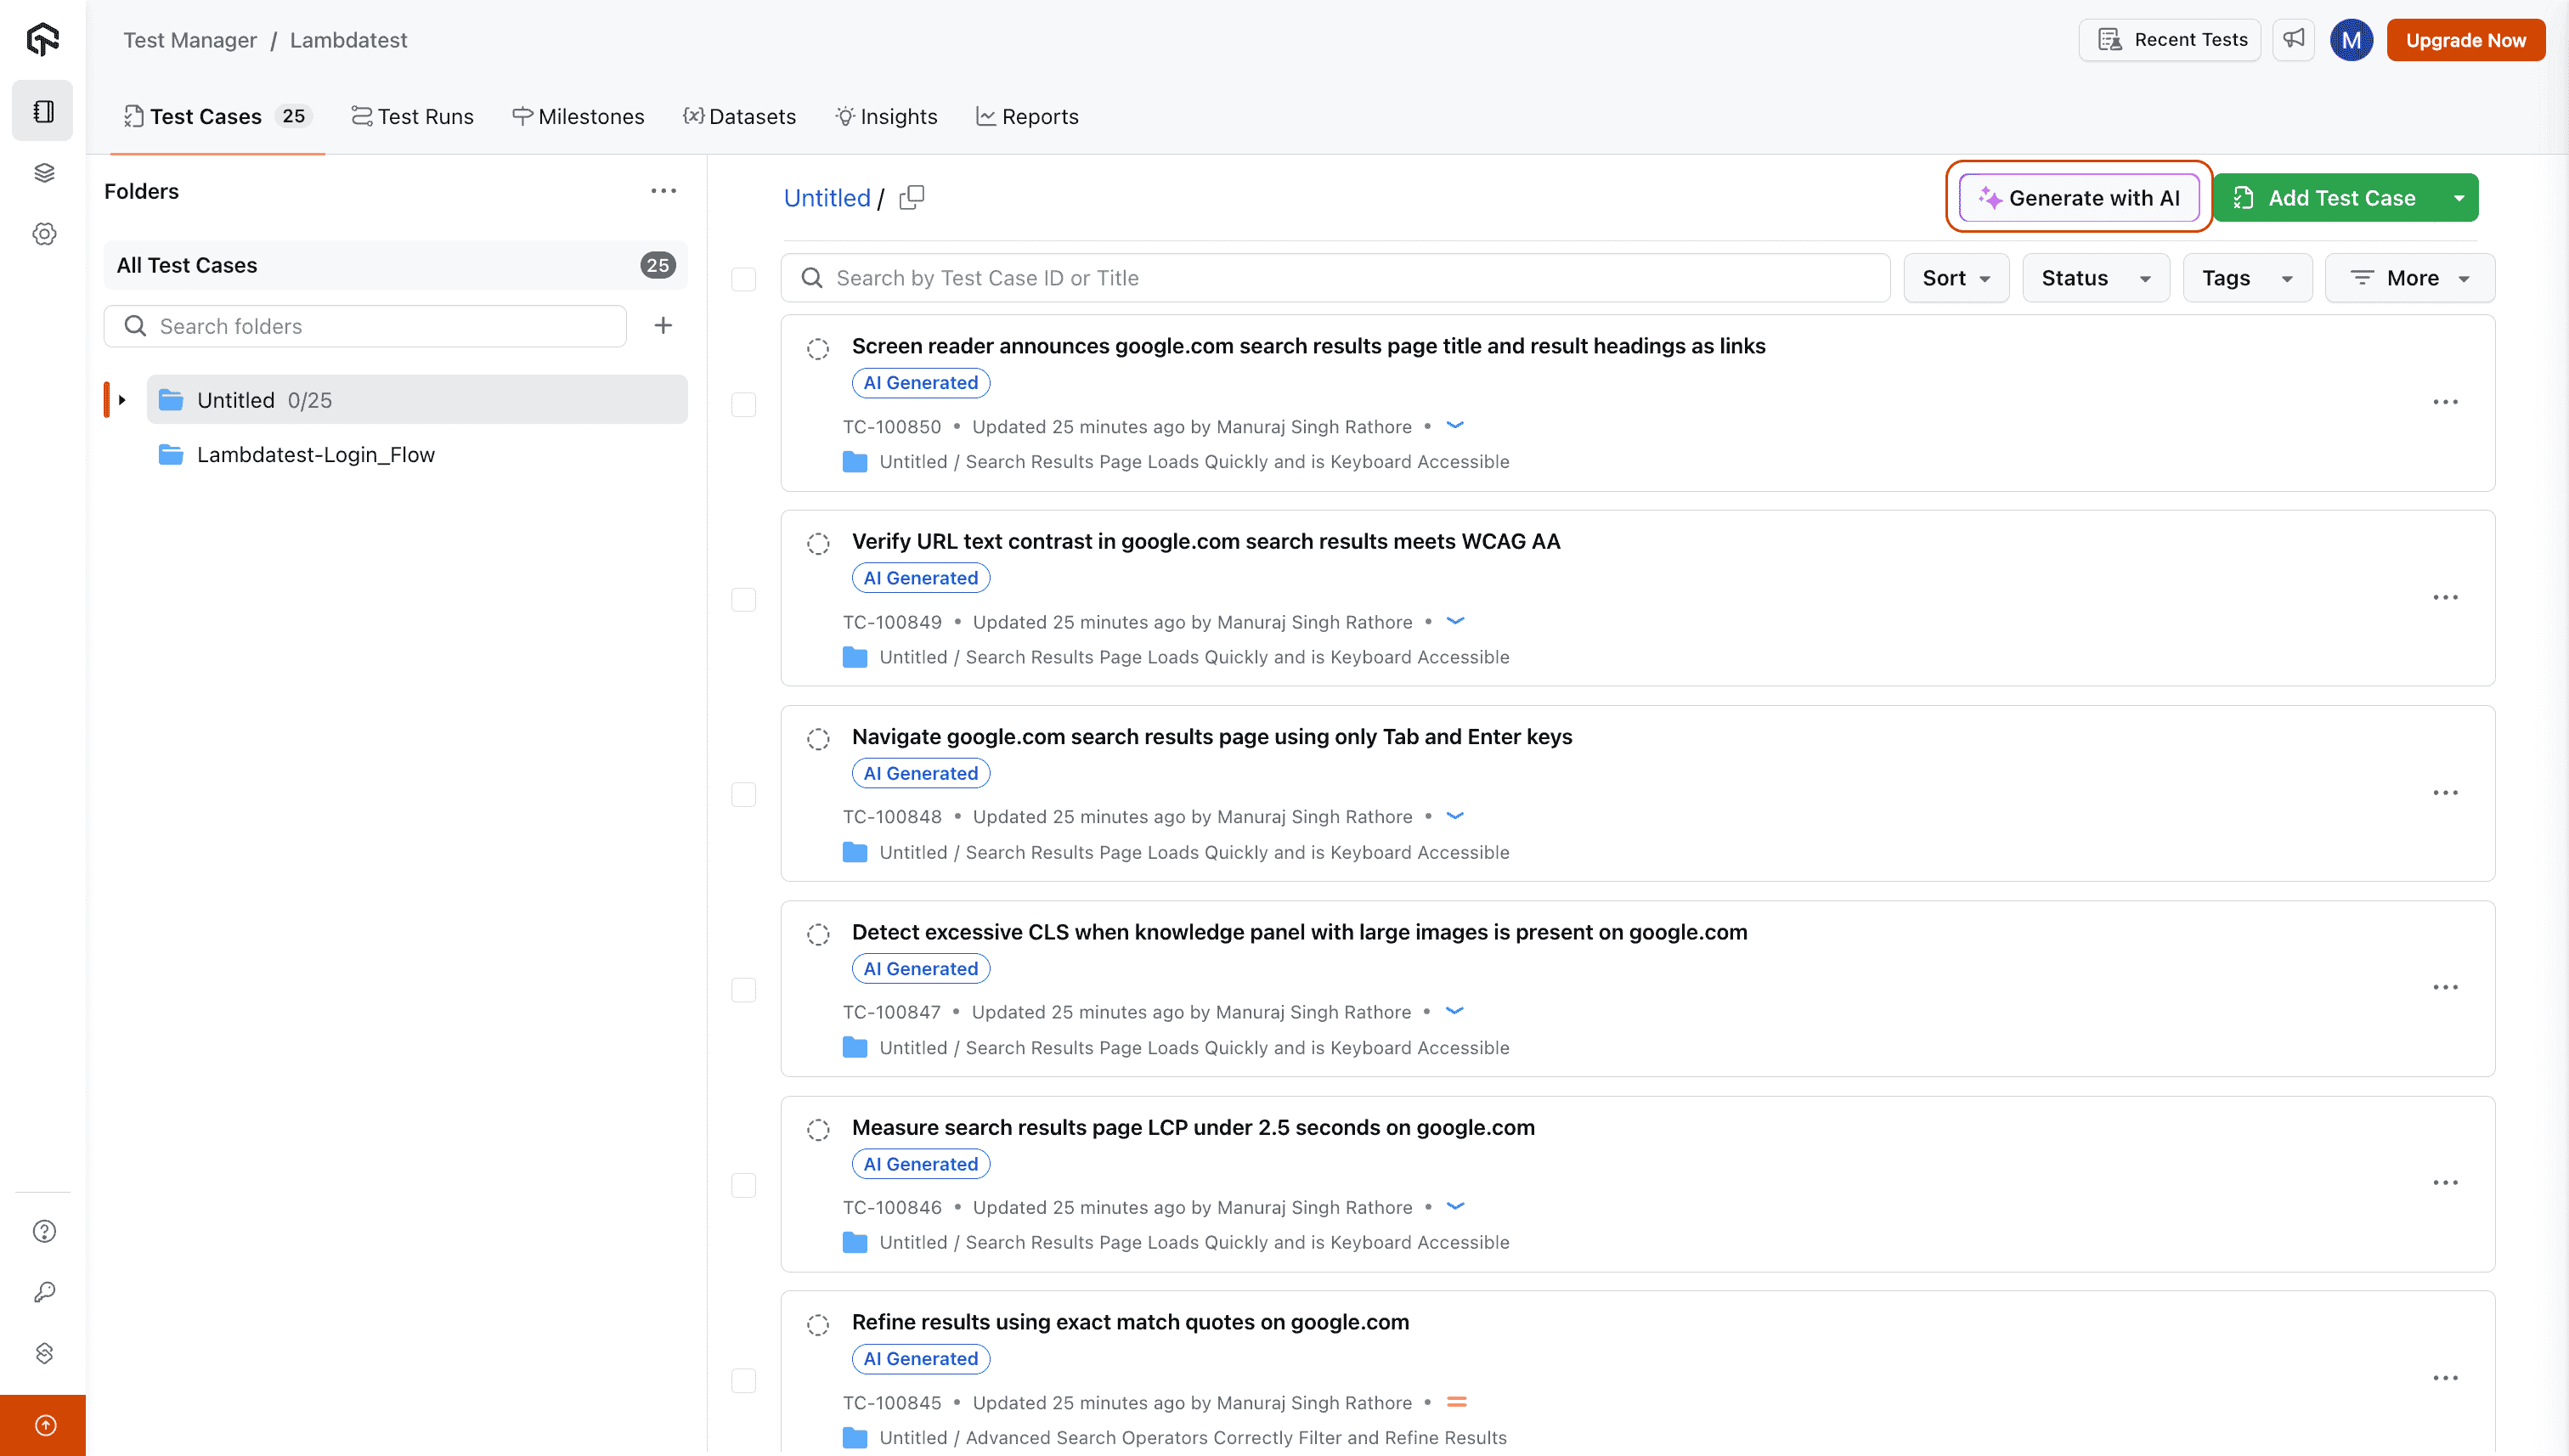
Step 1: Open the AI Test Case Generator
You can access the AI Test Case Generator from two entry points:
From Test Manager:
Navigate to the Test Case Listing page within your project and click on Generate With AI. An input box will appear where you can provide your requirements.
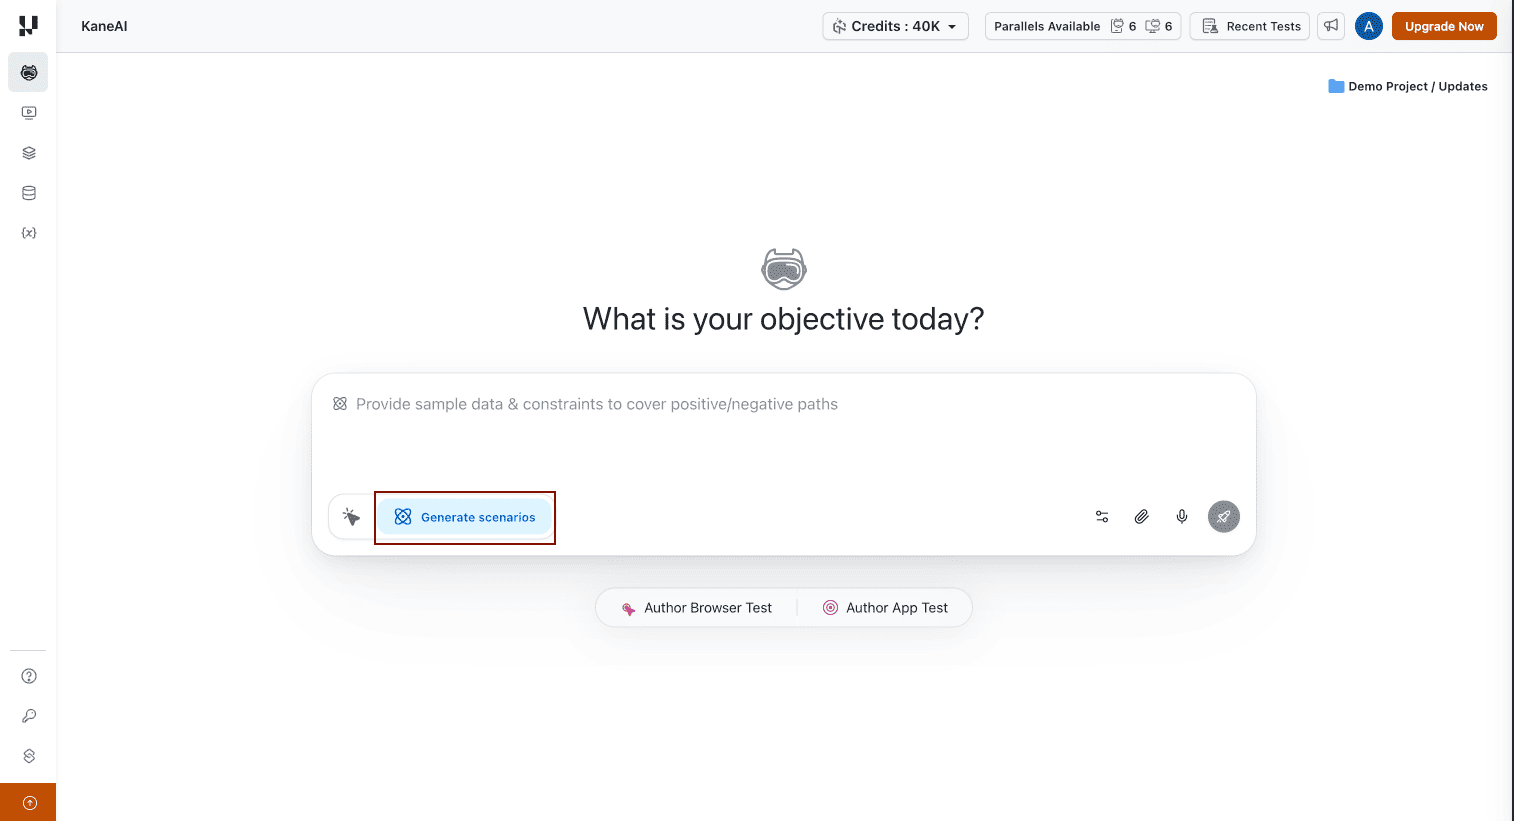
From KaneAI:
Navigate to the Agent page in KaneAI and select Generate Scenarios. This opens the same AI Test Case Generator interface.
Step 2: Enter Your Requirements
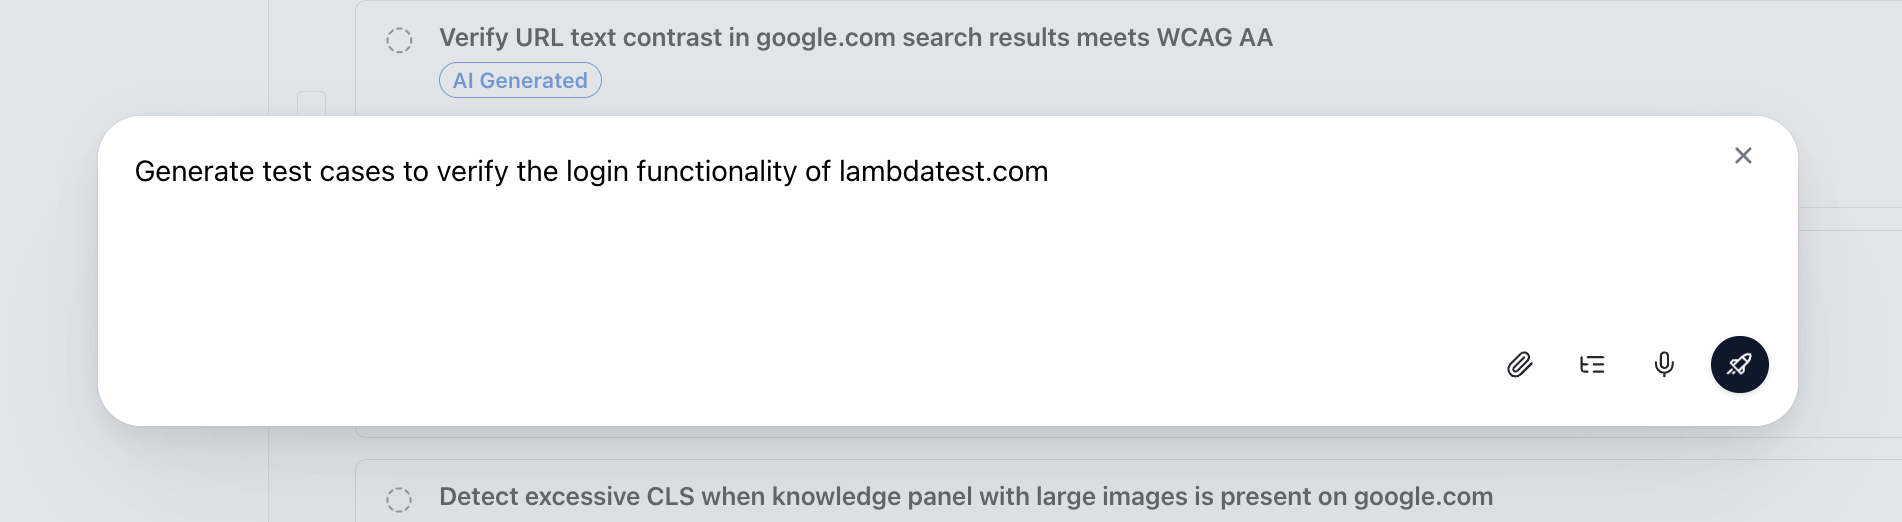
Start by entering your product or feature requirements in the input box.
We support multiple input formats, including:
- Textual requirements
- Jira/Azure DevOps links (e.g., epics, stories, tasks)
- PDFs
- Images
- Audio (recordings or uploads)
- Videos
- Spreadsheets (CSV or XLSX)
- Documents
- JSON or XML
Currently, the AI Test Case Generator can only access publicly available URLs. Websites behind a VPN, corporate proxy, firewall, or those requiring authentication to reach the landing page cannot be analyzed.
Support for private URLs is coming soon.
Add Input Requirements
Text Input
- Type your requirement directly into the input box.
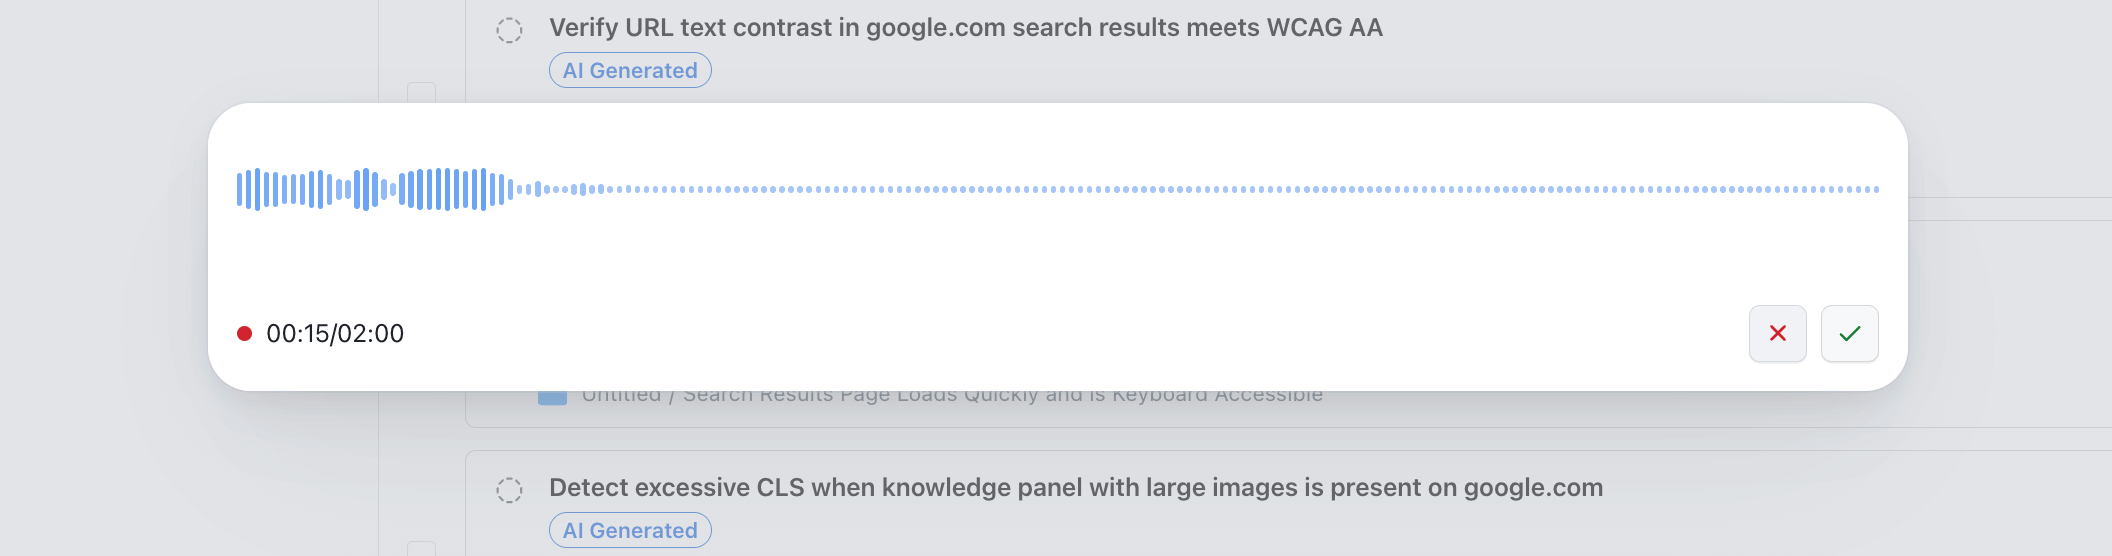
Record Audio
- Click the mic icon to begin recording, as shown in the picture.
Audio recording is not supported in Firefox, ARC and Opera browsers.
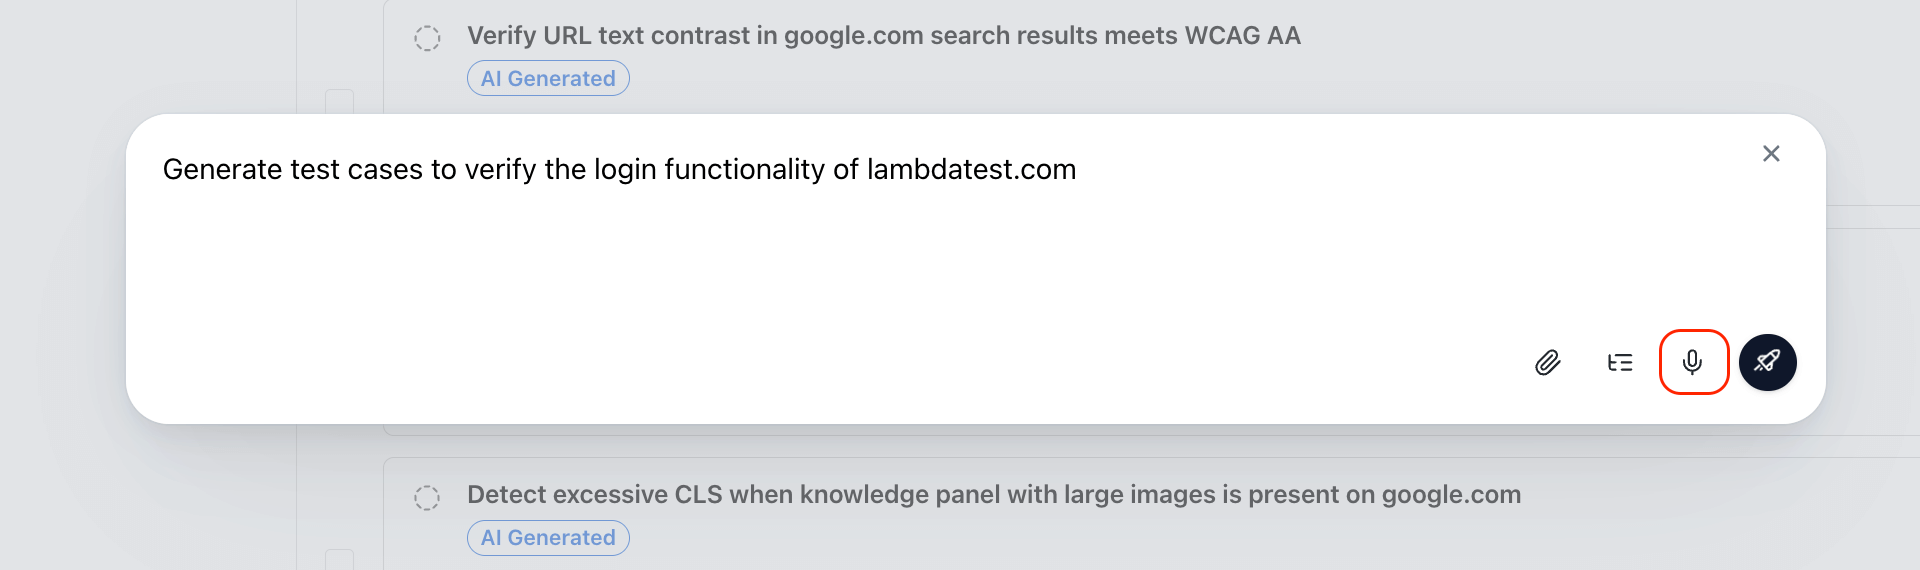
- Click the tick icon to confirm, or the cross to discard.
Upload Files
- Click on the pin icon 📎, then select
Upload from device. - You can select a maximum of 10 files from your device.
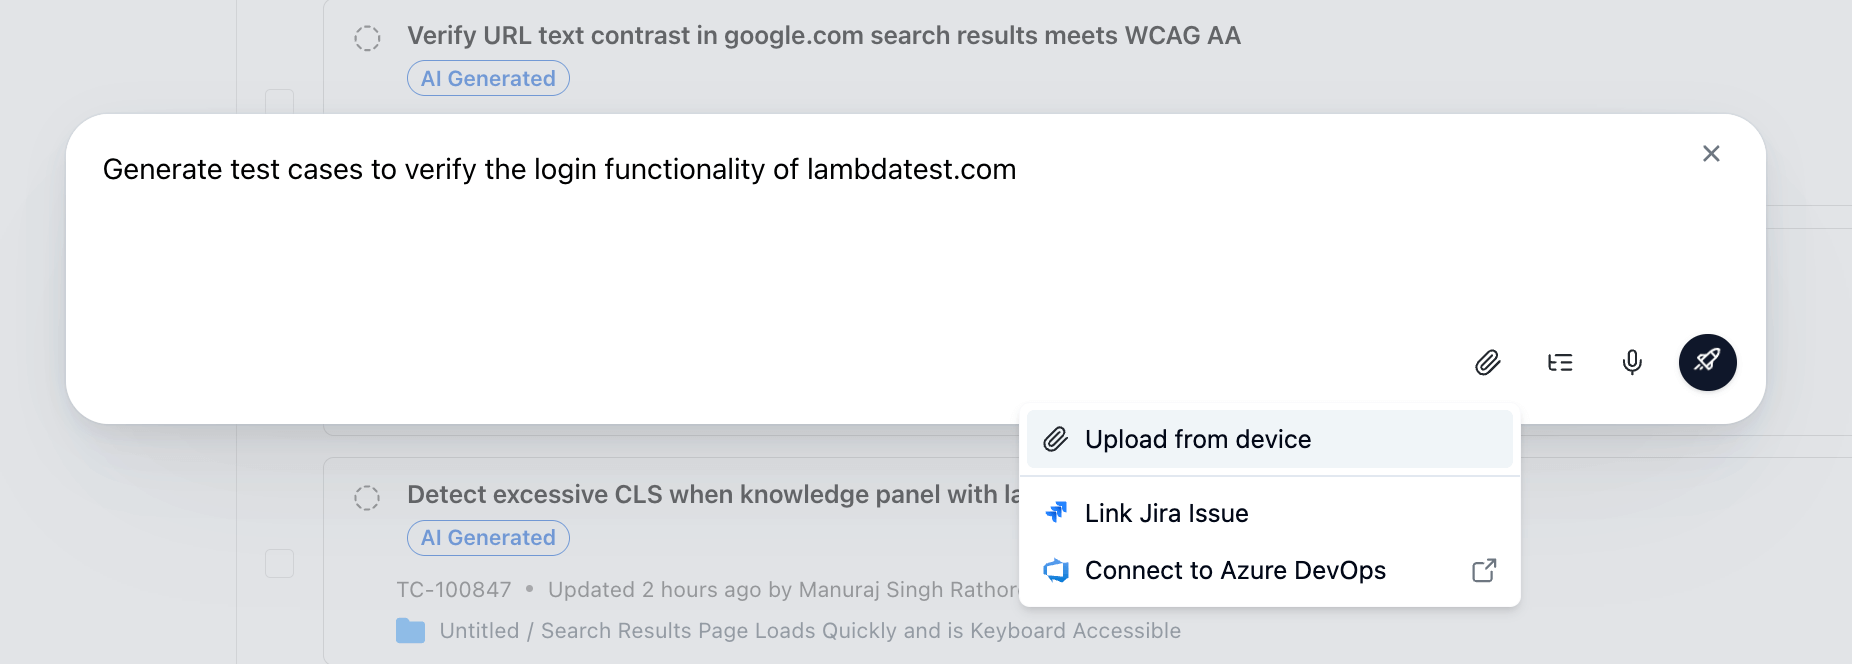
- Uploaded files will appear within the input box.

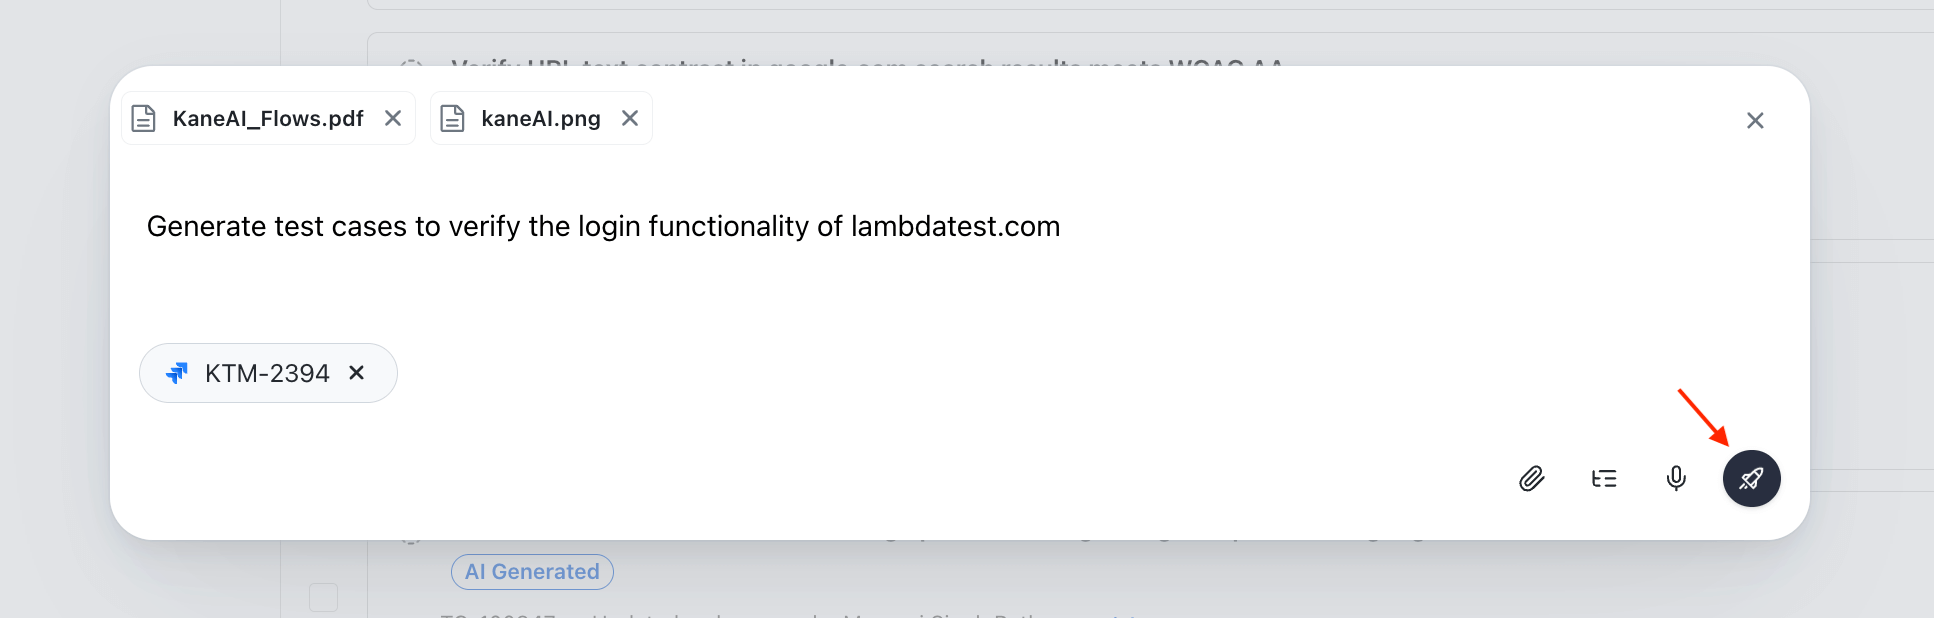
Add Issue Links
-
Integrate your TestMu AI account with Jira/Azure DevOps. Follow the steps described in the following link to integrate Jira/Azure DevOps: TestMu AI Jira Integration / TestMu AI Azure DevOps Integration
-
After integration is completed, select
Link Jira Issues/Link Azure DevOps Issues.
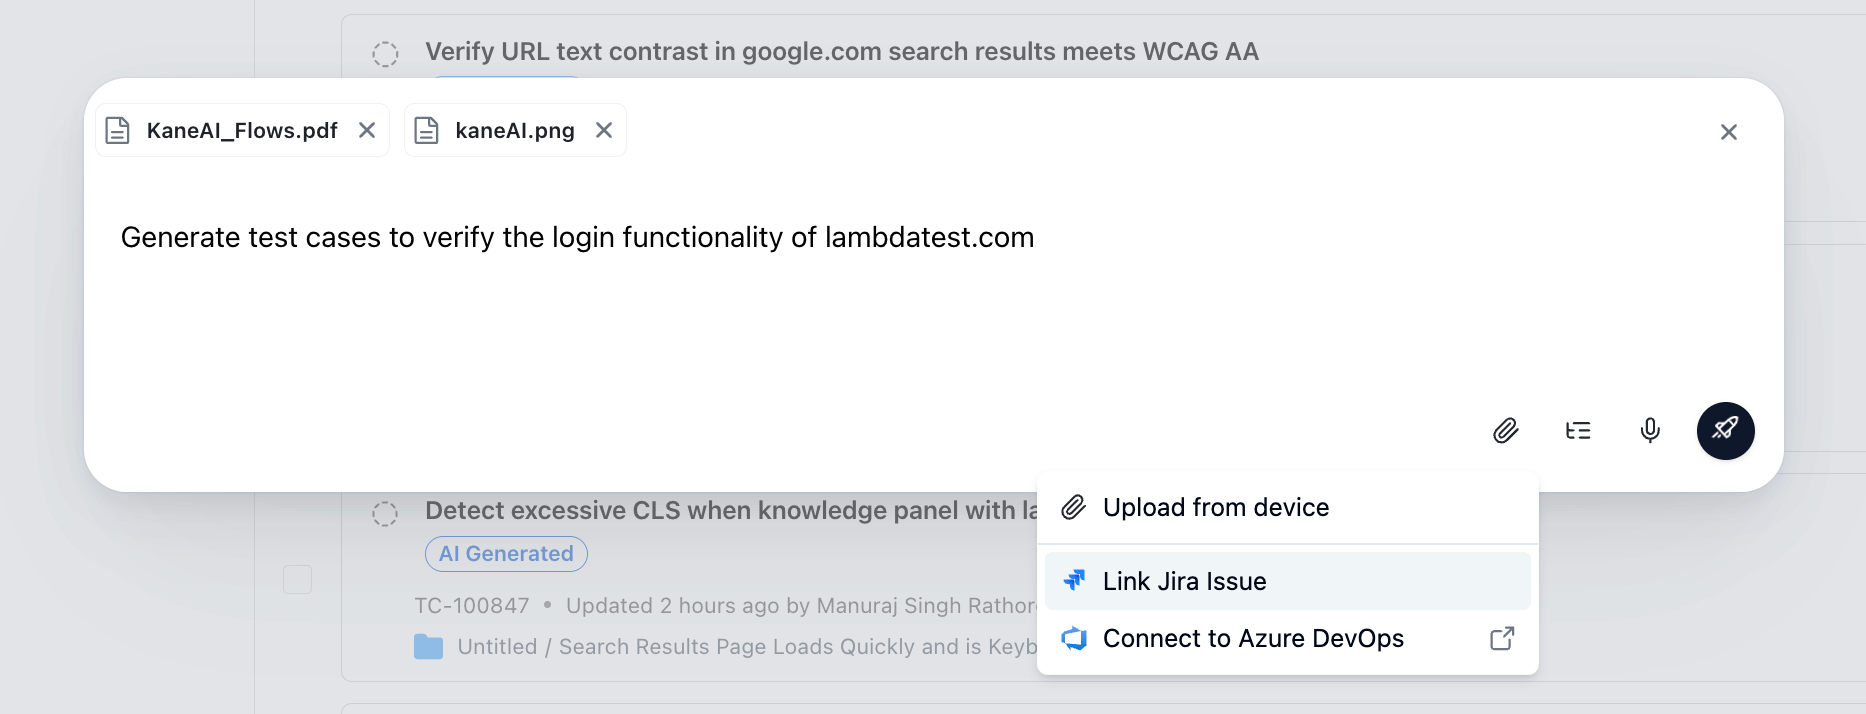
- Enter your Jira/Azure DevOps issue ID or link and press Enter.
Only issues from the connected Jira/Azure DevOps project can be linked here.
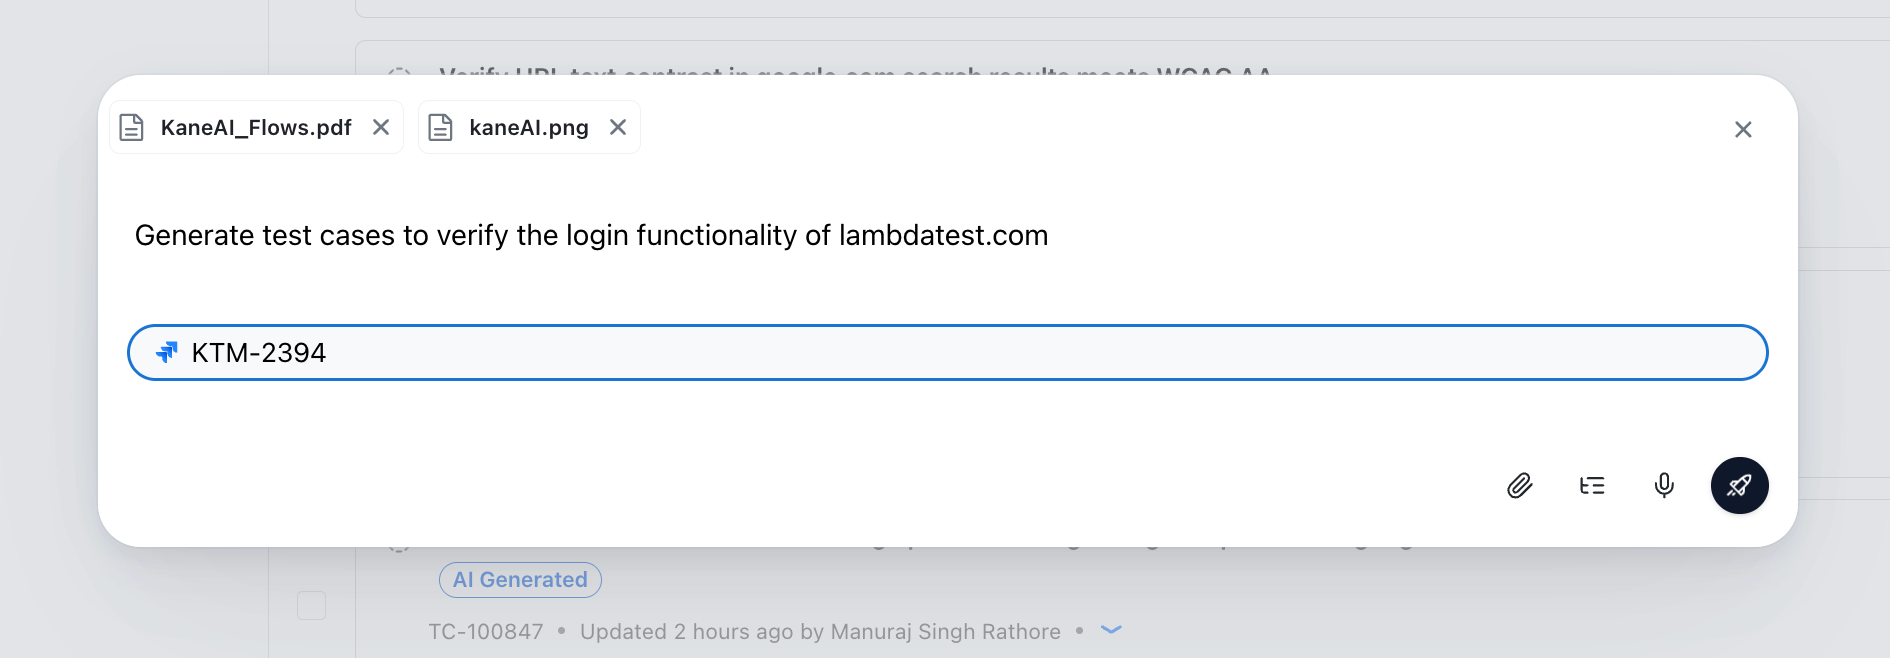
- The linked issue will then appear inside the input box.
Configure Generation Settings
Before triggering a generation session, you can configure the following settings to control the AI's output:
| Setting | Description |
|---|---|
| Max Test Scenarios | Set the maximum number of test scenarios the AI will generate in the session |
| Max Test Cases per Scenario | Set the upper limit for test cases within each individual scenario |
| Memory Enhancement | Toggle to enable or disable the Smart Context: Memory Layer, which retrieves relevant existing test cases from your repository to improve generation quality |
| Project Instructions | View and verify the project-level custom instructions that will be applied to the session |
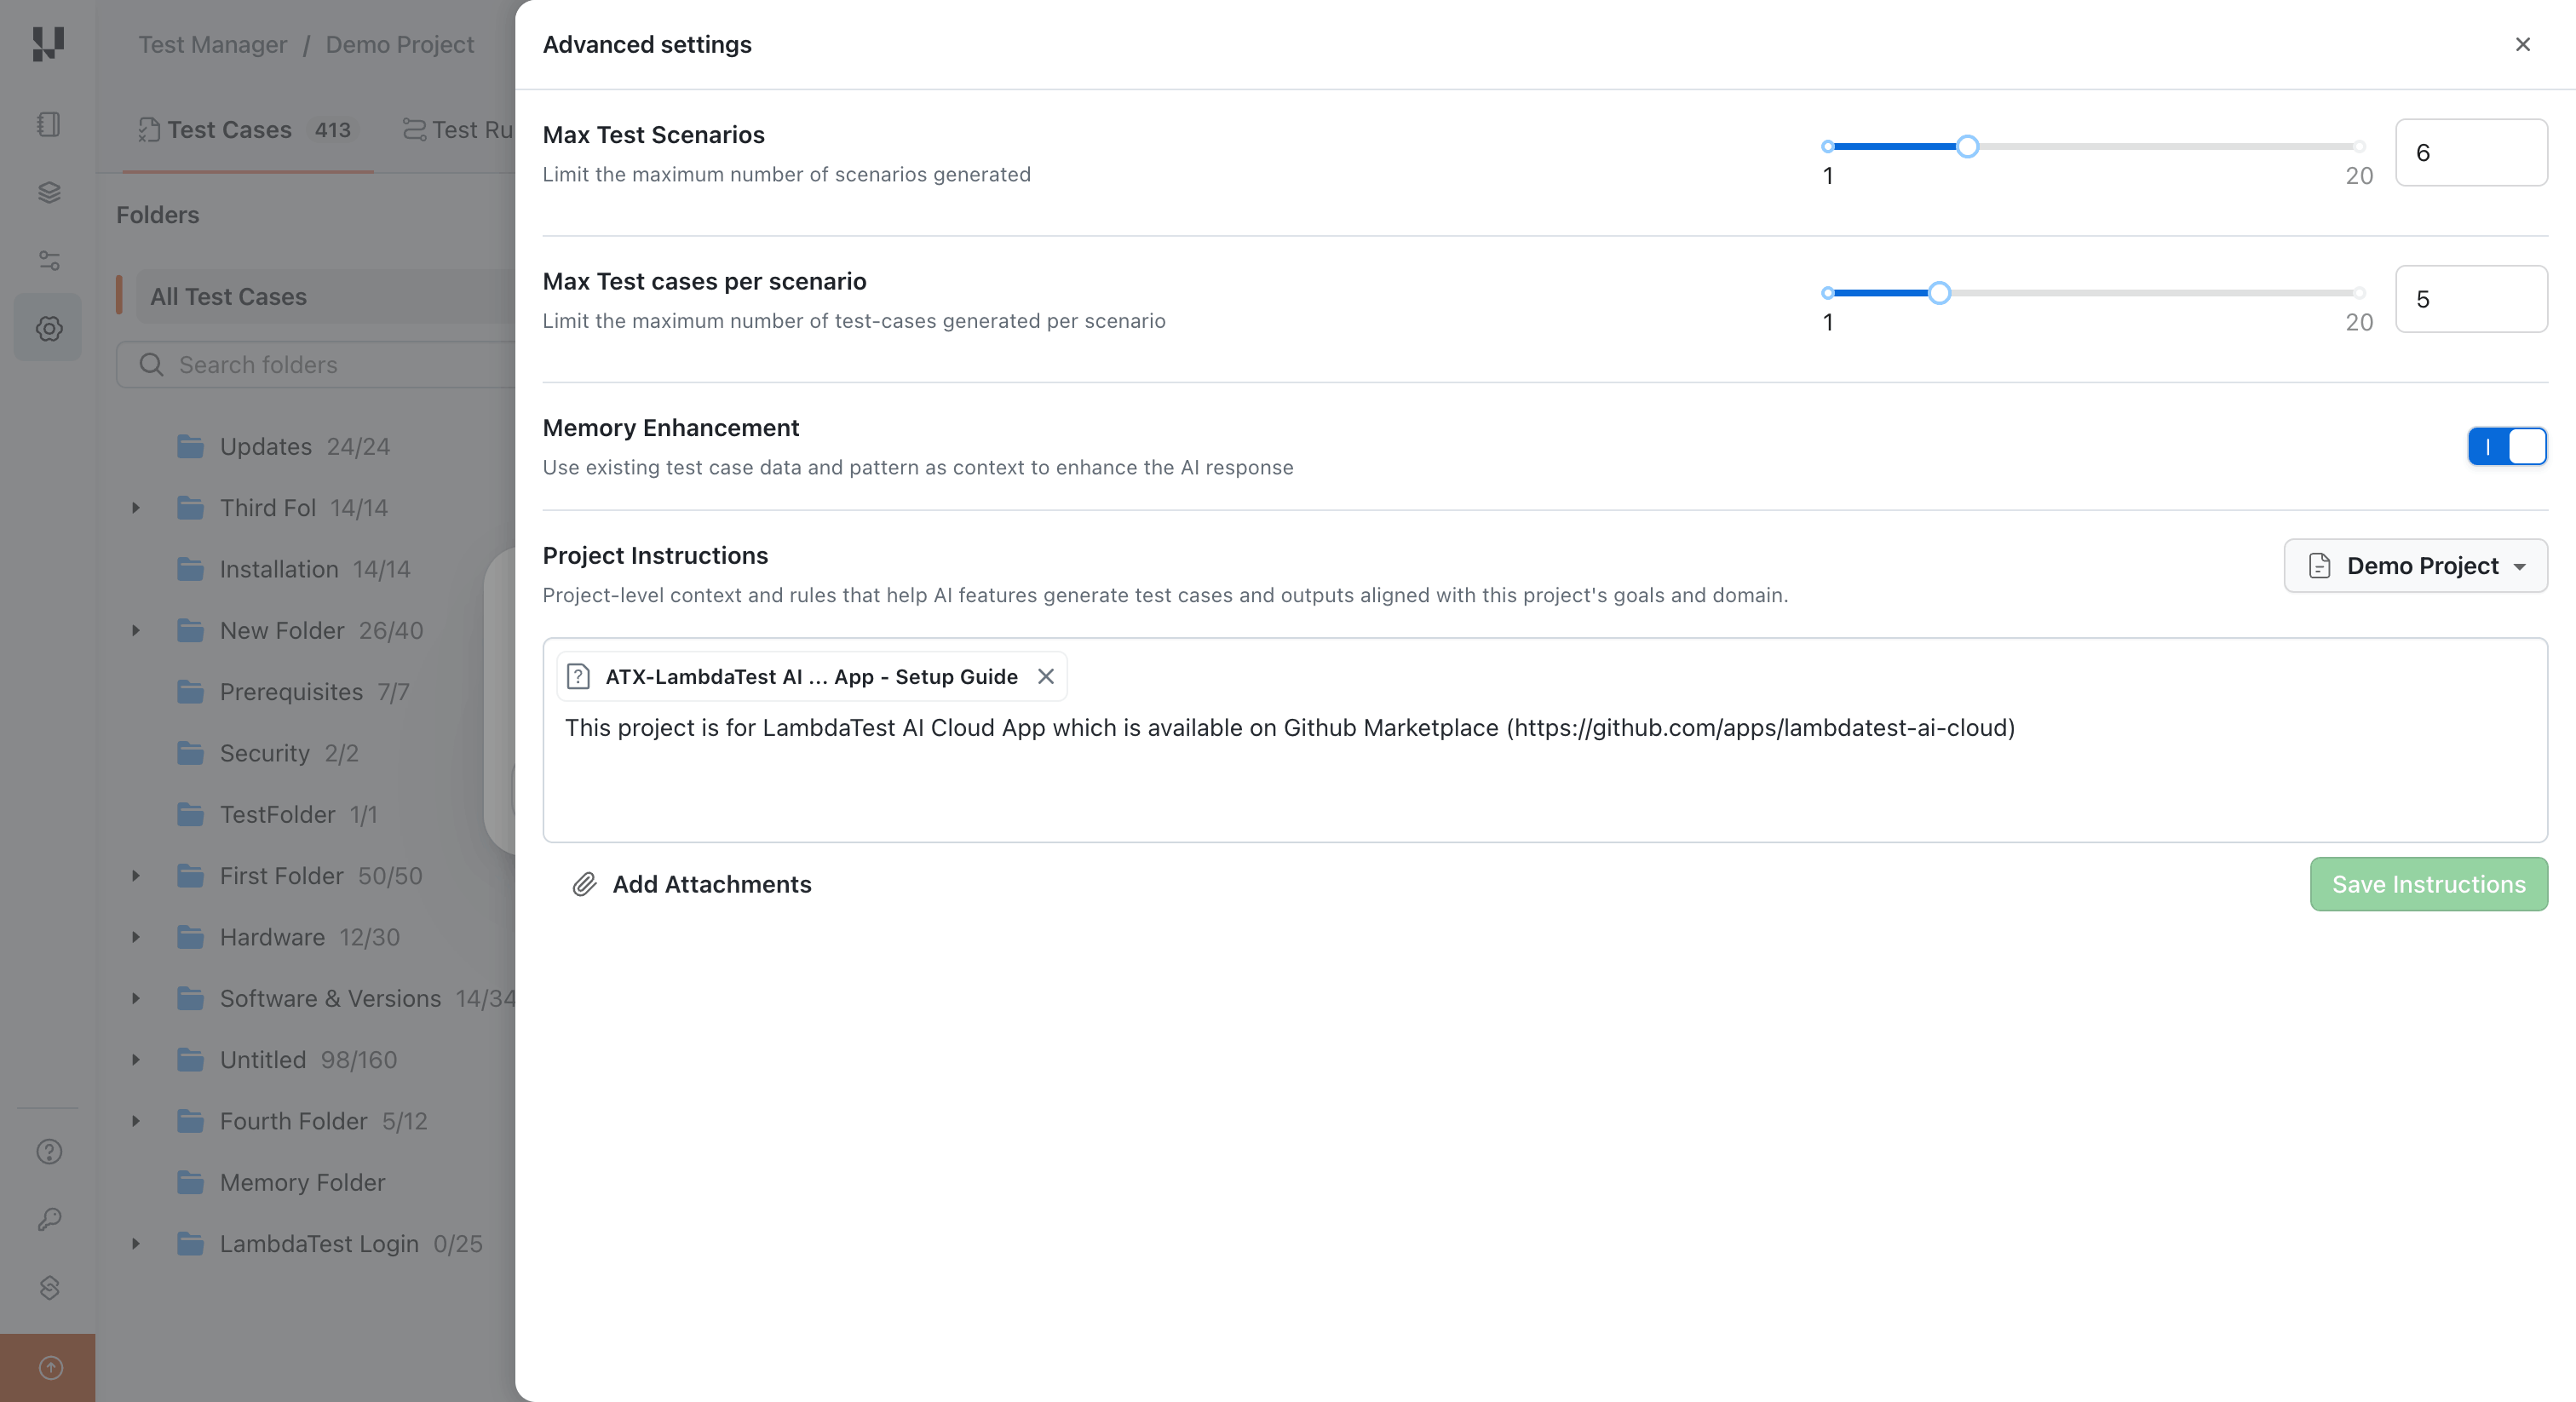
Configure these settings before pressing Enter to ensure the AI generates test cases aligned with your session requirements. Organization-level instructions, if configured, are automatically applied in addition to project instructions.
Step 3: Generate Test Cases
- Once all your input requirements are added (along with any custom instructions), press Enter to start generating test cases.
- The AI analyzes your input, retrieves relevant context from your existing test case repository via the Smart Context: Memory Layer, and generates test cases that are both comprehensive and non-duplicative.
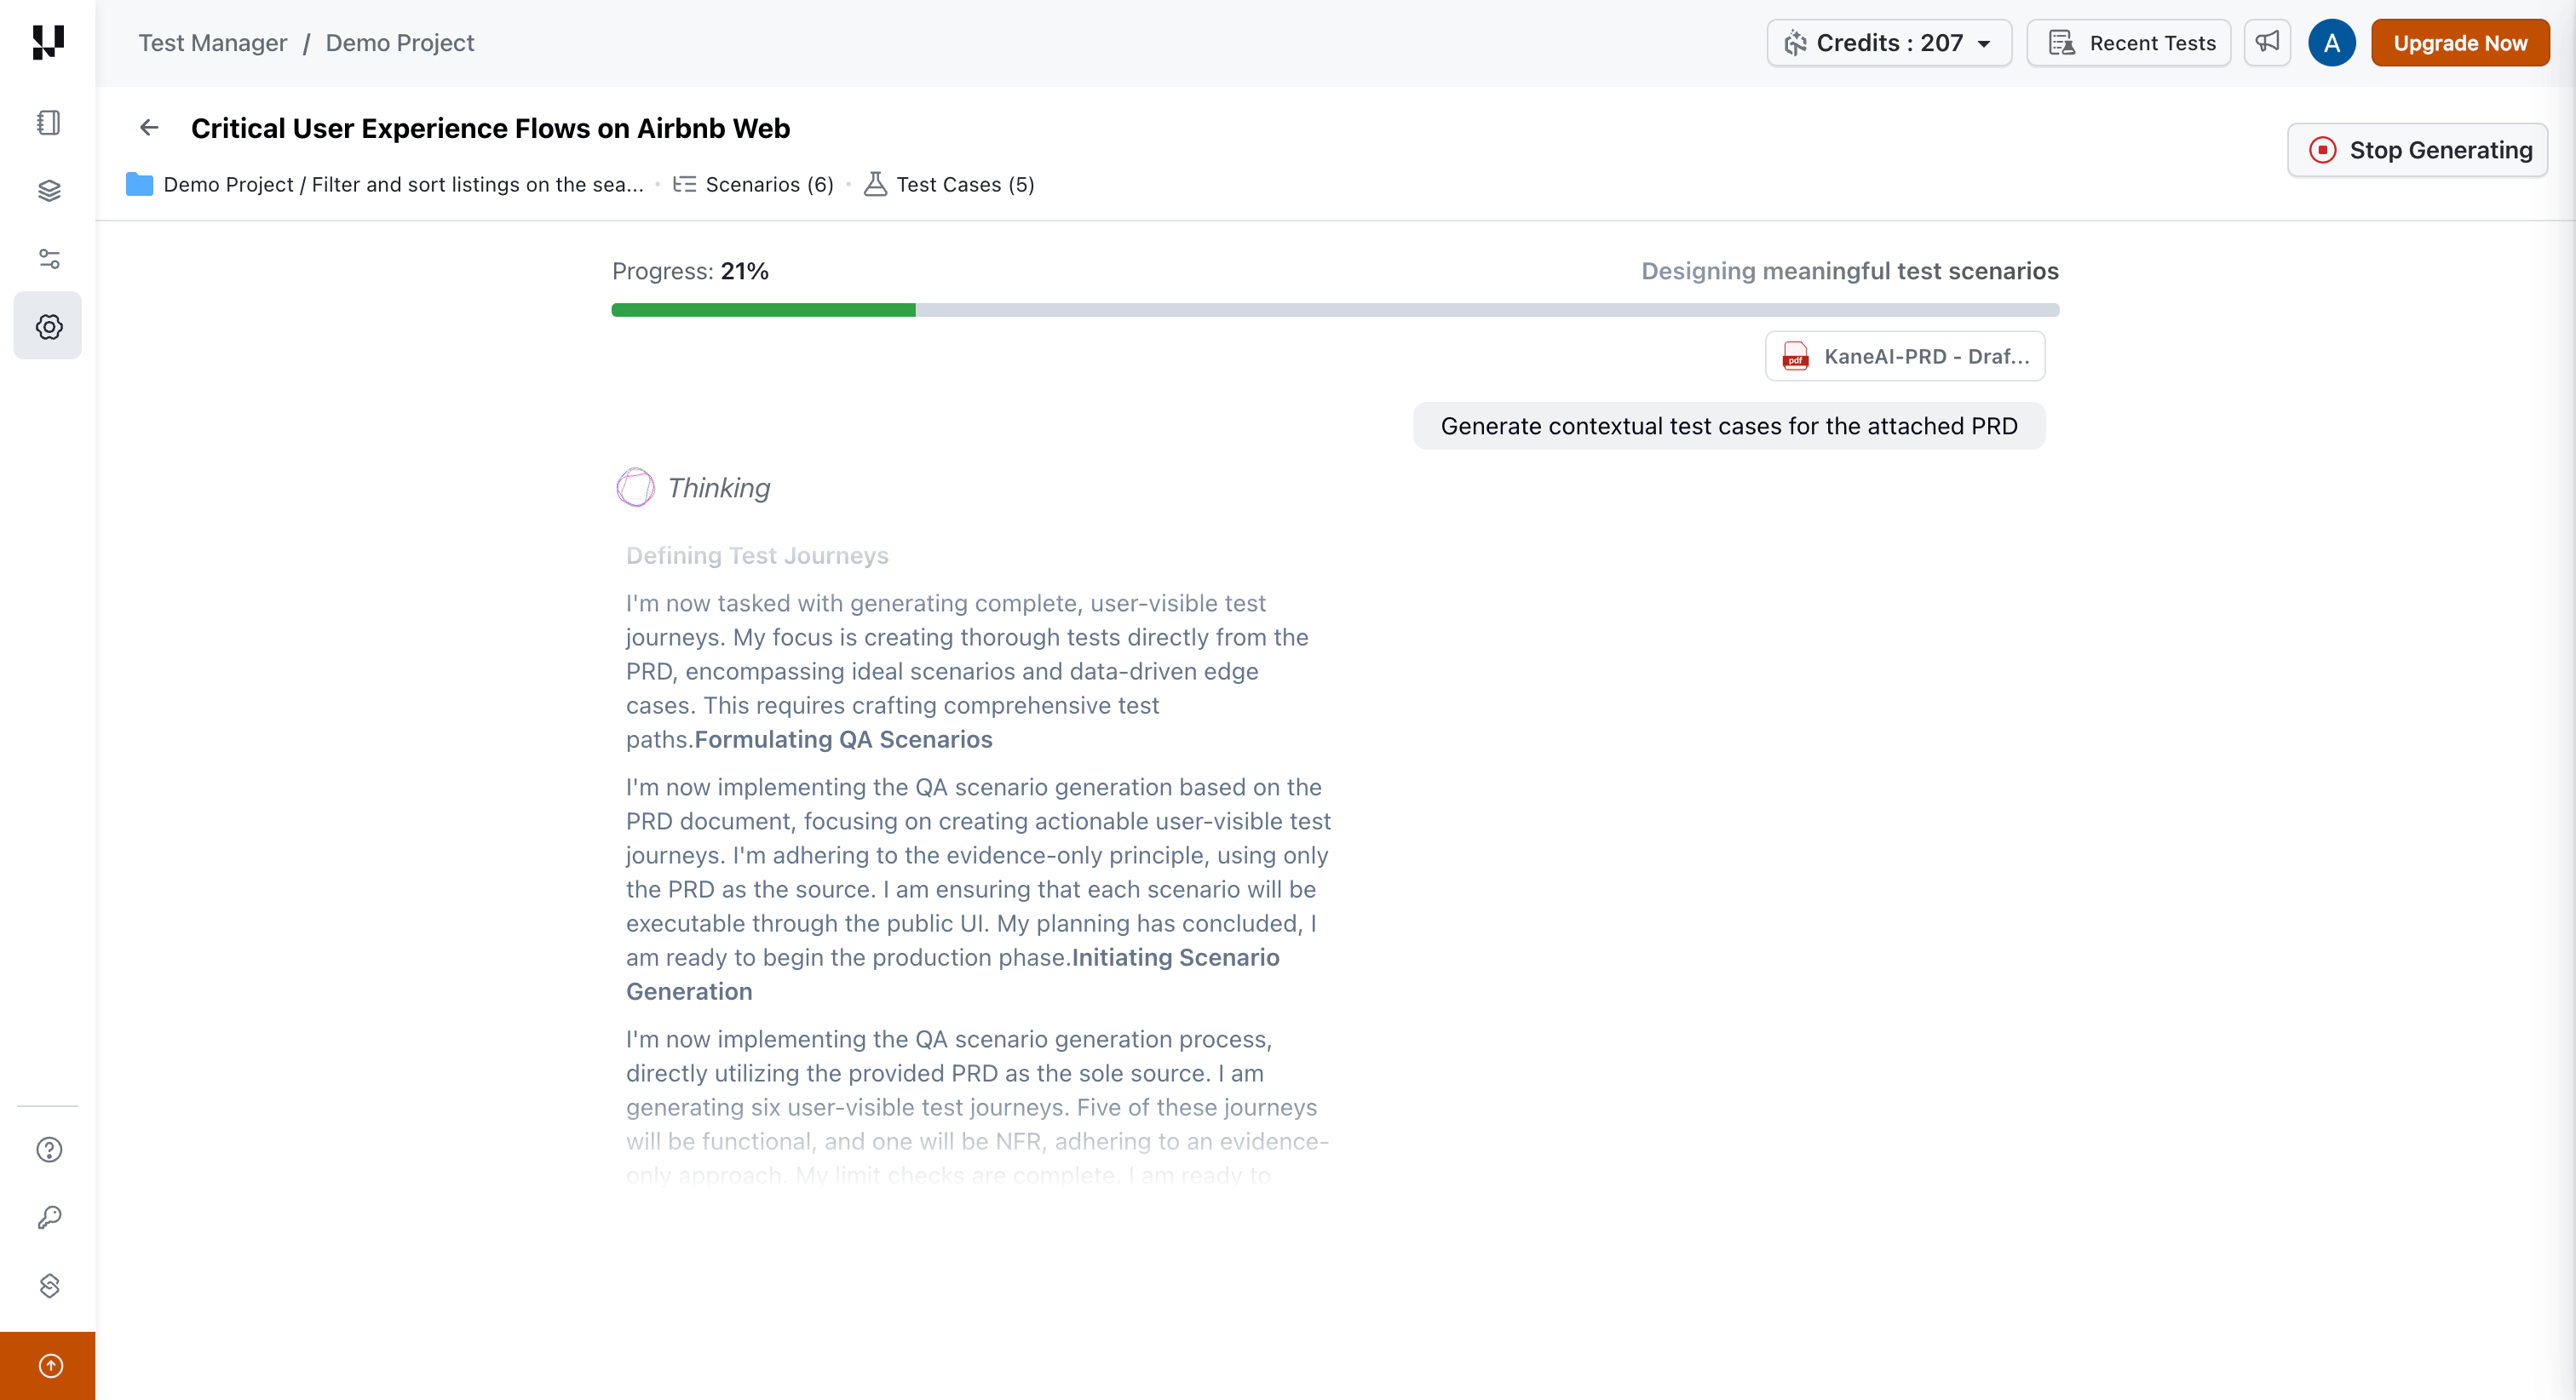
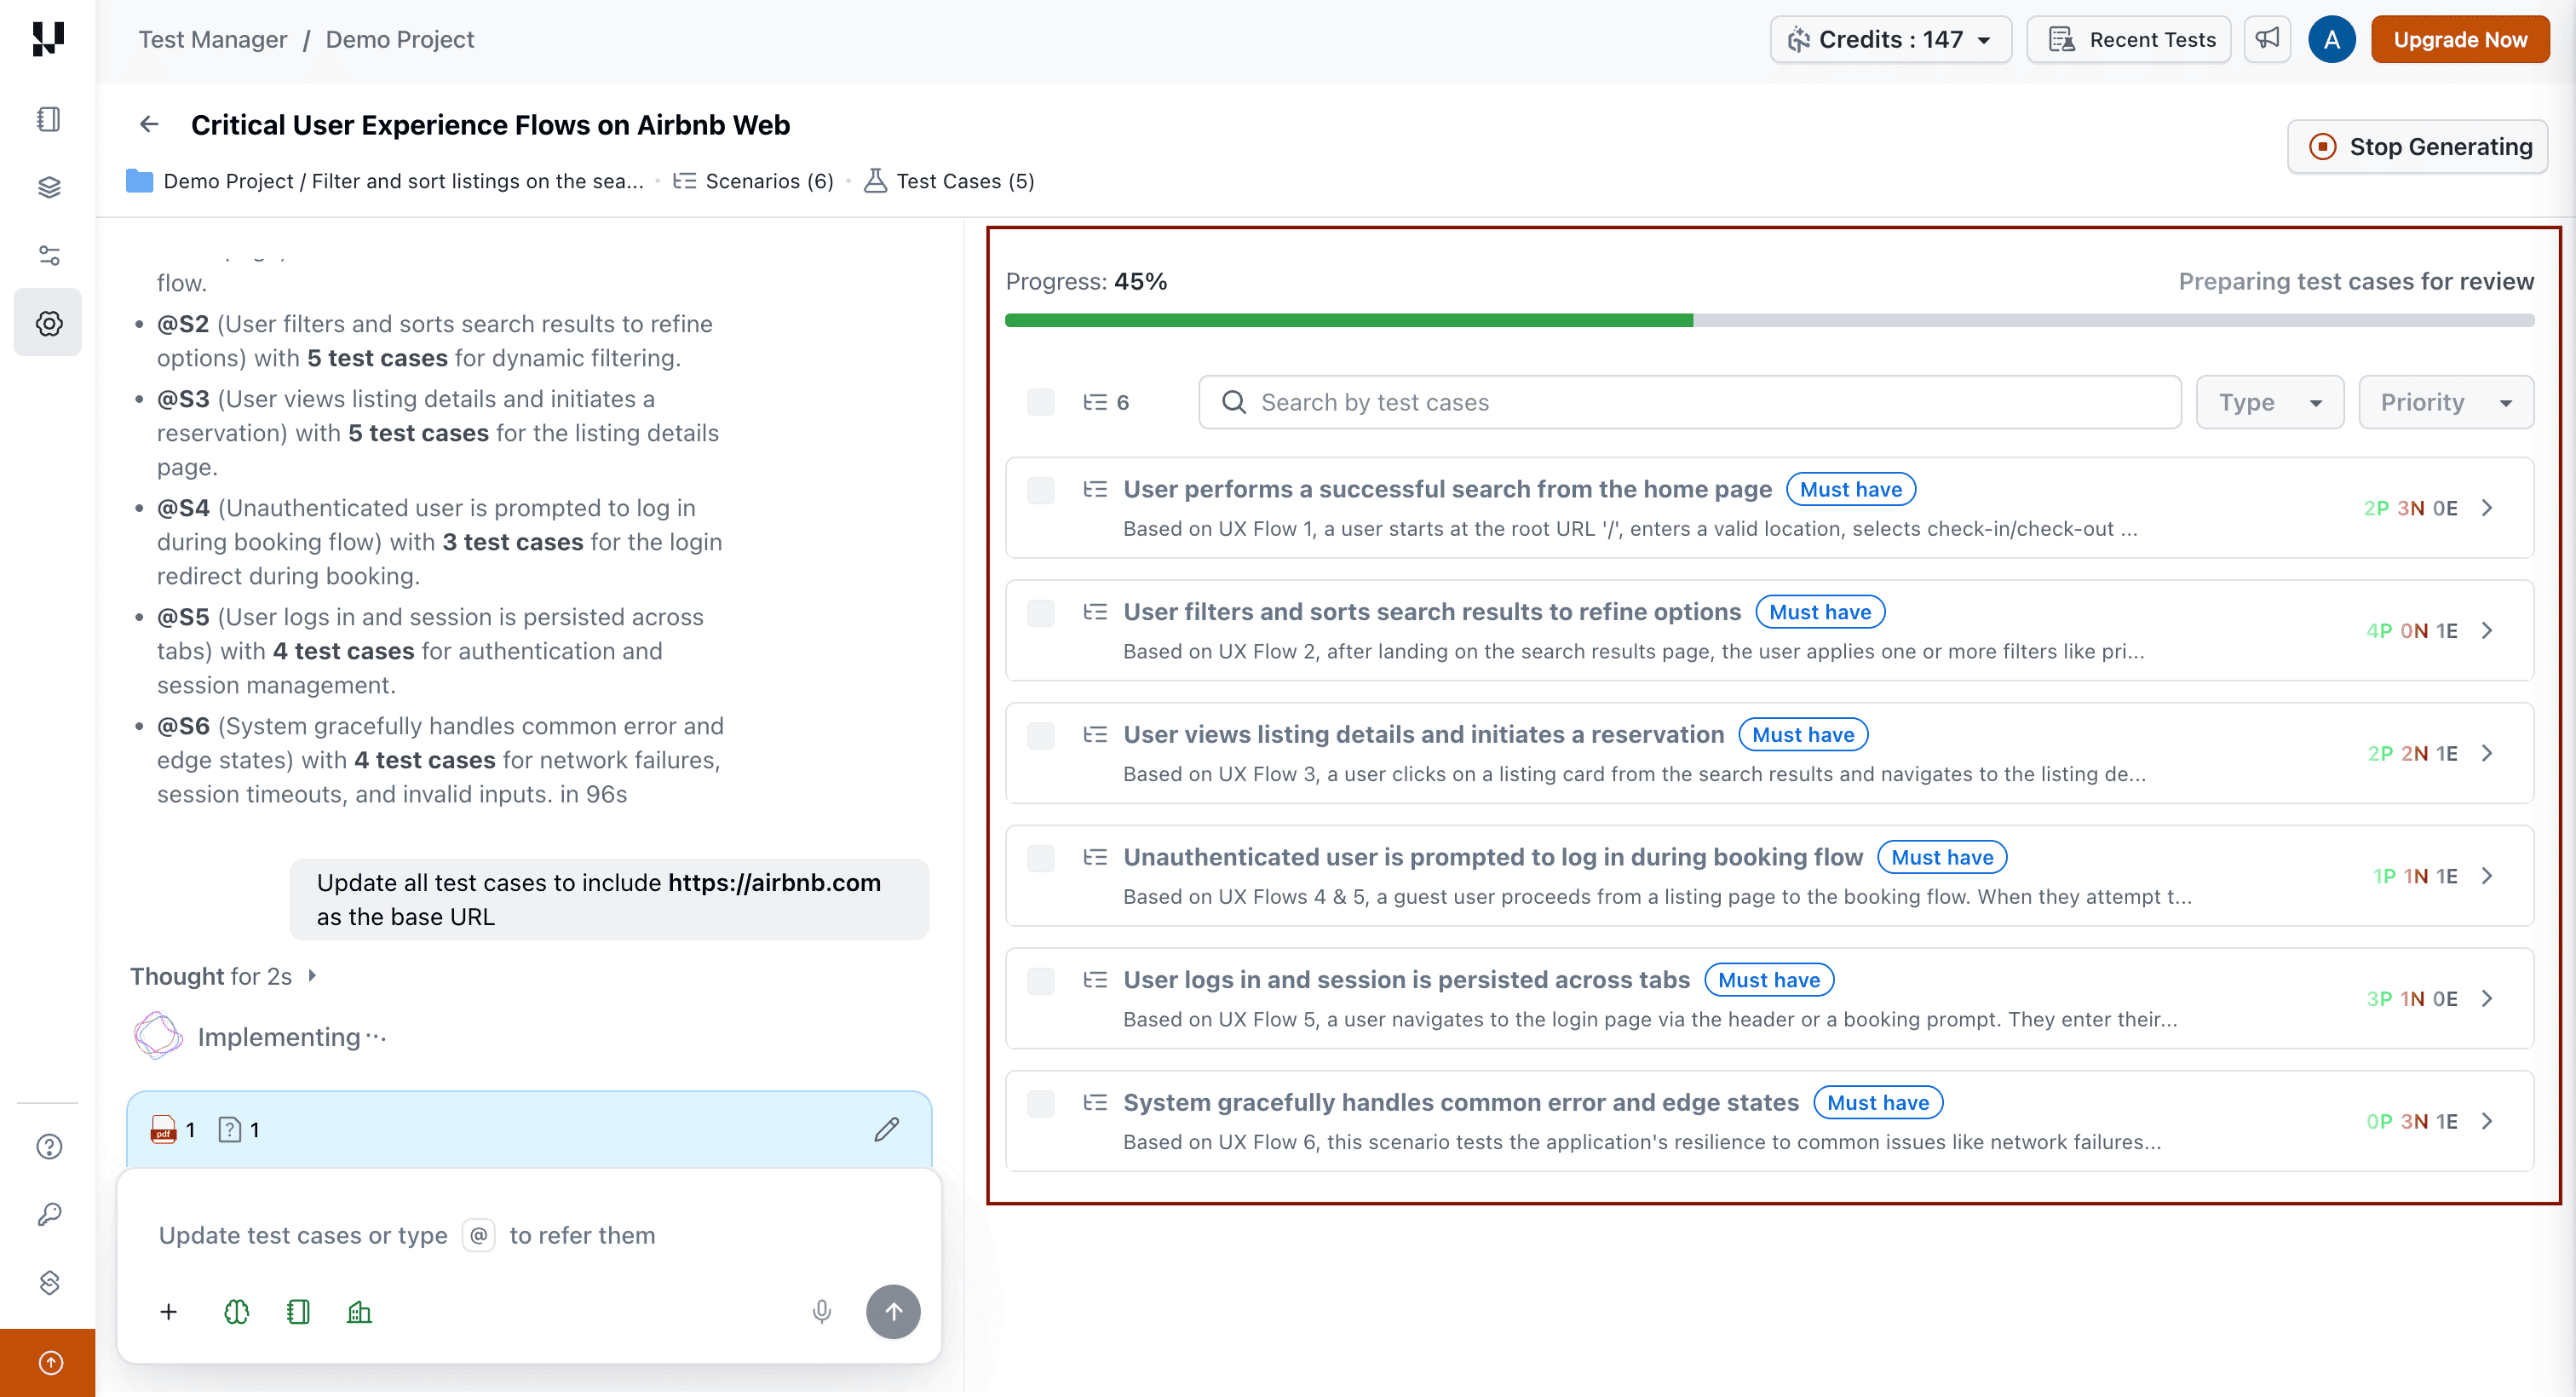
To end the test case generation while the Agent is thinking, click on the Stop Generating button.
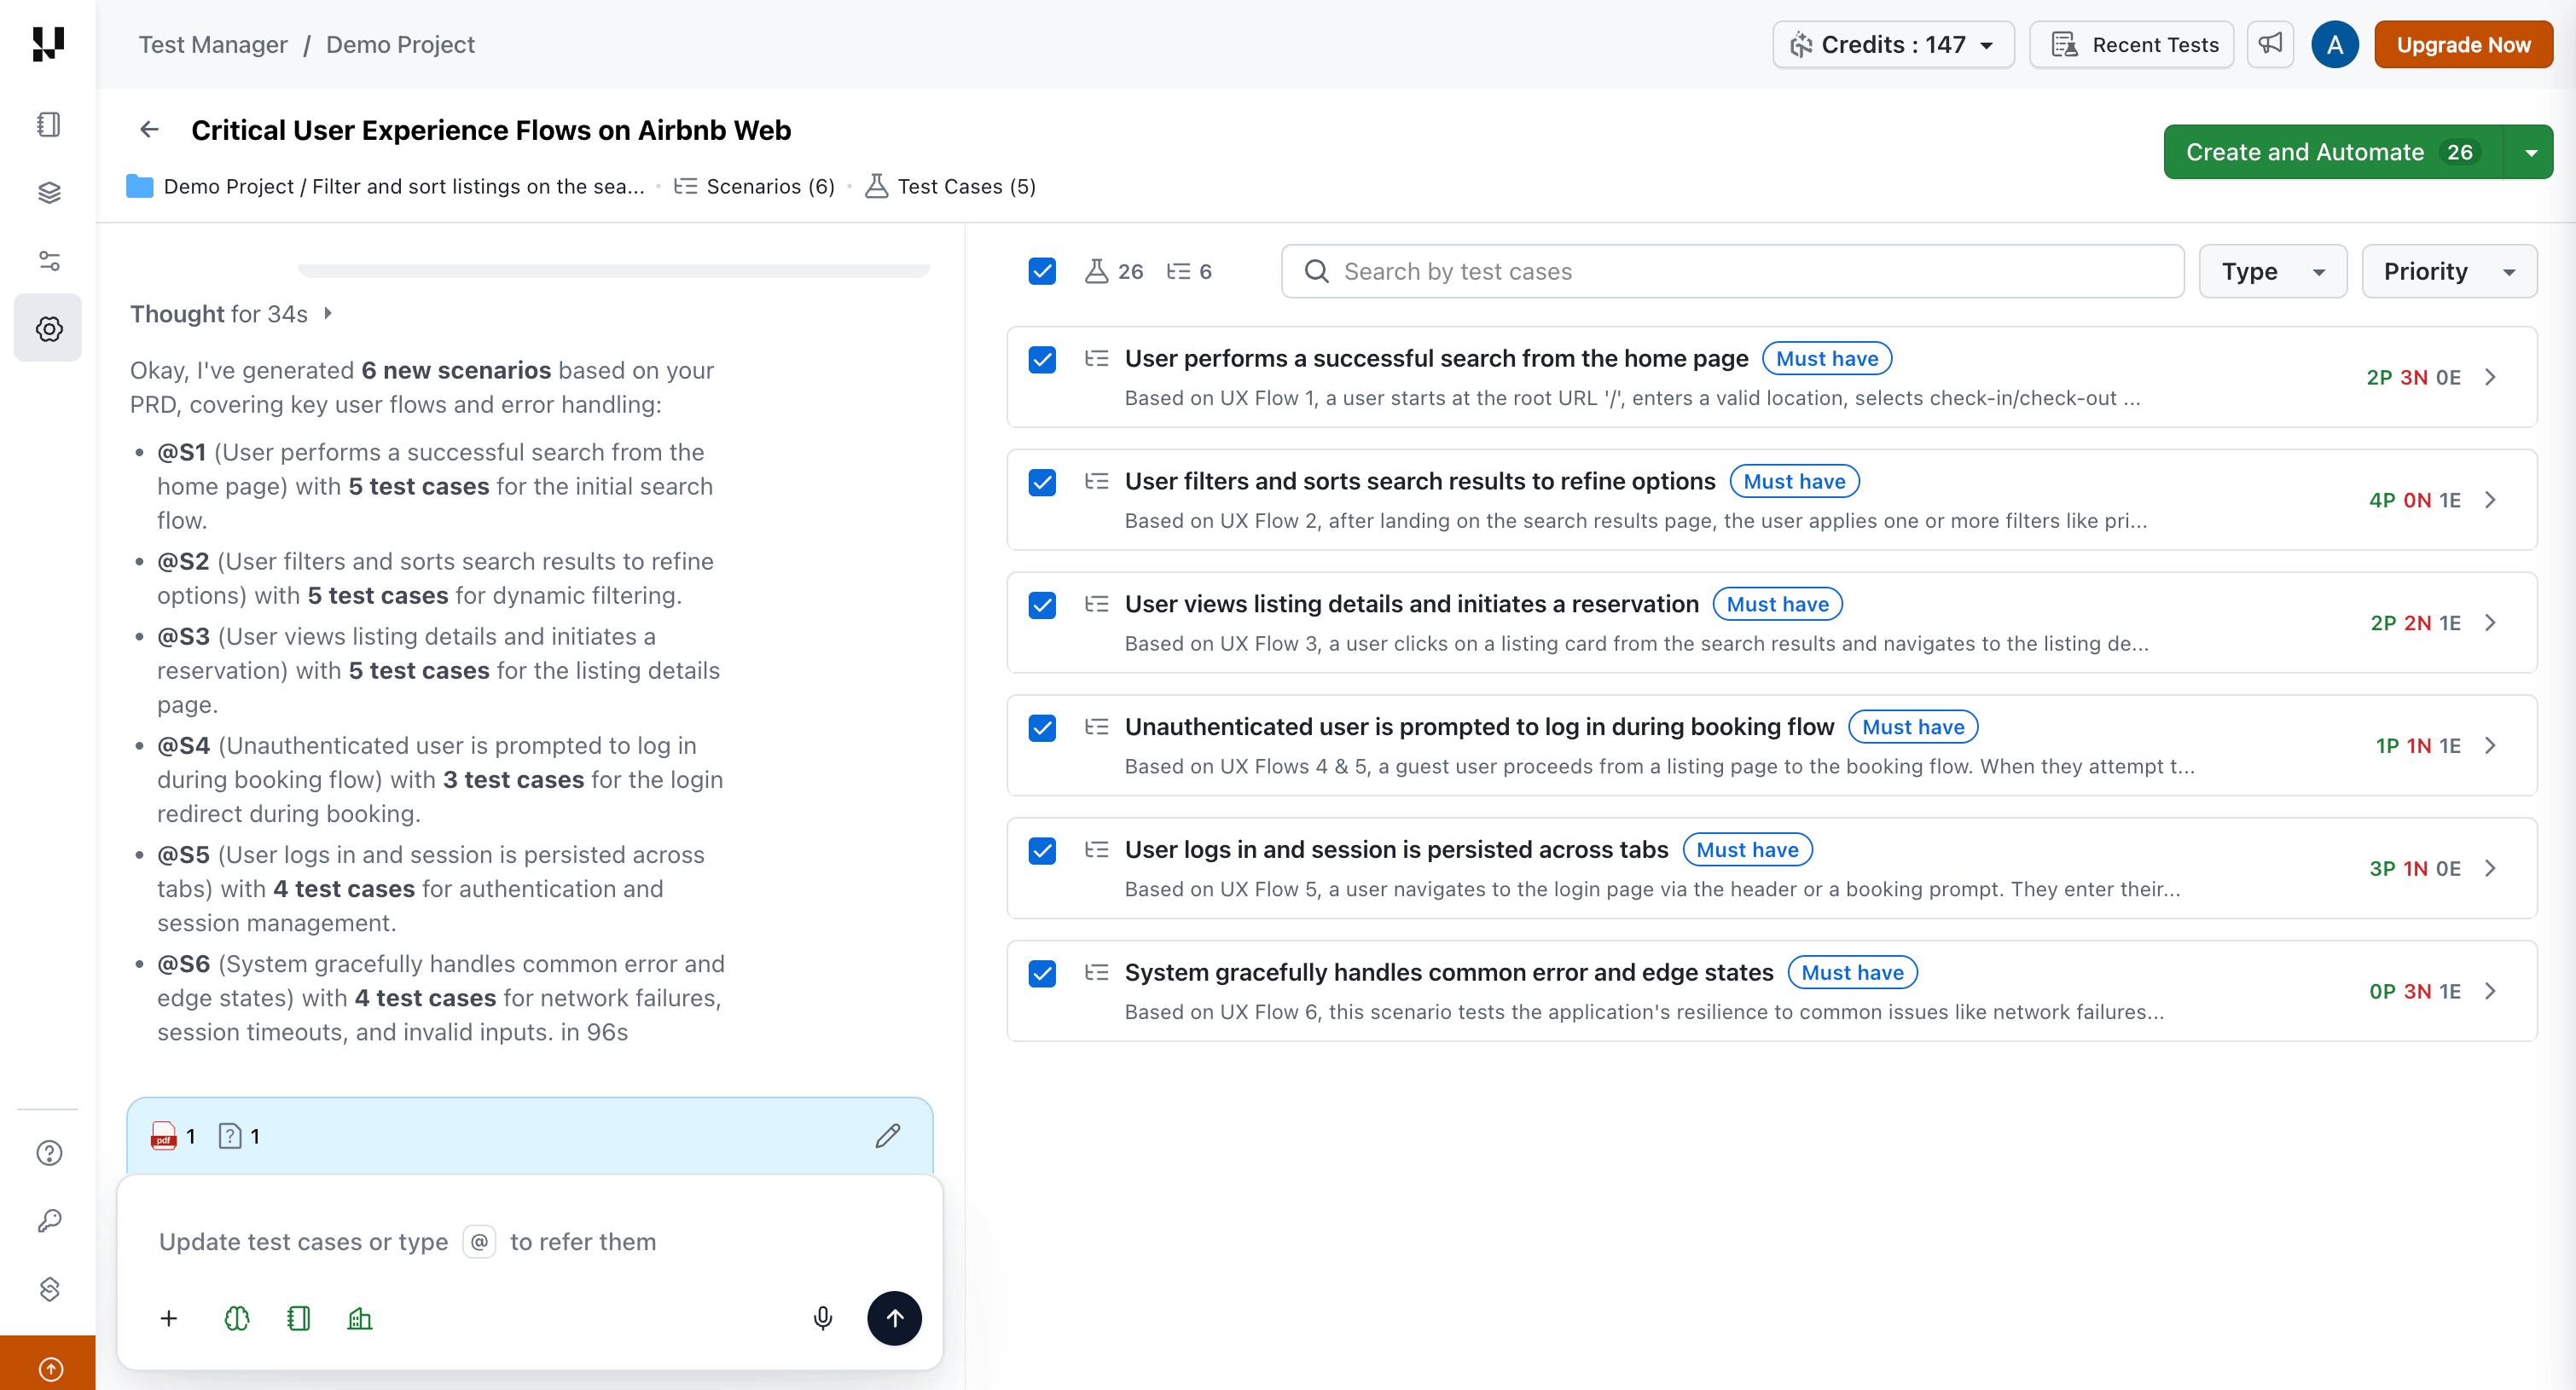
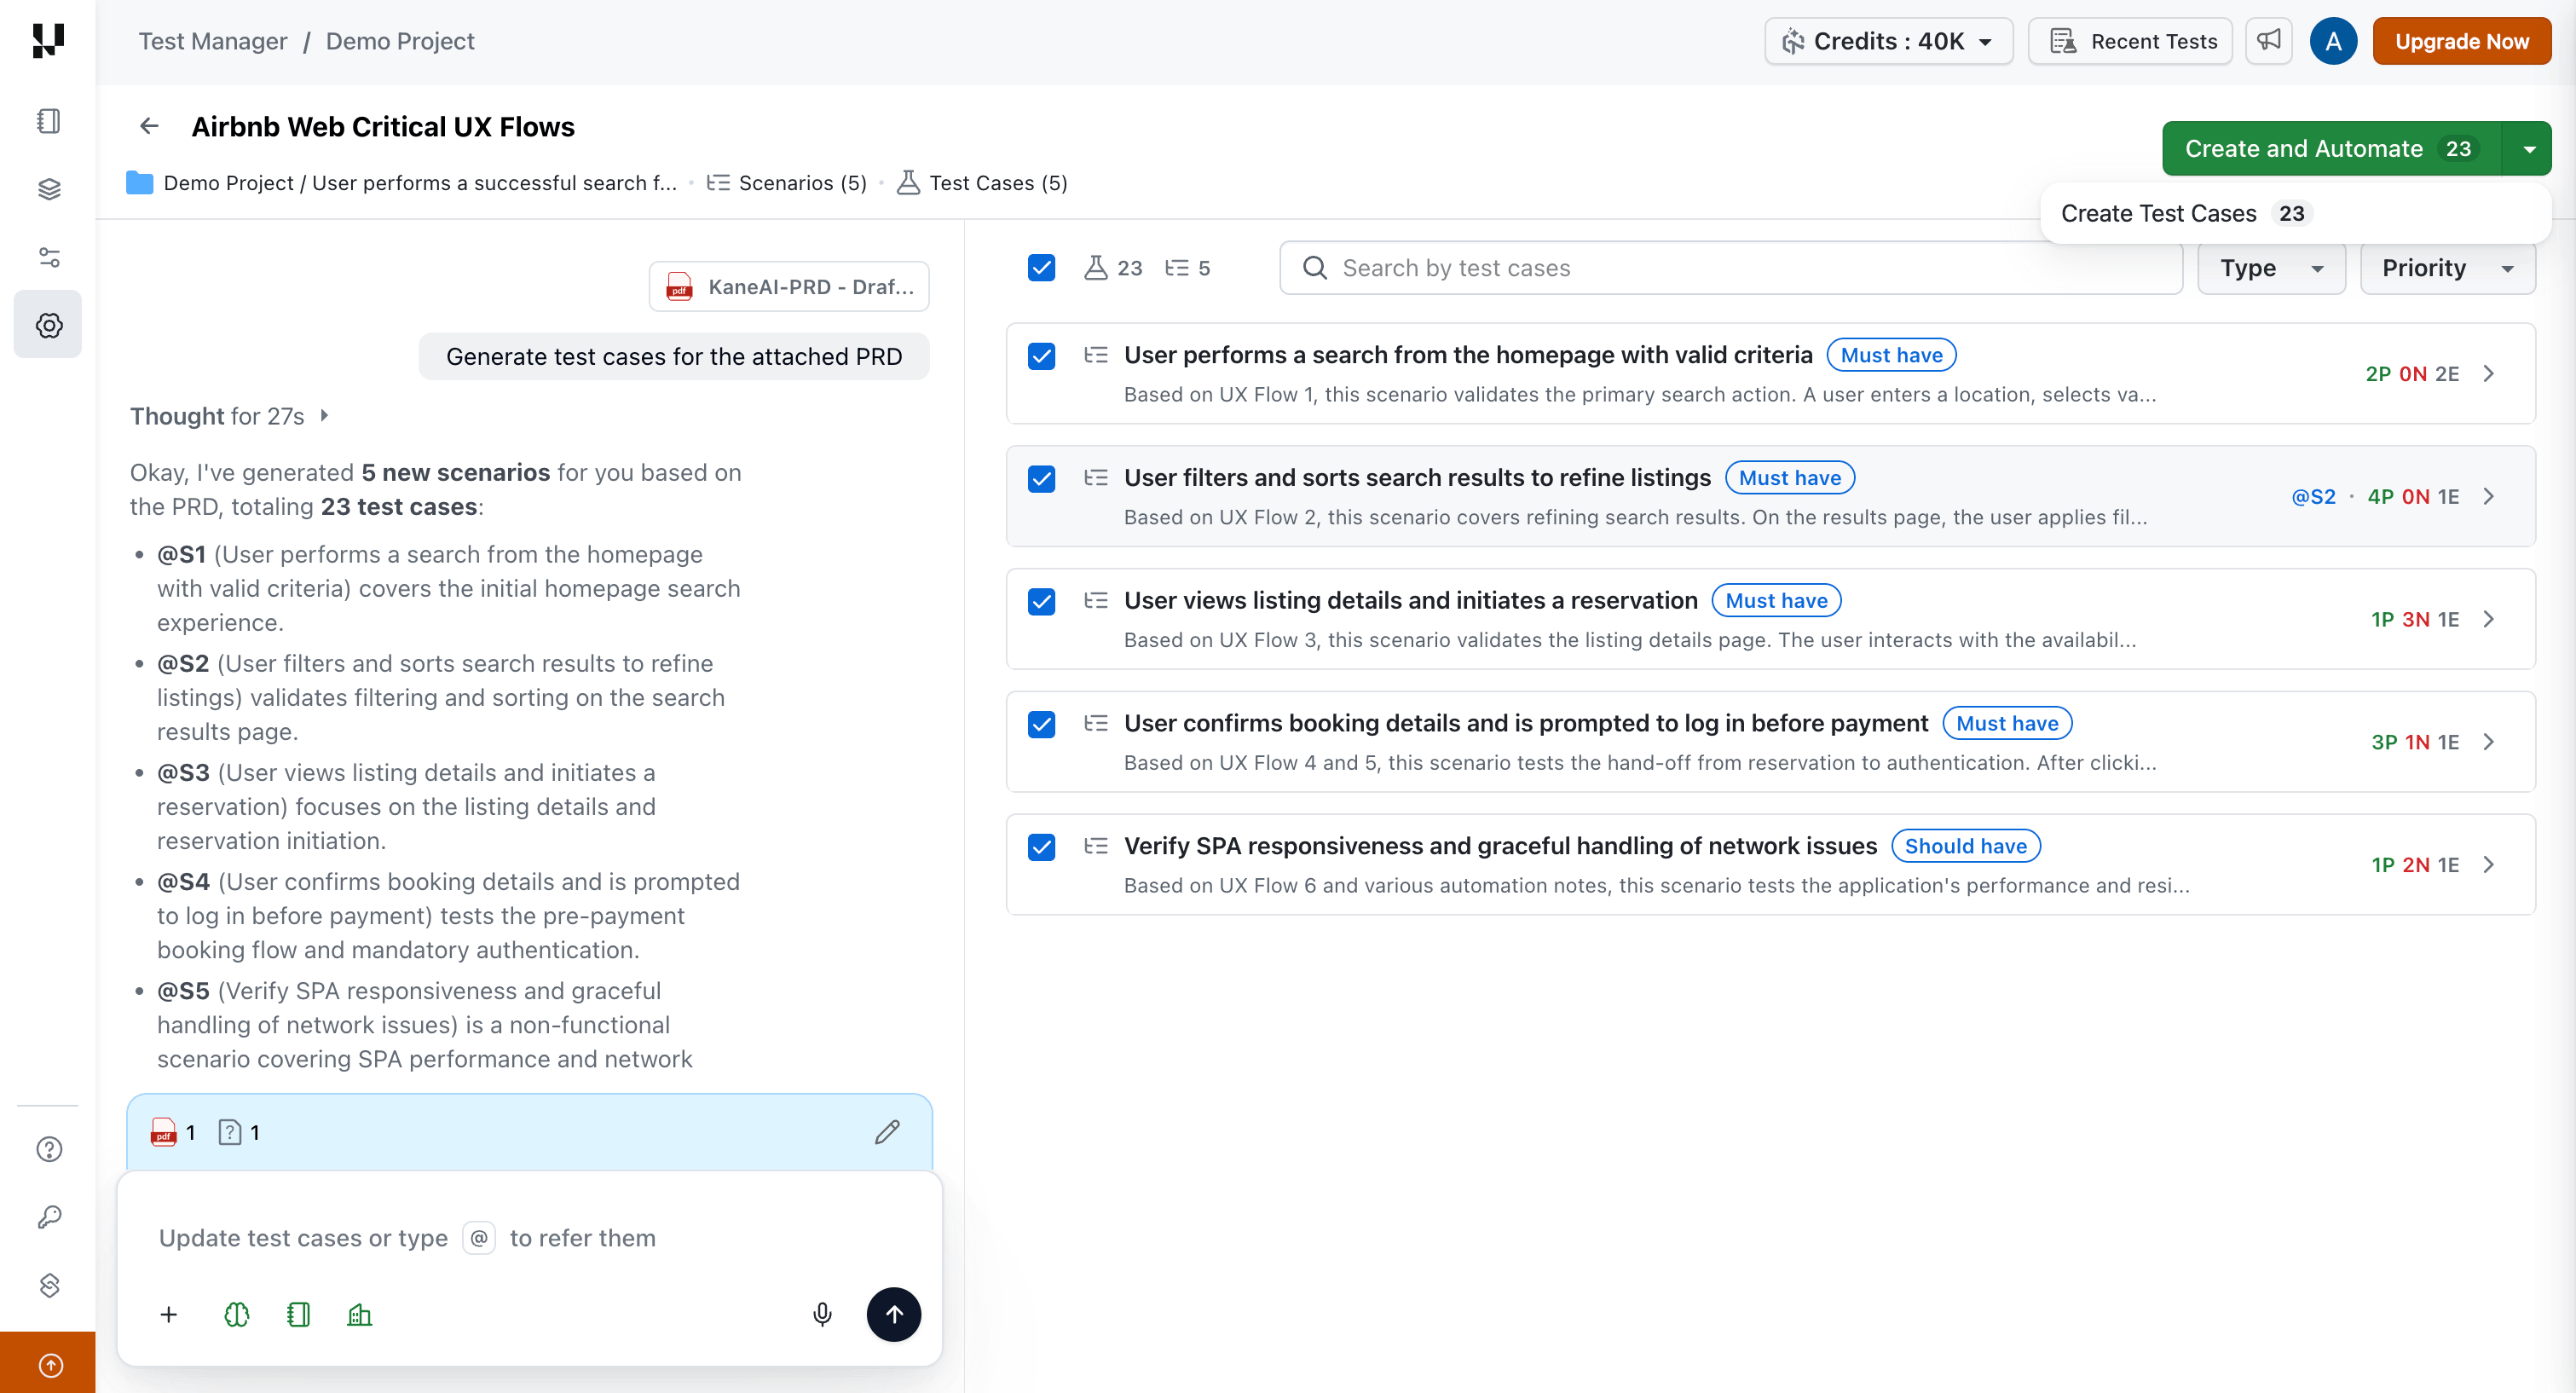
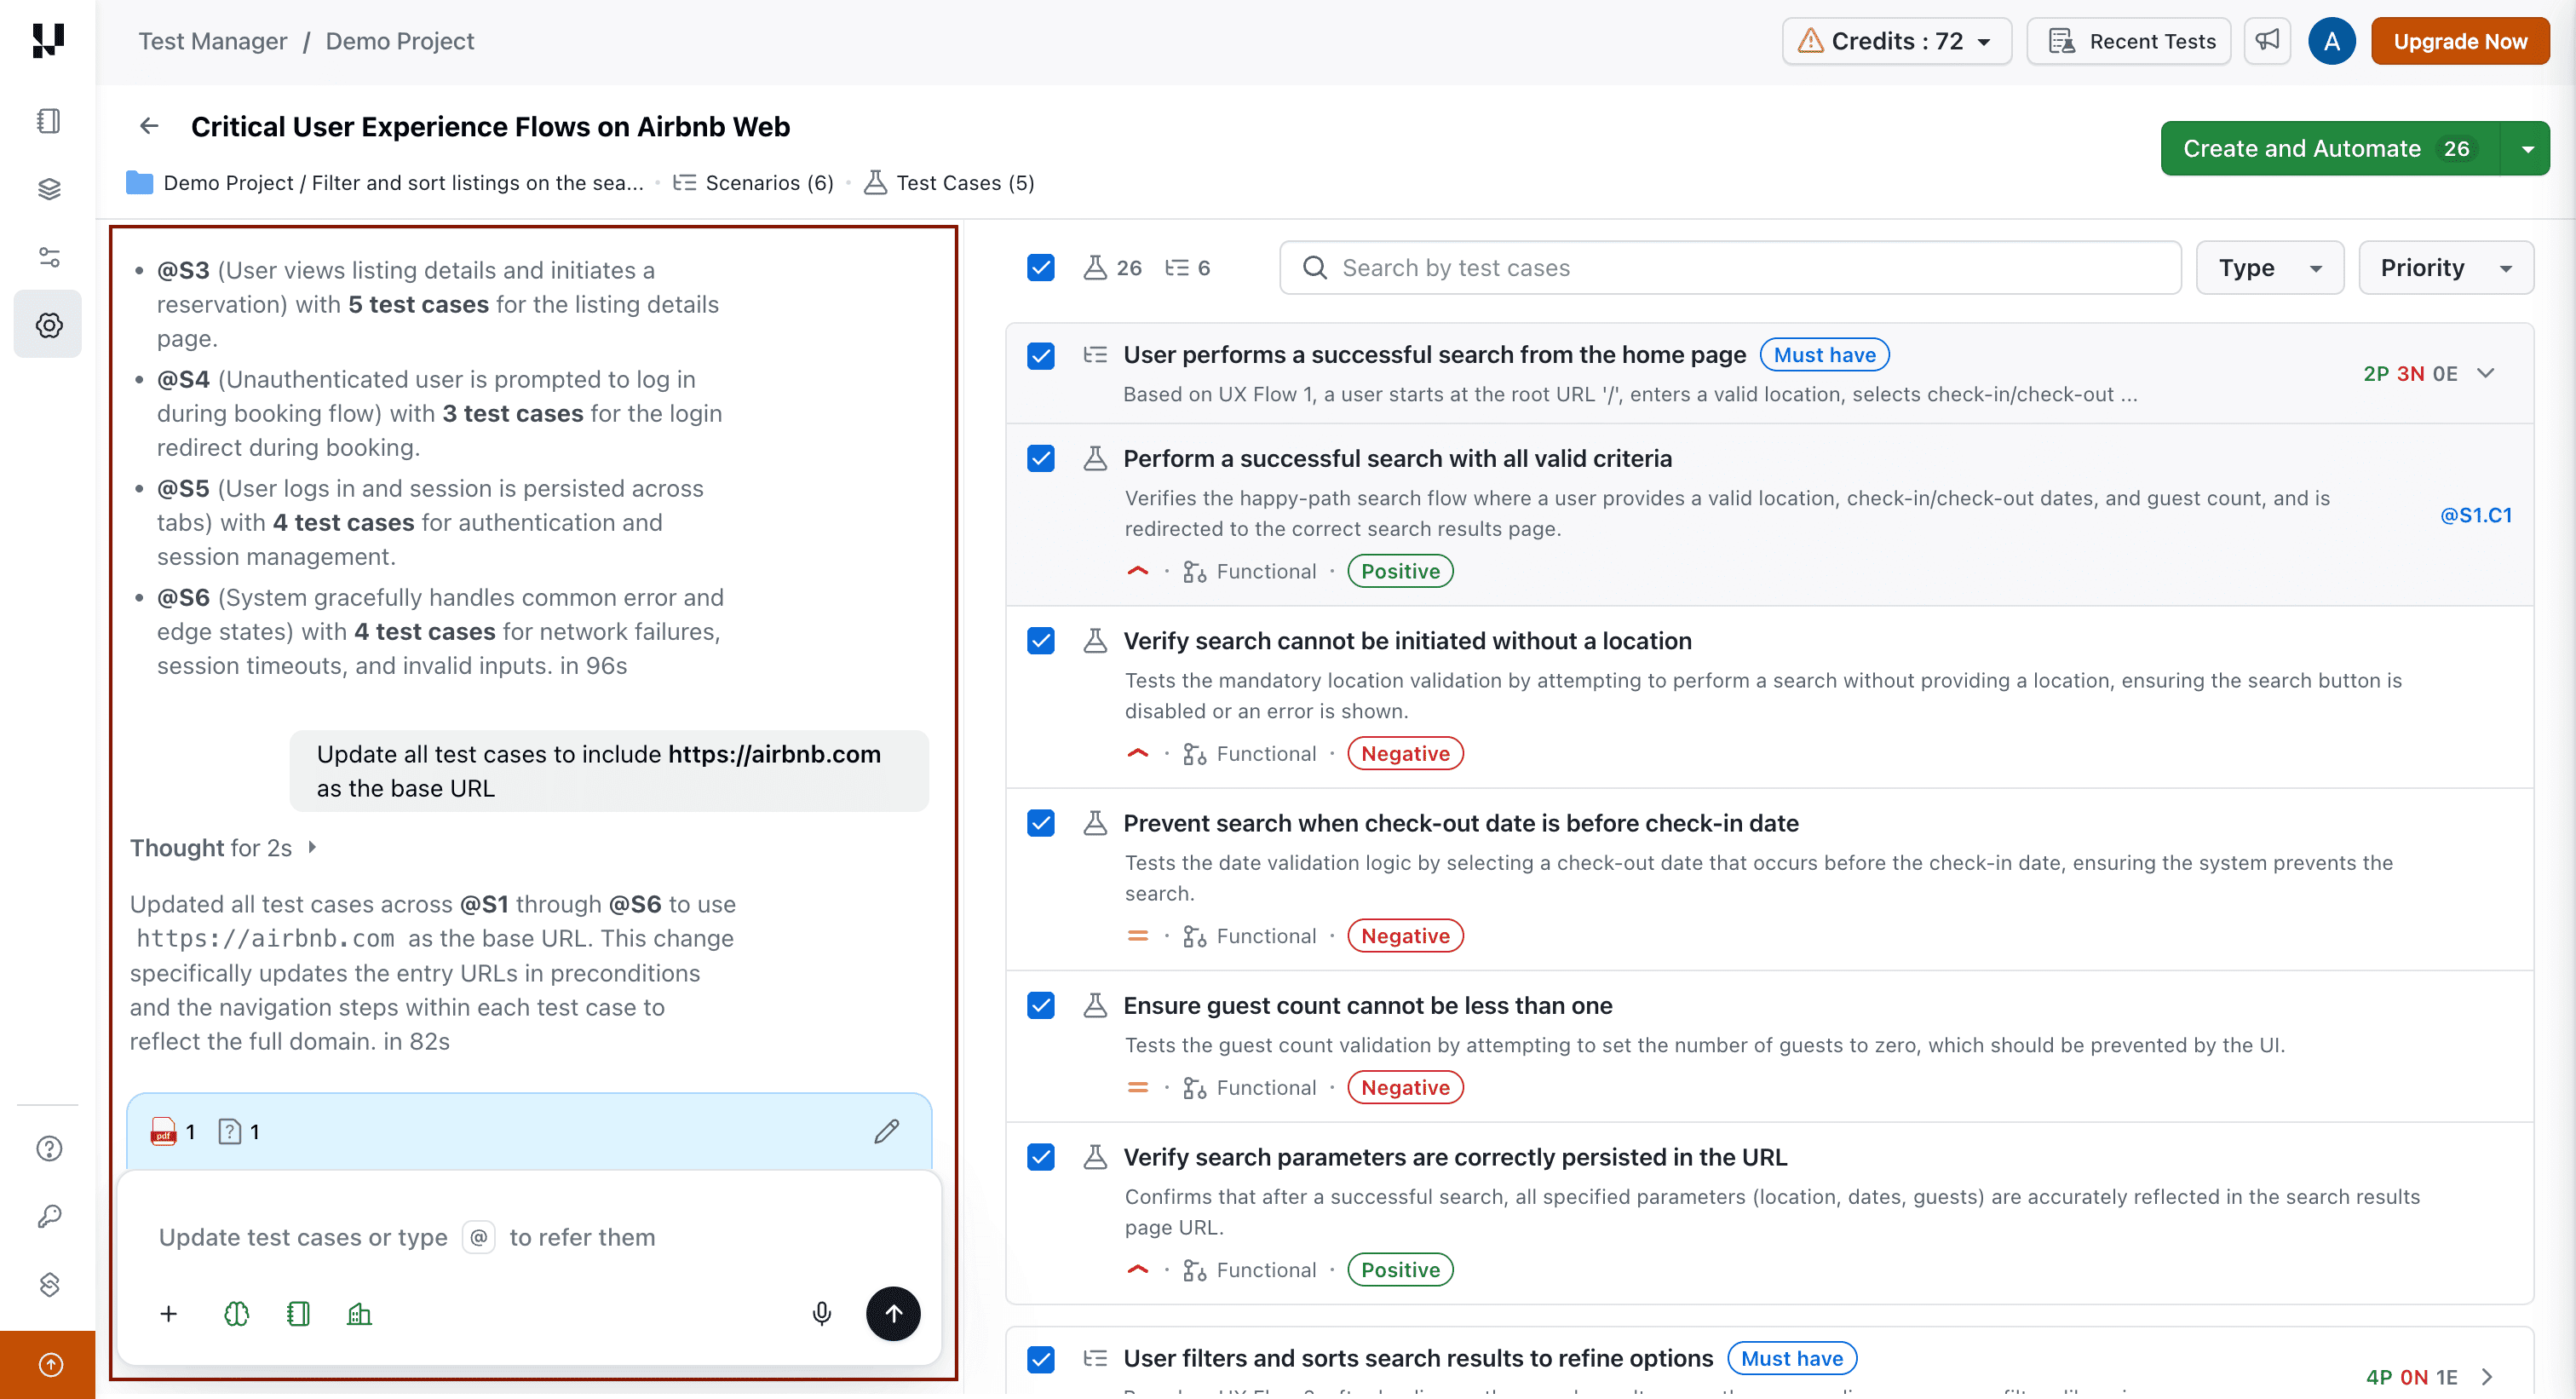
Step 4: Review Test Cases Across Scenarios
-
Test cases are grouped into high-level, logical test scenarios. Each scenario represents a theme or functional area for easier navigation and categorization.
-
Scenarios are labeled with tags such as
Must have,Should have, andCould have, indicating their relative importance as determined by the Agent. -
Individual test cases are further categorized with tags:
- Positive: Valid test cases expected to pass.
- Negative: Invalid or failure cases designed to test robustness.
- Edge: Corner cases that may be overlooked in testing flows.
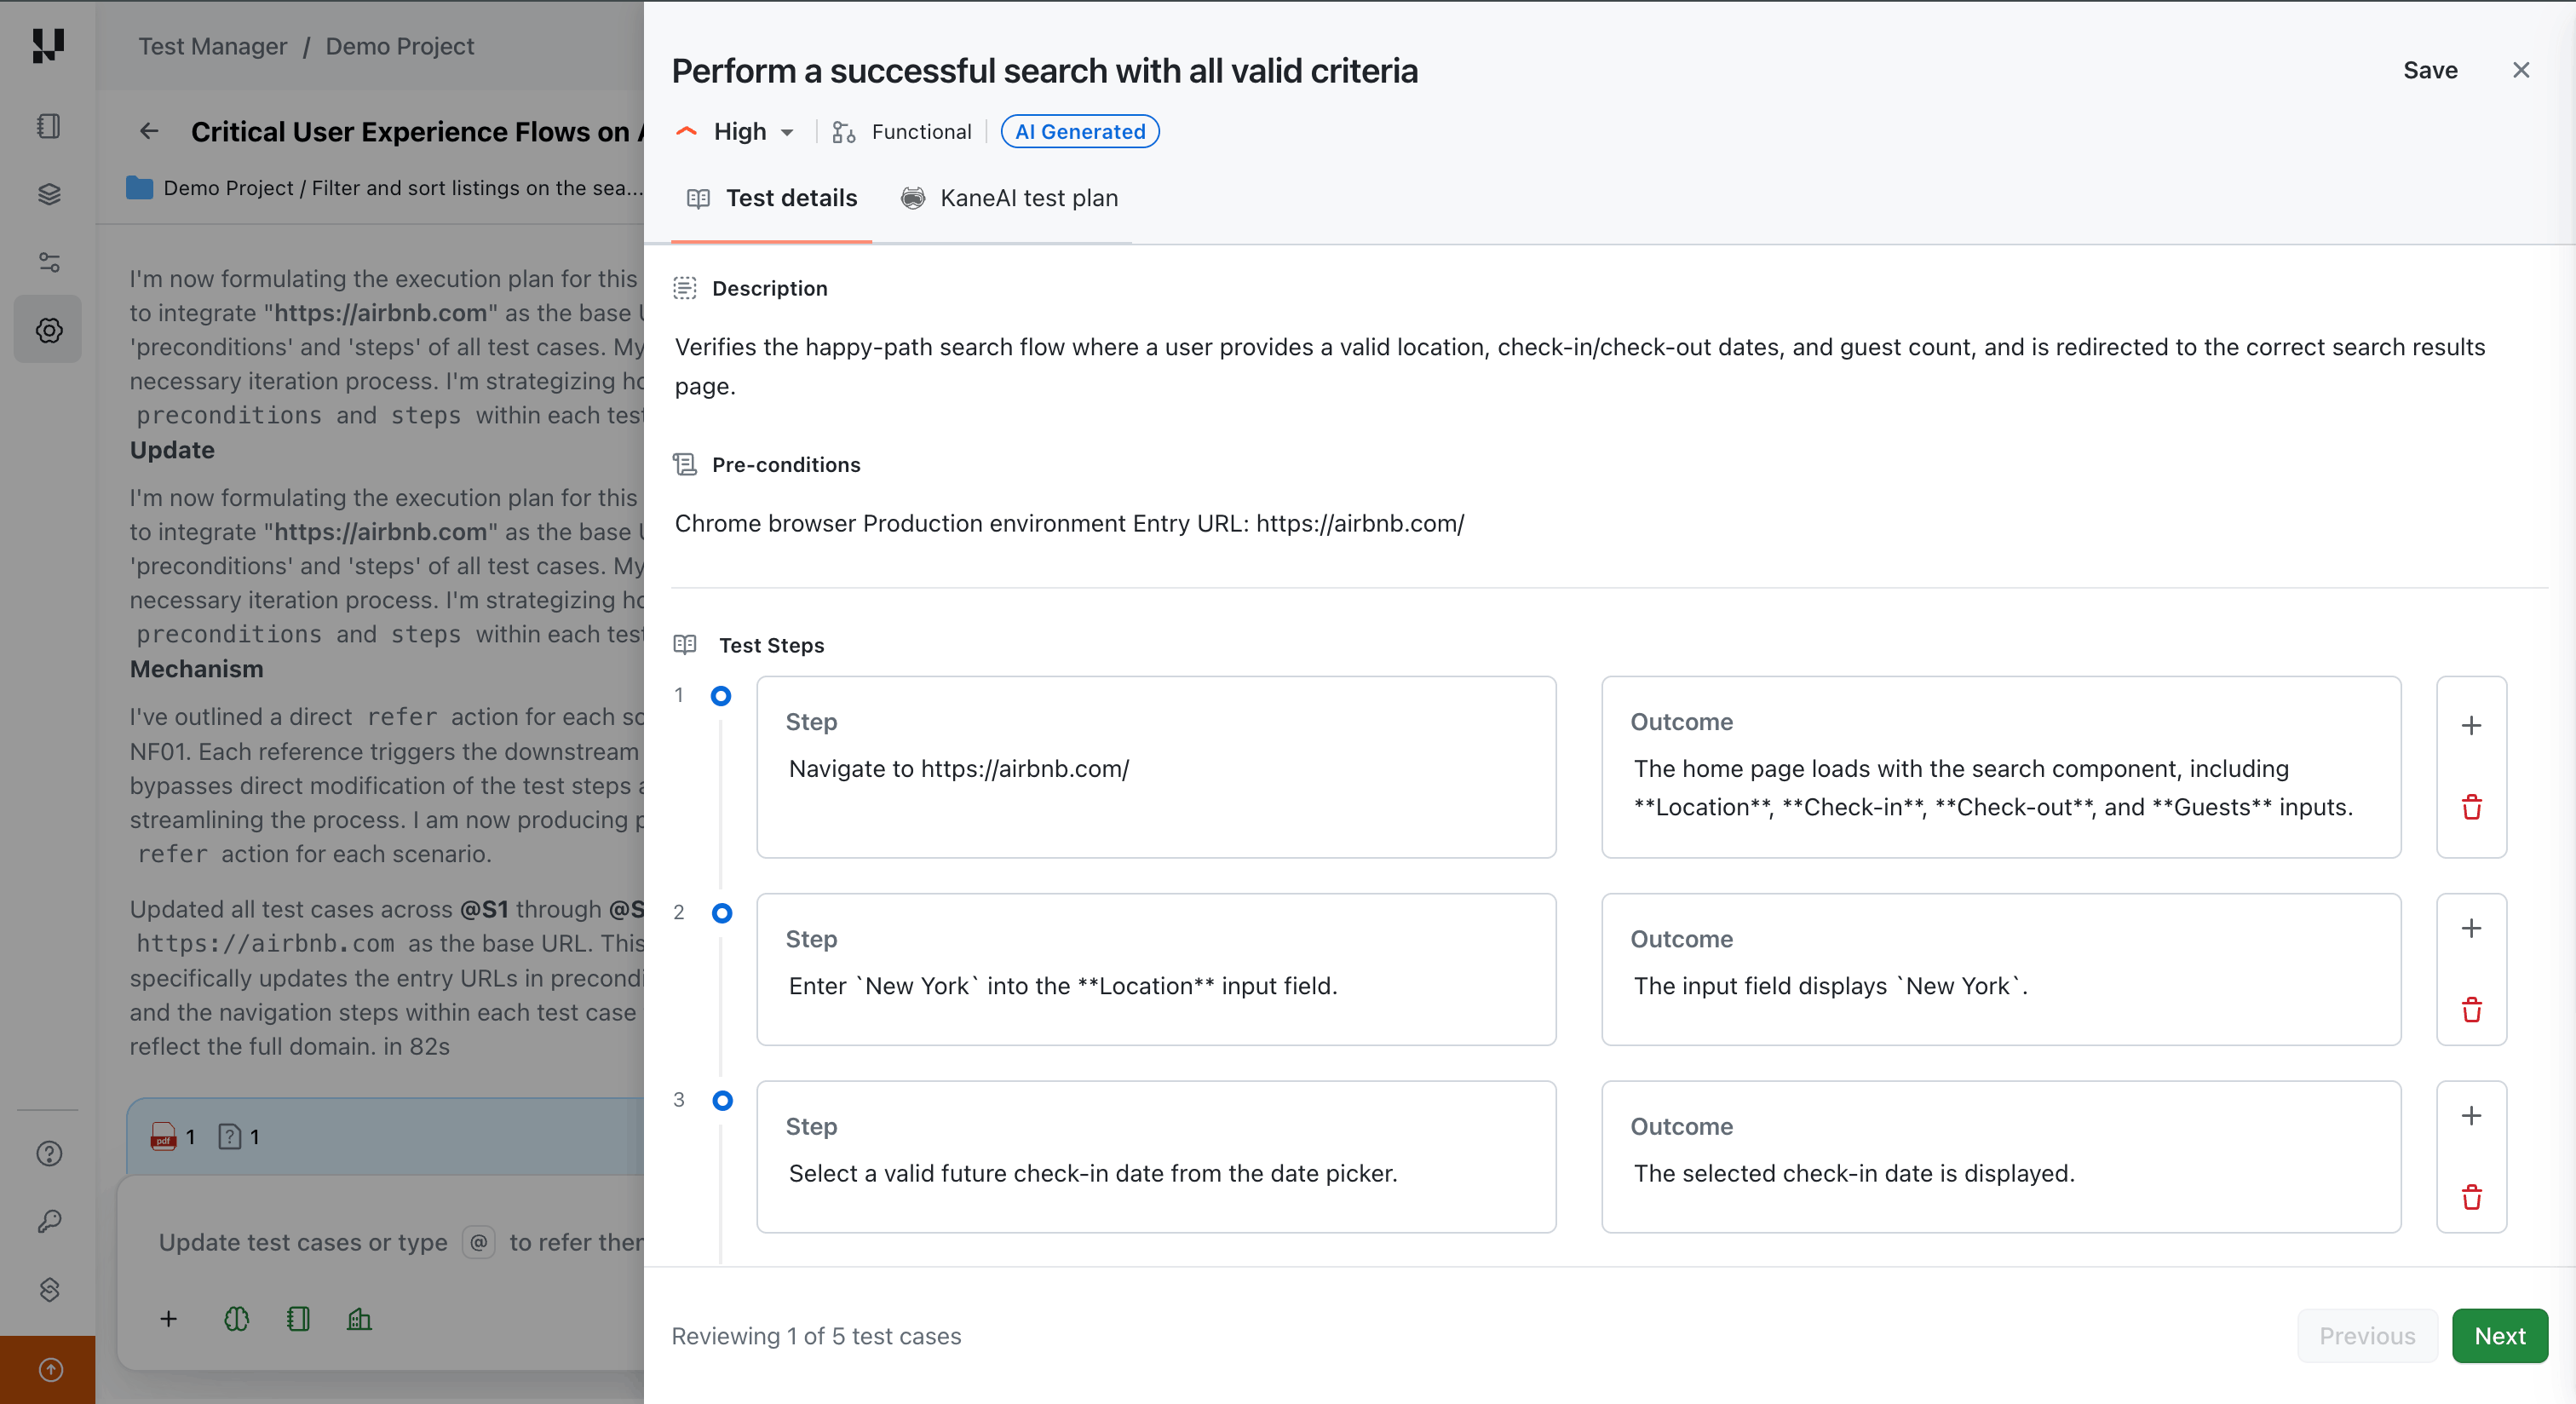
Step 5: View and Edit Test Case Details
Click on any test case to explore its full details, including:
- Test Case Title
- Description
- Pre-conditions
- Priority
- Test Steps and Expected Outcomes
You can edit any part of the test case if you want to add more context or align it with your test strategy.
Conversation Layer: Refine Your Test Cases
After generating your initial test scenarios and cases, you can use the Conversation Layer to iteratively refine them through natural language. Instead of manually editing each test case or regenerating everything from scratch, simply describe what you want changed in the chat interface, and the AI applies the modifications in real time.
Conversational Workspace
When the Conversation Layer is active, the workspace is divided into two primary panels:
Chat Interface (Left Panel)
The left panel is your chat interface for refining test output:
- Message input — Type your refinement instructions in natural language at the bottom of the panel.
- Conversation history — All messages and AI responses are preserved within the session.
- @ Autocomplete — Type
@to trigger an autocomplete dropdown for referencing specific scenarios or test cases. - File attachments — Attach files directly within the conversation using the attachment button.
- Confirmation prompts — The AI asks for confirmation when a change affects more than 5 test cases.
Live Output View (Right Panel)
The right panel is the primary workspace showing your generated test scenarios and test cases:
- Real-time updates — Affected scenarios and test cases update with a streaming animation as changes are processed.
- Scenario cards — Each scenario is displayed as an expandable card containing its test cases.
- Visual indicators — Scenarios and test cases being modified are visually highlighted during streaming.
- Full test case details — Expand any test case to view its steps, expected results, preconditions, and other fields.
Session Context Drawer
To review the context used for your current generation session, click the pencil icon located just above the chat input box at the bottom left. This opens a side drawer displaying:
- Attached Files — All files uploaded during the session.
- Organization Instructions — Organization-level custom instructions applied to the session.
- Project Instructions — Project-level custom instructions applied to the session.
- Linked Issues — Jira or Azure DevOps issues linked to the session.
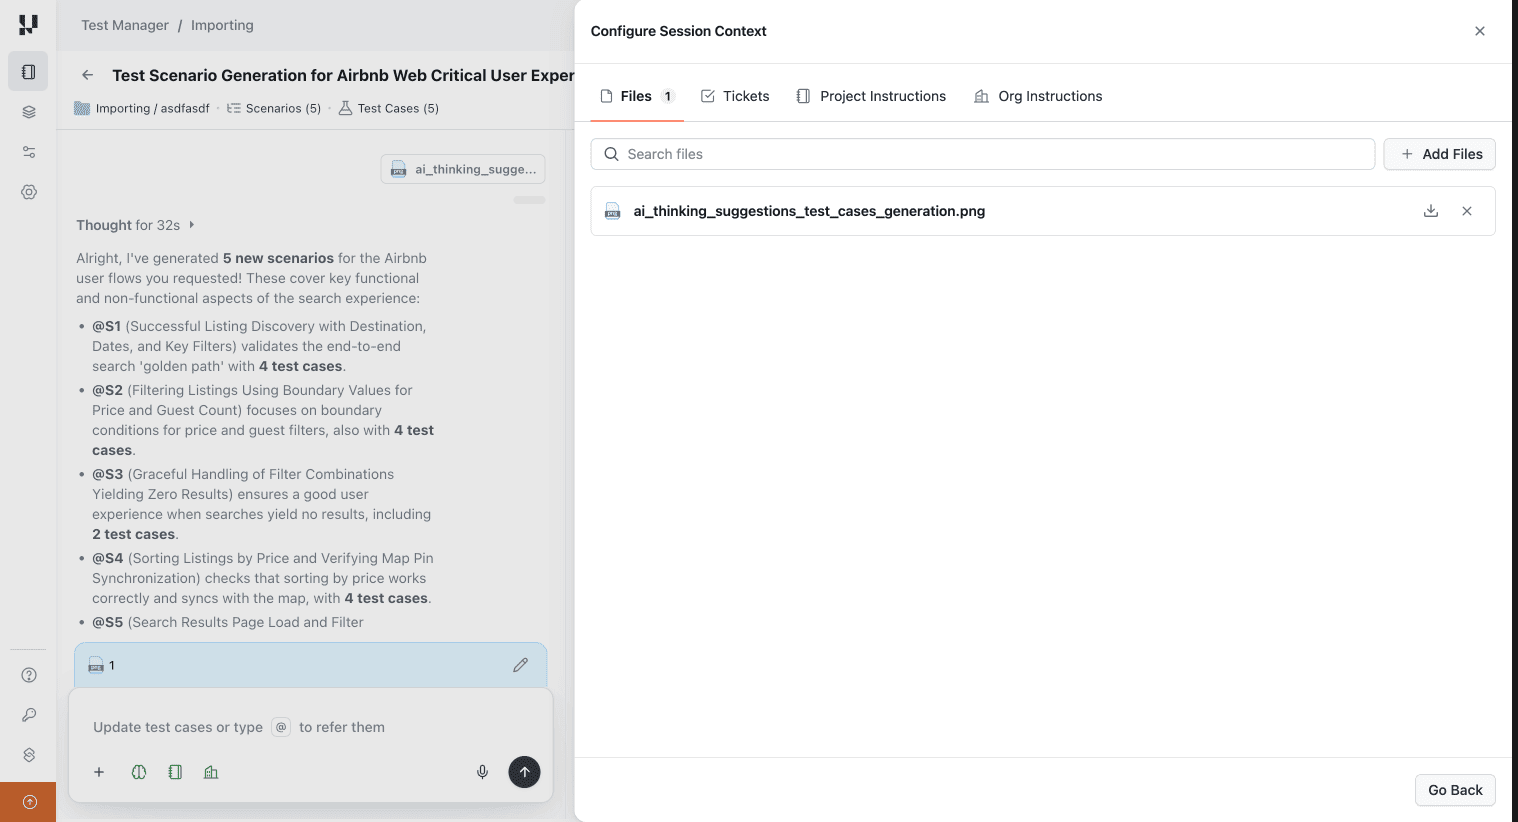
Use the context drawer to verify that the AI is working with the correct inputs. You can review linked issues, attached files, and the custom instructions being applied before sending refinement messages.
Conversational Refinement
How It Works:
- You send a message in the chat interface describing what you want to change.
- The AI interprets your intent and determines which scenarios or test cases to modify.
- Changes stream in real time to the live output view on the right.
- You review and iterate — send follow-up messages to fine-tune further.
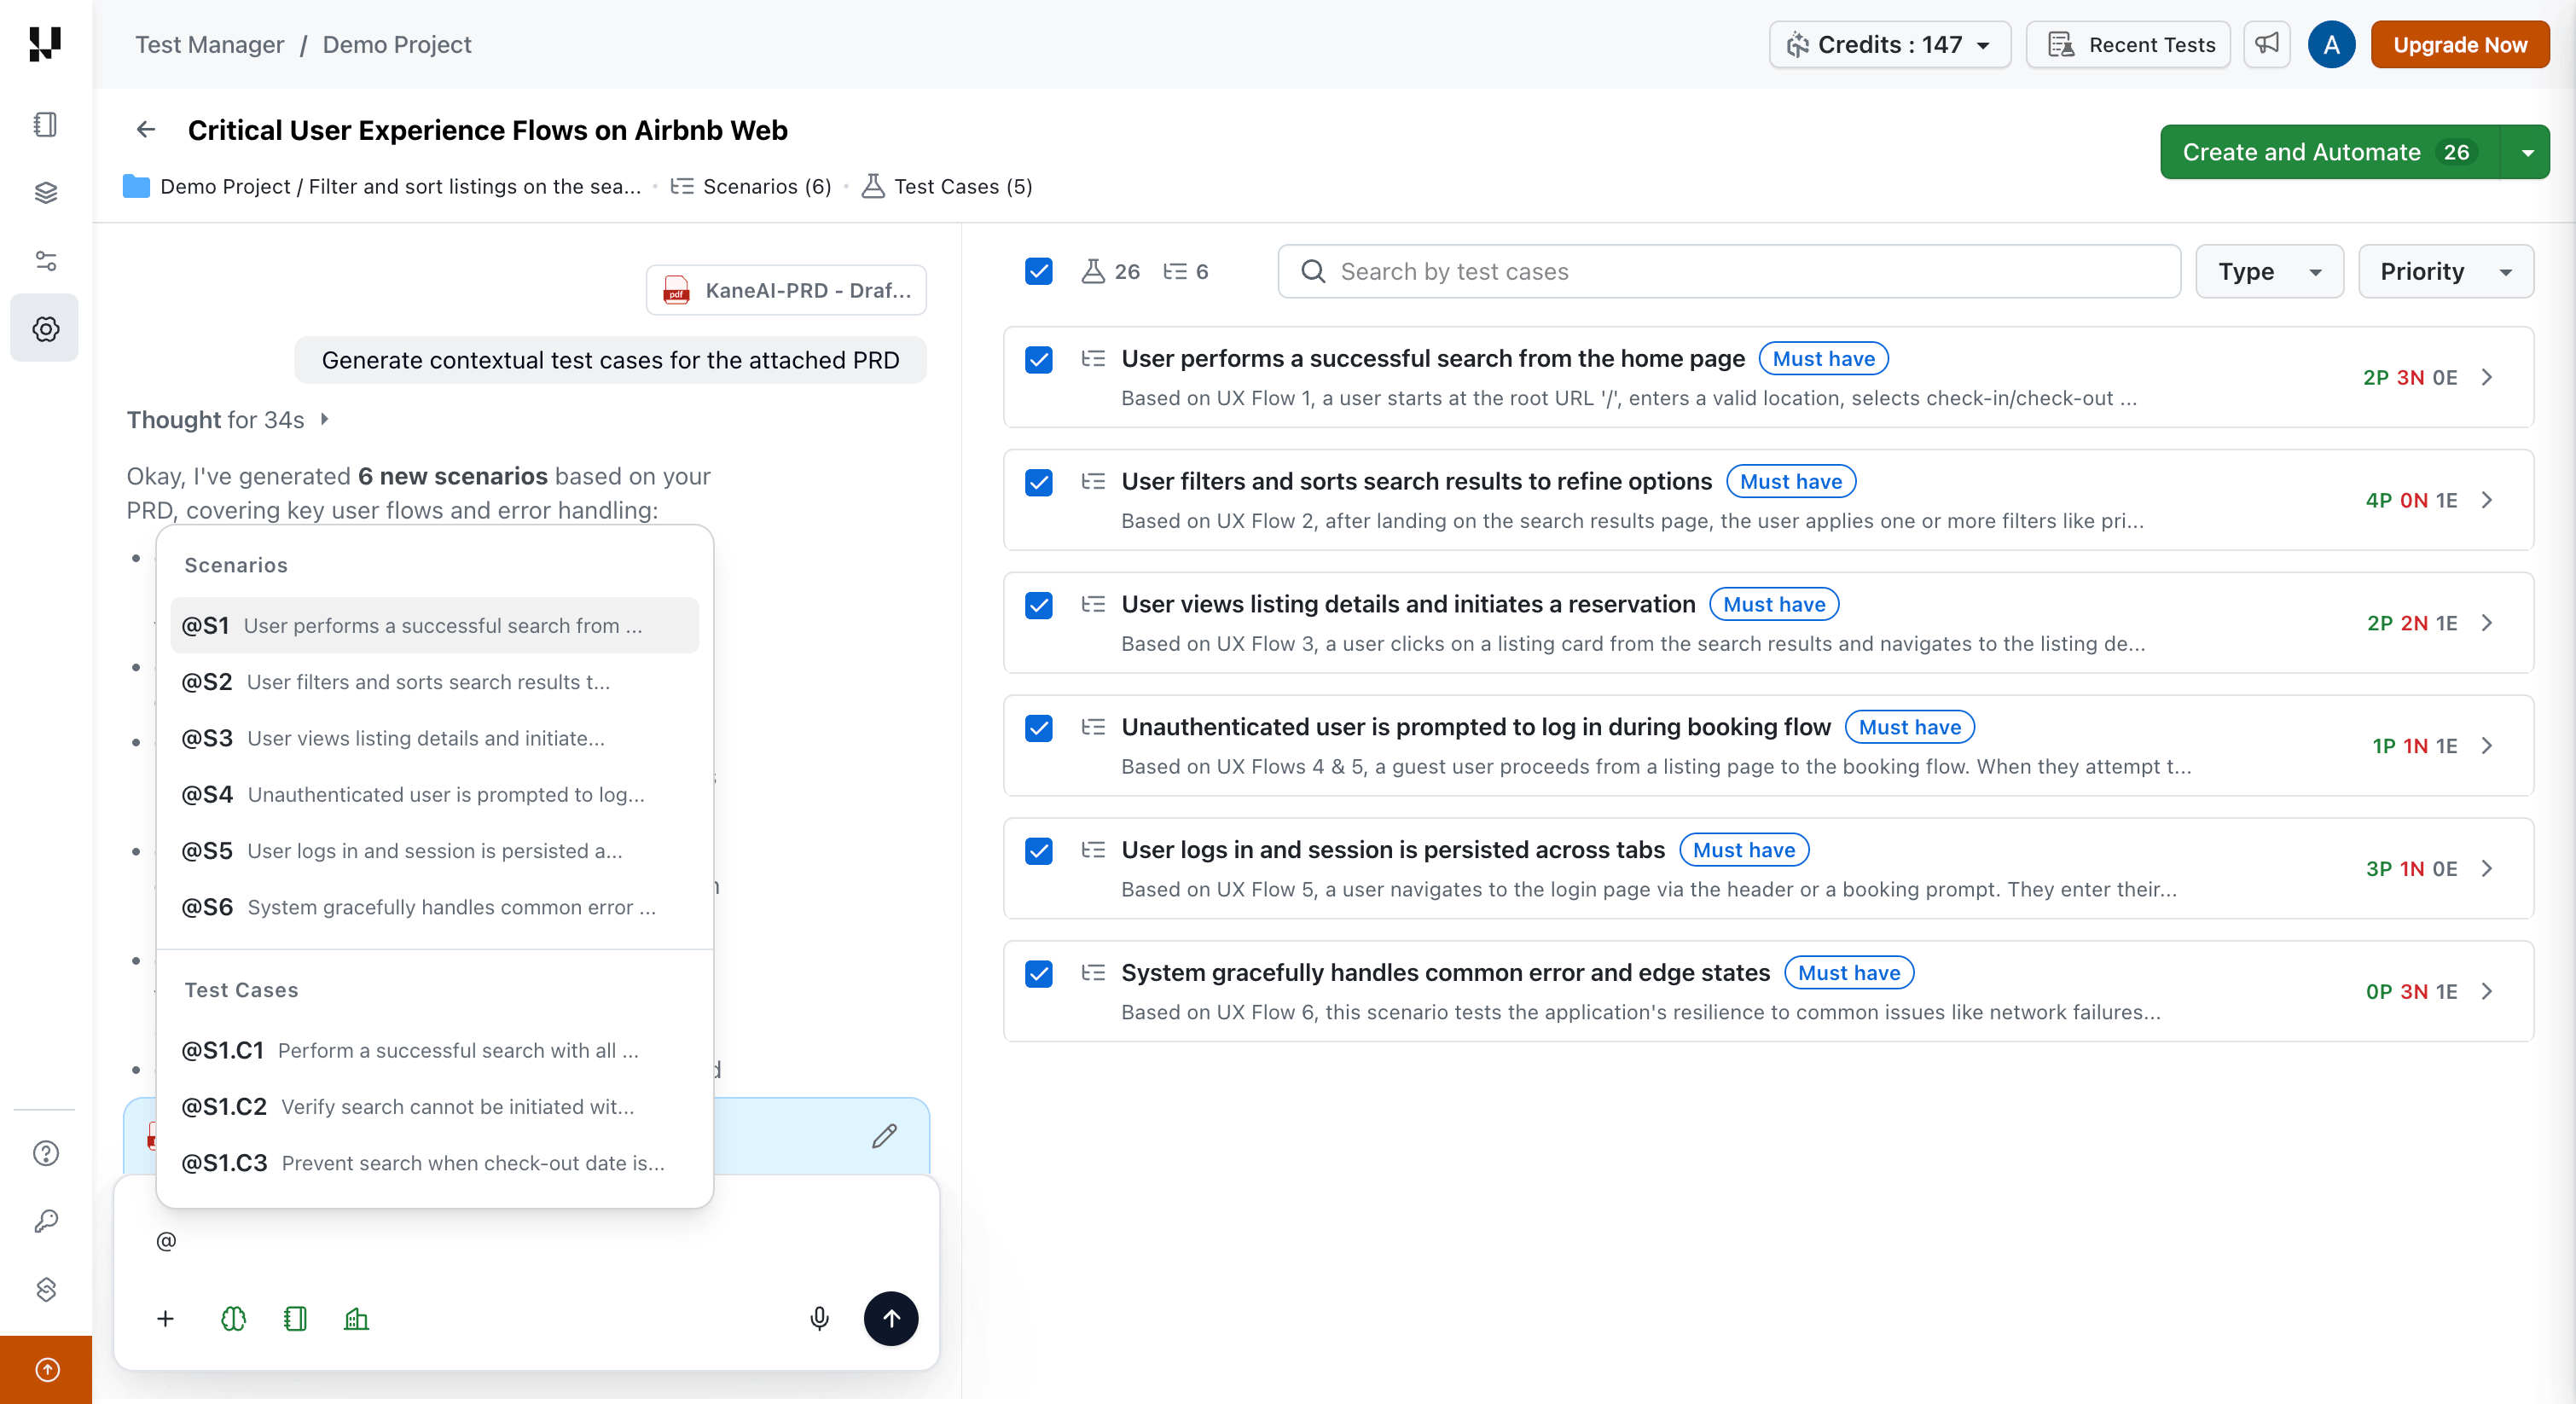
@ Referencing System
The @ referencing system allows you to precisely target specific scenarios or test cases in your messages.
| Reference | Example |
|---|---|
| Scenario | @S1, @S3 |
| Test Case | @S1.C1, @S2.C4 |
Using Autocomplete:
- Type
@in the conversation input. - An autocomplete dropdown appears showing all available scenarios and test cases.
- Start typing to filter the list (e.g.,
@S2filters to scenarios,@S2.*filters to test cases in Scenario 2). - Click or press Enter to select the reference.
What You Can Do with Conversational Refinement:
The Conversation Layer transforms how you refine test scenarios. Instead of manually editing each test case, describe what you need in natural language, and watch your test suite reshape itself in real time.
Reorganize Test Scenarios
Restructure how your test cases are grouped and organized.
| Action | Example Prompt |
|---|---|
| Group by feature or module | Reorganize all test cases by feature — create separate scenarios for User Authentication, Shopping Cart, Checkout, and Order History |
| Split by test type | Split @S1 into three separate scenarios: one for positive flows, one for negative/error cases, and one for boundary conditions |
| Group by platform or environment | These test cases are mixed. Group them by platform — create one scenario for Web Desktop, one for Mobile Web, and one for Mobile App |
| Create user journey scenarios | Create end-to-end user journey scenarios. Combine login, product search, add to cart, and checkout into a complete "Customer Purchase Journey" scenario |
Expand Test Coverage
Add new test cases or scenarios to improve coverage.
| Action | Example Prompt |
|---|---|
| Add missing test types | Add negative test cases to @S1 covering invalid email formats, passwords shorter than 8 characters, usernames with special characters, and empty field submissions |
| Add security tests | We need security coverage for @S3. Add test cases for SQL injection, XSS attacks, CSRF validation, and session hijacking across all input fields |
| Add platform-specific tests | Add mobile-specific test cases to @S2 — include touch gestures, pinch to zoom, orientation changes, and offline mode scenarios |
| Fill coverage gaps from uploaded files | I've attached the updated requirements document. Review it against our current test cases and create new ones for any features or user stories we haven't covered yet |
| Add new scenarios | Create a new scenario for the password reset flow with test cases covering successful reset, expired reset links, invalid tokens, rate limiting, and already-used tokens |
Remove Unnecessary Tests
Clean up your test suite by removing low-value or out-of-scope test cases.
| Action | Example Prompt |
|---|---|
| Remove by priority | We're focusing on critical paths for this release. Delete all Low priority test cases from @S2 and keep only High and Medium priority ones |
| Remove by test type | Remove all test cases that only verify UI cosmetics like text labels, button colors, and spacing. Keep the functional validation and business logic tests |
| Keep specific functionality only | We're deprecating the wishlist feature. Keep only the shopping cart test cases and remove everything related to wishlist functionality |
| Remove by user role | Our next sprint focuses only on logged-in users. Remove all guest user and anonymous browsing test cases, keep authenticated user workflows |
Combine and Merge Tests
Reduce redundancy by merging overlapping test cases.
| Action | Example Prompt |
|---|---|
| Merge duplicate tests | I notice @S1.C3 and @S1.C5 both test login validation with different edge cases. Merge them into a single comprehensive test case that includes all the validation scenarios from both |
| Create end-to-end flows | Combine the separate test cases for user registration, email verification, and first-time login into one end-to-end "New User Onboarding Journey" test |
| Consolidate compatibility tests | We have separate test cases for Chrome, Firefox, Safari, and Edge. Merge these into a single cross-browser compatibility test with browser-specific validation steps |
Standardize Naming and Formatting
Apply consistent naming conventions and formatting across test cases.
| Action | Example Prompt |
|---|---|
| Enforce naming conventions | Rename all test cases to follow this format: [Feature] - [Scenario Type] - Description. For example: [Login] - Positive - Successful authentication with valid credentials |
| Align terminology | Our team uses "save" instead of "submit". Replace every instance of "submit" with "save" across all test case titles, steps, and expected results in @S2 |
| Standardize priorities | Update priority to High for all test cases that involve payment processing, checkout, or financial transactions |
| Add tags | Tag all critical user journey test cases with "smoke-suite" so we can easily filter them for our smoke testing runs |
Enhance Test Case Details
Add preconditions, cleanup steps, or additional context to test cases.
| Action | Example Prompt |
|---|---|
| Add preconditions | Add a precondition to all test cases in @S1 and @S3 stating: "User must be logged in with a verified email account and have at least one saved payment method" |
| Add cleanup steps | All test cases that create new users or test data need cleanup. Add a final step to delete the test account and associated data to prevent database pollution |
| Add specific steps to all test cases | Add these two steps to all test cases in @S2: Step 1 - Clear browser cache and cookies. Step 2 - Verify the homepage loads successfully before proceeding with the test |
| Add steps to specific test cases | In @S1.C3 and @S1.C5, add a step after login to verify the user's dashboard displays their last login timestamp and session information |
| Add steps at specific position | In @S2.C2, add a step between step 3 and step 4 to take a screenshot of the shopping cart and verify the item quantity matches what was added |
Make Targeted Modifications
Precisely modify specific scenarios or test cases using @ references.
| Action | Example Prompt |
|---|---|
| Modify scenario scope | Update @S3 to focus only on admin dashboard functionality and role-based access control. Remove all end-user and guest user test cases from this scenario |
| Update specific test case | In @S2.C4, the expected result needs updating. Change it to "Account is locked for 30 minutes after 3 consecutive failed login attempts" instead of just showing an "Invalid credentials" error |
| Expand test case validation | Expand @S1.C2 to include password strength validation: minimum 8 characters, at least one uppercase letter, one number, one special character, and cannot contain the username |
- Use
@references for precision — Target specific scenarios (@S1) or test cases (@S2.C3) to ensure the AI modifies exactly what you intend - Combine multiple actions — Request several changes in one message: "Remove all Low priority test cases from @S1, add 2 boundary tests for the email field, and rename remaining test cases to include the module name"
- Provide updated context mid-session — Upload revised specifications or link Jira/Azure DevOps tickets at any point to help the AI identify coverage gaps and generate test cases aligned with the latest requirements
- Start broad, then refine — First organize scenarios at a high level, then drill down to individual test cases
Re-Generation Settings
The Test Case Generator provides several controls that work alongside the Conversation Layer:
- Max Scenarios — Control the maximum number of scenarios generated in a session.
- Max Test Cases per Scenario — Set the upper limit for test cases within each individual scenario.
- Regenerate Scenarios — Regenerate all scenarios utilizing existing context and to regenerate fresh Scenarions and Test Cases.
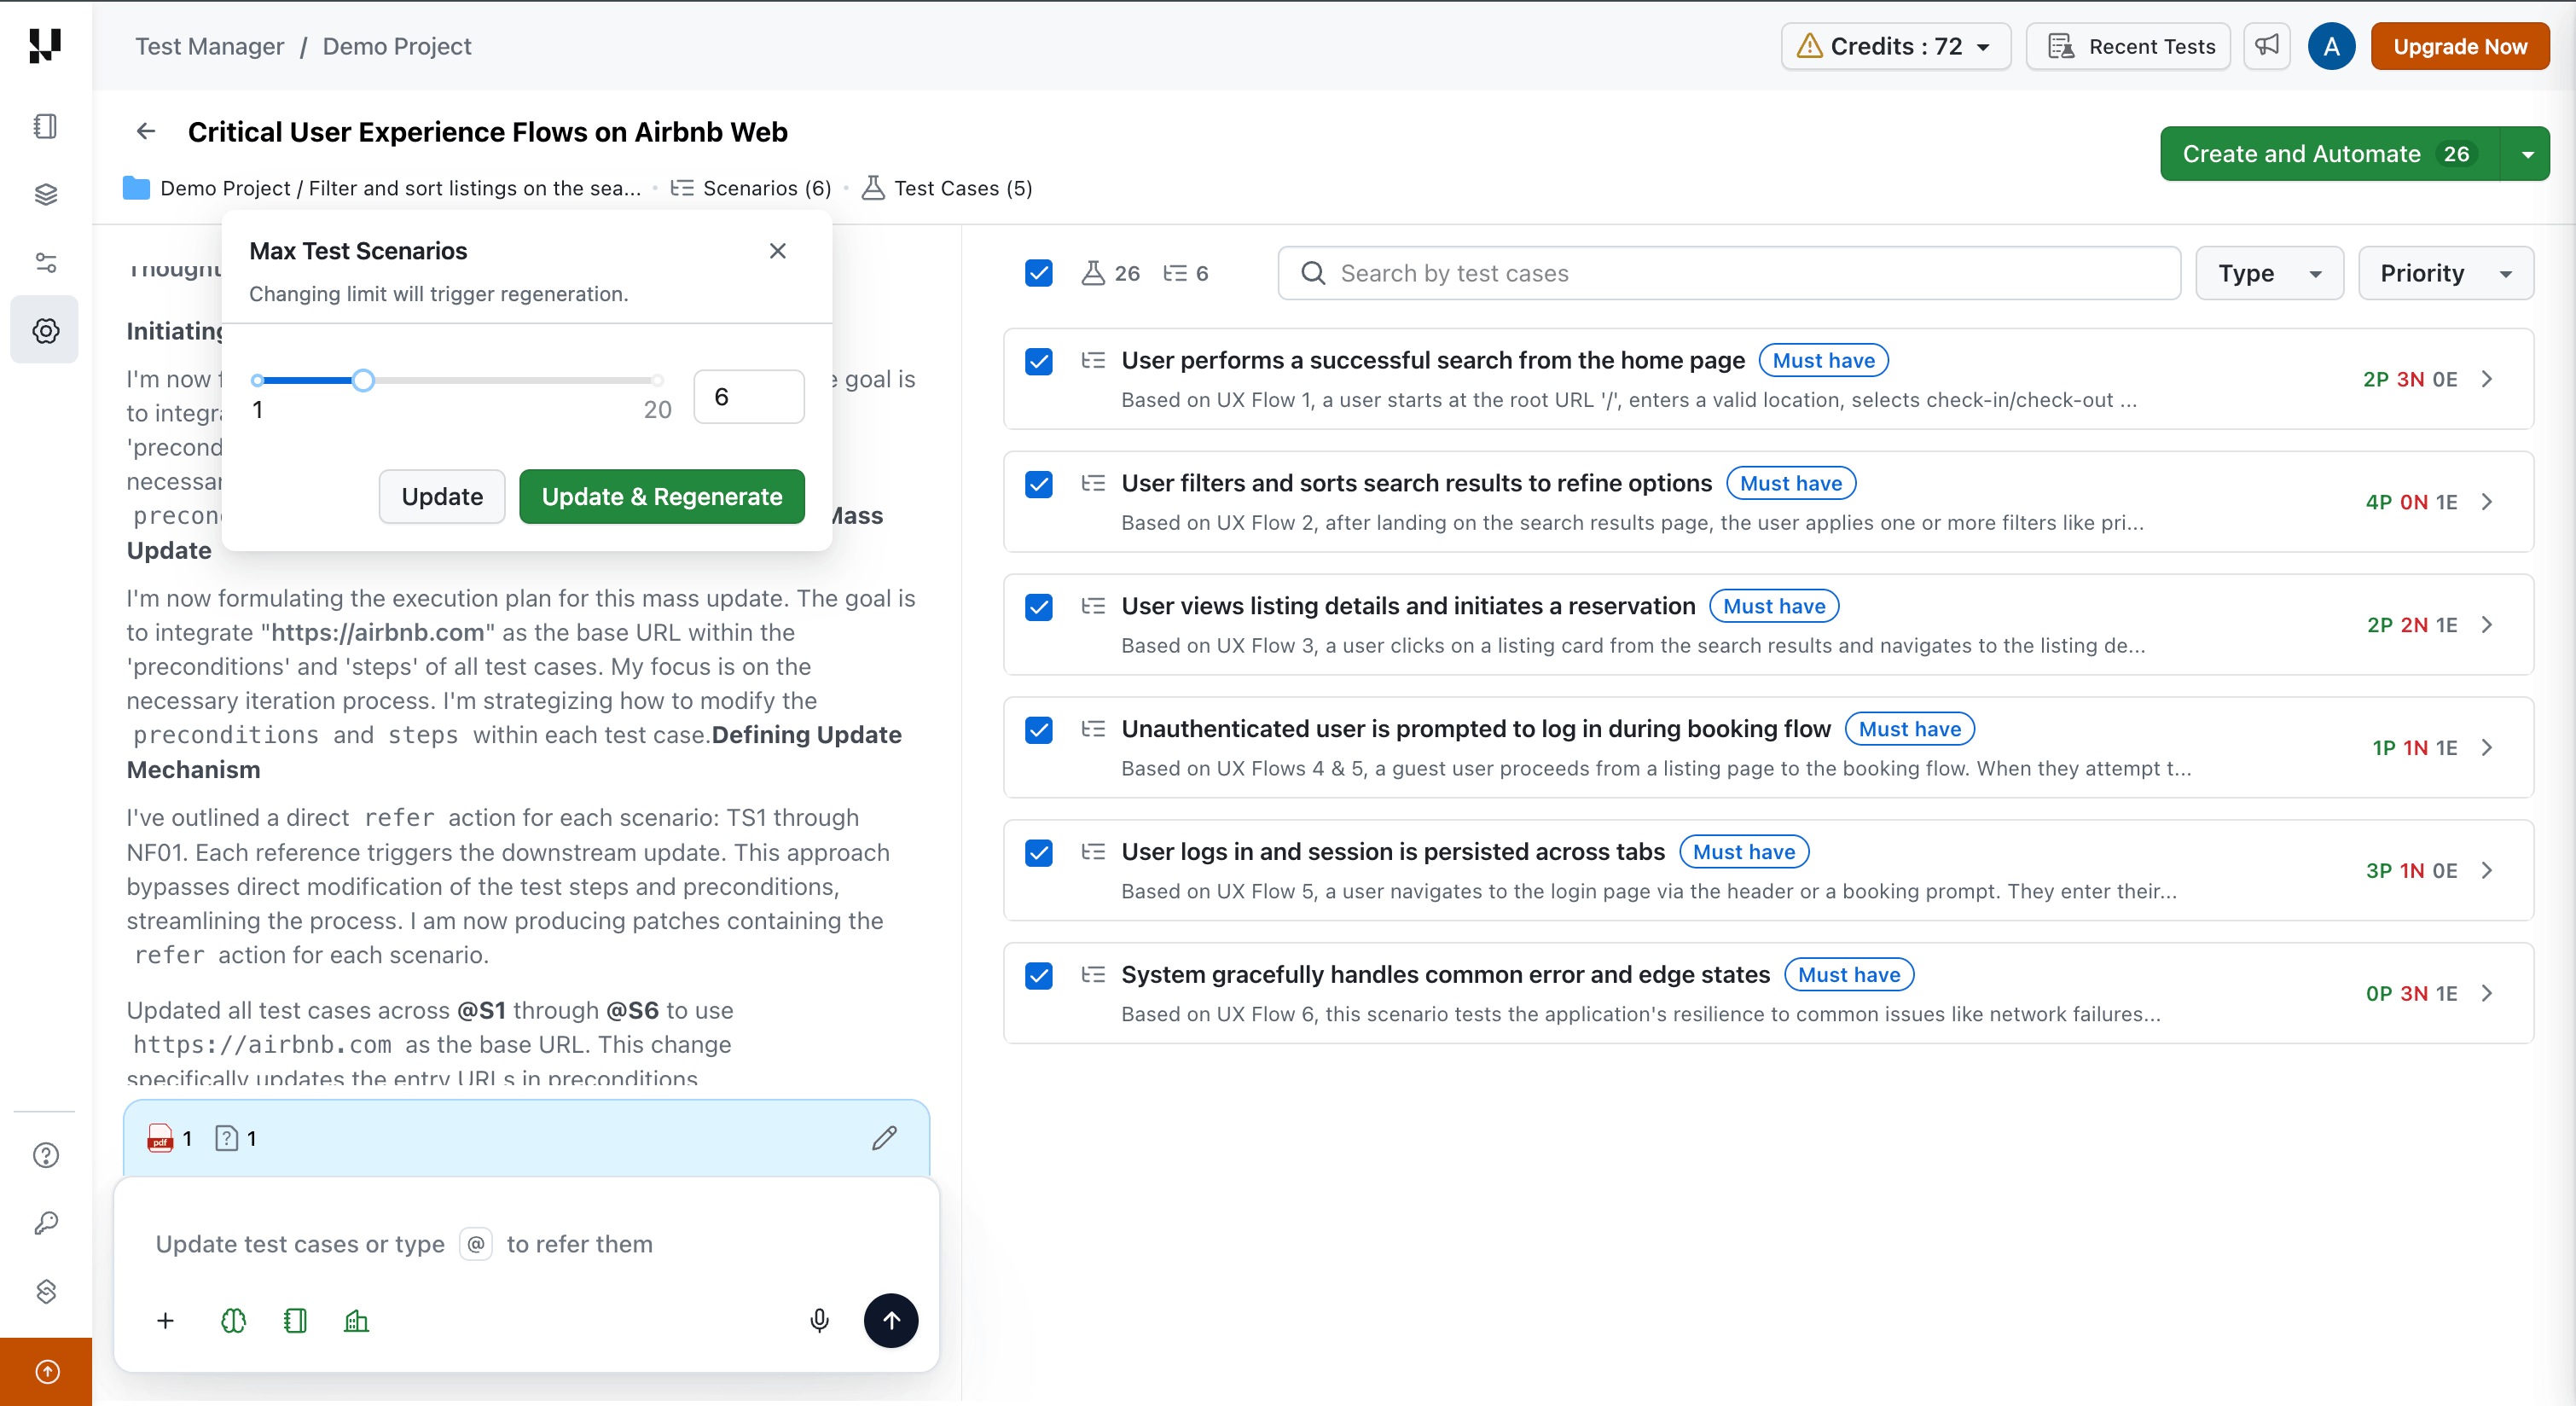
Regeneration replaces all current scenarios. To keep specific scenarios intact and only modify others, use targeted conversational refinements instead.
Credit Usage
The Conversation Layer consumes AI credits based on the scope of each refinement.
| Action | Credit Cost |
|---|---|
| Edit or modify a scenario (including its test cases) | 5 credits |
| Edit or modify a single test case | 1 credit |
- Credits are deducted per message based on the scope of the change.
- If your message affects multiple scenarios, credits are deducted for each scenario impacted.
- Your remaining credit balance is visible in your account dashboard.
Current Limitations
The following capabilities are planned for future releases:
- Undo and versioning — No rollback mechanism for individual conversation-driven changes.
- Step-level referencing — You cannot reference individual steps within a test case. Instead, reference the test case and describe the change.
- Coverage queries — Asking analytical questions (e.g., "Do we have tests for invalid amounts?") without requesting a change is not supported.
Save or Automate Test Cases
Once you have generated and refined your test scenarios and test cases, it's time to save your work. Select the test cases you want to keep and choose one of the following options:
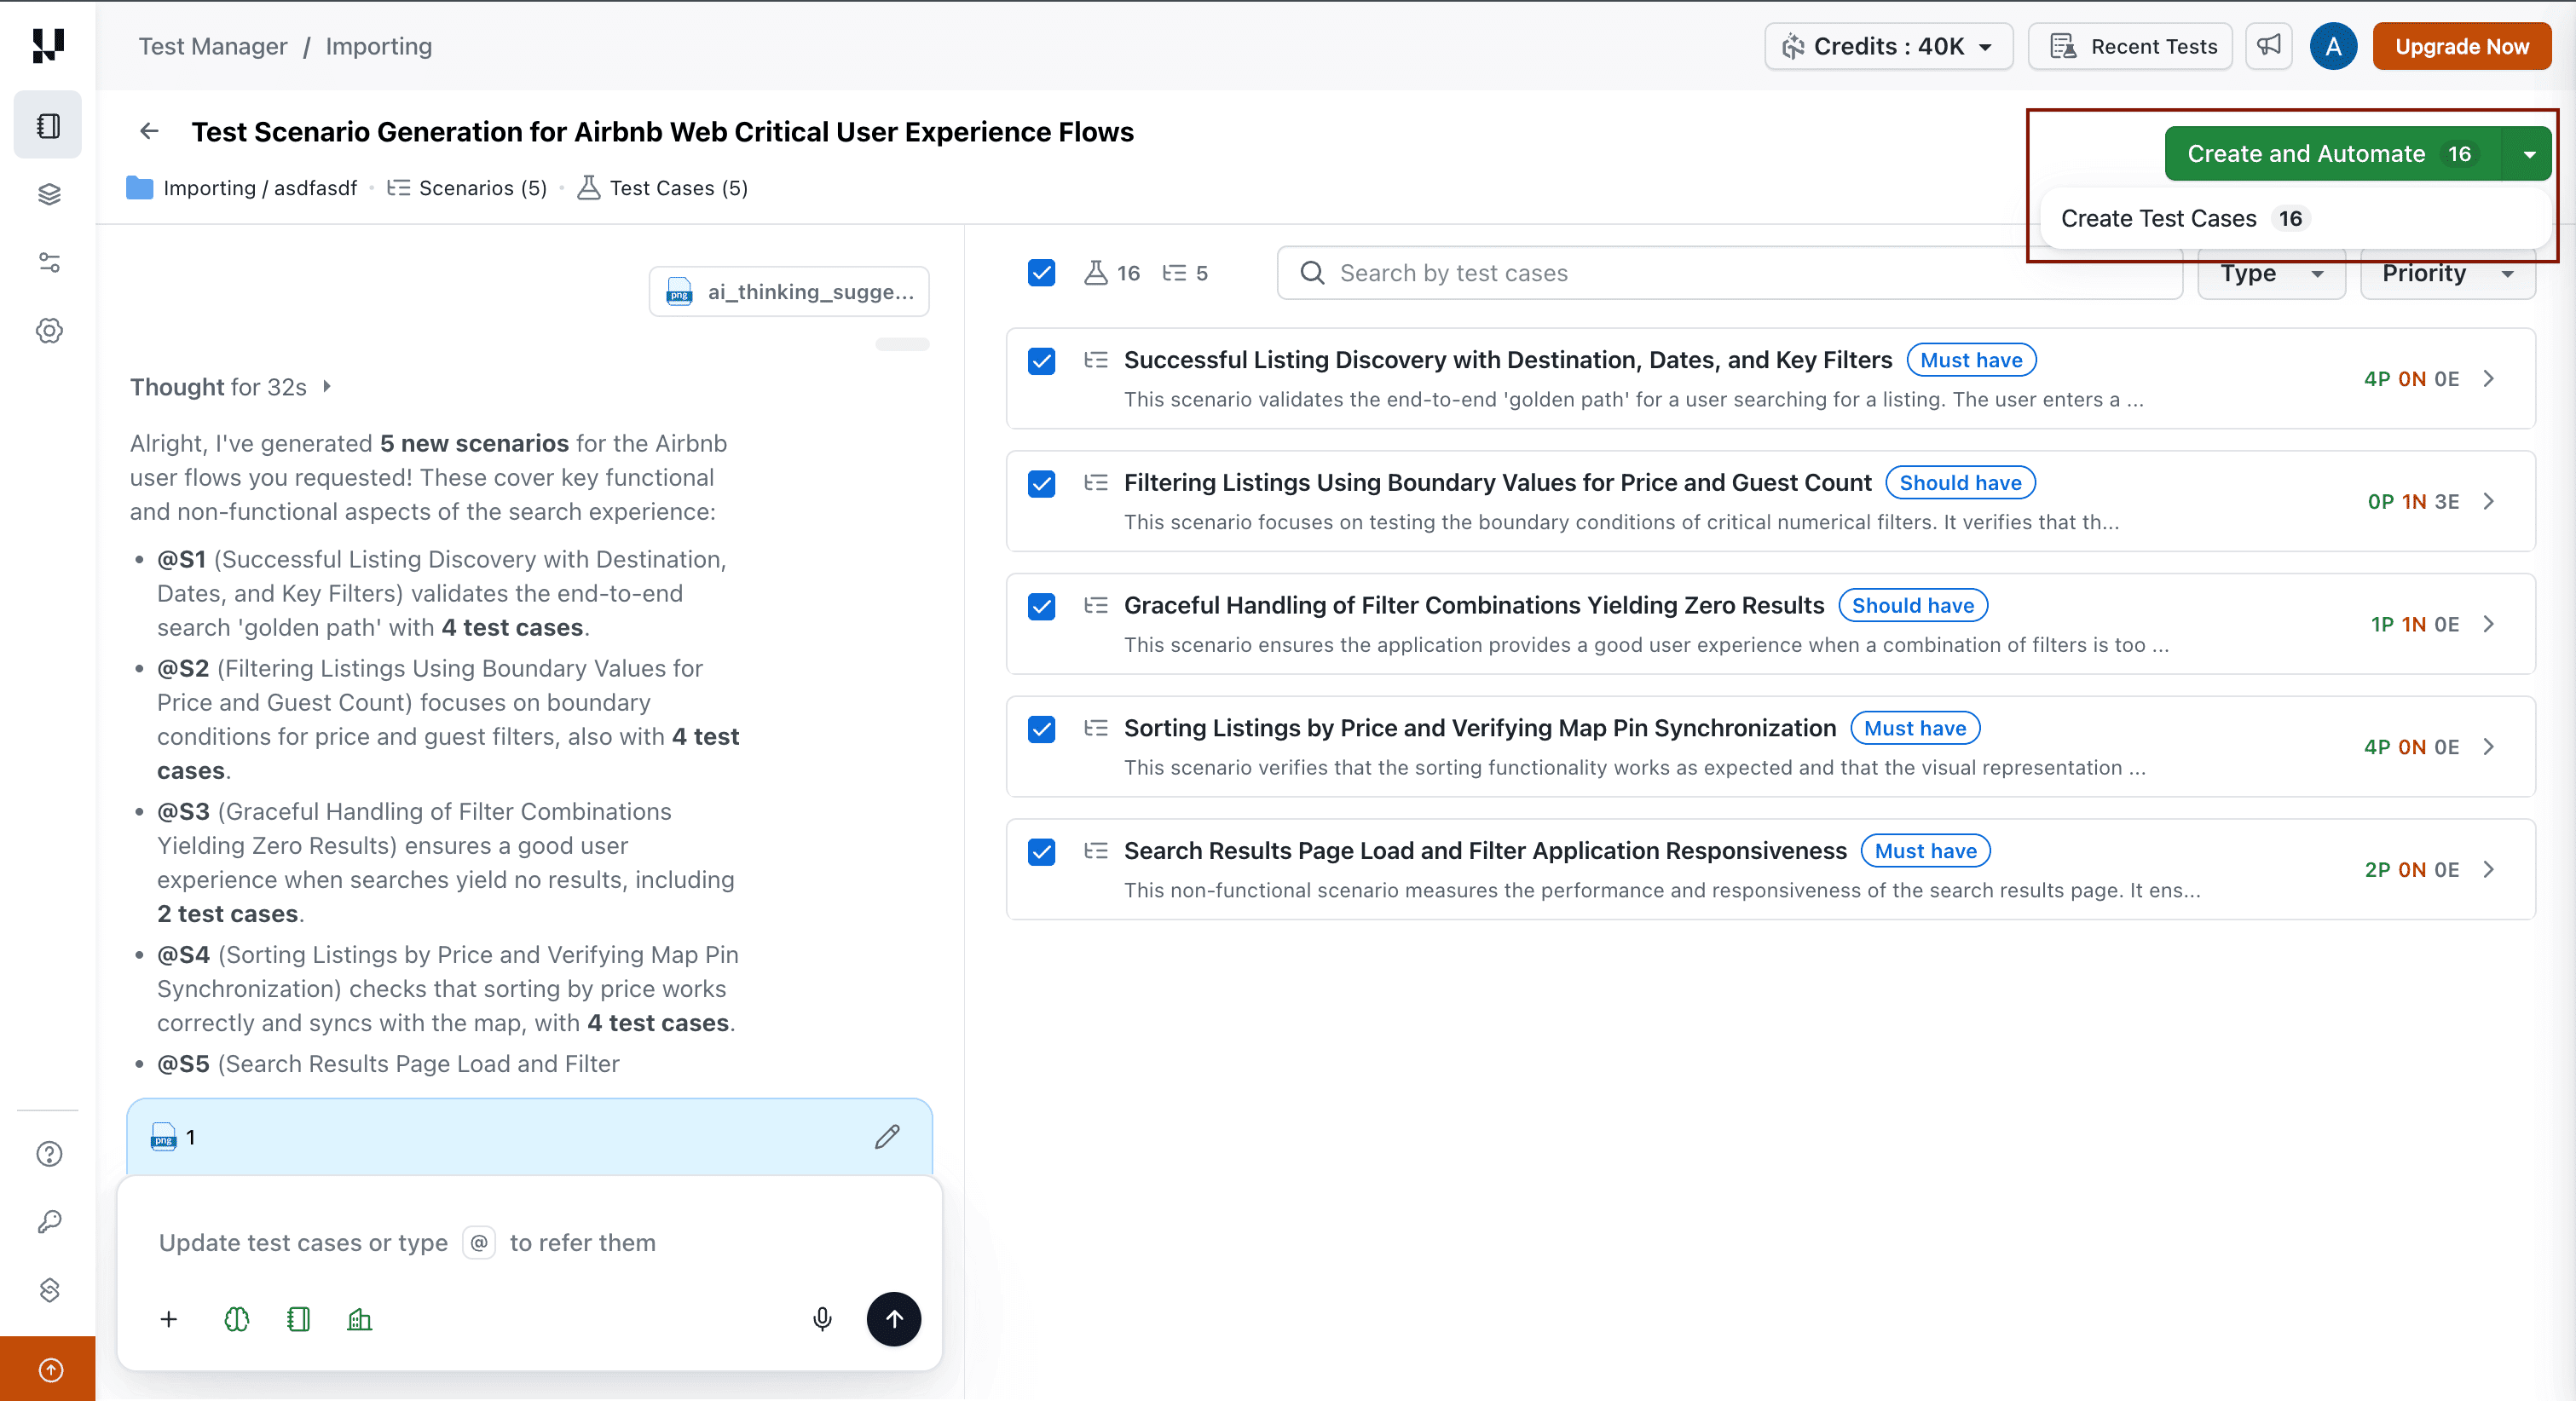
Option 1: Create Test Cases
Select the desired test cases and click Create to save them directly to your Test Case Repository in TestMu AI Test Manager. These saved test cases can then be assigned to test runs, shared with teams, or used in manual test planning.
Option 2: Create and Automate with KaneAI
Select the desired test cases and click Create and Automate to save the test cases to your repository and automate the generated test cases through KaneAI. This option streamlines the transition from test design to test automation.
The Create and Automate option requires KaneAI access. If you do not have KaneAI enabled on your account, use the Create option to save test cases manually.
Troubleshooting
| Issue | Resolution |
|---|---|
| Conversation Layer panel not visible | Ensure you have generated at least one set of scenarios. The Conversation Layer activates after the initial generation completes. Refresh the page if needed. |
| Changes not appearing in Live Output View | Check your internet connection. Large changes may take longer to process. If the issue persists, send a new message — the AI resumes from the current state. |
| AI modified the wrong scenario or test case | Use explicit Scenario (@S1) or Test Case (@S1.C1) references to avoid ambiguity. Rephrase your message with a direct reference and send it again. |
| File upload fails | Verify the file does not exceed the 50 MB size limit and that you have not exceeded the 10-file session limit. |
| Credits deducted but no changes appeared | This can occur if the AI could not interpret your request or if there was a connection interruption. Check the conversation history for an error message. |
| Regeneration removed refined scenarios | Regeneration replaces all current output. Use targeted conversational messages instead to preserve specific scenarios. |
Video Walkthrough
Watch the video below for a quick walkthrough of the AI Test Case Generator in action.
Frequently Asked Questions
Can I undo a change made through the Conversation Layer?
Undo and versioning are not available in the current release. If a change is not what you expected, send a follow-up message to revert or adjust the change.
Does the Conversation Layer work with manually created test cases?
The Conversation Layer operates within AI Test Case Generator sessions only. It refines scenarios and test cases generated by the AI within that session. Manually created test cases in Test Manager are not accessible through the Conversation Layer.
How many messages can I send in a single session?
There is no fixed limit on the number of messages per session. Each message consumes credits based on the scope of the change.
What happens if I close the browser mid-session?
Your session context, including generated scenarios and conversation history, is preserved. You can return to the session and continue refining from where you left off.
Can I export the refined test cases?
Yes. After refining your test cases through the Conversation Layer, you can export or save them to your Test Manager project using the same export workflows available in the Test Case Generator.
Is the Conversation Layer available for all plans?
The Conversation Layer is available to all users with access to Test Manager Premium or KaneAI plans. Credit consumption applies based on your plan's AI credit allocation.
