Lambda Hooks For Appium Automation
This document will help you provide lambdahooks which can be used to improve your test scripts to easily debug your test cases for App Automation on Real Devices on TestMu AI Cloud.
Adding custom status & remark
To add custom status & remark, just add the code snippet using the JavascriptExecutor.
JavascriptExecutor accepts two arguments as shown below:
| Arguments | Example |
|---|---|
status | failed OR passed |
remark | Any remark can be added here limited to 255 characters. |
((JavascriptExecutor) driver).executeScript("lambda-hook: {\"action\": \"setTestStatus\",\"arguments\": {\"status\":\"failed\", \"remark\":\"This is a sample remark for failed test \"}} ");
Here is a sample automation script in Java for the sample status & remark. Ensure to update the app_url, username & accesskey in the below code.
import io.appium.java_client.AppiumDriver;
import io.appium.java_client.MobileBy;
import io.appium.java_client.MobileElement;
import org.openqa.selenium.JavascriptExecutor;
import org.openqa.selenium.remote.DesiredCapabilities;
import java.net.MalformedURLException;
import java.net.URL;
public class vanilla_android {
    private static AppiumDriver driver;
    public static void main(String args[]) throws MalformedURLException, InterruptedException {

        try {
            DesiredCapabilities capabilities = new DesiredCapabilities();

            capabilities.setCapability("deviceName", "Galaxy S20");
            capabilities.setCapability("platformVersion", "11");
            capabilities.setCapability("platformName", "Android");
            capabilities.setCapability("isRealMobile", true);
            capabilities.setCapability("app", "APP_ID"); //Enter your app url
            capabilities.setCapability("build", "Java Vanilla - Android");
            capabilities.setCapability("name", "Sample Test Java");

            //Enter your Username & Accesskey here:
            driver = new AppiumDriver(new URL("https://" +userName + ":" + accessKey + "@mobile-hub.lambdatest.com/wd/hub"), capabilities);

            MobileElement color = (MobileElement) driver.findElement(MobileBy.id("com.lambdatest.proverbial:id/color"));
            color.click();

            //Javascript Executor for marking the status and custom remark.
            ((JavascriptExecutor) driver).executeScript("lambda-hook: {\"action\": \"setTestStatus\",\"arguments\": {\"status\":\"failed\", \"remark\":\"This is a sample remark for failed test \"}} ");
        }
        // The driver.quit statement is required, otherwise the test continues to execute, leading to a timeout.
        driver.quit();
    }
}
Once you have added the code snippet, the status and remark will be visible on the TestMu AI App Automation Dashboard as shown below:

Update Test Name
To update the name of the test, just add the code snippet using the JavascriptExecutor.
| Arguments | Example |
|---|---|
lambda-name | For changing the Test Name. |
((JavascriptExecutor) driver).executeScript("lambda-name=TestName");
Differentiating Test Cases in Single Session
TestMu AI has introduced a LambdaHook to help automation engineers differentiate between multiple test cases within a single Appium session. This feature aims to improve debugging capabilities, making it easier to identify which test cases may be causing errors or taking longer to execute.
The test case hooks (lambda-testCase-start, lambda-testCase-end and lambda-testCase-status) are supported for App Automation on both Real Devices and Virtual Devices. They are not supported for web automation sessions.
Adding Lambda Hooks
You can use LambdaHooks to start and end a test case within a single Appium session.
Test Case Start
To start a test case, use the lambda-testCase-start hook:
// To start a test case
((JavascriptExecutor) driver).executeScript("lambda-testCase-start=find Name");
Test Case End
To end a test case, use the lambda-testCase-end hook:
// To end a test case
((JavascriptExecutor) driver).executeScript("lambda-testCase-end=find Name");
Marking the Status of a Test Case
By default, TestMu AI derives the status of each test case from its commands: if any command executed between lambda-testCase-start and lambda-testCase-end fails, the test case is marked Failed. This is not always the real result. A command may fail and then pass on a retry, or a command may be expected to fail as part of a negative check (for example, verifying that an element is not displayed).
Use the lambda-testCase-status hook to send the real result from your framework. The status you send overrides the derived status of the test case in Test Case Insights.
Test Case Status
Call lambda-testCase-status after lambda-testCase-start and before lambda-testCase-end:
// To mark the open test case as passed or failed
((JavascriptExecutor) driver).executeScript("lambda-testCase-status=passed");
To store a remark with the status, pass the status as JSON. The remark is optional and is limited to 255 bytes; longer remarks are truncated.
((JavascriptExecutor) driver).executeScript("lambda-testCase-status={\"status\":\"passed\",\"remark\":\"404 on first attempt, retry succeeded\"}");
| Argument | Description |
|---|---|
status | passed or failed. The value is case-insensitive. Any other value, such as skipped, is ignored. |
remark | Optional. Any text explaining the status, limited to 255 bytes. Supported only in the JSON form. |
Example
The following examples mark each test case with the result your framework reports, so a retry that passed or an expected failure does not mark the test case as failed.
- Java
- Python
- Cucumber (Java)
for (TestCase tc : suite) {
    driver.executeScript("lambda-testCase-start=" + tc.getName());
    boolean passed = tc.run(); // your framework handles retries and negative checks
    driver.executeScript("lambda-testCase-status=" + (passed ? "passed" : "failed"));
    driver.executeScript("lambda-testCase-end=" + tc.getName());
}
driver.execute_script(f"lambda-testCase-start={name}")
# ... test steps ...
driver.execute_script("lambda-testCase-status=passed")
driver.execute_script(f"lambda-testCase-end={name}")
@After
public void markTestCase(Scenario scenario) {
    String status = scenario.isFailed() ? "failed" : "passed";
    ((JavascriptExecutor) driver).executeScript("lambda-testCase-status=" + status);
    ((JavascriptExecutor) driver).executeScript("lambda-testCase-end=" + scenario.getName());
}
How the Final Status is Decided
| Scenario | Final status of the test case |
|---|---|
No lambda-testCase-status call | Derived from commands: Failed if any command failed, otherwise Passed. This is the same behavior as before. |
lambda-testCase-status called once | The status you sent, even if it differs from the derived status. For example, failed marks the test case as Failed even when every command passed. |
lambda-testCase-status called more than once | The last valid status you sent. |
Invalid or empty value (for example, skipped) | The call is ignored and the test case keeps its previous status. If no valid status was sent, the derived status is used. |
Called before any lambda-testCase-start, or after lambda-testCase-end and before the next start | The call is ignored, because no test case is open. No test case is changed. |
| Test case started but never ended | The test case is still recorded with the status you sent. |
JSON without a status, or malformed JSON | The call is ignored. If no valid status was sent, the derived status is used. |
Each call returns a message to your script stating whether the status was set or why it was ignored (for example, no active test case or an invalid status). Ignored calls never fail the session and appear in the command logs as warnings, not errors.
lambda-testCase-status only sets the status of a test case. It does not change the session status, which you continue to set with lambda-status or setTestStatus. A session marked Passed can still contain test cases marked Failed, and the other way around.
Labeling and Filtering Command Logs
Any command logs executed between lambda-testCase-start and lambda-testCase-end will be labeled with the name you provide. The name should not exceed 255 characters.
You can also filter the command logs based on these labels.A screenshot has been provided below, demonstrating the use of labels and how to filter command logs based on them.

Viewing Test Cases and Their Trends
Every test case you mark with the start and end hooks is also listed on the automation session details page. Click the test case selector above the command logs to open the Select Test Case panel, which lists all the test cases recorded in the session along with the trend of their last five runs.
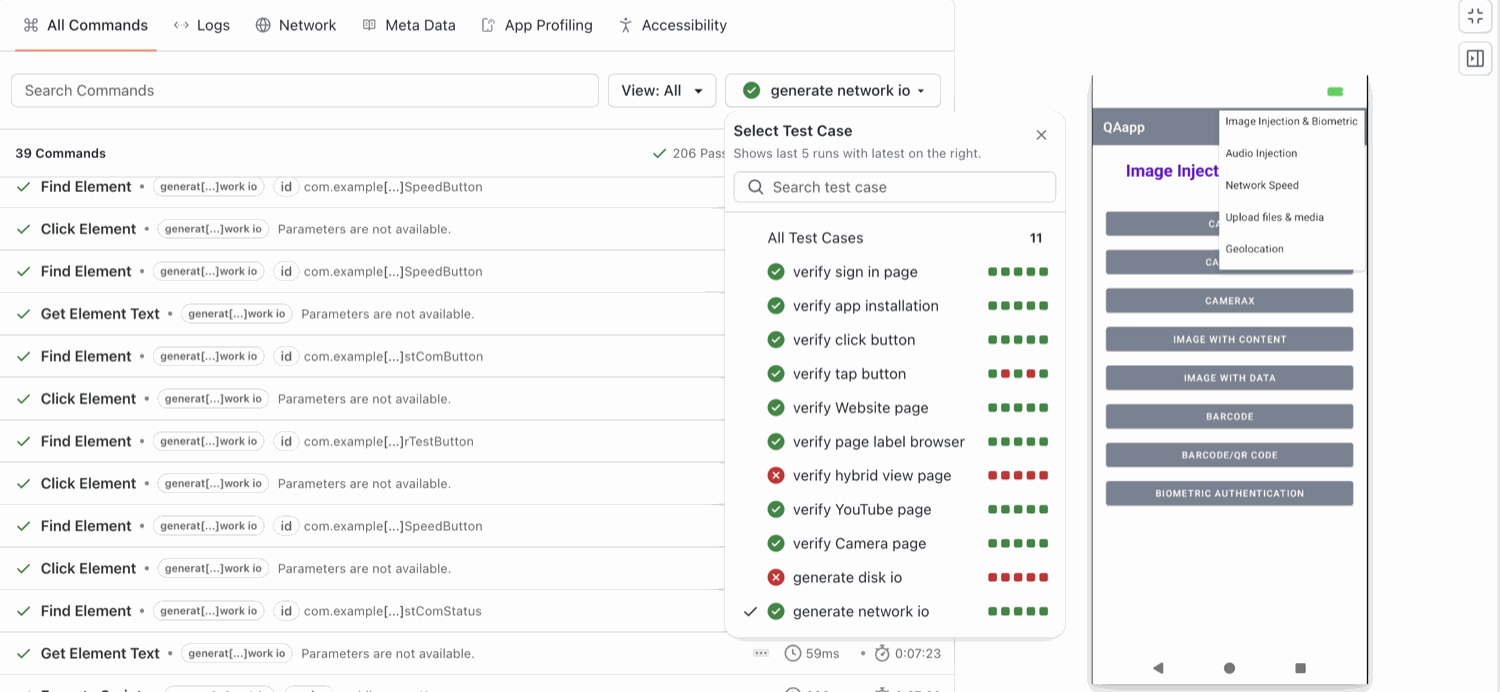
The panel shows the following details:
| Detail | Description |
|---|---|
| All Test Cases | The list of every test case captured between the lambda-testCase-start and lambda-testCase-end hooks, along with the total count of test cases in the session. |
| Search test case | Search for a test case using the name you passed to the hook. This is helpful when a single session runs a large number of test cases. |
| Status | A green tick indicates that the test case passed in the current session and a red cross indicates that it failed. |
| Last 5 runs | The strip of squares next to each test case shows the result of its last five runs, with the latest run on the right. Green denotes a passed run and red denotes a failed run. |
Selecting a test case from the panel filters the command logs to the commands executed between that test case's start and end hooks, so you can jump straight to the section of the session you want to debug.
The Last 5 runs trend lets you tell a genuinely broken test case from a flaky one without opening older sessions. A test case that is red across all five runs points to a consistent failure, whereas a mix of red and green points to flakiness that is worth investigating separately.
Command Annotations
Command Annotations allow you to add metadata and debugging information to your test scripts. They work similarly to LambdaHooks by providing structured logs on the TestMu AI Automation Dashboard, making it easier to track test execution, debug failures, and navigate specific test sections.

Using Command Annotations
Annotation Start
Verifieddriver.execute_script("lambdatest_executor: {\"action\": \"stepcontext\", \"arguments\": {\"data\": \"youtube\", \"level\": \"debug\"}}");
Arguments:
| Argument | Description |
|---|---|
data | String value representing the information you want to log. |
level | Log severity level. Acceptable values: info (default), debug, warn, error. |
Annotation End
To close the executor at the end of your script, pass data as an empty string:
driver.execute_script("lambdatest_executor: {\"action\": \"stepcontext\", \"arguments\": {\"data\": \"\"}}");
Mutual exclusivity: Test case and Command Annotations cannot be used together in the same script. You can only use one of them per session.

 Chat with Us