Connect and Explore AI Agents
Exploration tells Rook what an agent is supposed to do before you tell it how to invoke the agent. Rook reads local material such as source code, prompts, skills, manifests, tool declarations, tests, README files, and product requirements.
The target can be a complete application, one agent directory, or a documentation-only workspace. Rook works with any agent framework.
Explore the Current Workspace
Start Rook from the repository root and run:
Verified/explore .
The headless equivalent is:
Verifiedrook explore .
Use a narrower path when a monorepo contains a specific agent package:
Verified/explore packages/travel-agent
Rook scans deterministically first, then gives its discovery subagent read tools scoped to the authorized workspace. The result depends on how many candidates it finds:
- One candidate: Rook asks whether to register it.
- Several candidates: Choose the candidates you want.
This real TUI capture shows /explore . finding the public triage sample and pausing for registration. Read the discovery summary before choosing yes; arrow keys change the choice, Enter submits it, and Esc declines. The progress line shows the current task and credit use while the footer keeps the selected project visible.
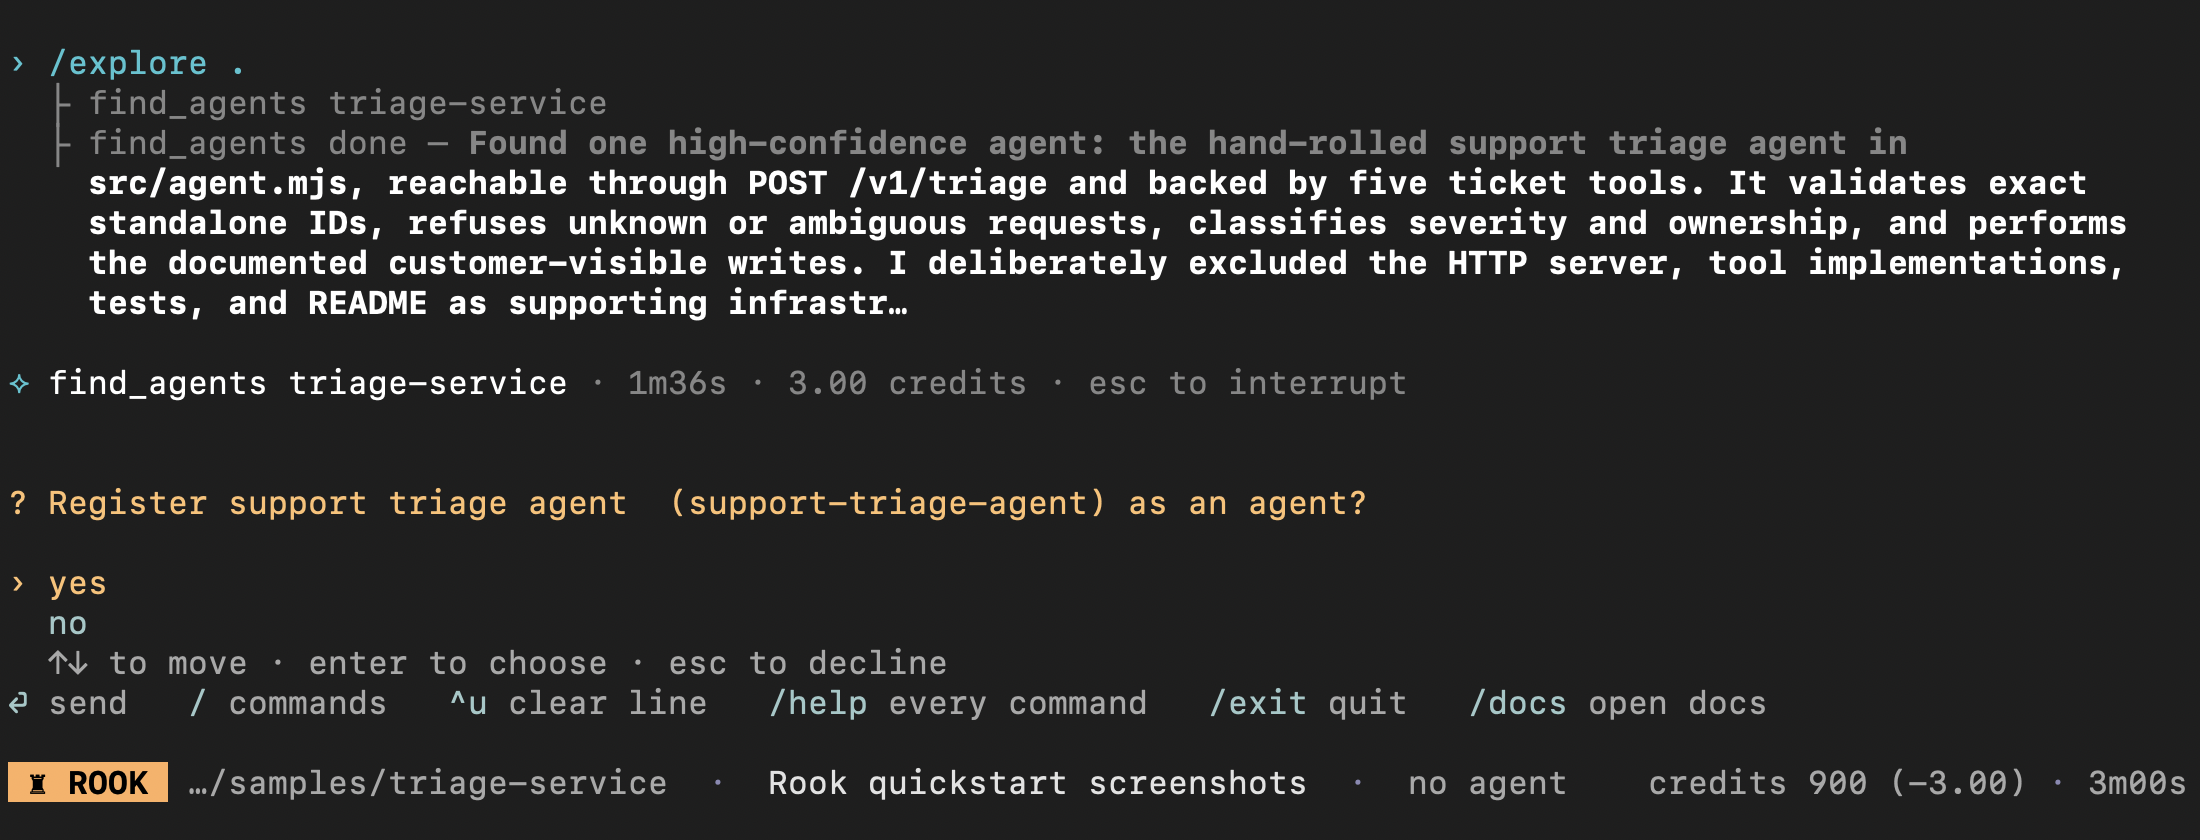
After approval, wait for agent and feature analysis to finish. Review the findings, then select the resulting agent with /agent. Discovery writes local records; it does not mean a profile has been verified, scenarios have been generated, or a run has passed.
What Rook Looks For
Rook can identify agents from evidence including:
- System and developer prompts.
- Model calls and agent loops.
- Tool or function registries.
- MCP server declarations.
- Framework files such as
.claude/agents/*.md. - Skills, subagents, routing rules, and policies.
- HTTP handlers and command entrypoints.
- Tests, fixtures, examples, and user-facing documentation.
- PRDs and other text describing intended behavior.
Discovery does not invent missing facts. If a tool's write behavior cannot be established, Rook records it as unknown rather than guessing from its name.
Before discovery, use the public service default ROOK_ENV=prod and select a project with rook project. Use the same account and project when opening the hosted Web UI.
Give Exploration Extra Context
Put free-form guidance after --:
/explore . -- focus on the refund approval threshold and identity checks
In headless mode:
Verifiedrook explore . \
-- "focus on the refund approval threshold and identity checks"
The instruction guides the discovery model, but it does not widen the filesystem scope.
Use --force after a substantial change or when you want to ignore the incremental freshness check:
/explore --force
Normally Rook hashes the relevant files and re-reads only what changed.
Explore a PRD Without Source Code
Create a clean directory containing the material you are authorized to share:
Verifiedtravel-agent-spec/
PRD.md
policies.md
api-examples.md
fixtures/
Start Rook inside that directory:
Verifiedcd travel-agent-spec
rook
Then run:
Verified/explore . -- the deployed agent is a multi-turn travel planner
If no structural agent signal is found, Rook can ask whether to register the directory anyway. A documentation-only exploration generates requirement-grounded scenarios, but it has less evidence about implementation details, tool behavior, and side effects than a source-backed exploration.
You still need an invocation profile that reaches the deployed agent. See Configure Rook Profiles.
Explore a GitHub Repository
Rook does not read a GitHub URL directly. Clone the repository, enter the checkout, and run Rook locally:
Verifiedgit clone https://github.com/<owner>/<repository>.git
cd <repository>
rook
Then:
Verified/explore .
If you paste a GitHub URL into /explore, Rook refuses it before spending credits and prints the corresponding clone workflow.
For a pull request, check out the exact head you want to test:
Verifiedgh repo clone <owner>/<repository>
cd <repository>
gh pr checkout <number>
rook
This keeps the source state, scenario evidence, and tested revision reproducible.
Never clone or check out untrusted code and then run its setup scripts without reviewing them first.
Explore an External Local Directory
You can explicitly point interactive Rook at a directory outside the current workspace:
Verified/explore ../another-agent
The path must be typed by a human. A model suggestion or stored record cannot grant a new external read scope.
Rook can read and report an external directory, but the current pre-alpha release does not persist an external agent record. To keep discovery state and generate scenarios, cd into that checkout and start Rook there.
Rook also refuses two paths to keep read scope tight:
- A parent directory that contains the current workspace: This would mix evaluator files with target files.
- A single external file: Granting its entire parent directory would be broader than the path you selected.
Manage Multiple Agents
Launch rook in your workspace, then enter /agent in the interactive TUI. The picker lists agents in the selected project. Type to filter, use the arrow keys to move, and press Enter to select an agent or Esc to go back. Check the active agent in the footer before exploring or running tests.
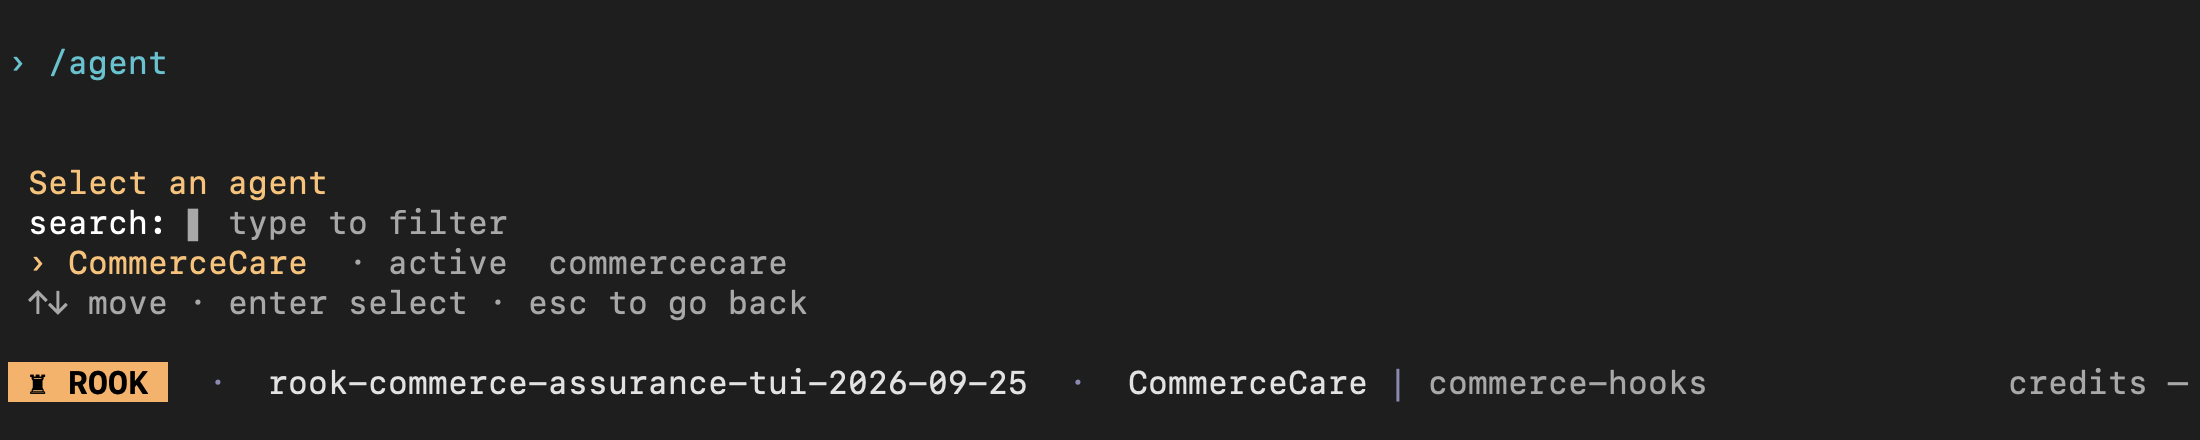
This saved demo has one agent. Projects containing several agents show more choices in the same picker. You can also select a known agent ID directly:
Verified/agent
/agent use <id>
Headless commands:
Verifiedrook agent
rook agent use <id>
The current command lists or selects agents; it does not provide an rm subcommand.
Explore All Discovered Agents in Headless Mode
Select a project before discovery. For automation, supply focused guidance and explicit, reviewed permissions; the older --all flag is not available:
rook explore . --json -- "discover the agents in this reviewed workspace"
Use --allow only for a narrowly reviewed tool call:
rook explore . --allow 'bash(npm test)'
--allow is additive authorization. It does not create a sandbox, and it does not restrict any other already approved grant.
Re-Explore After Changes
Run /explore again when prompts, tools, policies, skills, or agent source change. Rook compares the current files with the stored index and updates the existing record, so it keeps your scenario and run history.
After exploration, run /generate to refresh scenarios. Rook shows a plan and names the stale prerequisite before it spends credits.
Review Discovered Agents Locally or Online
Run rook ui --local to see the current workspace's Agents list. Open an agent and use Summary, Profiles, Features, Scenarios, and Runs. This does not require publishing the discovery result. See the rollout note for earlier CLI layouts if your screen differs.
For team review, sync the reviewed definitions and run rook ui. In the hosted Web UI, open project → agent → Summary, Versions, or Features. Those screens show uploaded records, not your latest unsynchronized exploration. Neither UI performs discovery or edits the definition. See local agents and hosted agent configuration in the same walkthrough.
Local UI: Discovery Findings
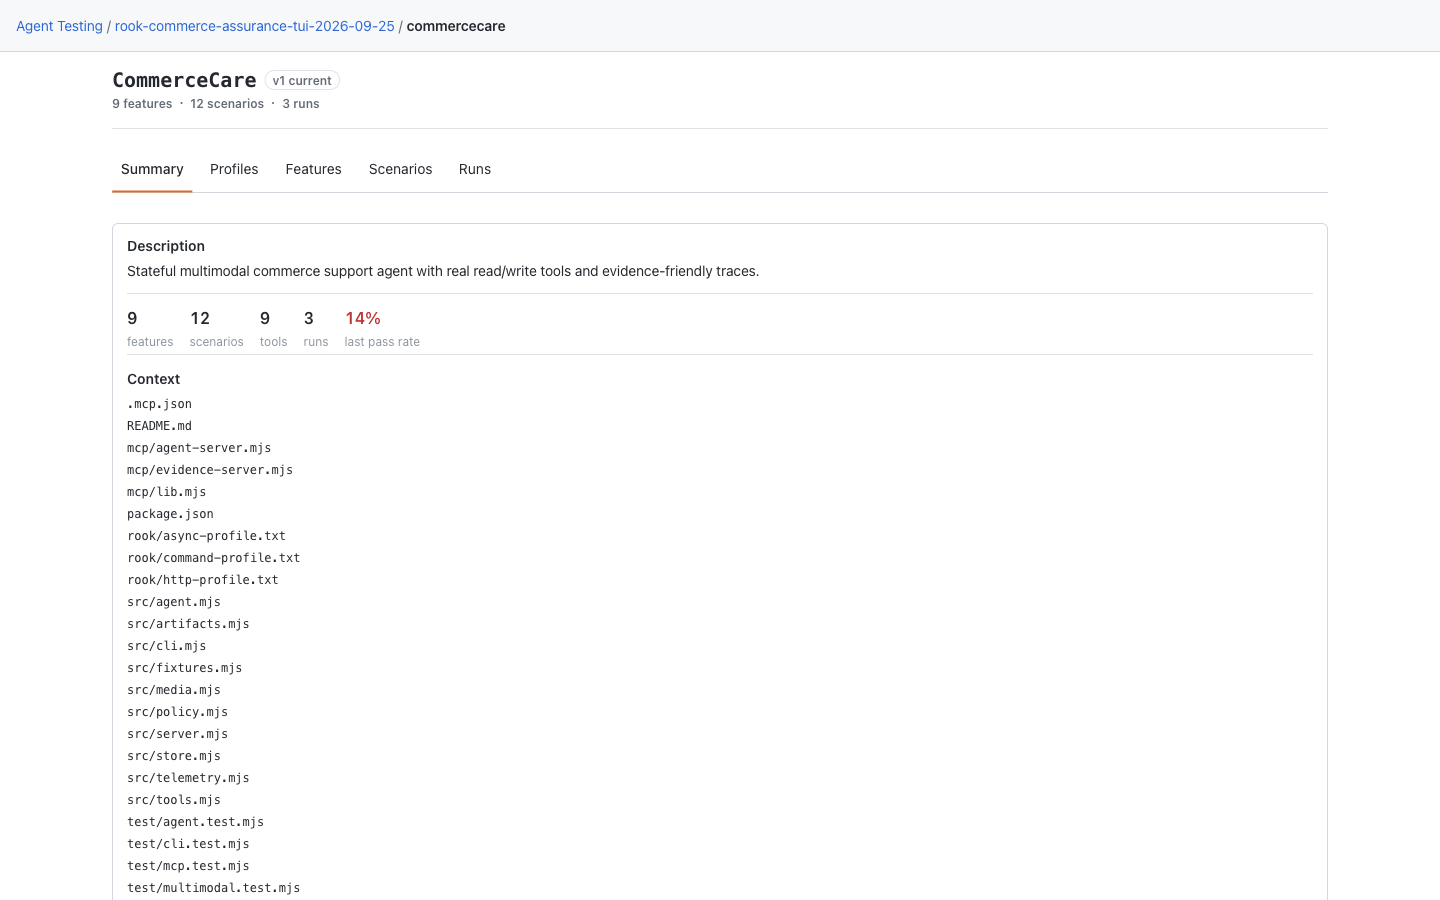
Open Agents → CommerceCare → Summary in this saved demo workspace. Read the discovered description and source Context, then scroll to View Full Spec and View findings to inspect the saved discovery records. Use the separate Features and Profiles tabs before generating more tests. Your workspace will show your own discovered agent.
Hosted Web UI: Synchronized Discovery
Open project → agent → Summary. Context identifies the source files used for discovery; View Full Spec and View findings open uploaded artifacts when available. Changes from a new exploration are not visible here until synchronized. Use the separate Profiles tab to inspect invocation hooks and phase configuration.
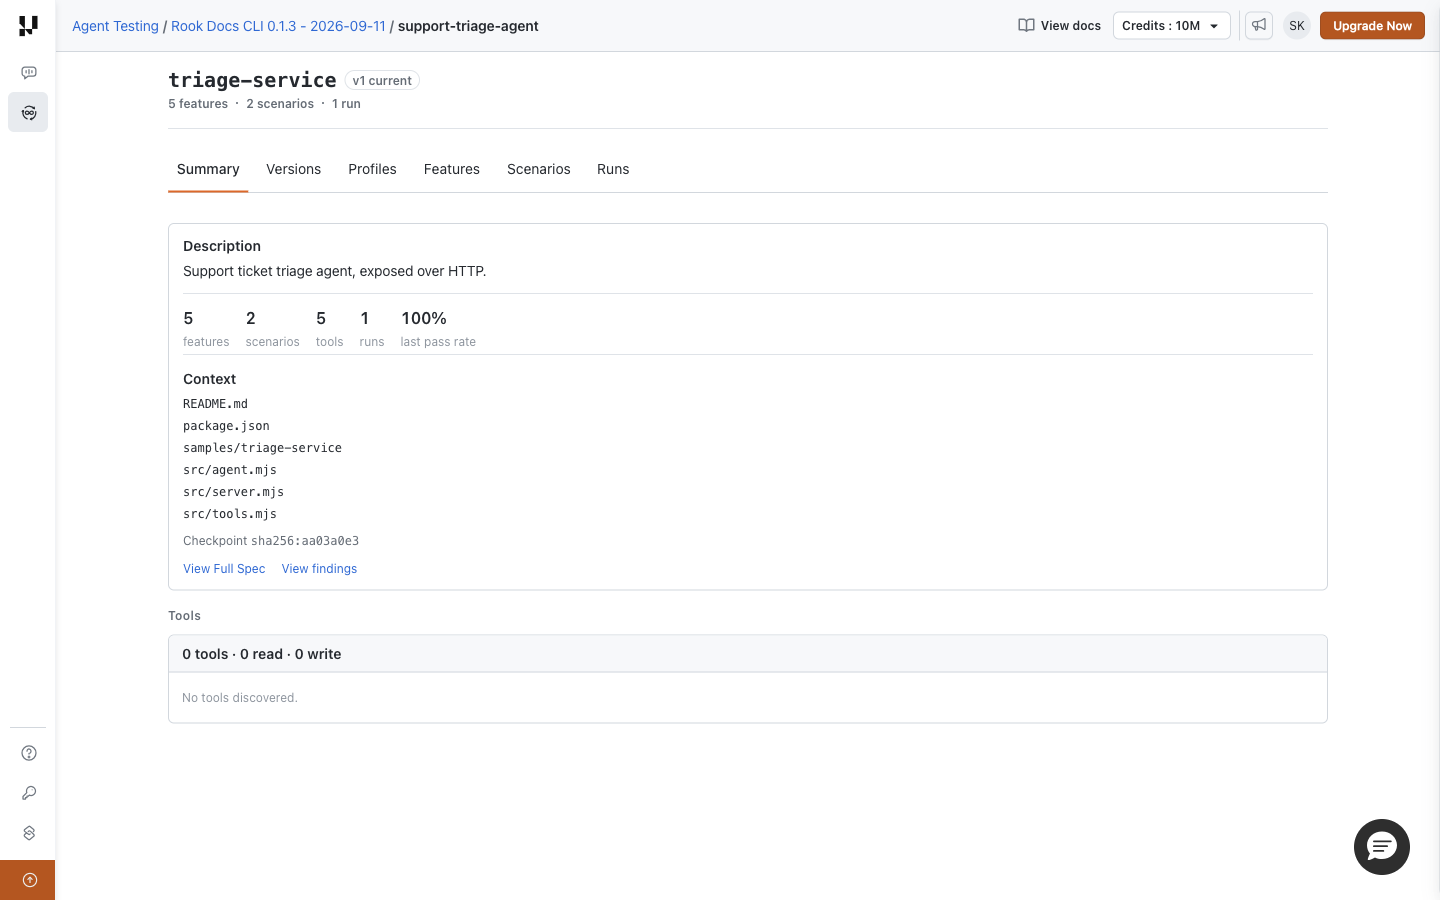
The capture's empty tool detail list conflicts with its five-tool counter. Inspect the saved specification and Versions call graph; see screenshot display notes. This is not evidence that discovery or the smoke run failed.


 Chat with Us