Run Your First Mobilewright Test
This guide shows you how to run your first Mobilewright test on a real Android or iOS device on TestMu AI. You clone a sample project, upload the sample app, set your credentials, and run the test with the usual npx mobilewright test command.
Mobilewright testing on TestMu AI is currently in Beta. To share feedback or report an issue, contact our support team.
Prerequisites
- Your TestMu AI Username and Access Key. You can find them under Profile > Account Settings > Password & Security.
- Node.js 22.12 or later, and npm.
- Git, to clone the sample project.
Step 1: Get a sample project
You can use your own project to configure and test it. For demo purposes, we are using the sample repository.
All the code samples in this documentation can be found on TestMu AI's GitHub Repository. You can either download or clone the repository to quickly run your tests.  View on GitHub
Clone the repository and install its dependencies:
git clone https://github.com/LambdaTest/testmuai-mobilewright-sample && cd testmuai-mobilewright-sample
npm install
The sample project already includes Mobilewright, its test fixtures, and the TestMu AI driver, @testmuai/mobilewright.
Step 2: Set your credentials
Set your TestMu AI Username and Access Key as environment variables. The driver reads them automatically.
- Linux / macOS
- Windows
export LT_USERNAME="undefined"
export LT_ACCESS_KEY="undefined"
set LT_USERNAME="undefined"
set LT_ACCESS_KEY="undefined"
Step 3: Upload your app
The sample references the app under test by an lt:// app ID. Upload the app once to get that ID. The commands below upload the Proverbial sample app; replace the URL with the path or URL of your own build to test your app.
- Android
- iOS
curl -u "undefined:undefined" -X POST "https://manual-api.lambdatest.com/app/upload/realDevice" -F "url=https://prod-mobile-artefacts.lambdatest.com/assets/docs/proverbial_android.apk" -F "name=proverbial_android"
curl -u "undefined:undefined" -X POST "https://manual-api.lambdatest.com/app/upload/realDevice" -F "url=https://prod-mobile-artefacts.lambdatest.com/assets/docs/proverbial_ios.ipa" -F "name=proverbial_ios"
The response is a JSON object that contains an app_url of the form lt://APP123456789123456789. Set it as an environment variable for the platform you uploaded:
- Linux / macOS
- Windows
export LT_APP_ANDROID="lt://APP_ANDROID_ID"
export LT_APP_IOS="lt://APP_IOS_ID"
set LT_APP_ANDROID="lt://APP_ANDROID_ID"
set LT_APP_IOS="lt://APP_IOS_ID"
To use a single app for whichever platform you run, set TESTMU_APP instead. It takes precedence over LT_APP_ANDROID and LT_APP_IOS in the sample config.
Step 4: Review the configuration
You do not need to change the sample config. When your credentials are set, mobilewright.config.ts attaches the TestMu AI driver and passes it the app ID for the selected platform. Without credentials, the same config runs the test on a local device instead, so your tests never change between local and cloud runs. The relevant part of the config is:
const platform = (process.env.PLATFORM || 'android') as 'android' | 'ios';

const app = process.env.TESTMU_APP
  || (platform === 'ios' ? process.env.LT_APP_IOS : process.env.LT_APP_ANDROID);

const config: any = {
  testDir: './tests',
  timeout: 180_000,
  expect: { timeout: 20_000 },
  reporter: [['list']],
  projects: [{ name: platform, use: { platform } }],
};

if (process.env.TESTMU_USERNAME || process.env.LT_USERNAME) {
  if (platform === 'ios') {
    config.projects[0].use.autoAppLaunch = false;
  }
  config.driver = testMuDriver({
    app,
    build: 'testmuai-mobilewright-sample',
    project: 'mobilewright-sample',
    video: true,
    networkLog: true,
    deviceLog: true,
    autoGrantPermissions: true,
    autoAcceptAlerts: true,
  });
}

export default defineConfig(config);
appis thelt://app ID from Step 3.buildandprojectgroup the session on the dashboard.video,networkLog, anddeviceLogcapture debugging artifacts for the session.autoGrantPermissions(Android) andautoAcceptAlerts(iOS) stop permission prompts from blocking the test.- On iOS, the sample sets
autoAppLaunchtofalseso that the app launch done when the session starts is kept, and a permission alert cannot interrupt an extra relaunch.
For every option you can pass, see Driver options.
The test itself is plain Mobilewright. It taps through the Proverbial app and asserts that the label changes:
import { test, expect } from '@mobilewright/test';
import { proverbial, type Platform } from '../src/proverbial';

test('Proverbial smoke — color, text, toast, notification', async ({ screen, platform }) => {
  const app = proverbial(screen, platform as Platform);

  await app.colorButton().tap();

  await app.textButton().tap();
  await expect(app.proverbialText()).toBeVisible();

  await app.toastButton().tap();
  await app.notificationButton().tap();
});
Step 5: Run the test
Select the platform with the PLATFORM environment variable and run the test:
- Linux / macOS
- Windows
PLATFORM=android npx mobilewright test
PLATFORM=ios npx mobilewright test
set PLATFORM=android
npx mobilewright test
The driver waits for a device to be allocated, runs the test on it, and releases the device when the run finishes. You can also use the standard Mobilewright CLI flags, such as --reporter html, --workers 4, or --retries 2.
Step 6: View your test results
Open the App Automation dashboard and select the testmuai-mobilewright-sample build. The session is named after the test it ran, is marked Passed or Failed, and shows Mobilewright as its framework. Open the session to watch the video recording and read the device logs, network logs, and command logs.
For more about the dashboard, see App Automation Dashboard.
Run your own project
To run an existing Mobilewright project, on version 0.0.56 or later (below 0.1.0), install the TestMu AI driver from npm:
npm i -D @testmuai/mobilewright
Then set the driver field in mobilewright.config.ts and describe the device in the use block:
import { defineConfig } from 'mobilewright';
import { testMuDriver } from '@testmuai/mobilewright';

export default defineConfig({
  testDir: './tests',
  driver: testMuDriver({
    app: 'lt://APP123456789123456789', // or a local .apk/.ipa path, or a public https URL
    build: 'My first Mobilewright build',
  }),
  use: {
    platform: 'android', // or 'ios'
    bundleId: 'com.example.app', // package name or bundle ID
    deviceType: 'real',
    deviceName: /Galaxy S2[34]/,
  },
});
For app options and device matching, see Set up your test environment.
Run tests in parallel
You can run a Mobilewright suite on several real devices at the same time to cut the total run time. Mobilewright controls parallelism through workers, and you can target several devices or both platforms in one run through projects.
How parallel runs work on TestMu AI
- Each Mobilewright worker gets its own real device and its own session on TestMu AI.
- A worker keeps its device for the whole run and runs its tests one after another on it. The driver keeps the session alive between tests, so you do not pay the device allocation time again for every test.
- The number of devices running at once is capped by your plan's parallel session limit. If you start more workers than your plan allows, the driver prints a warning and the extra workers wait in the queue until a device is released.
Set the number of workers to your plan's parallel session limit or lower. Workers above the limit add queue time without making the run faster.
Set the number of workers
Set workers in your config, or pass --workers on the command line. The command-line flag overrides the config value.
npx mobilewright test --workers 4
By default, Mobilewright runs the tests inside one file in order on one worker and spreads the files across workers. Set fullyParallel: true to spread individual tests across workers as well.
Run on Android and iOS in one run
Use projects to run the same tests on several device profiles. Each project has its own use block, so you can set a different platform, device, OS version, and app ID per project.
Use the driver's apps option to give each platform its own build. The driver picks the app that matches the project's platform.
import { defineConfig } from 'mobilewright';
import { testMuDriver } from '@testmuai/mobilewright';

export default defineConfig({
  testDir: './tests',
  workers: 4,
  driver: testMuDriver({
    apps: {
      android: './build/app.apk',
      ios: './build/app.ipa',
    },
    build: 'Cross-platform Run',
  }),
  projects: [
    {
      name: 'android',
      use: {
        platform: 'android',
        bundleId: 'com.example.app',
        deviceType: 'real',
        deviceName: /Galaxy S2[34]/,
      },
    },
    {
      name: 'ios',
      use: {
        platform: 'ios',
        bundleId: 'com.example.app',
        deviceType: 'real',
        deviceName: /iPhone 1[56]/,
        osVersion: '>=17 <19',
      },
    },
  ],
});
Run every project:
npx mobilewright test
Or run one project only:
npx mobilewright test --project ios
Test status and reports
The driver reports results to the App Automation dashboard without any extra code.
Session status and names
You do not need to add a reporter or call a status hook. When the run ends, the driver updates every session on the dashboard:
- Status: A session is marked Passed when every test that ran on it passed, and Failed when at least one did not. Only the tests that actually ran on that session count.
- Retries: A test is judged by its final attempt. A test that fails and then passes on retry does not fail its session.
- Name: A session that ran one test is named after that test. A session that ran several tests is named after the first three, followed by a count of the rest, for example
sign in · sign out · add to cart (+2 more). Names are capped at 255 characters.
To give every session the same fixed name instead, set the driver's name option. To stop the driver from pushing status, set testResults: false.
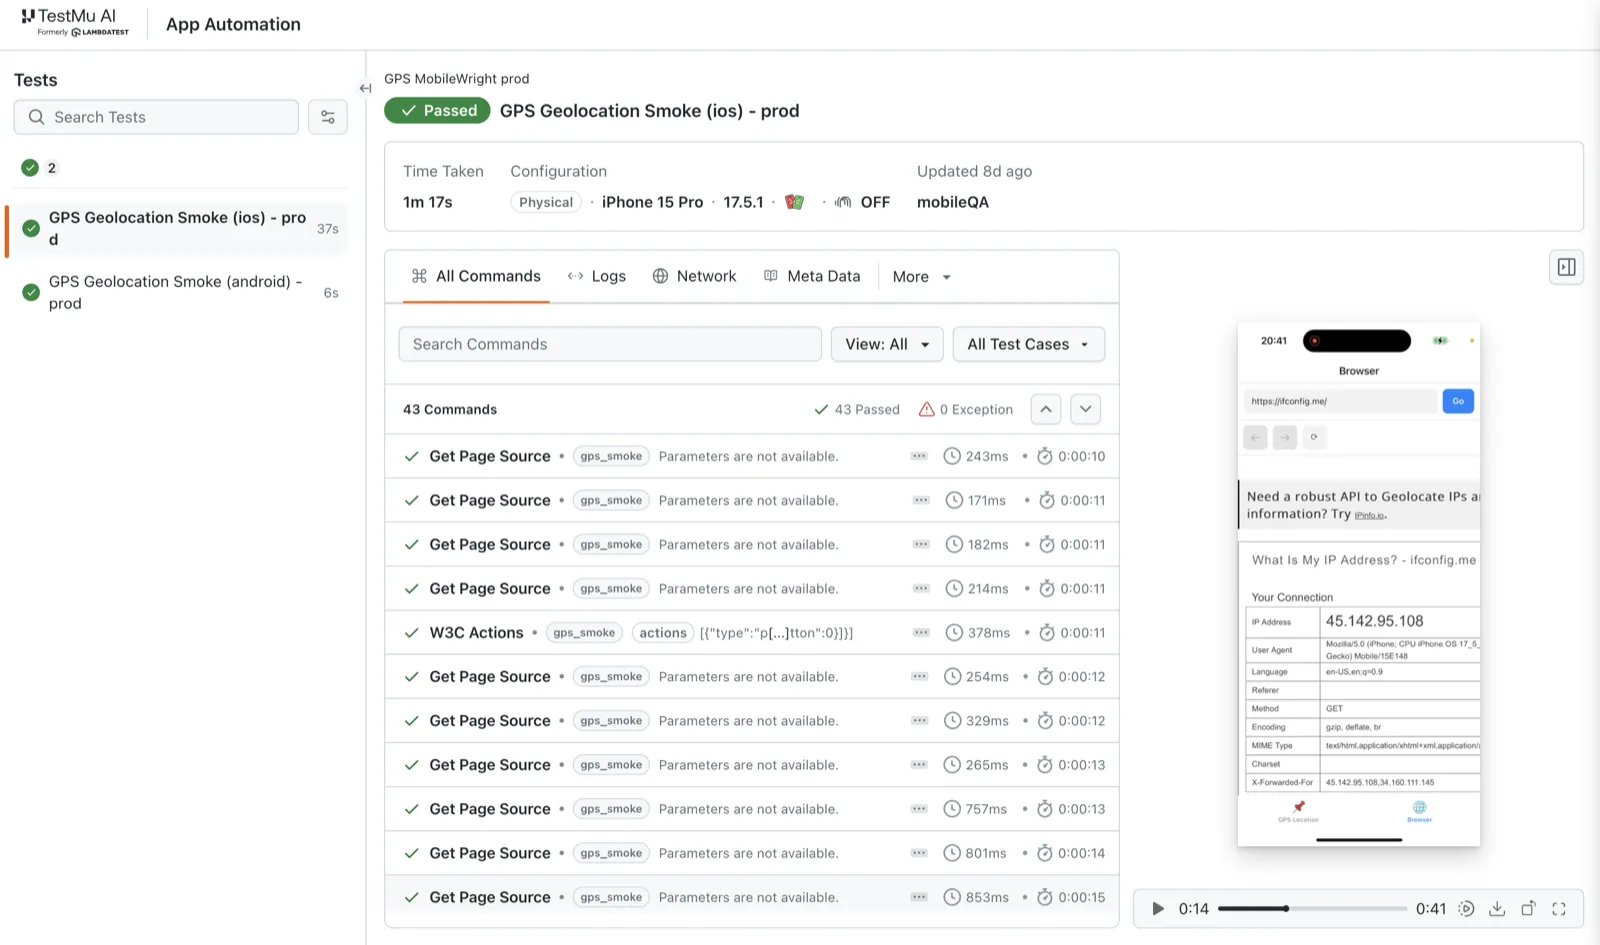
Open a session to see its status, device configuration, and duration, along with every command the test sent, the logs, network traffic, and the video recording of the run:
Build names
Use the driver options build, project, and tags to organize runs on the dashboard. The build name is chosen in this order:
- The
buildoption. - The
TESTMU_BUILDorLT_BUILDenvironment variable. - A name detected from your CI system, as described below.
Build names from CI
When you run inside a supported CI system and do not set a build name, the driver names the build after the pipeline and run number, so every pipeline run gets its own build.
| CI system | Build name |
|---|---|
| GitHub Actions | <owner>/<repo> #<run number> |
| GitLab CI | <project path> #<pipeline number> |
| CircleCI | <repo> #<build number> |
| Buildkite | <pipeline> #<build number> |
| Bitrise | <app title> #<build number> |
| Azure Pipelines | <repository> #<build number> |
| Jenkins | <job name> #<build number> |
| TeamCity | <build configuration name> |
Run in CI/CD
To run your suite from a pipeline, store your TestMu AI credentials as secrets, expose them as environment variables, and run npx mobilewright test.
- GitHub Actions
- Jenkins
- GitLab CI
name: Mobilewright tests

on: [push]

jobs:
  test:
    runs-on: ubuntu-latest
    steps:
      - uses: actions/checkout@v4
      - uses: actions/setup-node@v4
        with:
          node-version: 22
      - run: npm ci
      - run: npx mobilewright test
        env:
          LT_USERNAME: ${{ secrets.LT_USERNAME }}
          LT_ACCESS_KEY: ${{ secrets.LT_ACCESS_KEY }}
pipeline {
  agent any
  environment {
    LT_USERNAME   = credentials('lt-username')
    LT_ACCESS_KEY = credentials('lt-access-key')
  }
  stages {
    stage('Test') {
      steps {
        sh 'npm ci'
        sh 'npx mobilewright test'
      }
    }
  }
}
mobilewright:
  image: node:22
  script:
    - npm ci
    - npx mobilewright test
  # Set LT_USERNAME and LT_ACCESS_KEY as masked CI/CD variables
Upload your app once at the start of the pipeline and pass the lt:// app ID through the TESTMU_APP or LT_APP environment variable. Later jobs can then reuse the same upload. See Upload your app.
Next steps
- Set up your test environment to manage apps, device selection, and test features.
- Review every option in the References.
- See known differences between cloud and local runs before you move a suite over.


 Chat with Us