TestMu AI GitHub App Integration
Your pull requests should deliver proof, not just code.
The TestMu AI Cloud GitHub App brings KaneAI — our AI testing agent — directly into your GitHub workflow. When a developer opens a pull request, KaneAI analyzes the changes, generates targeted test cases, executes them at scale on HyperExecute, and reports back with AI-powered Root Cause Analysis. The entire cycle runs in minutes, and every update appears right inside your PR.
No context switching. No manual test authoring. No waiting.

Key Capabilities
Automated AI Test Authoring
Automatically generate test coverage for every pull request. KaneAI reads your code diff, PR description, README, and custom agent instructions to create automated tests that reflect actual business logic — not generic boilerplate.
Smart Intelligence
KaneAI scans your existing test inventory in TestMu AI Test Manager to find semantically similar test cases relevant to the PR changes. These existing tests are added alongside the newly generated test cases into the test run and executed on HyperExecute — maximizing test coverage by combining new and proven tests in a single validation cycle.
Seamless Execution
Tests run automatically and seamlessly on TestMu AI's HyperExecute infrastructure — in parallel across browsers, devices, and platforms. Time to first signal is measured in minutes, not hours.
In-Depth Insights
Detailed execution reports enriched with AI-powered Root Cause Analysis, offering actionable recommendations. When tests fail, KaneAI analyzes logs, screenshots, network traces, and stack traces to surface the specific root cause — directly in your PR comment.
Prerequisites
Before implementing the TestMu AI Cloud GitHub App in your development workflow, ensure your organization has the following:
Account Requirements
-
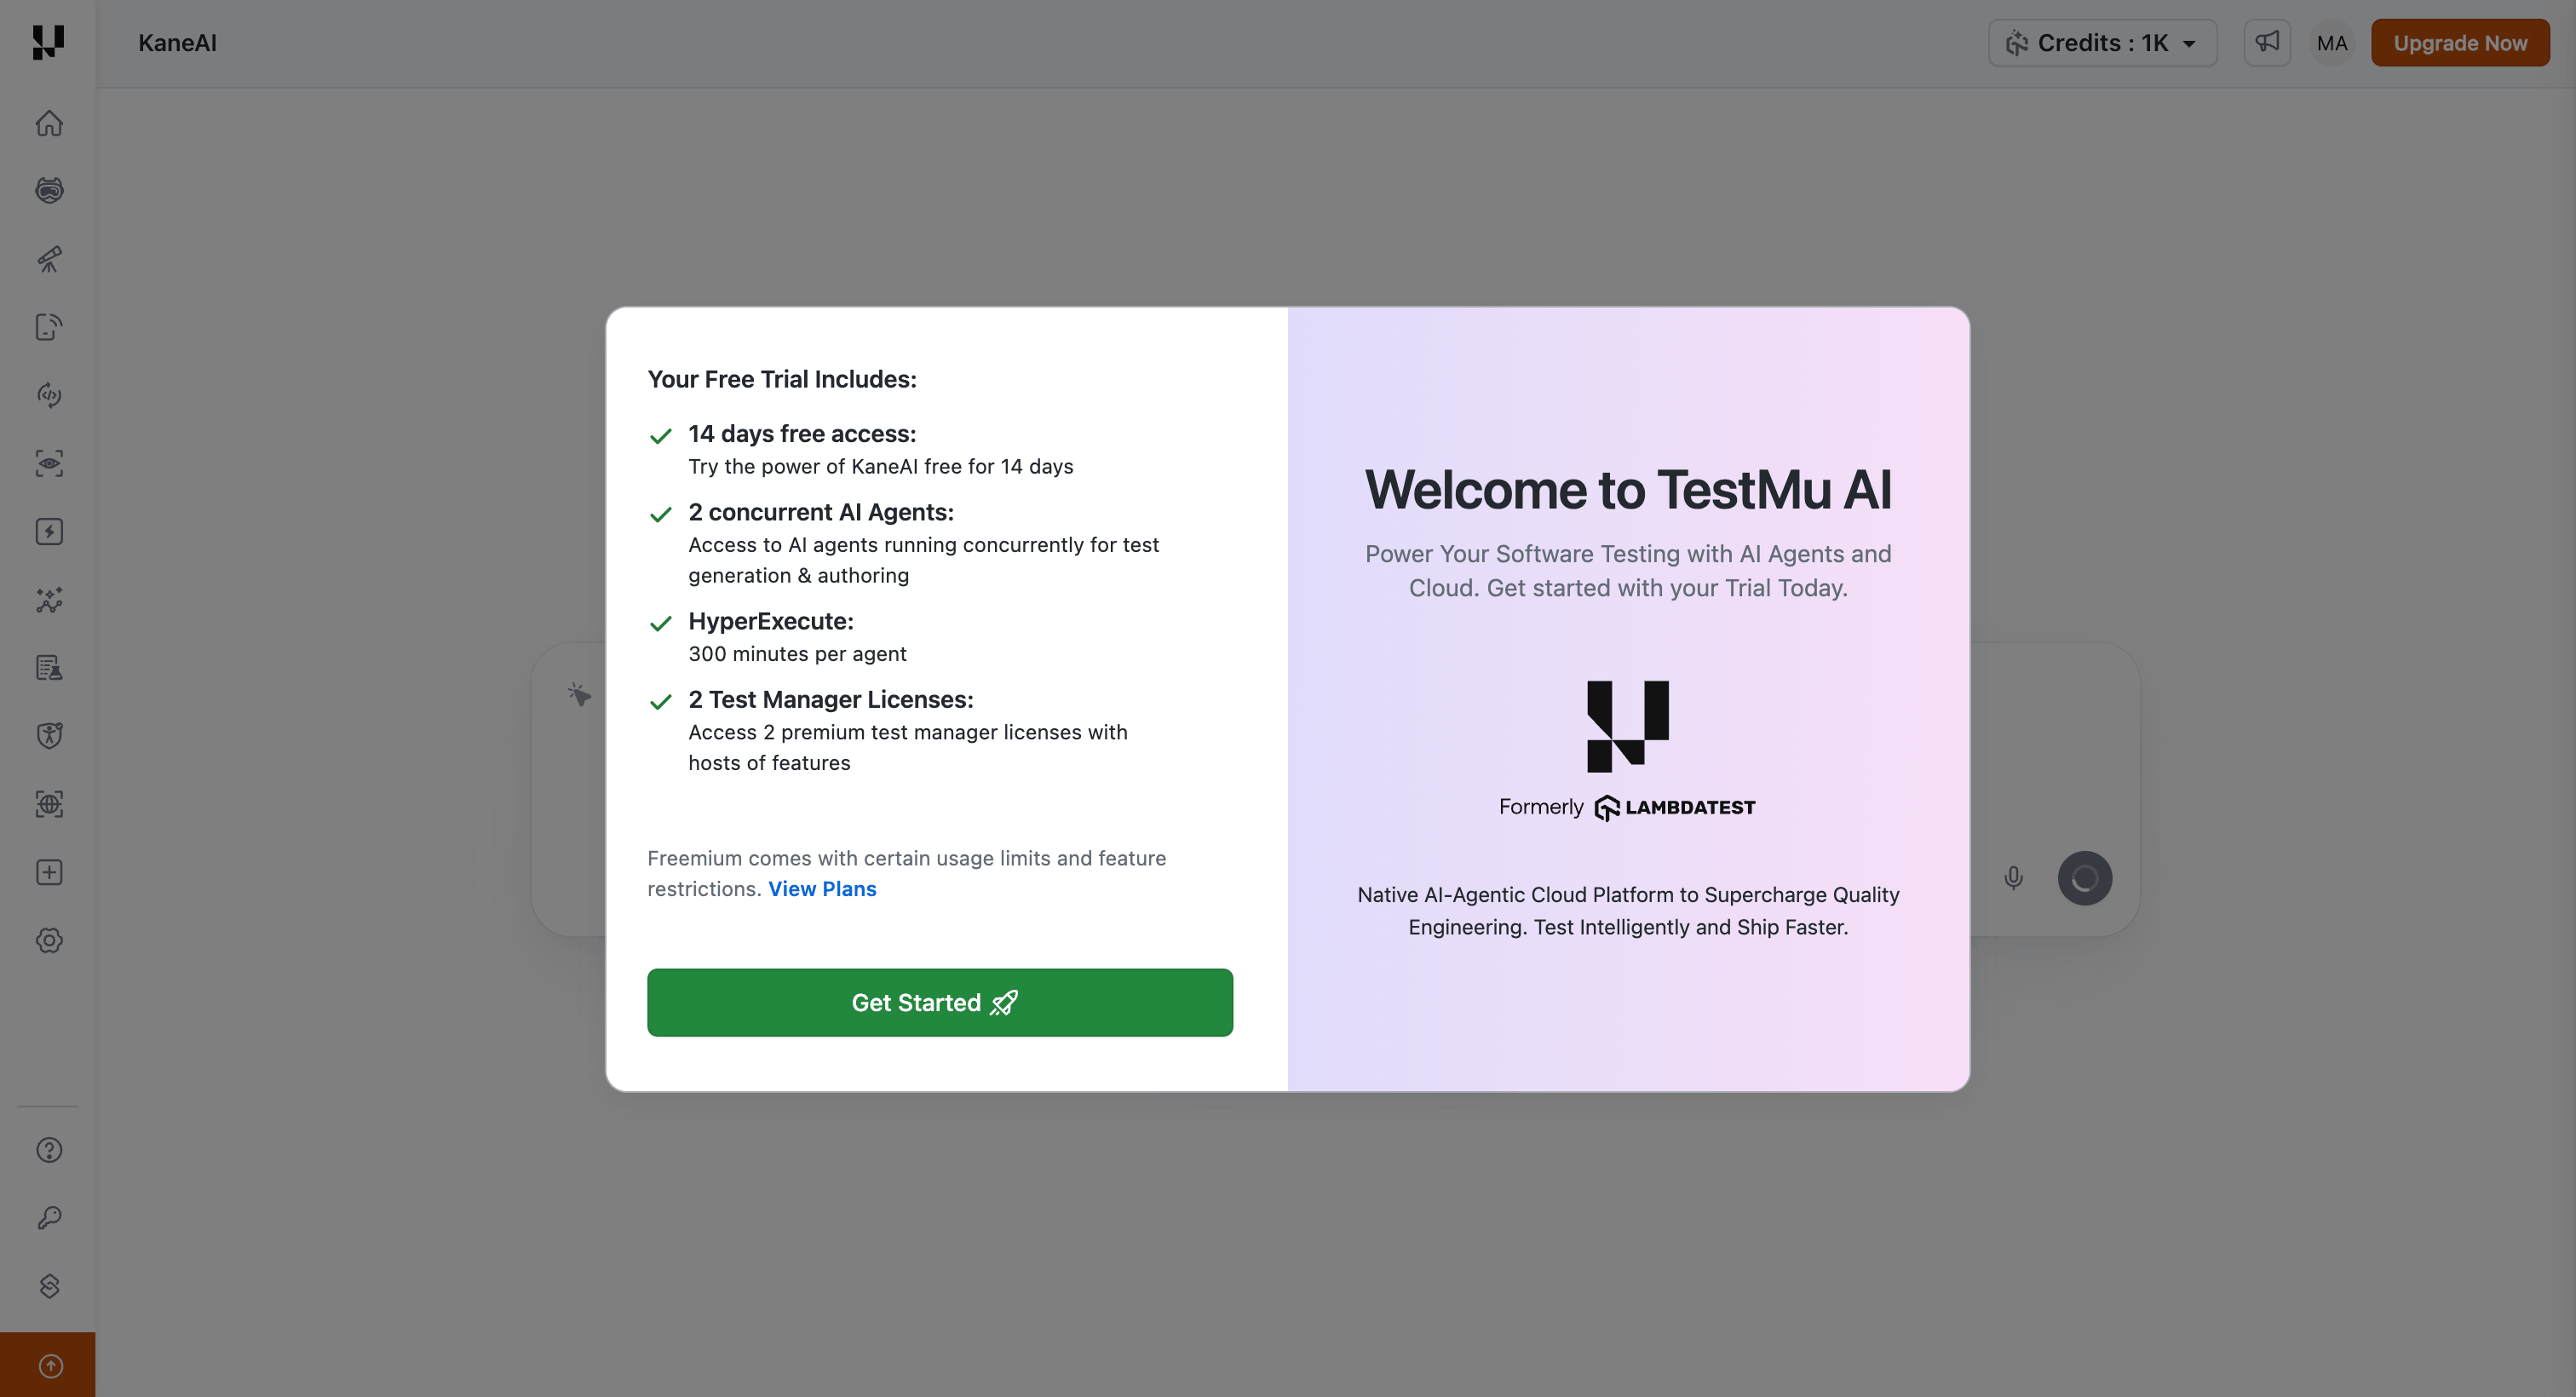
TestMu AI Account: An active TestMu AI account with appropriate licensing. Sign up now if you don't have an account yet.
-
KaneAI Access: This integration requires KaneAI to be enabled on your TestMu AI account. New signups can start a free trial to explore KaneAI's key workflows.
Repository Requirements
- GitHub Repository Access: Administrative access to the GitHub repositories where you want to install the app
- Repository README (recommended): A descriptive
README.mdin your repository improves test quality. KaneAI uses it to understand your application's purpose, architecture, and key user workflows.
Installation
Follow these steps to install and authorize the TestMu AI Cloud GitHub App for your organization.
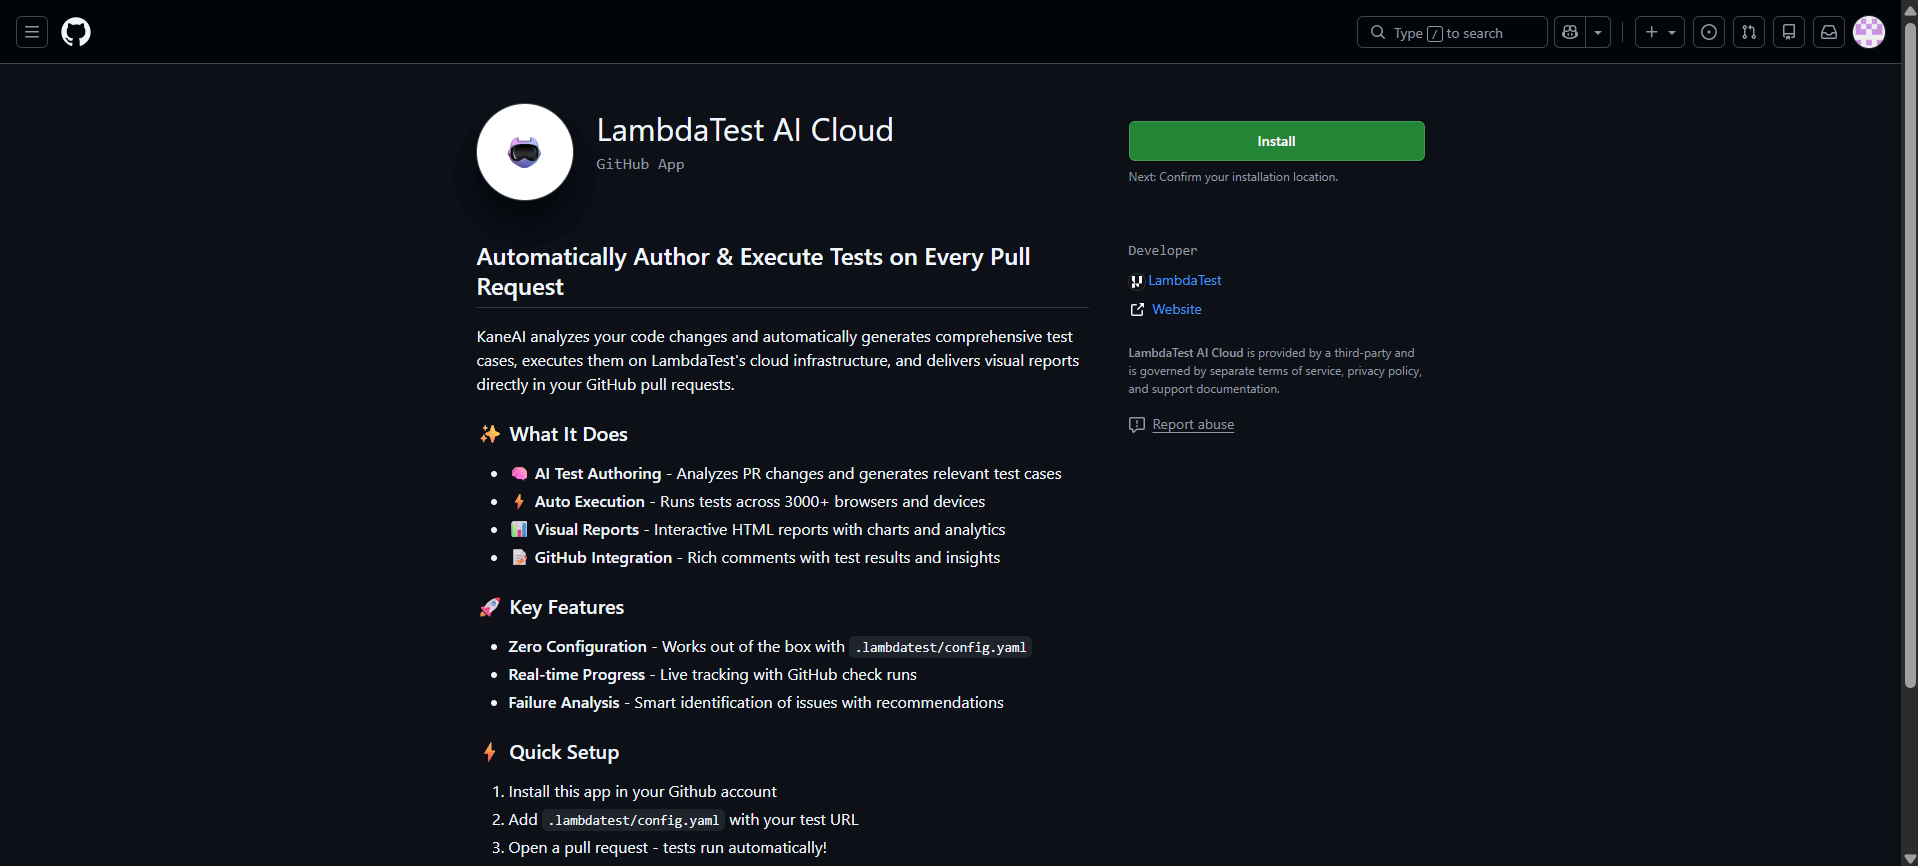
Step 1: Access GitHub Marketplace
Navigate to the TestMu AI Cloud GitHub App on GitHub Marketplace and click Install to begin the installation process.
Step 2: Configure Repository Access
During installation, you'll need to specify which repositories should have access to the app:
- Organization-wide Installation: Select All repositories to enable the app across your entire GitHub organization
- Selective Installation: Choose Only select repositories and specify individual repositories for more granular control
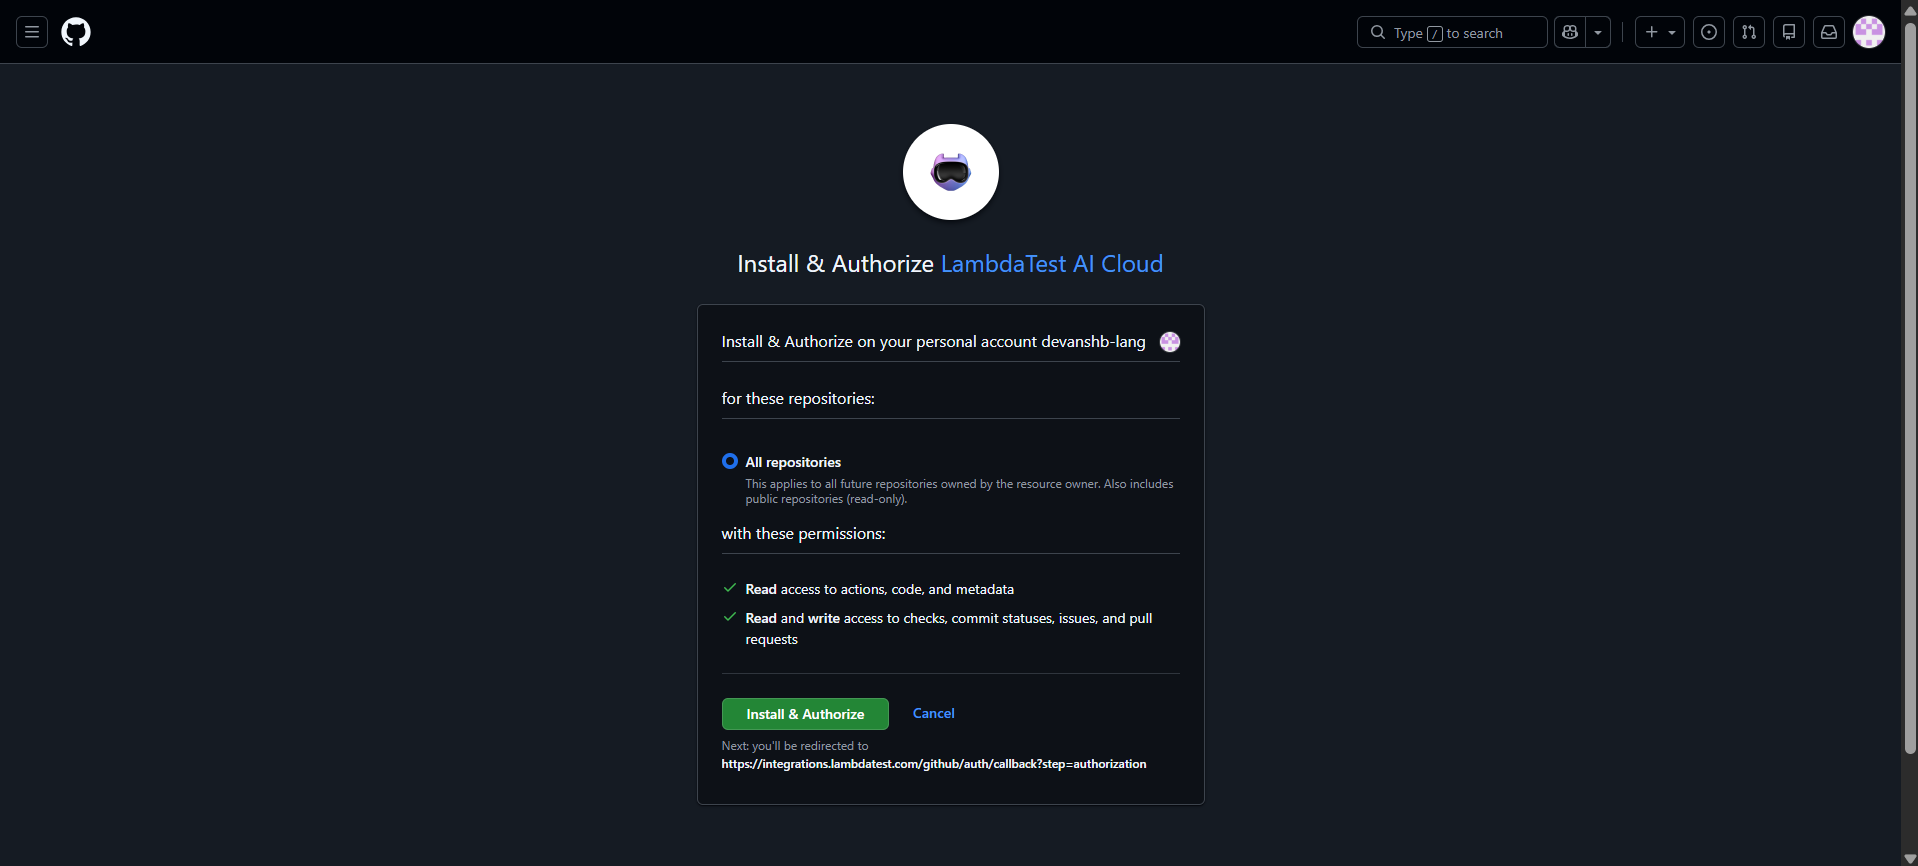
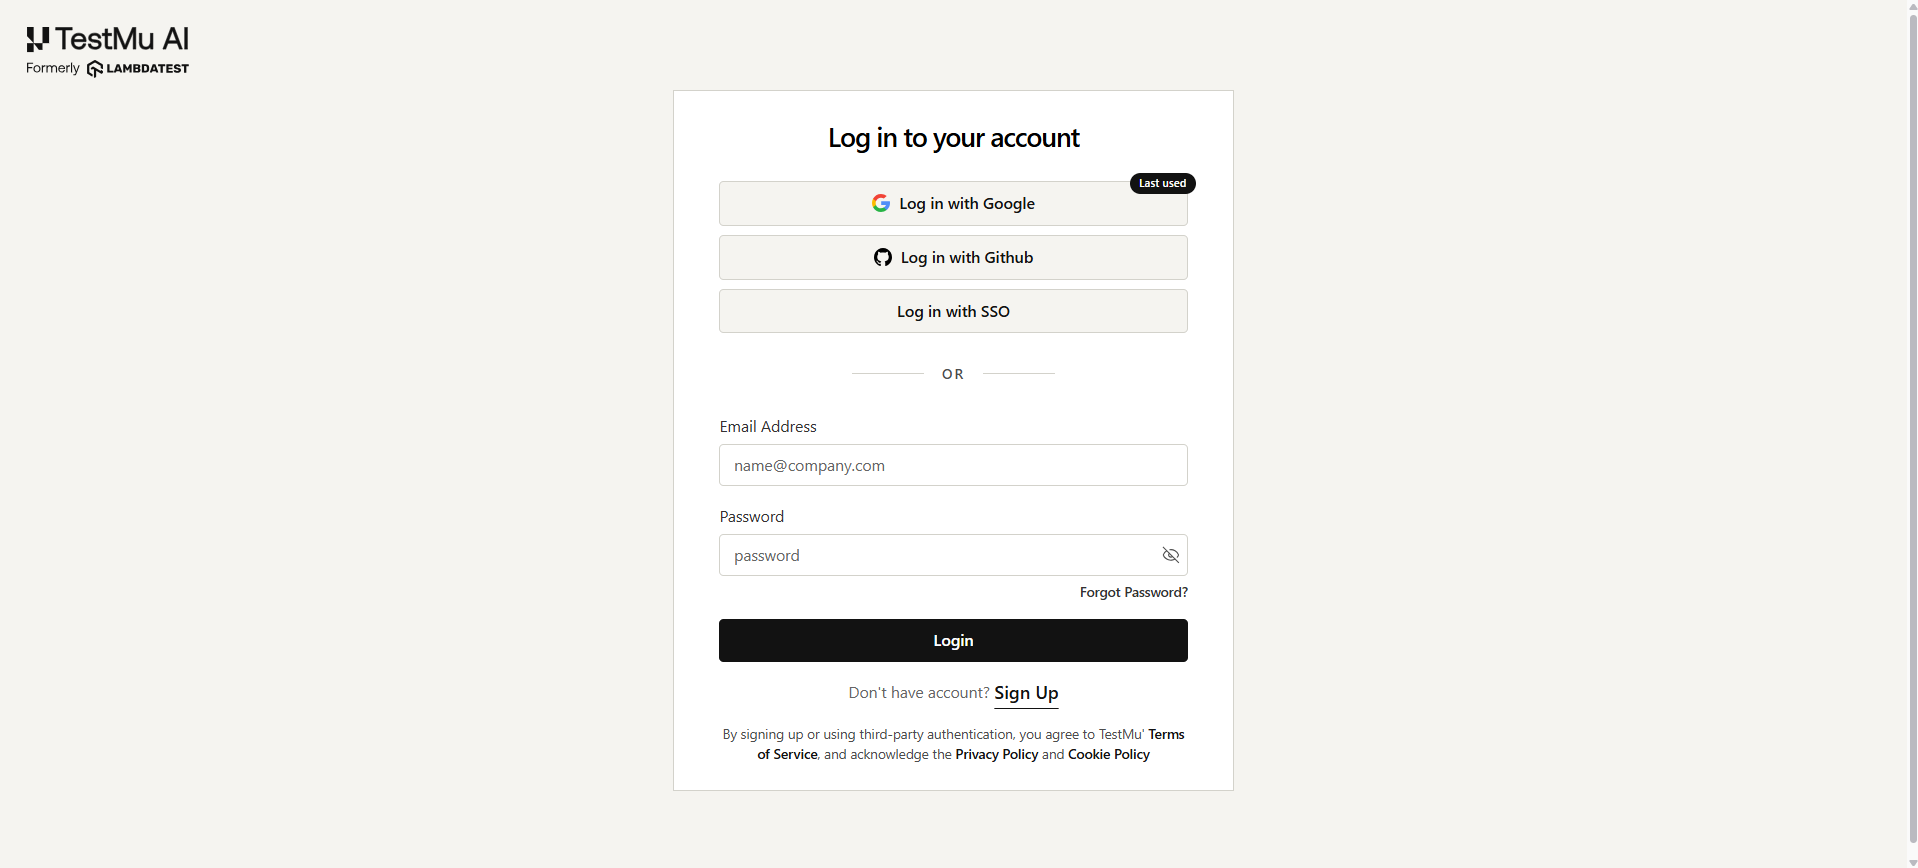
After making your selection and clicking the Install and Authorize button, you will be redirected to TestMu AI where you will be asked to login.
Once done, you will be redirected to the Integrations page.
For pilot programs or initial rollouts, we recommend installing on a select subset of repositories first. Once your team is comfortable with the workflow, you can expand access organization-wide.
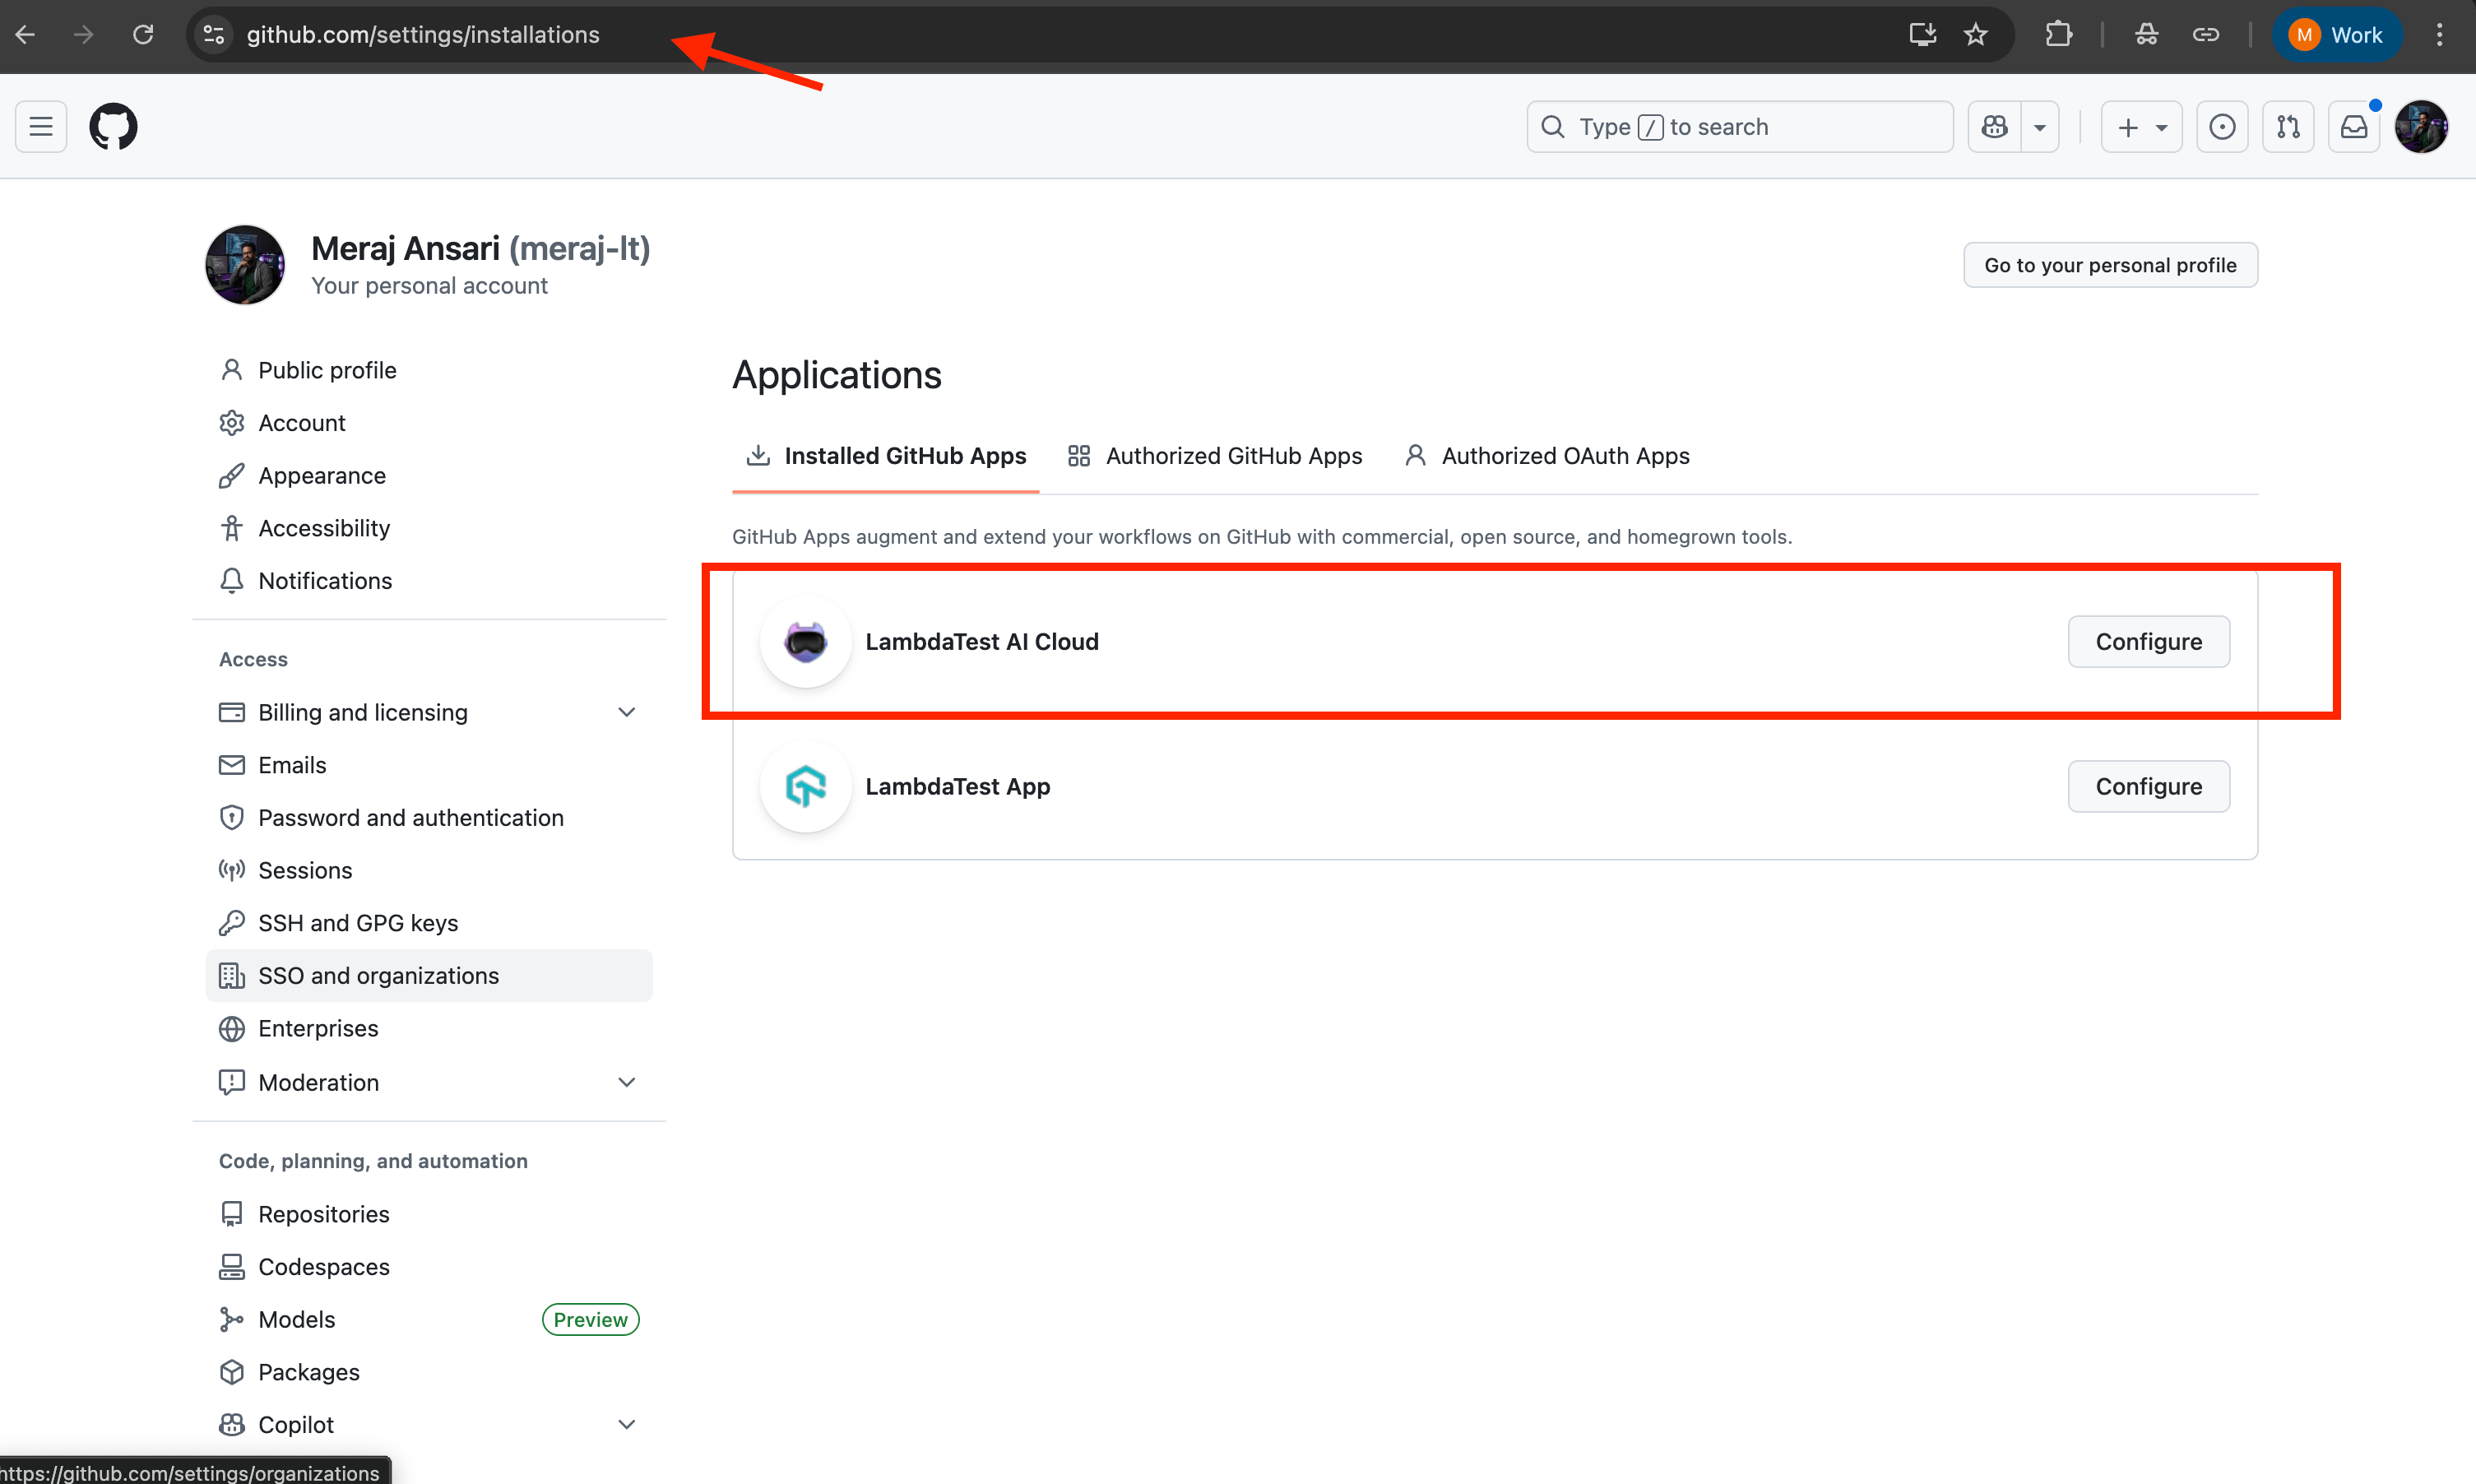
Step 3: Verify Successful Installation
Confirm the installation was successful by:
- Navigating to your GitHub organization's Settings page
- In left side menu under Integrations, click Applications.
- Selecting Installed GitHub Apps from the left sidebar
- Verifying that TestMu AI Cloud appears in the list of installed applications
You can also click on the app to review and modify repository access permissions at any time.
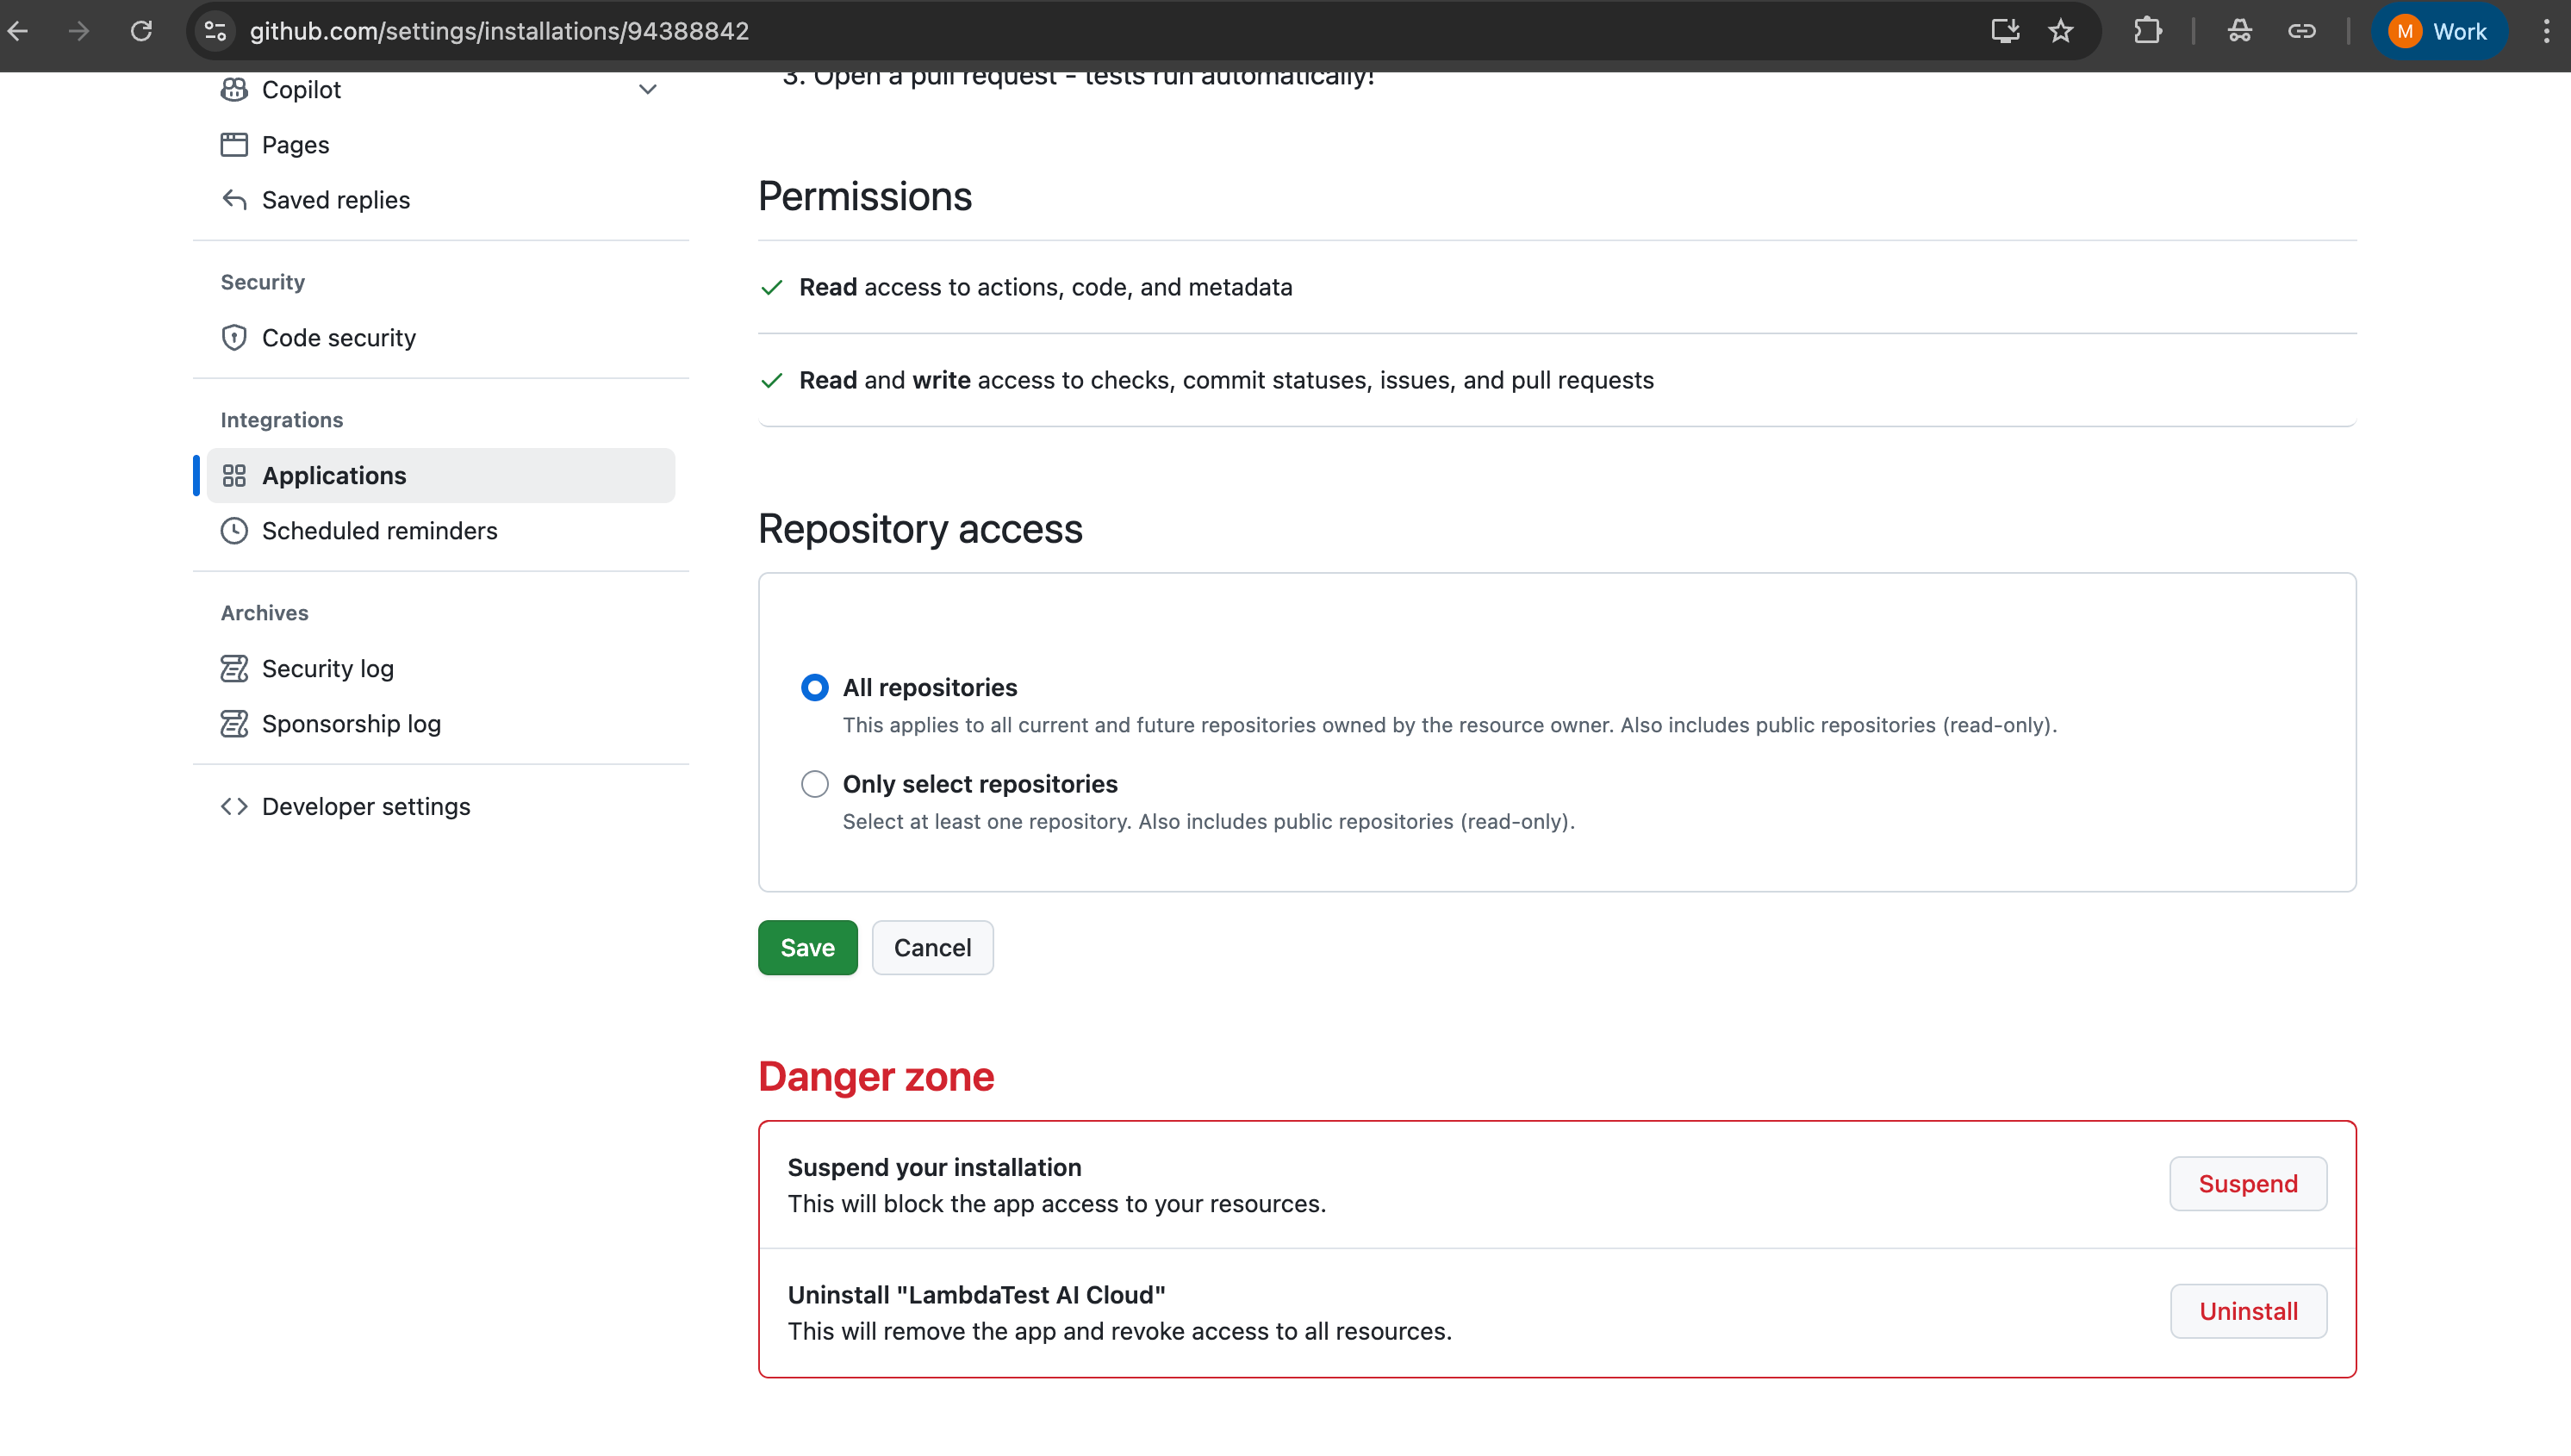
Uninstalling the GitHub App
If you need to remove the TestMu AI Cloud GitHub App from your organization:
- Navigate to the TestMu AI Cloud GitHub App on GitHub Marketplace
- Click on the Configure button to access the app settings
- Scroll down to the bottom of the page to find the Danger Zone section
- Click on the Uninstall button to remove the app from your organization
- Confirm the uninstallation when prompted
Repository Configuration
After installing the GitHub App, each repository requires a configuration file to connect your GitHub workflow with your TestMu AI Test Manager environment. This configuration defines where tests should be stored, who should be assigned, and which environment to test against.
Configuration File Setup
Create a .lambdatest/config.yaml file in the root directory of your repository with the following structure:
# LambdaTest AI Cloud Configuration
project_id: "your_project_id"
folder_id: "your_folder_id"
assignee: your_user_id
environment_id: environment_id
test_url: "https://your-deployed-app-url.com/"
Configuration Parameters
| Parameter | Description |
|---|---|
project_id | The unique identifier for your TestMu AI Test Manager project |
folder_id | The folder where generated test cases will be organized |
assignee | The TestMu AI user ID who will be assigned to test runs for executions |
environment_id | The target testing environment (browser, OS, device configurations) |
test_url | The base URL of your application under test (your staging or testing environment URL) |
After installing the GitHub App, you are redirected to the integration settings page where all configuration values — project ID, folder ID, assignee, and environment ID — are displayed with a copy button. Use these to populate your .lambdatest/config.yaml file directly.
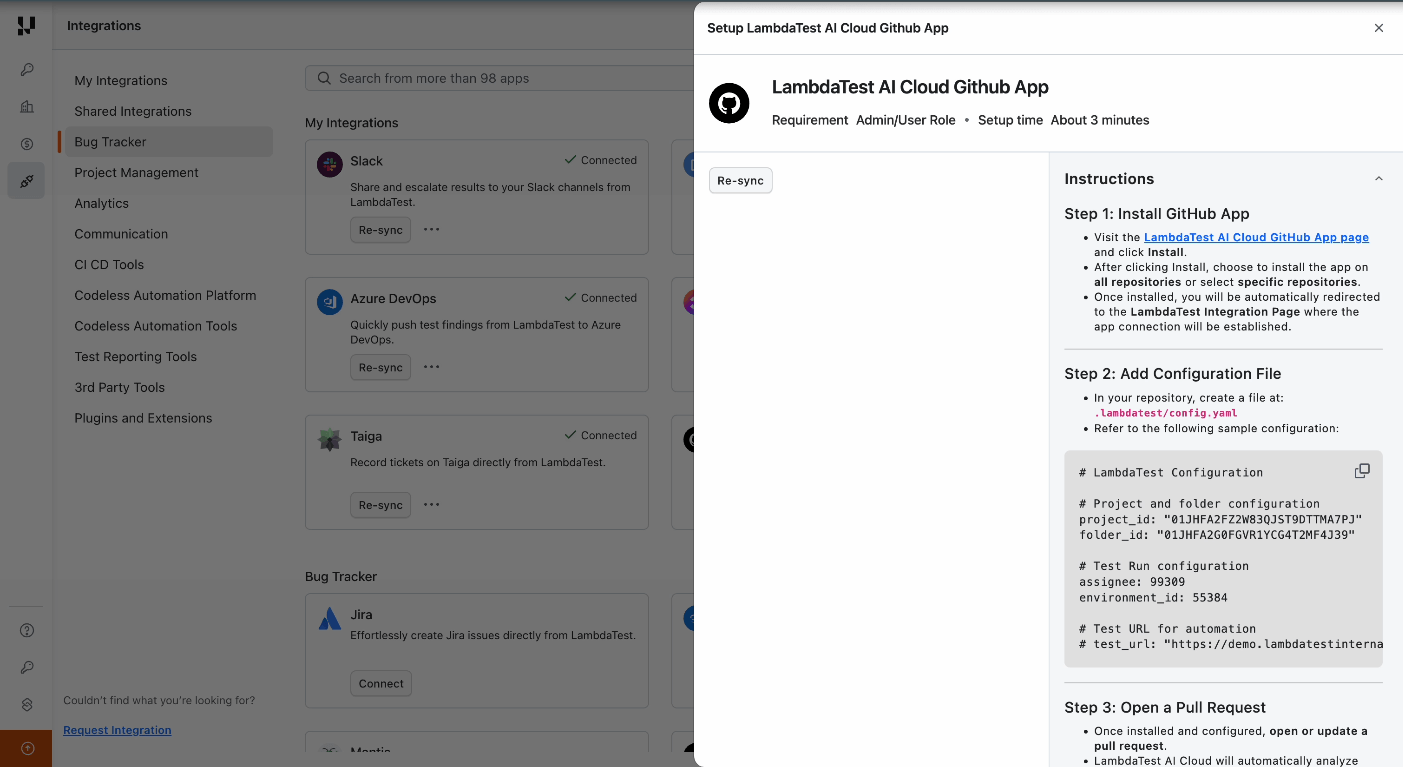
Note: All configuration IDs can also be retrieved programmatically from the TestMu AI Test Manager API Documentation.
KaneAI uses your README.md and agent.md to improve test quality. Keep your README comprehensive (app overview, key workflows, tech stack) and use agent.md for custom instructions like testing priorities, scenarios to cover or skip, and domain-specific rules.
Repository Structure
Your final repository structure should look like this:
your-repo/
├── .lambdatest/
│   └── config.yaml          # LambdaTest configuration
    └── agent.md             # Optional file for custom instructions to enhance responses
├── src/                     # Your application source code
├── README.md                # Detailed project documentation (used by AI)
└── ... other project files
Configuration Best Practices
- Environment Segregation: Use separate
project_idandfolder_idvalues for different branches (e.g., staging vs. production) to maintain test organization - Team Assignment: Configure
assigneeto route test runs to the appropriate QA team member or use a shared team account for visibility - Dynamic URLs: For teams with ephemeral preview environments, consider parameterizing
test_urlor updating it per deployment - Version Control: Commit
.lambdatest/config.yamlto your repository so all team members use consistent configuration
Try It Out — Sample Repository
Explore the GitHub App workflow using our public sample repository:
ai-native-quality-validation-sample
Browse the open pull requests to see:
- AI-generated test cases
- Test execution results
- Root Cause Analysis comments
Quick Start with Your Own Fork
To experience the full workflow hands-on, fork the sample repository and run the GitHub App in your own environment:
- Fork the repository — Click Fork on the sample repository to create a copy under your GitHub account.
- Install the GitHub App — Install the TestMu AI Cloud GitHub App on your forked repository (see Installation above).
- Configure your credentials — Add the
.lambdatest/config.yamlfile with your TestMu AI project ID, folder ID, and other configuration values (see Repository Configuration). - Set up GitHub Pages & Actions — Enable GitHub Pages and GitHub Actions in your forked repository to handle deployment and workflows.
- Trigger the workflow — Open a pull request in your fork and comment
@KaneAI Validate this PRto see the full AI testing pipeline in action.
Triggering Test Generation
With the GitHub App installed and your repository configured, you're ready to start generating AI-powered tests for your pull requests.
Initiating the Workflow
The test generation workflow is triggered through a simple comment on any pull request:
- Create a Pull Request: Push your feature branch and open a PR as you normally would.
- Add a Trigger Comment: Post a command in the PR comments section.
Available Commands
| Command | Description |
|---|---|
@KaneAI Validate this PR | Triggers the full AI testing workflow — analysis, generation, execution, and reporting |
@LambdaTest Validate this PR | Alias for the above |

What Happens Next
After you post the trigger comment, KaneAI immediately begins working:
- Code Analysis: The AI examines all code changes in the pull request, including file modifications, additions, and deletions.
- Context Gathering: Your repository's README.md, PR title, description, comments, and AGENT.md are analyzed to understand application context.
- Test Strategy: Based on the changes and context, the AI determines which areas require testing and what scenarios to cover.
- Test Generation: Intelligent test cases are created with appropriate assertions, validations, and edge case handling.
The first signal — test plan and progress tracker — appears in your PR within approximately 1 minute of triggering the workflow. Full execution and reporting typically completes within minutes, depending on test volume and complexity.
Live PR Updates, Step by Step
From the moment you trigger the workflow, KaneAI posts real-time updates directly in your pull request. Every phase — from analysis through execution to reporting — is visible without leaving GitHub. Here is what happens at each stage.
Step 1: Real-Time Progress Tracker
As soon as the workflow begins, KaneAI posts a comprehensive progress tracker comment to your PR. This dynamic comment serves as your single source of truth for the entire testing operation.
The Progress Tracker includes:
- Current Workflow Status: Real-time updates on which phase is currently executing
- Test Case Pipeline: Progress through analysis, generation, authoring, and code generation phases
- Intelligent Test Case Suggestion: AI identifies existing semantically similar test cases from your project and adds them to the test run alongside newly generated tests
- Test Run Management: Execution status, including configuration, triggering, monitoring, and completion
- Reporting Status: Final report generation and PR approval recommendation
The tracker automatically updates as each stage completes — no manual refreshes required.
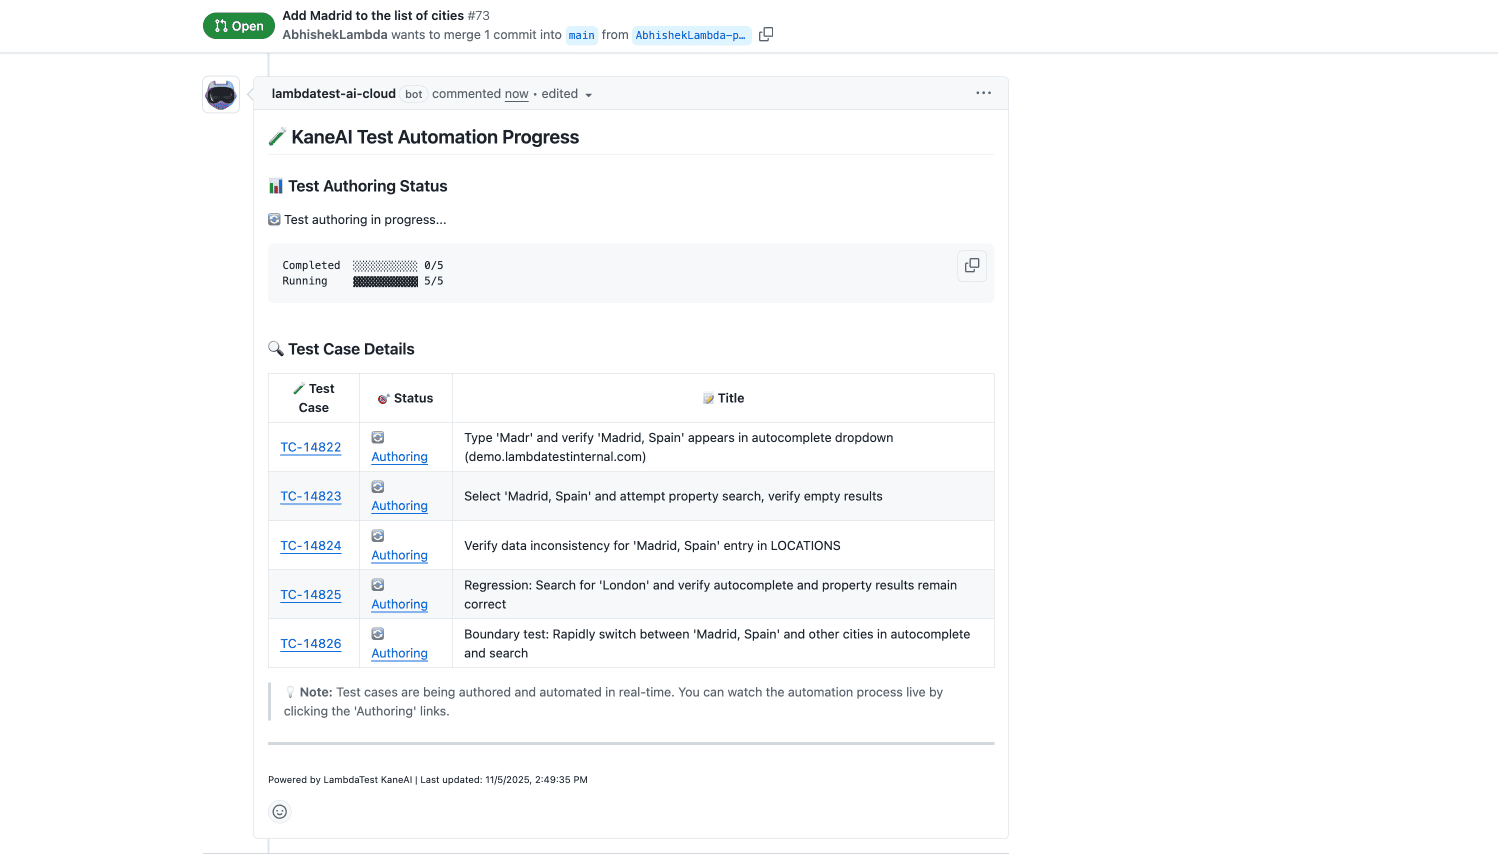
Step 2: Automated AI Test Authoring
Once KaneAI completes test generation, a detailed comment lists every test case that was created. These are not generic tests — they reflect the specific code changes in your PR and your application's business context.
Each entry includes:
- Test Case ID: A clickable link (e.g., TC-14822) that opens the test case directly in TestMu AI Test Manager. Any user in your organization with Test Manager access can open these links.
- Status: The current authoring state of each test case. When a test case is in Authoring status, the link redirects to the live KaneAI session where the test is being authored in real time.
- Test Case links (TC-XXXXX) can be accessed by any user in your organization who has TestMu AI Test Manager access.
- Authoring status links can only be accessed by the user who integrated the GitHub App, as they redirect to that user's live KaneAI session.
This comment updates dynamically as test authoring progresses, so you can monitor the transition from conceptual test cases to executable automation.
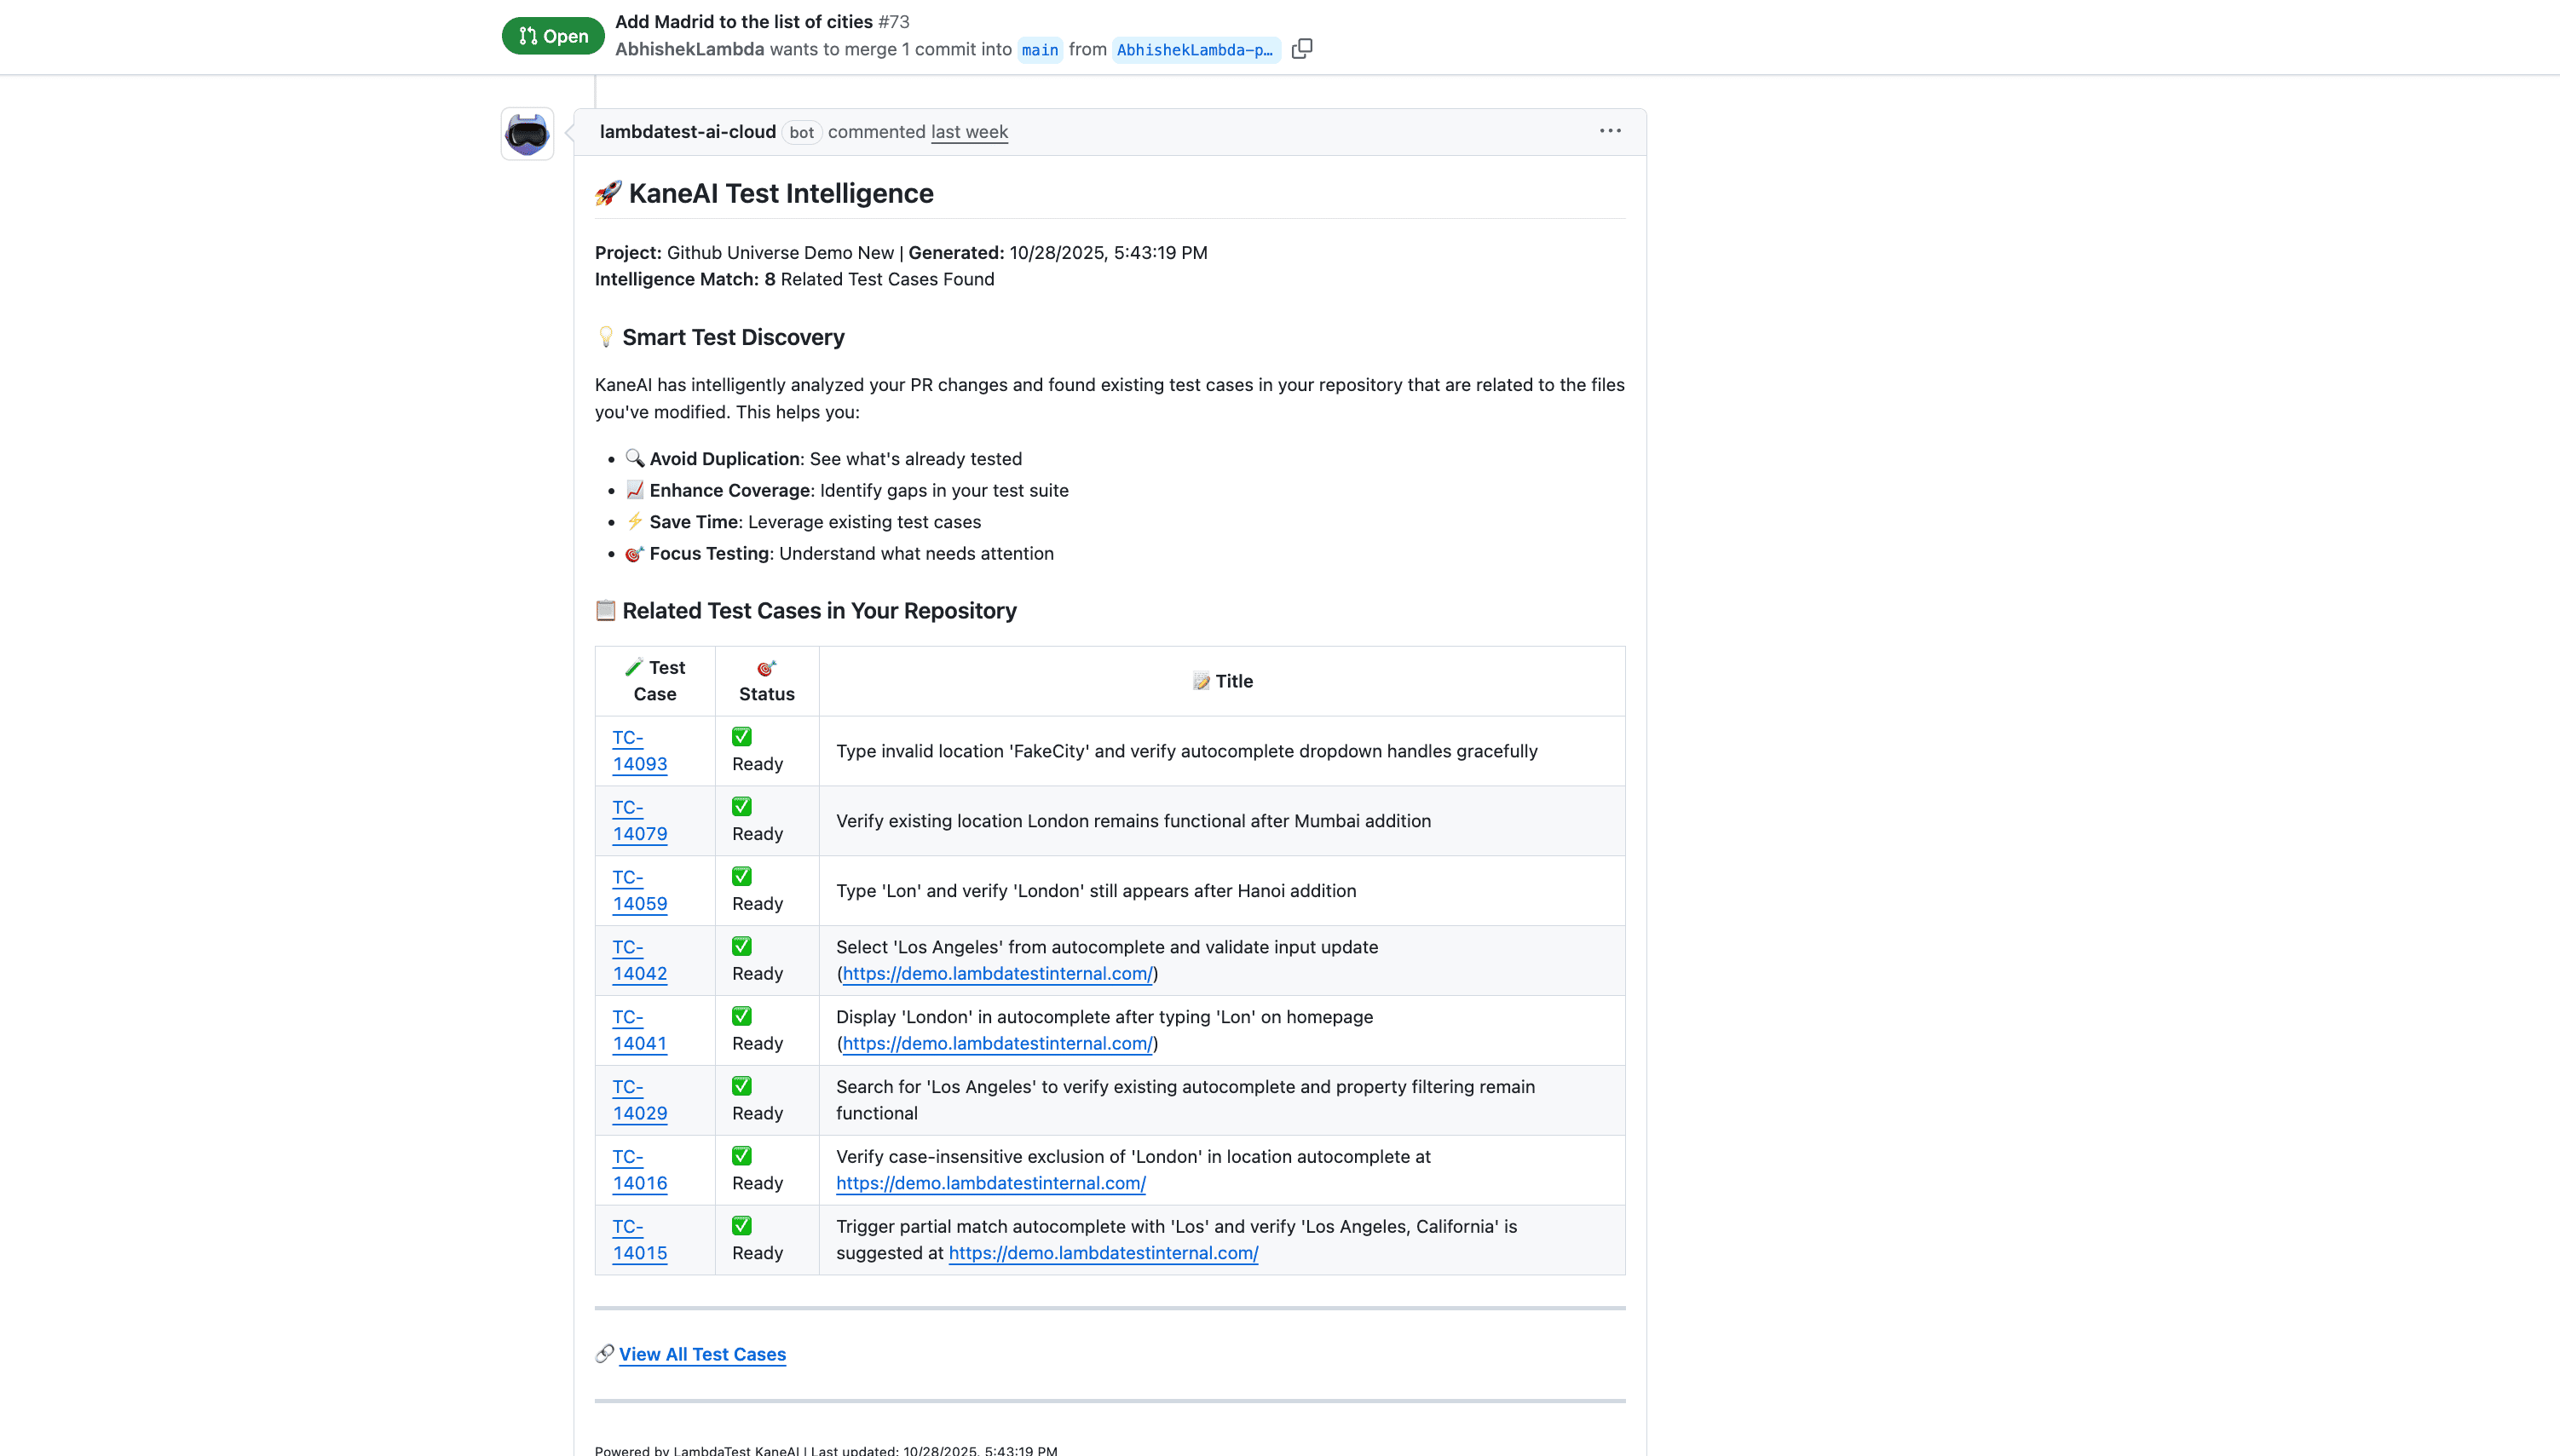
Step 3: Smart Intelligence — Similar Test Detection
KaneAI does not rely solely on newly generated tests. It scans your existing test inventory in TestMu AI Test Manager to find semantically similar test cases that are relevant to the PR changes. These existing tests are added on top of the newly generated test cases into the test run for execution on HyperExecute. This is Smart Intelligence at work.
- Maximizes coverage — Combines AI-generated tests with proven existing test cases, ensuring both new and established scenarios are validated in a single run.
- Leverages your test library — Your team's existing test cases become active participants in every PR validation, not just historical records.
- Builds institutional knowledge — Every test run enriches the system's understanding of your project, making future test suggestions progressively more accurate.
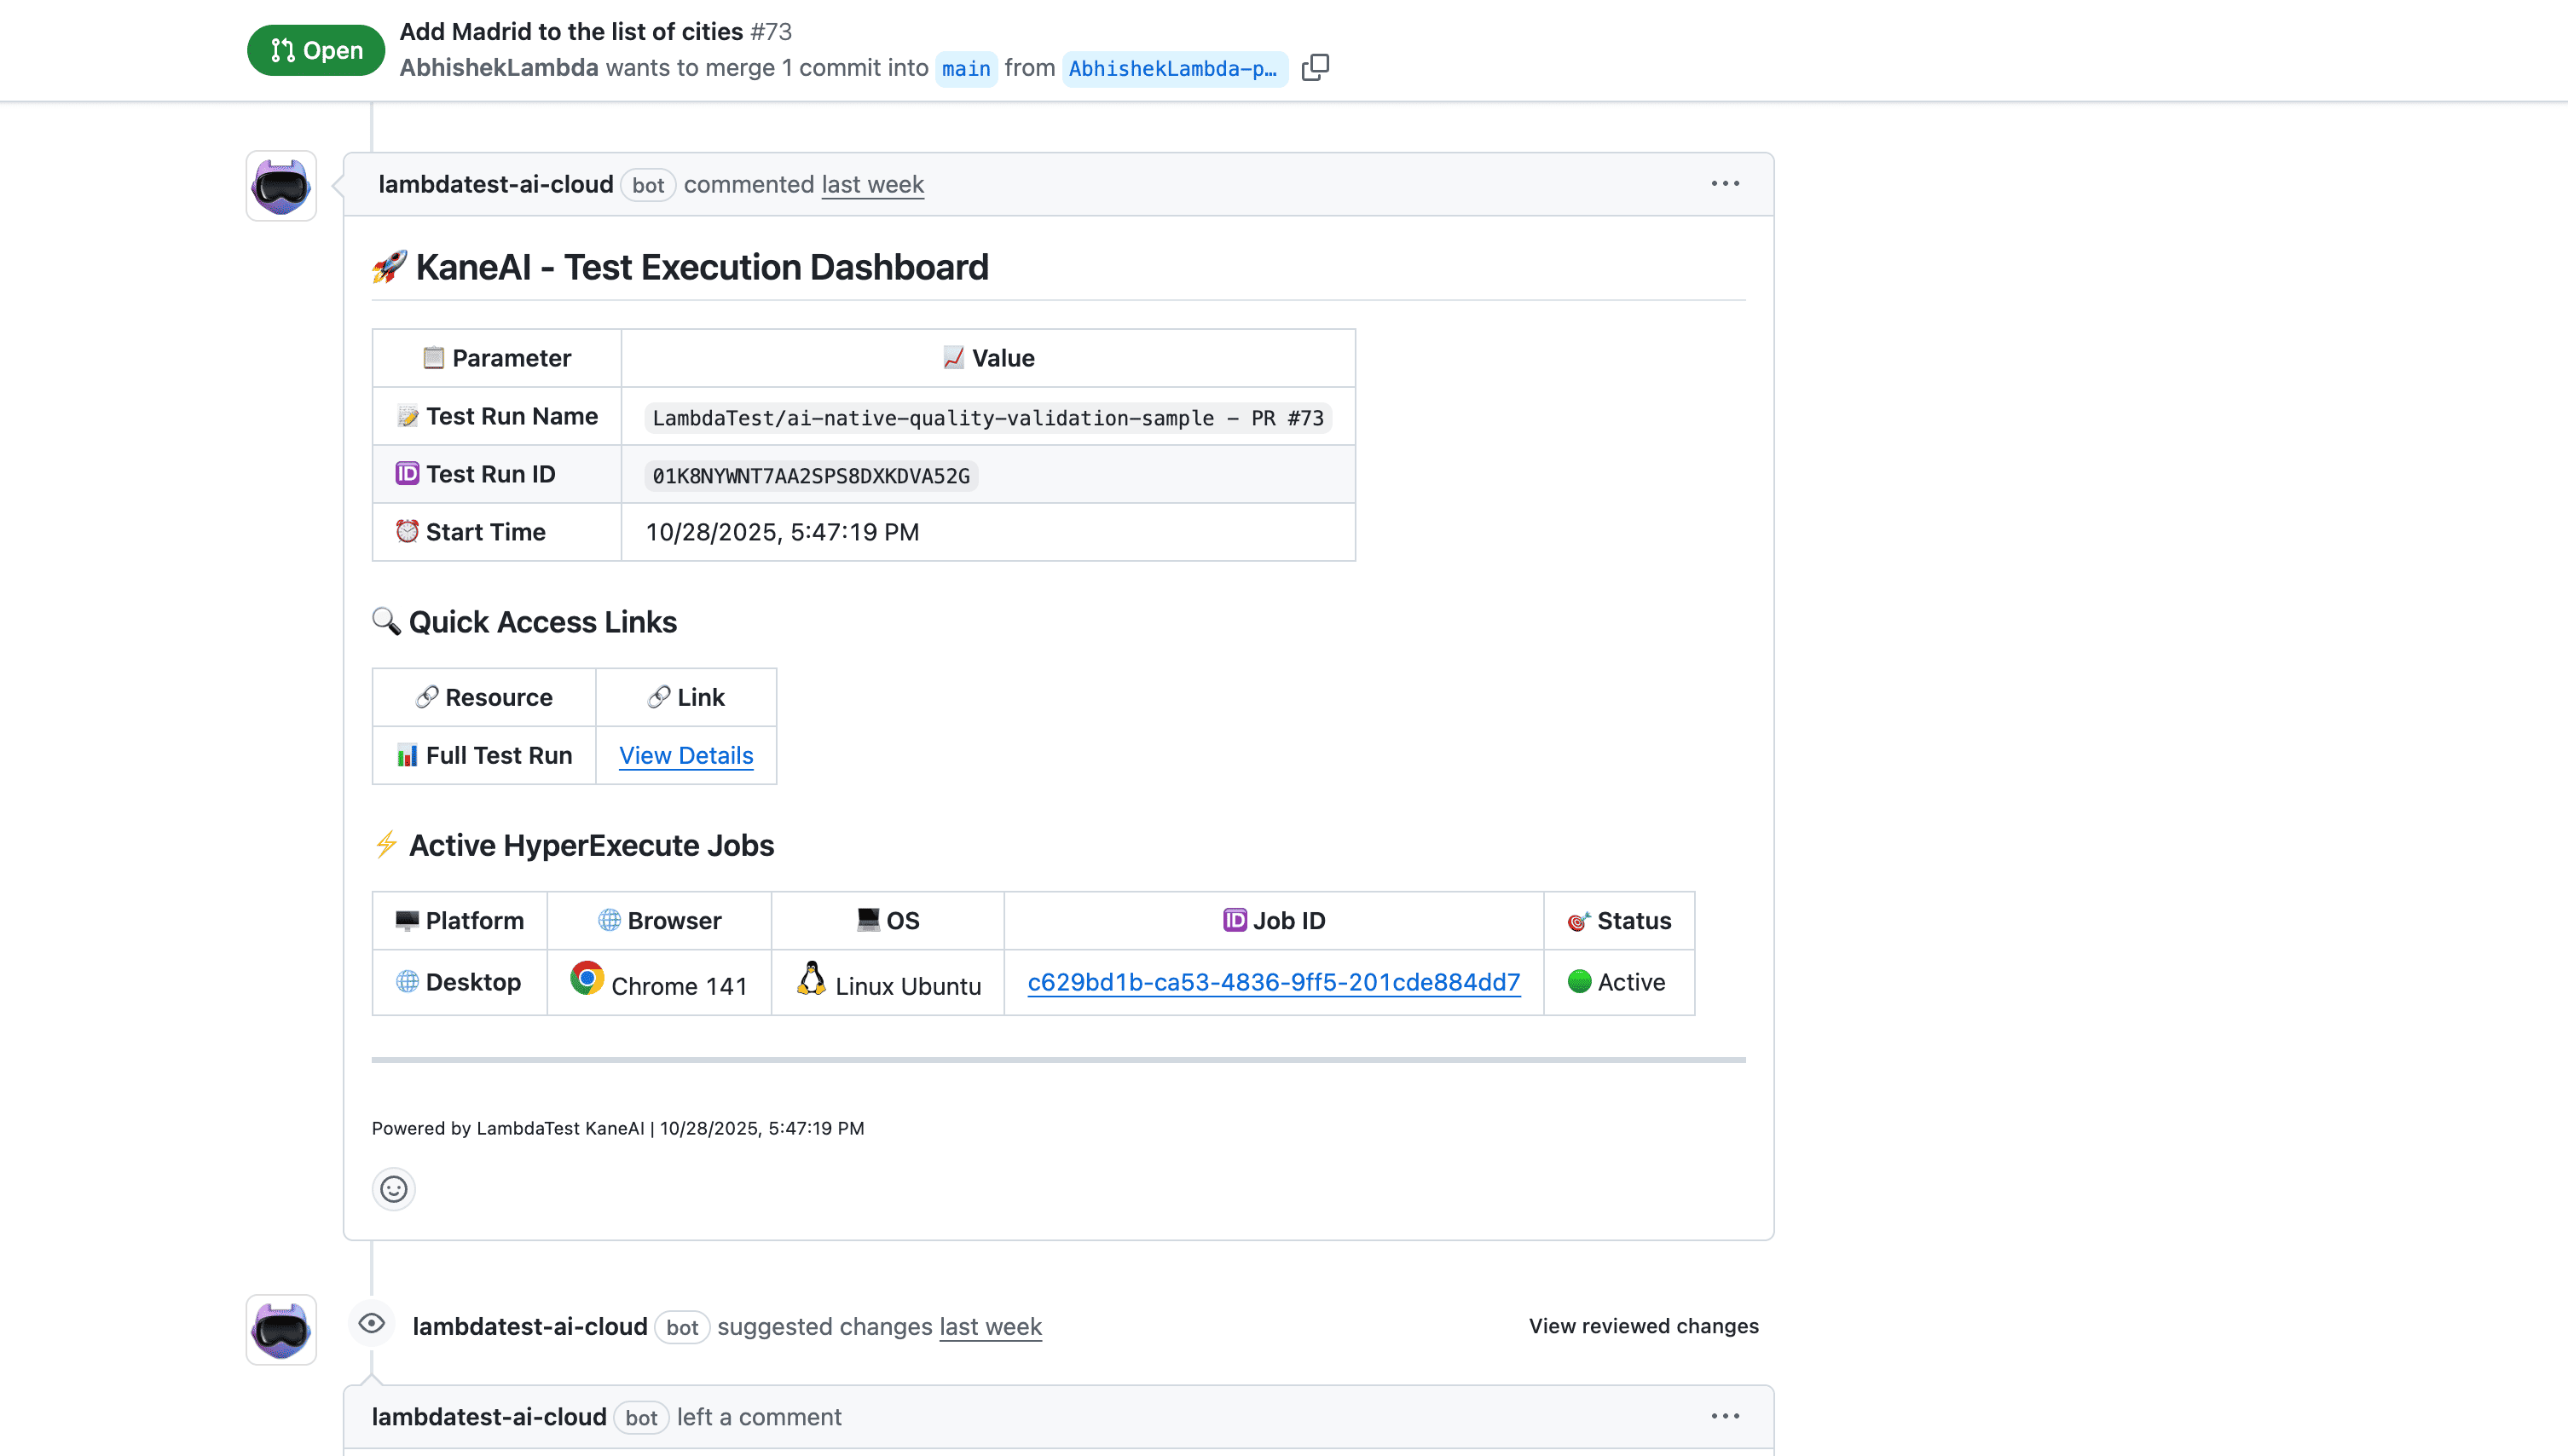
Step 4: Seamless Execution on HyperExecute
When test execution begins, a dedicated comment provides live status updates directly in your PR:
- Test Run Configuration: Execution environment, browser matrix, and parallel execution settings
- Real-Time Execution Status: Live updates as tests run, including pass/fail counts and completion percentage
- HyperExecute Dashboard Link: Direct access to detailed logs, screenshots, video recordings, and network traces
Tests run in parallel across browsers, devices, and operating systems on TestMu AI's HyperExecute infrastructure — delivering results at scale without queuing delays.
Test run link in this comment can be accessed by any user in your organization who has TestMu AI Test Manager access.
Step 5: In-Depth Insights and Root Cause Analysis
Upon completion, KaneAI generates a final report that goes far beyond simple pass/fail metrics:
- Executive Summary: High-level test coverage and success rate for quick stakeholder review
- Detailed Test Results: Pass/fail status for each individual test case with failure details
- PR Approval Recommendation: Based on test results and failure severity, KaneAI suggests whether the PR should be approved, requires changes, or needs further investigation
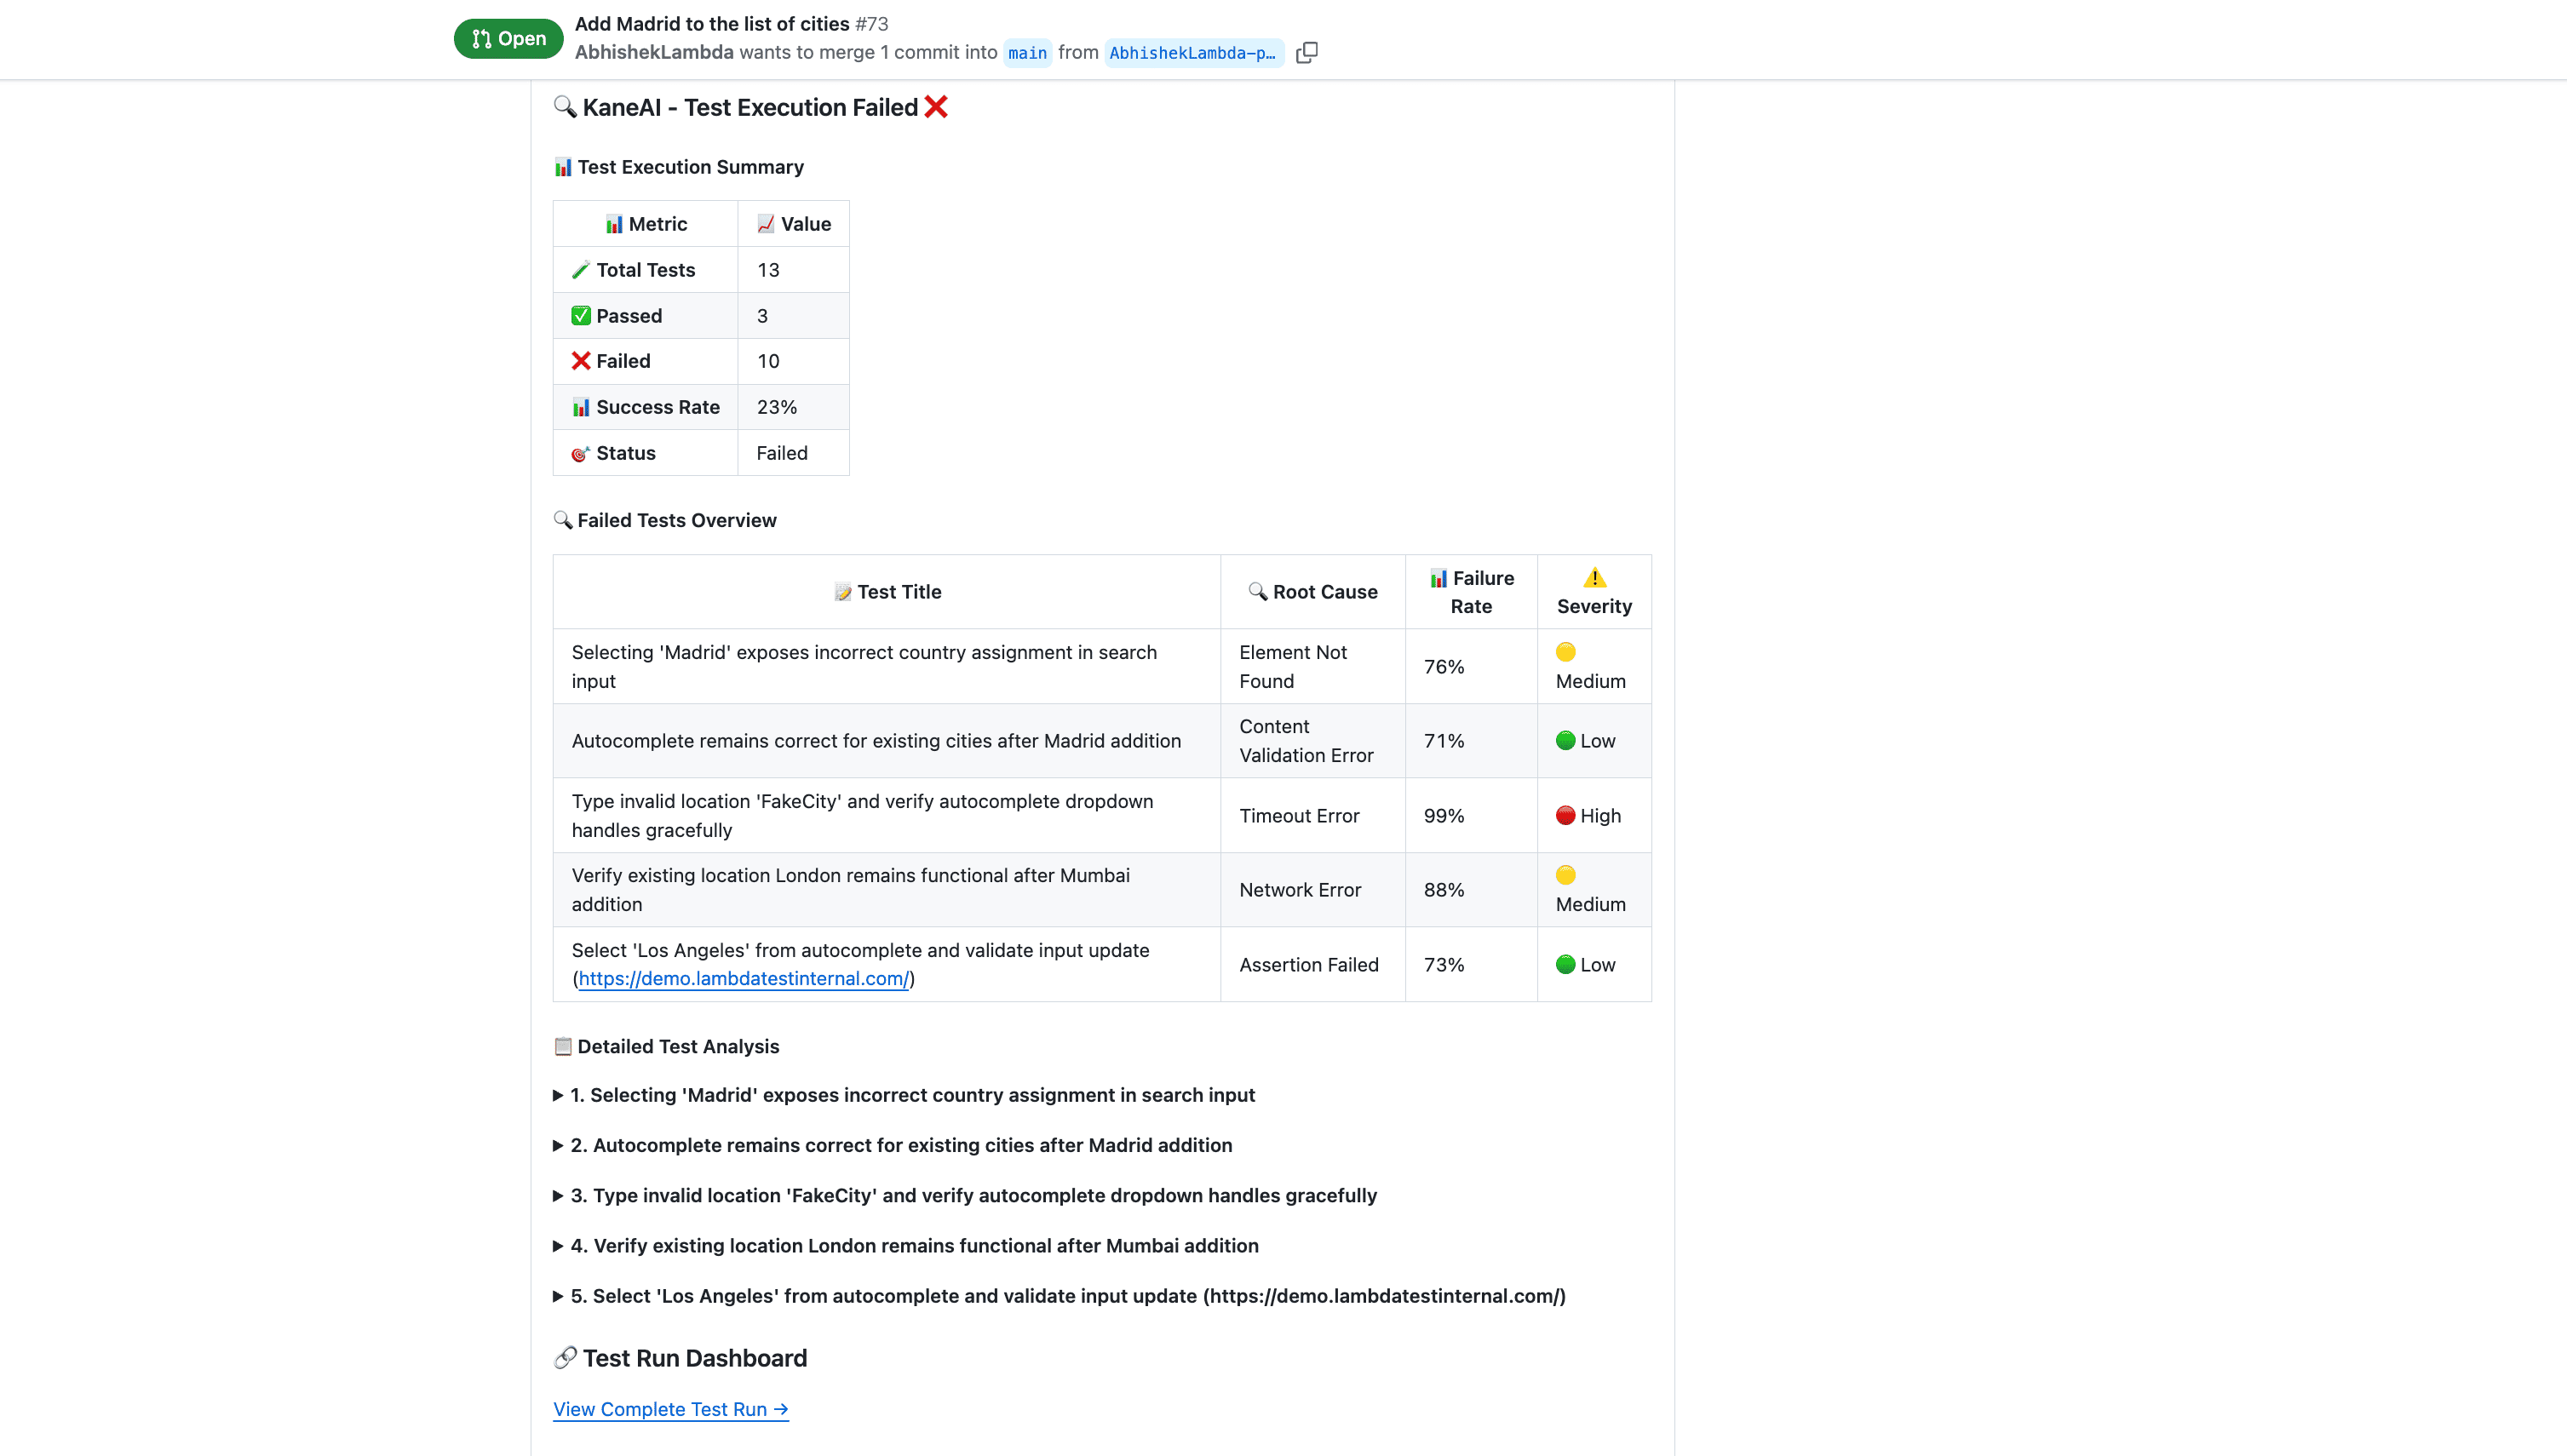
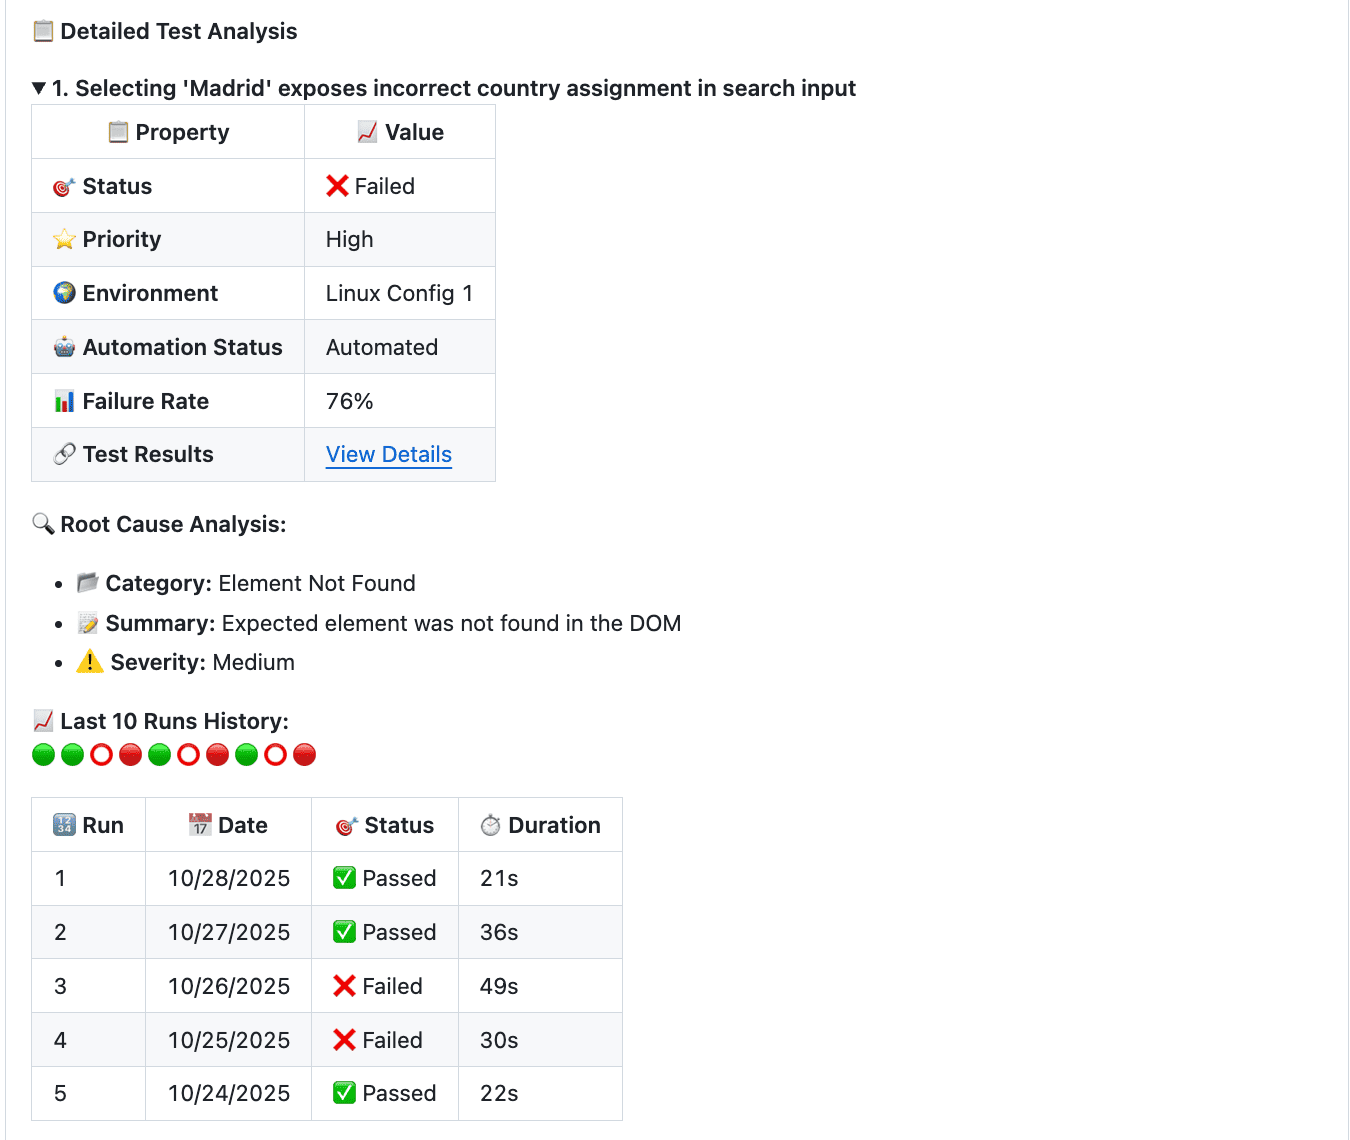
For any failing test, KaneAI performs automated Root Cause Analysis (RCA) by correlating:
- Screenshots and video replay at the point of failure
- DOM state and selector changes
- Network request logs and timing
- Stack traces and error messages
The RCA summary is posted directly in your PR, along with a clear recommendation — approve, request changes, or investigate further. Your team gets a readable diagnosis, not a raw stack dump.
Test run link in this comment can be accessed by any user in your organization who has TestMu AI Test Manager access.
Why This Changes Your Workflow
The TestMu AI Cloud GitHub App eliminates the gap between code change and validated confidence. Instead of treating testing as a separate phase that happens after development, every pull request becomes a self-validating artifact.
- Automated AI Test Authoring — KaneAI handles test design, script generation, and execution. Your team reviews results, not writes boilerplate.
- Smart Intelligence — AI finds existing test cases semantically relevant to your PR changes and adds them alongside newly generated tests, maximizing coverage with every validation run.
- Seamless Execution — Tests run automatically inside your PR workflow. Developers, QA engineers, and stakeholders all see the same information in the same place — no context switching required.
- In-Depth Insights — AI Root Cause Analysis transforms cryptic test failures into actionable diagnoses with recommended fixes.
Every test run, result, and AI recommendation is permanently recorded in your PR history, providing a complete audit trail for compliance and retrospective analysis.
Video Walkthrough
Watch the video below for a complete walkthrough of the TestMu AI Cloud GitHub App in action — from installation to AI-powered test generation and reporting.
