Puppeteer Testing With Jest
Jest is a Facebook-maintained framework for developing frontend and backend unit tests in JavaScript and executing end-to-end testing using Playwright. It provides you with the flexibility to target a single test, delivering structured output, or an entire suite for common assertions.
TestMu AI allows you to run Puppeteer tests with Jest on a browser farm of 40+ real browsers and operating system combinations.
This guide will cover the basics of getting started with Puppeteer testing with Jest on the TestMu AI platform.
Prerequisites
Note: All the code samples in this documentation can be found in the TestMu AI's Repository on GitHub. You can either download or clone the repository to quickly run your tests.
View on GitHub
-
Clone the TestMu AI-Puppeteer repository on your system.
-
Install the npm dependencies.
npm install
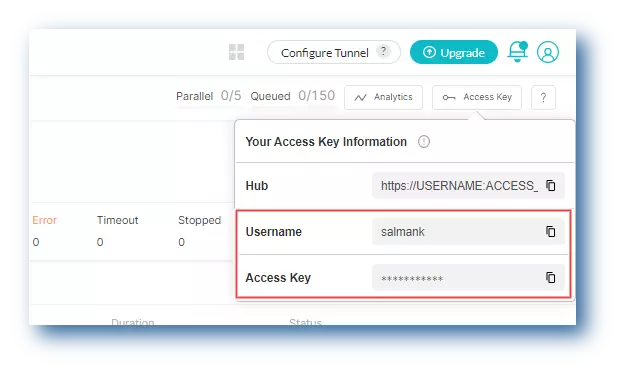
- In order to run your Puppeteer tests with Jest, you will need to set your TestMu AI username and access key in the environment variables. Click the Access Key button at the top-right of the Automation Dashboard to access it.
Windows
set LT_USERNAME="YOUR_LAMBDATEST_USERNAME"
set LT_ACCESS_KEY="YOUR_LAMBDATEST_ACCESS_KEY"
macOS/Linux
export LT_USERNAME="YOUR_LAMBDATEST_USERNAME"
export LT_ACCESS_KEY="YOUR_LAMBDATEST_ACCESS_KEY"
Running Tests Using Jest
Test Scenario: The below test script searches TestMu AI on DuckDuckGo and verifies the website title.
- To run the Puppeteer tests using Jest on TestMu AI, you need make some tweaks to the
jest-puppeteer.config.jsfile.
const caps_chrome = {
	browserName    : 'Chrome',
	browserVersion : 'latest',
	'LT:Options'   : {
		platform   : 'Windows 10',
		build      : 'Sample Puppeteer-Jest',
		name       : 'Puppeteer-jest test on Chrome',
		resolution : '1366x768',
		user       : process.env.LT_USERNAME,
		accessKey  : process.env.LT_USER_KEY,
		network    : true
	}
};

const caps_edge = {
	browserName    : 'MicrosoftEdge',
	browserVersion : 'latest',
	'LT:Options'   : {
		platform   : 'Windows 10',
		build      : 'Sample Puppeteer-Jest',
		name       : 'Puppeteer-jest test on Edge',
		resolution : '1366x768',
		user       : process.env.LT_USERNAME,
		accessKey  : process.env.LT_USER_KEY,
		network    : true
	}
};

module.exports = {
	connect : {
		browserWSEndpoint : `wss://cdp.lambdatest.com/puppeteer?capabilities=${encodeURIComponent(
			JSON.stringify(caps_chrome)
		)}`
	}
};
- Pass the below command to run the test.
npm run test
- Visit the TestMu AI Automation Dashboard to see the results of your Puppeteer Jest tests.
Using the Jest Agent Skill with TestMu AI
The jest-skill is a part of TestMu AI Skills that guide AI coding assistants in generating production-ready test automation.
The jest-skill package includes:
jest-skill/
├── SKILL.md
└── reference/
    ├── playbook.md
    └── advanced-patterns.md
It provides structured guidance for:
- Project structure and setup
- Dependency configuration
- Local execution
- TestMu AI cloud execution
- Debugging patterns
- CI/CD integration
Installing Jest Agent Skill
Install a Jest Agent Skill using the command below:
# Clone the repo and copy the skill you need
git clone https://github.com/LambdaTest/agent-skills.git
cp -r agent-skills/jest-skill .claude/skills/

# Or for Cursor / Copilot
cp -r agent-skills/jest-skill .cursor/skills/
Note: If you prefer installing all available framework skills instead of only jest-skill, clone the repository directly into your tool's skills directory (for example, .claude/skills/, .cursor/skills/, .gemini/skills/, or .agent/skills/).
